July AJ Page-Leave The Trail

Happy weekend!  Where in the world did July go?!  I can’t believe we are at the end of the month already.  It’s really been a busy Summer this year and I know that Autumn is a favorite season of mine which will be busy as well, but that’s all a good thing.

It’s now that time for a monthly Art Journal page and collaboration with my crafty friend, Carol (from Crafty-Stamper), so please check out her blog for more inspiration too!  We’re trying to get creative by using up our never-ending stash piles!  So here’s my Art Journal inspiration with the “SMASH OUR STASH” July prompt of: “decorative papers/collections/kits, etc” :

OK, I don’t really know how much of a “challenge” it is to use decorative papers on anything…but I have such a HUGE stash of papers and I’m always trying to find different ways of using it up instead of always hoarding it!  The papers I’ve used on this page are exactly that…I hoarded it!  It’s just too awesome NOT to use!  I purchased this pack of Stamperia Sir Vagabond 8×8 papers when they came out and haven’t even touched it!  Now is the time!

I used my traditional 6×9 size with the holes pre-punched at the top to fit with the book I’m making.  I ran out of my usual 140# watercolor paper, so I’ve switched to another pad from my stash which is Strathmore Acrylic paper…very thick and made to use with paints. (I like the canvas texture it has.)

For the background:  I started with some old paint from my stash and brush blended the different colors.  I didn’t want them to be too bright which I thought would take away from the paper images.  After it dried, I covered the entire page with some Tim Holtz Postage Tissue Wrap.  I thought it ‘stood out’ too much, so I painted over it again using the same paint colors.

For the Journal Prompt with the papers: I cut out pieces with scissors that had interesting images I wanted to use like the circle map, the “Vintage Travel” strip, the hot air balloon with train, the “mountains” at the bottom, the circled compass, the sentiment and then I ‘ripped; a piece for the top of the page and then re-punched the holes.  The compass circle, hot air balloon/train and ripped newspaper edge was sponged around the edges with Toffee ink.

Before placing the cut paper images, I decided to add a fun textural window image.  I stamped the window with chocolate colored pigment ink and heat embossed it with clear embossing powder.

Collage Medium was used to attach all of the different paper images except the balloon/train, compass and sentiment.  I used Pitt Big Brush Markers to go around these collaged images for some shadowing.  I then used some white and chocolate paints to create splatters over the page being careful to cover up the window area.

Before attaching the sentiment strip and the compass, I used some Aged Brass Metallic Wax to go around the edges.  I also used this around my entire page and over the shutters on the window.  I attached the sentiment strip and the metal cogs with 3D Matte Gel and then used foam squares to pop up the compass and balloon/train.

 – Really fun AJ page to create and I hope that you’ve enjoyed it too!  Thanks so much for stopping in today!

Challenges:

  1. Country View – Travel
  2. Creative Artiste – Anything Goes Mixed Media
  3. Mixed Media Lovers – Anything Goes Mixed Media
  4. Arty Divas – Anything Goes
  5. NBUS – Anything Goes + Never-Before-Used-Schtuff (papers!!)
  6. Simon Says Stamp Wednesday – Anything Goes

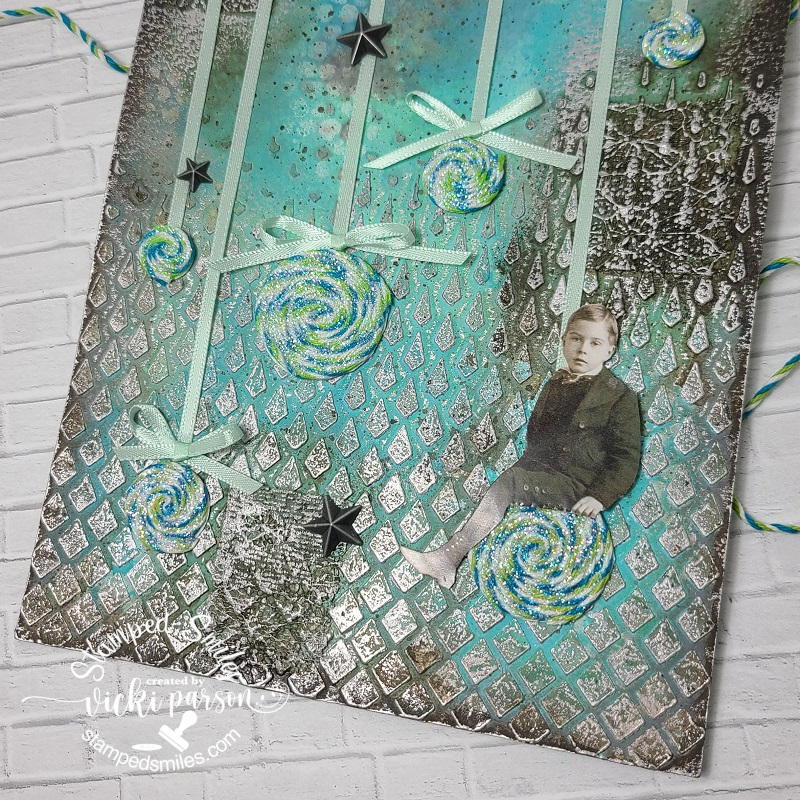
February AJ Page-Explore

Hello friends!  Hope that you are doing well and staying warm and safe out there.  It’s been a few minutes since my last post, but that’s because I’ve been working very hard making wedding invites!  They’re coming together and almost done!  At some point I will share those, but today I have an AJ page to share with you!  It was nice to be able to take a break from creating invites to turning my mind on making a page.

**My crafty friend Carol is joining along with me each month to help inspire us both as well as others and I’m so thrilled to be doing this with her, so please click on her name and check out her page too!  We’re coming together as I think we both have an issue with “too much stash”…who doesn’t?!🙄 So I’ve come up with some ‘AJ prompts’ to help us both “Smash Our Stash” to start using it up for our own creative outlets and have some FUN!  The month of February gives us the prompt: ribbon/fibers/twine/thread

If you do any Art Journaling, then you know that sometimes when you have something in mind to do, it doesn’t always turn out like you think it will in your head!  This is the case with this one!  I like how it turned out and really enjoyed the process of it along with feeling good about using up some ribbon and twine overflowing in my stash!

I’m continuing on with making my own AJ book, so I’ve got the holes ready at the top of my 6″ x 9″ 140# watercolor page.  I like to use something really thick as I think it helps to hold all of the wet media/paint without it warping too badly.  

I’ve started by using a Tonic Studios “Falling Diamonds” stencil with embossing paste towards the bottom and not going all the way up to the top of the page.  I then used Salvaged Patina and Mermaid Lagoon Distress Oxide Sprays over top letting colors mix and run.  Once dried, I added some sponged white paint over a Tim Holtz stencil.  I then took some Ranger Ground Espresso paint and added some paint splatters over it, set aside to dry.  Then came my first introduction of the prompt onto my page.  I took some left over pieces of lace (in fact this was the last of this piece from my stash…why I kept it?  Who knows!!!) and glued it randomly onto the background.  Once dried, I added some water-downed Ground Espresso paint over those areas, sprayed with water and let run.  I also took the same paint and sponged around the edges to darken them up.  After it dried, I took some Art Alchemy “Old Silver” wax and rubbed over the raised areas of the paste and lace with my fingers until it showed up as I wanted it to.

I decided at this point, that I wasn’t going to do what I had planned in my head as I thought the background was going to turn out much lighter and brighter.  It turned out more antique/grunge, but I was still happy with it and just changed the plan a bit.  I don’t know what these are called, but I named them “Twine Twirls“.  I took a double-sided adhesive sheet and covered a piece of cardstock with one side, die cut a couple of different sized circles, took the backing off the other side of the adhesive and used some twine in my stash to continue to swirl around the center of the adhesive circle until reaching the edges.  (Do you ever get twine wrapped around one of your craft orders and save it?  That’s what all of this twine is from…can you believe I saved them and got plenty more to use?!!)  I then took a piece of VERY old ribbon from my stash and attached to the back of each “Twine Twirl”.  I laid these over the page where I wanted it and added an adhesive strip at the top of the page right below the holes to secure them as well as glued the back of the circles.  You can also see that I’ve attached some bows above 3 of the “Twine Twirls” too.  I used some Stickles glitter glue and brushed over top of each “Twine Twirl” and set aside to dry.

I also fussy cut out one of the Tim Holtz paper dolls to glue over one of the “Twine Twirls” and then used some foam tape to pop him up over the page as needed once the glitter had dried.

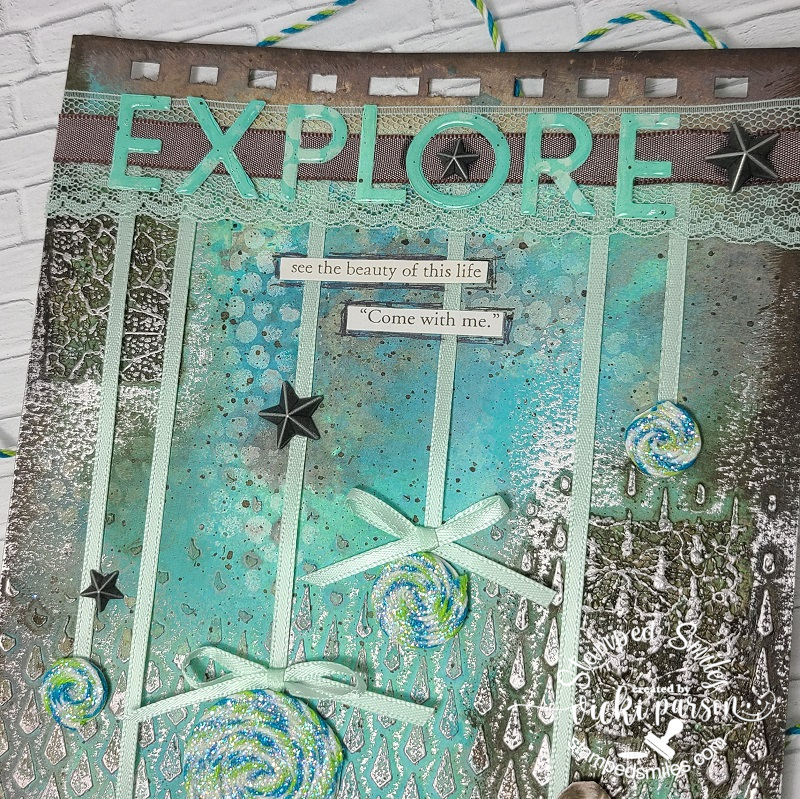
For the top of the page where I’ve added the “Twine Twirl” ribbons, I took another piece of lace that matched that ribbon and covered it over top of the ends.  Since it’s lace, you can see through it, so I layered on another piece of brown taupe ribbon in the center of that. (I’ve used scissors to cut the ends off the page.)

For the lettering, I used some of the items I used for the background page onto a piece of blank cardstock and then cut the letters out using the Taylored Expressions Cap It Off Alpha taking off the frame around the letters.  I glued the letters over top of the ribbon and then covered each letter with glossy accents.

The phrases come from a Tim Holtz “Clippings” sticker book and then I took a brown pen to outline around it.  I finished the page by adding some of the Tim Holtz stars adornments in random areas.

I really hope you’ve enjoyed our AJ pages today or have been inspired in some way!  Be sure to join us next month too!  Thank you so much for dropping in and I’ll see you soon!

Challenges:

  1. Art Journal Journey – What’s Your Style? (I love using stencils most of the time but enjoy “exploring” different medias too!  Not sure about a specific style…I like them ALL!)
  2. Simon Says Stamp Monday – Art Journal
  3. Try It On Tuesday – Add Some Texture
  4. Creative Artiste – #79 Anything Mixed Media Goes
  5. Mixed Media Lovers – #10 Anything Mixed Media
  6. Arty Divas – Anything Goes
  7. Simon Says Stamp Wednesday – Anything Goes

Vintage Anniversary and Commissioned Ones Too!

Hello friends and happy February!  I feel like we just started a new year and it’s already into the second month!  I will need to get going on a couple of Valentine cards really soon!  Today, I wanted to share a card I had made for my parent’s 57th wedding anniversary along with a few other anniversary cards I was commissioned to make that I had forgotten to share until I made my parent’s card! LOL!

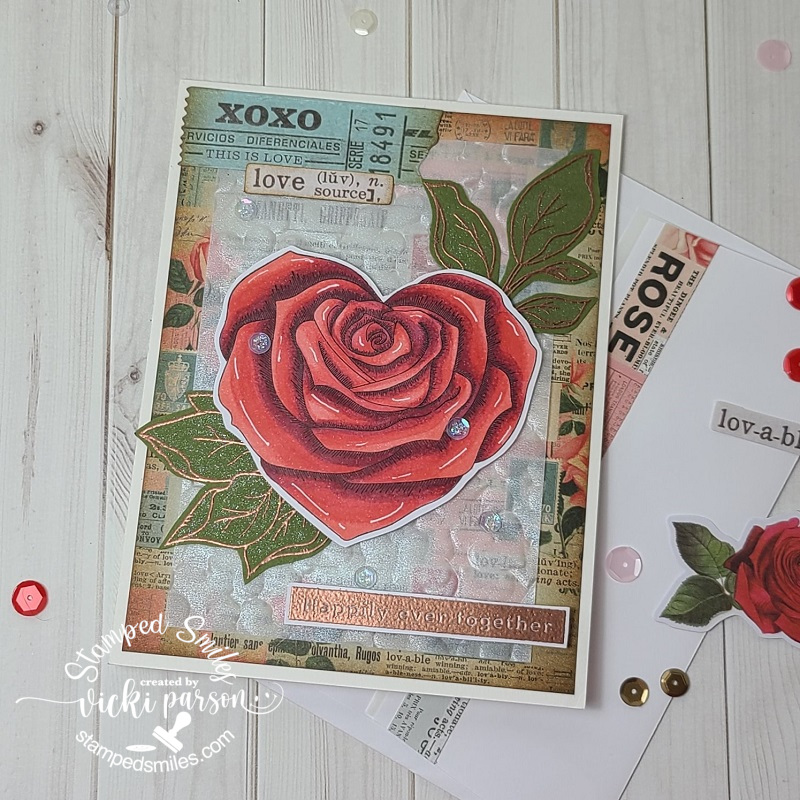
I really like how this one turned out!  If this looks familiar to you, then you may recognize it from a past Simon Says Stamp card kit. (This one came from a Valentine 2020 kit.)  I thought that the papers in the kit looked “Vintage” and I really liked that, so I thought I’d try to go for that style in my card.

I used the heart rose stamp image from the kit and colored it with Copics and fussy cut it out.  I also copper heat embossed the leaves from the stamp set included in the kit over some green cardstock and fussy cut those out as well.  The sentiment was also from the same set as the leaves, and I copper heat embossed that for the bottom right corner of the card.  It’s hard to see from the shine, but it says: “Happily ever together” and was fussy cut as well.

I started with the Vintage looking papers and cut a piece down to size and inked up along the edges with Vintage Photo distress ink and layered it over a side folding A2 white card base.  I pulled out a piece of shimmer vellum that I ran through a Sizzix 3D heart embossing folder and layered it over top of the background.  I also took some of the ephemera from the kit and added those to parts of the background after sponging the edges of that too.  (See the “ticket” in the top left.) 

Finally, I arranged the heat embossed leaves along with the heart shaped rose over top.  I glued the leaves and then popped up the rose with foam tape along with the heat embossed sentiment.  I added some shimmer to the leaves with a shimmer brush pen and then took some sequins from the kit to attach over the card and filled with Stickles glitter.

I think this would be a special Valentine card as well for someone! 😉

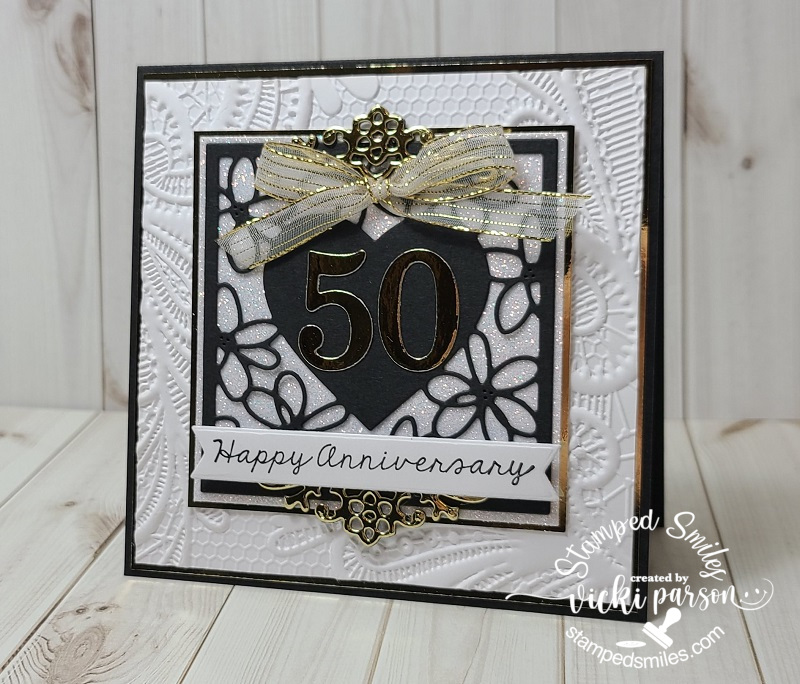
At the end of last year, I was also commissioned to make a 50th wedding anniversary card for someone.  I was just given the detail that the wedding photos were shown with the colors black and white…so I based my card using that idea.

I always think that wedding/anniversary style cards look especially elegant with die cuts and embossing, so I dig through my die cut and embossing folder stash.  I’m sure you can imagine me sitting on the floor with things everywhere! LOL!!  Do you do this too when you’re not sure what you want to do and/or what all you have?

So I found this really pretty Memory Box die cut with the heart in the center that I wanted to use and thought some glitter paper behind it would be so pretty.  This is why my card is a square shaped design.  Since it was celebrating 50 years, I thought it would be appropriate to add some gold in there too and die cut the numbers for the center of the heart as well at the border pieces on the top and bottom of the heart.  (Not sure where that die came from as it’s old. The number dies are really old too!)

I layered this onto the glitter paper and gold foil paper.  I stamped a sentiment (Taylored Expressions-The Inside Scoop Anniversary used both inside and out of card.) and die cut it out with a banner die and popped it up under the heart with foam tape.  I layered this onto a white 3D embossed background that was layered over a black top folding square card base.  I attached a gold ribbon bow over top.

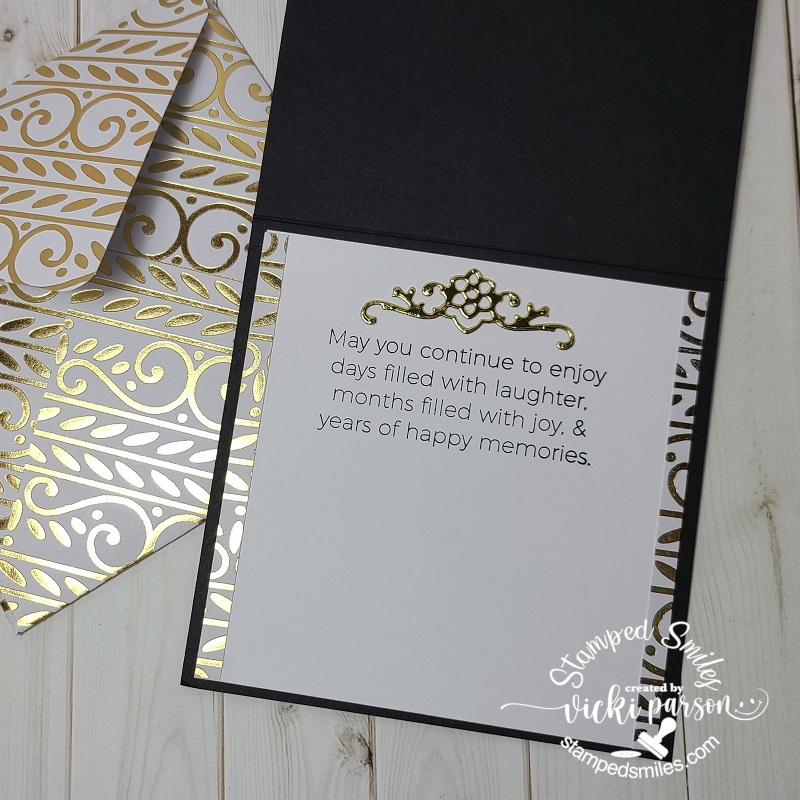
I stamped a sentiment for the inside of the card and you can see that I’ve decorated the inside of the card using the same die cut border with gold foil cardstock.  The papers I’ve used for the borders on the inside were also used to create a custom envelope for this card.  Sometimes if I don’t have the envelope on hand, I make my own envelope.  Sometimes I prefer to do this for special cards anyway.

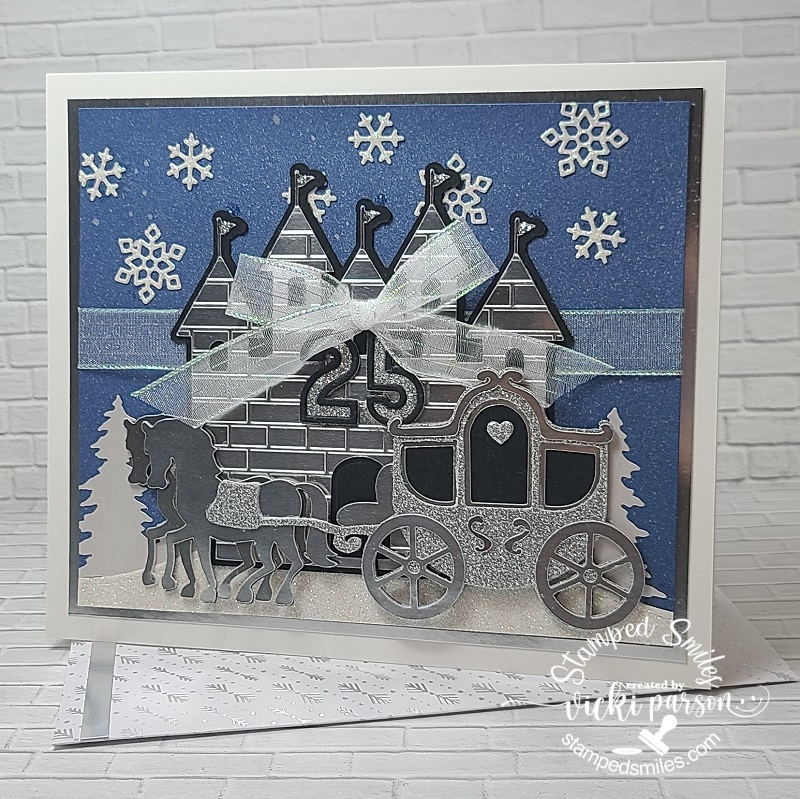
And this is another card that I had been commissioned to do for someone that wanted a card for an anniversary on Christmas Eve.  I was given the detail about them spending time at Disney World and seem to be a fan of Disney along with it being their 25th anniversary…so my card was based on those details.

I have no Disney character type stamps/products at all.  My thought was to create something with a “winter/Fairytale” theme which is why I turned to my Cricut machine for help.  I was lucky enough to find the carriage and horse image that I cut out using brushed metallic silver and silver glitter cardstock for the different pieces.  I also found a castle image that I cut from the brushed metallic silver as well.  I used black cardstock for the base and insides of the cut-out images.  After I cut out the castle, I ran it through a brick embossing folder to give it that brick castle look.  I also die cut the numbers from Taylored Expressions Cap It Off Numbers dies.  I attached the numbers in the center of the castle and attached a silver ribbon bow over top of the numbers.

Since I had my main cut out images for my card, I was able to create my scene and size based on those.  My finished card measures approx. 7″ x 5″ which is not a regular size for me, but I thought it was fitting given the type of card it was along with the cut-out images.  I started with a piece of blue cardstock and generously sprayed it with some Pearlescent Cosmic Shimmer previously received from a class I took.  It gives a really stunning look, and the shimmer doesn’t show very well from the photo either.  Once dried, I die cut both the snowflakes and snow border at the bottom from some white glitter cardstock.  Both dies used for them come from Lawn Fawn.  The trees behind the bottom snow border were cut from some pearl white paper with an older Stampin’ Up! die set in my stash.  

I attached the sprayed blue background over a piece of silver metallic cardstock after wrapping a silver ribbon around the center.  I then attached the trees and added the snow border at the bottom.  I added the castle and snowflakes next being careful that everything was showing the way I wanted and then I popped up the carriage with foam tape.

This whole scene was placed over a white 7 x 5 top folding card base. I also took some silver glitter to add to the little flag ends on the castle.  I thought with all of the glitter and shimmer it didn’t need any more embellishment!  I was happy with how it turned out because I wasn’t quite sure it would!

There was a custom envelope that was also made for this card using some pretty silver pattern paper from my stash.

Everyone seemed to be pretty pleased with how the cards turned out for them and I was very happy to have had the privilege of being a part of someone’s special day too!

Speaking of wedding anniversaries, I’ve been given the honor to create wedding invites for my son’s wedding coming up this Summer and I know I’ll be getting really busy putting those together as well!  So that will be coming up really fast and I hope I can keep up with things! LOL

Thanks so much for stopping in today!  I hope that you’ve enjoyed my creations or been inspired in some way!  See you soon!

Challenges (TOP CARD ONLY)

  1. Simon Says Stamp Wednesday – Anything Goes
  2. Krafty Chicks – All Occasions
  3. Crafty Catz – Anything Goes with optional add flowers
  4. Colour Crazy Craft – Anything Goes with coloring (Copics used for heart rose image)
  5. Creatalicious – Anything Goes with optional love
  6. Simon Says Stamp Monday – Use embossing folder (3D heart folder over vellum piece)

Turner Syndrome Awareness Blog Hop

Hello friends!

February is TSA month and If you’re not familiar with this, please read about it below:

Turner Syndrome is a genetic disorder where a female is born with only one X chromosome, instead of two, leaving her with life-long medical issues and learning disabilities. This condition occurs one in 2,500 female births worldwide, but is more common among pregnancies that do not survive to full term. That is why Turner Syndrome Females are considered MIRACLES!

My TS related project is inspired by the TSA official color board:

For my project, I have combined two different digital sets that were kindly made especially for this blog hop and the TSA cause:

Vicki-JansDigi-TSAbloghop

I was really inspired by the wonderful colors along with the images from the inspirational board above, but it was fairly easy since the images were already pre-colored in the set to create with!

I’ve used the TSF Key digital set from Jan’s Digi Stamps for the images on my card.  Also what’s cool about this set is that all of the proceeds from this set go directly to the Turner Syndrome Foundation!  It’s a stunning set to have plus a great way to help with a terrific cause too!

I have printed out the images over a piece of white cardstock and cut them out.  I also added one of the images in a repeat pattern to print out over a piece of green cardstock for a decorative strip on the background of my card design.

I took an embossing folder and embossed only the top portion of my card base, added the green printed strip with ribbon wrapped around it and sponged the edges.  I layered some pink cardstock and cut a scallop square piece of lavender colored cardstock for behind my vanilla panel and popped it up over the card base with foam tape.

Lastly, I’ve attached the bow, button and twine to the side of the image panel and attached the cut-out butterfly to the top corner of the image panel.  I glued only the center portion of the butterfly so that I could pop out the wings.

Vicki-JansDigi-TSAbloghop-close

Here’s a closer view of the images.  I’ve used a Copic marker on the vanilla-colored panel to create a “shadow” around the key image and then I attached the cut-out key over top of that.  I’ve used the same Copic marker for a few more shadows around the key.  For that butterfly, I’ve used a glitter gel pen to color portions of the butterfly and then a clear glitter brush pen to go over the wings.

You can see that TSA symbol on the key which is the same image used for the green background panel I created on the computer.

Vicki-JansDigi-TSAbloghop-flat

I hope you’ve enjoyed my card today!

Thank you so much for stopping by!

Challenges I’d like to enter my card for:

  1.  Jan’s Digi Stamps Challenge – #6 Anything Goes
  2. Pammie’s Inky Pinkies – PIP2004 Anything Goes
  3. Arty Divas – #14 Anything Goes
  4. Through the Craft Room Door – Anything Goes
  5. Allsorts – A Touch Vintage

Just For You at 2 Crafty Critter Crazies

Hello friends!  It’s not only the weekend, but it’s also the first of February!  It’s what we call the “love dovey month”! LOL!  The first of the month also brings us a new challenge starting over at the 2 Crafty Critter Crazies blog!  It’s always an “ANYTHING GOES + ANIMAL” for your project each month.  We look forward to seeing your creations!

For this month we’re being sponsored by Jan’s Digi Stamps and here’s what I’ve come up with for my project:

Vicki-2CCC35-JansDigi-BlueRitz

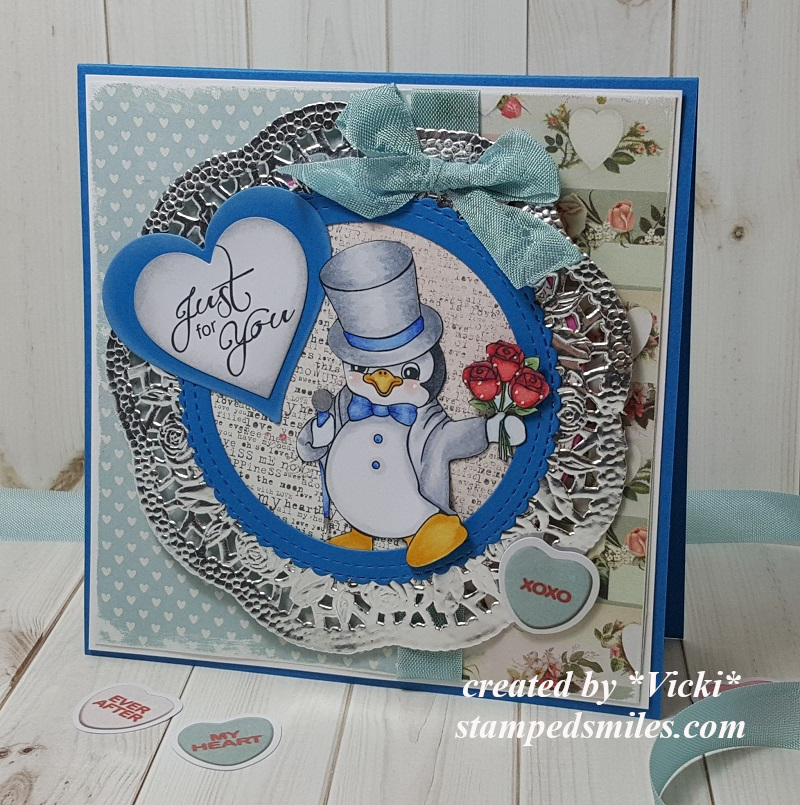
Check out this dapper little penguin stepping out to hand his loved one a bouquet of flowers! 🙂  I’ve used the adorable Puttin’ On the Ritz digital set for my card here.  It had me at penguin! LOL!

I have pulled out some of those cool vintage looking papers from that SSS Valentine card kit that I had used earlier this week on my parent’s anniversary card and just loved the blue tones in them, so I went with that color scheme for my design!

The penguin was colored and fussy cut out.  The way he was positioned looked like he was popping right through an opening to hand out the flowers, so I’ve used some circle die cuts with more of the vintage papers for the background and tucked him in there with his foot and flowers outside the circle frame.  I’ve placed a silver doily behind him.

The base of the card measures 5″ square, I’ve taken a couple of strips of the papers and layered them over a white card panel that I’ve sanded the edges on before mounting it over the blue card base.  I took some seam binding ribbon to wrap around it and then attached the circle panel to the front with a bow and candy heart accent over top.

The sentiment was printed out from the same stamp set and cut out and layered with a heart die set.  I’ve also sponged around the edges of the white heart with grey ink.

Vicki-2CCC35-JansDigi-BlueRitz-close

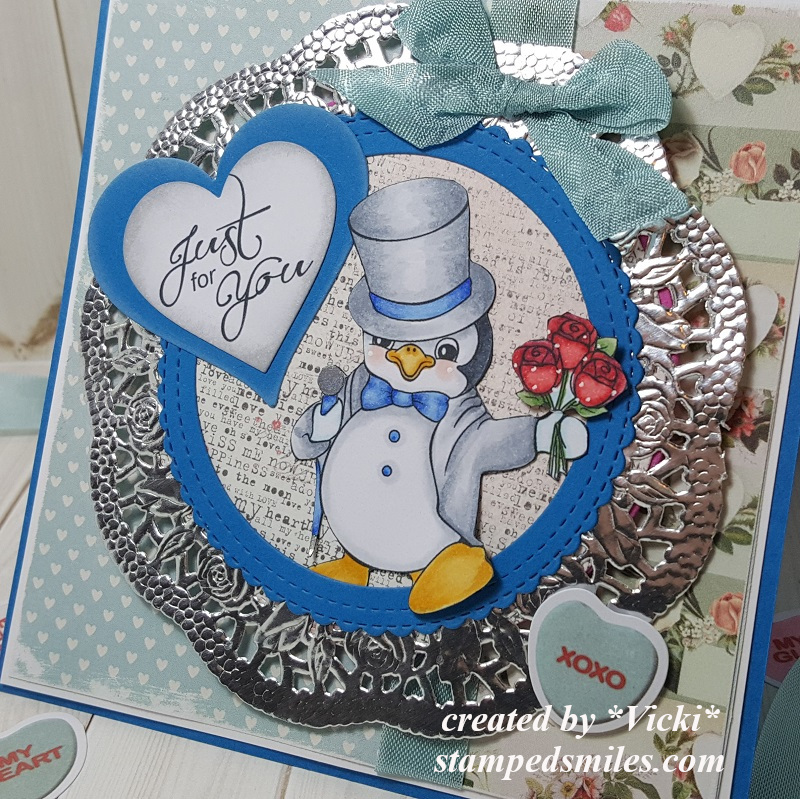
Here’s a close view of the image and how I’ve got him all colored up with Copic markers.  I’ve used a white gel pen for dots on his cheeks as well as dots around the flowers.  Sometimes those bouquet of roses have the baby’s breath with them…for some reason I think it makes the bouquet look extra special!

For part of the penguin’s “cane” or “umbrella”…not sure, I’ve used a silver metallic gel pen to color in parts of it.

I kept his hands white as I felt like he was wearing white gloves.  LOL.

Vicki-2CCC35-JansDigi-BlueRitz-flat

I hope you’ve enjoyed my fancy little love penguin card today and have been inspired!

Thanks so much for stopping in!

Challenges:

  1.  Jan’s Digi Stamps Challenge – #6 Anything Goes
  2. Simon Says Stamp Monday – All Loved Up
  3. Cute Card Thursday – Valentines
  4. Krafty Chicks – Anything Goes
  5. As You Like It – Warm or Cool Colors (love the cool tones)
  6. Daring Card Makers – Layer it Up!
  7. QKR Stampede – #383 Anything Goes

A Vintage Love

Hello friends!  I hope you’re having a great week!  I must be really wishing for flowers as this seems to be my theme this week!…along with watercolor and heat embossing! LOL!

Today I wanted to share a card I’ve made for an anniversary:

Vicki-SSSBeMyValentine-Anniversary

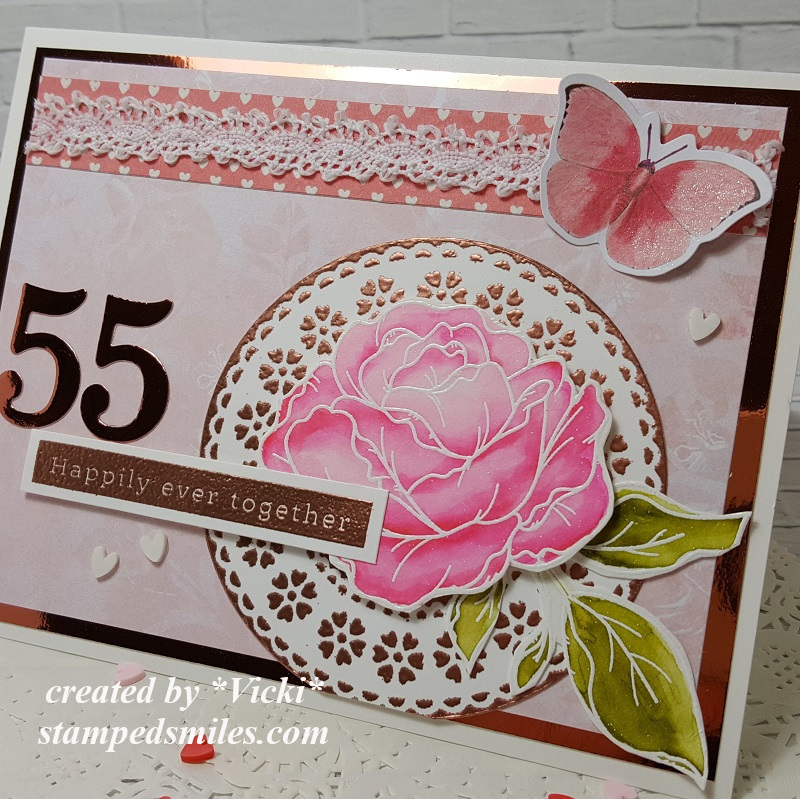
As you can see from the card itself, my parents have been married for 55 years.  So when I saw this Simon Says Stamp LE Valentine 2020 card kit, I knew that this would be a great way to start using the kit immediately!

I actually really didn’t know what direction I was going to go with this anniversary card and I just started pulling things out and switching different items to see what I wanted to do.  I sampled the stencil with the metallic paste from the kit and really liked it, but when I pulled out my copper metallic mirror cardstock, I decided to heat emboss over the stencil with the same copper EP that I used on the sentiment for this card.

I’ve also cut out the numbers with the copper metallic mirror cardstock along with the layer behind some of the papers from the card kit.  I’ve added another heart strip of the papers from the kit at the top and used one of the butterflies from the kit to go over the piece of lace I’ve added from my stash.  The layers were all attached over an A2 sized top folding card base.  Lastly, I added some white hearts that were actually from a different card kit.  LOL!

Vicki-SSSBeMyValentine-Anniversary-close

I wanted to share a closer look at the flower.  The stamp set in that card kit is so stunning!  I’ve white heat embossed the flower and leaves over some watercolor paper and then used my Clean Color Real Brush markers to color it with.  I’ve used some foam tape to pop up the flower over the stenciled heat embossed piece that was cut out with a circle die and attached to the card front.

You can see the shimmer over the butterfly wings that I’ve covered with a glitter brush pen.  I only glued the center of the butterfly so that I could pop out the wings a bit.

Vicki-SSSBeMyValentine-Anniversary-flat

Although this card looks a bit simple, there were a few steps to the stenciling and heat embossing some of the elements.

I hope you like it!  Thanks so much for stopping in and I’ll see you soon!

Challenges:

  1.  Simon Says Stamp Wednsday – Anything Goes
  2. QKR Stampede – #382 Anything Goes
  3. Allsorts – Take Flight
  4. Creative Fingers – #178 Anything Goes
  5. Watercooler Wednesday – WWC256 All About Occasions
  6. Lil Patch of Crafty Friends – #124 Anything Goes

Mixed Media Wall Hanging

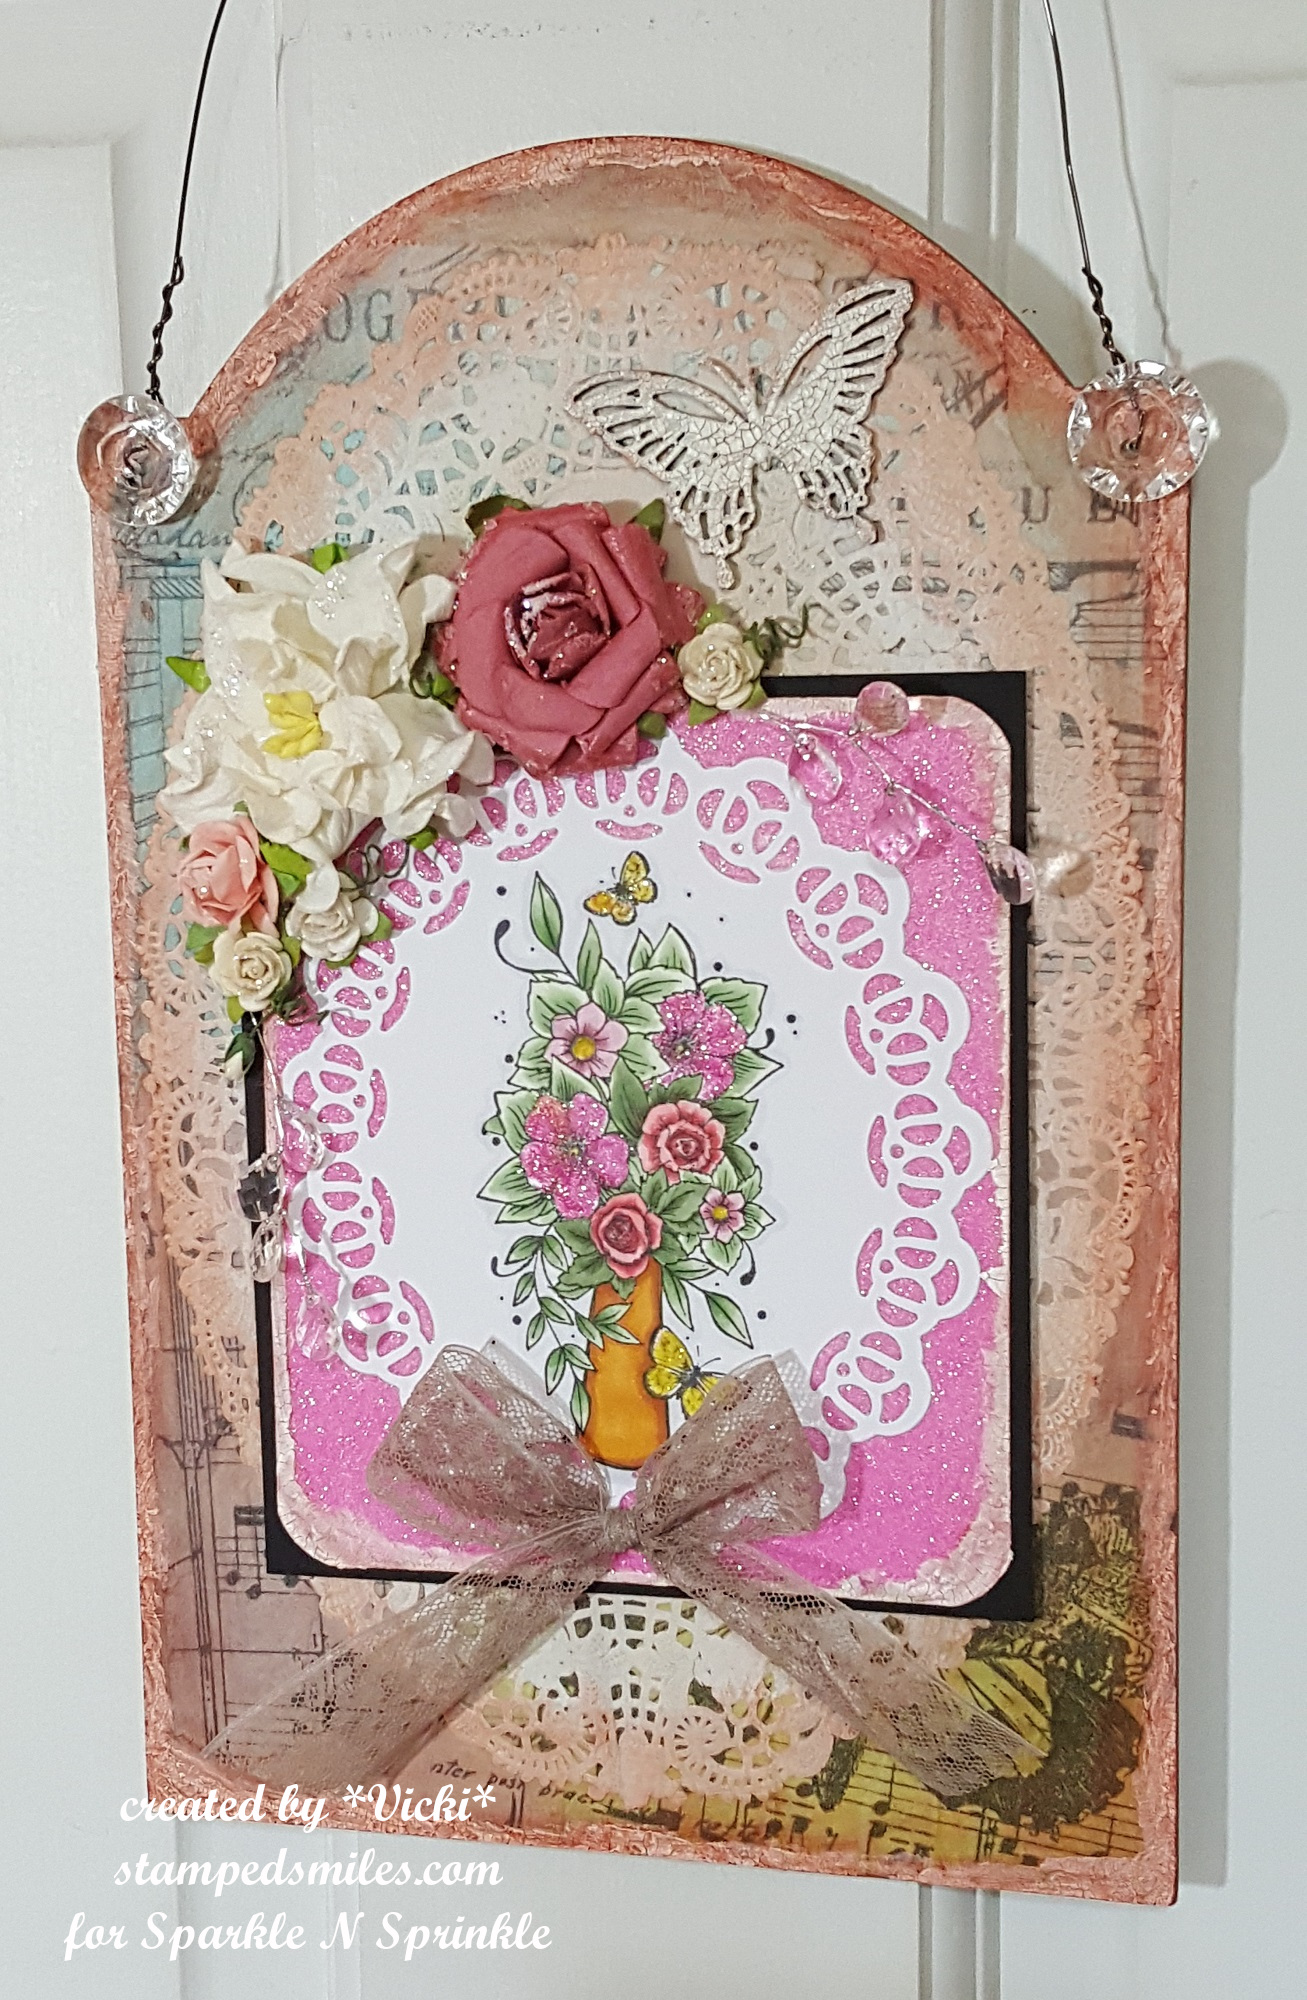
Hello friends!  I’m back again to share a mixed media wall plaque that I’ve made:

vicki-vaseofflowers-wallhanging-project3

It’s been a while since I’ve made any mixed media projects, so it was nice to be able to “get messy” and use some media products that I don’t pull out often enough!

So I started out the image panel thinking I was going to make a card with it, but then it felt like it was too large, so I decided I was going to make a Vintage style wall plaque with it instead!  I had this plaque hanging around my room for about a year knowing that at some point I wanted to do something with it, so this felt like the opportunity I needed to get a project going.

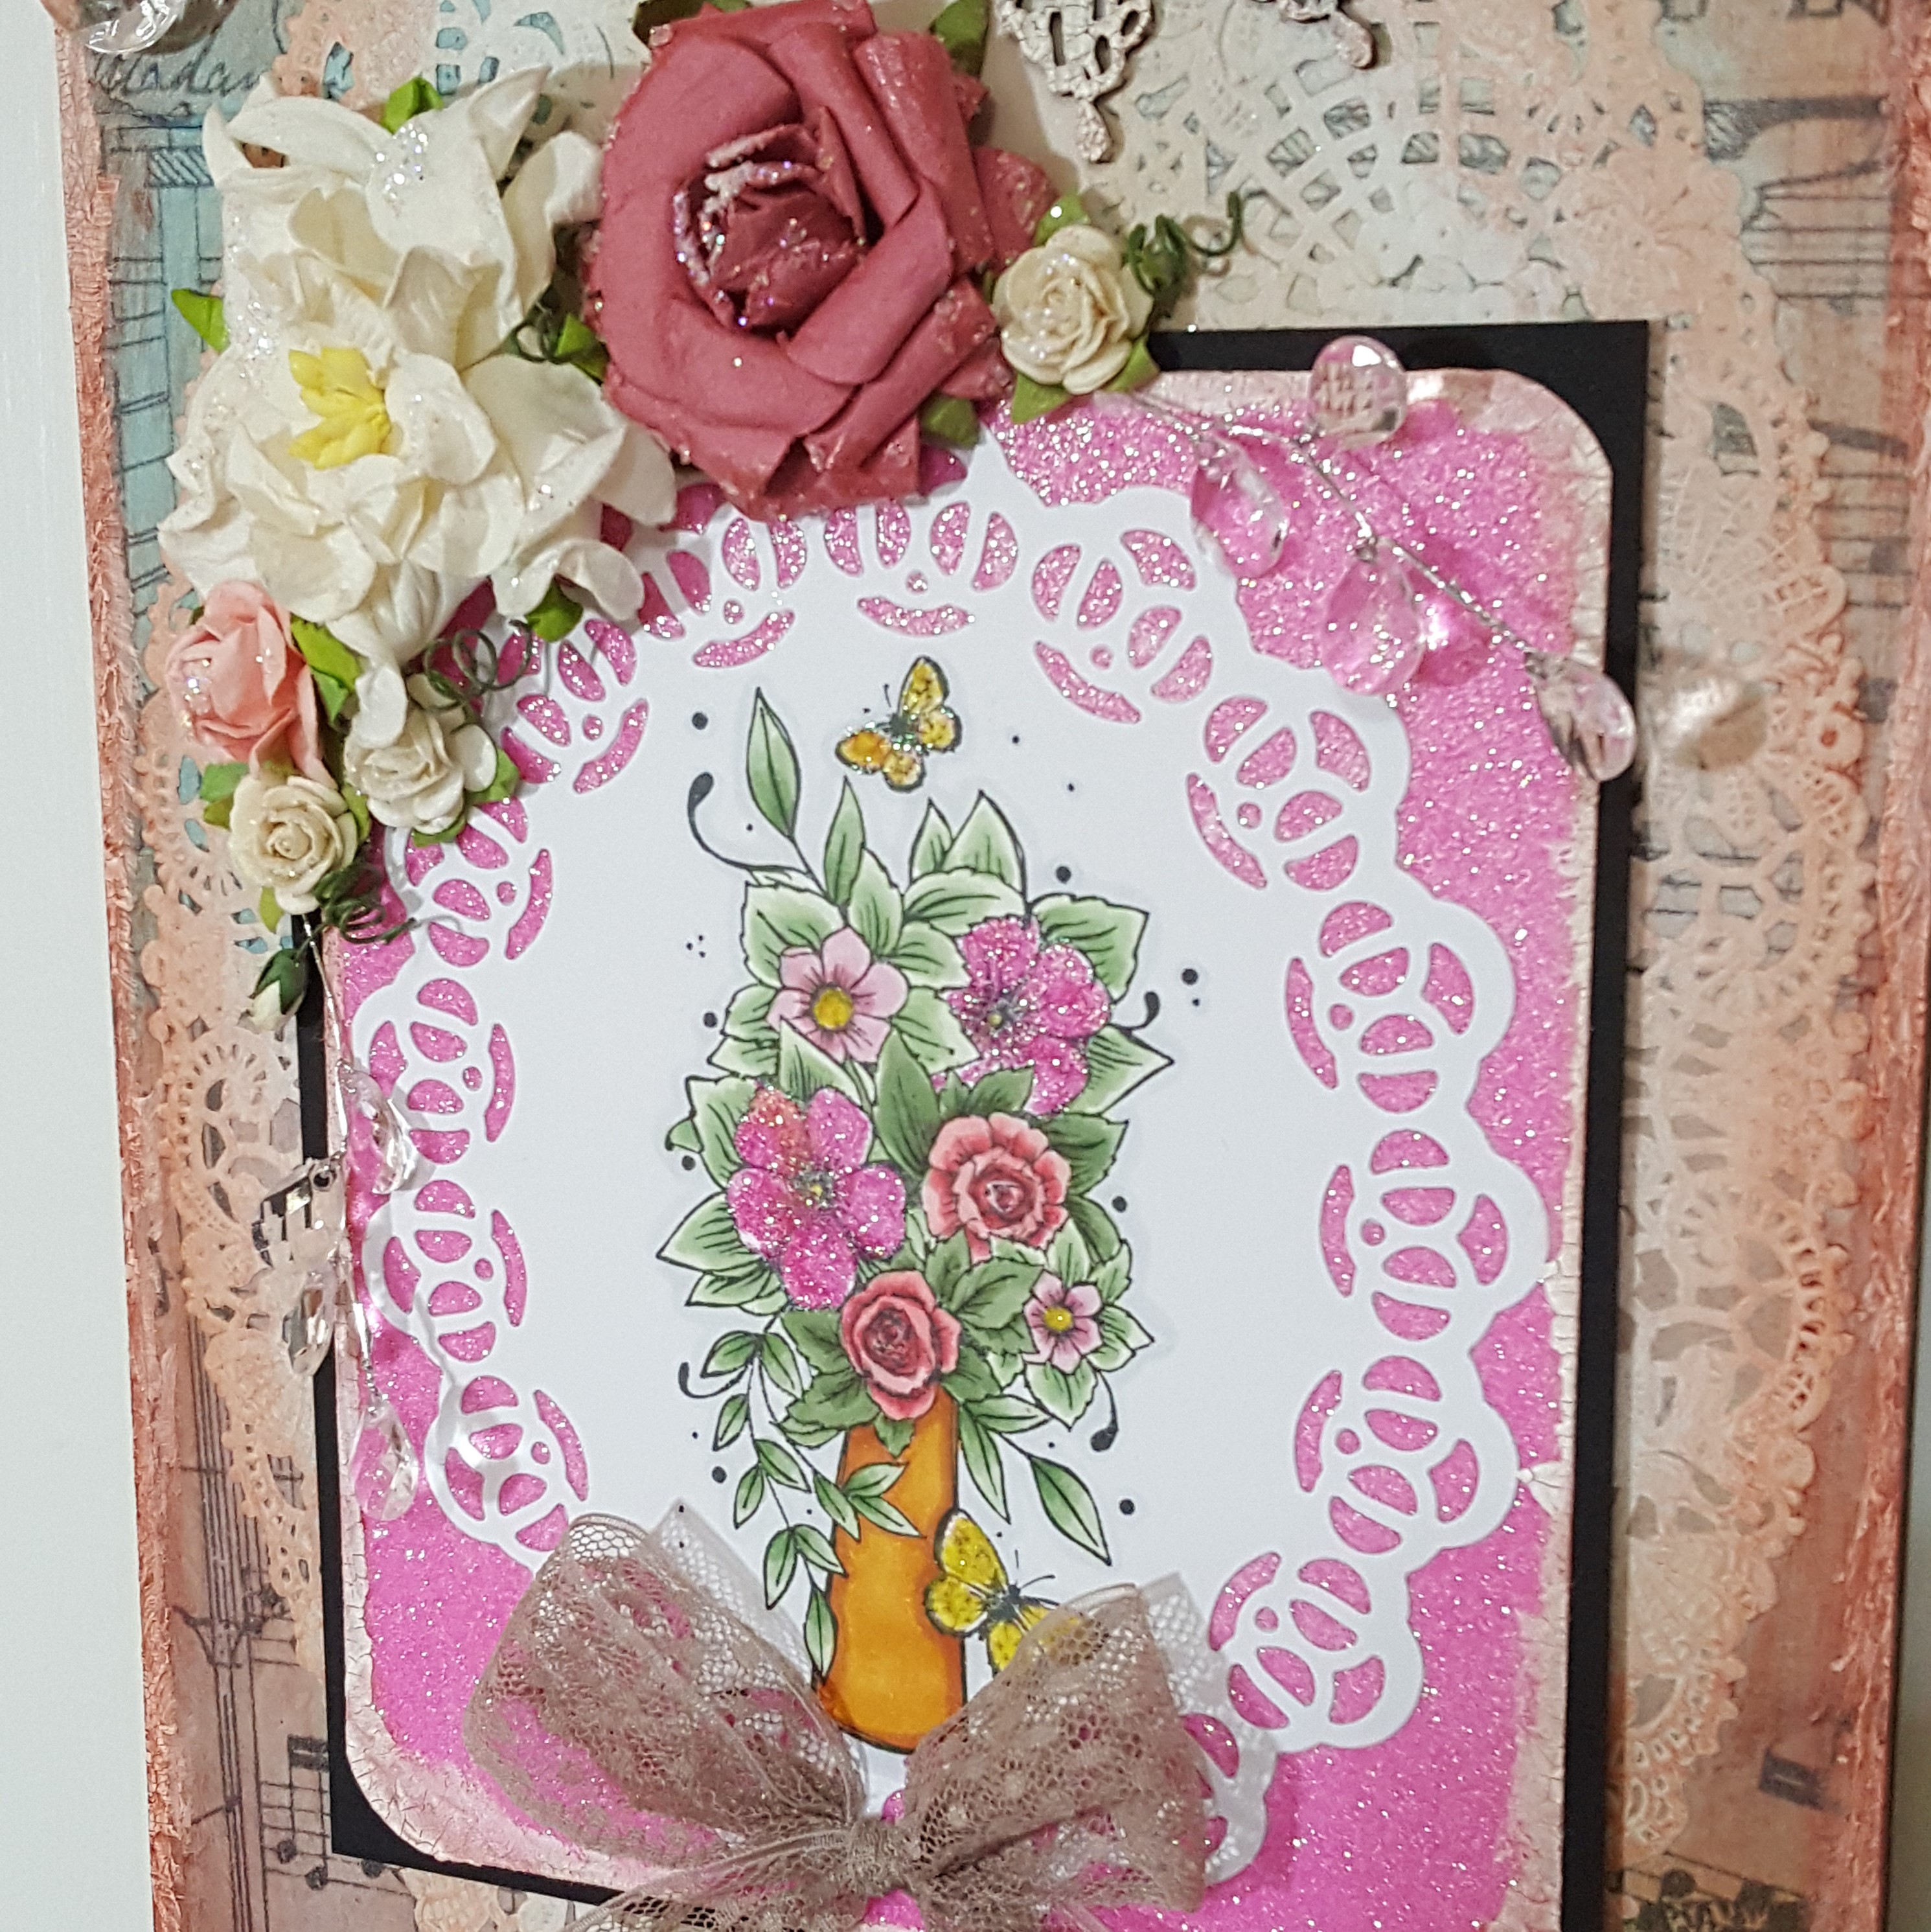
vicki-vaseofflowers6

I’ve used a January release stamp set from Bugaboo called Vase of Flowers stamp set.  I colored it with Copic markers except for the pink flowers and butterflies.  I covered the flowers with the Pink Fizz glitter and the butterflies with the Canary flocking.  I cut out the image panel with the Tonic Loopy Lace Oval Die and added it to a piece of cardstock that was covered with the Super Adhesive Sheets.  I then covered the entire panel with the same Pink Fizz glitter and burnished into the background.

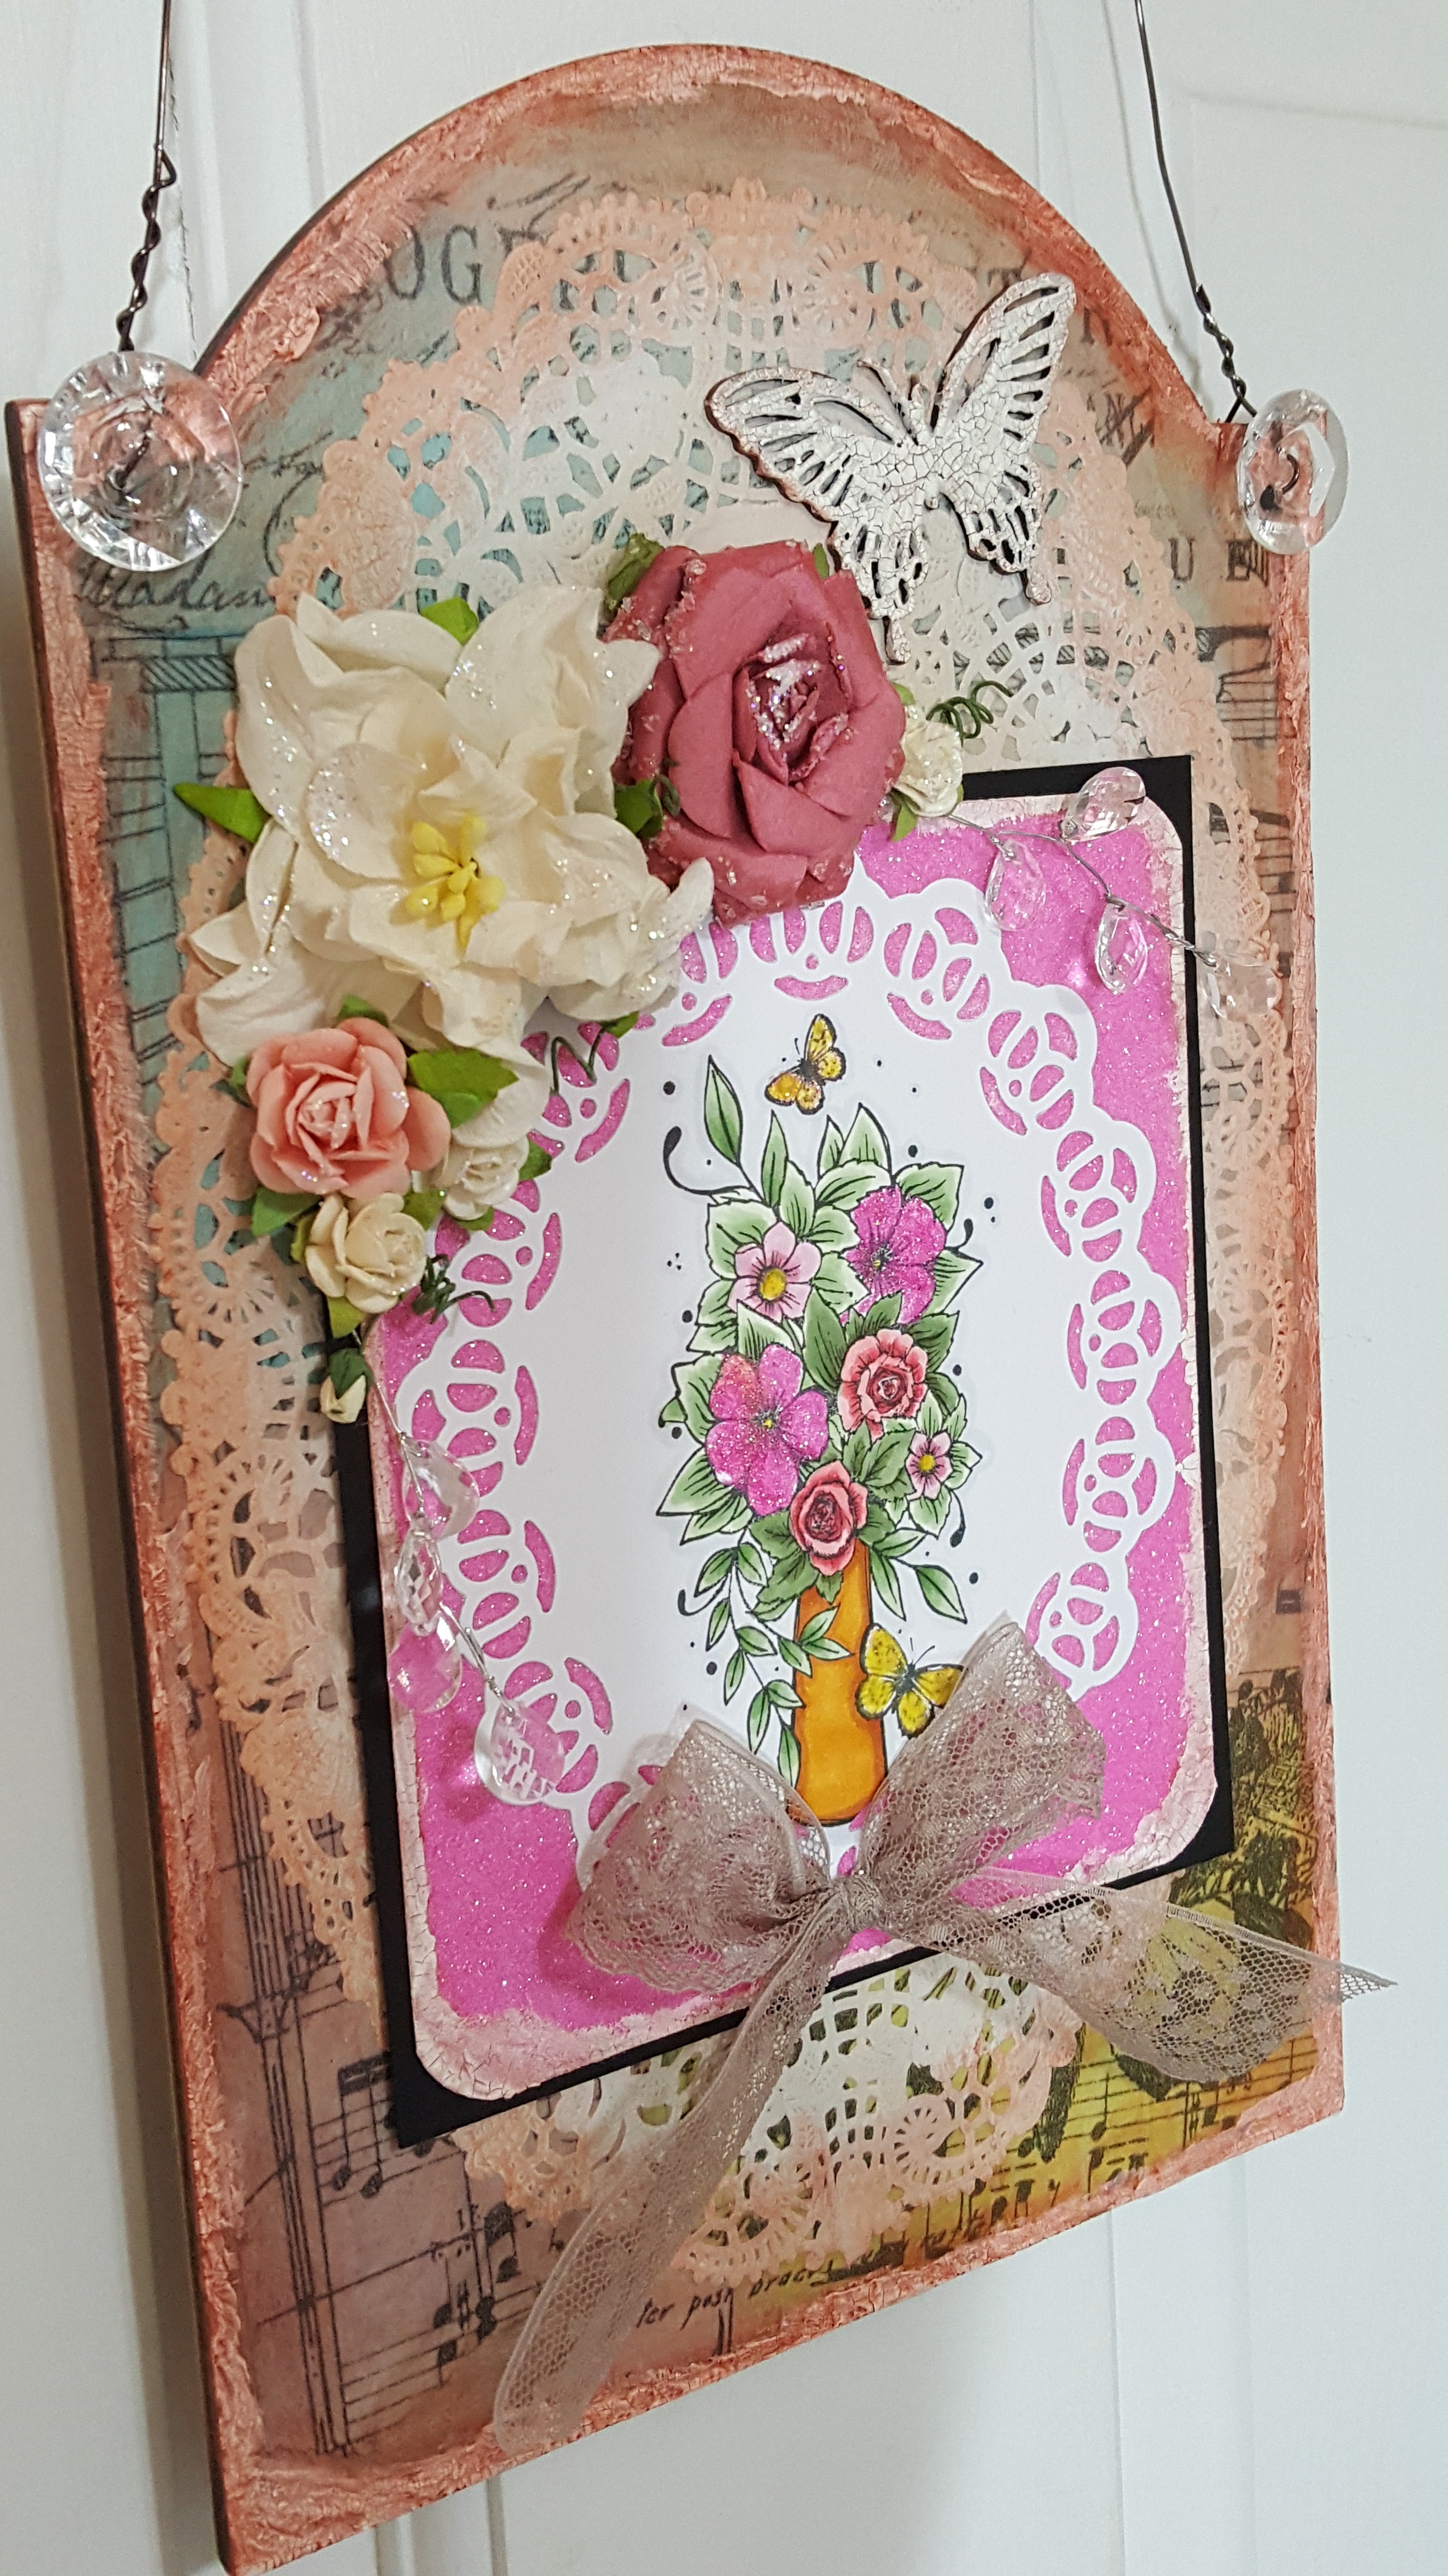
vicki-vaseofflowers7

Shown at a different angle, you can see all of the dimension and detail of the design.

I have also covered the flowers using some Brushable Glue and brushed it over top in certain areas over the flowers and then I sprinkled some Diamond Dust glitter over top of them.

I hope that you were inspired by my mixed media project today and I thank you so much for stopping in as I’m always happy to hear what you think!

Here’s the challenges I’d like to enter:

  1.  Not Just Cards – Anything Goes
  2. Crafty Gals Corner – Make it Sparkle
  3. Stamping Sensations – Fabulously Feminine (Stamped Vase of Flowers rubber stamp and colored it in.)
  4. Creative Moments – Anything Goes
  5. Crafty Calendar – Make it Flowery

Sympathy & Banish the Blues

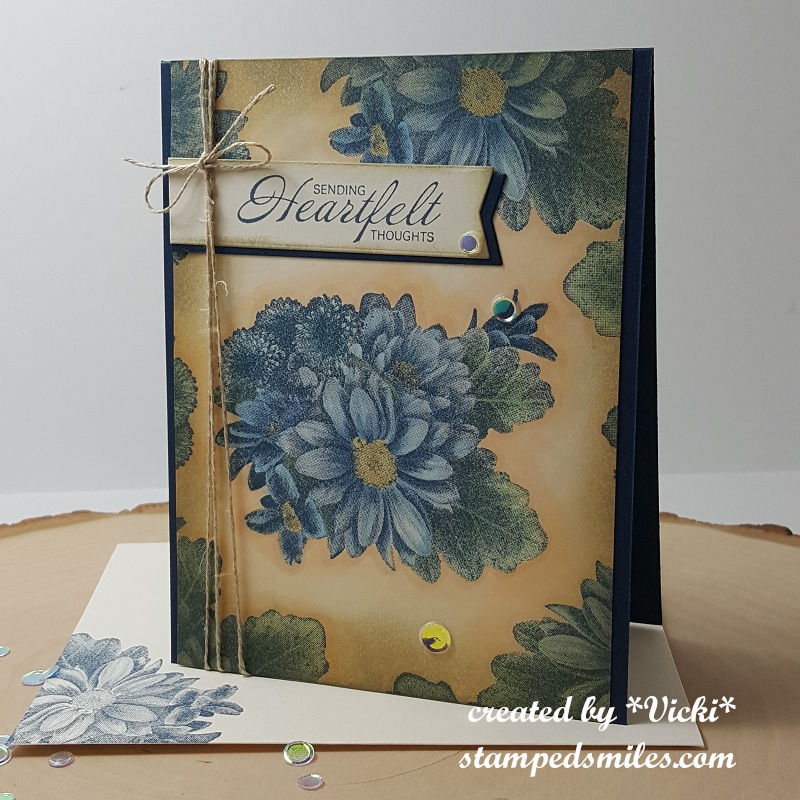
Hello friends!  Hope you have enjoyed a nice weekend.  Unfortunately, I needed to make up a sympathy card and didn’t realize that I had run out of them, so I will need to make some up in the future so I can have them on hand and not have to worry about it when the time comes again.  I had a friend who recently passed and needed a card for her family, so I pulled out a set that I hadn’t used before until now:

vicki-su blue sympathy

This is an older set from last year’s Sale-a-Bration at Stampin’ Up! called “Heartfelt Blooms”.  I think it’s so pretty and since the lady who passed was a happy crafter, I felt good about making this tribute for her.  I will miss seeing you at lunches Penny, rest in peace my friend.

I stamped the floral image several times with a Copic friendly navy color ink over some cream colored cardstock and then colored in the images with my Copic markers.  I also went around the images with some markers and blended it all out around the design.

I then took some distress ink and the foam ink blending tool to soften the edges a bit and make it look a bit more Vintage.  I also stamped the sentiment with navy ink and die cut it along with some navy cardstock with a banner die.  I sponged around the edges of this as well.  I wrapped some linen thread several times around this panel and tied it off with a bow next to the banner.  I then attached it over an A2 sized top folding navy card base.

I created a matching envelope by stamping the image in navy ink over it as well.  Lastly finished off the design with some clear sequins.

vicki-su blue sympathy-close

Here’s a closer view of the coloring on the floral image I did as well as the sponged around the front panel and banner.  I thought all of the blue colors turned out really pretty and made a nice Vintage feel.

Challenges I’d like to enter for the above card:

  1.  A Bit More Time to Craft – #84 Anything Goes
  2. The Creative Crafters – Anything Goes
  3. Crafty Catz – Anything Goes with optional:  Blue, Green plus one other color (cream)

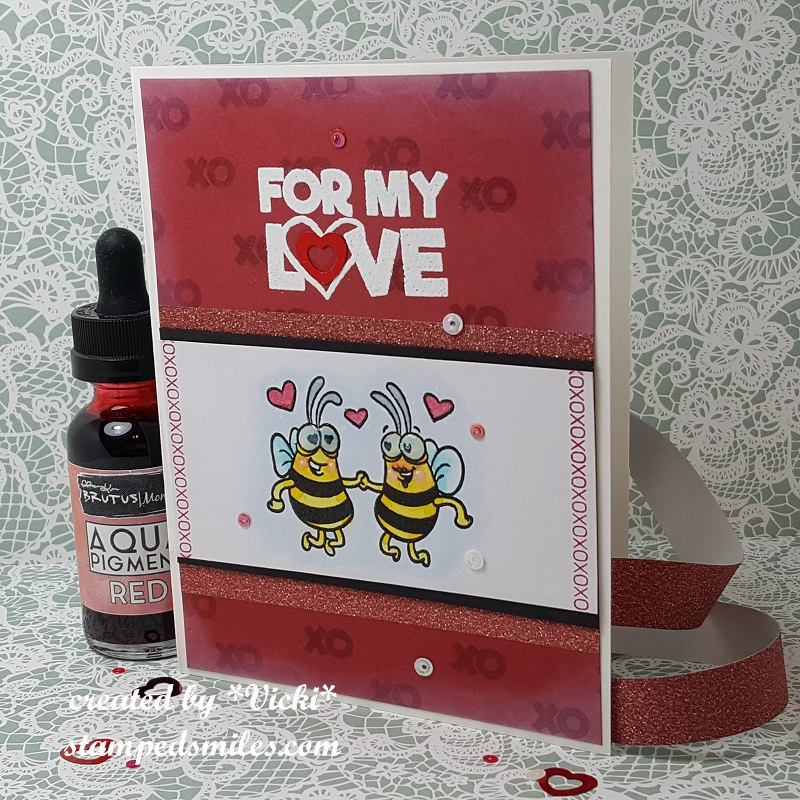
So on another {positive} note, I’d also like to remind you that there are still a couple of days left to play along with us over at the Cute Card Thursday Challenge this week!  The theme for this challenge is “Banish the Blues” which I felt like doing in my craft room and so I decided to make this “Fun-Loving” card:

vicki-bm-lovebugs

Now how happy do these cute honey bees look?!  They almost look like they’re dancing in the air!!  I’ve used items from a February card kit for this card.

I’ve heat embossed the bees and colored them in with some Aqua Pigments. I’ve used the paper from the kit and stamped the background and the edges of the bee panel with some SU! ink that happened to match up with it.  I then white heat embossed the sentiment from the same stamp set above the bee panel.  I sponged around the edges of this red panel with white ink and attached it to a side folding A2 sized card base.

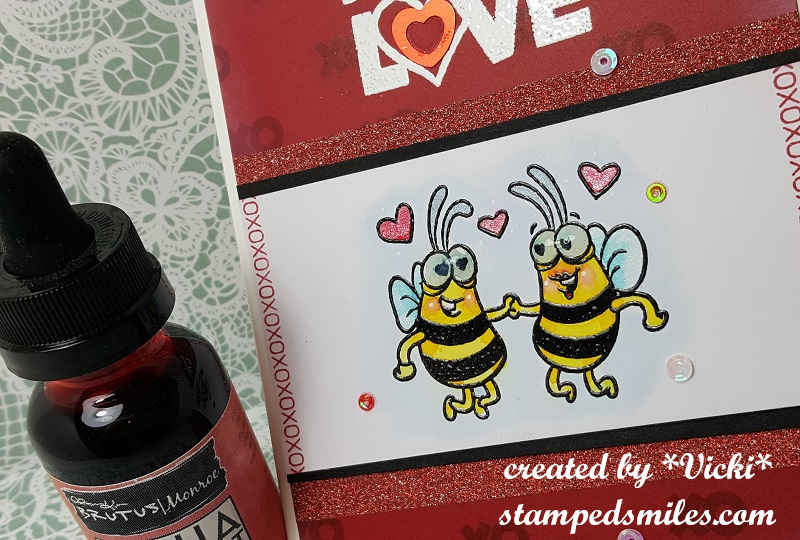
vicki-bm-lovebugs-close

Here’s a closer look at the bees and how I’ve colored them.  Some of the Aqua Pigments are shimmery and I’ve used a couple of those colors too!  I’ve added some white dots on their cheeks as well as a few around the hearts.  I topped off their eye-balls with some glossy accents.  I’ve also stamped some more “xoxo”s on each end of this image border and layered it over a piece of black cardstock.  I took two strips of glitter washi tape from the kit and added it above and below the image panel area and then attached the bees over top but between the strips.  Lastly I’ve added a heart shaped sequins to the center of the white embossed heart “O” in the sentiment and the rest of the sequins from the kit randomly placed on the card.  I topped off the circle sequins with some Nuvo White Blizzard Glitter Drops.

Hope this helped to end my post on a happier note with a smile.

Thanks so much for checking in with me today!  I’ll see you again tomorrow for more crafty inspiration!!

Here’s some challenges I’d like to enter the above “Bee card” for:

  1.  Shopping Our Stash – #SOS386 Hearts On Fire
  2. Moving Along With the Times – #89 Have a Heart
  3. QKR Stampede – #331 Anything Goes
  4. Pammie’s Inky Pinkies – #PIP1903 Anything Goes
  5. Paper Girls – #168 Sparkle and Shine
  6. Double Trouble:  #20 Thing 1 Trouble Maker – “Love is in the Air” (honey bees!), Thing 2 Double Dare – Entered the Paper Girls Challenge #168, Thing 3 Twisted Sister – “Sparkling and Shining” (I used metallic watercolor, sequins, glitter drops and glitter washi tape)

Feeling Young at Heart

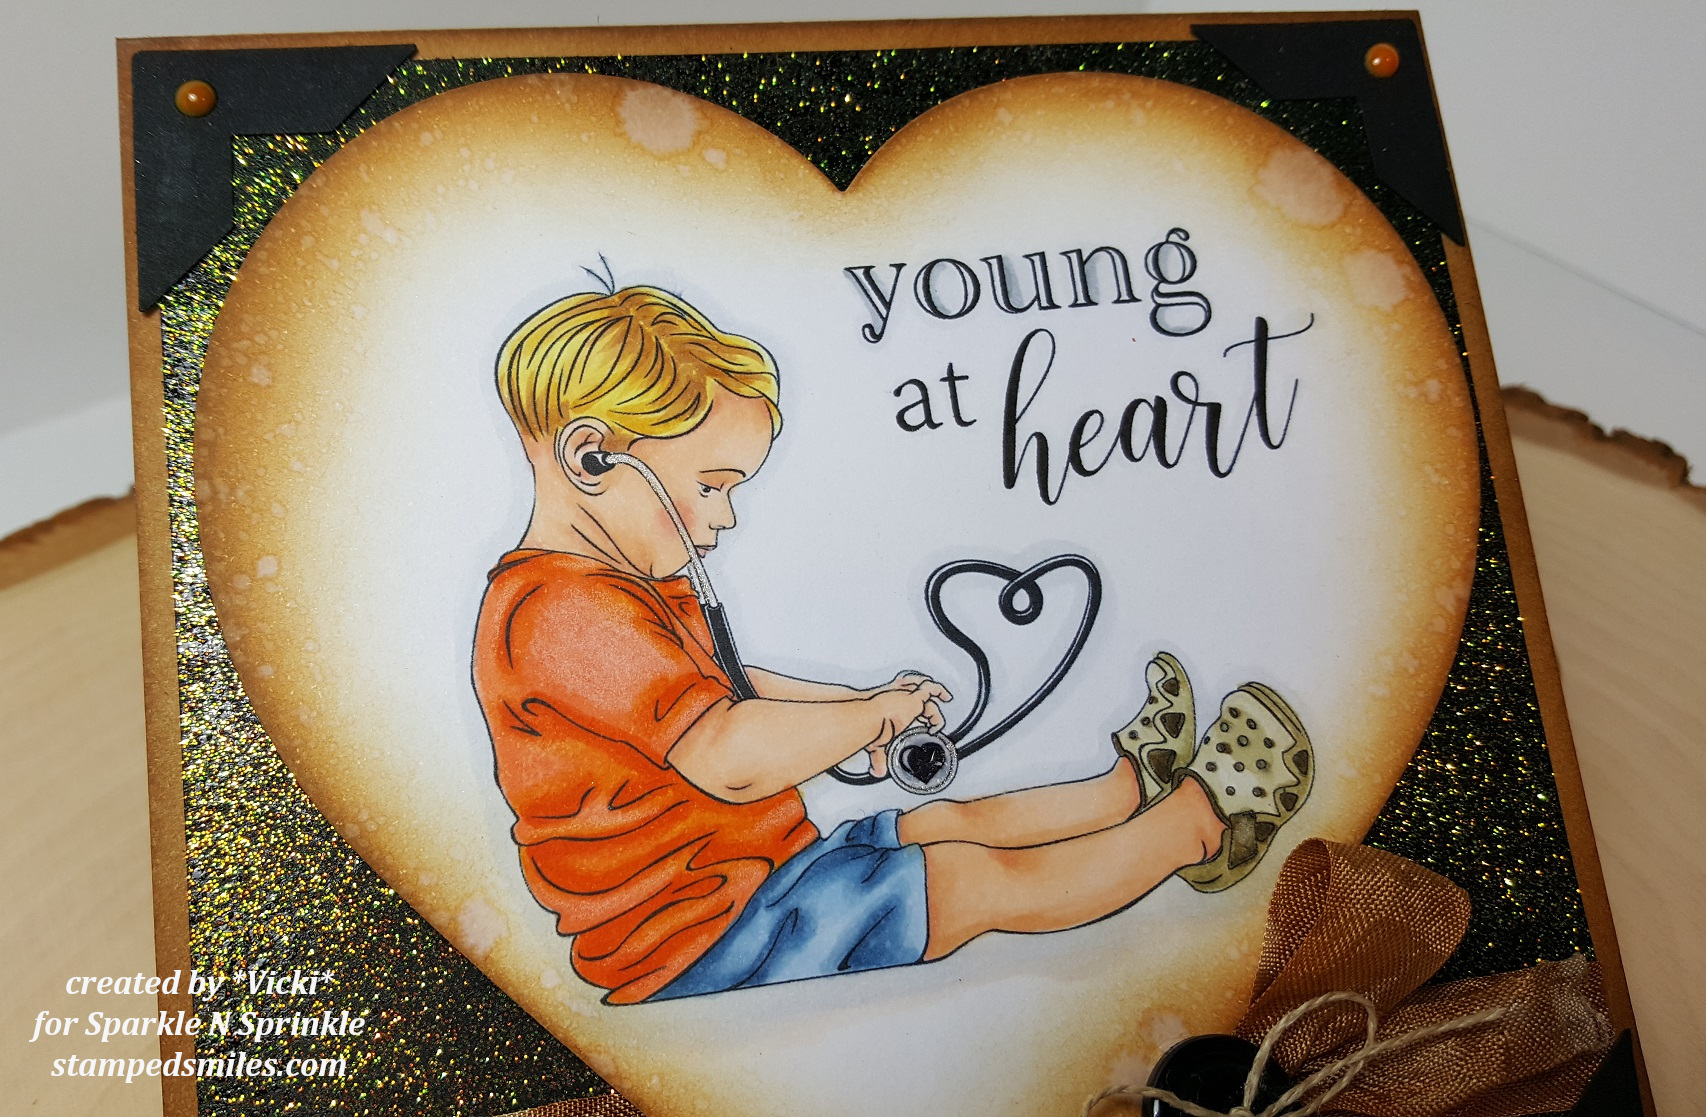
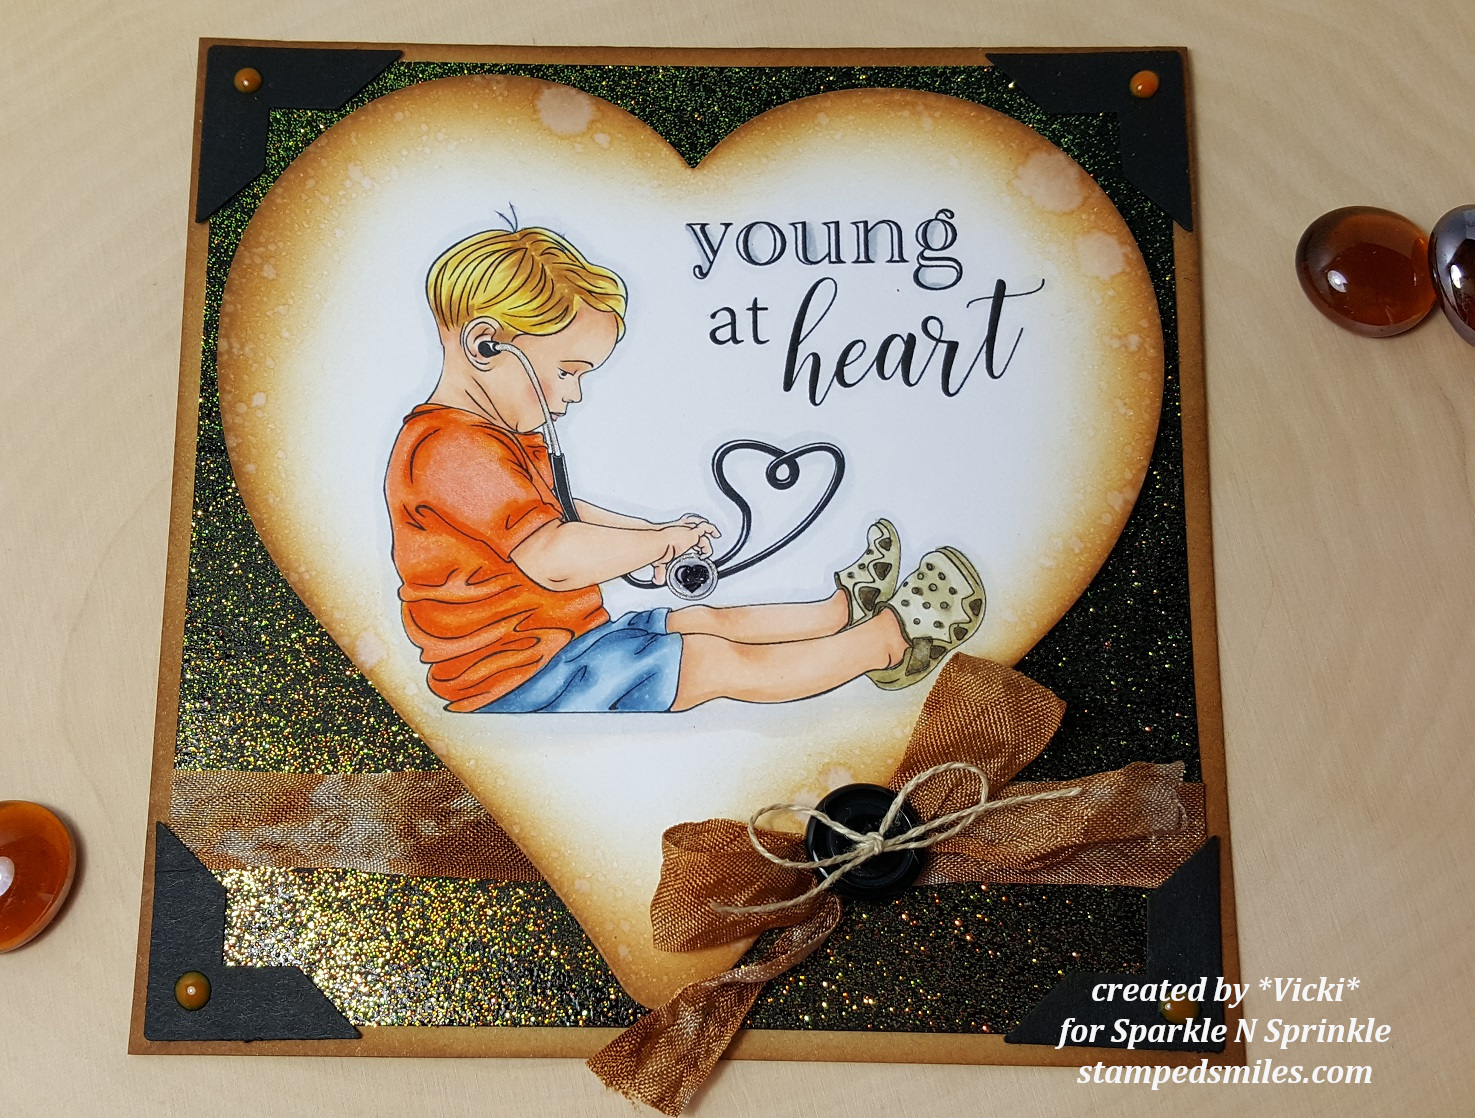
Hello friends!  Stopping in to share another guest design creation that I’ve made!   Here’s another I’ve made using the very sweet digital set Doctor at Heart:

Vicki-SnSNov-YoungatHeart

Isn’t this image darling?!  My first thought on this set was to try and go a little “vintage” with my design.  I opened up a Word doc. to insert the image and sentiment and sized and arranged it how I wanted it to look.  I printed it out on some cream-colored card stock and then cut it out with the Tonic Studios Follow Your Heart die using the frame portion only.

I wasn’t sure I wanted the image to look “vintage” so in asking hubby, he told me that I needed to color him up with blue shorts, brown/tan shoes, orange top and blond hair!  He was very specific about that!! LOL!  So I colored this cute image up with my Copic markers and gave some “outlining” shadows around the sentiment too.  I took a gel Stardust Pen and colored in the ‘metal parts’ of the stethoscope and then added some Nuvo Crystal Drops Morning Dew (Gloss-clear) to the heart circle the boy is holding and let it dry.  I then used some distress inks and sponged around the edges of the heart image panel and spritzed it with water, waited a few seconds and dabbed it up with a paper towel.  I love the watermark look it gives to add that vintage flair and tie it all in together.

Vicki-SnSNov-YoungatHeart3

So when you tilt the card, you notice that the background looks like I’ve used some special glitter paper, but I did NOT!  I made my own glitter paper for the background!  I took another piece of black cardstock and covered the entire panel with VersaMark Ink and sprinkled it with some Black Magic embossing powder. Stunning sparkle!

Vicki-SnSNov-YoungatHeart2

For the look on the ribbon, I took some cream-colored seam binding ribbon and sprayed it with some water and rubbed it in some ink that I smeared onto my TH Glass Media Mat and crinkled it up and then let it dry.  I wrapped it around the embossed glitter background panel and added a bow with a button and natural twine for the center of it.  I mounted this glitter panel onto a 5 1/2″ squared cream-colored card base that I’ve ink blended around the edges in the same colors that I’ve used on the heart.  The heart image panel was then popped up over the ribbon strip and glitter background with craft foam and then the seam binding bow was attached along the edge of the heart.

Vicki-SnSNov-YoungatHeart1

For the corners of my card, I had a very old corner punch that I punched out from black card stock and attached them to the corners of the card.  I then used the  Nuvo Crystal Drops Ripened Pumpkin to add some “dot” in the middle of each punched corner piece to finish it off.  I think that the tiny bit of orange color ties in nicely with the glitter background and his orange shirt.

I really hope that you’ve enjoyed my fun ‘vintage charm’ creation as well!  Thanks so much for stopping in today and I’ll see you soon!

Challenges I’d like o enter my card for:

  1.  Little Red Wagon – “Remember When” (used Crystal Nuvo Drops – Rippened Pumpkin – meant to be for Halloween)
  2. Crafty Creations – Anything Goes
  3. The Creatie Crafters – Anything Goes
  4. Fussy and Fancy Friday – Anything Goes