Hello friends and a happy weekend! I really can’t believe that we’re already on the last Saturday of March right now! This month flew by, but I’m so happy to get even further into the Spring months, how about you? The chirping birds seem more intense as Spring gets into her song!
Today I’m sharing my monthly Art Journal page and collaborating with my blog friend Carol as we both try and get creative with journaling by using up our never-ending stash piles! So please pop on over to her blog to see some more inspiration with our “SMASH YOUR STASH” prompt of: “Die cuts/punched out pieces/tags(unfinished to decorate)“! Let’s get to creating!
Well, I don’t know about you, but I sure do have TONS of those punches that I hardly ever use any more. I also keep piling up tons of die cuts too! So this was my focus on my page today by pulling out lots of those to come up with a Spring theme in mind…
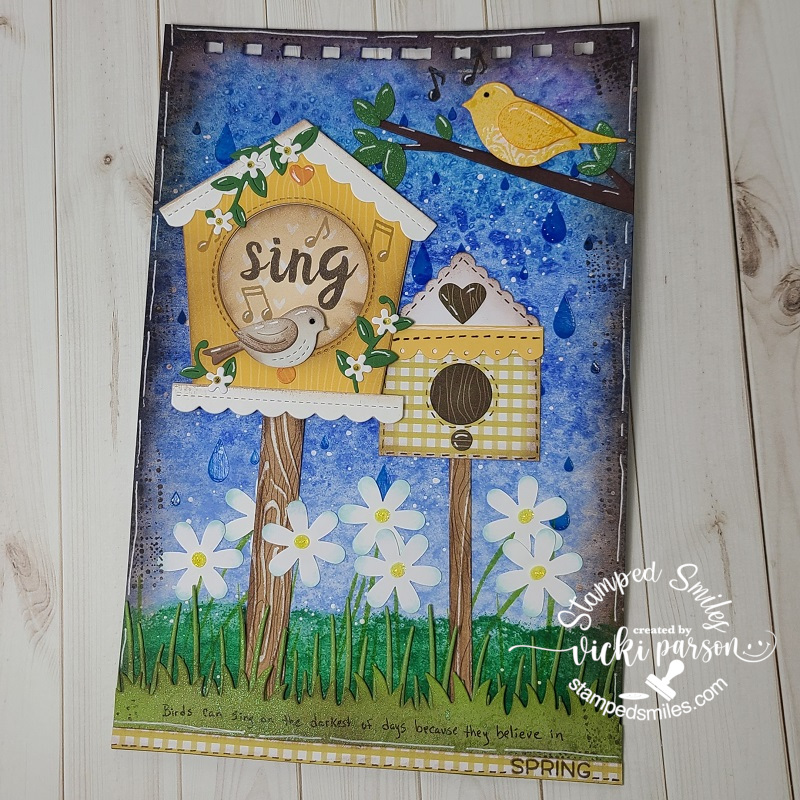
I started out with my usual 6×9 thick watercolor paper with the binder holes at the top. My first thought was to create a blue “watery” background by using my Zig Kuretake Gansai Tambi watercolors to paint an ombre blue. It was nice to pull these out to play with as I haven’t used them in quite a while. While it was still wet, I covered the panel with some Sea Salt crystals and let it dry. After it dried, I scrapped off the salt. If you’ve never tried it, it makes for a really unique look. I then took a raindrop stencil and went over it with some blue Chroma Glaze. I really like how the glaze makes it look shinny. I mixed some blue and yellow Deco Media Fluid Acrylics to make the green color and sponged it over the bottom to create my grass scene. I also had a tall grass stamp that I stamped over it with green ink. Lastly, I used white paint to splatter over the background.
So this is where I moved onto the rest of my separate pieces to create my scene. I pulled out circle, square, heart, scallop border, birds, leaves, flowers, branch, grass borders, etc and began cutting out all of my pieces! The yellow bird at the top was stamped and then punched out. The birdhouse on the right is all punches and the daisy flowers at the bottom are all punches. The larger birdhouse with the bird and flower vines is a die set by Lawn Fawn, the branch and leaves at the top right is a die set from My Favorite Things and I’ve also used a couple of different grass die cut borders at the bottom from My Favorite Things. This is my very first time using that birdhouse die set and I’ve had those grassy border dies forever but use quite often.
I was also quite happy that I was able to pull out several pieces of scrap papers from my stash to punch and die cut all of them too! That’s a good way to use up more of your stash when you’re using punches and dies!
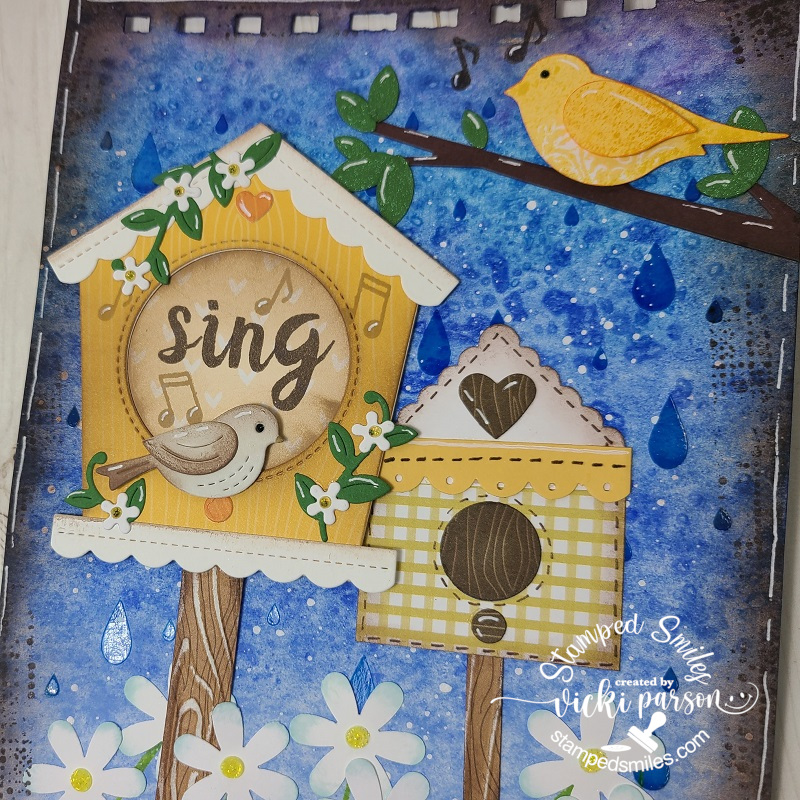
Trying to zoom in a bit so you can see the background and how it looks with the watercolor salt technique as well as the shine from the raindrops. For the birdhouse posts, those are just strips of woodgrain looking pattern paper that I’ve cut into strips and then ran through an embossing folder. I used a sander to bring out the texture.
I stamped the music notes next to the birds and also stamped the “sing” letters in the center of the birdhouse. I’ve got both of the birds popped up with foam tape. I’ve glued the birdhouse posts to the page, but popped up the large birdhouse with foam tape as well. You can also see where I’ve went all the way around the edges and I sponged brown ink around everything. I also stamped a random image around the edges with brown ink too.

At the bottom of the page, you can see that I’ve taken a brown marker to write “Birds can sing on the darkest of days because they believe in” and then I stamped “SPRING” over a strip of pattern paper and attached at the bottom and used the brown marker to create the dash lines. Also did this on my made up punched birdhouse.
Both the last grassy border and the leaves above on the branch were die cut from green cardstock, but I’ve also used some green mica spray and sprayed over top of them which gives a pretty shimmer to them. Before popping up the yellow bird at the top, he was also sprayed with a yellow mica spray.
To finish it off I’ve added all of the white gel pen details and along the edges of the page. Lastly, I used some yellow Stickles to center each of the daisy flowers as well as the flowers on the birdhouse. I used black Stickles to the bird’s eyeballs.
Really enjoyed putting this one together and playing around with more stash items! Hope that you’ve enjoyed as well and have been inspired in some way! I thank you so much for stopping in! Have a great weekend!
Challenges:
- Art Journal Journey – Spring
- River of Creativity – Anything Goes but NO CARDS
- A Bit More Time to Craft – Anything Goes
- Lil Patch of Crafty Friends – Anything Goes
- Pammie’s Inky Pinkies – Anything Goes
- Simon Says Stamp Monday – Bright and Cheerful
- Everybody Art – Spring