Crafty Chefs Gnome Joy & FINALLY Finished Projects from Whimsy Retreat!🎉

Hello my friends!  Are you getting all of your Holiday errands finished up?  I’ve still got some cards to send out and get going on my cookies!  I always feel behind every year…are you this way too?

So while I was “making merry” literally, I thought I’d join in the December Crafty Chefs Group Challenge and see what I could come up with for it.  This cute little gnome has been wanting to jump on my craft table for a while…

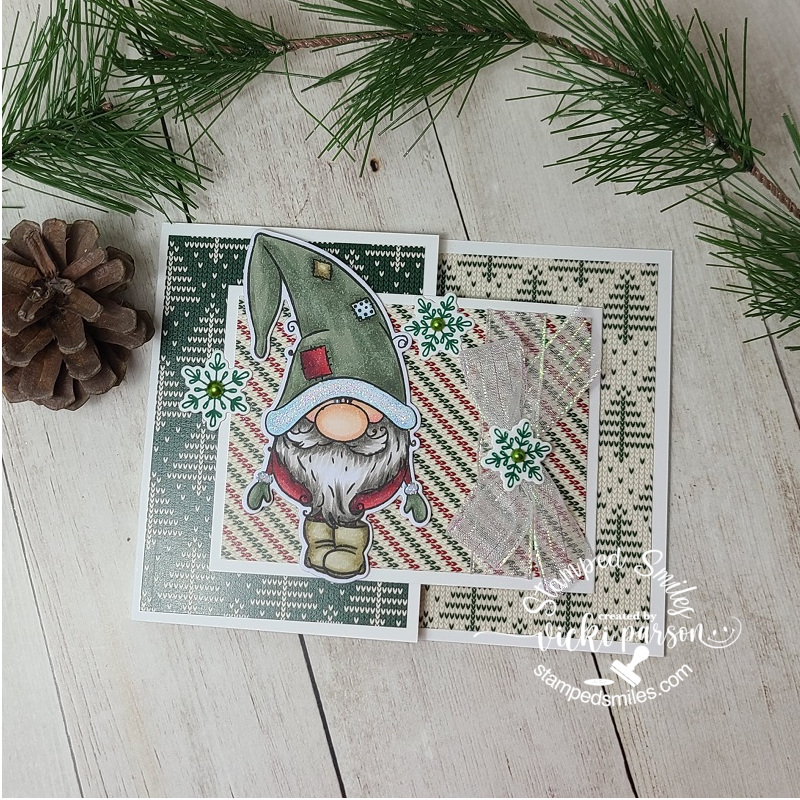
Isn’t he adorable?!  He came from a stamp set that I had actually got last year around this time and just never had the time to pull it to play with before Christmas rush finished up.  Note to self…I have TONS of those items this year, so plan EARLIER! LOL!  It seems I always get closer to a deadline and then want to come up with all kinds of things I want to try…is it the pressure or what?!

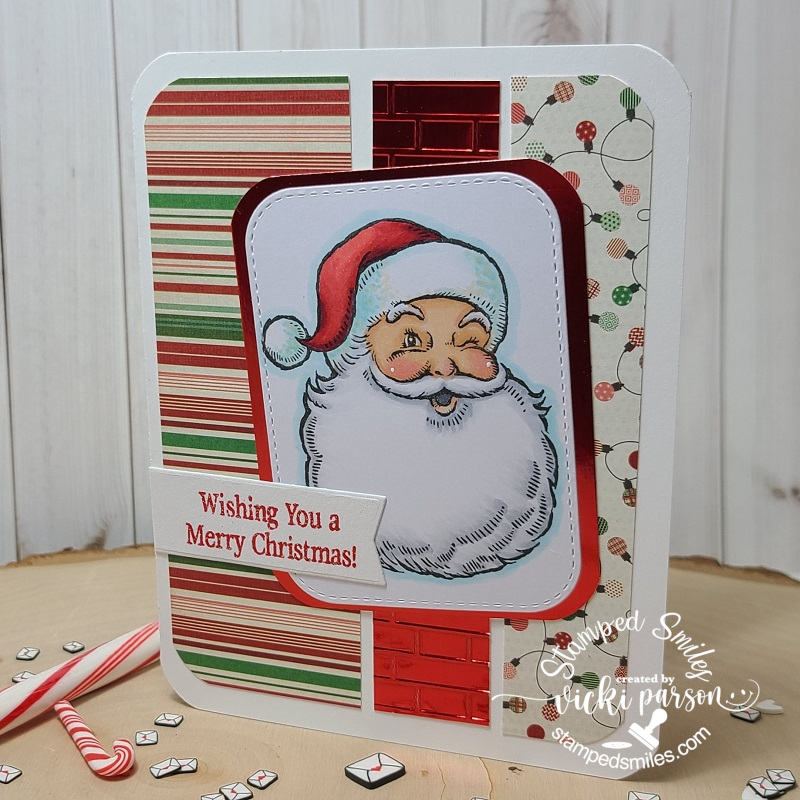
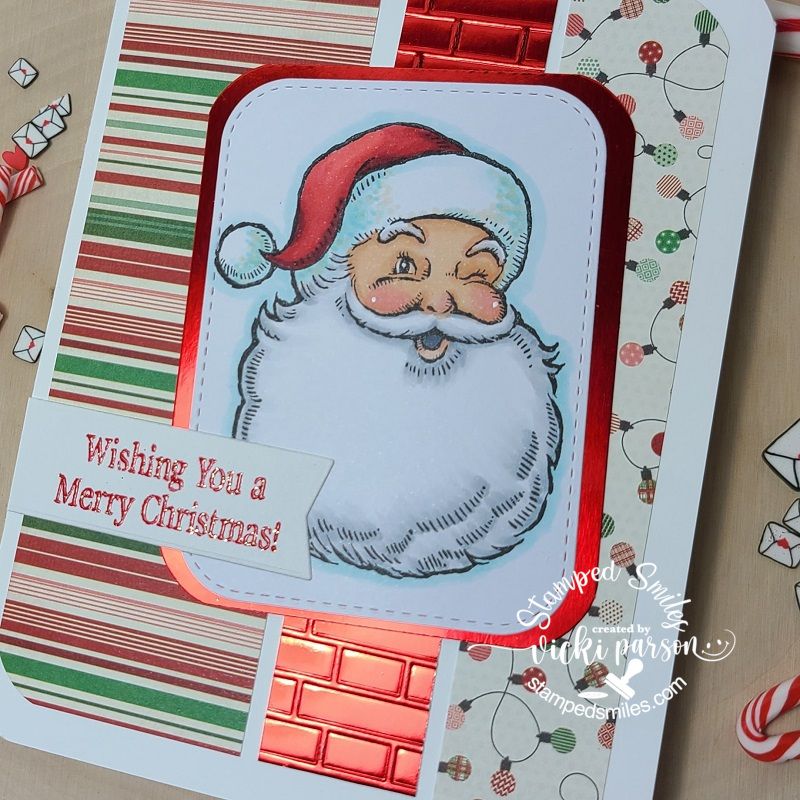
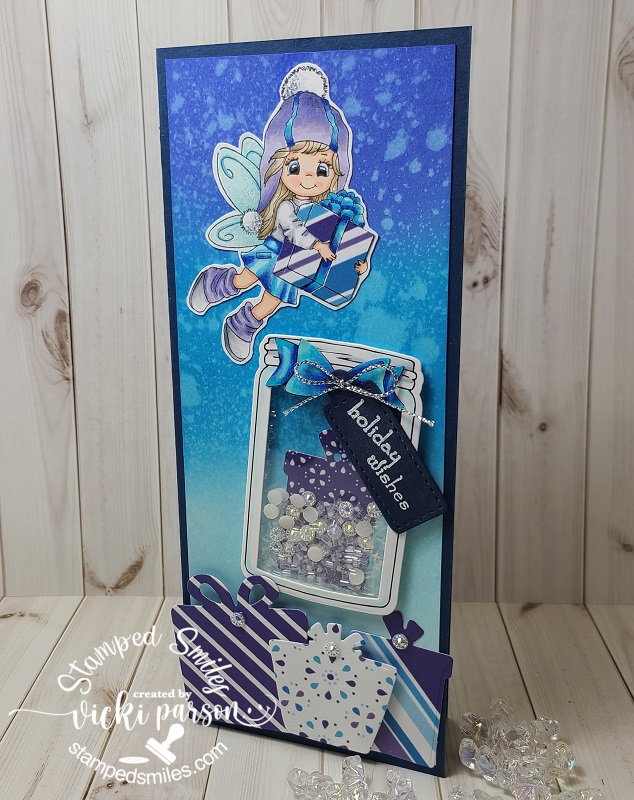
Anyway, I’ve got him all colored up with Copics and then I used the coordinating dies to cut him out with that I’ve attached with foam tape over my “Joy Fold Card“.  (This was part of the challenge for the Crafty Chefs this months and I followed along with a tutorial to a link *see link above* that was given, but I changed it up slightly by making it an A2 size.)  For the card design, I’ve used these Sweater Weather Papers.  I’ve added some shimmer metallic ribbon and also stamped some green snowflakes from the gnome stamp set and cut them out with the coordinating dies as well.  I also found some green colored pearls to add to the centers of each one too!  The ribbon, pearls/gems and color green were a requirement for the Crafty Chefs challenge.

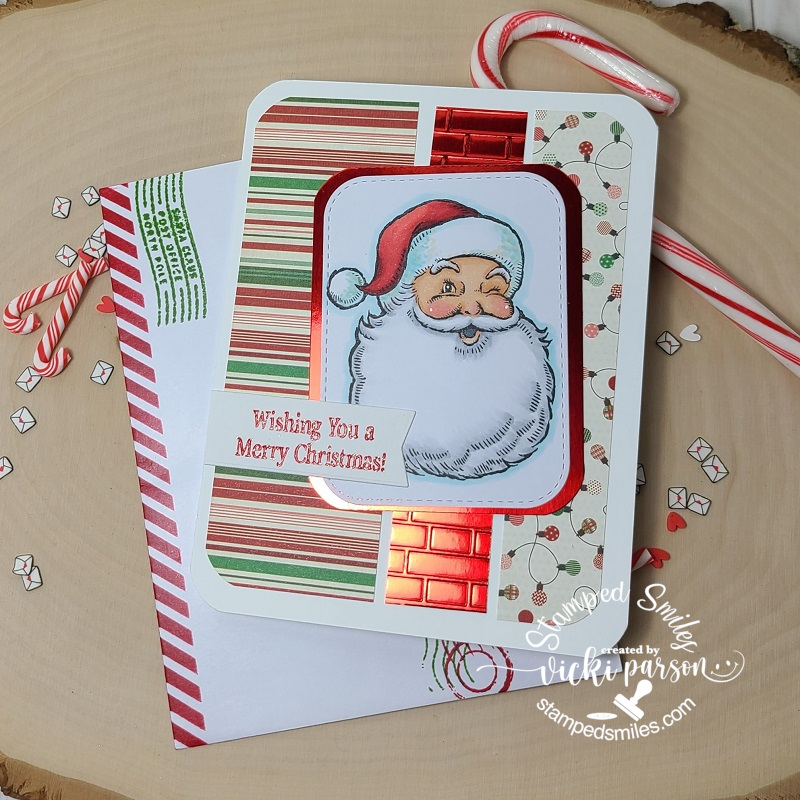
The snowflake on the left side of the gnome is popped up and actually helping to hold the top flap down, so you have to pull it out to open the card.

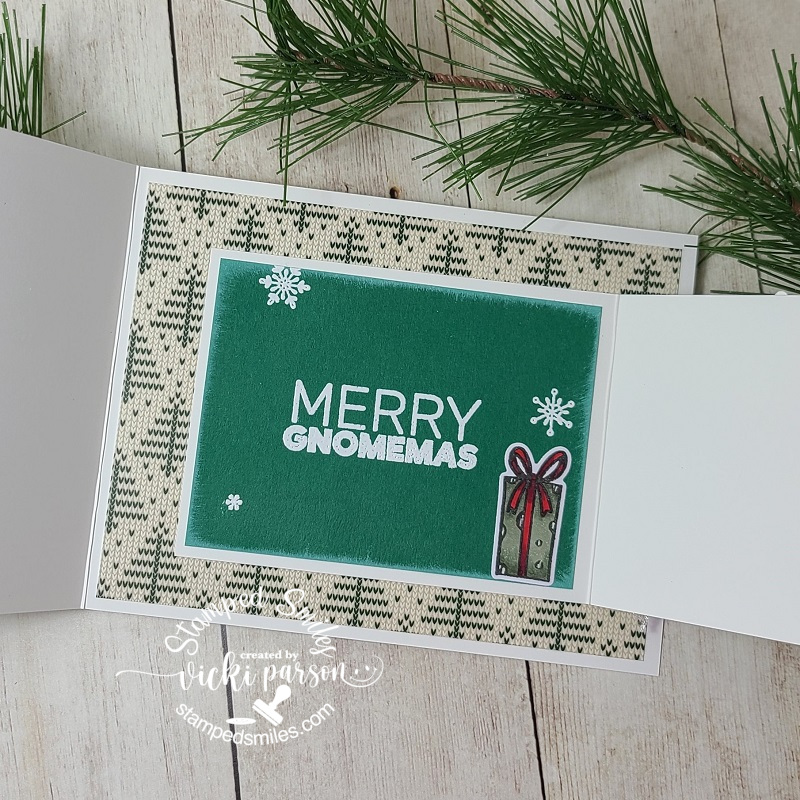
So when you pull open the flap, open the inside flap, this is what you’ll see inside.  I heat embossed the sentiment along with a couple of snowflakes from the gnome stamp set with white EP and colored up a gift package, cut it out with the coordinating dies and attached it to the green panel.  I also took the white Ink Pad and rubbed it along the edges of the green panel before attaching.

Here’s this month’s requirements for the December Crafty Chef Challenge.  I used them all except for the very last one.  It’s been a long time since I’ve made a Joy Fold card, so this was really fun!

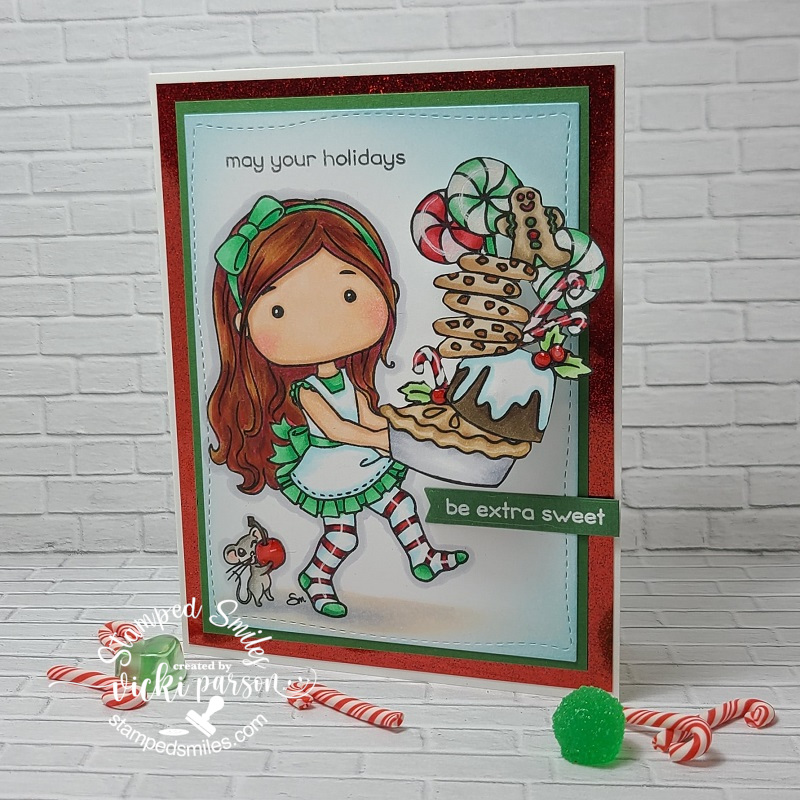
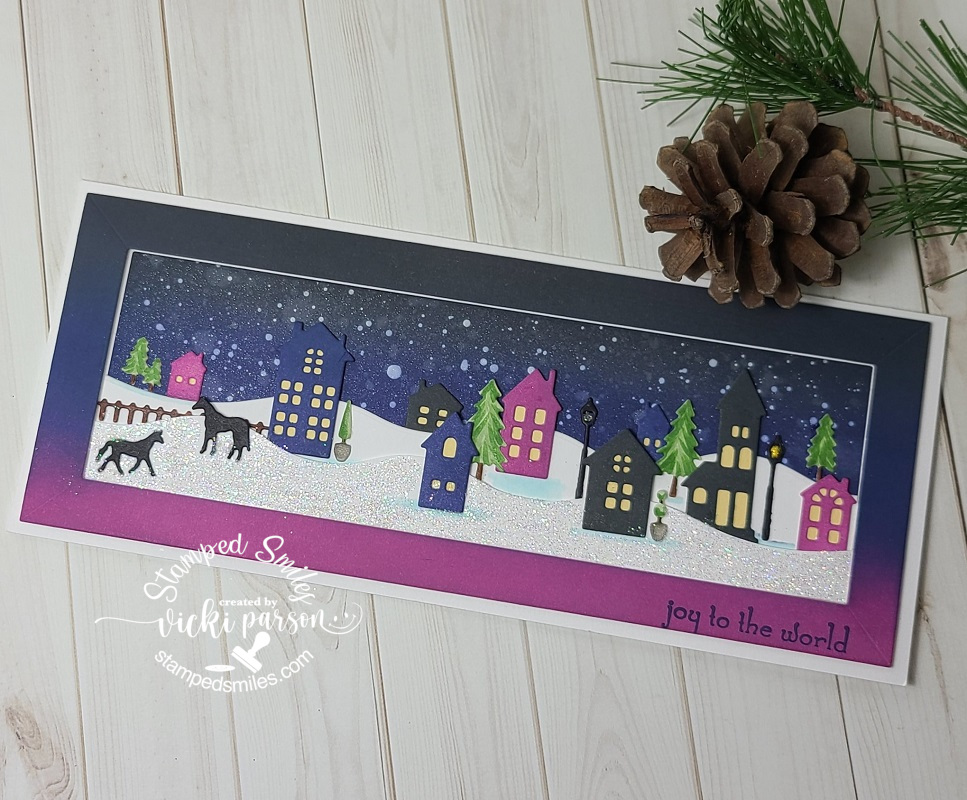
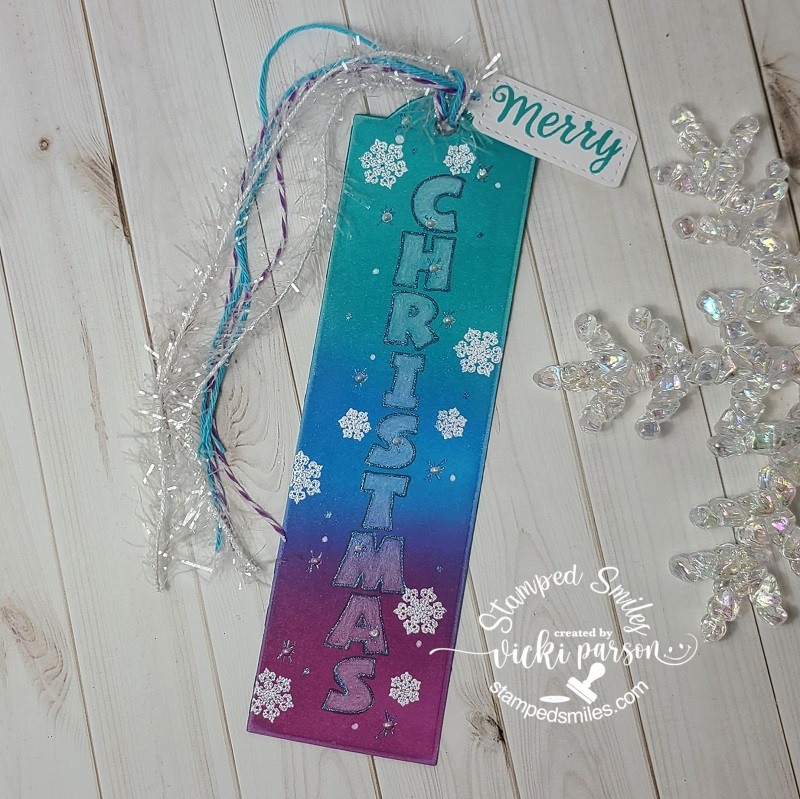
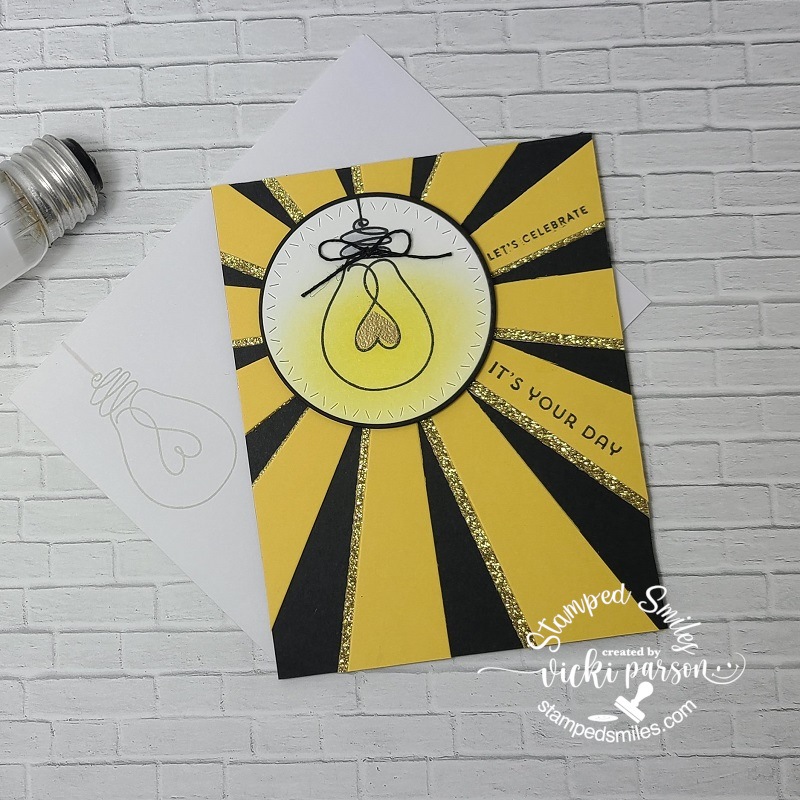
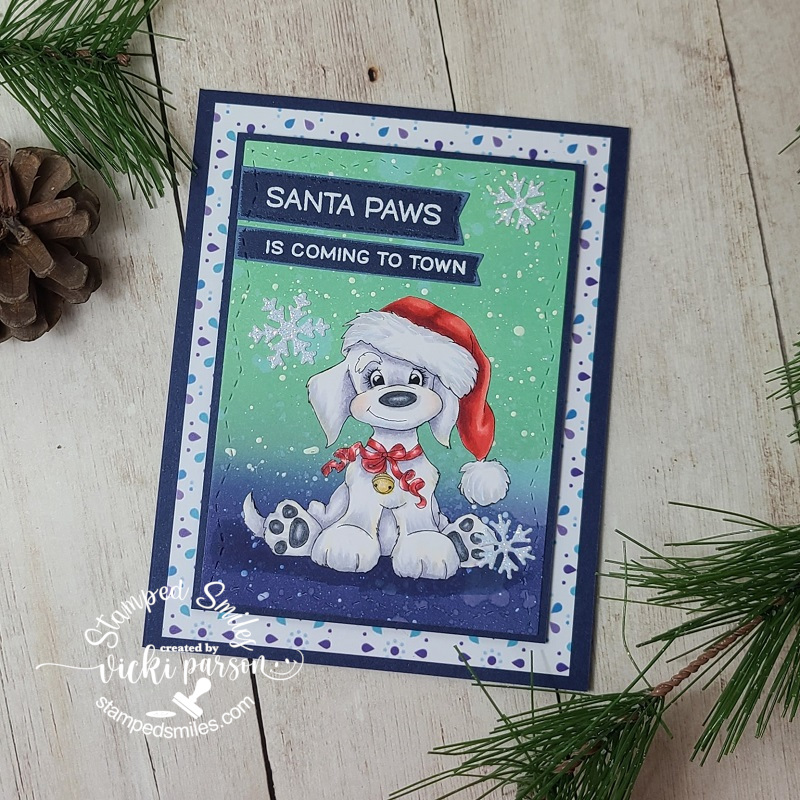
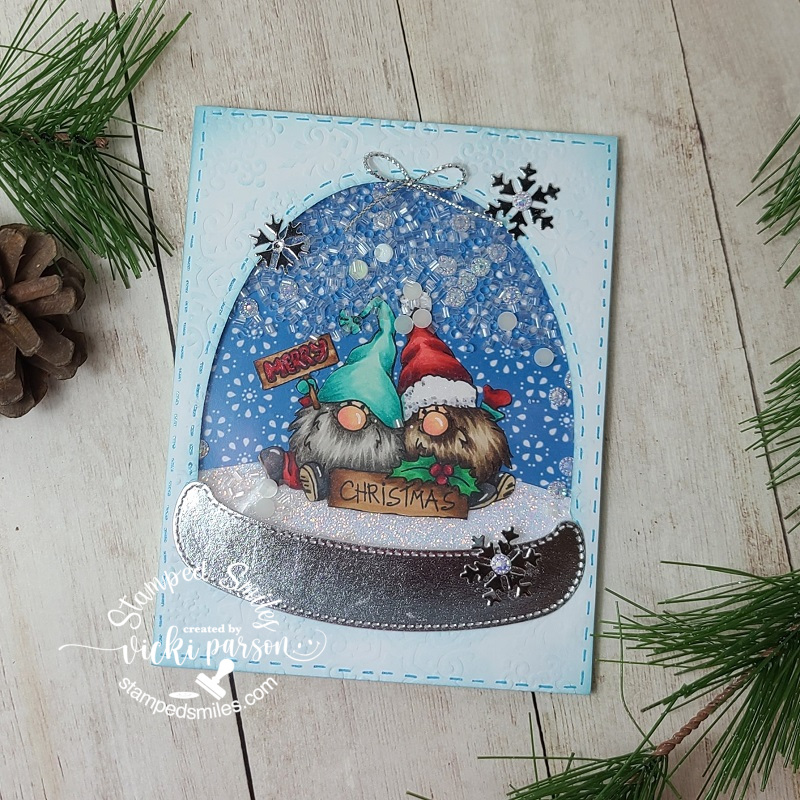
I’m also VERY excited to announce that I have FINALLY finished all of those projects from the Whimsy Stamps Virtual Retreat that I took over a weekend back in October!  Yep, I guess I’m pretty slow!  In my defense, I took extra time so that I could enjoy each minute of it all and go back to revisit posts and tutorials!  There were 23 projects total and I made a few extras along the way.  Here are my last ones:

This was for kit 19 and a wonderful coloring tutorial from the one and only Crissy who also illustrated the image of course! The sentiment I added myself is from Lawn Fawn.
This was for kit 20 and I was so thrilled to finally be able to get to these adorable gnomes! Love this fun shaker design! I put my own spin on it with the embossing folder background, stitches, twine and snowflakes.
Last, but certainly not least is this fun mixed media project by Iris for the final project. We even got to make a customized envelope to house the slimline card. She had Christmas greeting on her design, but I wanted to make it a winter birthday card. Love how it turned out!

So that’s all I have to share for now, but I know I’ll be back again on Monday to share a reminder challenge post for you!  I appreciate you taking the time to stop by to see what I’m doing friends!  Hope you are staying healthy and happy!  Enjoy your weekend!

Challenges (ONLY for Joy Fold Gnome Card):

  1. A Perfect Time to Craft – #12 Anything Goes
  2. A Bit More Time to Craft – #129 Anything Goes
  3. Crafts Galore Encore – #82 December Anything Goes
  4. Love to Craft – LTCCB53 December Anything Goes
  5. QKR Stampede – #409 Anything Goes
  6. Arty Divas – #32 Anything Goes
  7. Crafty Creations – #416 December Anything Goes
  8. Colour Crazy Craft – Anything Goes + coloring

Card for Santa’s Friend and Christmas Projects from Whimsy Retreat!🎅

Hello there friends!  I hope that you enjoyed Thanksgiving Day for those of you that celebrate.  It’s difficult not being able to celebrate the holiday in the usual way with sitting at the table with family and I really miss them all so much and look forward to being able to hug them tightly in the future.  I did have a nice dinner with hubby and we stuffed ourselves, also enjoyed spending time with each other.

After Thanksgiving comes the “Black Friday” shopping which I don’t go out and do in the department stores anyway let alone during this time, but I do enjoy taking advantage of deals online!  Did you shop any sales or plan to this weekend?

feb92ee3-da28-45ee-8157-1e2e4a8206a2-danny1

Today I have a Christmas card that I’ve made for a very special individual with Down Syndrome.  He has a very weakened immune system and is unable to go out and visit Santa like he usually does (6 times at least each year)!  Santa is his friend and he doesn’t understand why he can’t see him and thinks he’s been “bad” this year.😥  Although he is an adult in age, he doesn’t understand with his mental handicap and his mother has asked if people would help in sending a Christmas card to him.  Of course THIS is the reason I love making cards!  CLICK HERE to read about the article in the newspaper if you’d like to send one to him too.  Here’s the card I made for Danny:

**Edited to add Danny’s mailing address as I’ve been contacted about some not being able to access the link to the newspaper article:

  • Danny Moreland
  • 2701 N. Prospect Road
  • Peoria, IL  61603
  • USA

I was trying to go through all of my stamps that had a Santa and the first one that came to my mind was this older Stampin’ Up! stamp set called “Jolly Old Saint Nick” and it’s one of my favorite images for a Santa!  I love how he’s got that “wink” going!

I colored him up with Copic markers and cut it out with a stitched round rectangle die and then layered it over a piece of red mirror cardstock that was cut with a rounder punch.  For the design of this card, I’ve used a current sketch challenge (see below this post).  I found some festive papers in my stash and cut the strips that I rounded the corners on with the punch as well.  For the middle strip, I used some more of the red mirror cardstock and ran it through a brick embossing folder before attaching it to the other pieces.  I layered them over a white A2 sized side folding card base that I also rounded the corners on as well.

For the sentiment, which also came from the same stamp set, I heat embossed it with Brutus Monroe Christmas Eve EP over a piece of white cardstock and cut it out with a banner die and cut off the edge of the card.

Here’s a closer look at Santa and how I’ve colored him in.  I couldn’t resist giving him white highlights on his cheeks with a gel pen.  You can see the beautiful mirror effect with that embossed middle strip as well as the pretty sparkle in the sentiment from that EP I mentioned above.

And of course I wanted to make the outside envelope that it’s getting mailed in just as fun!  I took a diagonal striped stencil and inked it up with red ink along the bottom on both sides.  I also had a fun “Postal Christmas” stamp set (unknown) and stamped a few of those all over the envelope in red and green inks.  I sure hope that he enjoys this card and helps to bring a smile to let him know that Santa KNOWS he’s been good!😉


I had also told you in a previous post that I was still working on projects from the Whimsy Stamps Virtual Workshop that I participated in during October…well I’ve just been slowly enjoying completing them as I go and I saved the Christmas projects for last for this reason! LOL!  I’m getting closer to finishing up all of those projects!  (Only 3-4 left to do I think!)  For now…here’s some Christmas projects from the retreat:

This was for kit 8. What’s fun about this card is that there is an action wobbler behind the pile of treats she’s holding! I had fun coloring her up and I couldn’t stop playing with the wobbler! LOL! PS: This is a good reminder for the {Cupcake Inspirations} challenge too!😋😉
This was for kit 13. I slightly changed up the card, but not much. I actually made a shaker with the jar and put some acetate behind it and then I also added a tag and silver ribbon at the top of the jar. I paper pieced the fairy’s gift box instead of coloring the strips too. I love the colors in this one!
This slimline card was for kit 17. All of the dies were actually really fun to color and arrange to create a scene with. I didn’t change things up too much with this one other than covering the bottom snow with glitter and then adding a sentiment onto the bottom of the frame. I splattered the sky with white paint instead of using a white gel pen.
And this fun bookmark was for kit 18. The ink blended colors were similar to the above card, but I colored in the letters with a white pencil and then used a gel pen to trace around the letters. I white heat embossed some snowflakes and added doodles with gel pens as well as pearl drops. I also added some tinsel ribbon to go along with the twine given. I might use this as a tag…not sure yet.

That was a rather long post!  I’m a bit behind and trying to catch up with my projects, posting right now.  I hope that you’ve enjoyed my projects today and have been inspired to get some festive projects going!  I’ll be back very soon with another project and challenge reminder soon!

Challenges for Santa card only:

  1.  Try Stampin’ On Tuesday – Sketch
  2. Creative Moments – Anything Goes
  3. Pammie’s Inky Pinkies – PIP2047 Anything Goes
  4. Always Fun – #190 Inspired On a Movie (“The Santa Clause” starring Tim Allen)
  5. Sweet Stampers – #50 Christmas
  6. The House That Stamps Built – N2520 Anything Goes
  7. Sweet Stampin’ – Spots or Stripes
  8. Christmas 24 – #22 Santa Claus 

Bright Birthday and More Whimsy Retreat Projects!💡

Hello friends!  Hope that you’re having a great week so far!  Hubby and I are trying to figure out how this “retirement thing” goes together! LOL!  I think we’ll be having so much fun and we’re just really excited about the future and what we’ll be doing.

Speaking of which, this past Sunday he also celebrated a birthday and of course I had to make him a card that was suited for an electrician.  I had to add a bit of humor about his age on the inside, but this is what I came up with:

I’ve had this Stampin’ Up! Sunburst die and stamp set and haven’t used it that much since I bought it. (quite a while ago! Not quite sure how old.. LOL)  I thought it would make a great light beam for my VERY old Simon Says Stamp ‘Watts Up’ stamp set that was from a past card kit. (circa 2014/2015)…yep, all old!

I die cut the sunburst from some yellow and gold glitterstock that I glued together slightly off-set and then attached it over a side folding A2 sized black card base.  I stamped the sentiments over a couple of the yellow strips with black ink taking care to make room for the circle panel.

I then stamped the lightbulb over a white piece of cardstock and colored the base with Copics and used a marker draw a line above it for the string.  I took a solid heart from the stamp set and heat embossed it with some Gold Metallic Gilded EP and then sponged some yellow ink over the bulb for some glow.  I die cut it out with a circle die and then layered over another die cut circle black piece and popped it up over the sunburst layers with foam tape.

I tied a bow with some black twine and glued it to the light bulb base.  I also stamped the bulb in a lighter gray ink over the envelope and added a string to that as well with a gray marker. (The inside of the card said:  “Old is the new black.” 😆)

———————————————————————————————————–

And I also wanted to share that I’m still plugging away on the several kits that I received from the Whimsy Stamps Virtual Retreat last month!  These are really amazing projects and I’m having lots of fun putting them together still! (Christmas will be coming next..so stay tuned for those!):

This is a fun interactive card with a pull tab at the top where this cut little dragon slides upwards towards the sky! This kit 9 came with an A2 sized envelope, but I had to make my own envelope slightly larger to accommodate for the pull tab sticking above the card. I’ve added doodle lines around the edges and shadow stamped a sentiment at the bottom for my own added details.
This set was from kit 14. The hexagon shaped box was super fun and even came with the candy! There was also an extra stamped and cut out bee, so I used it to make another card… shaker style! I used the left over honeycomb die cut piece as a stencil on the card as well. I used the envelope that was provided in the kit above and decorated it for this A2 sized card instead. (I know someone that loves these candies…so they might get a surprise at some point! 😉)
And lastly, this was from kit 15 and TOTALLY different than what was photographed in the booklet! First of all, I received a plant image with a die cut speech bubble sentiments and thought it might be cool for a Halloween card on another project, so I saved those to use later. I received an EXTRA stamped sunflower image from kit 22 that I had posted earlier and decided to use it for this card here. I colored it similar to that one and cut it out, but cut off a portion of it on this design. I also changed up the background ink blended colors and splattered some gold paint on this one. Love how it turned out. This will be for an Autumn anniversary card for someone coming soon.

Hope you’ve enjoyed all of my projects today!  Thanks so much for stopping by and I’ll be seeing you soon!

Challenges (For the Birthday Lightbulb card ONLY):

  1.  Retro Rubber – Anything Goes + stamps older than one year
  2. Cardz 4 Guys – Birthday for adult male
  3. Creative Moments – Anything Goes
  4. Crafty Calendar – Anything Goes
  5. Pammie’s Inky Pinkies – Anything Goes
  6. Shopping Our Stash – Tic Tac Toe (I used middle across: String/twine, 5 year old stamp, bright colors)
  7. Watercooler Wednesday – All About Occasions (birthday)

Retirement Time and More Whimsy Stamp Workshop Retreat Projects

Hello there friends!  It’s hard to believe that we’ve made it to November and rounding the corner to end 2020!  It’s been a very strange year all the way around, but I have to say that it’s a bitter sweet day today as hubby will have his last day of work on his 40 year career as an electrician.  So today I’m dedicating my post to him:

This would be a perfect situation for my hubby and something he talked about all the time…which was to go out to the lake, relax, enjoy some fishing time on a boat including staying in a cabin.  Sure look forward to spending some time with him doing just that next year too!⛵🌅  He is a hard worker and certainly deserves it.

The stamp set that I’ve used for this card was a perfect scene image from Whimsy Stamps called Happy Place.  I colored it up with Copic markers and cut it out with an oval die and layered another oval piece from black cardstock.

I found some papers in my stash that I thought would be perfect with this, so I’ve used the Whimsy Stamps Pierced Border Trio Dies to cut it with to fit half-way on my A2 white side folding card base.  Before attaching the piece down over the base, I took some Mustard Seed Oxide Ink and sponged across the middle of it and then used some Tumbled Glass Oxide Ink slightly at the top.  I then attached all piece including the image panel.

I took the sentiment from the Happy Place stamp set and stamped one of the sentiments at the top of the oval panel and then I white heat embossed the “relax” sentiment over black cardstock and cut it out with the Whimsy Stamps Quick Strips die set, glued it along the edge and trimmed off the excess.  Lastly, I’ve added some Whimsy Stamps It’s a Party Enamel Dots.

Then of course I wanted to share the inside of the card which you can see that I’ve used the same image from the stamp set from the front of the card and just stamped that in a lighter grey ink color.  I masked off the edge of the inside of the card so it didn’t stamp completely.  I also used it in the same way on the envelope as well.

For the greeting, I took the Whimsy Stamps Happy Large Word Die and cut it out with some black cardstock and then attached it with liquid glue.  I stamped the “retirement” greeting right underneath it from the Whimsy Stamps Happy Sayings stamp set with black ink.

It may be hard to tell in the photo above, but I’ve also taken a glitter brush pen and went over the sun as well as the water for some added sparkle.

This card was actually fun to put together and I was thinking about the future and all the things we had talked about the last few years and getting ready for this day.  Things are a bit different than we had envisioned of course, but we will have “our time” for sure.  We’re so excited about it!

This card is being handed to him this morning while we have our coffee before he leaves for work on his last day!😀


And now I also have some more finished kits that I’ve been working on since the Whimsy Stamps Virtual Workshop Weekend!  I’m still really enjoying finishing them up and still have MANY more to do!  I’m so amazed at how much we received and very happy that there were several Christmas projects which I’ll be working on next!  For now…here’s more of the finished kits:

This was for kit 12 and I LOVED the cute dragon in the purples! This card is going to my youngest grandchild as she is my “PURPLE girl”!!
This is the INSIDE of Kit 12. It was a really cool “FUN FOLD” design! I put my image off to the edge so I had room to write a message.
This was for Kit 6 and the entire scene was made using Copic coloring including the sky background! The squirrel and pumpkins were popped up with foam tape.
This was for kit 21 and my first time practicing with no-line coloring!
This was for kit 22. This mega large sunflower is gorgeous! Loved coloring and fussy cutting it out!

I hope you’ve enjoyed my projects and post today!  I sure have been having fun just playing and trying out different things with my cards.  I do look forward to finishing up these kits as we get near the Christmas time!  So be watching for more of those!

Thanks for dropping in with me today and I’ll see you again soon!

Challenges: (For Retirement Card ONLY)

  1. Colour Crazy Craft – Anything Goes + coloring
  2. A Perfect Time to Craft – Anything Goes Nov
  3. A Bit More Time to Craft – Anything Goes
  4. Crafts Galore Encore – Anything Goes Nov
  5. Love to Craft – LTCCB52 Anything Goes Nov
  6. QKR Stampede – #407 Anything Goes
  7. Lil Patch of Crafty Friends – #145 Anything Goes
  8. The Corrosive Challenge – #11Nov Anything Goes
  9. Pammie’s Inky Pinkies – PIP2044 Anything Goes

Boo!👻 It’s Halloween!!!🎃

Hello my crafty friends!!  Today is Halloween and I thought it would be a great time to share several Halloween themed creations that I had made during the Whimsy Stamps Virtual Retreat!  I’m actually STILL working on the project kits because there were SO MANY of them and I’m such a slow crafter there was no way that I could’ve done them within that weekend time frame!  It sure was so much fun and so many treats along with it!  So happy that I decided to join the virtual event!  I encourage everyone to join the next!!

So what I decided to do was to go through all of my 23 kits and pick out the Halloween themed ones to get them finished up before Halloween so that I would have them to share and give out!  Enjoy the spooky creative fun:

Kit 1 – spooky green behind the eyes! Slimline design
Kit 2 – Slimline design with a spooky graveyard! The cockroach bugs were a nice little “surprise gift” from our lovely instructor for the first two kits! LOL
Kit 5 – All Copic coloring and something brand new to me was coloring a scene freehand! So scary!! But I made it!
Kit 7 – a slimline die used two different ways…LOVED the ink blending!
Kit 10 – Cutest little treat box! Added crystal eyeballs to my skull and sparkled it up with sparkly clear EP. I’ve rubbed white ink around the black edges.
Kit 11 – The ink blending on this was awesome too! I have so many new combos now! The black sparkly die cut is my fave!
Kit 16 – Last but not least, this really adorable card made me giggle the whole time! I’ve added some glossy accents to the eyeballs.

So there are still SO many more kits left to do and I look forward to crafting them and sharing more with you as I go too!  Obviously these kits were created and put together by the talented group of people for Whimsy Stamps, so they’re the ones that get the credit for the creativity on these, and therefore, I won’t enter these into any challenges.

Hope you’ve enjoyed my share from the retreat and I’ll be sharing more soon!


I also have finished one more treat bag that I’ve made with the special Halloween Creative Kit from Brutus Monroe:

I used the stencil from the kit to ink over the stencil from the kit and then added the fun stamped and colored elements over the pattern paper from the kit.  I used the spooky graveyard stamp and heat embossed it over the pattern paper with Raven Sparkle EP including the moon image at the top left.

I even used the ribbon and sequins from the kit to decorate with and then added a tag from my stash to tie on the bow.

This is the little poem that I’ve attached to the back of the bag that was a fun little print out from Brutus Monroe as well as the colorful strips that I’ve used on the top and bottom portions of the image panel on the front of the treat bag.  I thought they were fun little elements to add and give out to my goblins this year! LOL!

Hope you’ve enjoyed my Halloween projects and thanks so much for dropping in!

**Please don’t forget to add your “Monsters/Ghouls” projects to the {Cupcake Inspirations} challenge too!

Want to wish all a very happy, spooky and SAFE Halloween!🎃💀👻