January AJ Page-BRR!

Hello friends!  Hope you’re enjoying your day so far and staying warm!  We’ve just recently survived a very cold below freezing temps in my area, so going outdoors is not that pleasant even bundled up!  So with that, I stay inside and find crafting to be my happy space!  

I’m very excited to be joining with my crafty friend, Carol (from Crafty-Stamper) for another year of SMASHING OUR STASH!🎉  I love the inspiration that we bring each other as well as accountability for getting those piles of stash used up!  Thank you for joining me again and please be sure to check out the wonderful inspiration on her blog too! Here’s my AJ page with this month’s prompt of “COLD” (anything related to this word):

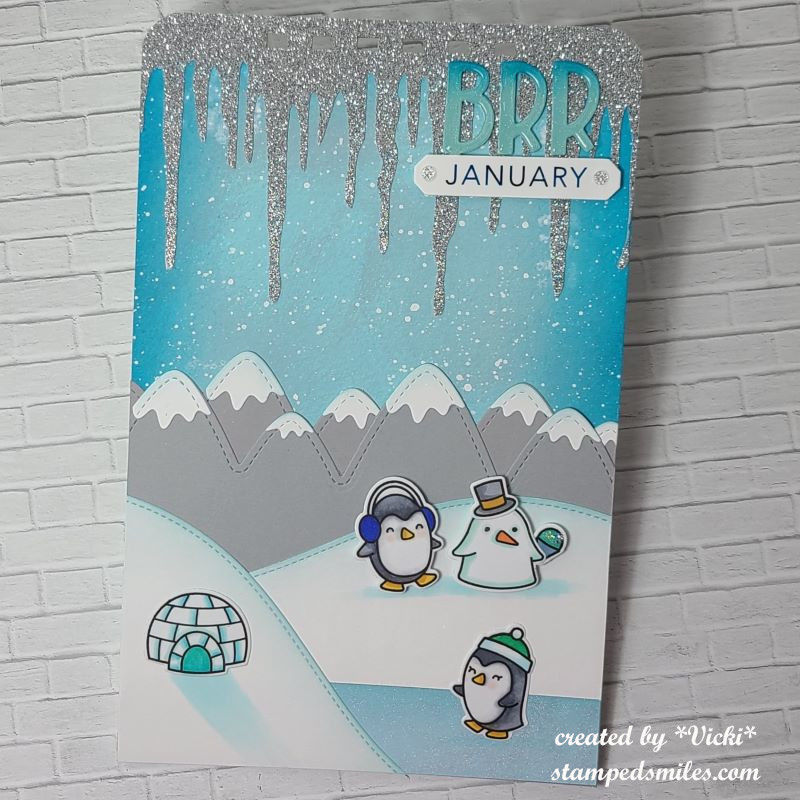
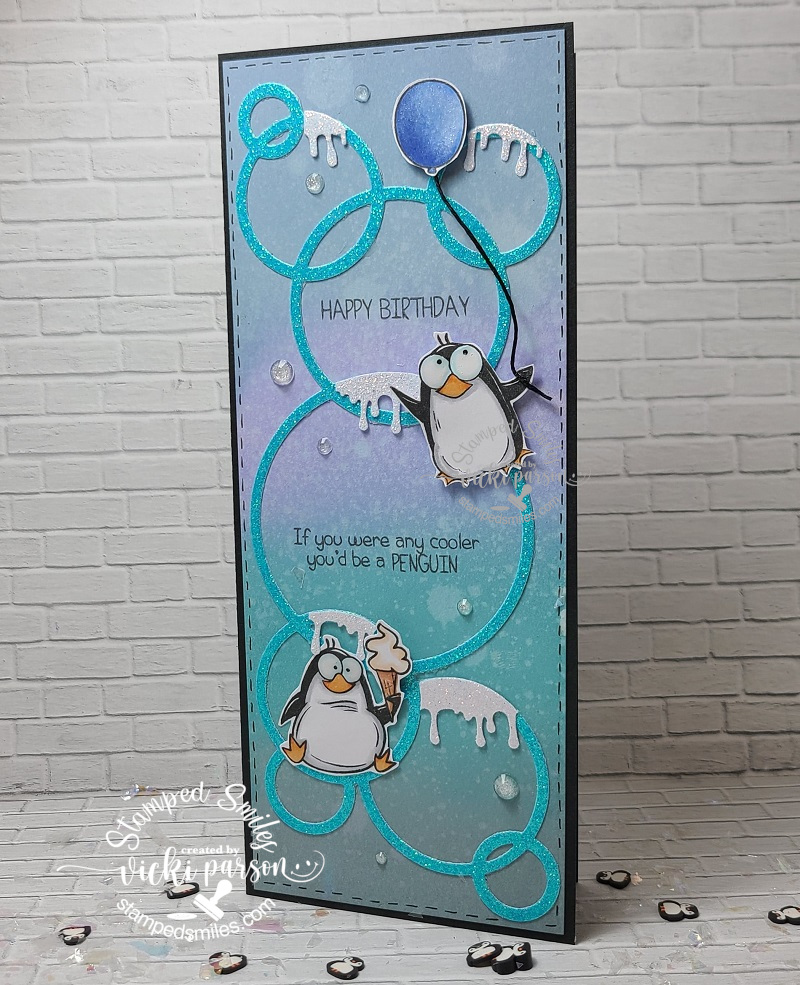
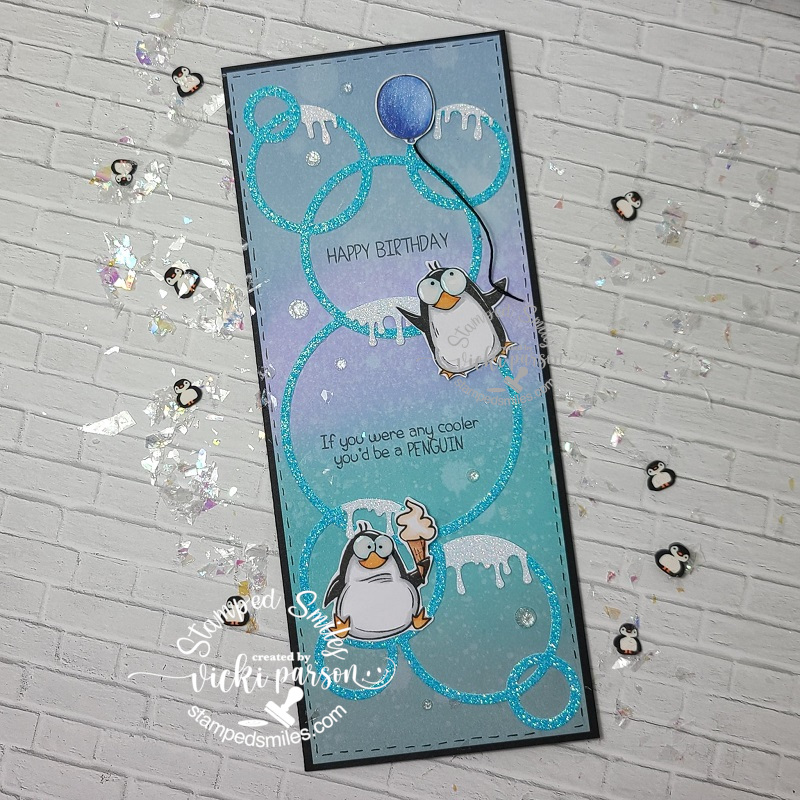
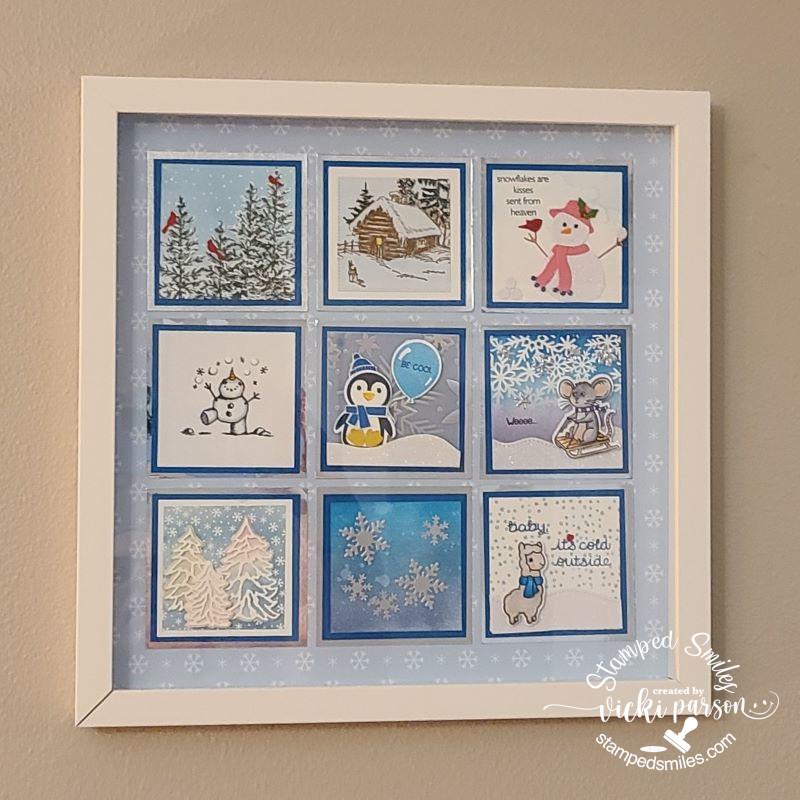
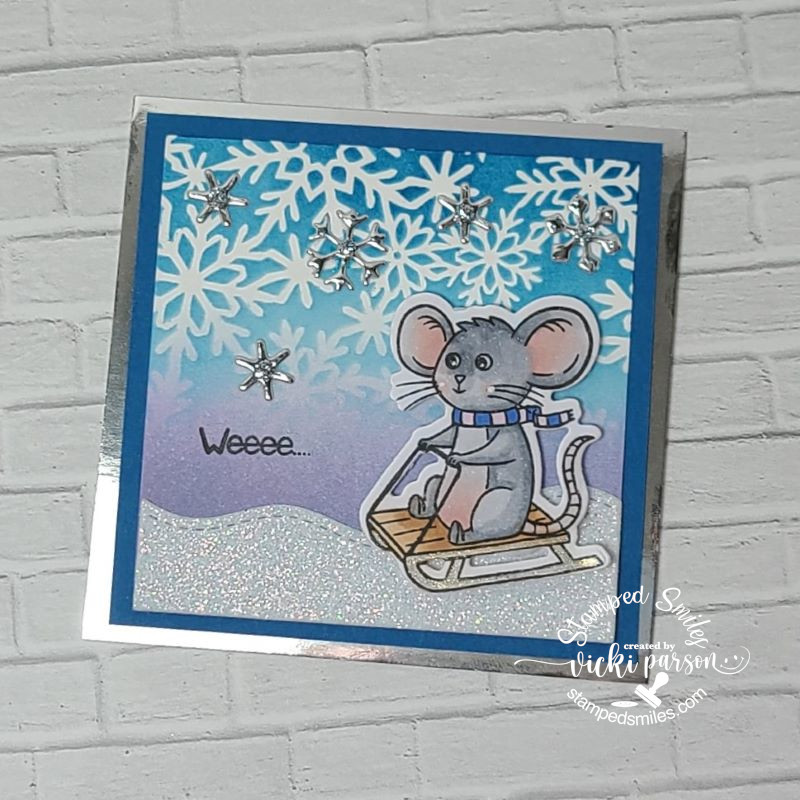
Of course when I think of cold, I think of my favorite animal…the penguin!!  I pulled out some Lawn Fawn stamps to use on my page today.  Lots of blues and silver and sparkle help with the feeling of cold too!  I have so many sparkly items, so it was great to use some up!

For the background:  I started with a piece of Canson Watercolor 140# coldpress 5.5″x8.5″ pre-punched holes at the top and covered it with blue colored acrylic paints using a baby wipe.  I also went around the edges with a darker blue and then used a number stencil with white paint which you can barely see as I’ve covered most of it up.  I then splattered with white paint using a fan brush for the snow.

  • I also found a cool icicle border and cut it out with my Cricut machine in silver glitter cardstock for the top of the page.  I then used my Zutter machine to punch the holes again and used a corner chomper to round the top edges.

For the bottom:  I used all Lawn Fawn border dies for the mountains and snow hills.  The blue ice water the penguin is standing on is just a straight piece of blue cardstock covered with a glitter brush pen.  I also used Stickles glitter to cover the snow cone that the penguin snowman is holding.

The lettering was done with a Lawn Fawn alphabet die that I ink blended in blues and covered with crystal effects.  I foiled over the “January” word with blue foil and cut it out with a die and placed a couple of silver rhinestones next to it.  This was popped up with foam underneath the “BRR” letters.

I hope you’ve enjoyed my AJ page today and have been inspired in some way!  Thanks so much for stopping in!

Challenges:

  1. Art Journal Journey – It’s On the Calendar (January is COLD!)
  2. Kreativ-Tanten – Snow
  3. Once Upon a TimeMr. Popper’s Penguin book cover
  4. Penny’s Paper-crafty– Anything Goes with Paper
  5. The Sisterhood of Crafters – Winter Blues

November AJ Page-Winter Wonderland

Hello friends!  Hope everyone has had a wonderful Thanksgiving for those that celebrate.  And with that, there is also the Black Friday deals, and today is “small business Saturday”.  So have you’ve gotten some really good deals or do you shop during this time?  I don’t really shop too much during this time, but I enjoy hearing about the great deals everyone has gotten!

The last Saturday of the month also brings us to the monthly Art Journal Page collaboration with my crafty friend, Carol (from Crafty-Stamper)! We get creative trying to use up our never-ending stash piles along with a prompt for each month.  I know she always has great inspiration to share, so please check out her blog too! Here’s my AJ page with the “SMASH OUR STASH” November prompt of “STENCILS” (can also make your own):

I do love stencils, don’t you?!  I have lots of them in my stash and I don’t always use them as much as I’d like to, so how fun to pull out several of them for this month’s prompt!  All of the ones I’ve used on my page are from Tim Holtz.  The entire page is stencil expect for the deer, sentiment and bottom snow!  (I would’ve used the deer for a stencil too, but I don’t have one.)

For the background:  Started with my usual 6″x9″ 140# watercolor pre-punched holes on the side.  I took the large star looking stencil and sponged some VersaMark ink over it towards the top of the page and heat embossed it with clear EP.  (This made a “resist” for the ink I layered on top.)  I took a long strip of masking paper and ripped it to create some hills for the bottom.  I needed to mask so the colors didn’t go over it.   I took several different colors of Distress Oxide sprays along with spritzing with water to help the colors move around and made a few layers with this.  Once dry, I went over the background with the dotted stencil and sponged ink over it with a blue color.

For the tree stencil, I needed to be sure that it would cover the background I created, so I used some green paint to sponge over the stencil, but because the background is blue, it’s sort of harder to see the green.  This stencil also had a second part where you can cover each tree with another layer for either another green or snow.  So I used some Hero Arts white paste to cover it with.  I also used the same paste to add another layer of stencil to the sky for snowfall.

The silhouette deer is a stamp that I stamped with black pigment ink and then I heat embossed it with clear EP.  My final touch to the page was to take the Hero Arts white paste and cover the hills at the bottom using my spatula.  Really love the dried look of the paste as it has a wonderful shine to it which works great for snow!  It didn’t take as long as I thought it would to dry. (About 2 hours it was hardened.)

I found a couple of the Tim Holtz sticker quotes to go with my theme, added to black cardstock and went around the edges with a silver paint pen.  I cut them out with scissors and glued to the page.  I took some silver wax and went around the edge of the page with my finger and lastly added some glitter drops to a couple of the centers of the “stars” in the sky.

Hope you’ve enjoyed my art journal page today or have been inspired!  I appreciate you taking the time to stop in! 

Challenges:

  1. Art Journal Journey – Nature (I love nature in the wintertime!  So pretty covered in snow!)
  2. Try It on Tuesday – Baby, It’s Cold Outside!
  3. Crafting From the Heart – Anything Goes
  4. Creative Artiste – Anything Goes Mixed Media (stencils, pastes, paints, inks)
  5. Stencil Fun – Anything Goes using stencil(s) optional: leaves
  6. 613 Avenue Create – Anything Goes optional embossing (heat embossed)

Winter Animals for Sparkles Monthly Challenge

Hello friends!  I hope you’ve had a great start to your November so far!  It’s been a few minutes since I’ve posted, but I have to say that I’ve been pretty busy in the background!  Hoping to share what I’ve been up to soon!

Today begins a new challenge over at the Sparkles Monthly Challenge!  This month, we’re looking to see some WINTER ANIMALS!  I hope you can join in the fun with us!  A reminder that this will be the final challenge for the year as we’ll be on Holiday break until January.  Here’s my take on the theme:

My first thought of a winter animal is a penguin of course!  I’m a huge fan of them and have so many in my collection…including other than stamp related!  These guys are really enjoying winter on this scene!  I’m using the My Favorite Things Playful Penguins stamp set and I started with a stencil from MFT that has “pond” shapes and lightly stenciled the soft blue for a place for my “ice platform” to be.

After creating the “ice pond”, I used some tape to mask off the bottom portion so that I could ink blend a sky at the top.  I used some White Opaque Copic and splattered it over the sky area.  I then used another MFT stencil to create some snow drifts in the background.

The two penguins, igloo, ice pad and sign were stamped, colored with Copic markers and die cut out to be placed over the scene.  I added the flattened penguin to the ice pad and then had the igloo in the background while the sign and penguin are waiting at the side of the pond.  I used a pen and wrote “FREE RIDES” on the sign.

I finished it off with a glitter pen over the “ice pad” and igloo and then used some Stardust Stickles over the snow on the sign.  I thought it needed some more snow falling down, so I took some sequins and added it to the scene.

If I were on that scene, I would probably be more like the flattened penguin on the “ice pad”!😆  How about you?  Do you like the snow?

Thanks so much for joining me here!  I hope you like my penguin card and will sharing your favorite winter animal in the challenge too!  Have a great day!

Challenges I’d like to enter this card for:

  1. Pearly Sparkles – #90 Christmas/Winter
  2. Craft Rocket – #109 Wintertime (No Christmas)
  3. Crafty Animals – Anything Goes with animal(s)
  4. Critter Crazy – Anything Goes featuring a critter(s)
  5. Love to Scrap – #164 Anything Goes
  6. Crafty Calendar – Anything Goes
  7. Creative Moments – Winter
  8. Penny’s Paper-Crafty – Anything Goes

Class Fun & Square Samplers + Give Away

Happy April friends!  We have finished March already and onto Easter very quickly approaching!  I hope you’re enjoying all things Spring coming up your way!  We’ve had several storms and we’re in the tornado season as well, so I hope everyone is staying safe out there whatever the weather.  I do have some things that I had previously finished and wanted to share:

First, I wanted to share about the Virtual Stamp Joy Event by Taylored Expressions that I participated in a few weeks ago.  I always have so much fun and enjoy the motivation that it seems to generate!  I’m sharing them in the gallery below, so if you’re on my website post, then just click on each photo to enlarge it.

  • The first four photos were from a class using the same floral stamp set and the others are from the next day of make-n-take projects.  Please let me know if you have any questions about any of them!

The last set of four cards were a “mass production” using a background stamp in different colored cardstock panels and clear heat embossing over them.  The class sample had “hello” sentiment on each one, but I changed up the sentiments and have placed them in a card box to give them out with envelopes as a gift for someone.

Hope you’ve enjoyed the inspiration as much as I enjoyed putting them all together!


From the end of last year up until this last month, I didn’t have much time with the Holidays and everything going on, but as you may have seen in previous posts, I participate in a “square sampler swap” and when everyone sends out their squares, we then complete a home décor piece with all of the squares, so I thought I’d share mine finally completed:

  • CLICK PHOTOS BELOW TO ENLARGE

This was for the Christmas Sampler SWAP and you can see that I’ve used a black shadow box frame for my sampler and placed some red with red metallic dotted paper behind it.  The square on the right is the one that I made. (I’ve used My Favorite Things products for my square.)

This was for the Winter Sampler SWAP and I went with a white shadow box for this one.  I’ve placed some soft blue snowflake papers for behind my sampler as I thought it was soft enough to not look too busy.  The square on the right is the one that I made. (I’ve used Inky Stamper products for my square.)

And recently we finished up our Spring Animals Sampler SWAP that I used another white shadow box for the sampler.  I’ve added a piece of pink colored “Watercolor Wishes” paper from Lawn Fawn behind it.  It looks a little off in the photo, but it looks better IRL.  The square on the right is the one that I made.  (I used Taylored Expressions products for my square.)

Not sure if we’re doing any more or not, but I had so much fun making the squares to swap with friends!


Lastly, I have a fun little thing to give to whoever is interested in these Taylored Expressions dies + foil-it panels package. (It’s not sold in stores anywhere as it was a free gift with purchase) I have an extra and so I thought I’d give it away to someone!  Just leave me a comment below if you’re interested and I’ll pick someone from the comments.
Leave a comment below if you’re interested!

That’s all I have for today!  Thanks so much for stopping in!  I’ll be seeing you soon!

Warm Wishes & Christmas too!

Hello friends!  Gosh, it’s been a few minutes since my last posting, but I’ve not been with a computer for a while and I haven’t been able to post or see what’s been going on in blog world.  I’m still without sound, but hopefully I’ll be fixed with that soon as well.  After you get used to a computer, it’s time consuming trying to set everything back up on a new one and make sure you have all of your stored photos/files too!  I’m getting there though!

Everything was a bit busy at the end of last year and I was not able to get around to participating in some classes that I’ve been wanting to do.  Unfortunately with no sound, I couldn’t hear the videos, but I managed to easily figure things out anyway along with an instruction print out.  So I was happy to get these Christmas/Winter cards finished:

I absolutely fell in love with the Lawn Fawn Ugly and Bright stamp set and I wanted to play with it and participate in their “Create with Us” class using it.  I colored the stamped pieces similar to the class, but I didn’t have the same snowflake stencil for the background, so I pulled out my Taylored Expressions Let It Snow stencil (retired) to use for it.

The critters as well as the letters were popped up with foam tape and I’ve added some loose glitter to the speech bubbles, and hats.  I used some LF chunky glitter to the bottom section of the letters.  The letters were die cut from the LF Henry’s ABCs and colored with Copic markers. 

And this one was also from the class using the same products as above, except the large sentiment came from the LF Giant Merry Christmas die and this time it was ink blended and sprayed with a shimmer spray.  This was also popped up with foam tape along with the speech bubble and Santa hat.  I was happy about the colors on this one and thought it was fun to put together and color.

For this last card, it was not a part of the class above, but I still wanted to play a bit more with the set and I had an extra deer critter cut out and colored and ready to be clothed!  For this one I decided to keep it as just a wintry theme so it could be used for Christmas OR non-Holiday-ish.  I pulled out the Lawn Fawn Snow Flurries Backdrop die to cut out a frame over top of a piece of the LF Knit Picky Winter Paper Pack that was ink blended along the edges and attached to an A2 top folding card base.

Thought that the deer looked a bit plain with no “grounding”, so I die cut a piece from some silver cardstock for him to stand on. (retired MFT die set) Added some glitter to his hat and sweater and popped him up with foam tape.  I wasn’t sure if I wanted to add some sequins, dots or other snowflakes to it, so I left for now.

  • Really sorry if you’re over with anything Christmas, but I am just happy to have finished the class and hopefully it won’t take me as long to get to the next one…which has already been out, and I haven’t gotten to yet! 🤨

Thanks so much for stopping in today and hope that you’ve been inspired in some way!  I will be doing my monthly AJ page Saturday, so I hope you’ll come back to see this month’s inspiration.

Challenges:

  1. NBUS – #46 New LF! Yay!
  2. Merry Little Christmas – Anything Goes Christmas
  3. Christmas Kickstart – Masks and Stencils
  4. Once Upon a Time – Snowy Day (third card)
  5. 613 Avenue Create – Anything Goes optional winter theme
  6. The Corrosive – Anything Goes
  7. Pammie’s Inky Pinkies – Anything Goes

November AJ Page-Peace Love and Hope

Hello friends!  Hope that you’re having a wonderful weekend and I can’t believe we’re looking at the end of November already as well as almost the end of the year too!  Since I’ve been doing most of my post this month with guesting for Inky Stamper, it’s time to change it up a bit.

At the end of the month, I do an Art Journal page and collaboration with my crafty friend, Carol (from Crafty-Stamper), so please check out her blog for her AJ page too!🥰  We’re trying to get creative by using up our never-ending stash piles!  So here’s my Art Journal inspiration with the “SMASH OUR STASH” November prompt of “washi tape/stickers/border stickers, etc” :

So with the Smash our stash theme, I went through and pulled out so many stickers in my collection…and then realized that I’ve had some of these things for such a long time!  I couldn’t use them all, but I made something work with a fun Christmas theme in mind.

For the background:  I started out with my pre-punched holes at the top of my 140# cold press paper sized 6″x9″ and covered the bottom portion of the page with some Tim Holtz Christmas themed washi tape.  I thought it was a bit too bright and went over it with some white paint and a brayer.  I also took a collage paper of Christmas music sheet paper and stamped a couple of different images over it to further the collaged background.  I also covered this area with a thin layer of mixed media silver paint.

I die cut a pine tree and sponged some inks around the edges and turned that as well as the die cut sparkle snowflakes into stickers using my Xron machine.  I stamped the two deer in black ink and heat embossed over it a clear EP.  I then took a Tim Holtz stencil and used some sparkle texture paste over it for snow. (Before I attached the larger snowflake stickers.)  I also splattered the page with some white paint too…lots of snowfall going on!

For the wording:  I had some black thickers (as they call them, which are thick foam letter stickers) for the “PEACE” and then the other words are stickers from my stash.  The heart is from the thicker sheet too.  I took some silver rubbing paste with my finger and went along the edges of the page as well as the thicker letters to add some interest.  Lastly: I made a “snow ground” for the deer by applying some glue and covering it with some glitter crystals.  I also added some black gem stickers to the center of each snowflake sticker.

I hope you’ve enjoyed my art journal page today and have been inspired in some way.  Thanks for much for stopping in and I’ll see you soon!

Challenges:

  1.  Art Journal Journey – Collage Fodder and/or Food and Drink (collage fodder here)
  2. Mixed Media Lovers – Letters/text/quote 
  3. Creative Artiste – Anything Mixed Media
  4. Creative Moments – Winter
  5. Arty Divas – Anything Goes
  6. Simon Says Stamp Wednesday – NOT a card

Winter is Shaping Up With Interaction!

So after getting my calendars ready to start the year off, which is easy to sit and craft during the cold snowy winter where I live, my mind turned to winter when creating!  Sometimes it’s nice to create with a “snowflake/winter” theme because I think they can be used interchangeable for Christmas or just a “warm winter greeting” for someone!  (Or… because you might be late sending one out or for those friends overseas that won’t arrive one time!)

Today I’m sharing a card that I’ve made for this month’s Inky Stamper challenge on FB with the theme: “Shaped Cards.”

Vicki-InkyStamper-Janchallenge-shapedcard

Isn’t she cute?!  I was trying to come up with a different shape besides a regular circle, etc.  So, I looked up “coloring pages for kids” free online and found this one that I resized to what I wanted and printed it out over some light purple cardstock.  I used another printed one as a template so that I could cut another one out over a folded cardstock piece to create a shaped folded card design. (You can partly see the back piece in the photo.)  The sparkly “ball” at the top was just die cut out from a scallop circle die with sparkly silver cardstock.

For the card front, I used the Inky Stamper Snow Angel stamp set to stamp the snowflakes in the background with some purple ink.  I white heat embossed the sentiment over and wanted it to stand out a bit more, so I sponged some more light purple ink over top of it.  I colored “Rosie” over Copic blending card and used the die to cut her out with.  I’ve die cut a couple of the large snowflakes from Lawn Fawn with white cardstock and layered them over the beanie hat.  You can see that “Rosie” is popped out a bit over that snowflake, which is where I’ve added a “wobbler” to her.

I finished the card with some sparkly Icicles sequins mix.  I filled the centers of them with some Silver Stickles.

Because of the “ball” on top and the length of the “beanie band”, it needs to be in a 5.5″ square envelope to mail.  You could also make your own envelope which I do all the time anyway.  But the 5.5″ size fits perfectly.

*Speaking of Inky Stamper things, this past prior weekend there was an OOAK event (on FB) that Inky Stamper was a part of, so of course I wanted to get the kit and play along too!  Here’s my results:

The top card is an interactive “Theater Fold” design.  (All of the pieces were included with the kit along with an instructional video/class.)  She usually always includes a mini bonus card which measures about an ATC size. (3.5″ x 2.5″) She used the “icicles” from the stamp set, but I decided to stamp and cut out another snowflake for the front of mine.  I added a pretty gem to the center of it.

And of course, that’s not the ONLY fun I had during the OOAK event!  I decided to play along with the always cute and funny Riley and Co. as well!  Here’s the set of cards created from that class:

I just thought these were so cute with the cow images and their little outfits along with the “Funny Bone” sentiments!  The instructions came with the kit which were really easy to follow along with.  I basically looked at the photos and put together the pieces from the kit.  For the clouds, I decided to pull out some sparkly white flock to cover them with.  They have a nice soft feel to them!  They just make me chuckle and I think it will be fun to send along to someone who needs a smile! 😉

*If you are visiting my website, then you can check out each one of these cards in the gallery below by clicking on the photos to enlarge them: (I’ve found some coordinating envelopes from my stash for each card.)

I sure hope that you’ve enjoyed my post today and have been inspired in some way!  Really appreciate you stopping in and I’ll be seeing you soon!🥰  Stay warm!

Challenges (For Winter Beanie Hat Shaped card ONLY):

  1. Challenge Up Your Life – Winter Fun
  2. Papercraft – Winter Wonderland
  3. Creatalicious – Anything Goes with optional winter
  4. Make My Monday – Winter-Wherever You Are (snowy and cold!)
  5. Make the Cards – Encouragement (You’re unique sentiment)
  6. Aud Sentiments – Anything Goes + sentiment

Christmas Chaos Finish Line…

Hello friends!!  I sure hope you’ve all had a wonderful Christmas! I am sure looking forward to starting a New Year as well!  Moving on to positive things for sure! 😀

**Needed to apologize for anyone who subscribes to my blog via e-mail and couldn’t get the link to work from my last post.  I don’t know what happened, but it got “wonky” when I scheduled it.  CLICK HERE for the link to that post if you didn’t get a chance to view it.**  THANK YOU!

Although I’m finished with sending out my Christmas cards, I still enjoy creating for Christmas and can ALWAYS get a good start on Christmas cards for the next year too, so that’s what this fun “Bugaboo Holiday Chaos” challenge event has allotted me to do and have some fun!  So, this post will finish up the last of my projects for that event before the deadline is up! (To see the first 3 challenge projects, I made CLICK HERE for that post.)

Here are my projects to finish up the challenges:

This card was made for the Holiday Chaos Bingo Challenge on Day 4.  There was also this really adorable freebie up that day, so I wanted to be sure to grab it while it was available.  This is the Kidz Reindeer image and I enjoyed coloring him up for my card here. For the Bingo, I used the middle row across, but could also have used the first row down or first square diagonal too. (See photo below)


I happened to have some Christmas Lights pattern paper with some of the green lightbulbs foiled on it.  I thought the green shimmer ribbon would go well with that and break up the “busy-ness” of it!  I took a Christmas Lights die from Lawn Fawn to attach across the card and image panel and then white heat embossed a sentiment at the bottom.  I’ve used some glitter for the snow around the image and then I’ve covered all the Christmas Lights with glossy accents. 

If you know Bugaboo Stamps, then you got to love Stella! 😂  This was made for Day 5 Holiday Chaos with the theme “Make Us Laugh”.  So of course, my mind went to Stella, and I thought this Stella Calendar November was a good one for a laugh about now as we were just hit with a winter storm with snow and ice.


Found some snowflake papers and paired her with some purple colors along with just adding some silver glitter snowflakes to the design.  I added a button in the center of one of them and attached a sliver bow over top.

Stella’s glasses were colored in with a gel pen for the shine. 

This card was created for Day 6 Photo Inspired Challenge. I thought it was such a darling photo and I noticed that the deer in the photo was so large compared to that little girl and so I was trying to capture that detail about with the photo by making the Bugaboo Ornament Element and this cute moose that was actually part of a tag image that I fussy cut out and attached him to the ornament. (I can’t find the moose I used in the store.)  I die cut a snowflake and the “believe” word to attach over top of the ornament.  I then took the sweet Bugaboo Ava Mistletoe Fairy that I’ve colored and fussy cut out in a smaller size to place on my scene.


The scene was created with some white Glitterstock that was die cut with a hillside border die with some die cut pines behind it.  I also used an embossing folder for the snowfall in the background.  I colored the snow with a Copic marker under the images before I attached them to the scene.

And this card was made for the final Day 7 color combo challenge.  Plus, there was this really fun and cute freebie during the event that I grabbed up again before it expired, but it’s the Bugaboo AKV Reindeer Skate image.  I colored him up and even created an “ice rink” for him with a pen and then used a Copic marker to make a “skating trail” inside the rink and then I covered the entire area with a glitter pen for shimmer.  I also stamped some snowflakes above him and dotted the centers with a gold gel pen which was also used to color part of his scarf with.


I added some papers to the opposite side of the image panel and lined the center between with gold foil paper.  I also gold heat embossed a sentiment over a red banner at the bottom and attached three gold accents at the top too.  The base of the card is kraft. Hopefully I have met all the challenges. 😉

Thank you SO MUCH for joining me here today friends!  I will be back with just one more project for tomorrow as I need to meet another deadline for a challenge…so I’ll see you again soon!

Challenges:

  1. Catch the Bug – Holiday Chaos Day 4 BINGO!
  2. Catch the Bug – Holiday Chaos Day 5 “Make Us Laugh!”
  3. Catch the Bug – Holiday Chaos Day 6 Photo Inspiration
  4. Catch the Bug – Holiday Chaos Day 7 Color Combo
  5. Papercraft – #65 Snowflakes (second card)
  6. CRAFT – #581 Christmas the Last Stretch
  7. Alphabet Challenge – ‘S’ is for Snow Scene (third card)
  8. Lil Patch of Crafty Friends – #148 Anything Goes
  9. Christmas Kickstart – #45 Christmassy

Birthday Penguin Slimline🐧

Hello friends!  There are SO many things going on this month and I’m having such a hard time keeping up with all of it!  After having some computer issues and trying to figure out what’s going on…I realized how far behind I am with my crafting!  I have waaay too many new things I want to play with too!  Really hate it when that happens!🤨😅  Totally missed out on World Card Making Day this year…however…

..before the WCMD “Inspired By” challenge ends over on the Whimsy Stamps Inspiration Blog, I wanted to be sure to play along which is using one of the design team’s projects for inspiration to create your own project:

I have made this fun slimline card using the Whimsy Stamps Penguin Poop stamp set along with the Whimsy Stamps Slimline Connected Bubbles die for my card today.  I am a huge penguin fan and these guys crack me up so much!

I wanted to keep the colors in a cool tone.  Over a piece of Bristol Smooth watercolor paper, I’ve cut it down to fit over a black side folding 3.5″ x 8.5″ slimline card base.  (I use the 8.5″ measurement because I find the size easier to use with a piece of 8.5″ x 11″ cardstock.  Then I only need to cut at 7″ on the long (11″) side and score in half at 3.5″ on this same side.  I am then left with another piece for layering over the slimline card if I choose.)  It’s easier to remember also…which is something good for me right now! LOL!  I digress…

I’ve used the Pink and Main blender brushes to ink blend Weathered Wood, Shaded Lilac, Broken China and Stormy Sky Distress Oxide inks for the background and then I used a water spritzer to make the droplet pattern over it.

I’ve cut the Slimline Connected Bubbles die from some Brutus Monroe Mermaid Glitterstock and glued it over the ink blended background.  I had a left over border of a punched out goo drip from white glitterstock, so I used the die to cut out pieces to glue over top of some of the circles from the die.  I stamped the sentiments inside a couple of the circles where I wanted with black ink and then used some foam dots to pop out the stamped and fussy cut penguins.

Lastly, I’ve taken a black marker to make some stitch marks along the edges of the ink blended panel and glued on some clear sparkling crystals.

Here’s closer view of one of the penguins.  It was very easy to grab a couple of Copic markers to color them in with and they were pretty easy to cut out along with the balloon.  I’ve used a black twine to connect the backside of the balloon and added a dab of glue to the penguin’s hand.

I used a glitter brush pen over the balloon and then added some glossy accents to both of the penguin’s big eyeballs.

This was such a fun card to create and it will be perfect for a winter birthday I will have coming up soon!🥳  The way I’ve been crafting behind, this will help out to have ready on hand when I need it!

Thanks so much for stopping in today friends!  I hope you’ve enjoyed my slimline card and that it has brought you a smile!  I’ll be seeing you again soon!

Challenges:

  1. Whimsy Stamps Inspirations – WCMD Inspired By challenge (Bev’s card)
  2. Shopping Our Stash – #430 On Trend Slimline
  3. Crafty Animals – #43 Anything Goes + animal
  4. 2 Crafty Critter Crazies – #43 Anything Goes + animal
  5. Moving Along with the Times – #123 Animals and/or Birds
  6. Cute Card Thursday – #654 Anything Goes
  7. Craft Rocket – #75 Add Sparkle
  8. 613 Avenue Create – Anything Goes optional winged things

Inspired By Crafty Friends❤

Hello there friends!

I have to say thank you for your lovely comments and thoughts!  Sometimes, you just never really know about something or how someone feels unless you are told or you ask!  I’m really amazed that there are people I didn’t realize that actually cared if I posted something!  Even if you have stats on your postings, you still don’t know who really DOES like to see what you’re posting.  I’ve had some blog friends that have been around for MANY years, even before this blog platform and I’m so thankful for you guys!  I am always truly inspired by you all for sure!  Thanks for being around!❤  (Even if you don’t comment!!) 😉

I have another card that I didn’t get a chance to share as it was created at the end of February and I never fit it in to post, but I pulled out a very old stamp to play with because I was inspired by a friend to use it:

Vicki-ShellysPenguin

Maybe you have heard or seen the Whipper Snapper Designs stamps?  I’ve had this adorable little penguin for a while now and I think he’s long gone from the website.  I don’t see him in the store, but the name on the side of the wood stamp is “Ice Cream Penguin” and no date.  I have a small collection of their stamps and they’re all older as I haven’t bought anything from them in years and not sure why really.  I hold them in high regard like my old Peanuts Gang/Snoopy wood rubber stamps as you can’t find those any longer either!  I don’t part with them! LOL!

Anyway, inspired by my friend Shelly that was featured on Splitcoast Stampers as the FS681 “mcshmidty” Featured Stamper.  This is a challenge where you find a project from their online SCS gallery and use it as inspiration to create something.  Here’s the card she made that I fell in love with in her gallery:

IMG_6447_12216_by_mcschmidty
card by Shelly Schmidt “mcshmidty” on SCS

I thought it would be fun to use an older stamp I had (I love penguins) and create a birthday style card with it.  I have a few birthdays to celebrate in the colder months, so I was just trying to think ahead and I liked that this could be a masculine or feminine card to give out too!  I can’t remember where I pulled the pattern paper from, but the colors really caught my eye!  Instead of the strip like Shelly has on her card, I made my strip into a banner.  I used a snowflake instead of a sun and two enamel dots.

Vicki-ShellysPenguin-close

I stamped and colored him up with Copic markers.  I used some liquid applique for the end of his hat and dotted his cheeks with a white gel pen.  I used glossy accents over top of the cherry on his ice cream cone.

The sentiment was pulled out from an older My Favorite Things stamp set that I white heat embossed over black cardstock and cut apart.  I also used MFT stitched die cuts for the banner and circle image.

Vicki-ShellysPenguin-flat

I must’ve been in the mood for ice cream before I took a blog break as I just realized my last post had ice cream too! LOL!!  Hope you like my card as I was really inspired by my friend’s card to make it!

Thanks for dropping in and I’ll be seeing you soon!!

Challenges:

  1.  Splitcoast Stampers Featured Stamper – FS681 mcshmidty
  2. Crafty Animals – #38 Anything Goes + animal
  3. 2 Crafty Critter Crazies – #38 Anything Goes + animal
  4. Challenge Up Your Life – #123 Animals
  5. QKR Stampede – #396 Anything Goes
  6. Lil Patch of Crafty Friends – #131 Anything Goes
  7. Crafting Happiness – #47 Anything Goes/optional: birds