September AJ Page-Quiet Beauty

Hello friends!  I do not even know where this month went!  Wow!  I guess life has a way of keeping us busy and sometimes we just need to make time to take time.  I do hope that you’re having a great September month and looking to the Autumn season.  It’s my favorite season to be out in…I still need the cooler weather though!  I’m hoping for it soon!

Can’t believe it, but it’s time for another monthly AJ page with my crafty friend Carol (from Crafty-Stamper) who is collaborating with me to “SMASH OUR STASH”! We get creative trying to use up our never-ending stash piles along with a prompt for each month.  I know she always has great inspiration to share, so please check out her blog too! Here’s my AJ page with the “SMASH OUR STASHSEPTEMBER prompt of “WOOD”: 

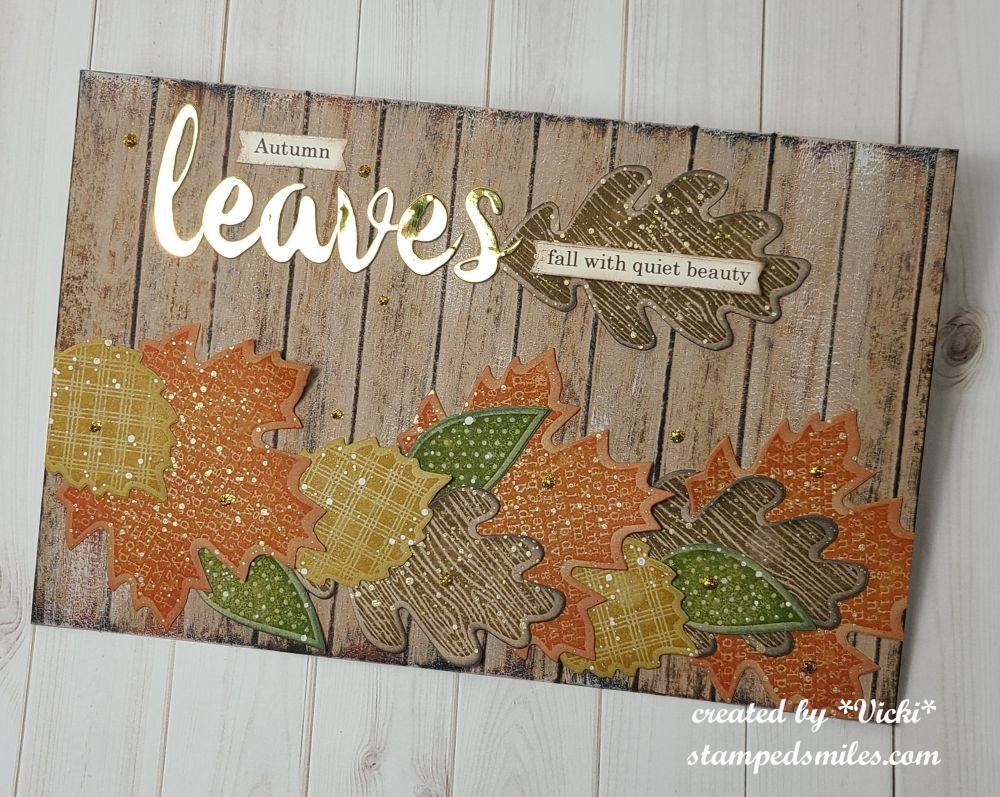
Although the temps are still unseasonably warm right now, I’m dreaming of those pretty Autumn colors and cooler temps!  I decided to get lots of inks out and make a background for this one to display my leaves across it.

For the background:  I started with a kraft piece of cardstock measuring my usual 8.5″x 5.5″ size and then at every 3/4″ I scored a line across the longer side edge.  So, using the score marks with the texture line facing up at me, I swiped  a few colors of distress inks in Vintage Photo, Walnut Stain, Rusty Hinge and Black Soot.  I then took a flat DRY paint brush and brushed down over the ink marks I swiped to brighten the colors.  It’s such a simple technique to make a background!

I definitely “shopped my stash” this time and pulled out a VERY old Stampin’ Up! stamp set called “Wonderfall” and the Bigz die to cut them out.  Those were the days where we didn’t have a MISTI tool to help us line stamps up! LOL  It’s much easier now with the MISTI!  So I splattered all of the leaves after the die cutting and stamping with metallic gold watercolor, brown and white Copic Opaque white.  I arranged them all over the background and attached them.

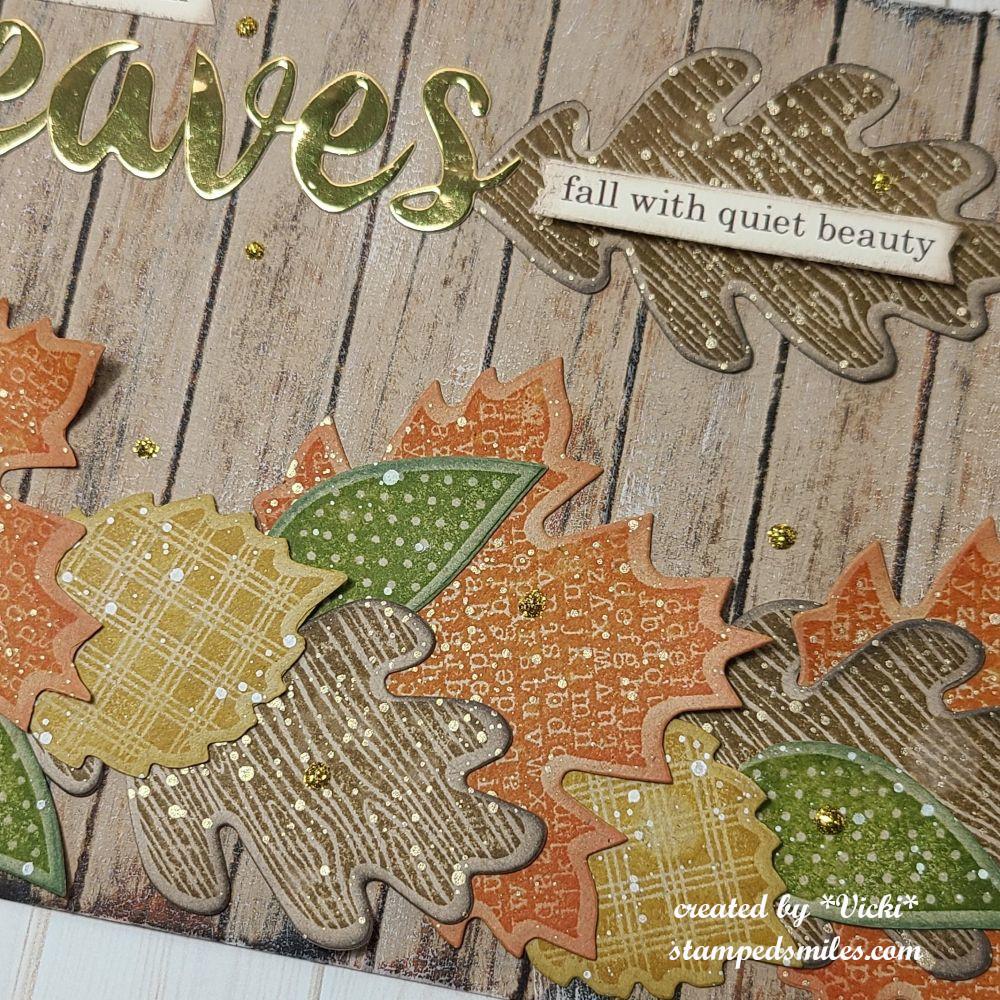
Here’s a closer view of the background so you can see how I’ve done it along with the details on the leaves.

For the sentiment, I die cut some letters from gold metallic foil cardstock and attached to background.  I used my computer to print out the other words and die cut them out with a banner die and sponged the edges.  I used foam tape to pop up the one over the leaf.

Lastly, I used some gold glitter drops to add a bit of sparkle to it.

  • Thanks so much for dropping in today!  I hope you’ve enjoyed my art journal page today!  I hope you’re able to get outside and enjoy your weekend!

Challenges:

  1. Art Journal Journey – Make Your Own Background (wood panel/plank background with inks)

It’s CAS at Cute Card Thursday!

Hello friends!  I hope you’re having a great week so far!!  I had forgotten to give updates on the “bird nest” situation, but actually the last time we had checked, the baby bird hopped onto the roof next door and the mother bird was chirping at us and then the baby took off and flew away!  We never were able to get any more photos.  I think there was just that one baby bird that survived.  Now we have the empty nest in the tree.  We think another bird may be trying to build on it, but we don’t see anything.

Today is Thursday which means it’s time for a brand new Cute Card Thursday Challenge!!  The theme for this week is CAS (clean & simple)  Our sponsor is All Dressed Up, so be sure to play along for your chance to win!

Here’s my take on the challenge:

Vicki-CCT586-ADU

I have used this really cute image kindly donated by our sponsor called Dreaming of Summer.  I love the “dreamy” pose she has!  I thought she would look so cute propped up over a fence, so I made one for her!

**Sometimes, CAS puzzles me as to the “definition” of what it TRULY is.  To me, it is a bit different to some than others.  I feel it to be more like an “art term” where everything is subjective in it’s form and if I have to think about it TOO much, I’m not being “me” and having my fun with it…so I just create weather it is considered simple or not.  🙂  For me, this seemed like a CAS design.**

First, I colored up the image and then stenciled on some clouds behind her.  I took a craft knife and cut out just the bottoms of her elbows.  I stamped another panel with a woodgrain stamp in gray colored ink and then used a punch with a sharp point to create the “planks” for the fence.  I sponged around the edges with more gray ink and then I tucked the fence panel underneath her elbows and attached it to the image panel.  I cut out these pieces with a stitched rectangle die and layered that onto a piece of black cardstock that was layered over an A2 top folding white card base.  Lastly, I added the die cut “hello” with black cardstock in the corner.

Vicki-CCT586-ADU-close

Here’s a closer look at the coloring I’ve done on this image.  I’ve colored her in with Copic markers and then for the tiny butterflies, bees and flowers around her, I’ve used some metallic gel pens to color them with.  You can see the shimmer on them.

I’ve also taken some liquid pearls to place some dots around her as well.  I thought it made her look a bit more whimsical.

You can also see where her elbows are lifted up over the fence panel too.

Vicki-CCT586-ADU-flat

Thanks so much for stopping by!!  See you soon!!

Challenges for this card:

  1.  All Dressed Up Challenge – Anything Goes + ADU image
  2. Craft Rocket – Summer is Coming
  3. Happy Little Stampers – Anything Goes with Dies
  4. Crafting From the Heart – Anything Goes
  5. Crafty Creations – #392 Anything Goes