Let it Snow for 2 Crafty Critter Crazies

Hello friends!  Happy November!  The weather has come in full force with the several inches of snow that came over our area on Halloween!  I blinked and Fall was over!   I don’t ever remember it snowing this early before, but I guess it’s very fitting for my card today then! LOL!

Since today is the first of the month, we begin a new challenge over at 2 Crafty Critter Crazies and the theme is always “Anything Goes + use a CRITTER” and it can be any type of crafty project you like to make!  Hope you will join us this month and share your lovely critter creations!

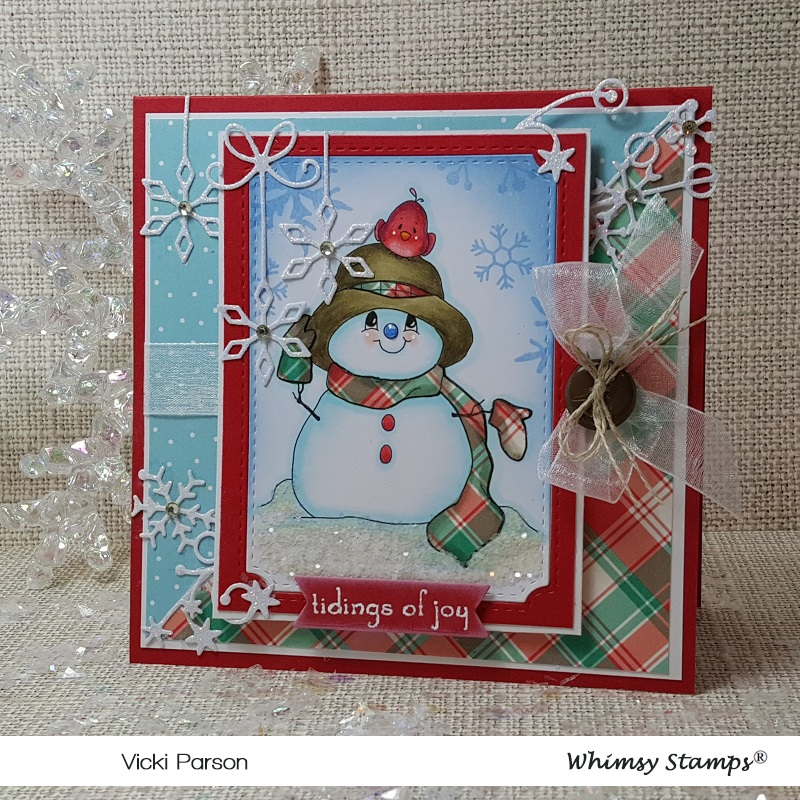
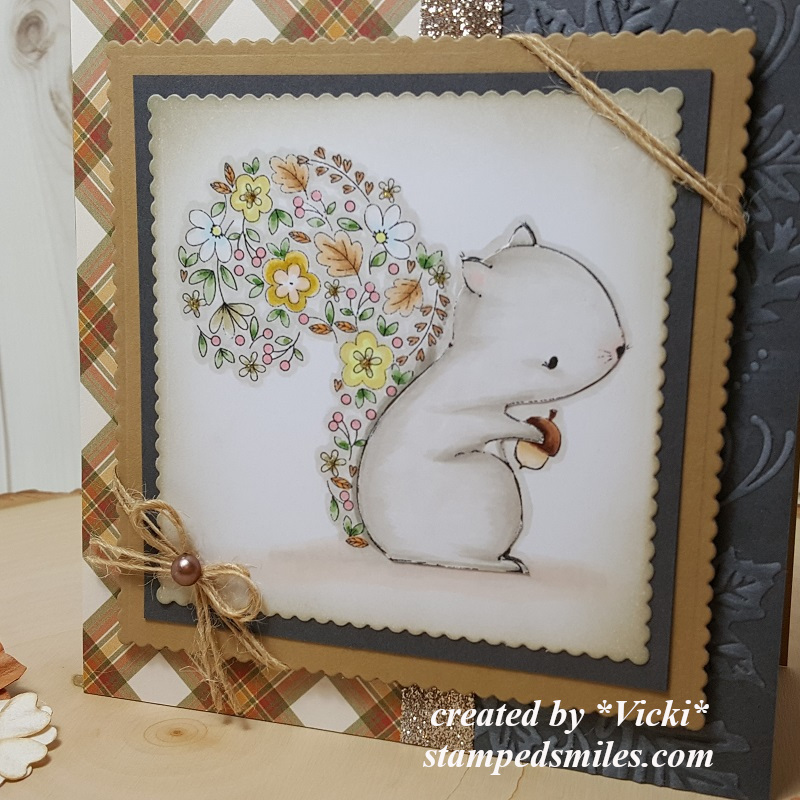
We are sponsored this month by The Paper Shelter and here’s the card I made:

Vicki-2CCC32-TPS

We were provided an image set to share for the team, and this beautiful set is called “Holy Night” and it comes with both the regular digital image, plus a colored version as well as some beautiful background scenes to go with it.

For my card, I printed out the “non-colored” image and used my Copic markers to color it and then used some oval dies to cut it out.  I also stamped a sentiment from Whimsy Stamps at the bottom of the oval.

I printed out the background scene paper and sponged around the edges with some blue ink that I’ve also sponged around the oval edges as well.  I added some silver metallic ribbon around the background layers and slipped the brown oval layer behind the ribbon.  I die cut some MFT snowflakes with silver glitter paper and added them around the card design.  These background layers were then mounted over a top folding white 5″ square card base.

I popped up the oval image panel with craft foam and then added a few rhinestones in the center of the snowflake over the oval and the one in the center of the bow.

Vicki-2CCC32-TPS-close

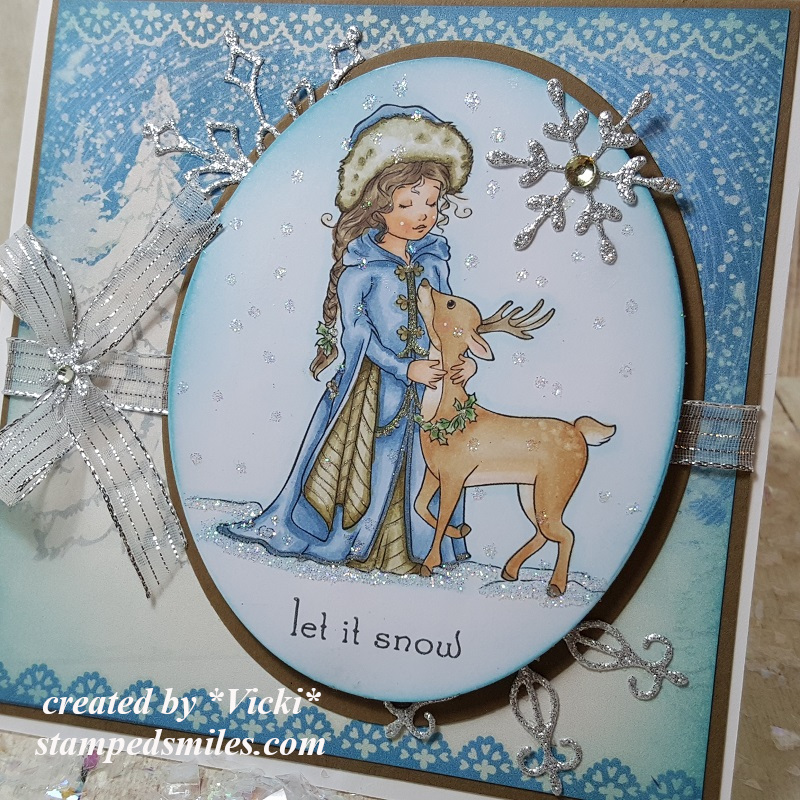
She looked a little Vintage to me and with the wintry papers, so I wanted to color her outfit in blue tones and accent with browns. For the “spots” on the deer, I used my blender 0.

I wish you could see it better in the photo, but I’ve used a gel pen for accents around her outfit trimmings including the lines of the inside of her cloak.  I also used the gel pen for the “berries” in the holy around the deer’s neck and her hair piece.

For the snowfall, I took a glue pen to add the “dots” over the image and lined the ground with it and then sprinkled some glitter over the entire oval image.

Vicki-2CCC32-TPS-flat

I hope you’ve enjoyed my wintry card today and were inspired in some way.

Thanks so much for stopping in today and please stay tuned for another post coming up from me today!!

Challenges:

  1.  The Paper Shelter – #404 Make it Square (square card)
  2. Aud Sentiments – Anything Goes + a Sentiment
  3. CRAFT – Winter

Snowman’s Birdie Friend For Whimsy Stamps

Hello friends!  I really can’t believe how COLD it’s been our way especially for October!  We even have SNOW in the forecast!  Eeek!  Now that’s scary for Halloween!

So since Christmas is on the way, I suppose it’s a good time to get into the spirit of the cold with a cute little snowman and his friend from Whimsy Stamps:

Vicki-WSSnowmanBirdie-Oct29

This guy looks so happy that his bird friend found a place to rest on his hat! 🙂  This image is called Snowman’s Birdie Friend by Crissy Armstrong for Whimsy Stamps.

I wanted to make a nice little “snowy scene” for the image, so I took out the Whimsy Stamps Snow Flurry clear stamp set and stamped some of the snowflakes from the set around the top of the image panel.  I then die cut the image out along with creating a red “frame” with the Whimsy Stamps Notched Rectangles die set.  (To do this, I just glued the red frame made with the die onto a piece of white cardstock and then glued the image panel inside the red frame.  It’s the same size, so it fit into each other.)  At this point, I added some glue to the bottom area under the snowman and sprinkled on some chunky white glitter for the snow-covered ground.

Since I was following a card sketch (see challenges below), I took out some papers from my stash and cut them on a diagonal and attached them over a piece of white cardstock and then wrapped some white organdy ribbon around it before attaching it to the top folding red 5″ square card base.

I took the Whimsy Stamps Holiday Mini Sentiments clear stamp set and white heat embossed the sentiment over the red cardstock and cut it out with a banner die from my stash.  I popped this up with foam tape over the image panel.  I also had a snowflake die and a border snowflake die that I cut with some glitter cardstock and attached around the card design and added some rhinestones in different areas.  (I thought this helped add to the wintry scene of the image too.)

Lastly, I’ve added a brown button and natural twine over top of my white organdy bow.

Vicki-WSSnowmanBirdie-Oct29-close

Here’s a closer view of how I’ve colored in the image.  As you can see, I’ve done a bit of paper piecing on the image by taking the same paper from the right edge of the card design and using it for the scarf, mittens and hat band.  (I’ve used Copics to give it a bit of shading too, which you can see details below.)

Maybe a bit hard to tell in the photo, but I’ve added just a small dot of Glossy Accents to his blue nose.  There are also highlights with a white gel pen on his nose, cheeks and the bird’s cheeks.

Here’s the Copic markers I’ve used to color the image with:

  • Snowman’s Hat – E89, E87, E84
  • Bird & Buttons – E39, E37, E35, E32 (Y17 for beak)
  • Snowman’s nose – B26, B24 (R00, R000 for cheeks)
  • Snowman’s Shadows – B00, B000, B0000
  • Scarf and Mittens Shadows – W3, W1

Vicki-WSSnowmanBirdie-Oct29-flat

Hope you’ve enjoyed my card today and it has brought you joy in some way! 🙂  I sure had lots of fun putting it together!  Thanks so much for joining me today and I’ll see you soon!

Challenges:

  1.  Sketch Saturday – Sketch #587
  2. Crafty Creations – Anything Goes #401
  3. Jingle Belles – Rudolph and Friends
  4. Crafty Catz – Anything Goes
  5. Winter Wonderland – Merry and Bright
  6. QKR Stampede – Anything Goes #369

Merry and Bright for Whimsy Stamps

Hello friends!  Hope you all had a wonderful weekend!  I had another great weekend out with hubby, but this time we visited Starved Rock National Park.  Really amazing nature hike we took and I’m wore out!  I sure wish I was able to do more hiking than what we did, but what we did do was amazing.  I will share some photos soon of our last two weekends out.

For today I have a sweet image from Whimsy Stamps to share with you and another Christmas card that I was able to add to my pile which is always nice to have!

Vicki-WSPolarBearXmasTree

This little guy is so sweet trying to decorate his poor “Charlie Brown” Christmas tree here! LOL!!  This is another adorable Crissy Armstrong image called Polar Bear’s Christmas Tree.

I’ve cut out the image the whole length of the card front panel and layered it over a piece of black cardstock and then some red cardstock.  I was placed over a piece of digital paper that I printed out from the Whimsy Stamps Rustic Wood and Brick Digital Paper Collection.  I ran the edge of some scissors along the edges of it and then added some of the plaid ribbon along the left side.  I then mounted this over a 5.25″ square top folding black card base.

I die cut some pine boughs from green cardstock and arranged and glued it down over the strip of plaid ribbon.  I then added a plaid ribbon bow over top and then attached a black button with a twine bow in the center of that.

Vicki-WSPolarBearXmasTree-close

I’ve put a lot of detail into this image which is why I wanted this to be the main focus of the card.  I actually didn’t use too many different colors of Copic markers, but it took a while to get the “fur” looking the way I wanted.  (See list below.)

I started the scene by ink blending around the top edges and a bit around the sides with Weathered Wood distress ink.  After the ink blending, I took the sentiment from the Whimsy Stamps Holiday Mini Sentiments clear stamp set and white heat embossed it over the top right edge of the image panel.

For finishing details, I took some yellow chalk for around the star at the top of the tree for a glow look and then covered the star with some gold Stickles.  I brushed the red ornament with a glitter brush pen and then the “hook” was colored with a gel pen.

I covered the entire bottom of the image panel with a glue pen and then sprinkled on some clear glitter for the snow.  Lastly I’ve added some red “berries” to the garland that the polar bear is holding with some Red Nuvo Drops.

Here’s the list of Copic markers that I’ve used to color in the image with:

  •  Polar Bear – W9, W7, W5, W3, W1, W0, blender 0, R00 and white gel pen
  • Tree and Garland – E25, E23, YG67, YG63, YG61, R39, R37, R35
  • Snow Ground and Shadows – BG000

Vicki-WSPolarBearXmasTree-flat

I love the “woodsy” look to this image and I was trying to capture it in my design too.  I hope that you’ve enjoyed my Christmas card today and were inspired or helped bring you a smile!

Thank you so much for stopping in with me today and I’ll be seeing you soon!

Challenges:

  1.  Merry Little Christmas – Anything Christmas Goes
  2. Crafty Animals – Anything Goes + animal
  3. Christmas at Sweet Stampin’ – Anything Goes with optional: stars
  4. Crafty Creations – Anything Goes
  5. Simon Says Stamp Wednesday – Christmas
  6. CRAFT – Christmas
  7. Crafty Catz – Anything Goes

Whimsy Stamps New Release with 2 Christmas Tails

Hello friends!  It’s October 1st which also means it’s time for a brand-new release for Whimsy Stamps…I’m back to share a card I’ve made for the brand-new digital release at Whimsy Stamps.

Today I’m sharing a Christmas card I’ve made using an adorable image:

Vicki-WS2XmasTails-Oct1

These adorable critters are having some festive fun!  This image is by Crissy Armstrong called “2 Christmas Tails“.

This is an unusual size and card opening for me on this card, but I wanted to be sure that the image fit completely on the design I was creating.

So I started with a 4.5″ x 5.75” side folding white card base.  I took a piece of red foil paper and clear heat embossed the snowflakes over it from the Whimsy Stamps Basic Christmas Backgrounds clear stamp set.  I mounted this over a piece of gold foil paper, added the striped paper in the bottom corner, the oval cut image panel and tied a glitter ribbon around the layers and mounted it to the white card base.

I took the Whimsy Stamps Christmas Large Word die and cut it from some of the gold foil paper and layered it over top of the gold foil banner I created by black heat embossing the sentiment.  I finished it off with some snowflake rhinestones above the critters.

Vicki-WS2XmasTails-Oct1-close

Here’s a closer look at how I’ve colored in these adorable critters.  The photos never show everything about the details of the card, but it’s so cool in person! 🙂

I’ve used Copic markers to color this in.  Here are the colors that I’ve used:

  • Santa Hats & Candy Cane – R39, R37, R35, R32, BG000
  • Bunny – E35, E33, E31, E30, R20, R00, C3, C1, C0
  • Mouse – W7, W5, W3, W1, R20, R00
  • Bell – Y28, Y26, Y21, YG13, YG11
  • Ground/Shadows – E84, E81, C1, E0000

I used a white gel pen for highlights on the candy cane and parts of the bunny’s tail.  I also covered the bell with a glitter brush pen.  I took a glue pen and added some clear glitter over the hat trimmings.  To get the blue faded color around the image, I used the oval die I cut it out with as a “mask” to blend some blue distress ink softly over it.

Vicki-WS2XmasTails-Oct1-flat

I hope you’ve enjoyed my Christmas card today and have been inspired in some way!

Thanks so much for joining me today and I’ll be seeing you soon!

Challenges I’d like to enter this card for:

  1.  Crafty Creations – Anything Goes
  2. The House That Stamps Built – S2519 Anything Goes
  3. Creative Knockouts – Anything Goes
  4. Crafty Catz – #476 Anything Goes
  5. QKR Stampede – #365 Anything Goes
  6. Simon Says Stamp Monday – Let’s Get Ready for Christmas
  7. Crafty Cardmakers – Add a Critter
  8. Sketch Saturday – (I turned sketch)

Meow-lloween Party for 2 Crafty Critter Crazies

Meow friends! 🙂   It’s October and I’m always excited about this month because there are so many fun Fall activities that happen and I also really enjoy the Halloween atmosphere around this time.  I hope you’ll enjoy the fun right along with me!

Today, I’m excited to bring you my creation for a brand new challenge for this month over at 2 Crafty Critter Crazies!  Remember that it’s always an “anything goes” challenge PLUS you need to use a critter on your creation!

This month we’re being sponsored by Beccy’s Place and was generous to supply the team with an image to play with:

Vicki-2CCC31-Beccy's Place

I just fell in love with this adorable kitty from the Scaredy Cats digital set.  I think he’s all dressed up and seriously ready to “get this meow-lloween party started“!!

So fun to pull out some Halloween papers and colors for this card.  I usually like to add in some purple somewhere if I can, so I found some ribbon and thought it matched up with kitty’s hat.

I couldn’t help but to add a few more elements to this kitty by taking a spider image from a Tim Holtz stamp set and adding it to kitty’s hat.  I also stamped the stars at the top along with the sentiment from a Simon Says Stamp Halloween stamp set from last year…I think.  The web up in the corner is an older die from my stash that I usually pull out for Halloween creations.

Vicki-2CCC31-Beccy's Place-close

Here you can see how I’ve colored up this fun kitty with Copic markers.  I’ve also colored the belt buckle on the hat with a gold gel pen.

I used some Wilted Violet to sponge around the edges of the kitty panel after I stamped the stars at the top.

While I was filling the sequins with gold Stickles, I added a few dots to the starry sky for just a bit more sparkle.

Vicki-2CCC31-Beccy's Place-flat

Hope you’ve enjoyed my fun “meow-lloween” card today!

Thanks so much for stopping in today my friends and be sure to check right back again here today as I have another post coming soon!

Challenges:

  1. Tuesday Throwdown – Anything Goes
  2. Creative Moments – Anything Goes + optional twist: masculine
  3. CRAFT -Animals
  4. The Paper Players – PP461 Tic Tac Toe

Sending Snail Mail Hugs

Hello friends!  Yippee!  It’s finally “officially” Fall now! (According to the calendar anyway.) We are very slowly starting to get lower temps at least in the evening time anyway.  I’ve gotten out my Fall decorations and I’m ready!  How about you?

Today I have a very sweet image from Whimsy Stamps to share with you:

Vicki-WSLoveSlowMuch-Sept24

Awe!  I wouldn’t normally hug a snail, but I must say, this one is SUCH a cutie don’t you think?  This digital image is called “Love You Slow Much” from Whimsy Stamps-Sylvia Zet’s Wee Stamps Collection which was previously released as a rubber cling stamp.  So now you can have the option of choosing the digital or the rubber versions!

Of course, with Fall having started, I was really inspired to create with this cutie in some orange, yellow and tan toned colors!  With the exception of that blue bow tie on the snail, I’ve colored it differently as I think that makes him really stand out especially for dispensing hugs…or perhaps receiving them! 🙂

I’ve cut out the image with a stitched circle die and then die cut another larger circle in the orange color to mat behind that.  I’ve taken a piece of decorative paper from my stash with the wording and added some stitch marks along the edge of it with a black marker and then mounted it to a piece of white cardstock.  I wrapped some white organdy ribbon around these two pieces and mounted it onto an orange 5″ square top folding card base.

I took another piece of orange cardstock and die cut a tag out from an older Whimsy Stamps die that I have and then I stamped the “hugs” sentiment from the Whimsy Stamps Everyday Mini Sentiments clear stamp set towards the bottom of the tag and added it to the bow on the ribbon.  Lastly, I took some flowers and attached them around the card design.

Vicki-WSLoveSlowMuch-Sept24-close

Here’s a closer look at the coloring I’ve done on this image and used the following Copic markers:

  • Snail Body:  W7, W5, W3, W1, R00
  • Snail Shell:  E35, E33, E31, E30
  • Snail Bow Tie:  B26, B24, B21
  • Fairy’s Dress, Hair Flowers, Shoes, Wings:  YR07, YR04, YR02, BG000, C7, C5, C3
  • Fairy’s Hair & Skin:  E47, E44, E42, E41, E21, E11, E02, E00, E000, R20
  • I used BG000 and E0000 for around image and shadows
  • I’ve also used a gold gel pen for the center of the flowers in her hair and over the tiny marks behind her wings.  I’ve used a white gel pen for highlights in the Fairy’s cheeks as well as highlights on the snail’s shell.  I took a glue pen over her wings and added some clear glitter over them.
  • I’ve also used a Copic marker (unsure of color) to color a rhinestone for the center of the orange flowers.

Vicki-WSLoveSlowMuch-Sept24-flat

I hope you’ve enjoyed my creation today and that it has inspired you in some way!

Thanks so much for stopping in today!  I always appreciate your support!  I’ll be seeing you soon!!

Challenges I’d like to enter this card in:

  1.  Creatalicious – Anything Goes with optional circles
  2. Stamps & Fun = Creativity – Anything Goes
  3. The Paper Girls – Anything Goes
  4. The Fairy & The Unicorn – Fantasy Anything Goes
  5. Creative Knockouts – Anything Goes
  6. QKR Stampede – Anything Goes #364
  7. Creative fingers – Anything Goes
  8. Always Fun – Cute Critters

It’s Autumn at Cute Card Thursday

Hello friends!  Thank you for joining me!  I hope you’re all having a wonderful week so far!  It’s a tad bit warmer than what I’d like to see it be in September for sure, so I’m hoping it cools down soon!

Today starts a new challenge this week for Cute Card Thursday.  This week we’d like to see your “Autumn” creations.  We look forward to seeing what you create for it!

Here’s what I’ve made using one of our sponsor’s images:

Vicki-CCT599-ADU

This little squirrel is so sweet and I love how the tail on him was designed!  This is called “Bushy Tail” from All Dressed Up.  They’re sponsoring the challenge this week, so please be sure to play along for a chance to win!

I’ve dug out some papers from my Autumn stash of papers and picked some out that I thought would go with this image.  I layered a strip over a 5″ square piece of dark gray cardstock that I embossed with a leaf embossing folder that I was finally able to use!  I sponged a bit of white ink over the raised areas.

I also took some score tape and ran it down the center of the card and added some glitter over it and burnished it in.  The image panel was popped up over the card with foam tape.  I added some twine around each corner of the image panel along with a bow that I’ve placed a pearl in the center.

Vicki-CCT599-ADU-close

Here’s a closer look at the squirrel image that I’ve colored in with Copic markers.  I wanted to keep the squirrel looking a bit softer, so I’ve used some lighter colors.

During the fall is a good time to view all of the squirrels running around our yard trying to burry their nuts.  We seem to find them in silly places sometimes as they save them for later! LOL!

I die cut the image with a scalloped square die and sponged around the edges with some Pumice Stone Distress Ink and layered it over a piece of the dark gray and then layered it again over a piece of kraft cardstock.

Vicki-CCT599-ADU-flat

Thanks so much for stopping by and I’ll see you again soon!

Challenges:

  1.  All Dressed Up Challenge – Anything Goes + ADU image #96
  2.   Creative Fingers – Anything Goes
  3. Allsorts – Autumn
  4. Crafty Friends – Autumn Colors
  5. Creative Moments – Anything Goes with optional Fall Colors
  6. Sunday Stamps – SSC213 “Autumn Whisper” colors

It’s Anything Goes for Cute Card Thursday!

Hello friends!  Here we are with the first week of September already coming to the end!  Wow!  I think it may be time to start thinking about that “C” word! (Christmas of course!)

Today is a new challenge over at Cute Card Thursday today and we have our first of the month “Anything Goes” challenge this week!  We our sponsored again by the lovely Whimsy Stamps, so be sure to enter for a chance to win a fun prize!

Here’s what I’ve made with our sponsor’s product:

Vicki-CCT598-WSPenMistletoe-Sept5

I’ve used this really sweet digital image from Whimsy Stamps called “Penguins Under the Mistletoe” and of course Crissy’s penguins are so fun to color up!

I have followed a sketch for my design using a challenge (see below) and have pulled out some older papers in my stash that I thought looked really festive and went with the colors I have picked out.

I white heat embossed the sentiment from the Whimsy Stamps Holiday Mini Sentiments on the green colored layer and popped the image panel layered in red cardstock over top with some foam tape.

I’ve taken some silver glitter paper and die cut a few snowflakes from the Whimsy Stamps No-See All Season Tree die set along with cutting a strip for the top of the card too.

Vicki-CCT598-WSPenMistletoe-Sept5-close

Here’s a closer view of the image so you can see how I’ve colored it up.  I’ve used the following Copic colors below:

  • penguin bodies:  C8, C7, C5, C3, C1, R20, R00, Y38, Y35, Y32
  • Santa Hat and Candy Cane:  R39, R37, R35, R32, BG000
  • Mistletoe:  YG67, YG61 (berries are red Nuvo Drops)
  • Hat and Scarf:  BB26, B24, B21, BG000
  • Gift:  G09, G07, Y17, Y15, Y11
  • I used BG000 for snow ground shadows

I went around the edges of the image panel with Tumbled Glass Distress Ink and the ink foam blending tool.  I ten took my quicky glue pen and added some dots for the snow as well as underneath the penguins and sprinkled on some glitter.

Vicki-CCT598-WSPenMistletoe-Sept5-flat

Thanks for stopping in and I’ll see you again tomorrow for something fun!

Challenges I’d like to enter this for:

  1.  The Holly and Ivy Christmas Challenge – Anything Christmas Goes
  2. Sketch Saturday – Pick any sketch from 215-578 (I chose sketch #356)
  3. Merry Little Christmas – Anything Christmas Goes
  4. Love to Craft – September Anything Goes
  5. Pammies Inky Pinkies – PIP1935 Anything Goes
  6. ABC Christmas Challenge – ‘S’ & ‘T’ are for Sparkle and Texture

Birthday Wishes for Digi Doodle Studios

Hello friends!  🙂   Happy Labor Day!  I hope you’ve enjoyed your weekend and I hope you get a nice relaxing Labor Day Monday included with it!  I’m enjoying a nice relaxing long weekend hanging out with hubby.

I have a very sweet card to share with you today using an adorable image from Digi Doodle Studios:

Vicki-DDDS-PupParty-Sept2

Awe!  Such a cute pup, isn’t it?!  I love how sweet this one turned out with the colors which I thought would be great for a little one’s birthday.  I have used this adorable image called Jasper’s Cupcake for my card plus some really fun digital papers from the Let’s Celebrate Digital Background Paper Collection!

I based my card around the colors of those papers and I just love the little pops of blue in them, so I found some cardstock to match up with them and started to put together my card design.

I layered the “Birthday Streamers” paper over a piece of blue cardstock and then sprayed it with some “Shimmer Craft Spray” (Which I’ll be sharing in an up-coming video so stay tuned!)  Then I mounted these layers onto a pink A2 sized top folding card base.

I then took a strip of the “Birthday Chevron” paper and wrapped some white organdy ribbon around it and attached it to the front of the card base.  I added my colored image panel onto a piece of blue cardstock and then mounted this over a piece of pink cardstock that was cut out with a stitched scallop rectangle die.  Lastly I added a sentiment and punched it out with a circle punch and added a punched out scallop circle in pink behind it and popped it up with foam tape over the design.  As you can see both of the image panel and the circle sentiment was sponged around the edges very lightly with some blue ink too.  (I almost forgot that I took some white ink and sponged around the blue edges of the cardstock too!)

I then added my ribbon bow to the right side of the card and glued a pink pearl in the center of it and added on the sequins randomly over the card.  I really like how that blue frames this design and picks up the blues from the papers too.

Vicki-DDDS-PupParty-Sept2-close

Here’s a closer view of the image and how I’ve colored it in!  I just adore that pup and it looked like he needed a few extra “spots”, so I added one on his back and then gave him a darker colored tail and a different colored paw too!

After coloring this up, I took a glitter pen and covered the pink balloon as well as the frosting on the cupcake for a bit of shimmer.  You’ve got to make that frosting look sugary right?!  I wish you can see the shimmer more in the background because it looks really cool!  You can sort of see it at the top of the photo.  However, if you check out my up-coming video, I’m hoping the camera will do it justice!

Vicki-DDDS-PupParty-Sept2-flat

I hope you’ve enjoyed my little party pup card here today!

Thanks for checking out my post today!  I appreciate ALL of your kind thoughts!  I’ll see you again soon!

Challenges I’d like to enter:

  1.  {Cupcake Inspirations} – CIC477 Food and Drink
  2. Little Red Wagon – Foodie
  3. Watercooler Wednesday – WWC236 All About Occasions
  4. Crafty Animals – #30 Anything Goes + animal
  5. Pearly Sparkles – Add a Ribbon and/or Bow
  6. Sheepski Designs – Die Cuts and/or Punches

Bookmark for the 2 Crafty Critter Crazies September Challenge

Hello friends!  Welcome to September!  Can you believe that it is here already?!  I’m looking forward to all things Fall and seeing all the wonderful crafty inspiration from everywhere for sure!

It’s been a while since I’ve shared a post for the 2 Crafty Critter Crazies Challenge, but I’m so happy to be back with my design team friends for this month’s challenge!  The theme each month is always “Anything Goes + a critter“.  So if you make something with a critter on it, we want to see it!  We look forward to seeing your crafty critter creations this month!

Our sponsor for this month’s challenge is QKR Stampede and they’ve provided some fun images for the team to use in their creations.  Here’s my project:

Vicki-2CCCSept-QKR

September is the time we know that the kids are back at school.  I remember telling my boys that it was time for them to start “hittin’ the books!”  They never seemed to care for that too much though!  LOL!  Thinking back at those old school days, I thought it would be nice to create a school themed bookmark with this adorable image from QKR Steampede called Reading Books.

Speaking of learning, I pulled out some Distress Oxide Sprays and played around with them on my tag to see what results I got.  I was surprised at how nicely the colors blended together.  I then took a Tim Holtz stencil and inked it up with embossing ink and heat embossed the letters with a Brutus Monroe Raven Sparkle EP.

Not quite finished with my background, I knew I wanted to use some black seam binding ribbon for the top of my tag, so I grabbed some silver alcohol ink and dabbled the ribbon with it.  What was left on my glass surface, I took a fan brush and splattered some of it over the tag background.  I also rubbed it along the edges of the tag.

To give the bear image a bit of a “ground” to sit on, I took a strip of Brutus Monroe Black Glitterstock and attached it at the bottom of the tag.  Then for the word strips at the top, they’re from a cardstock sticker panel I had from an old card kit.  (They got splattered along with the background.)  Lastly, I just added a button with some twine in the middle of my seam binding bow.

Vicki-2CCCSept-QKR-close

And here’s a better look at this adorable bear image who’s studying really hard on his book!  I thought it would be funny to title the book for him.  So I took out my Copic liner pen and wrote in “Book of Honey” on the cover!  LOL!

I’ve colored up this image with Copics and fussy cut him out to attach to the bottom of the tag/bookmark.  I turned him over and rubbed a stylist over him to add some dimension to the image.  I popped him up with some foam dots over the black glitterstock strip.

Vicki-2CCCSept-QKR-flat

I hope you’ve enjoyed my bookmark/tag project today!  I had fun playing around with some media that I hadn’t had a chance to play with which was really fun!

Thanks for hanging out with me this weekend!  Hope you had fun or were inspired in some way!  I’ll be seeing you soon!

Challenges I’d like to enter:

  1. QKR Stampede – #361 Anything Goes
  2.  Simon Says Stamp Monday – ‘S’ is for…”Sprays, Stack of books, seam binding, school, study, stories, sit”
  3. TGIF Challenge – #TGIF227 Product Spotlight embossing powder