Animal Star Gazers

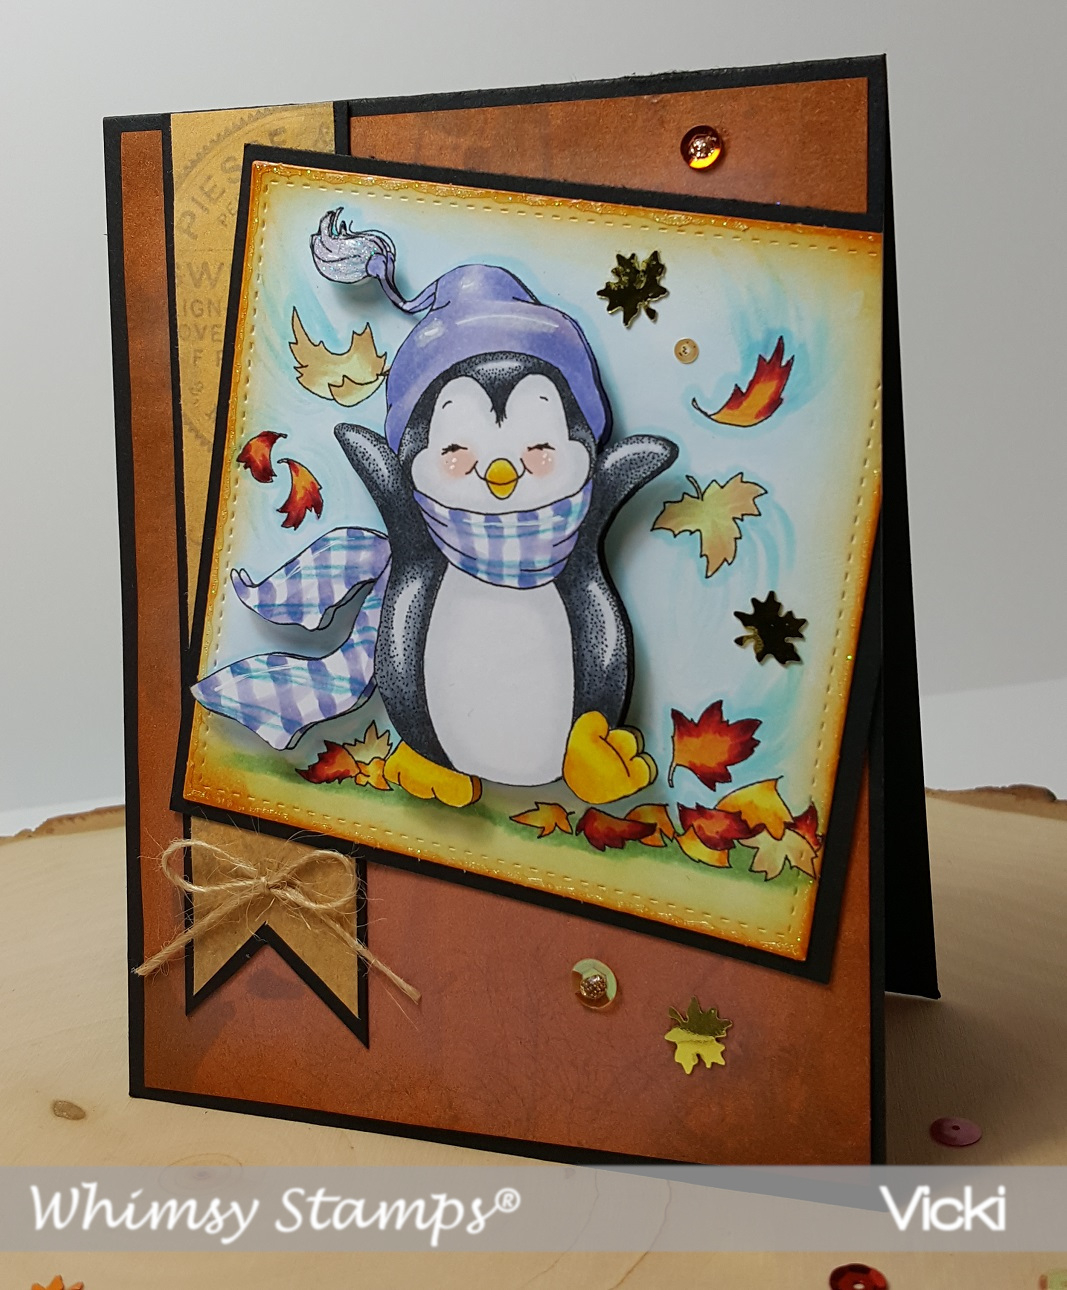
Good evening friends!  Just swinging by to share a card I made with some cute animal star gazers! 🙂  I thought evening would be an appropriate time to post it:

Vicki-LFUponaStar-Com

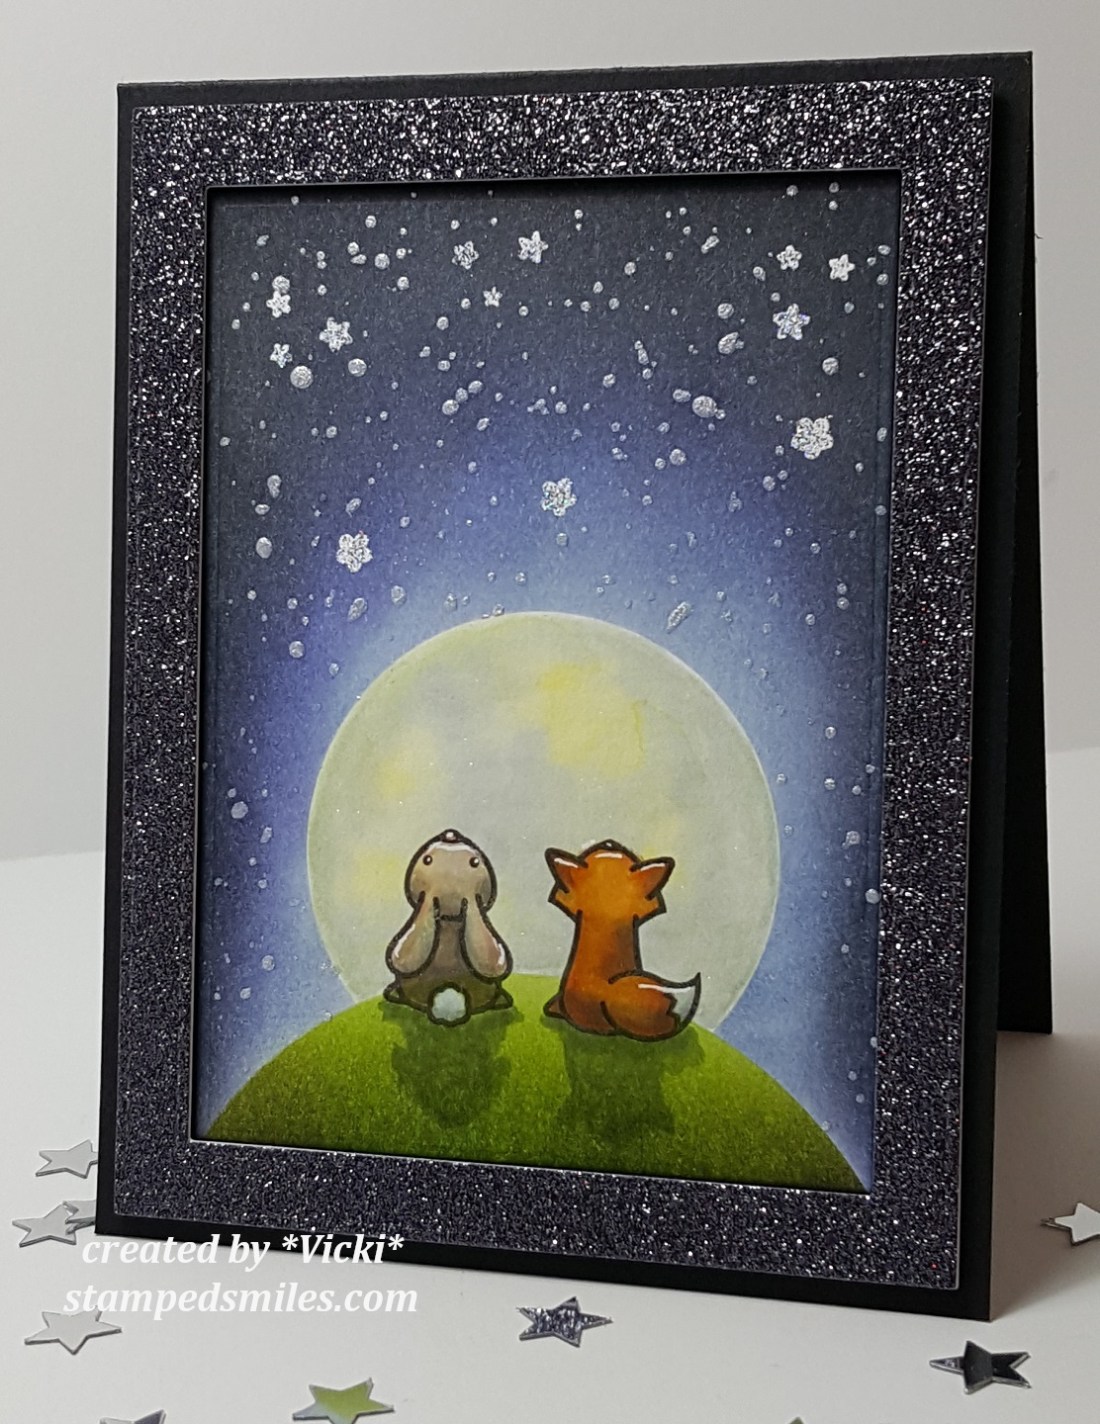
When this set first came out from Lawn Fawn called Upon a Star, I knew I had to get it as I fell in love with it.  I really hadn’t used it all that much, so it was great to get it out for a play as I needed to make a commissioned card.  I have created a scene for these critters using masks that I made with my circle die set and some ink blending with my distress inks.  For the stars, I took a brush and splattered some “Super Sparkle Lumiere Paint” watered down a bit while masking off the moon and hill.  The moon was created with some watered-down distress inks and a brush.

I then stamped the critters sitting on top of the grassy hill where I wanted them and colored them in with my Copics.  I took a brush filled with clear water to “take out” the inks on the critters before I did that.  I also took a gray Copic marker to create shadows on the animals as well as draw in my own shadows on the hill.  I took a white gel pen to add some highlights on the animals where I thought the moon would be shining on them.  I also put dots in the center of the bunny’s eyes to make it appear as if a star is reflected in them.

To cut out the image panel, I have used a rectangle frame die which was used to cut out some watercolor cardstock.  I then used the same die and cut out a piece of this gorgeous black glitter cardstock and popped the frame up with foam tape to go around the edges of the image panel design.  I mounted everything over a black A2 sized top folding card base.

Vicki-LFUopnaStar-Com-close

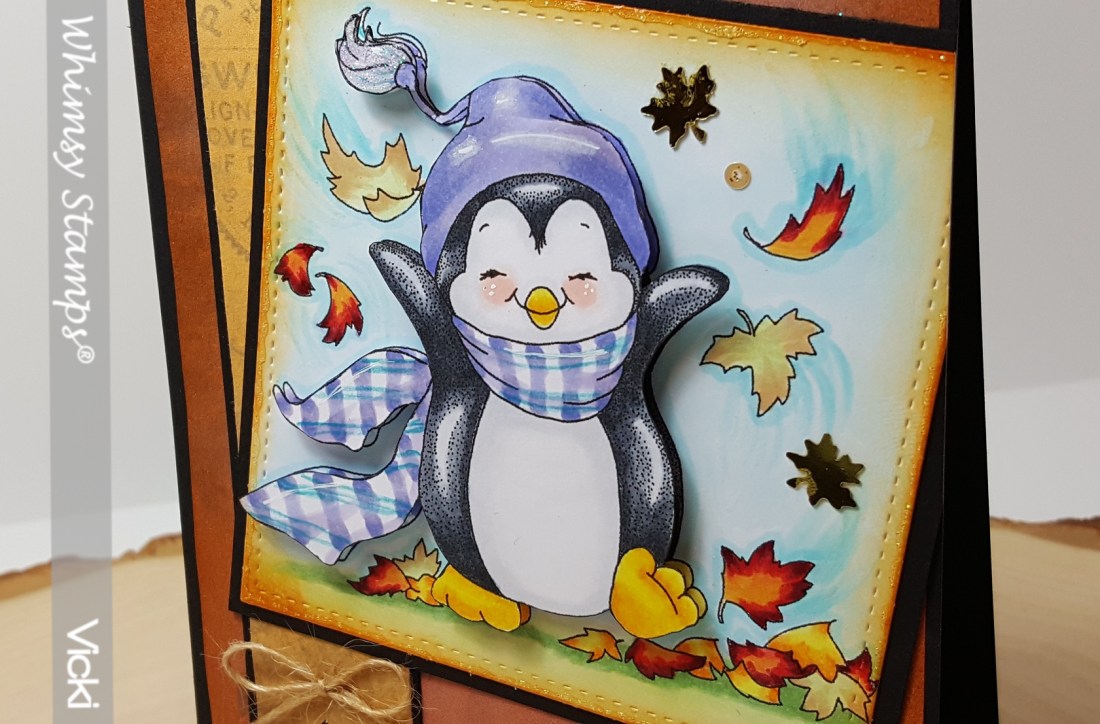
Here’s a closer look at the details.  Here you can better see the shimmer on the moon.  As always you have to get just the right angle for the photograph, but I covered the moon with a Spectrum Noir Glitter Brush Pen.

I took a couple of the tiny solid stars from the stamp set and heat embossed them with Sparkle N Sprinkle Vanilla Ice EP.  Love the way it gives a bit of extra sparkle!  I think the stars really show up beautifully and it always looks better in person of course! 🙂

I do not have a sentiment on this as waiting for instruction on how to proceed with that if necessary.  I’m happy with the way this turned out and look forward to playing with more starry sky creations!

Thanks so much for stopping by this evening and I wish you a wonderful weekend my friends!

Challenges:

  1.  Lawn Fawnatics – Bling It Out!
  2. AAA Cards – Moonlight
  3. Sunny Day Crafting – Animals
  4. The Creative Crafter – Anything Goes
  5. Simon Says Stamp Monday – Starry Night
  6. Simon Says Stamp Wednesday – Animal Antics

Guest Design for the Retro Rubber Challenge

Hello friends!  I’m super excited to have been asked to be a guest designer for one of the challenges over at the Retro Rubber Challenge blog!  Yay!  I really enjoy playing along in their challenges when I feel the need to break out some of my older stamps that have either been unused or neglected for a while.  If you have some stamps that are at least one year or older…or older yet as many of mine can be, then this is a great challenge to play along with!  Be sure to pop on over there and see what it’s all about, check out the inspiration from the design team and play along!

Here’s the card that I’ve created for the challenge but be sure to check out the full details along with lots more photos below!

Vicki-rrcb97-GDT

For my card, I went with the bottom row of “animals, window and circles“:

Vicki-rrcb97guestDT

I have pulled out some stamps from my “penguin stash” as I like to call it!  LOL!  I have lots and lots of them and most of them are years and years old.  I’m actually not really sure how old this stamp set that I’ve used on my card today is, but it’s from Darcie’s Stamps and they haven’t been in the store for quite a while now I think.

For my card, I’ve taken a circle die and cut out my colored images.  I had to mask the hat so that it looked like the penguin was wearing it as well as mask that giggling penguin along with the hat so that I could stamp the mug so that it looked like the penguin was in front of the mug.  I also white heat embossed the sentiment and cut it out with a banner die at the top.  The sentiment also came with the stamp set.  I cut out a scallop circle and then cut the center out with the same size circle as the penguins to create the frame around the penguin scene.  I’ve used some older SU! papers from my stash to go along with my theme and then lastly added some red baker’s twine at the top along with some white enamel dots as well as a cute little wrapped up peppermint candy accent.

I have cut the center of the heart on the mug with my craft knife and now we are going to zoom in on the mug….

Vicki-rrcb97-GDT-windowcloseup

Here you can see the glittery heart window with the penguin on the other side!  I have made a window by cutting out the heart on the mug and then on the other side, I’ve used some packing tape with the sticky side exposed through the window so that I could add some glitter to it.

Vicki-rrbc97-GDT-insidecard

And then of course when you open the card, you can see this cute little penguin trying to balance himself on these glittery rolling peppermint candies!  LOL!  This is why the penguin on the front was giggling.  I think they had too much sugar!

I colored in a penguin from the set, fussy cut him out and then layered him over this line of peppermint circles that I found from an older card kit I had in my stash.  It’s from a piece of patterned paper that I cut out.  I added some shimmer over them with a glitter brush pen.  At the top you can see the cut-out heart I made.

Vicki-rrbc97-GDT-inside

This is just a closer view of the penguin on the inside.  There is plenty of room above him to write a message.  Wasn’t sure if I wanted to leave this blank or put a Christmas sentiment on the inside yet.

I hope you’ve enjoyed my card for today!

Challenges:

  1.  Simon Says Stamp Wednesday – Get Ready for Christmas
  2. 4 Crafty Chicks – (4CC423) Something Old is Something New (old stamps and paper)
  3. Crafting with An Attitude – Anything Goes
  4. Happy Little Stampers Christmas – Anything Goes with Optional Twist:  ribbon
  5. Crazy 4 Challenges (C4C455) – Make any card in honor of WCMD
  6. Crafting By Designs – Anything Goes

Anything Goes For Cute Card Thursday!

Hello friends!  It’s Thursday and time for a new challenge over at Cute Card Thursday!

This week is an easy “Anything Goes” challenge!  So please share with us what you are working on this week weather it be a card, a scrapbook page, journal page or altered item, etc.  We look forward to seeing what you’re doing!

I’ve decided to use another newly released image from Whimsy Stamps (our sponsor this week) on my design today:

Vicki-CCT550-WS-Oct 4

Isn’t this cat just too stinkin’ CUTE?!   I’ve used the newly released October digital stamp Scruffy Cat by Crissy Armstrong for Whimsy Stamps on my card today.

*Edited to Add Copic marker colors I’ve used! *

For hat:  R59 for darkest shadows blended out with R29, R27 and R24.  I’ve used a white Prismacolor pencil for some highlighting.  I did use some B000 for shadows on the hat trimmings, but the loose glitter I glued on covers it up in the photo.

For cat:  I used W5, W3, W1 and W0 and started with the darkest color along edges and flicked in with the other colors.  R20 blended out with R00 for his ears and cheeks.

Collar:  G07 and G05.  I used a glitter gel pen for the tag.

I have used the Whimsy Stamps Notched Rectangles die set to cut him out with and mount him over a piece of red card stock.  I’ve also used a strip of red card stock cut with the same die and white heat embossed the sentiment from the Whimsy Stamps Holiday Mini Sentiments clear stamp set and attached under the kitty.

Before attaching the kitty panel, I’ve used some of the Whimsy Stamps Christmas Cool Mix digital papers and added a white organza ribbon around it.  I also sponged around the edges with some white ink using a sponge dauber and then I attached that to the front of a red top folding card base.  Lastly, I’ve attached the kitty panel along with the ribbon bow underneath and finished the card with snowflake sequins and silver glitter in the centers.

Vicki-CCT550-WS-Oct 4-close

Here’s a closer look at my coloring as well as the glittery details on the kitty collar tag and the loose fine glitter on the hat trimmings.

Please be sure to check out the challenge blog to see the details of the challenge and catch the inspiration from the rest of the design team!

Hope you’ve enjoyed my card today and look forward to seeing what you come up with!  Thanks so much for stopping in!

Challenges:

  1.  QKR Stampede – Anything Goes #315
  2. The Paper Players (PP412) – Tic-Tac-Toe:  Green, any embossing, sequins/glitter
  3. Crafty Animals – Anything Goes
  4. Crafty Cardmakers – Lace or Ribbon

It’s New Release Time at Whimsy Stamps!

Hello friends!  Can you believe that October has gotten here so fast?!  I thank you SO MUCH to everyone that has shared about my give away and I really have been enjoying your comments about the way you share smiles through your creations.  It is such an inspiration and joy to hear about this.

For my card today, I am sharing a sweet and fun festive image from the new release:

Vicki-PenguinElvesWorkshop-Oct2

Yes, I cannot get enough of the penguins that Crissy Armstrong makes up for Whimsy Stamps!  This image is called Penguin Elves at the Workshop and I think they’re having lots of fun for Christmas!  They’re colored up with Copic markers and then I’ve taken a white gel pen for highlights as well as a silver and gold gel pen for detailing.  I took some fine loose glitter and attached with liquid glue on parts of the penguins’ hats and then a glitter brush pen on the bow the penguin is holding.  I have used the Pierced Border Trio dies to cut the panel on the top and bottom of the image.  I then took an ink blending tool to add some distress ink around the panel.

For the sentiment banner, I printed out the new released Penguin Christmas Sentiments 1 and cut out a banner and then went over it with a Copic marker so that it matched up with my design.  For the front panel of my card, I also took the newly released digital papers called Christmas Red, Gold and Green and printed them out and trimmed it to size my A2 white card base.  I also took my ink blending tool to distress more coloring on the edges to match my image panel.  I then took that and mounted it over the papers and then glued some gold thin ribbon on the top and bottom of the image panel and added a bow along with some festive sequins filled with Stickles tinsel glitter glue.

I hope you’ve enjoyed my card today using the new digital release from Whimsy Stamps this month.  Be sure to check back for other creations I make from the new release this month too!!  Thanks so much for stopping by!

challenges:

  1.  The Holly and Ivy Christmas Challenge – Anything Goes with Christmas
  2. Christmas Card Throwdown – Technique:  Coloring
  3. Crafting By Designs – Get Ready for Christmas
  4. Aud Sentiments – Use a 2 word sentiment
  5. Winter Wonderland – Anything Goes + Christmas
  6. Crafting From the Heart – Anything Goes
  7. Make My Monday – Animals

Fun in the Fall

Hello friends!  I can almost feel it in the air!  Fall is coming near and I’m looking forward to joining in the crisp cool air and pretty colors with the changing leaves.  These are just a couple of things that I love about this season!  How about you?

Well this sweet little penguin certainly knows how to have fun in the Fall for sure:

Vicki-PenguinFuninFall-Sept 11

Here’s another September release from Whimsy Stamps called Penguin Fun in Fall image by Crissy Armstrong.  Of course, I grabbed my purple color markers to color his hat and scarf!  LOL!  I decided to create a purple and turquoise plaid pattern.  I also gave the leaves in the air a bit of movement with my coloring as if he’s throwing them up in the air.  Trying to be a bit different with my layout, so I tilted the image panel and cut it off on the right side of my card base.

I’ve also used the September release digital papers from Whimsy Stamps called Autumn Beauty.  These are fabulous papers and I know I’m going to be using some more of these on an up-coming card!  I’ve used two different patterns on the background and the banner strip.  Lastly, I added some fun Autumn Leaves sequins from Little Things from Lucy’s Cards.  I’ve actually had it for a while and hoarded the package and not used it until now!  I filled the centers of the round ones with some gold Stickles.  I also added a twine bow at the bottom of the banner strip.

Vicki-PenguinFuninFall-Sept11-close

Here’s a closer view of the image.  Here you can see where I’ve used some foam dots to pop up the fussy cut penguin for a bit of dimension. (I’ve also colored the one underneath as you can see it peeking out a bit on the side.)   I cut the image panel out with a stitched square die, sponged around the edges with some Spiced Marmalade distress ink and then went over the edges with some clear glitter Stickles as well as put some on the penguin’s hat tassel.

I hope you’ve enjoyed my colorful Fall card today! Thanks for stopping by as I really appreciate seeing your encouraging words or knowing you’ve stopped by! 🙂

Challenges:

  1.  Creative Inspirations – Anything Goes
  2. Crafting By Designs – Anything Goes
  3. That’s Crafty – Autumnal theme.
  4. Brown Sugar – All Creatures Great & Small
  5. Use Your Stuff – Animals

Anything Goes at Cute Card Thursday with a Shaped Apple Card

Hello friends!  It’s time for another weekly Cute Card Thursday Challenge!   For this week, since it’s the beginning of the month, we will have our easy peasy “Anything Goes” challenge for you this week!  We are sponsored by Whimsy Stamps!

Vicki-PenguinAppleBushel-Sept6-CCT546-ATG

I couldn’t resist using this cute little fellow on my card for today!  This is the Penguin Apple Bushel digital stamp from Whimsy Stamps.  I’ve colored him with Copics and pencils and then fussy cut him out and attached him on the front of my apple shaped card with foam tape.  Hard to see in the photo, but I’ve added just a wee bit of shimmer with my glitter brush pen on the bitten inside apple he’s holding.  I’ve also added some white dots for his eyes with a gel pen.

Vicki-CCT546-ATG1

For the shape of my apple card, I found a fun apple card pattern and cut it out with my Cricut Explore machine and enlarged it the size that I wanted it to be.  I’ve taken some sponges and ink to add some shading and highlighting details to the apple.  I’ve taken that CUTE stamp set from Lawn Fawn called Thanks a Bushel to stamp a couple of hearts around the penguin as well as white heat emboss the sentiment on the front.

I’ve also added a black gingham ribbon along with some twine that I’ve attached an apple charm to before attaching it to the top of the apple.

Vicki-CCT546-ATG

So of course, I wanted to show you what the inside of the shaped card looked like too!  I thought that the inside needed to “look like” the inside of an apple, so I took the Lawn Fawn Outside In Stitched Apple die and cut a piece to fit the inside of the apple and then followed the “bite marks” to cut off the end and then I took a sponge to sponge around the areas of it with brown colored ink for shadows.  I’ve also taken the same die set to add a tiny green apple on the opposite side of the inside of the card.  The purpose for that was not just to add an extra decorative element, but I also wanted to cover up the back side of the penguin sticking out from the front of the card.  I then needed to add the “apple seeds” to the inside of the apple, so I took the Lawn Fawn Stitched Apple Frames to cut out the seeds die in black cardstock and glued them to the vanilla die cut apple panel. I’ve also added some shimmer to the seeds with my glitter brush pen.

I thought that there was still plenty of room for a message below the seeds or you could also write on the opposite side as well.  It’s just a fun and unique card design to go with that darling penguin!  I will need to make a special envelope to fit the card inside for giving.

Thanks so much for joining me on my blog today!

Have a fantastic day!

Challenges:

  1.  Stamping Sensations – “I Spy with My Little Eye, Something Beginning with ‘B’!” (Bushel, bows, blue cap, bite, barrel)
  2. Crafting From the Heart – Anything Goes
  3. Artistic Inspirations – Anything Goes
  4. Crafty Cardmakers – All Creatures Great & Small
  5. Fab ‘N’ Funky – Bingo! (I’ve used the third column:  die-cuts, ribbons, red)
  6. The Crafty Addicts – Anything Goes with optional Back to School

It’s a Mouth-Full!

Hello friends!  I’m back with you again to share another fun image from the Whimsy Stamps September Digital Release!

Vicki-NutsAboutYou-Sept4

This guy is so stinkin’ CUTE and I really had fun coloring this one! 🙂  I thought this was a great image to use any time of the year really and a cute idea for also a “new home” themed card.  I have used the So Nuts About Home Digital Stamp.

After coloring the image, I went around the edges with some distress ink using my ink foam blending tool.  Mounted that onto a black layer and popped it up over the card design with some craft foam.  I die cut a leaf from kraft cardstock and used some more distress inks with the ink foam blending tool to give it a bit of color.  I then added some sparkle with some Ranger Vintage Platinum glitter and a clear shimmer brush pen.  I curled the edges a bit and attached it over the image panel in the corner.

For the background of my card, I have used the new Autumn Beauty digital papers released this month.  You can see a bit peeking out, but it really doesn’t do justice to the papers…they’re really gorgeous!  I’ve layered them onto a piece of glitter cardstock that was cut along the edge with a scallop border die and then I lined it all up along the right side of my card base.  I’ve added a piece of burlap ribbon and a button with a twine bow on the lower portion of the card before adding my image panel to it.

Vicki-NutsAboutYou-Sept4-close

Here’s a closer look at this cutie and my coloring details.  He really makes me smile! 🙂

Hope you’ve enjoyed my creation today!  Thanks for sharing part of your day with me!

Challenges:

  1.  4 Crafty Chicks – Crazy Egg Anything Goes
  2. Moving Along With the Times – Gingham and/or Buttons
  3. Alphabet Challenge – ‘L’ for leaves

Lawn Fawn Friday

Hello friends!  Yay, it’s Friday!  I have lots of fun Lawn Fawn “goodies” to share with you today and although it’s still a bit warm over my way, I am in the mood for Fall, how about you?  There’s nothing better in the Fall, for me, than a warm apple cider donut that we get every year from an apple orchid we like to visit each Fall!  It had me thinking of the current challenge going on…

Vicki-LF-FallTreats

It may be a bit of an oldie, but a goodie to me and I really enjoy using it!  I have pulled out my LF Love You a Latte stamp set to base my card for today.

I started with a white A2 sized top folding card base and added a piece of (now retired) “Perfectly Plaid Fall” mini paper stack that I’ve cut with the LF Stitched Rectangle die along with the pieces used on my image panel also cut with the same die set.  I layered that onto a white piece of cardstock that was cut from the LF “Scalloped Rectangle die” (Looks to be retired too!)  I have taken a strip of the plaid papers and used the LF Valentine Borders die to cut the edging on it.  I then wrapped some twine around it and added the LF Stitched Leaves that were cut from kraft cardstock and colored on the edges with distress ink and a foam blending tool.  I then tied a bow with the twine and placed it over the leaves.

I colored my images, fussy cut them out and placed them over my layered paper panels and then popped it up over the plaid card base with some craft foam.

Vicki-LF-FallTreats1

Upon a closer view of the image, you can see that I white heat embossed the sentiment from the stamp set.  I also added some glitter to the marshmallows in the cup and covered the donut with some glossy accents.  I added a LF Small Stitched Leaves that I made similar to the others to tuck inside with my treats! 🙂  All the leaves were covered with a glitter brush pen.

*Be sure to scroll down below for more Lawn Fawn goodies!!*

Here are the challenges I’d like to enter this card for:

  1.  Lawn Fawnatics – Coffee, Tea and Treats
  2. Retro Rubber (RRCB94) – Anything Goes + Older Stamp(s) Mine is circa 2015
  3. Watercooler Wednesday (WWC185) – Anything Goes
  4. Simon Says Stamp Wednesday – Anything Goes

I thought this was a good place to stick in this project I made and had entered into my local county fair last month.  This particular item did not place, but the category was “Hand Stamped Item Other Than a Card”…so I created this using a Lawn Fawn stamp:

Vicki-LFSkunk-Wood Slice

I found a bag of these really cute wood slices when I was out shopping with my mom earlier this Summer at Hobby Lobby.  They seemed like a perfect size to do this with!

I stamped this adorable skunk from the Lawn Fawn Stinkin’ Cute stamp set and then colored him in with my Prismacolor pencils.  Of course, the woodgrain gives it some slight imperfections, but I didn’t mind and thought it gave it more character!  (See the wood knot under his chin!)  I’ve added some green “Flower Soft” for the grass portion to give him something to stand on.  I also added some glitter to the hearts above his head.  Hubby drilled a hole in it for me so that I could add some twine for it to hang.

Vicki-LFSkunk-WoodSlice1

Here I’ve turned it at a bit of an angle so that you can see the thickness of the slice and the fun texture of the bark on it.  I thought this would be so cute on a gift bag or something.  I have it hanging in my room because he’s just too stinkin’ cute anyway! 🙂

Thanks for stopping in today and I wish you all a fabulous weekend!

P.S.  Sunday I will be sharing a post with a brand-new release…so be sure to check that out too!  Bye!

It’s Magical at Cute Card Thursday

Hello friends and happy Thursday to you!  Tomorrow is Friday and we are about to get started on the weekend!  I am ready for it too!

We have another brand new challenge up for you this week at Cute Card Thursday and the theme is “Magical“.  This will be fun to see how you interpret this one! 🙂  Here’s the card that I made for the challenge:

Vicki-CCT545-oddball-magical

I have used one of the sponsor’s images this week from Oddball Stamps which is Kawaii Big Eye Unicorn (with and without ornaments) Twinkles.  I have used the image without the ornaments on him, but it comes with both!  I think it’s adorable!

I printed out the image and used a wonky stitch rectangle die to cut out the panel with the image in the bottom right corner.  I printed it out a second time so that I can cut it out with some masking paper.  I placed the cut out masked paper unicorn over my card panel unicorn and stenciled the colorful cloudy background.  I colored the unicorn and the grass he’s sitting on with Copic markers.  Lastly, I stamped a sentiment from a My Favorite Things stamp set at the top with black ink.

Vicki-CCT545-oddball-magical-close

So looking at the unicorn from a different angle, you can see that I’ve added tons of shimmer and glitter to it.  I used a glitter brush pen for the muzzle, the hooves, the inside ears and around the eyes.  I’ve also went around the unicorn on the grass for a bit more shimmer too.  I took some clear dazzling diamonds glitter to add to the rainbow horn and tail using liquid glue.   Of course, there’s even more sparkle with the sequins.  I had a couple of heart sequins to add around the unicorn as well.

Thanks for stopping in today!

Challenges:

  1.  Papercraft Challenges – animals
  2. Addicted to Stamps & More! – Make Your Mark (stencil and Copics)
  3. Crafty Gals Corner – Anything Goes

I’m Just Lion Around

Hello friends!  It’s the start of the very last week for August already!  Fall is quickly approaching, and no… I’m not “lying” around, but I have been playing with this really cute King Lion digital image from Whimsy Stamps:

Vicki-WSKingLion-Aug28

I really enjoyed coloring in this image!  I’ve used my Copics to color it and of course I had to add some fun little details as you will see in the photo below.

I was trying to keep this design somewhat simple as the star of the show needs to be this image.  To help with the design, I’ve printed out some Whimsy Stamps digital papers called Great Outdoors.  Although the distress coloring on the edges of the image panel looks a little bright in the photo, it is more toned down on the card when seeing it IRL.  I have also stamped the sentiment and some accents on the image panel from the Whimsy Stamps Painted Sayings clear stamp set.  I added some ribbon through the center and then I added some wood veneer accents on each side of the image panel before popping it up with foam tape.  I’ve also added a couple of gold enamel dots on each end of the sentiment above the image panel.

Vicki-WSKingLion-Aug28-close

Here’s a closer look at my coloring of the image and you can also see that I’ve added some glossy accents to his nose, some shimmer on his crown as well as some red glitter Stickles in the center of the red gems on his crown.  I’ve added even more glitter along the distressed edges of the image panel with some tinsel glitter Stickles.  I used a distress tool to go around the edges.

I hope you’ve enjoyed my card today!  I will be back again on Thursday for a new challenge!  Thanks so much for stopping by!  I appreciate you being here! 🙂

challenges:

  1.  Sketch Saturday – sketch #528

2.  Crazy 4 Challenges (C4C449) – masculine

3.  Crafty Friends – Animals/Birds