Hot Dog! It’s Birthday Time!

Hello friends!  As you know, I’ve been TRYING to get my MOJO flowing and I REALLY appreciate the feedback that I’ve gotten from you and others about things I can try including non-craft related things!  (Honestly, right now in this world with what is going on, it is hard to concentrate along with worrying about my own family in different ways…so that doesn’t help either!)  But I’ve been trying to find things to keep my mind focused and try new things that are interesting to me…so I will just keep going along and see what happens!!  I would like to continue with as many “stamped smiles” as I possibly can right now….we all need that at this time!

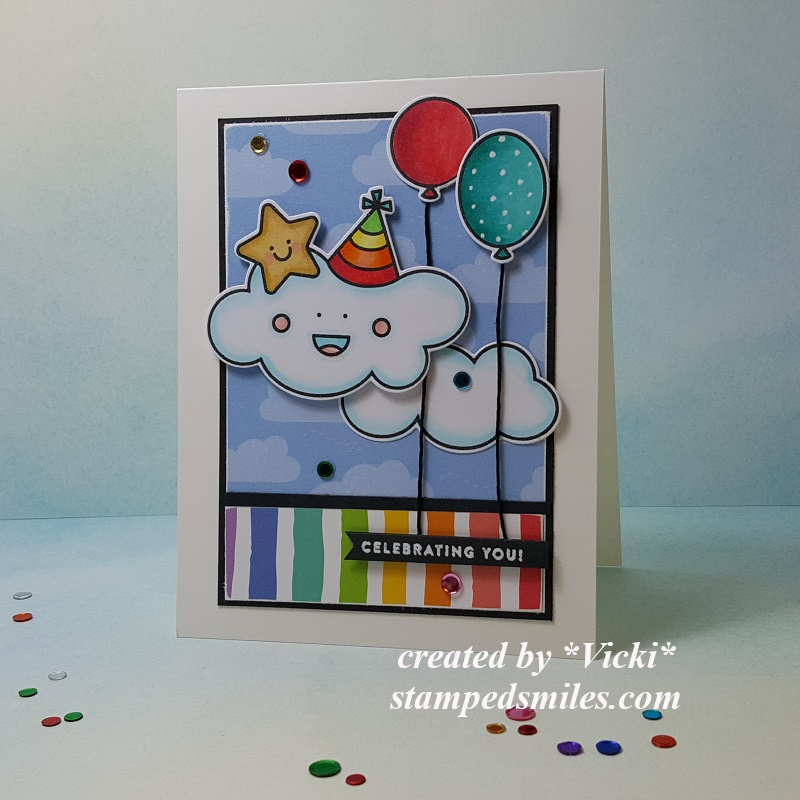
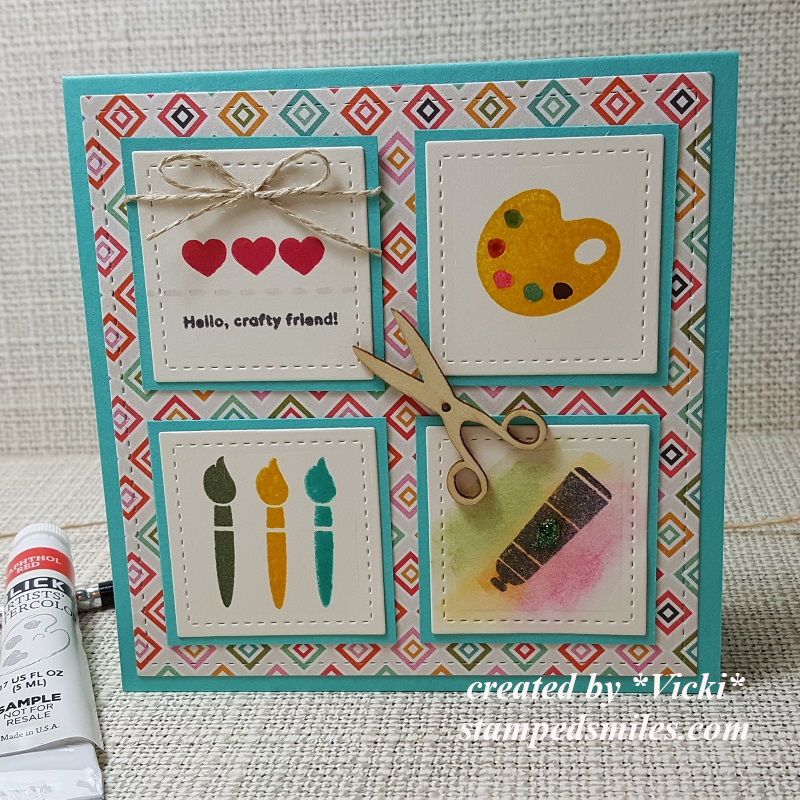
Today’s card was made for my son’s birthday that was this past Saturday:

Vicki-SSSSoPunFriends

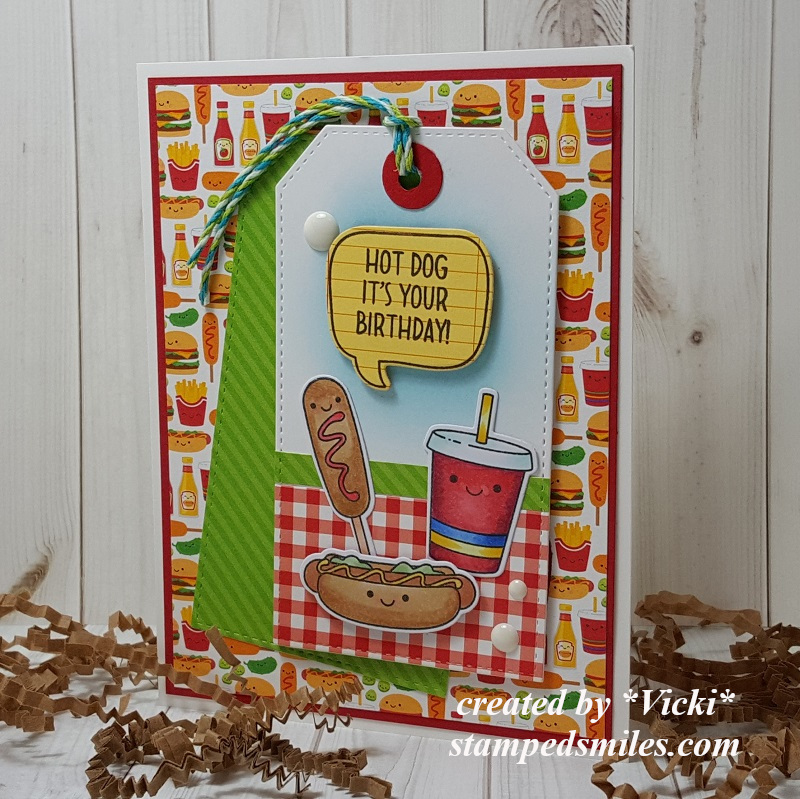
I pulled out an older Simon Says Stamp card kit and used the So Pun Friends and the I Chews You stamp sets along with the coordinating dies.  I’ve used the cardstock and cute Doodlebug So Much Pun Papers that came with the card kit as well.  The tag was cut using the My Favorite Things Stitched Tag dies.  I created the hole at the top of the tag with circle punches and the twine is from left over packaging.

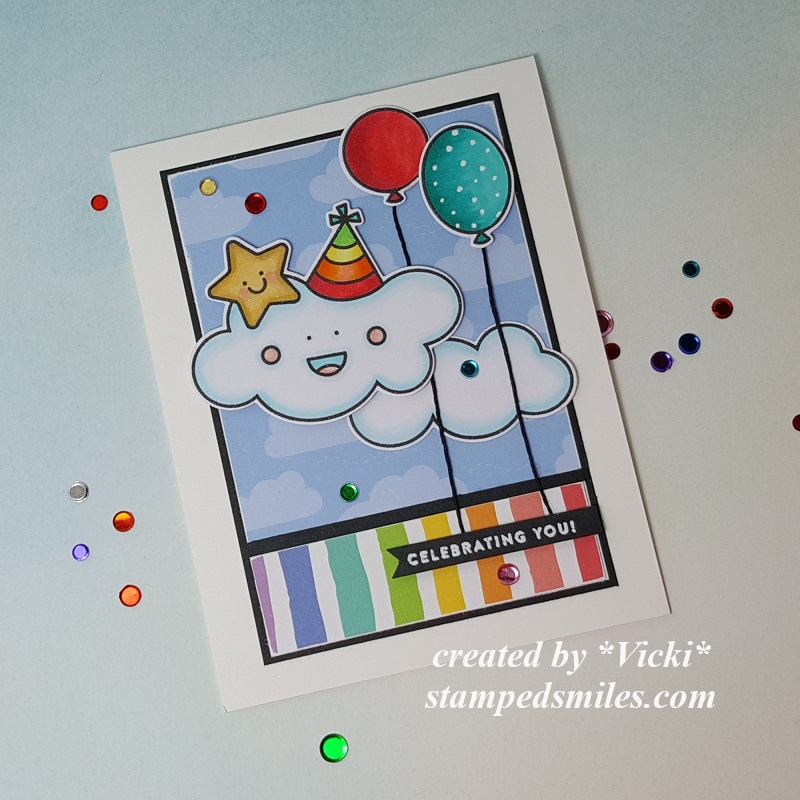
I cut the tag shape out again with more of the papers from the kit and then popped up the image tag with foam tape and added some white enamel dots.

On the inside I stamped a birthday greeting and made a pocket to hold a gift card for him.  We usually take him out to dinner for his birthday, but since he’s moved away I had to send him a gift card instead.  Bummer…

Vicki-SSSSoPunFriends-close

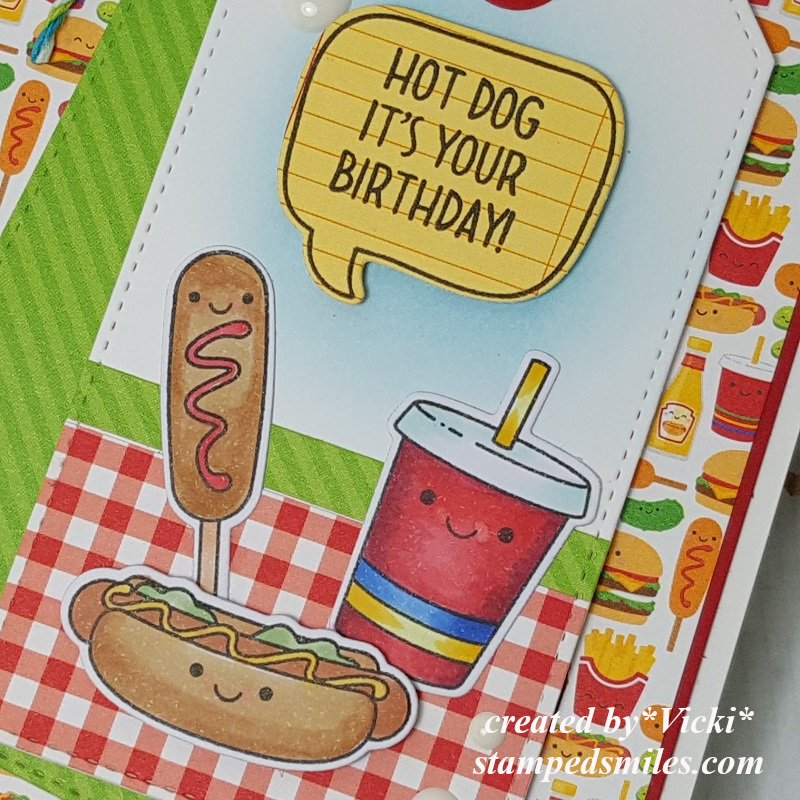
Here’s a closer look at the cute smile face images that I colored up with my Copic markers.  I cut out the food images with the So Pun Friends coordinating dies.  For the sentiment, I stamped the speech bubble from the I Chews You stamp set over a piece of the Doodlebug papers and then added the sentiment from the So Pun Friends stamp set in the center of the speech bubble.  I then die cut it out with the I Chews You coordinating dies.  

I used some blue distress ink to blend some color over the center of the white area on the tag and then popped up the speech bubble with some foam tape over that area.  The hotdog at the bottom was also popped up with foam tape as well.

Vicki-SSSSoPunFriends-flat

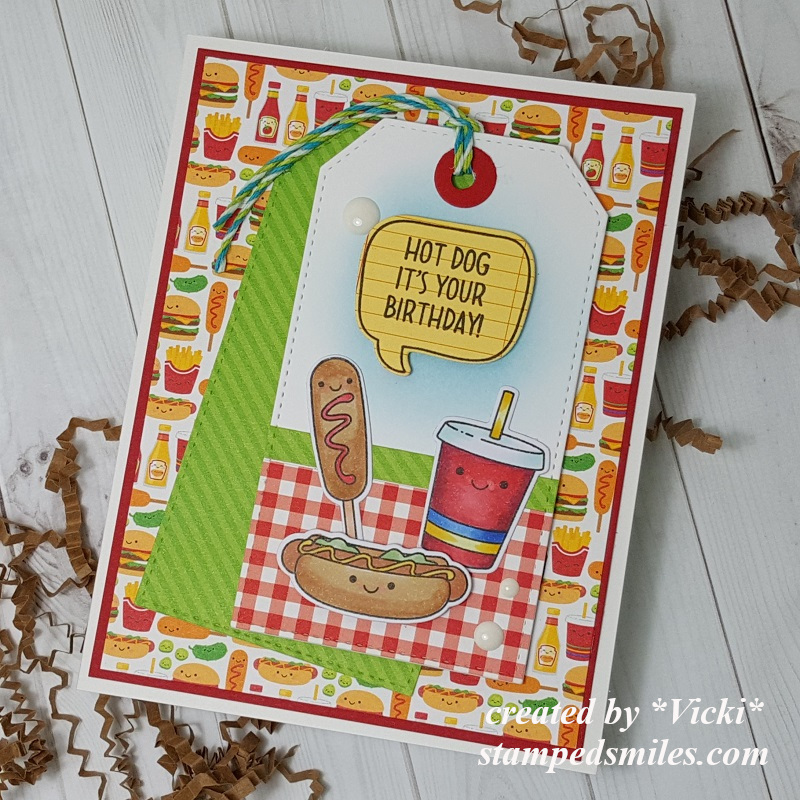
I actually had some fun pulling out this older card kit to play with and who could resist a hotdog smiling at you?!  LOL!

Thanks so much for stopping in and for your continued support!  It’s very much appreciated and I hope that I helped bring a smile or inspiration to you today! 

I actually have a couple more birthdays coming up that I need to make cards for, so I’m sure you’ll be seeing more of those in the near future too!

Challenges:

  1.  Not Just Cards – March Anything Goes
  2. Little Red Wagon – Etc, etc, etc (3 enamel dots and 3 food images with smiles)
  3. Cute Card Thursday – Celebrate!
  4. TIME OUT – Birthday with optional twist:  die cutting or fussy cutting
  5. Seize the Birthday – #185 Touch of Green or Anything Goes

Full Bloom Rainbow

Hello friends!  I hope you’re having a great week so far!  I’m wondering if this cold weather has me feeling this way lately, but I’m seriously lacking in creativity and just have misplaced my MOJO lately!  If you’ve found it, please let me know! LOL!

In the meantime, I seriously needed to create a rainbow in my life and found that a young lady certainly was in need of a smile sent her way as well so I thought I would do just that:

Vicki-PinkMainCK-MMTPT604

I had received my Pink and Main Crafty Courtyard Card Kit and really loved the happy colors and pretty blooms in the stamp set and so I started out using the stencil with rainbow order inks for the background!

I’ve also used the same color of Distress Oxide inks to do the stamping on the tag and envelope as well.  I absolutely love the tag die set was included with the kit which I’ve used for the main focus of my card.  I always want to add just a bit of black to my rainbow colors, so I decided to white heat emboss the sentiment from the stamp set and then used one of the tag die elements to cut it out with and pop up over the bottom of the tag.

I’ve also used the ribbon and enamel dots included in the kit to finish it off.  (The floral sequins used for the photo prop were also included in the kit.  LOL!)

Vicki-PinkMainCK-MMTPT604-close

Here’s a closer look at the details in the tag.  For the black border around the tag, I just cut a piece down to size and then cut off the edges with my scissors to match up with the tag.  The scallop tag behind it was cut with the paper and die from the kit.  I used some circle punches to create the black re-enforcer and then I tied the ribbon together with some black twine from my own stash and topped the center with an enamel dot from the kit.

Vicki-PinkMainCK-MMTPT604-flat

This card has now been sent along to a young lady that is currently in the hospital dealing with cancer treatments and really needs some cheerful happy colors, so I hope that this will help fill her day with some cheer.

Hoping that this card has also sent some feelings of cheer today your way as well!  Thanks so much for stopping in today friends and I’ll see you soon! 🙂

Challenges:

  1.  Allsorts – Dies and/or Punches
  2. A Bit More Time to Craft – Anything Goes #110
  3. Pammie’s Inky Pinkies – PIP2007 Anything Goes
  4. Through the Craft Room Door– Anything Goes
  5. Fab ‘N’ Funky – For a Child (sent to a 15 yr. old in hospital)
  6. Simon Says Stamp Wednesday – Add a Sentiment
  7. Creative Knockouts – Flower Power

A Vintage Love

Hello friends!  I hope you’re having a great week!  I must be really wishing for flowers as this seems to be my theme this week!…along with watercolor and heat embossing! LOL!

Today I wanted to share a card I’ve made for an anniversary:

Vicki-SSSBeMyValentine-Anniversary

As you can see from the card itself, my parents have been married for 55 years.  So when I saw this Simon Says Stamp LE Valentine 2020 card kit, I knew that this would be a great way to start using the kit immediately!

I actually really didn’t know what direction I was going to go with this anniversary card and I just started pulling things out and switching different items to see what I wanted to do.  I sampled the stencil with the metallic paste from the kit and really liked it, but when I pulled out my copper metallic mirror cardstock, I decided to heat emboss over the stencil with the same copper EP that I used on the sentiment for this card.

I’ve also cut out the numbers with the copper metallic mirror cardstock along with the layer behind some of the papers from the card kit.  I’ve added another heart strip of the papers from the kit at the top and used one of the butterflies from the kit to go over the piece of lace I’ve added from my stash.  The layers were all attached over an A2 sized top folding card base.  Lastly, I added some white hearts that were actually from a different card kit.  LOL!

Vicki-SSSBeMyValentine-Anniversary-close

I wanted to share a closer look at the flower.  The stamp set in that card kit is so stunning!  I’ve white heat embossed the flower and leaves over some watercolor paper and then used my Clean Color Real Brush markers to color it with.  I’ve used some foam tape to pop up the flower over the stenciled heat embossed piece that was cut out with a circle die and attached to the card front.

You can see the shimmer over the butterfly wings that I’ve covered with a glitter brush pen.  I only glued the center of the butterfly so that I could pop out the wings a bit.

Vicki-SSSBeMyValentine-Anniversary-flat

Although this card looks a bit simple, there were a few steps to the stenciling and heat embossing some of the elements.

I hope you like it!  Thanks so much for stopping in and I’ll see you soon!

Challenges:

  1.  Simon Says Stamp Wednsday – Anything Goes
  2. QKR Stampede – #382 Anything Goes
  3. Allsorts – Take Flight
  4. Creative Fingers – #178 Anything Goes
  5. Watercooler Wednesday – WWC256 All About Occasions
  6. Lil Patch of Crafty Friends – #124 Anything Goes

It’s a HAPPY Birthday!

Hello friends!  I hope you’ve had a lovely weekend!

After starting this year, I tend to “look back” on my stash items and take a good “inventory” of what I have and the things that hardly EVER get used, if have gotten used at all!  And of course I try to tell myself…”no more!”  LOL!  I honestly just let all of my card kits just sit and don’t dive into them and use them!  I get so excited about them when they come out, oooh and aaahhh over every single item in the kit and then it just sits…then before you know it, another kit comes out!  It’s an endless cycle that I’d like to stop!  Does anybody else have this problem?!

**This year, I hope to not only just open the boxes with content, but also make some creations with them!  If I’m already suscribed and getting boxes, then why am I not using them?!  You saw in a previous post the Snowflake set of creations, so I plan on doing more of that this year…so stay tuned! 🙂

I actually have made a card from a fun special edition “Sweet Birthday” card kit from Simon Says Stamp last year that I was super excited about, but only dug in enough of it to make this one card:  (Hanging head…..)

Vicki-SSSSweetbirthday

At least I made ONE with it, right?! LOL!  I just thought this was such a happy, colorful and fun card kit that it was just perfect to send a birthday smile for someone that really needed some “happy” sent their way.  My schedule was crazy and then I forgot to get it posted!  LOL!

The stamp set used in creating this one from the SSS card kit was called Sweet Birthday and I was excited to be able to get the coordinating dies to go with it too.  It’s very simple with the cardstock and pattern papers from the kit for the layout design.  I used an additional piece of black cardstock to white heat emboss the sentiment from the stamp set, cut it out with my scissors and pop it up along with the party hat cloud and balloons with the black “strings” underneath them.

I used a white gel pen to add “dots” to the blue balloon and then added some sequins from the card kit over the design.

Vicki-SSSSweetbirthday-close

Here’s a closer look at the images and how I’ve colored them up with my Copic markers.

At this point I don’t remember if I’ve added a glitter brush pen over anything, but more than likely I probably did because I like using it! LOL!

I’ve also used a sanding block around the edges of the pattern paper as I like to distress my papers sometimes too.

Vicki-SSSSweetbirthday-flat

I didn’t know who this person was that received this card, but a request came from a crafty friend who asked to send smiles to someone for a loved one’s birthday and of course I was happy to get creating and hope that this helped in some way to lift spirits.

And I hope that this has helped put a smile on your face too!

Thanks so much for popping over here today and I truly enjoy seeing your comments!  Please let me know what you think of YOUR stash?  Is it “out of control” like mine?  LOL!  Would you like to see me making posts using more of my card kits?  Share your thoughts below! 🙂

I’ll see you again soon my friends!

Challenges:

  1.  Love to Craft – LTCCB42 Jan. Anything Goes
  2. Love to Scrap – LTSCB129 Jan. Anything Goes
  3. Seize the Birthday – Anything Goes + Toppings:  Layer It!
  4. Use Your Stuff– Anything Goes
  5. Try it On Tuesday – What a Cutie/Make Someone Smile

Working in a Winter Kit!

Hello friends!  If you live around my area, then you know that it’s in full swing Winter Weather time!  We do have snowflakes in the forecast for tomorrow, but hopefully it’s not too bad!

So while we’re thinking of snow, I thought this would be a great time to share with you all of the winter style cards I’ve made using a brand new subscription card kit that I’ve got going from Pink and Main.  So grab a cup of your favorite beverage and enjoy some crafty winter inspiration!

So my first card kit from Pink and Main was the December 2019 Winter Wonderland Crafty Courtyard Box which is no longer available, but they have this month’s box out which I will I get soon!  Here’s what I’ve made for the December box:

Vicki-PMCCboxDec2019-set

Yeah, I know!  That’s a lot of cards, right?!  I was surprised myself how many cards I was creating from this kit and I could’ve just kept going as I still have plenty of supplies left!  I needed to make a few more cards to send out after Christmas for the ones I missed and send out thank yous…so this came in handy actually!

P.S.  Every single one of these cards were completed with an envelope too!  (So far so good on my New Year’s Resolution! Yay!)

Vicki-PMCCboxDec2019-card6

My first card here is a “see through” design using acetate for the center of the design.  I have used a Bold Snowflake die from Pink and Main NOT included in the kit, but overlayed it with another foam snowflake and button that WAS included in the kit.

I stamped snowflakes from the stamp set in the kit and added some “dots” with Stickles over the design too.

Vicki-PMCCboxDec2019-card2

This card was pretty simple, but I love it!  I’ve used the sentiment die that was included in the kit and die cut it with the sparkle cardstock from the kit as well as the pretty snowflake papers.  All I did was stamp 3 snowflakes and added another dot of Stickles to the centers.  I chomped the corners at the bottom and done!

Vicki-PMCCboxDec2019-card1

For this particular card, I’ve decided to make a ‘Z-fold’ card design and if you’d like to know the measurements and/or how to see one put together, then please check out my video tutorial on it here – “Coffee Style Z-fold Gift Card Holder“.

Vicki-PMCCboxDec2019-card1A

This is how the card folds closed.  It folds down to an A2 size.  I love how the colors look on this one!  Everything on this card except for the greeting on the inside was from the kit.

Vicki-PMCCboxDec2019-card4

So I wanted to use lots of those papers from the paper pad included with the kit and they were double sided so I had even more choices to deal with! LOL!  I decided to make square panels for my layout and use those sparkly silver snowflakes from the kit to place over top.  I heat embossed the sentiment from the stamp set at the bottom.

Vicki-PMCCboxDec2019-card7

This card was just destined to be a square design.  I wanted to use my Reverse Scallop Square dies from Pink and Main for this one.  I’ve also used papers from the kit as well as the silver sparkle paper and snowflake.  I took a snowflake embossing folder fort he background.  I used sequins from the kit and filled the centers with more of that silver Stickles.  (I got a bit of the prop  over my sentiment there.  LOL!)

Vicki-PMCCboxDec2019-card3

I wasn’t finished using that “Reverse Scallop Square” die set, so I took it to die cut some embossed snowflakes and layer them over some of the papers from the kit.  The middle of the card has a strip of the awesome translucent tape included in the kit.  I covered the middle of the snowflakes with a rhinestone and pop up the embossed sentiment with foam tape over the tape.

Vicki-PMCCboxDec2019-card5

And this last one was hubby’s favorite. I took the largest image from the stamp set in the kit and heat embossed it over a watercolor panel.   Then I took some Distress Oxide ink spritzed with water over a glass mat and brushed them over it and splattered some with with a brush as well.  I die cut the sentiment from the die included in the kit with the sparkle paper in the kit and finished the design with more sequins filled with Silver Stickles.

I had “SNOW” much fun with this kit and creating these cards!  I hope you’ve enjoyed it as well and have been inspired in some way!!

Thanks so much for stopping in and I enjoy seeing what you have say!  I loved reading all of your New Year’s resolutions and NOT resolutions too! LOL!!

I’ll see you again soon my friends! 🙂

Challenges:

  1.  Cardz 4 Guyz – Blue is the Color
  2. Arty Divas – #12 Anything Goes
  3. Classic Design– Anything Goes
  4. Creative Inspiration – Something New or Something Old
  5. Challenge Up Your Life– Anything Goes
  6. A Bit More Time to Craft – Anything Goes
  7. Simon Says Stamp Work It Wednesday – Snowflakes!

Merry Christmas Friends!

Merry Christmas to all of my friends here and I’m honored to be a little part of your life with you in some way…I hope you know that!

**This is a pre-scheduled post to wish you all a special happy day.  I’m away spending time with my family right now, so sit back with your favorite beverage for a time out and I hope you enjoy today’s long post.**

Just wanted to share BATCHES of the cards and creations that I’ve made for the Holidays this year.  I know that I make lots of creations, but for the purposes of mailing cards, I try to keep these particular cards as “mail friendly” as possible, so these are more simple in style for me, but really enjoyed making them and just had fun:

Vicki-GlitterSnowSceneSet

I tend to do bulk cards in a set of 4-6 so that I don’t get “bored” with it or run out of a certain supply or something! LOL!  So this first set of 6 cards is using the gorgeous Stampin’ Up! stamp set “Winter Woods”.  I stamped up the scene background and then covered the entire panel with double stick adhesive and then covered it with dazzling diamonds glitter.  (The deer I added is from a favorite Newton’s Nook stamp set called Serene Silhouettes.)  The white heat embossed greeting is from the Stampin’ Up! stamp set “Itty Bitty Christmas”.  (I think this set was probably my favorite to do!)

Vicki-PenguinChristmasSet

I just *had* to get these penguins in there somewhere! LOL!  These set of cards are actually all just a bit different, but I colored up the penguins from the “Pablo the Penguin” free stamp set included with the Making Cards Magazine for December and cut them out in different ways and then mounted them onto cards.  Some of them use some of the free papers that were also included with the issue.  So this is another set of 6 cards that were mailed out.  Love those cute penguins with the different hats! LOL!

Vicki-ReindeerChristmasSet

Here’s another set of cards that I’ve made to send out, but because these were even more simple than the ones above with very little stamping involved, I made 8 of these.  (So if you’re counting, I’ve made 20 total so far…not including some other special cards I’ve mailed out to people along the way.)  – I absolutely fell in love with this die set from STAMPlorations called “Two Reindeer” and was so excited to see that I had won a gift certificate from their blog and this was something that I knew I would be getting right away!  This was cut from gold cardstock and mounted over a piece of various different Stampin’ Up! pattern paper from my stash…it’s always nice to be able to use up more of my hoarded paper stash!  The sentiment is again from the Stampin’ Up! “Itty Bitty Christmas” stamp set.

Vicki-GnomeXmasWobbler

Now I didn’t want to leave out a couple of cards that I made especially for my boys.  They know their mom likes to stamp, but they know I have to add in a bit of my goofy humor with them as well! 🙂  So of course I had to pull out this fun Simon Says Stamp “Gnome for the Holidays” card kit (sold out) to make them!  I think I ended up using ALL of the wobblers in the kit too!  I told my son that this is me wobbling with the presents about to drop everything and my hubby is trying to save everything! LOL!

Here’s a little wobbler action for you too…

And of course I had to make another card for my other son too…

Vicki-GnomeXmasWobbler2

I absolutely feel in love with all of those cute gnomes that came out everywhere this year for crafting…so I still have more that I didn’t get a chance to use, but thought this would be perfect for my son with this trendy style design…of course using a wobbler too!  And I do love him GNOME matter what! 🙂

For some reason, I thought the wobbler action on this one was more fun! LOL!  Not sure if it’s because of the weight/size or what…but cool to see the difference.

And whilst in the middle of making up all of these cards to mail out, I also had fun playing with the Christmas Advent Calendar that I had purchased a while back.  Because it’s an “Advent Calendar” you start with December 1st and open each day.  So each day to open was pretty cool because there was a new surprise stamp inside!  So I took each day’s stamp and made a tag for each one clear up until today’s last window to open: (obviously previously opened and made to finish! LOL!)

Vicki-BMAdvent-Week1

I will show by the week.  So this is week 1 with the first 5 days opened.  The stamp that I received for each day is noticeably featured in each tag.

Vicki-BMAdvent-Week2

And these are the tags made for week 2.  The angel tag was made with Deco Foil in the background.

Vicki-BMAdvent-Week3

These are week 3 tags made.  The purple colored tag on the left bottom is actually a shaker.  The window sheet was glaring in the camera.

Vicki-BMAdvent-Week4

This is week 4 of the tags.  Hubby picked out the candy canes as his favorite of all of them.  Mine was the stockings tag.

Vicki-BMAdventTags-Week5

And here is the final last week of the tags from the Advent Calendar.  Really cool to have all of these tags on hand for gifts!  I needed them! 🙂

And of course I wasn’t done with the Advent Calendar box itself because I thought I could “recycle” the little window flaps on the box because they had some cute images on them for each day…so I cut them off with my scissors after I opened that day and kept them:

Vicki-BMAdventTags-windowflaps

So I thought it would be fun to use them to create a card!  They had numbers on them, but I have covered them up in certain ways so that they’re not showing.  The cover die was cut out from the same colored cardstock for the background too.

Whew!  Now to get finished up with my wrapping and “merry making” before the big day!  I hope you are or have enjoyed yourself a wonderfully HAPPY Christmas day no matter how you’re celebrating it!  Thank you for spending some of your time here on my blog today!

I’ll be seeing you soon my friends!

Spots and Dots for Cute Card Thursday

Hello friends!  Hope you’re having a great week so far.  The month of October is flying right through and I know once Halloween gets here, it will be the end of the year before we know it!

Today starts a new challenge over at Cute Card Thursday this week!  We are looking for “Spots and Dots” on your creations this time!  We look forward to seeing your take on this one!

For my card, I decided to keep it rather simple:

Vicki-CCT604

This card is using items from the Simon Says Stamp Sweet Birthday Limited Edition card kit which has since been sold out, but I know that you can still purchase a few of the items that were included in the kit.

I started out by taking the SSS Celebrate stencil from the kit and spread on some Deco Foil Transfer Gel over a white piece of cardstock from the kit and let it completely dry before moving on.  After it was dry, I took the Rainbow Shattered Glass transfer foil sheet and put it through my laminator.  It looks so pretty and shinny with a wow factor to it!  I cut this piece down and layered it over a black scallop square die cut panel.  I then layered these pieces over the green colored Tim Holtz Metallic paper from the kit.

For the square card, I used a black top folding 4.25″ black card base and then layered another piece of that green metallic paper over it.  I took a ‘dotted’ piece of paper from the Honey Bee Over the Rainbow papers (included in the kit) and layered it over top of the metallic green.  Then I added my foiled balloons panel over this.

Lastly, I took the sentiment from the Simon Says Stamp Sweet Birthday stamp set and white heat embossed it over a piece of black cardstock that I trimmed down to a banner and popped up over the card with some foam tape.

Vicki-CCT604-flat

I really didn’t want to add too much more to it as it was for a male and I think with all of that foil and shine, it really didn’t need much else!  I think it’s fun, simple and really cheery looking especially with that foiling done.

I know that I’m getting this fun kit out again very soon as I am in need of another birthday card to send to someone that needs a good birthday cheer!

Challenges:

  1.  Pammie’s Inky Pinkies – PIP1941 Anything Goes
  2. Crafty Cardmakers – Sparkle
  3. Through the Craft Room Door – Anything Goes
  4. A Bit More Time to Craft – Anything Goes
  5. Watercooler Wednesday – WWC243 Masculine Anything Goes

Thanks so much for stopping in and sharing a bit of myself with you!  Wishing you a beautiful day friends!

Cute Card Thursday is Sentimental

Hello friends!  Hope you’re having a great week so far!

Today starts a brand new challenge over at Cute Card Thursday and the theme for this week is “Sentimental“.  We look forward to seeing your interpretation with your creations for this challenge!

Here’s how I’ve interpretated the challenge this week:

Vicki-CCT601-Sentimental

I really love sentiment stamps and sometimes they just seem to get used when you need to add a sentiment with your design.  I actually like to use them as not only the focal point of a design, but I like to also use them for backgrounds!

For my card today, I have used an older Simon Says Stamp card kit. (Nov 2016)  I really loved the font and the wording in this set and the different sizes that you can mix together.  The images are from the SSS Thankful Heart stamp set.

I started by stamping two of the images from the set with white ink over the A2 sized top folding card base and then added some papers from the card kit on the bottom portion.  I took a piece of white twine around the center of the card and added a button and bow.

The heart was die cut from a piece of cardstock from the kit with a stitched heart die and then I white heat embossed the sentiment and added some craft foam behind it before attaching it to the card.  I’ve also added a couple of hearts that were cut from white cardstock.

Very simple card, but a good one to have on hand for someone!  I hope you’ve enjoyed it and please be sure to join along with us this week!

Thanks so much for stopping in and I’ll see you soon!

Challenges:

  1.  Double D – Focus on the Sentiment
  2. Aud Sentiments – Anything Goes + Sentiment
  3. Retro Rubber – rrcb120 – Anything Goes + stamps older than 1 year (circa 2016)
  4. Shopping Our Stash – embossing
  5. Sweet Stampers – Use a Sentiment
  6. Simon Says Stamp Wednesday – Anything Goes

Cute Card Thursday is Square

Hello friends!  It’s “Hip to be Square”, right?!  That’s what the theme of this week’s new challenge is over at Cute Card Thursday!  So please hop on over and check out the inspiration and play along with us!  Here’s the card I’ve made for the challenge:

Vicki-CCT583-square

What better card to make than one for a crafty friend! 🙂   I’ve used a past Simon Says Stamp card kit from February 2018 for this one.  I thought that I would carry the “square” theme throughout the design. – It’s great to pull out past kits and have a play with them!

The stamp set is called SSS Crafty Friends and I’ve randomly stamped some of the images on a vanilla-colored cardstock and then cut out each one with a stitched square die cut.  I’ve also used the same die to cut out a square piece of decorative paper contained in the kit which also has a colorful square pattern on it.

For the paint pallet image as well as the tube of paint panels, I took some of the watercolor provided in the kit and added it for some color with a water brush.  I took some twine and wrapped it around the top left panel with the hearts and sentiment and then placed the bow over top.  I then added the scissors wood veneer over top which was also included in the kit.  The turquoise-colored cardstock base and squared layered panels also came from the kit as well.

Vicki-CCT583-square-close

Here’s an even closer look at the different squared panels.  You can better see the watercolor over the panels as well as the turquoise colored Nuvo Glitter Drops that I’ve added to the paint tube on the bottom panel.

Vicki-CCT583-square-flat

Hope you’ve enjoyed my “SQUARE” card today!

Thanks so much for dropping in!  I’ll see you soon!

Challenges:

  1.  Crafty Friends – Anything Goes
  2. Pammie’s Inky Pinkies – PIP1920 Anything Goes
  3. Through the Craft Room Door – Anything Goes
  4. Crafty Creations – Anything Goes

It’s Easter at Cute Card Thursday!

Yes!  Hello friends!  Easter IS on the way, isn’t it?!  I remember many Easters ago of hiding the eggs for the kids and then forgetting where I hid all of them myself, so I had to join in the Easter egg hunt too!  LOL!  Do you have any fun Easter memories?

So since it’s Thursday, it’s time for a fun new challenge at Cute Card Thursday!  Obviously, the theme this week is “Easter“!  We look forward to seeing what Easter makes you’re making this week, so come join us!  Here’s my card:

Vicki-CCT577-SSSEgg-stra Sweet Easter

I had a lot of fun creating this card!  I couldn’t help myself, I had to snatch up that Simon Says Stamp Limited Edition Egg-Stra Sweet Easter card kit. (Sorry, it’s sold out, but you can still purchase the stamp set, Background stamp, egg dies, and stencil separately from the kit though.  I have actually used all of those items on my card today too!

For the background, I took the jellybean background stamp and clear heat embossed it and then while I was cutting it out with a stitched rectangle die, I also took one of the eggs dies and cut out the center of the yellow card panel.  I cut a piece of white cardstock the same size as the yellow layer and then used the stencil and the Nuvo mousse that came in the kit and sponged it over the white panel.  I layered this piece along with a black heat embossed sentiment over vellum on a strip to wrap around the yellow panel along with a piece of black cord at the top.  I took some foam tape and mounted these pieces onto a white A2 sized top folding card base.  Lastly, I’ve added some clear sequins filled with some Nuvo glitter drops in the centers.

Vicki-CCT577-SSSEgg-stra Sweet Easter-close

Here’s a closer look at this sweet little Easter bunny that I’ve colored in with Copics.  I fussy cut it out and then decided to line up the bottom of it and cut it out with the same stitched die that I used on the yellow background panel.  I kept his ear out of it.

I took the glossy accents that also came in the card kit and covered the jellybeans with it.  I also took a couple of metallic gel pens to make some dots on a few of the Easter eggs and center of wheel.  Up close, you can see some of the shimmer from the Nuvo mousse in the white background egg that I stenciled on.

Vicki-CCT577-SSSEgg-stra Sweet Easter-flat

Lots of fun little details going on in this card, but that’s what I love about Easter…so many colorful and happy things going on!

Thanks so much for dropping in today!  I will see you soon!

challenges:

  1. Simon Says Stamp Wednesday – No Designer Paper
  2.  My time to Craft – Easter or Hedgehogs
  3. Brown Sugar – Spring or Fall
  4. Creative Craft – No Patterned Paper
  5. Crafty Cardmakers – Easter
  6. Crafty Gals Corner – Easter is on its way
  7. Crafting By Designs – Easter Challenge