A Salute to Healthcare Workers👩‍⚕️

Hello friends!  I haven’t really mentioned too much about what’s going on in the world right now, and I know it has tremendously affected many people around me.  In the crafting community I sense changes as well in different ways.  I do hope that crafting can help either take your mind off the situation or at least help with making you ‘feel’ that creating from the heart, as we stay at home, is a fantastic way to contribute and help bring about smiles in many ways.

I would like to ask you if you want to respond about it:  Has crafting helped you during this time or has it made it difficult to concentrate?  I have found that taking TONS of classes have actually been my savior right now especially as I was taking that break I had. (Helps me to concentrate on something like a technique.)  I found MANY having classes (free or having group parties going on with crafters teaching and sharing).  Due to this pandemic, I know many people/companies in the crafting community have revved up their classes and challenges as well… along with giving out free digital images!

This brings us to my post for today….

Vicki-TEcarddrive

I have made several stacks of “thank you” cards geared towards our healthcare workers and it has been very rewarding for me to be able to color in all these images in my post today as a salute and honor to those that have been “on the front line” dealing day to day since the beginning of this pandemic.  My heart goes out to all in this uncertain time and although there are many horrible stories related to this, there are also some good ones too.  Let’s rise up.

Taylored Expressions put on a card drive to send cards to the healthcare workers and it ended today, so these cards have already been sent.


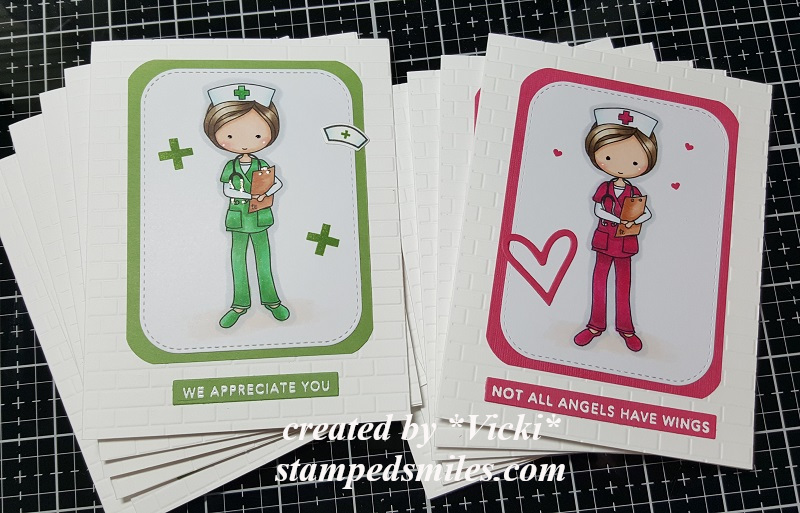
For this particular stack of cards, I’ve made 6 of the pink and 6 of the green using this adorable MOKA Melissa Nurse free download from Taylored Expressions.  I’ve also used the Subway Tiles embossing folder for the background as well as white heat embossed the sentiments from the Life Saver Mini Strips stamp set and die cut them out with the clever Mini Strips Die.  I’ve used a heart die that came with an order I had and then I took some tiny images from other sets for the accents.

Vicki-TEcarddrive-inside

I stamped a message on the inside of all of the cards from TE Big Thanks stamp set too.  (This set came for free with an order I placed.)


Vicki-BRMSuperherocards

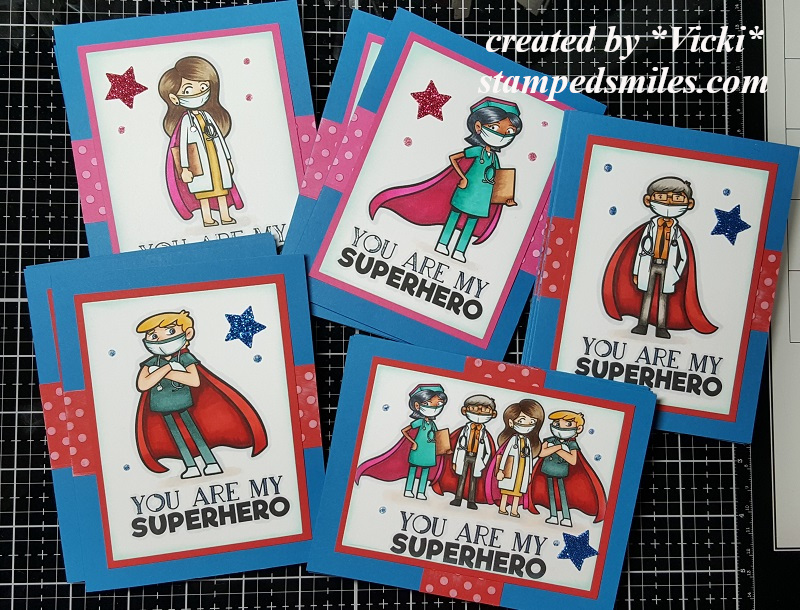
Here’s another set of 20 cards I made for healthcare workers using the Freebie Healthcare Super Hero Coloring Pages.  (To print these out to fit over an A2 sized card base, I used my printer settings to print out 4 pages on one sheet.)

I layered them over some pink and red cardstock and then the base of the card is some A2 sized side folding blue cardstock.  The left over pieces from the pink and red cardstock strips were ran through and embossing folder and white white Ink was ran over it.

Vicki-BRMSuperherocardsA

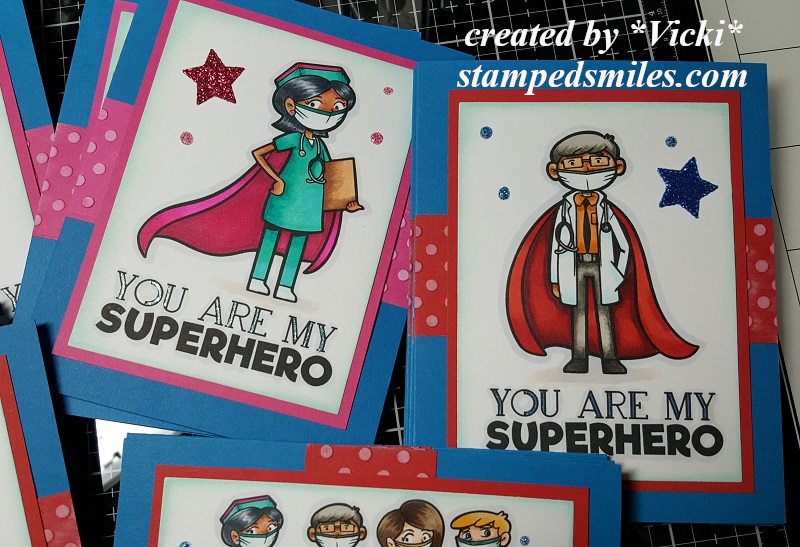
Here’s a closer look at the individual sets.  I used a star die to cut out some stars with Glitter paper.   I also took some blue and pink glitter glue to create extra “dots” around them.  This was good practice for me to experiment with different skin tones too.

Vicki-BRMSuperherocards-B

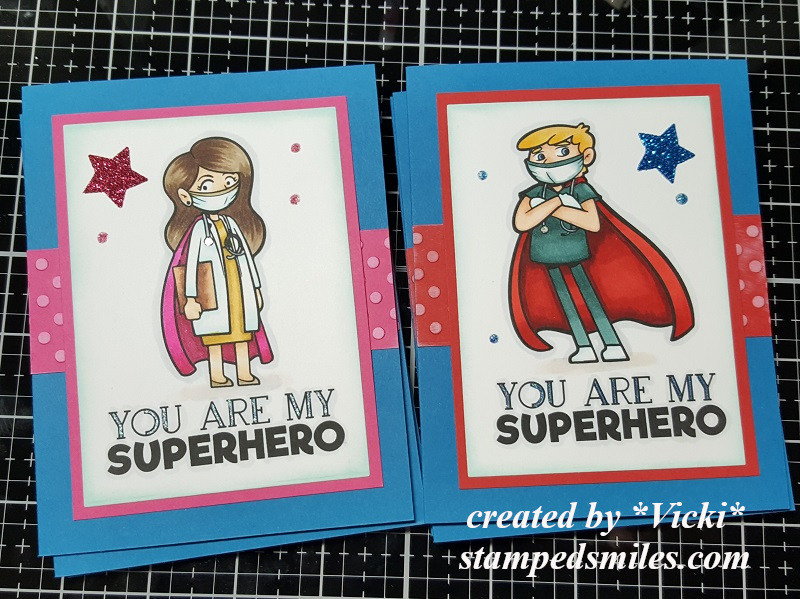
I’ve used Copic markers to color all of these in with and then I took some gel pens to color in parts of the image as well as the outline in the sentiment too.

Vicki-BRMSuperherocards-group

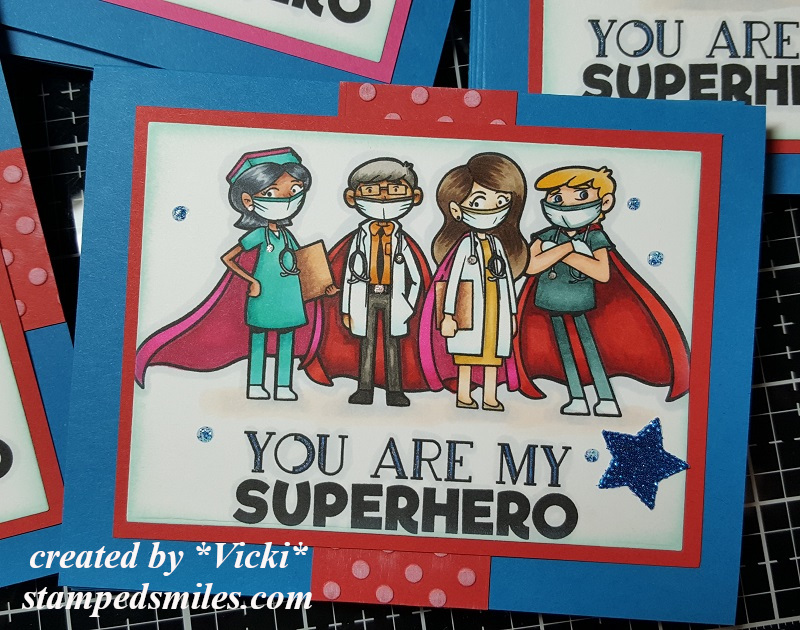
I thought this was a fun one with all of them together and I like that they’re all wearing capes and masks too.  I had these finished up at the end of April, but just now getting all of these out where I wanted them to go.  I’m sending some masks along with the cards to our local hospitals.

Vicki-BRMmailhero

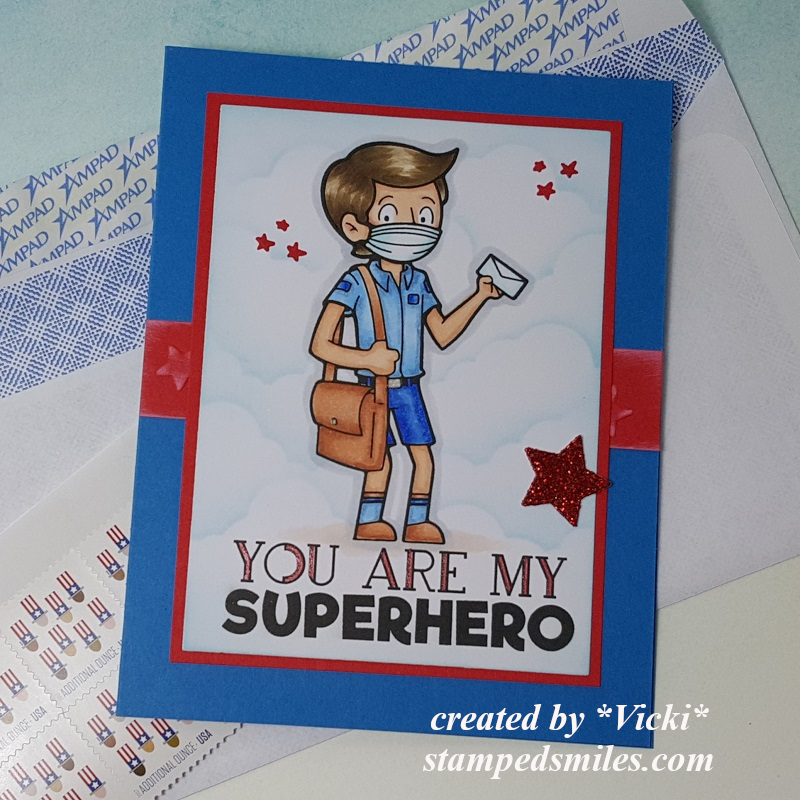
One last and important card I made was specifically for my son who’s a postal carrier.  Of course I tried coloring it in with the same hair color he has too.  LOL!  After I made the batch of cards above, they came out with more superhero freebie downloads, so I grabbed the Mail Carrier Superhero Coloring Pages to make one for him too.  And this one is already on it’s way as well.  For the background, I used the Scene stencil for the clouds with blue distress ink.

I finished this one similar to the ones above.

The ONLY superhero I’m missing is one for my other son who’s a food service worker and I haven’t seen any of those images out yet.  Does anyone know where to find one?  I would love to make a “thank you” card for him as well.  I may just come up with my own version with what I already have…but have to think about how first.  LOL!

This particular song came to my mind and was something that I listened to while coloring….

It was somewhat catchy and upbeat I thought.  I always like to try and think of the positive ways that cards I make give a positive impact or inspiration somehow.  Could be wishful thinking, but it’s my hope anyway.

Thank you so much for taking the time to stop by today to read my post!  I hope that you’ve been inspired in some way!  Have a beautiful weekend my friends!

Challenges:

  1.  Colour Crazy Craft – Anything Goes + hand colored image
  2. Love to Scrap – LTSCB133 – Anything Goes
  3. Love to Craft – LTCCB46 – Anything Goes
  4. Allsorts – Anything Goes
  5. Pammie’s Inky Pinkies – PIP2019 Anything Goes
  6. Not Just Cards – May Anything Goes
  7. Fab ‘N’ Funky – Hand Colored Image
  8. Aud Sentiments – #251 Anything Goes + sentiment

Inspired By Crafty Friends❤

Hello there friends!

I have to say thank you for your lovely comments and thoughts!  Sometimes, you just never really know about something or how someone feels unless you are told or you ask!  I’m really amazed that there are people I didn’t realize that actually cared if I posted something!  Even if you have stats on your postings, you still don’t know who really DOES like to see what you’re posting.  I’ve had some blog friends that have been around for MANY years, even before this blog platform and I’m so thankful for you guys!  I am always truly inspired by you all for sure!  Thanks for being around!❤  (Even if you don’t comment!!) 😉

I have another card that I didn’t get a chance to share as it was created at the end of February and I never fit it in to post, but I pulled out a very old stamp to play with because I was inspired by a friend to use it:

Vicki-ShellysPenguin

Maybe you have heard or seen the Whipper Snapper Designs stamps?  I’ve had this adorable little penguin for a while now and I think he’s long gone from the website.  I don’t see him in the store, but the name on the side of the wood stamp is “Ice Cream Penguin” and no date.  I have a small collection of their stamps and they’re all older as I haven’t bought anything from them in years and not sure why really.  I hold them in high regard like my old Peanuts Gang/Snoopy wood rubber stamps as you can’t find those any longer either!  I don’t part with them! LOL!

Anyway, inspired by my friend Shelly that was featured on Splitcoast Stampers as the FS681 “mcshmidty” Featured Stamper.  This is a challenge where you find a project from their online SCS gallery and use it as inspiration to create something.  Here’s the card she made that I fell in love with in her gallery:

IMG_6447_12216_by_mcschmidty
card by Shelly Schmidt “mcshmidty” on SCS

I thought it would be fun to use an older stamp I had (I love penguins) and create a birthday style card with it.  I have a few birthdays to celebrate in the colder months, so I was just trying to think ahead and I liked that this could be a masculine or feminine card to give out too!  I can’t remember where I pulled the pattern paper from, but the colors really caught my eye!  Instead of the strip like Shelly has on her card, I made my strip into a banner.  I used a snowflake instead of a sun and two enamel dots.

Vicki-ShellysPenguin-close

I stamped and colored him up with Copic markers.  I used some liquid applique for the end of his hat and dotted his cheeks with a white gel pen.  I used glossy accents over top of the cherry on his ice cream cone.

The sentiment was pulled out from an older My Favorite Things stamp set that I white heat embossed over black cardstock and cut apart.  I also used MFT stitched die cuts for the banner and circle image.

Vicki-ShellysPenguin-flat

I must’ve been in the mood for ice cream before I took a blog break as I just realized my last post had ice cream too! LOL!!  Hope you like my card as I was really inspired by my friend’s card to make it!

Thanks for dropping in and I’ll be seeing you soon!!

Challenges:

  1.  Splitcoast Stampers Featured Stamper – FS681 mcshmidty
  2. Crafty Animals – #38 Anything Goes + animal
  3. 2 Crafty Critter Crazies – #38 Anything Goes + animal
  4. Challenge Up Your Life – #123 Animals
  5. QKR Stampede – #396 Anything Goes
  6. Lil Patch of Crafty Friends – #131 Anything Goes
  7. Crafting Happiness – #47 Anything Goes/optional: birds

Celebrate For 2 Crafty Critter Crazies + Other News

Hello friends!  Happy April 1st which means it’s time for a new monthly challenge for the 2 Crafty Critter Crazies Challenge!  Remember that it’s always an “ANYTHING GOES + CRITTER” challenge to enter your creation.  We’re looking forward to seeing your projects!

This month we’re being sponsored by Digi Doodle Studios!  They were kind enough to provide images for the design team to create their projects with, so here’s what I’ve made for my challenge project:

Vicki-2CCCwithDDS

I think I could probably celebrate with these cute little hedgies, couldn’t you?!🦔🦔

This image is called Hedgie Party from Digi Doodle Studios and it was super fun to color up for my card!  We can always use birthday cards in our stash, so I pulled out some papers from my stash…including some left over pieces to assemble the design.

I used a Simon Says Stamp stamp set to heat emboss the stars over the green decorative paper with gold EP.  I stamped the sentiment at the bottom of the paper from the same stamp set with black ink.  I cut out this panel with a square stitched die, layered over white cardstock and then attached it to a piece of orange top folding 5″ square card base.

I pulled out some gold mirror cardstock cut with a scallop square die and layered it over the design, wrapped some gold ribbon around it, placed the layered image panel over top of that with craft foam and added the bow.

Vicki-2CCCwithDDS-close

Here’s a closer view of the image I’ve colored with Copic markers.  I’ve also used a white and gold gel pen to create some polka dots over parts of the image.

Hard to see in the photo, but I covered the big present bow with a glitter brush pen too.

Vicki-2CCCwithDDS-flat

I hope you’ve enjoyed my card today using this sweet DDS image! Thanks for stopping in!

Other news:

Just FYI that this post will be my final creation as a design team member for not only 2 Crafty Critter Crazies, but also for Digi Doodle Studios as well.  Although I adore everyone on these design teams very much, it’s just time for me to let DTs go for a while.

Challenges:

  1.  Krafty Chicks – All Occasions
  2. Di’s Digi Challenge – Birthdays
  3. QKR Stampede – #391 Anything Goes
  4. Creative Knockouts – #343 Anything Goes
  5. Pammie’s Inky Pinkies – PIP2013 Ribbon
  6. Country View– Animal Magic

Purple Day Blog Hop For Epilepsy Awareness

Hello my friends!  Today starts the annual “Purple Day” blog hop and I have joined with my friend Fiki to help bring awareness about epilepsy.

Please take a moment and read important information about this special day:

Purple Day is a global grassroots event formed with the intention to increase worldwide awareness of epilepsy, and to dispel common myths and fears of this neurological disorder. Further intentions of this movement are to reduce the social stigmas commonly endured by many individuals afflicted with the condition; to provide assurance and advocacy to those living with epilepsy that they are not alone in their ongoing endurance; and to initiate individuals living with the condition to take action in their communities to achieve these aims.

The day occurs annually on March 26.  To read more about epilepsy or how you can help in the U.S., check out the Epilepsy Foundation’s website.

My card inspiration:

Vicki-DDS-purplebloghop

Isn’t she just the sweetest little girl with her big heart?!  So delighted, of course, to have been provided this darling image from Digi Doodle Studios which is one of the sponsors for our blog hop today!  This image is called Sweet Carlina and I’ve got her colored up in purples and pinks.  She has a little white heart tucked in her jacket pocket to go with the white hearts on my design.

I found some pretty purplish decorative papers from a recent card kit I had and then I just followed along with a sketch to complete my design. (See challenges below.)  After coloring her out, I’ve cut her out with a MFT Wonky Stitch rectangle die and then layered with a purple cardstock layer cut out with a MFT Scallop Stitch rectangle die.  I popped it up with craft foam over strips of lace, twine and accents I’ve created with the papers.  I’ve used a LF scallop border die to cut accents to go with my heart paper strips.  Extra hearts left over were used in the top corner.  I also added a purple flower button with twine to finish it off.

Vicki-DDSpurplebloghop-close

Here’s a closer view of the coloring I’ve done on her with my Copic markers.  I’ve used white gel pen to dot her checks and color the heart in her pocket.  You can barely see the shimmer that I’ve done over the heart she’s holding with a glitter brush pen.

You’ll also notice that I’ve printed out this image twice, fussy cut out just the portion of the heart she’s holding along with her hands and popped it out over the colored image to give it some depth.

Vicki-DDSpurplebloghop-flat

I hope you’ve enjoyed my inspiration for the blog hop!  I sure enjoyed creating it and helping to give support to my friend along with creating awareness for epilepsy!

Challenges:

  1. Time OutPurple (helping to support epilepsy awareness with us!)
  2.  Sketch Saturday – sketch #602
  3. Pammie’s Inky Pinkies – PIP2012 Anything Goes
  4. Arty Divas – #18 Anything Goes
  5. Through the Craft Room Door – Anything Goes
  6. Simon Says Stamp Wednesday – Anything Goes
  7. The House That Stamps Built – M2520

Hot Dog! It’s Birthday Time!

Hello friends!  As you know, I’ve been TRYING to get my MOJO flowing and I REALLY appreciate the feedback that I’ve gotten from you and others about things I can try including non-craft related things!  (Honestly, right now in this world with what is going on, it is hard to concentrate along with worrying about my own family in different ways…so that doesn’t help either!)  But I’ve been trying to find things to keep my mind focused and try new things that are interesting to me…so I will just keep going along and see what happens!!  I would like to continue with as many “stamped smiles” as I possibly can right now….we all need that at this time!

Today’s card was made for my son’s birthday that was this past Saturday:

Vicki-SSSSoPunFriends

I pulled out an older Simon Says Stamp card kit and used the So Pun Friends and the I Chews You stamp sets along with the coordinating dies.  I’ve used the cardstock and cute Doodlebug So Much Pun Papers that came with the card kit as well.  The tag was cut using the My Favorite Things Stitched Tag dies.  I created the hole at the top of the tag with circle punches and the twine is from left over packaging.

I cut the tag shape out again with more of the papers from the kit and then popped up the image tag with foam tape and added some white enamel dots.

On the inside I stamped a birthday greeting and made a pocket to hold a gift card for him.  We usually take him out to dinner for his birthday, but since he’s moved away I had to send him a gift card instead.  Bummer…

Vicki-SSSSoPunFriends-close

Here’s a closer look at the cute smile face images that I colored up with my Copic markers.  I cut out the food images with the So Pun Friends coordinating dies.  For the sentiment, I stamped the speech bubble from the I Chews You stamp set over a piece of the Doodlebug papers and then added the sentiment from the So Pun Friends stamp set in the center of the speech bubble.  I then die cut it out with the I Chews You coordinating dies.  

I used some blue distress ink to blend some color over the center of the white area on the tag and then popped up the speech bubble with some foam tape over that area.  The hotdog at the bottom was also popped up with foam tape as well.

Vicki-SSSSoPunFriends-flat

I actually had some fun pulling out this older card kit to play with and who could resist a hotdog smiling at you?!  LOL!

Thanks so much for stopping in and for your continued support!  It’s very much appreciated and I hope that I helped bring a smile or inspiration to you today! 

I actually have a couple more birthdays coming up that I need to make cards for, so I’m sure you’ll be seeing more of those in the near future too!

Challenges:

  1.  Not Just Cards – March Anything Goes
  2. Little Red Wagon – Etc, etc, etc (3 enamel dots and 3 food images with smiles)
  3. Cute Card Thursday – Celebrate!
  4. TIME OUT – Birthday with optional twist:  die cutting or fussy cutting
  5. Seize the Birthday – #185 Touch of Green or Anything Goes

Peyton is Painting Eggs for Easter!

Hello there friends!  Where have I been?  Well, I went off looking for my “MOJO” and he’s doing some disappearing acts on me for sure!  I’m having such a hard time getting motivated and feel that my creative juices have completely dried out!  Do you ever feel this way too?  What are some things you have done to help you?  I will keep trying for now!  LOL!  So sorry for being MIA lately!

Today I must share with you a card I came up with using this really adorable image from Digi Doodle Studios just in time for Easter!

Vicki-DDSPayton-March13

Isn’t he adorable?!  This digital image is called Peyton’s Painted Eggs from DDS and he’s busy at work painting up eggs to get them done in time for Easter!  I’d say he looks like myself getting messy and into the job!  LOL!

After coloring him up, I used a MFT die to cut him out and create the layered frame around him with some purple glitterstock along with some black and white cardstock.  I white heat embossed a sentiment (from Simon Says Stamp) and cut it out with a banner die to go over the image panel.

I took some white ribbon and wrapped it around the corners and attached a bow on the top corner with a flower embellishment in the center…found in my stash.

Also “found in my stash” was the fence and grass dies that I used to attach to the bottom of the card front panel.  Some of the “grass” was placed behind the image panel and some in front of it.  I also attached in the center a strip of the purple glitterstock Lawn Fawn Spring Plaid paper for the front of the card and this was layered over another piece of black cardstock which was mounted over a top folding 5″ square white card base.

Vicki-DDSPayton-March13-close

Here you can see how I’ve got him all colored up with Copic markers.  He was actually really fun to color up.  My first notion was to make him a white bunny, but I thought he would really stand out if he was brown in color instead.  I added some blades of grass around him with my markers.

I left the egg he was in the process of painting white along with the plain one on the ground…after all, he IS in the process of working on them! LOL!

I’ve only used the white gel pen for his cheeks and  I’ve used a clear metallic gel pen on the paint brush.  The “shinny” areas you see on the “fresh paint” colors are the places that I’ve covered with glossy accents.  The light is naturally highlighting them!

Vicki-DDSPayton-March13-flat

I hope that you’ve enjoyed my Easter bunny card today and it’s helped get you in the mood thinking warm Spring thoughts!  I know I’m really looking forward to warmer weather and being outdoors for sure!  Easter is just around the corner now!

Challenges:

  1.  Crafty Animals – Anything Goes + animal
  2. A Bit More Time to Craft – Anything Goes
  3. Crafts Galore Encore – #73 Anything Goes
  4. Love to Craft – LTCCB44 Anything Goes
  5. Lil Patch of Crafty Friends – #127 Anything Goes
  6. Creative with Stamps – #48 Egg
  7. Pammie’s Inky Pinkies – PIP2010 Anything Goes
  8. Crafty Creations – #407 Anything Goes
  9. Creative Fingers – #181 Anything Goes
  10. Sweet Stampers – #42 Easter or Spring
  11. The Sisterhood of Crafters – Easter

Raggedy Love

Happy Valentine’s Day my friends!!  Hope that you’re “feeling the love” and have a wonderful day today!

I wanted to share a card I made for Valentine’s Day.

Vicki-RaggedyLove

This really cute images is from Stamp On It called “Love You” digital stamp by QKR Stampede.  I wanted to try and keep to the “original” Raggedy Ann style of colors as I could, so I ended up Google searching for photos so that I could use that as a basis for my coloring.  I also thought that the rectangle die cut panels would go great for cutting her out with.

I sponged around the edges of the image panel with some blue distress ink, added some heart confetti pieces along with a white twine bow to the center of the heart.

Vicki-RaggedyLove-close

Taking a closer look at the image, you can see how dimensional those confetti hearts are.  There is actually a heart that prints out in the center of the “o” in the sentiment, but I decided to place one of those confetti hearts over it.

There is also some shimmer you can see in the heart with the bow that I’ve covered with a glitter brush pen.  And in coloring her in, I’ve added some extra “dots” on her blue dress and then I took a white gel pen to add a pattern on her red patch on the apron and then also to add some “stripes” to her socks and “dots” to her cheeks.

If you look at her eyes, I’ve taken a black gel pen which gives them a slight dimension and makes them stand out a bit more.

Vicki-RaggedyLove-flat

I really hope you’ve enjoyed my “Raggedy Love” card today and that you have a wonderful Valentine’s Day today!

Thanks so much for stopping in and I’ll see you again very soon!

Challenges to enter this card for:

  1.  QKR Stampede Anything Goes
  2. Pearly Sparkles – Include some red
  3. Lil Patch of Crafty Friends Anything Goes
  4. Make My Monday I Heart You
  5. Try It On Tuesday – Share the Love
  6. Double D – Hearts
  7. The House That Stamps Built – DCC F520 Hearts
  8. Aud Sentiments – Love/Valentine Sentiment

Oh BABY! It’s Shaping Up!

Hello friends!  Hope that you’ve enjoyed a fantastic weekend whatever it was you were doing!  It’s been SO freezing over my way and I’ve been covering up with electric blankets!  Brr!

Today I’d like to share with you a couple of shaped baby cards made with a newly released and adorable Pairables set from Digi Doodle Studios along with a few other fun products from their store…

Vicki-DDSPeciousBabies-Jan21

Check out these shaped baby style cards I made with these ADORABLE little baby images from the Precious Babies Pairables set!  You may remember not too long ago the other baby card I made on THIS POST with the other new set called Little Ones Pairables.

Vicki-DDSPreciousBabies-Jan21-close

I wanted to share a close-up look at the coloring I’ve done with these two sweet little baby images.  I’ve used Copic markers to color them with and then just used a white gel pen for highlights on the cheeks as well as creating polka-dots for the baby girl’s dress on the yellow portions.

It’s hard to tell in the photos, but I covered the baby bottle with a glitter brush pen.

The baby girl was cut out with a circle die and layered over another die cut scallop circle from pink cardstock.  I’ve used my scissors to fussy cut out the baby boy and pop him over the design with foam dots.

Vicki-DDSPreciousBabies-Jan21-girl

For this baby onesie shaped design, it’s actually REALLY simple to do!  It’s just a matter of measuring in, cutting and then circle die-cutting where you need to put the neck hole and leg holes is all!  It is a standard sized A2 top folding card and will easily fit inside a standard A2 sized envelope for mailing which I love!

The pink gingham paper that covers the entire front panel of this card comes from the Digi Doodle Studios Bundles of Joy Digi Paper Pack.

I’ve used the same ribbon for behind the circle panel as well as for the “ruffles” around the neck area.  I just folded up the ribbon to give it that look and attached it along the neck hole line.  I’ve attached a couple of pink ribbon bows on each side as well.

For the arm and leg hole areas, I’ve just used scallop style die cuts and sized them over the ‘openings’ and trimmed them down to fit.

I’ve taken the printed out sentiment from this same Pairables set and trimmed it down to attach along the side of the onesie, used some foam tape to pop up the baby girl image panel and added some pearls to the bottom of the onesie card.

Vicki-DDSPreciousBabies-Jan21-lilboy

For this baby boy bib card, it’s just as simple!  You could use ANY circle die cut you have, but I didn’t happen to have a size that I was looking for, so this scallop circle design was cut from my Cricut machine.  It cut out the light blue and the dark blue layer behind it.  I ended up cutting out an additional dark blue panel to create my full shaped card design.  (This card measures exact size as above for regular A2 sized envelopes!)

The next step was using a circle die to die cut through all of these scallop circle layers for the neck opening on the bib.  I’ve used a score board to score a line on the top layer only (as the bottom was the back/inside of the card and didn’t need score lines.) and added the ribbon before securing the top two ends (behind the buttons) to the back of the card panel so that it opens like a regular top folding card.  (I also added an additional light blue circle panel to the inside for a message.)  The ribbon is secure and doesn’t interfere with the opening of the card.

I’ve used another circle die to cut a piece of paper from the Digi Doodle Studios Baby boy Digi Paper pack.  Obviously this was also cut out for the bib neck line as well.  I tied a bow with white twine on the buttons before gluing them down on the top ends of the bib.  I printed out the sentiment from the DDS Little Ones set and cut it out with the same circle die that I’ve used for the papers and trimmed it down into a strip and added another dark blue layer behind that to attach to the front of the bib.  I popped up the baby boy and the wood block with foam dots over the card and added some blue pearls along the side.

Thanks so much for joining me here today and I’ll see you again soon!

Challenges I’d like to enter:

  1.  Daring Cardmakers – Something ‘NEW’
  2. Arty Divas – Anything Goes #13
  3. Through the Craft Room Door – Anything Goes
  4. A Bit More Time to Craft – Anything Goes
  5. The Creative Crafters – Anything Goes
  6. Cute Card Thursday – What’s New?
  7. As You Like It – Anything Goes

It’s a HAPPY Birthday!

Hello friends!  I hope you’ve had a lovely weekend!

After starting this year, I tend to “look back” on my stash items and take a good “inventory” of what I have and the things that hardly EVER get used, if have gotten used at all!  And of course I try to tell myself…”no more!”  LOL!  I honestly just let all of my card kits just sit and don’t dive into them and use them!  I get so excited about them when they come out, oooh and aaahhh over every single item in the kit and then it just sits…then before you know it, another kit comes out!  It’s an endless cycle that I’d like to stop!  Does anybody else have this problem?!

**This year, I hope to not only just open the boxes with content, but also make some creations with them!  If I’m already suscribed and getting boxes, then why am I not using them?!  You saw in a previous post the Snowflake set of creations, so I plan on doing more of that this year…so stay tuned! 🙂

I actually have made a card from a fun special edition “Sweet Birthday” card kit from Simon Says Stamp last year that I was super excited about, but only dug in enough of it to make this one card:  (Hanging head…..)

Vicki-SSSSweetbirthday

At least I made ONE with it, right?! LOL!  I just thought this was such a happy, colorful and fun card kit that it was just perfect to send a birthday smile for someone that really needed some “happy” sent their way.  My schedule was crazy and then I forgot to get it posted!  LOL!

The stamp set used in creating this one from the SSS card kit was called Sweet Birthday and I was excited to be able to get the coordinating dies to go with it too.  It’s very simple with the cardstock and pattern papers from the kit for the layout design.  I used an additional piece of black cardstock to white heat emboss the sentiment from the stamp set, cut it out with my scissors and pop it up along with the party hat cloud and balloons with the black “strings” underneath them.

I used a white gel pen to add “dots” to the blue balloon and then added some sequins from the card kit over the design.

Vicki-SSSSweetbirthday-close

Here’s a closer look at the images and how I’ve colored them up with my Copic markers.

At this point I don’t remember if I’ve added a glitter brush pen over anything, but more than likely I probably did because I like using it! LOL!

I’ve also used a sanding block around the edges of the pattern paper as I like to distress my papers sometimes too.

Vicki-SSSSweetbirthday-flat

I didn’t know who this person was that received this card, but a request came from a crafty friend who asked to send smiles to someone for a loved one’s birthday and of course I was happy to get creating and hope that this helped in some way to lift spirits.

And I hope that this has helped put a smile on your face too!

Thanks so much for popping over here today and I truly enjoy seeing your comments!  Please let me know what you think of YOUR stash?  Is it “out of control” like mine?  LOL!  Would you like to see me making posts using more of my card kits?  Share your thoughts below! 🙂

I’ll see you again soon my friends!

Challenges:

  1.  Love to Craft – LTCCB42 Jan. Anything Goes
  2. Love to Scrap – LTSCB129 Jan. Anything Goes
  3. Seize the Birthday – Anything Goes + Toppings:  Layer It!
  4. Use Your Stuff– Anything Goes
  5. Try it On Tuesday – What a Cutie/Make Someone Smile

Welcome Little One From Digi Doodle Studios!

Hello friends!  So now that we have celebrated the Holidays and have started the year, it’s time to look at all things “new”, right?!  I have some new things to share with you today using Digi Doodle Studios products!

To me, there’s nothing better to celebrate “new” than new crafty items to play with as well as a new baby theme:

Vicki-DDSBOJ-Jan7

I hope you just said “Awe!” right along with me here!  Absolutely fell in love with this precious digital Pairables set that’s BRAND NEW at Digi Doodle Studios called “Little Ones“!

I started by printing out the images and coloring them up.  I colored the giraffe, balloon, heart and baby rattle and then fussy cut them out for my card design.  There is a very soft interlocking heart grey background papers from the Digi Doodle Studios Baby Boy digital paper pack that I’ve used for the background with the frame layout.

The frame was cut out using the Whimsy Stamps Peekaboo Window 3 die from some yellow cardstock.  I then took a brand new textured embossing folder from Sizzix that I got over the Holidays and embossed it.  Love the texture of the hearts!

I used some pop dots to lift the images up a bit and added some white twine to the balloon and giraffe.  The sentiment was printed out (also from the same Pairables set) and cut out with a banner die.  Lastly, I’ve added the ribbon bow, button and some tiny heart sequins in random areas.

Vicki-DDSBOJ-Jan7-close

Here’s a closer look at the coloring I’ve done on this sweet little giraffe.  I’ve used Copics to color all the images.  You can see how pretty that texture from the embossing is!  Lots of little hearts going on here! (Including on the giraffe in case you didn’t see that!)  🙂

You can see where I’ve added some shimmer to the balloon, tiny hearts on rattle and the tiny heart inside the yellow heart with a glitter brush pen.

Vicki-DDSBOJ-Jan7-flat

I hope you’ve enjoyed my “NEW” creation for you today!  Please be sure to stop in the store and check it out along with all of the other new items available!

Challenges I’d like to enter this card for:

  1.  Crafty Creations – Anything Goes #405
  2. Pearly Sparkles – Anything Goes
  3. Moving Along With the Times – All Things New (new digi stamps/papers/embossing folder and new baby)
  4. Simon Says Stamp Wednesday – Something New
  5. Craft Rocket – Something New
  6. QKR Stampede – Anything Goes #379
  7. Crafty Friends – Something New
  8. Crafter’s Castle – Anything Goes