Let’s Celebrate at 2 Crafty Critter Crazies!

HAPPY NEW YEAR FRIENDS!!!

*I wanted to take a moment to first wish all of my friends and blog readers here an extremely Happy New Year and best wishes for the most amazing 2020 you can have!  I have REALLY appreciated each and every one of you for your friendship, support and comments throughout this last year…it really means so much to me!  I hope to continue to inspire and spread smiles with you in the comng year as well!  HUGS*

Today is obviously the first which means it’s time to start a brand new challenge over at 2 Crafty Critter Crazies!  So remember that you have the entire month to play along and It’s ALWAYS an “Anything Goes + a critter” on your crafty project!  Easy peasy!

Here’s the creation I made for this month:

Vicki-2CCC34-BugabooBday

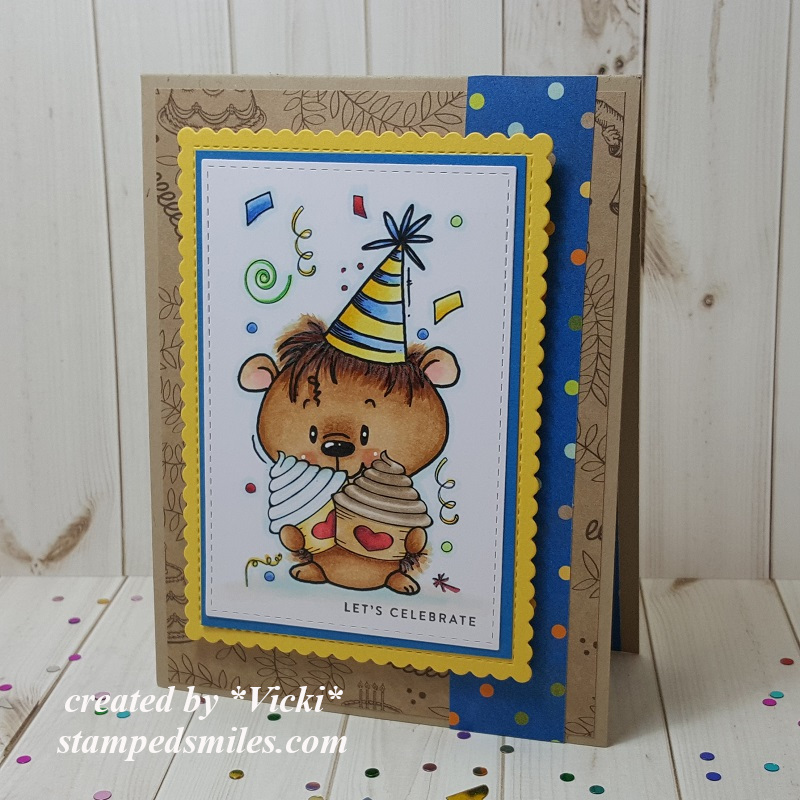
He’s such a cutie and I think he would be a fun little guy to celebrate with especially since it looks like he’s handing out cupcakes! LOL!!

The sponsor for our challenge this month is Bugaboo Stamps and the team were given some images to play with, so I have used this adorable Birthday Hedgie 02 digital stamp on my card today!

After coloring him up with Copic markers, I used a stitched rectangle die to cut him out with and then layered him onto a blue layer of cardstock along with another yellow layer that was cut from a stitched scallop rectangle die.  I used some craft foam to pop him up over the card front design.

For the card base, I took a top folding A2 sized kraft card base and found some fun birthday papers in similar colors slightly cut down to go over top.  I also found a matching blue dotted strip of paper to place from top to bottom of the card base design.  the sentiment was stamped in black ink at the bottom of the image panel.  This is a new set I got from Simon Says Stamp called Tiny Words.

Vicki-2CCC34-BugabooBday-close

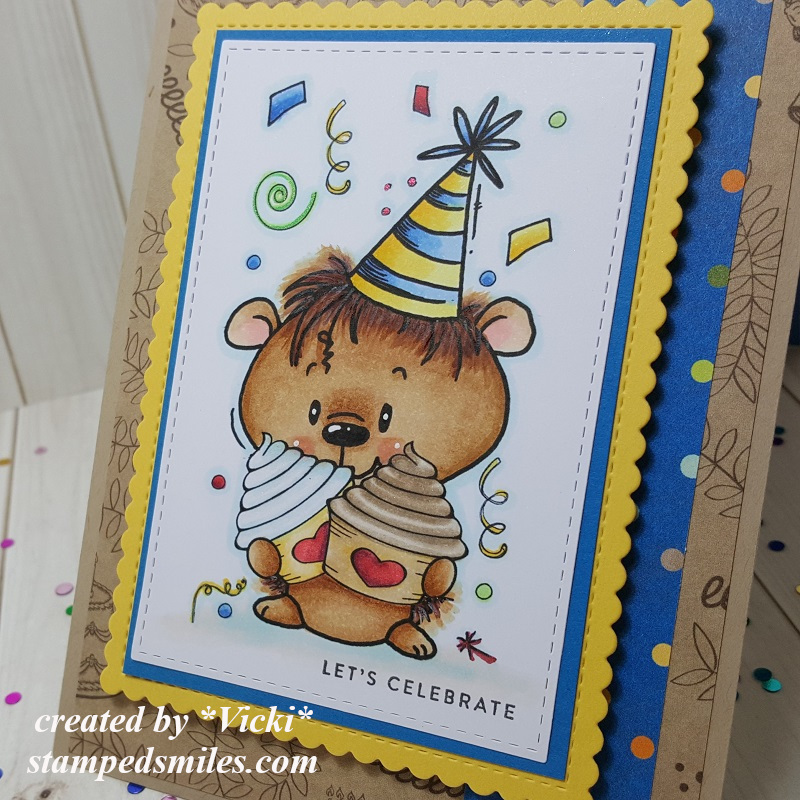
Here’s a closer look at the coloring I’ve done on this cute little guy!  His “hair” actually got a bit more “fuzzy” than what I was going for, but I didn’t want to keep going over him or he might look like he partied a bit too much! LOL!

Of course it’s very hard to see unless you see it person, but I’ve added some shimmer with my glitter brush pen over the cupcakes and little hearts.  I also used some colored gel pens to go over some of the confetti pieces around him.  I also used a white gel pen for his cheeks and I thought he needed some eyeballs and I made those too!

Vicki-2CCC34-BugabooBday-flat

I hope you’ve enjoyed my card today!

P.S.  Just for fun, please share with me if you have any crafty or non-crafty “New Year’s resolutions/goals” for this year!  My goal is to COMPLETELY finish each card I make this year with sentiment/decorated inside, with the envelope and signed on back!  I hope it holds up!  I started with this card!

Challenges:

  1.  Make My Monday – Female Birthday (Thought it could be used for anyone!)
  2. Simon Says Stamp Monday – “Party Time”
  3. Creative Knockouts – Celebrations
  4. QKR Stampede– #378 Anything goes

A Special Present from Santa for Digi Doodle Studios

Hello friends!  Happy weekend!  It has warmed up slightly for us this weekend and the sun is out…for now!  It’s supposed to get below freezing again soon though and I’ll have my warm slippers ready for it!

Today I have another fun card to share with you using a Pairables set from Digi Doodle Studios:

Vicki-DDSChristmasElves-Nov16

Surprise!  This cute little girl is popping out of the gift marked:  “From Santa” and she threw open the box lid and is tossing blue ribbon around everywhere!  She seems to be so happy about celebrating in the cold!  LOL!

All of the images I’ve used for this card came from the Christmas Elves Pairables set from Digi Doodle Studios. (There are so many elements to play with in this set!)  I have actually enlarged a couple of the images from the set and sized them the way I needed them to fit with my scene and make it appear as if she was popping out of a large box.  I printed out the girl a couple of times so that I could place her behind the box with the lid and then another image to cut her out without the lid of the box and make it more dimensional.

I’ve used several layers of cardstock and more decorative papers behind her with both stitched and scallop rectangle dies.  I used my Martha Stewart “goo” border punch to add the “snow” look at the top of the layers with white Glitterstock.

I’ve added some silver metallic ribbon behind the smaller layers and placed a snowflake rhinestone in the middle of the bow.  I die cut the sentiment with a stitched tag die and added some silver twine to tuck alongside the present.  I stamped some pink snowflakes over the tag and crinkled it up a bit for dimension and movement.

Vicki-DDSChristmasElves-Nov16-close

Here’s a closer look of the coloring I did on her with Copic markers.  I’ve used a white gel pen for her cheeks as well as to help create the texture on her coat.

I’ve used some Nuvo White Blizzard Glitter Drops for the sparkle on her hat trimmings and she was popped out from the background paper with foam tape.

Vicki-DDSChristmasElves-Nov16-flat

I hope my card gave you a smile today and were inspired in some way!

Thanks so much for popping in here today my friends!  So happy you’re here!  I’ll see you again soon!

Challenges:

  1.  Addicted to Stamps – Anything Goes
  2. Pammie’s Inky Pinkies – PIP1945 Anything Goes
  3. Through the Craft Room Door – Anything Goes
  4. Fab ‘N’ Funky – Add Some Sparkle
  5. Creative Knockouts – Anything Goes
  6. Jingle Belles – Baby, It’s Cold Outside!
  7. Send a Smile 4 Kids – Happy Holidays or Anything Goes for kids

Naughty or Nice for Digi Doodle Studios

Hello friends!  Hoping you all had a wonderful weekend!

Today I’m sharing a fun circle shaped design using a cute new Pairables set from Digi Doodle Studios:

Vicki-DDSChristmasElves-Nov4

This cute little elf is sitting atop of an ornament, getting out the list for Santa and marking down who’s naughty or nice! LOL!  This image and sentiment are apart of the Christmas Elves Pairables Digi stamp set.   On my computer I actually expanded the ornament image to make it larger and then added the cute little elf from the set right on top of the ornament.  I printed it out as one image and colored it up with Copics.  I’ve also stamped some snowflakes around the image and cut him out with a circle die.  I used some Broken China distress ink to sponge around the edges.

I layered him onto a brushed gold die cut circle and added some gold stickles around the edges.  I then layered these onto a red die cut circle that was embossed with an embossing folder, which is also the same one that I used for the green piece on the inside of the card.

I made a circle easel card and then cut out the sentiment from the digi set in a strip  (also sponged with Broken China ink) and mounted it over another piece of red cardstock and attached it on the inside right above the green embossed layer.  (This strip is what helps keep the front layer propped up.)

Vicki-DDSChristmasElves-Nov4-side

Here you can see the side view of the card design.  These are very simple to make with die cut shapes and I love how they nicely display for the recipient.

I’ve add some green saddle stitch ribbon to the center of the red circle before attaching it to the easel card backing and then added a bow that I’ve tied 2 gold bells on with a piece of twine.  I then used the twine to make a double bow to go behind the green one and glued them on my card.

I added some snowflake accents and placed a blue rhinestone in the center of each.

Vicki-DDSChristmasElves-Nov4-close

Here’s a closer view of the details on this cutie.  I actually have lots of thing going on with this image.  First, I covered the bottom of his ornament with glossy accents.  It’s a fairly thick layer and you can see the details of it in the photo below, but I had to let it dry over night!

I have taken a gold gel pen and colored the “bells” on the elf’s outfit.  I then took a white gel pen for his cheeks.  On top of the ornament, I used a glue pen and covered it with some clear loose glitter.

For the trim on his hat, I took some Brutus Monroe Snow Paste and a small brush to apply it.  It’s REALLY thick stuff, so for a small area like that, I had to be a bit careful.  Love the sparkle in it and you can see, in the photo above this one, the side view of how thick it actually is!  I heat set it with my heat gun because it “puffs” up a bit when you heat it.

Vicki-DDSChristmasElves-Nov4-flat

Here’s what the card looks like when it is closed up.  I think this would also make for a really cute ornament too!  You can really see the shine on the glossy accents from this photo and why it took all night to dry! LOL!

I hope you’ve enjoyed my easel card today and gotten some inspiration and/or a smile!  Thanks so much for stopping in today!  I’ll be seeing you again soon!

Challenges:

  1.  Merry Little Christmas – November Anything Christmas Goes
  2. Pearly Sparkles – Christmas
  3. My Time to Craft – No Rectangle or Square Cards Allowed
  4. Stamping Sensations – Traditional Christmas Colors (Red, Green, Gold)
  5. A Bit More Time to Craft – Anything Goes
  6. Crafts Galore Encore – Anything Goes

It’s SNOW Fun for Whimsy Stamps!

Hello friends!  Welcome to the weekend and I hope you are having a great one so far!

Today I’m sharing this adorable image from the November Digital New Release for Whimsy Stamps!  Be sure to check them all out in the store!  They’re so cute!!!!

Vicki-PenguinSnowFun-Nov2

How fun and cute are these guys?!!  I’m using the Penguin Snow Fun image for my card today!  Now you already know how I love these penguins, but how cute are they especially that one in the middle with the mouth open! LOL!

For my card I started with a watercolor panel and then white heat embossed the snowflakes over it from the Whimsy Stamps Snow Flurry stamp set.  I then went over this panel with water and added some colors over it with Distress Oxide ink pads smooshed down on my glass mat and picked up with a brush and water.  I’ve used Peacock Feathers, Stormy Sky, Dusty Concord, Chipped Sapphire and Salty Ocean for the colors.  I tilted my panel to get the water to run down a bit and heat set it.

I cut a piece of glitter cardstock with the Kinetic Curved Hills die set as well as some snowflakes from the No-See All Seasons Tree die set.  I placed the hill at the bottom of the watercolor panel and randomly attached the snowflakes to the background.

For the sentiment banner, I white heat embossed it from the same WS Snow Flurry stamp set and added a snowflake in the center of the ‘O’.  I trimmed it into a banner with my scissors and added to the card.

I then took some foam tape and popped up the image over the hill and then added some gems to the center of each die cut snowflake.

Vicki-PenguinSnowFun-Nov2-close

Here’s a closer look at this adorable image that I’ve got all colored up with Copic markers.  For the bear and everyone’s cheeks, I’ve used a white gel pen and for the band on the penguin’s earmuffs, I used a clear glitter gel pen.

For the penguin’s red hat trimmings, I used a glue pen and some loose clear glitter over top.  I fussy cut out the image and popped it over top of the glittery snow hill.

OOPS…a bit of the snowflake staging stuck to the glittery snow hill a bit! LOL!

Vicki-PenguinSnowFun-Nov2-flat

Really had a great time coloring this sweet image and getting messy creating the background too!  Hope you’ve enjoyed my creation today as well!

Thanks so much for checking in with me today my friends!  I appreciate it very much and I’ll be seeing you soon!

Challenges:

  1.  Happy Little Stampers Watercolor Challenge – Anything Goes (using watercolor) + optional: animals
  2. Christmas Crafts All Year ‘Round – Stockings or other Winter Clothing
  3. Crafty Animals – Anything Goes + animal
  4. Crafty Catz – Anything Goes with optional: snow
  5. Brown Sugar – November Anything Goes

Ghostly Haunts with Digi Doodle Studios + a Bag-a-lope Video Tutorial!

Hello friends and happy weekend to you!  Hope that you have some fun included in your weekend.

Today I’m sharing this really adorable digital stamp set from Digi Doodle Studios called “Ghotstly Haunts” and I had SO much fun with it that I made several projects using it including a fun video tutorial that may give you ideas for not only your favorite goblin, but for other fun ideas that I’ll reference:

Vicki-DDS-Bag-a-lope video

Now how cute are the ghosts in this set?!  As you can see, I had tons of fun creating several projects using the Ghostly Haunts Pairables digital stamp set!

The two projects on the ends are actually what I’ve created for the “bag-a-lope” video tutorial.  If you’ve been crafting for as long as I have, then I’m sure you’ve heard of this idea somewhere along the way.  People buy up those dies, but this way seems so much easier and cheaper to deal with to me.  Here’s the project idea that I share in the video:

Vicki-DDS-Bag-a-lope1

This is such a fun and easy bag to create and fill with treats for your favorite goblin!  You can fill with yummy treats or a small gift.  It would be great to put a gift card inside with some tissue or bag fill too!  Not only for Halloween, but for Christmas too!

In the video below, I share how I created this bag along with another fun project using the same idea with just a plain old envelope!  That’s all you need to make these along with your own ideas!  I’ve used the Ghostly Haunts Pairables set to create the fun spider web paper in the background as well as the spider and sentiment.

If you’d like to see how to create this treat bag along with some other fun ideas with tips and tricks, then be sure to watch my video tutorial below or CLICK HERE to view it on You Tube. – If you haven’t yet, please be sure to hit “like”, comment and subscribe to my channel!

Vicki-DDS-Bag-a-lope2

As seen in the video, I have also used this adorable set using the same “bag-a-lope” idea to create a fun Lumiere using a vellum envelope.  I have printed out an additional ghost and attached him to the clip on the top of the bag.  LOL!

For the spider web strips at the top and bottom, they were the same left over papers that I’ve used on the treat bag above, but for these strips I’ve heat embossed over them with some clear sparkle EP.  It’s hard to see in the photos, but I’ve taken a sparkle glitter brush pen and covered every single ghost on my projects.  I’ve used my Copic markers to color in all of the images after printing out my scenes from the computer.  The sentiment for this project was actually made by myself using a font from my computer.

Vicki-DDS-Bag-a-lope-candle

Here you can see how the battery tea light candles are glowing through the vellum Lumiere bag.  I also thought this would be a fun idea for Christmas time as well!

Vicki-DDS-Ghostely Haunts

Lastly, I HAD to create a card using this adorable digital set too!

For this card, I created the scene on my computer and printed it out.  I printed it out again over some masking paper.  I cut the images out of masking paper and put them over the printed out scene so I could do the ink blended background.  I actually fussy cut the ghost and popped him up over the tombstone.  I covered him with a glitter brush pen too!  (I’ve also added a touch of “moon glow” on the top of his head.

I die cut the scene and attached it over a piece of purple glitterstock and then die cut the black frame to go over top of the card.  Before adding the frame, I attached the die cut fence and a couple more pieces of “grass” from the digital stamp set.  That sentiment cracks me up!  I sponged over it, added to a black strip and attached it over the card front panel.  This was all attached to an A2 sized top folding card base.

Hope you’ve had as much looking at my projects as I had making them! Thank you so much for dropping by today and I’ll be seeing you soon!

Challenges:

  1.  Try it On Tuesday – Witches/Wizards/Halloween
  2. The Creative Crafters – Anything Goes
  3. Creatalicious – October Anything Goes with optional Autumn/Halloween
  4. Simon Says Stamp Wednesday – Halloween
  5. The Male Room – Halloween
  6. Krafty Chicks – #477 Ghost Card
  7. CRAFT – Box or Bag
  8. Creative Knockouts – Halloween
  9. TGIF Challenges! – #tgifc234 – Happy Halloween

It’s Halloween at Cute Card Thurday!

Hello friends!  Has the weather been cooling down for you yet?  We are supposed to get much cooler than normal over my way this weekend!  Night time low around 36 degrees is a bit too chilly this time of year!  I need Fall to last! 🙂

Today starts up a new challenge this week for Cute Card Thursday!  The theme for this one is “Halloween“!!  So if you still have some more Halloween cards or treat projects, etc that you need to make, please share it with us!  We look forward to seeing what you make!

For my card, I thought it would be fun to use another Whimsy Stamps October digital stamp with a Halloween theme:

Vicki-CCT603-Witch Cinnamon-Oct10

This cute little witch is called Witch Cinnamon and I’ve used her in a little different way from the original version for my card.

First thing I did was take some black cardstock and used an embossing folder for the trees in the background.  I took a white ink pad over it so the embossing stands out a bit better over it.  I layered this onto a piece of purple cardstock and then added it over an A2 sized top folding black card base.

I took a circle die and cut it out with some yellow glitter cardstock which I then popped up with some black craft foam that I also cut out with a circle die.  I took the bat die and also die cut some bats from black glitter card stock and attached them over the design along with the witch image that is “flying” in front of the moon.  I black heat embossed (sparkly black EP) the sentiment from a Simon Says Stamp Frightful Fun set over purple card stock that I cut into a banner over the design.  I then added a thin strip of green glitter card stock at the bottom of the card.

Vicki-CCT603-Witch Cinnamon-Oct10-dark

For this photo, I tried shutting the lights off so that you can see the “green dots” in the sky that glow in the dark!  These are Nuvo Glow Drops Neon – Apple Sour that I added for the dots in the sky area.  I’ve also taken a Stampin’ Up! punch from my stash and added some purple colored stars around the area too.  If you compare this photo to the one above, you can see that with the light on, the drops are a bit more translucent.  When the lights are dimmed, you can see the glow-in-the-dark effect!

Vicki-CCT603-Witch Cinnamon-Oct10-close

I’ve zoomed in on how I’ve colored up this cutie for my card.  She’s colored with Copic markers and colored pencils.  If you take a look at the original image, you can see that I have decided to fussy cut out just the witch as I wanted her flying in front of a full bright glittery moon!  She still looks pretty cool if you were to cut her out entirely with a circle die too! 🙂

I’ve used a colored pencil to create a nice little “moon glow” on one side of her and in some areas along the top of her where I thought the moon would be glowing some light on her.

I’ve also used a white gel pen for her checks and for highlighting on her stockings.  I also used a silver gel pen to color in the buckle on her hat.  Hard to see in the photo, but behind her broom, I took a glitter pen to add a bit of shimmer where she was flying.

Vicki-CCT603-Witch Cinnamon-Oct10-flat

I hope you’ve enjoyed my card today and been inspired to create some Halloween projects soon!

Challenges this card was entered for:

  1.  Aud Sentiments – Halloween/Fall + sentiment
  2. Brown Sugar – October Anything Goes
  3. QKR Stampede – #366 Anything Goes
  4. Daisy Chain – Pink or Halloween
  5. Simply create Too – Anything Goes with optional:  Spooky/Scary
  6. Fab ‘n’ Funky – Halloween
  7. Little Red Wagon – Cut it Out!

Anything Goes for Cute Card Thursday!

Hello friends!  And here we are almost the first week in October coming to a close!  Wow, time goes so quickly I can’t keep up with it! LOL!

It’s Thursday and time for a brand new challenge over at the Cute Card Thursday Challenge blog!  The challenge for this week is our monthly “Anything Goes” theme with our sponsor Whimsy Stamps!

Vicki-CCT602-Oct3

Now how cute is this little Frankenstein girl?!  She could be a trick-or-treater coming around the tree with her arms out trying to walk like a Frankenstein to scare you, but I’m giggling! 🙂    This digital cutie is called, of course, Frankie by CC Designs for Whimsy Stamps.

I wanted to create a spooky scene for her (you know, to help with her trying to be scary and all!)  So I took a piece of Bristol Smooth cardstock and made a circle mask for the glowing moon and placed it where I wanted it go and began ink blending around it with some Carved Pumpkin distress ink.  I then went over that a bit with some Twisted Citron and then worked my way with Wilted Violet, Dusty Concord and Black Soot for the bottom portion.  I removed the mask and went over circle with some Squeezed Lemonade.  I wanted lots of stars in the sky, so I first sprayed the background with water and picked up the colors, then I added some “dots” with a white gel pen.  I know it won’t show up in the photos, but I sprayed the background with some shimmer spray which really makes the background so sparkly.

To finish the scene I took the Whimsy Stamps No-See All Seasons Tree die set and cut the tree out from the Whimsy stamps Rustic Wood and Brick digital papers and then sponged around the edges of it with some Black Soot distress ink.  I also took the grass die from that set and cut out 3 pieces of it with black cardstock for the ground.  I took the sentiment and spider image from the Simon Says Stamp Spook Up Some Fun stamp set and added it to the scene.  I had an older Whimsy Stamps Halloween die cut set that I cut the bat from black cardstock and added to the scene too.

Vicki-CCT602-Oct3-close

Here’s a closer look at the image and how I’ve colored it in.  I tried to capture the sparkle in the background, but it just doesn’t show up like it does in person.  You can see for the “streaks” in her hair that I’ve used a purple gel pen so it’s glittery.  I’ve also used that same gel pen for the trim on her outfit.  I used a silver gel pen for the “bolts” from her neck/face area.  She was fussy cut out and attached to the scene.  I took a glitter pen and went over her skirt too.

I’ve used Copic markers to color her in with and they’re listed below:

  • Frankie’s Hair and Shoes – C8, C7, C5, C3, C1
  • Frankie’s Skin – YG67, YG63, YG61
  • Frankie’s Outfit – V20, V17, V15, V12, YG11, C3, C1

Vicki-CCT602-Oct3-flat

Of course, I needed to make it even more spooky by adding some plastic spiders to the scene!  And yeah…. if I see a real spider…you’d be hearing a very high-pitched scream coming from me!! LOL!!  Not a fan…but pretend is just fine!  Let’s just hope I don’t drop one on the floor and see it later and scream! LOL!

I hope you’ve enjoyed my spooky Halloween card today!

Challenges I’d like to enter for this card:

  1.  Creatilicious – Anything Goes with optional: use a punch
  2. Pearly Sparkles – Spooky and/or Cute
  3. A Bit More Time to Craft – Anything Goes
  4. Addicted to Stamps and More! – Anything Goes #361
  5. Crafting by Designs – Anything Goes

Meow-lloween Party for 2 Crafty Critter Crazies

Meow friends! 🙂   It’s October and I’m always excited about this month because there are so many fun Fall activities that happen and I also really enjoy the Halloween atmosphere around this time.  I hope you’ll enjoy the fun right along with me!

Today, I’m excited to bring you my creation for a brand new challenge for this month over at 2 Crafty Critter Crazies!  Remember that it’s always an “anything goes” challenge PLUS you need to use a critter on your creation!

This month we’re being sponsored by Beccy’s Place and was generous to supply the team with an image to play with:

Vicki-2CCC31-Beccy's Place

I just fell in love with this adorable kitty from the Scaredy Cats digital set.  I think he’s all dressed up and seriously ready to “get this meow-lloween party started“!!

So fun to pull out some Halloween papers and colors for this card.  I usually like to add in some purple somewhere if I can, so I found some ribbon and thought it matched up with kitty’s hat.

I couldn’t help but to add a few more elements to this kitty by taking a spider image from a Tim Holtz stamp set and adding it to kitty’s hat.  I also stamped the stars at the top along with the sentiment from a Simon Says Stamp Halloween stamp set from last year…I think.  The web up in the corner is an older die from my stash that I usually pull out for Halloween creations.

Vicki-2CCC31-Beccy's Place-close

Here you can see how I’ve colored up this fun kitty with Copic markers.  I’ve also colored the belt buckle on the hat with a gold gel pen.

I used some Wilted Violet to sponge around the edges of the kitty panel after I stamped the stars at the top.

While I was filling the sequins with gold Stickles, I added a few dots to the starry sky for just a bit more sparkle.

Vicki-2CCC31-Beccy's Place-flat

Hope you’ve enjoyed my fun “meow-lloween” card today!

Thanks so much for stopping in today my friends and be sure to check right back again here today as I have another post coming soon!

Challenges:

  1. Tuesday Throwdown – Anything Goes
  2. Creative Moments – Anything Goes + optional twist: masculine
  3. CRAFT -Animals
  4. The Paper Players – PP461 Tic Tac Toe

Sending Snail Mail Hugs

Hello friends!  Yippee!  It’s finally “officially” Fall now! (According to the calendar anyway.) We are very slowly starting to get lower temps at least in the evening time anyway.  I’ve gotten out my Fall decorations and I’m ready!  How about you?

Today I have a very sweet image from Whimsy Stamps to share with you:

Vicki-WSLoveSlowMuch-Sept24

Awe!  I wouldn’t normally hug a snail, but I must say, this one is SUCH a cutie don’t you think?  This digital image is called “Love You Slow Much” from Whimsy Stamps-Sylvia Zet’s Wee Stamps Collection which was previously released as a rubber cling stamp.  So now you can have the option of choosing the digital or the rubber versions!

Of course, with Fall having started, I was really inspired to create with this cutie in some orange, yellow and tan toned colors!  With the exception of that blue bow tie on the snail, I’ve colored it differently as I think that makes him really stand out especially for dispensing hugs…or perhaps receiving them! 🙂

I’ve cut out the image with a stitched circle die and then die cut another larger circle in the orange color to mat behind that.  I’ve taken a piece of decorative paper from my stash with the wording and added some stitch marks along the edge of it with a black marker and then mounted it to a piece of white cardstock.  I wrapped some white organdy ribbon around these two pieces and mounted it onto an orange 5″ square top folding card base.

I took another piece of orange cardstock and die cut a tag out from an older Whimsy Stamps die that I have and then I stamped the “hugs” sentiment from the Whimsy Stamps Everyday Mini Sentiments clear stamp set towards the bottom of the tag and added it to the bow on the ribbon.  Lastly, I took some flowers and attached them around the card design.

Vicki-WSLoveSlowMuch-Sept24-close

Here’s a closer look at the coloring I’ve done on this image and used the following Copic markers:

  • Snail Body:  W7, W5, W3, W1, R00
  • Snail Shell:  E35, E33, E31, E30
  • Snail Bow Tie:  B26, B24, B21
  • Fairy’s Dress, Hair Flowers, Shoes, Wings:  YR07, YR04, YR02, BG000, C7, C5, C3
  • Fairy’s Hair & Skin:  E47, E44, E42, E41, E21, E11, E02, E00, E000, R20
  • I used BG000 and E0000 for around image and shadows
  • I’ve also used a gold gel pen for the center of the flowers in her hair and over the tiny marks behind her wings.  I’ve used a white gel pen for highlights in the Fairy’s cheeks as well as highlights on the snail’s shell.  I took a glue pen over her wings and added some clear glitter over them.
  • I’ve also used a Copic marker (unsure of color) to color a rhinestone for the center of the orange flowers.

Vicki-WSLoveSlowMuch-Sept24-flat

I hope you’ve enjoyed my creation today and that it has inspired you in some way!

Thanks so much for stopping in today!  I always appreciate your support!  I’ll be seeing you soon!!

Challenges I’d like to enter this card in:

  1.  Creatalicious – Anything Goes with optional circles
  2. Stamps & Fun = Creativity – Anything Goes
  3. The Paper Girls – Anything Goes
  4. The Fairy & The Unicorn – Fantasy Anything Goes
  5. Creative Knockouts – Anything Goes
  6. QKR Stampede – Anything Goes #364
  7. Creative fingers – Anything Goes
  8. Always Fun – Cute Critters

Super Girl Starla Flying By!

Hello friends!  Happy Tuesday and I hope you’re having a wonderful week so far!  I actually can’t believe that September is already flying through this quickly!

Speaking of “flying”, I have this really cute card to share with you using another Whimsy Stamps image:

Vicki-WSStarla-Sept17

This little digital cutie is called Starla from Whimsy Stamps.  She has her arms out and so I thought it would be cute to have her appear as if she’s smiling while flying up through the clouds at us!  I also thought this would be a really nice encouragement card for a child and I’ll be sending it out to hopefully share some smiles.

I stenciled some clouds in behind her, cut the image out with a stitched square die and layered a piece of purple cardstock behind her.  I ran a piece of green colored cardstock through a star embossing folder, wrapped a silver ribbon around it and then attached it to a purple 5″ square top folding card base.

I die cut some stitched cloud borders for the bottom of the card design but sponged them with some Broken China Distress Ink before attaching them with foam tape.  I also die cut some stars to add for accents on the design with both silver glitter stock and a piece of purple to paper piece in the center of one of the silver outline stars.  I also added a rhinestone star to the center of the bow.

Vicki-WSStarla-Sept17-close

Here’s a closer look at Starla with the coloring I’ve done on her.  I’ve colored her up with Copic markers and added some details with gel pens.  I’ve also covered her headband with a glitter brush pen and also added some extra glitter over the stars at the top of her head band.  You can also see where I’ve added some “strokes” to show that she’s zooming through the clouds.  I also covered that area with a bit of shimmer with the glitter brush pen as well.    The “little girl” in me had to color some purple!

Vicki-WSStarla-Sept17-flat

The sentiment at the bottom was stamped with a sentiment from my stash with some black ink.

I hope you’ve enjoyed my card today and it’s brought you a smile or inspired you in some way!  Thanks so much for stopping in!  See you soon!

Challenges:

  1.  The House That Stamps Built – S1119 TicTacToe
  2. Daring Cardmakers – Special Thoughts
  3. QKR Stampede – #363 Anything Goes
  4. Sweet Stampin’ – Cards for Kids
  5. Addicted to Stamps – For a Lady/Girl
  6. Splitcoast Stampers Teapot challenge – Put a Smile on their face