Cheerful Sketches Guest Designer

Hello friends!  Hope you’ve had a wonderful weekend!  I just got back from a lovely weekend trip with hubby and we had such a great time visiting over in Hannibal, MO.  This was something we both really needed to just get away for a bit and it was wonderful to be able to go and do something fun!

Today I’m sharing my creation I made as a guest designer for the Cheerful Sketches challenge blog.  (I had won a spot with one of my creations I had entered.)  I was also shared the sketch and an image to work with:

Vicki-GDTCheerfulSketches-MyBesties

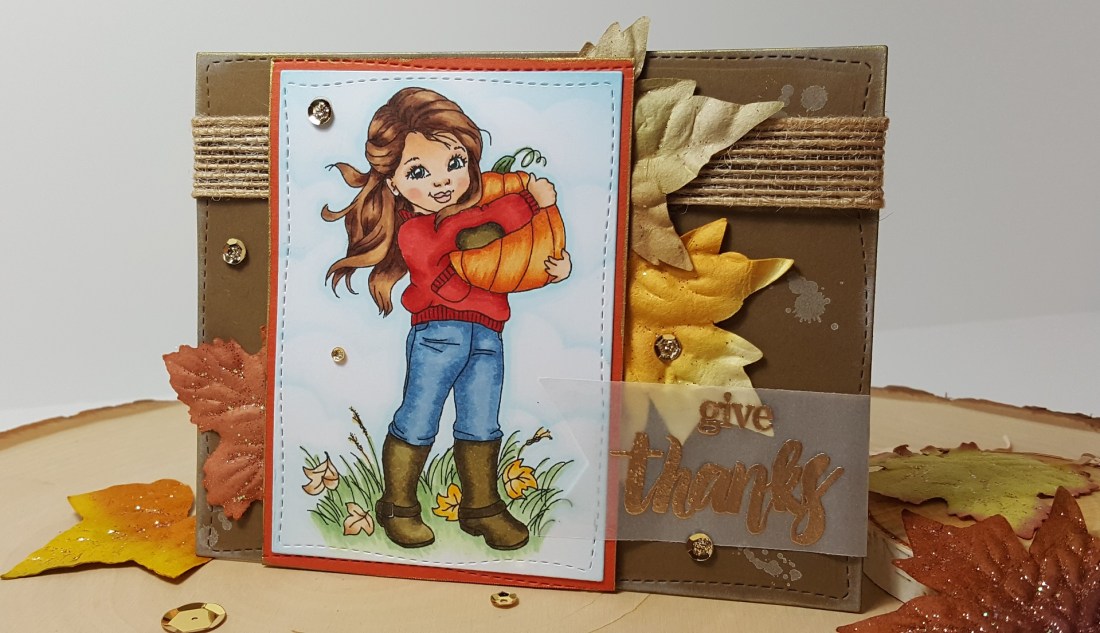
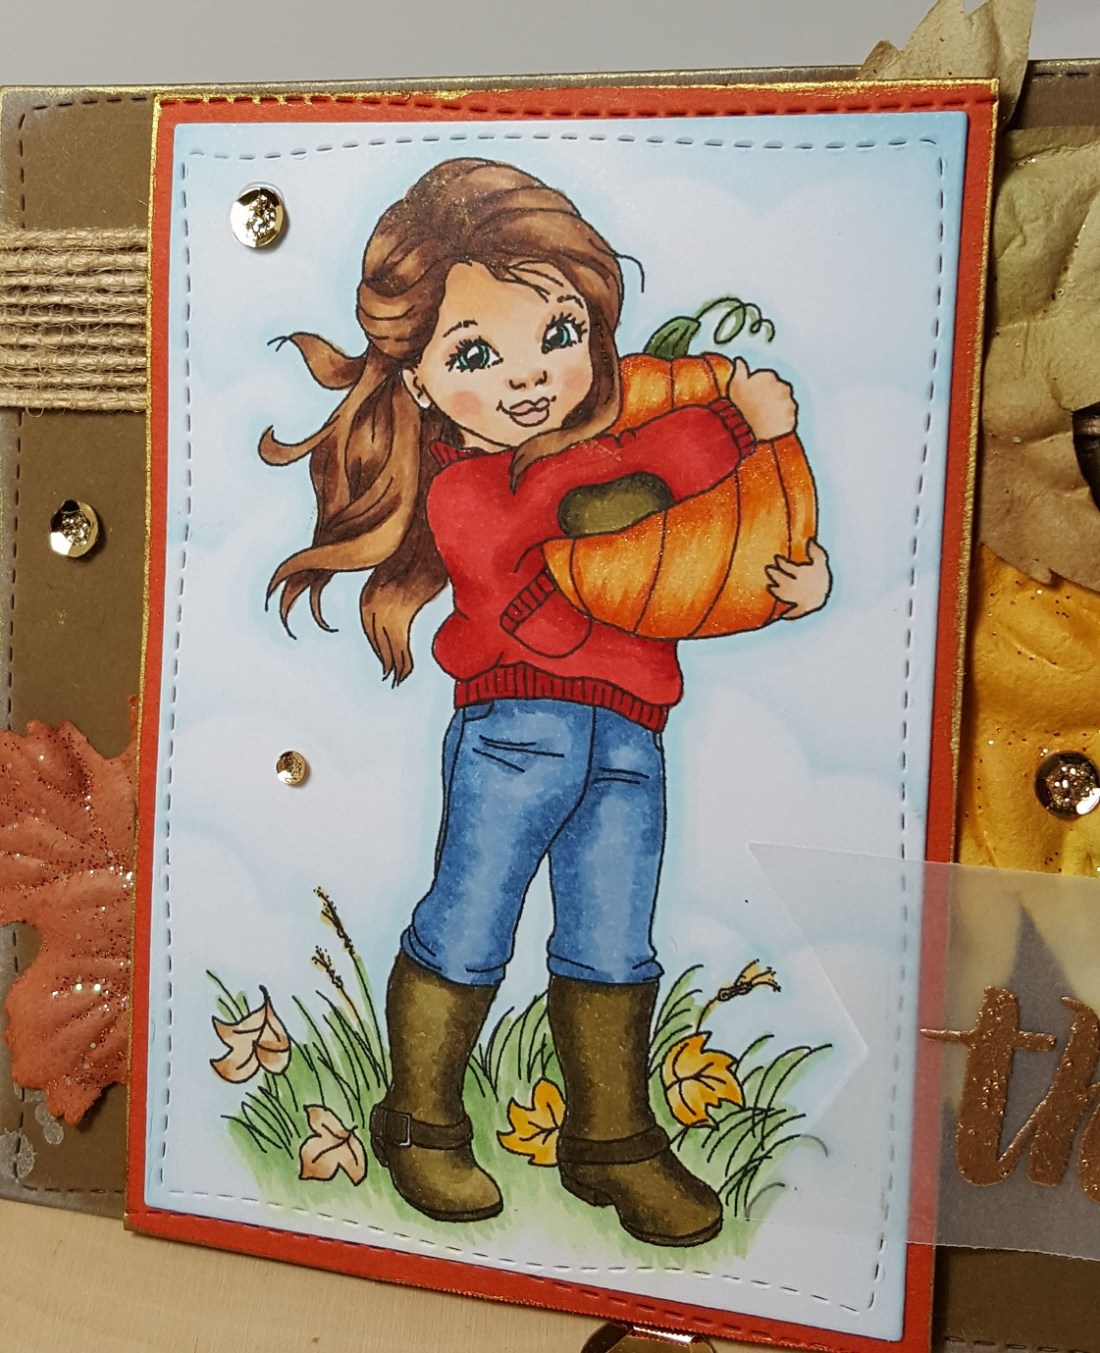
The was a company that I have heard of before, but this is the first time that I have actually colored one up.  This is from the My Bestie Shop in their Harvest Collection called Harvest Besties Doll 25.

I took the image and colored it up and cut it out the size I needed for my card and layered it with some dark brown cardstock.  I took some sunflower style papers from my stash and placed a piece over a 5.5″ square dark brown top folding card base.

I cut out a couple of squares for each corner of the card and layered a scallop die cut square to each one with some orange colored cardstock.  I also took a strip of this same orange cardstock and attached it diagonally across it.

Lastly, I took the image panel and wrapped some seam binding ribbon around it with a bow, twine and button.  For the seam binding ribbon, I spritzed it with water and crinkled it up a bit and let it dry before adding to my card.  I then added some Fall Prima flowers around the design.

Vicki-GDTCheerfulSketches-MyBesties-close

Here’s a closer view of the image and how I’ve colored her up with Copic markers.  For the gold glittery details in the Fall sentiment and around her (including the buttons on her shoes), I’ve taken a Quickie Glue Pen to color it in with and then added some pretty Fall gold glitter over it.

The edges of this image panel were sponged with some Tea Dye Distress Ink and then sprayed with water for the water droplet marks.

Vicki-GDTCheerfulSketches-MyBesties-flat

She has put me in the mood to go to the pumpkin patch and bring one home!

Thanks so much for stopping in today!  Hope you’ve been inspired in some way and I’ll be seeing you soon!

Challenges:

  1.  Love to Craft – LTCCB39 Oct Anything Goes
  2. Little Red Wagon – Pumpkin Party
  3. Fab ‘N’ Funky – Autumn Colors
  4. Watercooler Wednesday – WWC241 Anything Goes Feminine
  5. Crafting with an Attitude – Anything Goes
  6. Crafty Catz – Anything Goes with option of Ribbon, Bow or Flower
  7. Creative Knockouts – Lots of Layers

It’s Fall Y’All!

Hello friends!

For my card today I’ve used acrylic bubbles and that is one of my faves to use on pretty much ANY style of creation I’m making and here you can see why:

Vicki-BMbloghop-DD

Fall is certainly my most favorite time of the year and I really enjoy creating with all of the fun Autumn style products.  The wreath and sentiment that I’ve used are from the Fall Y’All stamp set and I’ve cut it out using the Fall Y’All Cut File that you can get for your cutting machine.  I have a Cricut, so I’ve used that to cut it out with.

Now that cut file does NOT cut out the center of the wreath, so I just poked my scissors in the center of it that made a large enough hole so that I could fussy cut around the inside of it.    The cut file will also cut around for your sentiment.

The base of the card is an A2 top folding card.  I took a couple of the leaf images from the Autumn Essentials stamp set and heat embossed a couple of them on the card base with the Gilded EP.

I then glued on the cut-out wreath image, popped up the sentiment in the center with foam tape and also added some gold thread behind it before attaching.  I took some white ink and sponged around the edges of the card base and then finally attached the acrylic bubbles over the card.

Vicki-BMbloghop-DD-close

Here’s a closer look at the image and how I’ve got it colored in.  I’ve used Copic markers to color it along with the leaves on the sentiment.  I also took some distress ink and sponged around the edges of the cut images.

For the sentiment, I first stamped it with the black ink and then cleaned off the stamp and then stamped it again with the embossing ink.  I sprinkled the Gilded EP over the sentiment and then brushed off the EP on the leaf areas as I didn’t want those embossed.  I heat set only the wording.

Vicki-BMbloghop-DD-flat

I hope you’ve enjoyed my creation today and were inspired in some way!

Challenges:

  1.  Crafty Gals Corner – Fall Colors
  2. Cardz 4 Galz – Welcome Autum/Fall
  3. A Bit More Time to Craft – Anything Goes
  4. The Creative Crafters – Anything Goes
  5. Pammies Inky Pinkies – PIP1937 Anything Goes
  6. Crafty Cardmakers – Autumn Colors

Autumn Embossed Background

Hello friends!

Here’s what I’ve made today:

Vicki-BM-Subbloghop

For my card, I stamped the image and cut it out with a circle die.  I’ve just colored mine up with Copic markers over a piece of White cardstock.

For the background, I’ve used a stencil with EP.

I took the stencil over a piece of white cardstock and covered it with the Embossing Ink and then lifted the stencil to sprinkle the embossing powder over it to heat set.  I cut out that piece and layered it over another piece of white cardstock that I die cut with a stitched scallop die.

Terracotta cardstock was used for my card base and the circle layer behind the image.

Lastly, I’ve added another circle layer with gold glitter paper, popped it up with some foam tape and added some gold thread nested behind it.  I took some gold sequins and filled them with gold glitter too.

Vicki-BM-Subbloghop-close

Here’s a closer look at the image and how I’ve colored it in.  As you know, I like to use my gel pens to add just a bit of sparkle to certain areas of the image and I’ve also added some “dots” around it with gel pens.

Vicki-BM-Subbloghop-flat

Here you can get a better glimpse of the heat embossed background on the left corner of the card.  It’s a very pretty Fall color and appropriately named “Crisp Leaves”.

Thanks so much for stopping by and I’ll see you soon!

Challenges:

  1.  Brown Sugar – Anything Goes
  2. Crafty Catz – Anything Goes
  3. QKR Stampede – #362 Anything Goes
  4. Simply Create Too – Anything Goes
  5. Crafty Calendar – Add Lots of Layers

Always Be Grateful

Hello friends!  Happy Saturday!  Yay!  The weekend is finally here! 🙂

I really love all things Fall including the beautiful colors you start seeing from the leaves on the trees.  Nothing better than a nice walk in the brisk cool air!  This is what has inspired my card today too!

Vicki-BMGrateful-Sept7

I knew I wanted to used this sentiment for a Fall theme.  I think it’s awesome just to have a sentiment be the focal of your card sometimes.  It was heat set over a piece of white cardstock and then sponged around the edges with the yellow Ink.  I wanted a bit more sparkle, so I took my Embossing Ink pad and rubbed it along the edges of the panel and heat embossed some of the Vintage Sparkle EP over it.

And of course I wanted to do some foiling too because it’s just fun especially when you have these cool Vintage Wallpaper-Foilable Washi Sheets to do it on!  I used the Deco Foil Spring Grass transfer sheets over it and then used more of that ink to sponge around the edges and also heat set some more of that Vintage Sparkle over the edges too.

For the background, I took a piece of white cardstock measuring 4″ x5.25″ and covered it with the Embossing Ink pad.  I used some more of that Golden Gourd EP and heat set this entire piece.  Then I took the foiled strips and attached them over top of this panel and layered onto a top folding A2 sized Jurassic card base.  I also layered the embossed sentiment panel over a piece of this same cardstock.

I then added the sentiment panel over the card front with some foam tape and then added some die cut leaves that I sponged with ink and then a couple of gold sequins with some gold glitter in the centers for more sparkle.

Vicki-BMGrateful-Sept7-close

Here’s a closer look at the heat embossed sentiment, background, and the sparkle around the edges where I heat embossed.

Vicki-BMGrateful-Sept7-flat

And here’s another look at the foiled washi strips too with the card laying flat.

I hope that you’ve enjoyed my Fall creation today and were inspired in some way!  Thank you for joining me today as well as the entire week!  See you soon!!

Challenges I’d like to enter this card for:

  1.  Creative with Stamps – Autumn
  2. Unicorn – #47 Autumn
  3. The Male Room – Autumn
  4. Simon Says Stamp Wednesday – Stamp It
  5. Aud Sentiments – Fall/Autumn + Sentiment
  6. Daisy Chain – Autumn is Coming

Caring Thoughts Wreath

Hello friends! Sorry to be throwing so many posts out to you at once, but as you can see there are so many exciting things going on the first of the month and I’m happy to be sharing it with you!

I have come up with an easel card design that I’ve created using the digital set called Memory in Our Hearts:

Vicki-SnS-MemoryinOurHearts-OctGDT

The great advantage to using a digital set is that they come with pre-colored images as well as outlined images to create many different looks you’re wanting.  In addition to that, you can also manipulate the size and structure of your image as I have done with my card here.  (This is a great way to come up with a unique design too!)

I have taken some of the pre-colored “sprigs” in the fall theme color and sized and moved them around in a Word doc. to create my own Fall wreath with it!  I then added the beautiful sentiment to the center and placed where I wanted it and then printed it out along with a couple more sprigs that you see on the inside of this design.

Vicki-SnS-MemoryinOurHearts-OctGDT1

To step things up a notch, I’ve used a protractor to draw a circle around my wreath image as well as a larger circle for a mat behind it and fussy cut them out. (I didn’t have a circle die large enough to accommodate my wreath image.)  I took my ink blending tool and some Tea Dye and Vintage Photo distress inks to add some color around the edges.  Since I made a Fall wreath design, I wanted to add some glitter to the leaves.  So, I took the Nuvo Precision glue pen and added some glitter over them.  For the “berries”, I took some Ripened Pumpkin Nuvo Crystal Drops in random areas around the leaves.  I made a bow with some natural twine and added it to the top of the wreath.  (I did this same process for the smaller “sprigs” on the inside of the card as well.)

Vicki-SnS-MemoryinOurHearts-OctGDT2

For my card design, I have made an “easel style” card (more on that below).  My card size is a 5 1/2″ square.  I have used the same cardstock color that I’ve used to print out my wreath image and separated it in two panels to fit on the front of my card base.  I took an embossing folder from my stash to add some texture to my design and also used the distress inks again to add some color around the edges.  I used glue to add some “dots” in the corners and then sprinkled some “Autumn Medley” glitter over them and let it dry.  I have also taken some 1/4″ Tear Tape to the middle edges of the card base and burnished some of this same “Autumn Medley” glitter to that.  I think it really brings in that pretty Fall color theme with some added sparkle!

Vicki-SnS-MemoryinOurHearts-OctGDT3

And for the inside of my card, you can see that those extra “sprigs” that I’ve printed and cut out create an easel style “stopper/display” function for my card design.  It’s easy to create this look with a score mark made in the center of the card front base as you can see with the circle wreath shown fully.

I have used some of the same-colored cardstock as the printed-out wreath for the inside of my card with some more distress inks along the edges as well as another strip of 1/4″ Tear Tape along the bottom edge burnished with some more of that “Autumn Medley” glitter.  I’ve used some foam tape to pop up the “sprig” cut out images so that they create the “stopper” for the front card base to rest while being displayed.

I hope that you’ve enjoyed my interactive card today and I look forward to sharing many more projects with you during my guest design spot!

Thanks so much for stopping in today my friends!  Please be sure to check out my earlier posts from today!  See you soon!

challenges:

  1.  {Cupcake Inspirations} CIC457 – Fall
  2. Try It On Tuesday – Thankful

It’s Autumn at Cute Card Thursday

Hello friends!  It’s Cute Card Thursday again and we are going all Autumn over there this week!  Sounds like a great challenge to me…hope you will stop over and check out the inspiration and add your creation in the gallery too!  Looking forward to seeing your makes!

Here’s my card:

Vicki-CCT549-KindaCute

I thought this image was so darn cute!  I’ve used an image from our sponsor this week called Girl with Wheelbarrow from Kinda Cute Stamps.  She is busy gathering pumpkins in that wheelbarrow and looks to be on a mission with it too!  I adore that sweet little bunny along for the ride!

I’ve colored the image with Copic markers including for the ground.  I’ve taken a tiny sponge with some blue ink and very lightly sponged in a sky.  The sentiment was stamped with brown ink from an older Lawn Fawn set.  I’ve also used the Stitched Leaves die from Lawn Fawn to cut out some leaves with kraft cardstock and then sponged some color over the edges to attach to the design.

I cut out both the image panel and the orange design paper with a Stitched Scallop rectangle die set from My Favorite Things.  I’ve also cut out a tiny brown banner at the top left corner from a die set from MFT as well.  Lastly, I’ve added some gold sparkling enamel dots around the leaves.

Hope you are out and about enjoying the Autumn season!  Thanks so much for stopping by my blog today, I’m so happy to have you here!  See you very soon!

Challenges:

  1.  Sweet Stampin’ – Dies/Punches (I stamped the sentiment-hopefully this qualifies)
  2. Always Fun – Anything Goes
  3. Addicted to Stamps & More – Anything Goes #311
  4. Crafty Gals Corner – Anything Goes + Fall
  5. Mod Squad – Autumn Colors (Orange, red, purple, yellow, brown) I used all EXCEPT purple! – must use at least 3

Just A Girl and Her Pumpkin

Hello friends!  Wow, I think Fall has begun over my way as the air has changed with cooler temperatures and I absolutely LOVE it! 🙂  Although I’ve been busy crafting away in my room, I like to get outdoors for a few breaks to walk around and see signs of the leave starting to change over.

Today, I am over at the Whimsy Stamps Inspiration blog to share my card with you using one of the really adorable images from this month’s release called “A Girl and Her Pumpkin” digital stamp by Crissy Armstrong:

Vicki-WSGirlPumpkin-Sept25-blogpost

Isn’t she adorable?!  I really enjoyed coloring her up with my Copic markers.  As I was coloring, it actually reminded me of going to a near-by apple orchid with my children as they were growing up.  I would take photos of them with all of the pumpkins surrounding them as they would pick out which one they wanted to carve for Halloween.  (My oldest was not a fan of “pumpkin guts” and so we always ended up doing that part for him! LOL!)  But it must have made an impression with them because they still enjoy going as adults now!   Besides, what’s better than apple cider donuts and freshly picked apples?!  YUM!

So, after the reminiscing of memories, I cut her out with the WS Hand Stitched Nested Rectangles along with the card front base and attached to a white A2 sized top folding card base.  For the sentiment, I took a piece of vellum and heat embossed a greeting from the WS Painted Sayings stamp set and I also took some of the splatter images from the same set and stamped them randomly in the background with white ink.

Before attaching the image panels onto the card, I’ve added some gold ink around the edges, attached some leaves behind it and popped it up with foam tape.  The piece of vellum was hand cut into a banner and folded around card base and attached with glue behind the letters to hide it.  I then put some burlap ribbon around the card front base as well as the image panel, vellum banner and gold sequins filled with gold Stickles.

Vicki-WSGirlPumpkin-Sept25-close

Here’s a closer view of the image and how she’s colored.  You can also better see the gold inked edges.  And of course, the photo didn’t pick it up, but I took some Wink of Stella clear glitter brush pen to go over the pumpkin with.

I’ve also used a cloud stencil to lightly sponge in a nice Fall sky behind her.

I think she would look so cute surrounded by a field of pumpkins…so there’s an idea!  Maybe I’ll work on that for next time!

Thanks so much for stopping in today!  I appreciate you taking the time!  See you soon!

challenges:

  1.  QKR Stampeded – Anything Goes #314
  2. Just Us Girls – JUGS459 photo week
  3. Crafty Friends – Autumn Colors
  4. Stamps & Fun = Creativity – Fall
  5. Crafting From the Heart – Anything Goes