Class Projects

Hello friends!  Just wanted to pop in and share the projects I made for this fun class I took!

This class was full of lots of cool things and plenty to complete the projects below plus I had some things left over too:

Vicki-BMJunkieClass19-foiltag

The first project was this ginormous, very thick tag!  It measures approximately 9.5″ tall and 5.25″ in width!  I thought it would be cool on a project you frame or hang from the wall.  Thinking about a burlap or something. hmmm…..  Have any suggestions?

Everything you need except the stamps, ink and adhesive come with this class kit.  So the background was foiled (foil included in kit) and I used my own tape adhesive to do that with the stripes for the background.  The wreath was made with a chipboard circle from the kit which the flowers were attached to.   I stamped and cut out the flowers from a stamp set which were colored with some of the Aqua Pigments that were included with the kit.  I used a deco foil pen to create “dots” in the center of the flowers and used the left over foil from the kit.  I curled up some of the edges of the flowers for added dimension.

For the banner, I used one of the sentiments from the same stamp set and stamped it out with the Black Ink over the tag included with the kit.   I decided to change mine up from the way it was shown in class.  So I cut off the end and added it underneath the wreath.  Then I took the twine from the kit, doubled it up and added it as a bow on the bottom of the wreath.  I took a cute bird button and glued it to the center of the twine bow.  I thought to add a bit more color along the edges of the tag and sentiment banner with white Ink which I think softened up the edges nicely.

Vicki-BMJunkieClass19-ChromaGlazeCard

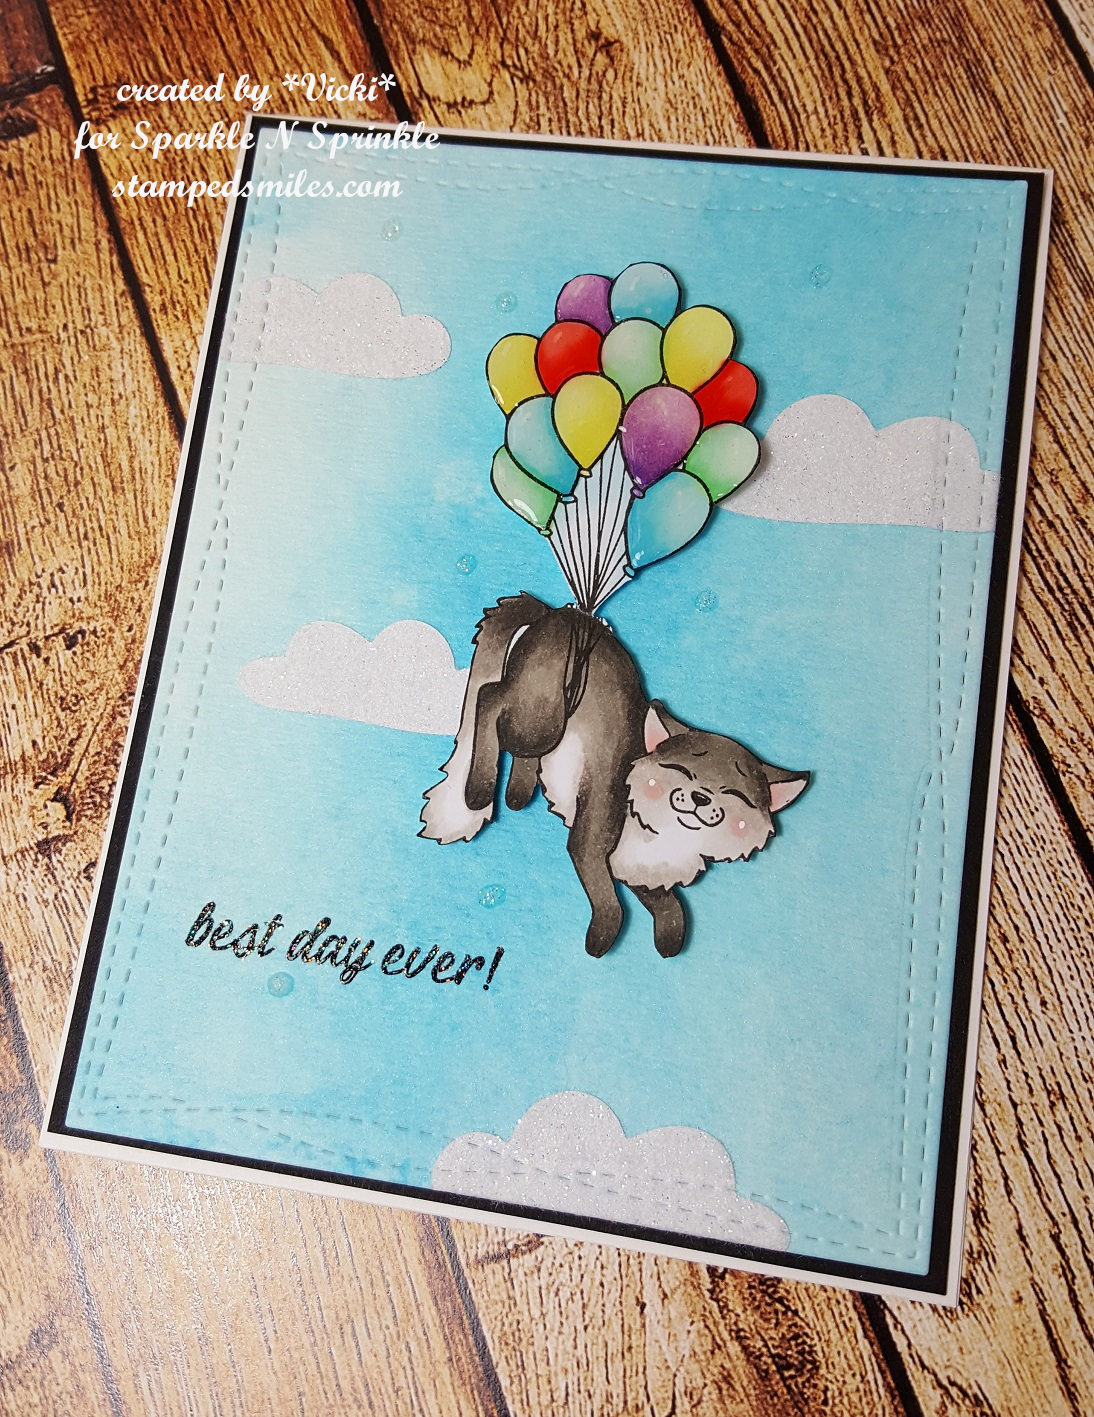
My second project was this card!  The background was created with some sample sized Chroma Glazes from the kit.  I chose to use a past stencil I had.

I decided to matt my stenciled background onto an A2 sized card base and also create an oval matt for behind my oval image panel.  There was an oval piece and full base card piece that came in the kit, but I decided with all of the Aqua Pigment coloring I did, I needed to use watercolor Paper for stability.  I used the Aqua Pigments from the kit as well as pulling in some browns and blacks from my stash.  I mixed colors together to get the look I wanted.   The image was stamped out.  I stamped the branch first, masked it off and then stamped the bird so his tail was behind the branch.  I then stamped the bird again and cut out his claws and attached them over the branch.  It makes it look more dimensional that way and so it really looks like the bird is perched.  I added some color to the background with the yellow Aqua Pigment from the kit.

I took the sentiment from this same stamp set and heat embossed it with some white EP and cut it into a banner to pop up over the card with some Foam Tape.  I took the Acrylic Bubbles that came in the kit and colored the backs of them with a yellow alcohol marker and attached them randomly to the design.

Vicki-BMJunkieClass19-minitags

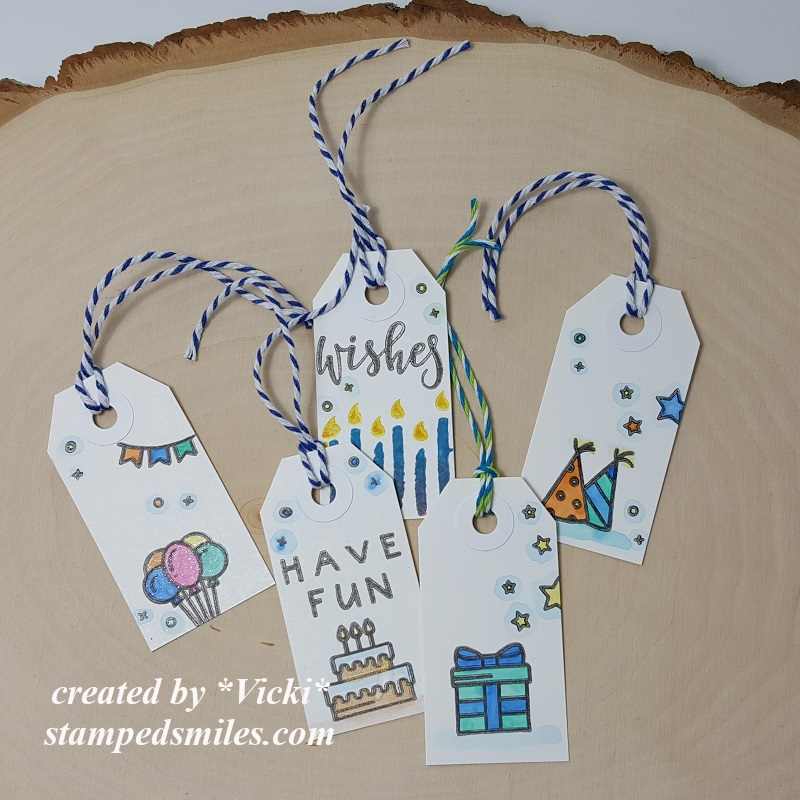
The final project for the class was making up these set of tags!  These tags came in the kit along with the blue twine.  There wasn’t quite enough to string the 5th tag, so I took a piece from my stash.  Not sure if I was supposed to get 4 or 5 tags…but I got 5! 🙂

I didn’t have the same stamp set that was shown in class, so I thought it would be a good idea to make up some birthday tags that I can add to gifts and/or cards!  So I used a stamp set from my stash and colored them all in with the Aqua Pigments from the class kit.  I just cut pieces of the twine and added them to the top  of the tags.  Simple, but fun!

Hope you’ve enjoyed my project share from class!  Thanks so much for dropping in today and I’ll be seeing you soon!!  Have an excellent weekend!

Challenges I’d like to enter:

  1.  Stamping Sensations – Things With Wings (for bird card)
  2. 613 Avenue Create – Anything Goes with optional create/decorate a container
  3. Through the Craftroom Door – Anything Goes

Bee Happy for Whimsy Stamps June Release!

Hello friends!  There is so much to “bee” happy about for sure!  It’s been sunny out lately; it’s the weekend and I have some fun creations to share with you for the Whimsy Stamps June digital release today! 🙂

Vicki-BeHappy-June1-Trio

Check out these ADORABLE bees!!  I have made 3 different cards because I just couldn’t stand not being able to color each one of these which are all included in this set!  I have used Crissy Armstrong’s “Bee Happy” digital stamp set.  This is a set that was previously released as a stamp set, but now available in digital format starting this month!  Good news that you can now choose between either format you prefer!

I’ve sized each of these bees in the format to fit onto a 4″ square card design.  I’ve cut them out with a hexagon die cut and layered another black piece of cardstock behind each one.

For the background, I’ve taken a yellow piece of cardstock slight smaller than the 4″ square top folding white card base and embossed it with a fun hexagon embossing folder.  Before attaching them to the card base, I’ve added some black ribbon at an angle over it.  I then attached the image panels and added the ribbon bow which I then placed a bee wooden accent to the center of each one.

The story with the black splatters actually came about from an accident I had!  I opened up a black shimmer pen over top one of the cards and it had a leak in it!  When I popped open the cap, it spilled all over my card!!  OH NO!!!  Obviously, I had all of my cards done at this point and I loved the way I had colored them….so I just decided to “go with it” and added some more splatters to each one.  I actually like the way it looked after I completed it!  They look like “busy bee’s” now! TEE HEE!

Vicki-BeHappy1-BeeMine

Here’s a closer look at the “couple bees” image.  For each one of the hexagon image panels, I’ve taken a black marker along the edges to make the stitch lines.  I went around the edges of the image panel with some Tumbled Glass Distress Ink and ink foam blending tool for each card.  Also, for the sentiments on each card, I found an old “bee” style stamp set and used it to go with them.  I believe that the “Bee Happy” rubber stamp set comes with sentiments that go perfectly with these cuties!

Here’s how all of the bees were colored up with the Copic colors:

  • Wings/around bees – B00, B000
  • black stripes/nose/feet and hands – W9, W7, W5
  • Yellow stripes – Y17, Y15, Y13, Y11, R20 (cheeks)
  • The tiny heart from the sentiment was colored with Y15 and then I’ve added some Nuvo Glitter Drops over it.
  • All the wings for each card were covered with the Wink of Stella Glitter Pen.

Vicki-BeHappy2-BirthdayBee

This little dude was so fun to color up with his party accents! 🙂  Here are the Copic colors I’ve used for the accessories:

  • bag – E87, E84, E81
  • hat balloon, party hat, tissue from bag – V12, V15, YG11, YG13, YG25, YR04
  • I’ve covered the purple on his hat with the Nuvo Glitter Drops
  • The wings and balloon were covered with the Wink of Stella Glitter Pen

Vicki-BeHappy3-BzzzFriend

I just love how he’s trying to hand out a flower to you! 🙂  Here’s the following Copic colors that I’ve used for the flower:

  • flower stem – YG61, YG63
  • flower middle – Y15 (I covered it with the Nuvo Glitter Drops again)
  • flower petals – R32, R35, R37
  • His wings were covered with the Wink of Stella

I hope you’ve enjoyed my bee creation today!  Please be sure to BUZZZZ on over to the Whimsy Stamps store!

Thanks so much for stopping by and I’ll see you again soon!

Challenges I’d like to enter:

  1.  Through the Craft Room Door – Anything Goes
  2. TGIF – #TGIFC214 Create a Set!
  3. Aud Sentiments – Nature + a sentiment (hoping bees are apart of nature)
  4. Creative Knockouts – Embossing Delight (embossing folder on each card)

It’s Party Time!

Hello friends!  It’s been sort of a crazy few days with our weather!  Usually it’s pretty warm and sunny, but we’ve been having some severe rain and cooler temps.  Plus more rain coming, so I guess I’ll be in my craft room playing!  🙂

Today I have this happy party fellow from Whimsy Stamps to share with you:

Vicki-WSPenguin Bday Party-May21

Isn’t he adorable?!  This image is called Penguin Birthday by Crissy Armstrong.  This was previously released as a rubber stamp, but this month it has been released in digital format so you can have either option available!

I have cut him out with the Whimsy Stamps Notched Squares die set and cut an additional piece in black cardstock for a layer behind him.  For the base of my card, I’ve used a green colored 5″ square top folding card base and attached a piece of striped paper across the lower section and sponged some white ink along the edges of the green card base panel.  I then used a piece of 1/2″ score tape across the top of the striped strip panel and then used some fun glitter over top of it and burnished into the tape.

I’ve also used this same glitter to go over the Whimsy Stamps Happy Large Word die cut out from some double-sided sticker paper.  I white heat embossed the “birthday” over a strip of black cardstock that I’ve cut into a banner and placed it directly underneath the glittered word die.  This came from the Happy Everything Clear Stamp set.

Vicki-WSPenguin Bday Party-May21-close

Here’s a closer look at the coloring I’ve done on this cutie.  You can also see the fun details of the glitter that I’ve used on the word die.  I love the sort of “confetti flex” contained in this glitter.  It’s something I got in a sample size from a card kit a couple of months ago and it’s great for birthdays! 🙂  Hard to see in the photo, but I’ve also used a clear glitter pen to go over the balloon and present.  I sponged around the image panel with some of the same green ink that I’ve used for the card base cardstock color.  I’ve used the following Copic markers to color him with:

  • Penguin – C8, C5, C3, C1, R00, R000, YR27, YR24, Y32
  • Balloon, party hat, present – YG01, YG11, YG13, V17, V15, V12
  • Shading, shadows, ground – C3, C1, E0000

Vicki-WSPenguin Bday Party-May21-flat

It’s always nice to have a good selection of birthday cards on hand when you need to hurry up and send one out and I think this one is great for any gender or age.

Challenges:

  1.  Little Red Wagon – Happy “BIRD”day!
  2. Creative Fingers – Anything Goes
  3. QKR Stampede – #348 Anything Goes
  4. Allsorts – Happy Birthday!!!
  5. Seize the Birthday – Anything Goes + toppings=Balloons!!

P.S.  I know that many of you have been asking for updates on the bird nest situation and so here’s another photo of what we were able to capture:

20190520_185442

After the flowers were done blooming, we were able to get more of a clear shot and CAREFULLY get close enough to get the mother Robin sitting on her nest!  Like I had mentioned, she doesn’t like it when we go out there.  She chirps at us and waits for us to leave.

20190520_184645

Here is one of her standing in the nest.  We think that she may have hatched those eggs as it looks like she might be feeding the babies!  So next time we’ll check back in and see if we can get a look at those babies in there! 🙂

Hope you’ve enjoyed my post today!  Thanks for stopping by and I’ll see you soon!!

Fairy Princess Bunny With a Pocket!

Hello friends!  Hope you have enjoyed your weekend.  Yay!  We are finally getting some decent weather to be outside in!  It’s been rainy and chilly for a while, so it’s been nice to see some sun the last few days!

Today I have this really sweet image to share from Whimsy Stamps May Digital release and a fun extra added element with it!

Vicki-PC Fairy Princess Bunny Tag

I have made a tag using this really sweet Pollycraft image from Whimsy Stamps called Fairy Princess Bunny.  Isn’t she so sweet?!  I found some pretty papers to go with her and placed it over a purchased kraft colored tag that I sponged some white ink around the edges.

After placing the papers where I wanted them and trimming it down, I also attached a lace trim on each end of the papers over the tag.  The papers also had a bunch of sentiments included in the pack, so I added the circle sentiment to the tag and then die cut a kraft piece to layer behind it.  I also added some flowers and the ribbon at the top and then finished it off with some clear sequins.

Vicki-PC Fairy Princess Bunny Tag-close

Here’s a closer view of the coloring I’ve done on this cutie.  I’ve used Copic Markers to color her in with using the following markers:

  • Dress, shirt, shoes, socks – B37, B34, B32, B01, B00, B000
  • Bunny, bunny ears – R11, R00, R000, C3, C1, C0
  • Wings – R00, R000, E000, BG000
  • Hair – YR30, E41, E43, E44, V95
  • Skin – E000, E00, E11, E21, R20, R00
  • Grass – G24, G21, G20
  • I used gel pens to make dots on wings and color in the crowns on the girl and bunny heads.  I also used a Wink of Stella glitter pen to go over the wings.

After I colored her in, I cut her out from a circle stitched scallop die and then sponged around the image with a cloud stencil and distress ink.  I also sponged around the edges of the scallop circle with another color of distress ink and mounted her over the tag with a piece of craft foam behind her.

Vicki-PC Fairy Princess Bunny Tag-otherside

So, when you flip the tag over, you can see that I’ve made a little pocket with the same papers I’ve used on the front of the tag.  I thought this would be a cute way to give out a gift card to your “Fairy Princess”.  The tag happens to be the perfect size for adding a pocket for a gift card to fit into.

Vicki-PC Fairy Princess Bunny Tag-flat

I hope you’ve enjoyed my little tag creation today!

THANKS SO MUCH FOR DROPPIN BY!!  HAVE A GREAT DAY!!

challenges:

  1.  Crafty Creations – Anything Goes
  2. Fab ‘N’ Funky – Anything Goes #437
  3. Crafty Catz – Anything Goes with optional twist of females
  4. QKR Stampede – Anything Goes #347
  5. Crafting By Designs – Fantasy

Rainbow Shaker Birthday!

Hello friends!  Yay!  It’s Friday and I thought I’d share this happy shaker card that I made.

Vicki-MFT Birthday Bear Rainbow

I saw over at My Favorite Things “Birthday Project” Challenge was a “rainbow” theme and I thought this would make for a happy and fun birthday card design!  So I pulled out the MFT Transparent Triangles Background stamp (now retired) and heat embossed it with white EP over some Bristol Smooth Watercolor paper.  I went to work with my rainbow background and sponged several colors of Distress Oxide ink in rainbow form over the heat embossed background for a “resist technique”.  I spritzed some water over it and my sprayer went a tad bit “droopy” and I ended up with a weird large droplet pattern, but I decided I wanted to keep it anyway, I liked it.

So to make sure that my shaker balloon was going to line up with my bear, I needed to stamp, color and fussy cut out this bear from the Beary Special Birthday stamp set.  I needed to fussy cut it out because the coordinating die cut would also cut out the balloon from the image, and I didn’t want to include it as I was making my own!  I’ve also white heat embossed a sentiment from the same stamp set and cut it out with the Essential Fishtail Sentiment Strips.  I also took the Mini Balloon Shaker Window & Frame Die-namics to cut out all of the pieces that I needed for the balloon.  (I used the fussy cut out bear for placement to see where I needed to die cut a hole in the background for the shaker area.)  Before attaching the bear down, I also took some green cardstock and cut out a border with the Grassy Fields Die-namics.  I sponged the edges with green ink and took a Copic marker to give a shadow around the bear.  So after I placed my “balloon hole” where I needed it on the background, I took the rainbow sequins to place inside the Mini Balloon Shaker Pouches and added a piece of black cardstock for the background, which was placed over an A2 sized white top folding card base.

Vicki-MFT Birthday Bear Rainbow-close

Here’s a closer look at the bear and how I’ve got him colored in.  I forgot that in addition to the rainbow sequins I had, I put some tiny star sequins in there as well.  At first, I thought I had gone a bit too dark for coloring the bear, but I like how he blended out and I think he really stands out on the rainbow background and doesn’t get lost with the black accents on the card.  I took a white gel pen to his cheeks and added some shimmer to his present with a glitter brush pen.

Vicki-MFT Birthday Bear Rainbow-flat

Here with the card lying flat, you can better see the shaker bits on the inside of the balloon and how they really stand out against the black balloon background.

I think I got a smile and it was passed around for the shaking.

Hope you’ve enjoyed my card today and I thank you so much for stopping in!  Wishing you a very happy and rainbow filled weekend too! 🙂

challenges:

  1.  MFT Birthday Project – Rainbow
  2. Creative with Stamps – Birthday
  3. Crafting By Designs – Anything Goes
  4. Little Red Wagon – “Shake It!”
  5. Always Fun – Birthday

April New Release for Whimsy Stamps with Interactive Card!

I’m excited to be sharing this really fun and unique interactive design that I’ve made with one of the cute images called Stretchy Giraffe digital stamp from the new release!

Vicki-Giraffe Flies extended neck-April 2nd

This giraffe is so sweet and was fun to color up with Copic markers!  (See below for the full list of the markers I’ve used.)

I took the extended neck version of the giraffe and made some fold marks in his neck so that when folded, it looks like the “regular neck” version of the image, but when you pull up on the purple balloon at the top, the neck extends up with it! LOL!

Check out this 18 second video below to see how it works:

I’ve used the Whimsy Stamps No-See Kinetic Basics die set along with the Kinetic Straight Basics die set to make the straight track behind the large cloud that is under the flying giraffe.  This way there’s no track behind the giraffe to move the neck which I think is pretty cool with these special WS Kinetic No-See dies!

Because this was a giraffe with a long neck, I wanted to make a tall skinny type of card for this design.  (It measures 3″ x 6″ when closed.)  I’ve used a cloud die cut to hide the interactive track behind the giraffe and then I used a cloud stencil to sponge on some Wilted Violet and Tumbled Glass Distress Oxide inks on the cloud die cut as well as the background white panel and the interactive pull behind the balloon so it all matches.  I thought it would be fun to add some stars, so I took the star from the Snappy Birthday clear stamp set and stamped them with the Wilted Violet Distress Oxide ink.  I also took the sentiment from the Dachshund Balloon rubber stamp set and stamped it on the bottom of the white card front panel.  (I thought it was the perfect sentiment to go along with this image!  LOL!)  I’ve rounded the corners of the white panel and cloud panel with a corner chomper.

The giraffe was popped up with the black string wrapped around his left “antler” and then secured on the back.  The other end of the black string was tied around the balloon which is attached to the pull tab underneath the cloud area.  I covered the stars with a clear glitter brush and added some sequins filled with some Nuvo White Blizzard Glitter Drops.  I’ve used foam dots to pop up the giraffe over the design.

Vicki-Giraffe flies extended neck-April 2nd-close

Here’s a closer view of the extended neck and the coloring I’ve done.  Here is the Copic list that I’ve used:

  • giraffe body – YR24, YR21
  • spots, muzzle, mail & tail end – E15, E13, E11
  • Hooves & horns – E49, E47, E44
  • ears & belly – R20, R11, R00, R000
  • balloon – V17, V15, V12

I fussy cut the giraffe and the balloon separately from the image so that I could add my own string and make this an interactive card design.

Vicki-GiraffeFliesExtendedNeck-April 2nd-pulled tab

Really enjoyed creating this fun interactive card in a unique way with this adorable new stamp!  I hope you’ve been inspired with it too!  Would love to see what you come up with if you purchase this image!!

Thanks so much for popping in today!!  I’ll see you soon!

Challenges I’d like to enter this card for:

  1.  TGIF Challenge – Balloons (TGIFC205)
  2. Alphabet Challenge – ‘A’ is for Animals
  3. Crazy 4 Challenges – C4C477 “Trick Card”
  4. Pammies Inky Pinkies – ATG (PIP1913)
  5. Crafty Animals – Anything Goes + animal
  6. 613 Avenue Create – Anything Goes with optional:  create a kinetic card

Time to Celebrate at Cute Card Thursday!

Hello friends!!  I’m very excited to share my card with you today for Cute Card Thursday!  We are celebrating our 11th birthday this week!!  WOO HOO!!  So of course, the theme for this week is “CELEBRATE“!!  Hope you can pop on over and celebrate with us by sharing your creation!!

This week we are sponsored by All Dressed Up Stamps and I have used one of their adorable images for my card today:

Vicki-CCT573-ADU-Celebrate

I have used this very sweet image called Time to Shine and she is having so much fun dancing around with all of the stars floating about her!

For the card, I have taken some silver sparkle cardstock and cut the stitched scallop frame and then placed some pretty papers behind it.  I mounted these pieces onto a piece of black cardstock as well as the image that was cut out with another stitched scallop rectangle die, also mounted with a piece of black cardstock and then added to the center of the sparkle framed panel.

I also took some pretty, pink, silky ribbon and wrapped it around the corners of these layers and also tied a bow with it that I’ve attached to the upper right corner of the wrapped around ribbon.  These layers were then mounted onto a white, top folding A2 sized card base.  Lastly, I’ve added some stars that were die cut from the same sparkly cardstock and I’ve also added one to the center of the wooden star veneer that was glued in the center of the pink bow.

Vicki-CCT573-ADU-Celebrate-close

Here’s a closer look at the Copic coloring I’ve done on this image.  I have added some extra sparkly details to the image by taking a Spectrum Noir Glitter Brush Pen and went over just the bottom portion of her dress.  I then took a silver gel pen and colored in the stars around her and added some dots to her dress and hair with it as well.  I wanted to create lots of sparkle and shine to this one! 🙂

Vicki-CCT573-ADU-Celebrate-flat

Thanks so much for dropping by!  I really appreciate your kind comments and I enjoy reading them so much!  Hope you have a fabulous day!

Challenges I’d like to enter this card in:

  1. All Dressed Up Challenge – Anything goes + ADU image
  2. All Dressed Up Facebook Challenge – Girly Girls
  3.  Crafty Friends – Ladies/Girls
  4. Simon Says Stamp Monday – Feminine/Girly
  5. Crafty Creations – Anything Goes

Celebrating at 2 Crafty Critter Crazies With a New Challenge For 2019!

Hello friends!!  Happy New Year to you!!  I hope you’ve enjoyed the celebrating with your family and friends!  Are you excited about a brand new 2019?!  I sure am!  I’ve got lots in store to share with you this year!  Hope you’re looking forward to it as much as I am!!

Let’s start this year off with a brand-new challenge over at 2 Crafty Critter Crazies, shall we?  Every first of the month there’s a brand new “Anything Goes” challenge…BUT you must use a critter somewhere on your project is all!

Vicki-2CCC22-Bugaboo

Isn’t this guy adorable?!  I have used one of our sponsor’s image for my card today from Bugaboo.  This is the Critter Balloons – elephant digital stamp.  I have actually cut him out twice and colored him in, but I cut just his head and the balloon to pop them up with some foam tape for a little dimension.

I’ve made a Center Step Card for my design today.  I kept the dimensions at an A2 standard size when it lays flat so that it will still fit inside an A2 envelope for mailing.

I’ve used some fun birthday style papers from my old stash and then I’ve used a sentiment from My Favorite Things More Essential Sentiments and white heat embossed it over a piece of black cardstock that I cut out with the Die-namics Essential Fishtail Sentiment Strips.  Lastly, I added some silver ribbon above that.

Vicki-2CCC22-Bugaboo-close

Here’s a bit of a close-up to see the dimension over the image.  I’ve also taken a glue pen over the balloon image and added some clear sparkly glitter over it.

Hope that you’ve enjoyed my card today and I’ll be back very quickly with a second post today!

Challenges:

  1.  QKR Stampede – Anything Goes #328
  2. A Perfect Time to Craft – Anything Goes

Celebrating 10 Years of Whimsy Stamps!

Today kicks off a weekend of fun to celebrate Whimsy Stamps 10th birthday! Yay!!!  If you’ve been following along with me for a while, then you know that I have been a design team member at a few different times throughout the 10 years and I’m honored to be a part of the team again to help celebrate their 10th birthday!

I also wanted to share my birthday card inspiration:

Vicki-WS-IGhop-DoggieIcecream

So what could be more fun than this little Doggie Ice Cream digital stamp to help celebrate with!  I have printed him out twice (I’ll explain below) and colored him up in the following Copic markers:

  1.  Doggie body:  E27, E25, E23, E21, R20 (cheeks) and white gel pen
  2. Doggie bib:  BG78, BG75, BG72
  3. Ice Cream bowl:  C8, C5, C3 (Used C3 for ground shadow under image)
  4. Ice Cream/bottom scoop:  R85, R83, R81
  5. Ice Cream/top scoop:  E53, E51
  6. Cherry on top:  R39, R37, R35

I have taken some older Whimsy Stamps paper packs (this one no longer available called “It’s a Party”) to use for the background of my card design…he has to have a party scene after all, right?!

I then took a thin strip of black card stock to go along the edge of the paper to give it a nice finishing touch.  I also took another piece of black cardstock and white heat embossed the fun sentiment from the Whimsy Stamps Bold Statements clear stamp set and then cut a banner and attached it alongside the black strip.  Lastly, I’ve added some fun matching Whimsy Stamps “It’s a Party” enamel dots to finish off the design.

A closer look at my image, you can see that I’ve added some glossy accents to the cherry on top of the ice cream as well as the pup’s nose.  I’ve used a Spectrum Noir glitter brush pen to over the ice cream scoops and then I took a liquid glue pen and sprinkled some more glitter under the pup image before attaching him to the paper.

The reason I printed out this pup twice is because I wanted to add some dimension to it.  I colored and fussy cut out the entire image and attached him over the glitter ground.  I took the second image and only colored his head/bib and the ice cream images.  I fussy cut those out, then turned them over to rub a tool over which make it curl around the edges a bit.  I used some foam tape to attach them directly over the image and it gives a nice dimension to it.

Vicki-WS-IGHop-Doggieicecream-dimension

Here’s a peek of what that dimension looks like underneath.  Because the edges curl, you don’t see much sticking out, but it gives a nice dimension to your image.

Vicki-WS-IGhop-DoggieIcecream-flat

Hope you’ve enjoyed my card today and I hope you take part in the celebration with us at Whimsy Stamps in any way you can!   I also wanted to thank each of you for the kind support you’ve given me with my Whimsy Stamps creations, it means so much!

Enjoy your celebration weekend and I’ll see you soon!

Challenges I’d like to enter this card for:

  1.  Addicted to Stamps & More – Make Your Mark
  2. Crafty Creations – Anything Goes
  3. Tuesday Throwdown – Anything Goes
  4. Watercooler Wednesday (WWC200) – Occasions
  5. CRAFT – Anything Goes

Kitty Celebrates Up in the Air!

Hello friends! I’m excited to start with this cute one for today:

Vicki-SnS-Kitty clouds

Tee hee!  Kitty got a little “carried away” with celebrating, I think!  I have used the NEW Kitty Celebrates rubber stamp set for my card.  I’ve stamped him over Copic Blending Card paper and colored him in with Copic markers and then fussy cut him out.

So before attaching him to my card, I thought it would be fun to add some Nuvo Crystal Drops in Morning Dew (Gloss-dries clear) and apply a layer over my balloons to give them a shiny balloon look!  I then set kitty aside while I worked on the rest of the card.

For the background of my card, I made a nice “blue sky” by taking some Watercolor Paper and sprinkling some Nuvo Blue Blitz Shimmer Powder over it and then spritzing some water over it and letting it run all over the panel until I achieved the look I was going for.  (LOVE the subtle shimmer over it too!) and then set it aside to let it dry.

The next thing for me to do was to create some “fluffy clouds” for the kitty to be among:

So, I took some cloud dies from my stash and cut them out with some Sticker Paper.

These sheets are sticky on one side, so I carefully peeled the release paper and handled them with some tweezers and applied some of the Twinkling Clouds Flocking over top of the sticky side, rubbed them with my finger to secure and tapped off the excess.  I now have some really cool soft and fuzzy clouds to attach to my blue sky!

So now all I have left to do is assemble everything for my card!  I started by taking the clouds and adhering them to my background with some dimensional Glue.   I then cut down the watercolor blue-sky panel with a rectangle stitched die that fit the size of my card.   Then I needed to add my sentiment, so I took the sentiment from the same stamp set and stamped it with a black pigment ink and added some Sparkle EP and heat embossed it.  I layered this die cut sky panel over a piece of black cardstock which was then layered over an A2 sized top folding white card base.  Lastly, I’ve added the fussy cut kitty over top of the sky background panel with some foam dots and then randomly added some drops with the Nuvo White Blizzard Glitter Drops over the sky panel.

Vicki-SnS-Kitty Clouds5

I think this turned out really cute and I sure had fun making it!  Here I’ve laid it down so the light catches the details of the sparkle in the clouds, the sentiment and the glitter drops in the background as well as the shine over the balloons too!

Hope you’ve enjoyed my card for you today!  Thanks for dropping in!

Here’s some challenges I’d like to enter this card for:

  1. Simon Says Stamp Monday – ‘B’ is for:  Balloons, Blue Sky, “Best Day ever”
  2. Tuesday Throwdown – Anything Goes
  3. Addicted to Stamps & More – Anything Goes
  4. The Male Room – Celebrate
  5. Little Red Wagon – House Pets