Floral Watercolor Foiled Hello

Hello friends!

Here’s what I made for today:

Vicki-BMhop-Aug28ATG

I’ve been wanting to do some coloring… so I got out several of my Aqua Pigments and Watercolor Brushes and went to town with one of these floral panels!  What I love about these card panels is not only are they all gorgeous, but I love that the lines on the images are a bit raised as if embossed which helps with the watercolor process.

Vicki-BMhop-Aug28-panels

As you can see, I’ve only used half of my card panel cut diagonally on my card.  So after coloring up the panel, I thought it was a nice way to cut the panel in half and then still have another panel left over to create another card with later!    So there’s a tip for extended more life out of your card panels!

Vicki-BMhop-Aug28-ATG-close

Here’s a closer view of my watercolor and the pretty shimmer from the Aqua Pigments!  So as you can see, I also did some foiling!  I wasn’t sure if these panels would foil correctly or not, but as you can see only a portion of the image foiled.  I was fine with that as it still adds a pretty sparkle to my card.

I did take the “hello” die and cut that from cardstock and then added some glue over it with the Deco Foil adhesive pen and then foiled over it in my laminator with some Deco Foil Rose Gold Transfer Sheets.  Love the look of the foiling and how it turned out!

Vicki-BMhop-Aug28ATG-flat

For my card, I attached the watercolor cut panel over a piece of black cardstock that I also cut diagonally with the panel and then attached it over a piece of very heavyweight white cardstock.  Then I attached my foil die cut sentiment across the card and added some Acrylic Bubbles randomly over the card. I finished it with some Nuvo Dew Drop accents as well.

I hope you’ve enjoyed my card today!  I appreciate you stopping by!

Challenges for my card:

  1.  Simon Says Stamp Wednesday – Clean and Simple
  2. Allsorts – Feminine
  3. Pammie’s Inky Pinkies – PIP1934 Anything Goes

Triangle Corner Pop Up Card + video tutorial!

Today I’m sharing the Triangle Corner Pop Up Card.  I have actually received several messages and comments that people wanted to see a video tutorial on how to make one.  So I thought I would come up with a version that I could share to show the many different variations that you can come up with and the fun you can have with it!

Vcki-BMBeHappy-TriCornerPop-opened

This style is a much more elegant approach which is much different than a past creation I put together.  I love that you can change the look and have fun playing with different stamps and elements to fit inside the design!

For this one, I have taken the Rose and Butterfly stamp sets to stamp and Copic color.  I fussy cut out the images on my design.  I’ve used Jurassic 100# and White 100# cardstock.  The decorative paper is from the Rustic Florals paper pad.  I stenciled the bottom of the Jurassic panel with a stencil using some Unicorn Horn Glitter Glaze.  Both of the rose images along with the small heart circle on the easel card were popped up with some foam tape.

For the circle easel design, I’ve cut out a scallop circle with the white cardstock in the size that I thought would fit within the design.  Then cut the body of the card with other circle dies in the Jurassic cardstock and then the front with some more of that Rustic Florals paper that I’ve used in the background.  The sentiment below the butterfly and the hearts on the small circle were stamped from same stamp set.  All of the white panels (with the exception of the scallop circle) was ink foam blending with some grey distress ink.  To keep the card “locked” in this position, I’ve used the Mini Disc Magnets.

If you are interested in learning how to create one of these cards for yourself, then please be sure to check out my video below.  CLICK HERE to view on You Tube.

These cards can look really intimidating, but once you see the measurements of how to put one together, they’re really easy and fun to make!

Vicki-BMBeHappy-TriCornerPop-unfolded

Here’s what the card looks like completely opened up.  You can see on the left bottom panel that I’ve taken that rose from the stamp set again and stamped it in the corner with some grey ink after ink foam blending around the edges of it.  This will be the area that I’m leaving for a personal message.

To fold it down to a 4″ square card that’s close you will start by folding down on the top and then fold it over from the right side to the left.  This will completely close it up.

Vicki-BMBeHappy-TriCornerPop-front

Here you can see that the card is completely closed to a 4″ square size minus the rose leaves sticking out which I don’t mind.

I took another panel of the Jurassic cardstock for the front of the card and sponged around the edges of it with the white Ink and then also stamped the rose again in the corner of it.  Because I had several dimensional and extra layers on this card, I had to use a ribbon to tie it together to help it stay closed up.  You might need an envelope that is slightly larger than an A2 envelope, but if you use less layers and dimension, it should fit in an A2 size envelope.

Hope you’ve enjoyed my interactive card and tutorial today!  Thanks so much for dropping in with me! 

Challenges I’d like to enter this card for:

  1.  Cardz 4 Galz – #103 Wings
  2. Crafty Cardmakers – It’s a Bug’s Life
  3. Through the Craftroom Door – Anything Goes
  4. Try it On Tuesday – In my Garden there is….

Oceans of Love for Digi Doodle Studios

Hello again my friends!  I’m back to share this card I made using this adorable image from Digi Doodle Studios:

Vicki-DDSNixie-Aug20

Isn’t she adorable with her little underwater crab friend?!  This is the Nixie Mermaid digital stamp from the Digi Doodles Studios “Under the Sea” collection.  I thought she was so cute and I actually had her colored up before I ended up hurting myself and had to leave.  I finished out the card when I got better.

I have also used some fun digital papers and a sentiment that work well with this particular image.  The pretty pink patterned papers you see in the background come from the Digi Doodle Studios Summer Breeze Card Making Paper collection.  The sentiment came from the Digi Doodle Studios Mermaid Sentiments set.  I printed out the sentiment and cut it out with a ticket die, sponged around the edges with the turquoise ink color and layered it over the same turquoise colored cardstock I’ve used throughout my layout.

The layout idea came from a sketch challenge that I’m entering for below this post.  I have several layer panels including the fun turquoise sparkly paper that I’ve used that was cut with a wave border die and then sponged with some white ink.  I added some pearls to each corner of the image panel, wrapped some white organdy ribbon around the card front base, tied a bow and added a silver bow where I have attached some silver string and a starfish charm to it.  The entire card measures 5.5″ square.

Vicki-DDSNixie-Aug20-close

Here’s a closer view of the coloring that I’ve done on this mermaid image.  Mainly colored with Copic markers, but I’ve used a gel pen to color the sprigs next to the flower in her hair and the bracelets around her wrists.  I took a glitter brush pen and covered her entire fish body and the bubbles in the water with.  (Of course it looks so shimmery in person!)  I then took some glossy accents and covered the little crabs eyeballs with and then some liquid pearls to dab a dot over the pearl inside the oyster.  This mermaid image panel was popped up with foam tape over the card front.

Vicki-DDSNixie-Aug20-flat

I hope you’ve enjoyed my underwater mermaid card today!

Thanks so much for stopping in today!  I’ll be back tomorrow with something fun!

Challenges I’d like to enter this card for:

  1.  Cheerful Sketches – August Challenge
  2. The House That Stamps Built – A1419 Tic-Tac-Toe (I used first row down)
  3. Pammie’s Inky Pinkies – PIP1933 Anything Goes

Steampunk Style

Hello friends!  Welcome to the weekend!  Hope you’re all doing well and have some fun plans!  I have some happy craft time planned while hubby works overtime!  🙂

I am SO excited as yesterday afternoon I had time to play and I couldn’t wait to make something to share today with you:

Vicki-BM-SteampunkBox

This was something a bit different for me as I don’t believe that I have ever gone in a “steampunk” direction before with my cardmaking, but I had so much fun putting the different metallic, sparkle and shimmer on this!

I started out with a white cardstock base A2 sized and top folding.  I took a piece of masking paper and used a circle die to cut out an area.  I used the negative of that piece to go over the entire front of the card base.  I then took a Stencil along with the sample size glitter glaze from the kit and spread it over the circle opening on the card base.  (Set it aside to dry.)

I then took some paper from the kit and used the embossing folder from the kit to get the texture and then sponged one some white Ink to bring out the texture.  I also used a circle die cut a bit larger than the circle on the card base to make a frame with it.  I attached the silver ribbon from the kit around the bottom of it and then attached the panel over the white card base.

Lastly, I colored the hot air balloon image from the stamp set with not only the Aqua Pigment, but also some other metallic Aqua Pigments like Penny and Brass!  The roses were colored as well.  There is a cut file for this stamp set, but I decided to just fussy cut around it this time.  I popped it up over the card with foam tape.  I then took some of the sequins from the kit and attached it randomly to the design.

The photo doesn’t do the sparkle and shimmer justice.

Vicki-BM-SteampunkBox-close

Here’s a closer look at the hot air balloon image along with the pretty sparkle from the Glitter Glaze.  I like the different color metallic to play with!

Vicki-BM-SteampunkBox-flat

I hope you’ve enjoyed my card today.  I had lots of fun playing around with it and I know that I’m not done yet!  I have more ideas floating around in my head that I’d like to try, so stay tuned!

Thanks so much for dropping in today!  I appreciate each of  you very much and I’ll see you soon!

Challenges I’d like to enter this card for:

  1.  Always Fun – Circles
  2. Crafty Creations – Anything Goes
  3. Creative Knockouts – Sparkle & Shine
  4. Creatalicious – Anything Goes with optional:  add some sparkle
  5. A Bit More Time to Craft – Anything Goes

Add a Quote For Cute Card Thursday

Hello friends!  It’s Thursday and time again for a new challenge over at the Cute Card Thursday Blog!  The theme for this week’s challenge is to “Add a Quote” to your project!  I happen to love quotes and find them very inspirational to help lift my spirits and I think it’s a wonderful type of card to send to someone who might need a little lift.  So here’s the card I created for the challenge:

Vicki-CCT595-BMQuote

There’s always something magical about a night sky especially with some soft glowing lights hanging up in your backyard!

Starting with the background, I took some watercolor paper and the Night Shift Aqua Pigments along with some sprayed water and some acetate to move around the watercolor and mix them together to create the “night” look I wanted for the background.  I then took some circle stencils that I made myself with some circle dies and white Ink with a sponge to create the “bokeh effect” over the background in the upper portion of the design.  Then I white heat embossed with white EP using an image from the stamp set.  I also heat set the quote at the bottom.  I also added some “splatter” at the top of the card with some watered down Pearl Aqua Pigment and a brush.  I then colored in some of the open stars with it. I’ve used some Brown Aqua Pigment to color in the branch too.  I used some yellow chalk to make the “lights” around the branch glow and then covered them some glitter.  Then I took some TINY star confetti and glued them around the branch area for more sparkle.

It’s hard to photograph all of that shimmer from the Night Shift Aqua Pigments and sparkle that’s all over this card, so I thought I would share it in motion:

I want to keep replaying so that I can see that shimmer in the background!

Vicki-CCT595-BMQuote-close

Here’s a closer look at the quote I’ve used in case you couldn’t read it.   “It is important to remember that we all have magic inside of us.” – JK Rowling  … Love that!

Vicki-CCT595-BMQuote-flat

You might be able to see a little bit of that shimmer on the background here if you look at the left lower portion of the card.

I hope you’ve enjoyed my card today and I appreciate you stopping in!

Challenges I’d like to enter:

  1.  CCEE Stampers – Embossing wet/dry CCEE1932
  2. Crazy 4 Challenges – C4C497 Inspiration from a Book (Harry Potter)
  3. Allsorts – Sun, Moon and/or Stars OR something for Baby (stars)
  4. Through the Craftroom Door – Anything Goes

Faux Metal Technique + video

Hello friends!!  I’m so excited to share with you this fun technique that’s not new, but a cool look to try with your embossing powders!

Vicki-BMHOP-subscriptions

I really love how this one tuned out!  I have used the “Faux Metal” technique on my card along with the “emboss resist” technique.

In order to share the steps of this card, I’ve made video so you can see how I incorporated these techniques into my design.  CLICK HERE to watch on You Tube or check it out below:

Vicki-BMHOP-subscriptions-close

Here’s a closer view of the impressed flower into the embossed panel.  It’s fun to run your fingers over the flower.  I happened to have found the perfect accent for the center of the flower too!  I think it really picks up the pretty colors in the card.

Vicki-BMHOP-subscriptions-flat

I hope you’ve enjoyed my card today!  Thanks for dropping by!

Challenges I’d like to enter this card for:

  1.  Rainbow Card – Passion for Purple
  2. Crafty Friends – Lace/Ribbon

Class Projects

Hello friends!  Just wanted to pop in and share the projects I made for this fun class I took!

This class was full of lots of cool things and plenty to complete the projects below plus I had some things left over too:

Vicki-BMJunkieClass19-foiltag

The first project was this ginormous, very thick tag!  It measures approximately 9.5″ tall and 5.25″ in width!  I thought it would be cool on a project you frame or hang from the wall.  Thinking about a burlap or something. hmmm…..  Have any suggestions?

Everything you need except the stamps, ink and adhesive come with this class kit.  So the background was foiled (foil included in kit) and I used my own tape adhesive to do that with the stripes for the background.  The wreath was made with a chipboard circle from the kit which the flowers were attached to.   I stamped and cut out the flowers from a stamp set which were colored with some of the Aqua Pigments that were included with the kit.  I used a deco foil pen to create “dots” in the center of the flowers and used the left over foil from the kit.  I curled up some of the edges of the flowers for added dimension.

For the banner, I used one of the sentiments from the same stamp set and stamped it out with the Black Ink over the tag included with the kit.   I decided to change mine up from the way it was shown in class.  So I cut off the end and added it underneath the wreath.  Then I took the twine from the kit, doubled it up and added it as a bow on the bottom of the wreath.  I took a cute bird button and glued it to the center of the twine bow.  I thought to add a bit more color along the edges of the tag and sentiment banner with white Ink which I think softened up the edges nicely.

Vicki-BMJunkieClass19-ChromaGlazeCard

My second project was this card!  The background was created with some sample sized Chroma Glazes from the kit.  I chose to use a past stencil I had.

I decided to matt my stenciled background onto an A2 sized card base and also create an oval matt for behind my oval image panel.  There was an oval piece and full base card piece that came in the kit, but I decided with all of the Aqua Pigment coloring I did, I needed to use watercolor Paper for stability.  I used the Aqua Pigments from the kit as well as pulling in some browns and blacks from my stash.  I mixed colors together to get the look I wanted.   The image was stamped out.  I stamped the branch first, masked it off and then stamped the bird so his tail was behind the branch.  I then stamped the bird again and cut out his claws and attached them over the branch.  It makes it look more dimensional that way and so it really looks like the bird is perched.  I added some color to the background with the yellow Aqua Pigment from the kit.

I took the sentiment from this same stamp set and heat embossed it with some white EP and cut it into a banner to pop up over the card with some Foam Tape.  I took the Acrylic Bubbles that came in the kit and colored the backs of them with a yellow alcohol marker and attached them randomly to the design.

Vicki-BMJunkieClass19-minitags

The final project for the class was making up these set of tags!  These tags came in the kit along with the blue twine.  There wasn’t quite enough to string the 5th tag, so I took a piece from my stash.  Not sure if I was supposed to get 4 or 5 tags…but I got 5! 🙂

I didn’t have the same stamp set that was shown in class, so I thought it would be a good idea to make up some birthday tags that I can add to gifts and/or cards!  So I used a stamp set from my stash and colored them all in with the Aqua Pigments from the class kit.  I just cut pieces of the twine and added them to the top  of the tags.  Simple, but fun!

Hope you’ve enjoyed my project share from class!  Thanks so much for dropping in today and I’ll be seeing you soon!!  Have an excellent weekend!

Challenges I’d like to enter:

  1.  Stamping Sensations – Things With Wings (for bird card)
  2. 613 Avenue Create – Anything Goes with optional create/decorate a container
  3. Through the Craftroom Door – Anything Goes

Cute Card Thursday is Going in Circles!

Hello friends!  I hope you’re having a great week so far!  Today is Thursday and it’s time to start a new challenge over at Cute Card Thursday!  This week we are looking for your “Circles” on  your creations!  So here’s what I’ve made for the challenge:

Vicki-CCT594-ADU

We are being sponsored by All Dressed Up Stamps and I’ve used this adorable “Girl On a Bike” image for my card.

I’ve colored her up and cut her out with a circle die that I commonly reach for which is the Hero Arts Infinity Circle dies and then I cut out a black cardstock circle to layer behind her as well as the sentiment circle.  I happen to find some papers that, for me, mimicked the bike wheels, so I cut that out in a circle as well for the design.  For each circle, I took my ink foam blending tool and went around the edges with the same ink color that I’ve used for the cloud background.

Now that I had all the circles cut out for my design, I used a cloud stencil to ink up background which I cut out with a stitched rectangle die along with the pattern paper circle and then wrapped some black ribbon around it before attaching it to a black cardstock layer that was then mounted over a white A2 sized card base.

I added the circle image and cut off the right edge that was sticking out along the side.  I took the sentiment circle and popped it up over the design with a foam circle and then I added some clear sparkling sequins in various places.

Vicki-CCT594-ADU-close

Here’s a closer look at the image and how I’ve got her colored up with Copic markers.  I used a white gel pen for the flowers in her hair along with a gold gel pen for the centers of each of the flowers and her shoes and shirt waist band.  I’ve used a silver gel pen for the bike wheels, petals and end handles.

Vicki-CCT594-ADU-flat

Thanks so much for dropping in today!  I appreciate each and every single comment and I look forward to sharing more with you soon!

I’d like to enter the following challenges:

  1.  All Dressed Up Stamps – July Challenge
  2. Just Us Girls – Summer
  3. Crafty Calendar – August Anything Goes
  4. Always Fun – Use Stencils
  5. Pammie’s Inky Pinkies – PIP1931 Anything Goes
  6. Get Creative – Anything Goes/no twist
  7. Papercraft – Summer Fun
  8. Papercraft Business – August Anything Goes with optional use a circle

Sending Smiles Mermaid Style

Hello friends!  Well it feels nice to get back into the swing of things here again!  I want to thank you from the bottom of my heart for the awesome welcome back I recieved from you guys!  Wish I could reach out through the screen and give you all a big hug!  🙂

Today is August 1st AND it’s on a Thursday too, so I wanted to share the card I made for the Whimsy Stamps August Digital new release as well as a brand new Cute Card Thursday Challenge too!!  Whimsy Stamps is our sponsor this week and it’s an easy “Anything Goes“, so please be sure to stop by the blog to see the wonderful inspiration from the rest of the design team and play along with us!!  We look forward to seeing what you’re working on!

Vicki-WSGoldie-Aug1

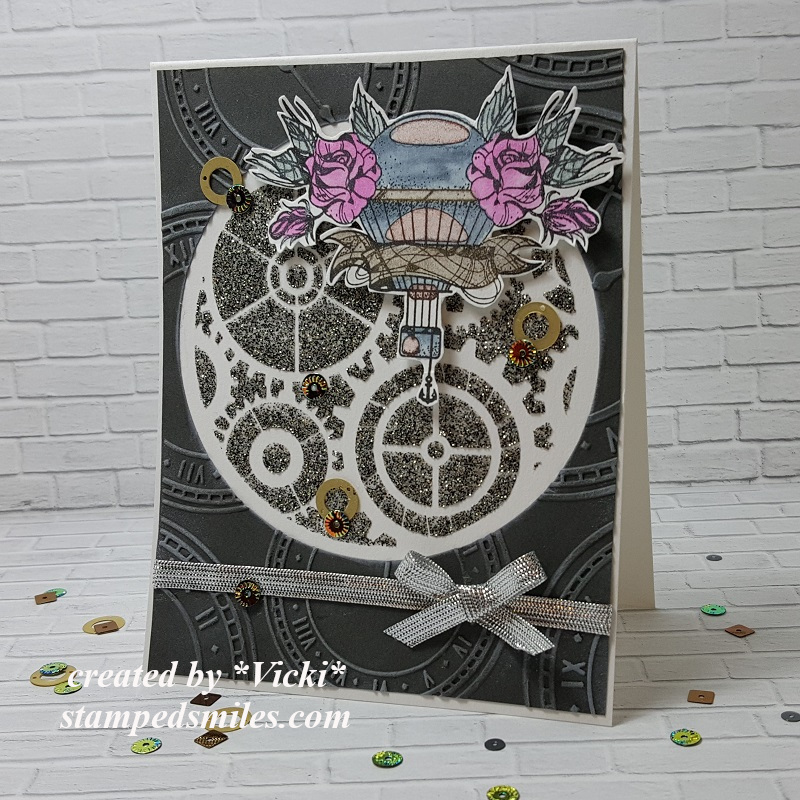
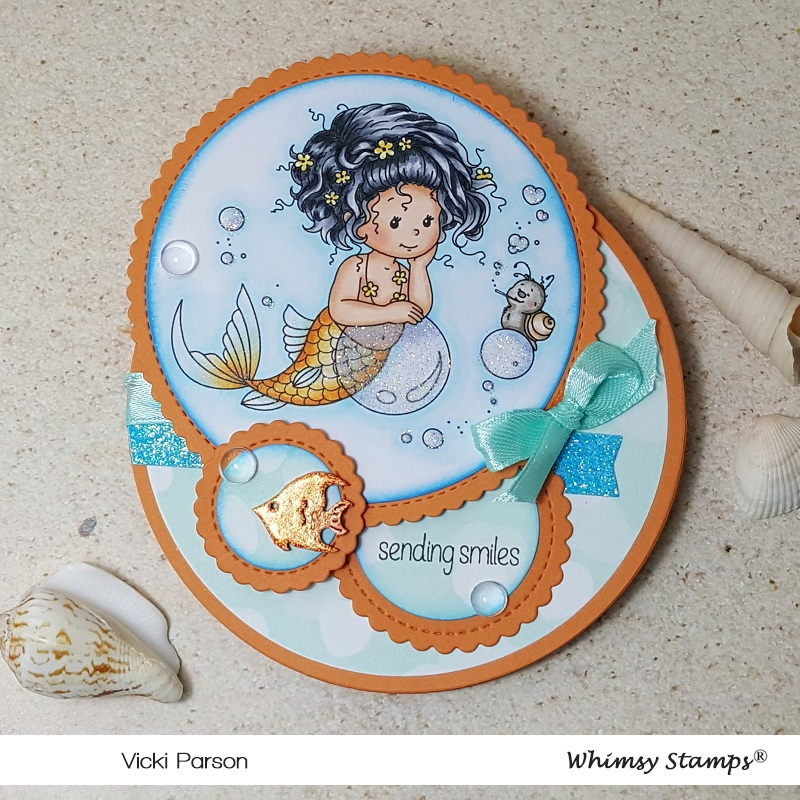
Oh aren’t these Sylvia Zet images just as cute as can be?!  I so enjoyed coloring her up!  (See the close up photo and details below.)  This is the DIGITAL version of  “Goldie” just released from Whimsy Stamps this month.  You can still also purchase the rubber cling stamp, but now it’s nice to be able to have the option to choose either one!

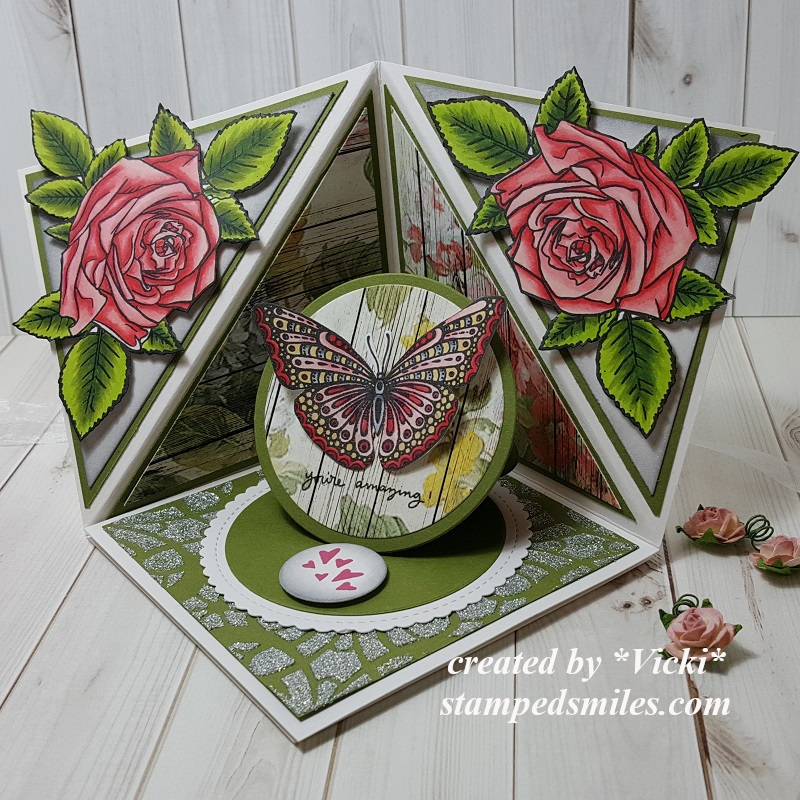
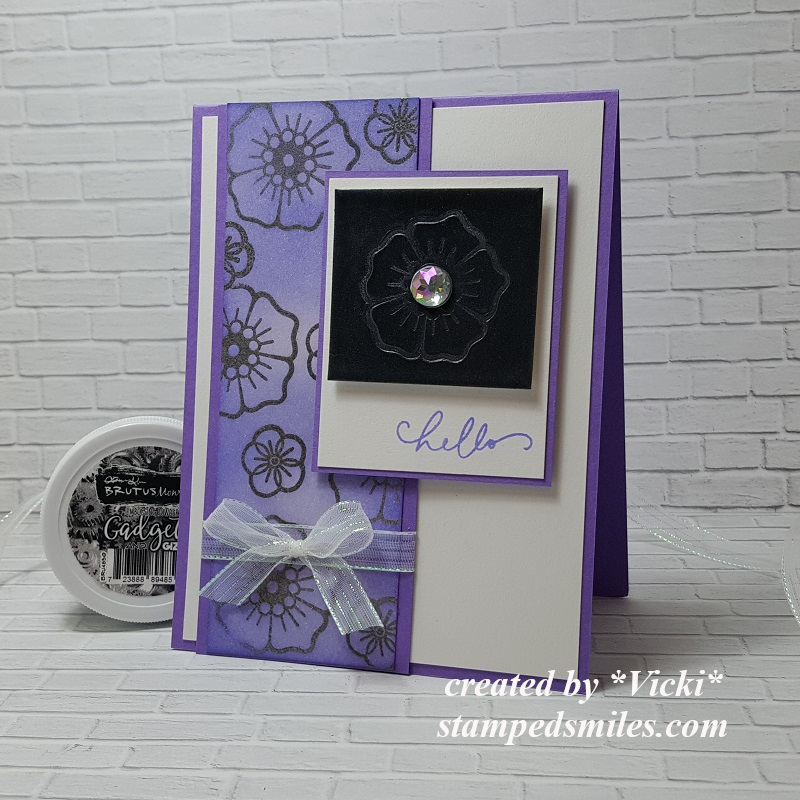
Since her name is “Goldie“, I had to use the orangish color palette for her!  When looking at the image, I immediately saw “bubbles”, so I thought it would be fun to make a circle easel card design with her!  This actually turned out to be a “non-traditional” circle easel card with the circled image going askew from the main area…which makes it seem more like several bubbles underwater!

I have cut several different sizes of circles, one for the main circle card base and several others with some old SU! bokeh looking papers from my stash.  I used a stitched scallop circle die set to cut out the layers behind the circles.  I sponged all circles with some blue ink for more depth.  I’ve added a strip of blue glitter cardstock on the main card front layer as well as some ribbon to attach to the front.  I arranged the circles where I wanted them and added some foam tape here and there to pop up the layers.

To hold up the card front, the inside of the easel card has another strip of that blue glitter cardstock and I stamped an anchor image over one of the circle panels using an older Whimsy Stamps clear set.  I used some foam tape to pop that up so that the front card panel would prop up.

I’ve taken the Whimsy Stamps Everyday Mini Sentiments stamp set to stamp the sentiment under the image panel with black ink.  For the accents on the card, I’ve used some clear acrylic bubbles randomly and glued them in places.  For the fish, it was a wood veneer from my stash that I heat embossed with some cool orange metallic embossing powder.

Vicki-WSGoldie-Aug1-side

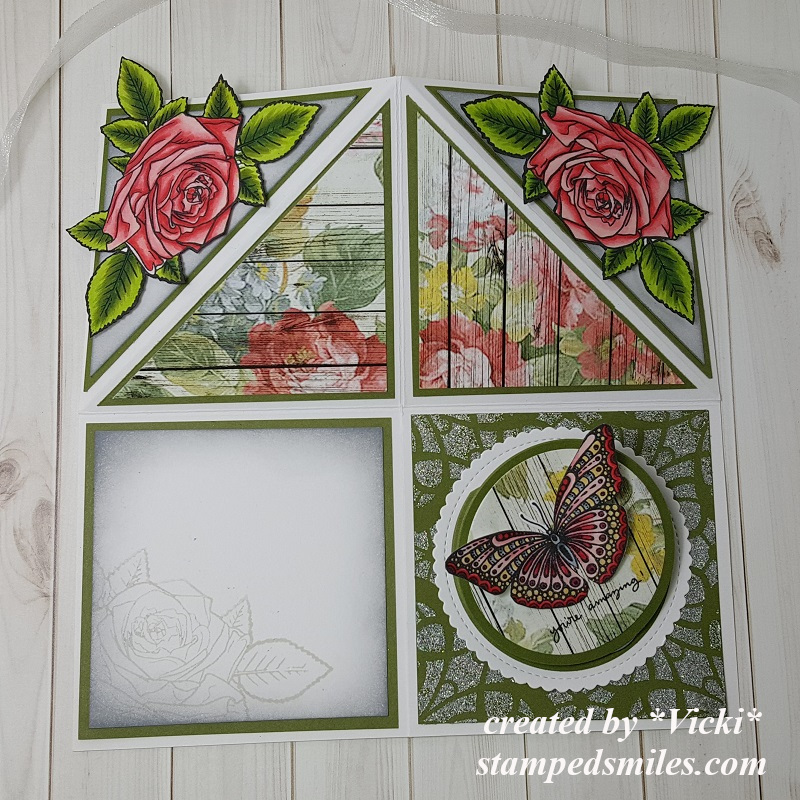
Here you can see the details from the side view of the easel design and how it’s propped up with that anchor circle holding the front card panel in place.  to mail this card, you just unfold it and lay it flat as shown in the last photo below.

Vicki-WSGoldie-Aug1-close

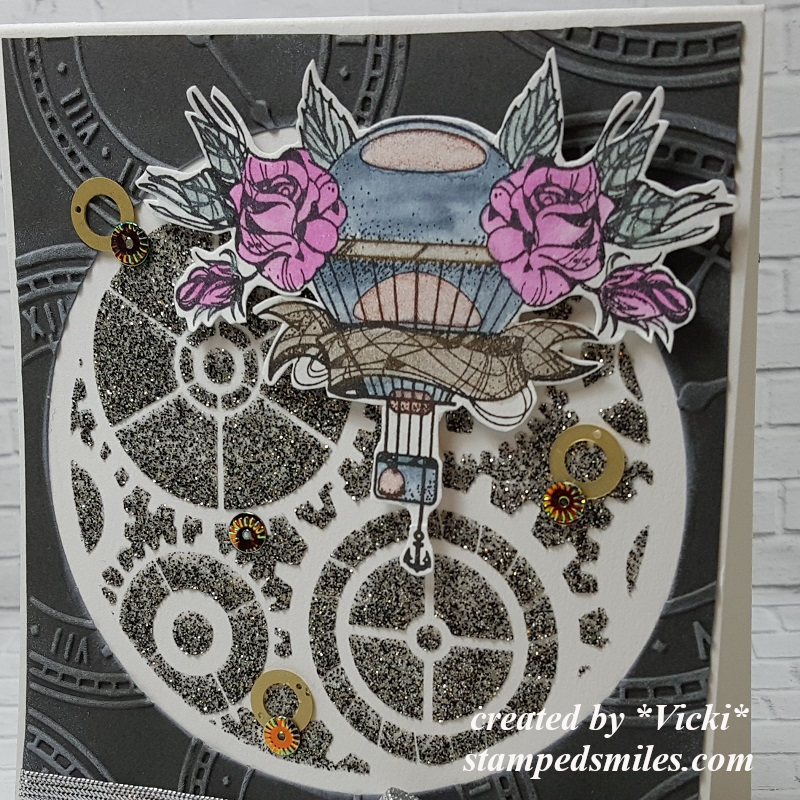
Here’s a closer look at this really sweet image.  Below are the list of Copics I’ve used to color her in with:

  • Fins, flowers, Bubbles – Y38, Y35, Y32, BG000
  • Hair – C8, C5, C3, C1
  • Skin – E21, E11, E02, E00, E000, R20
  • Snail – W5, W3, W1, E33, E31, R20

Wink of Stella used for mermaid body, clear glitter and 2-way glue pen used for the bubbles.  I used a black gel pen to dot the center of flowers.

Vicki-WSGoldie-Aug1-front

Here’s what the folded and closed circle card looks like.  She will not quite fit into a regular A2 sized envelope because I arranged the circles differently, but a nice 5×5 size would work great.  I do have an envelope creator which is handy for those odd shaped designs that I can custom make.

Hope you’ve enjoyed my card today!

Challenges I’d like to enter this card for:

  1.  Sweet Stampers – Summer (digi and stamp used)
  2. QKR Stampede – #358 Anything Goes
  3. Addicted to Stamps & More – #352 Make Your Mark
  4. Little Red Wagon – Digital Stamps
  5. Crafty Gals Corner – 3+ layers

It’s CAS at Cute Card Thursday!

Hello friends!  I hope you’re having a great week so far!!  I had forgotten to give updates on the “bird nest” situation, but actually the last time we had checked, the baby bird hopped onto the roof next door and the mother bird was chirping at us and then the baby took off and flew away!  We never were able to get any more photos.  I think there was just that one baby bird that survived.  Now we have the empty nest in the tree.  We think another bird may be trying to build on it, but we don’t see anything.

Today is Thursday which means it’s time for a brand new Cute Card Thursday Challenge!!  The theme for this week is CAS (clean & simple)  Our sponsor is All Dressed Up, so be sure to play along for your chance to win!

Here’s my take on the challenge:

Vicki-CCT586-ADU

I have used this really cute image kindly donated by our sponsor called Dreaming of Summer.  I love the “dreamy” pose she has!  I thought she would look so cute propped up over a fence, so I made one for her!

**Sometimes, CAS puzzles me as to the “definition” of what it TRULY is.  To me, it is a bit different to some than others.  I feel it to be more like an “art term” where everything is subjective in it’s form and if I have to think about it TOO much, I’m not being “me” and having my fun with it…so I just create weather it is considered simple or not.  🙂  For me, this seemed like a CAS design.**

First, I colored up the image and then stenciled on some clouds behind her.  I took a craft knife and cut out just the bottoms of her elbows.  I stamped another panel with a woodgrain stamp in gray colored ink and then used a punch with a sharp point to create the “planks” for the fence.  I sponged around the edges with more gray ink and then I tucked the fence panel underneath her elbows and attached it to the image panel.  I cut out these pieces with a stitched rectangle die and layered that onto a piece of black cardstock that was layered over an A2 top folding white card base.  Lastly, I added the die cut “hello” with black cardstock in the corner.

Vicki-CCT586-ADU-close

Here’s a closer look at the coloring I’ve done on this image.  I’ve colored her in with Copic markers and then for the tiny butterflies, bees and flowers around her, I’ve used some metallic gel pens to color them with.  You can see the shimmer on them.

I’ve also taken some liquid pearls to place some dots around her as well.  I thought it made her look a bit more whimsical.

You can also see where her elbows are lifted up over the fence panel too.

Vicki-CCT586-ADU-flat

Thanks so much for stopping by!!  See you soon!!

Challenges for this card:

  1.  All Dressed Up Challenge – Anything Goes + ADU image
  2. Craft Rocket – Summer is Coming
  3. Happy Little Stampers – Anything Goes with Dies
  4. Crafting From the Heart – Anything Goes
  5. Crafty Creations – #392 Anything Goes