Whimsy Stamps + Anything Goes at Cute Card Thursday!

Hello friends! I’m not only here to share my creation for the new release at Whimsy Stamps, but also another new challenge for Cute Card Thursday which is also being sponsored by Whimsy Stamps this week!  The new challenge for Cute Card Thursday this week is another “Anything Goes“!  We look forward to seeing your creations, plus if you enter this week, you put your name into a draw for a win from our sponsor!  Don’t miss out!

Vicki-Cratefulkittens-Jan3

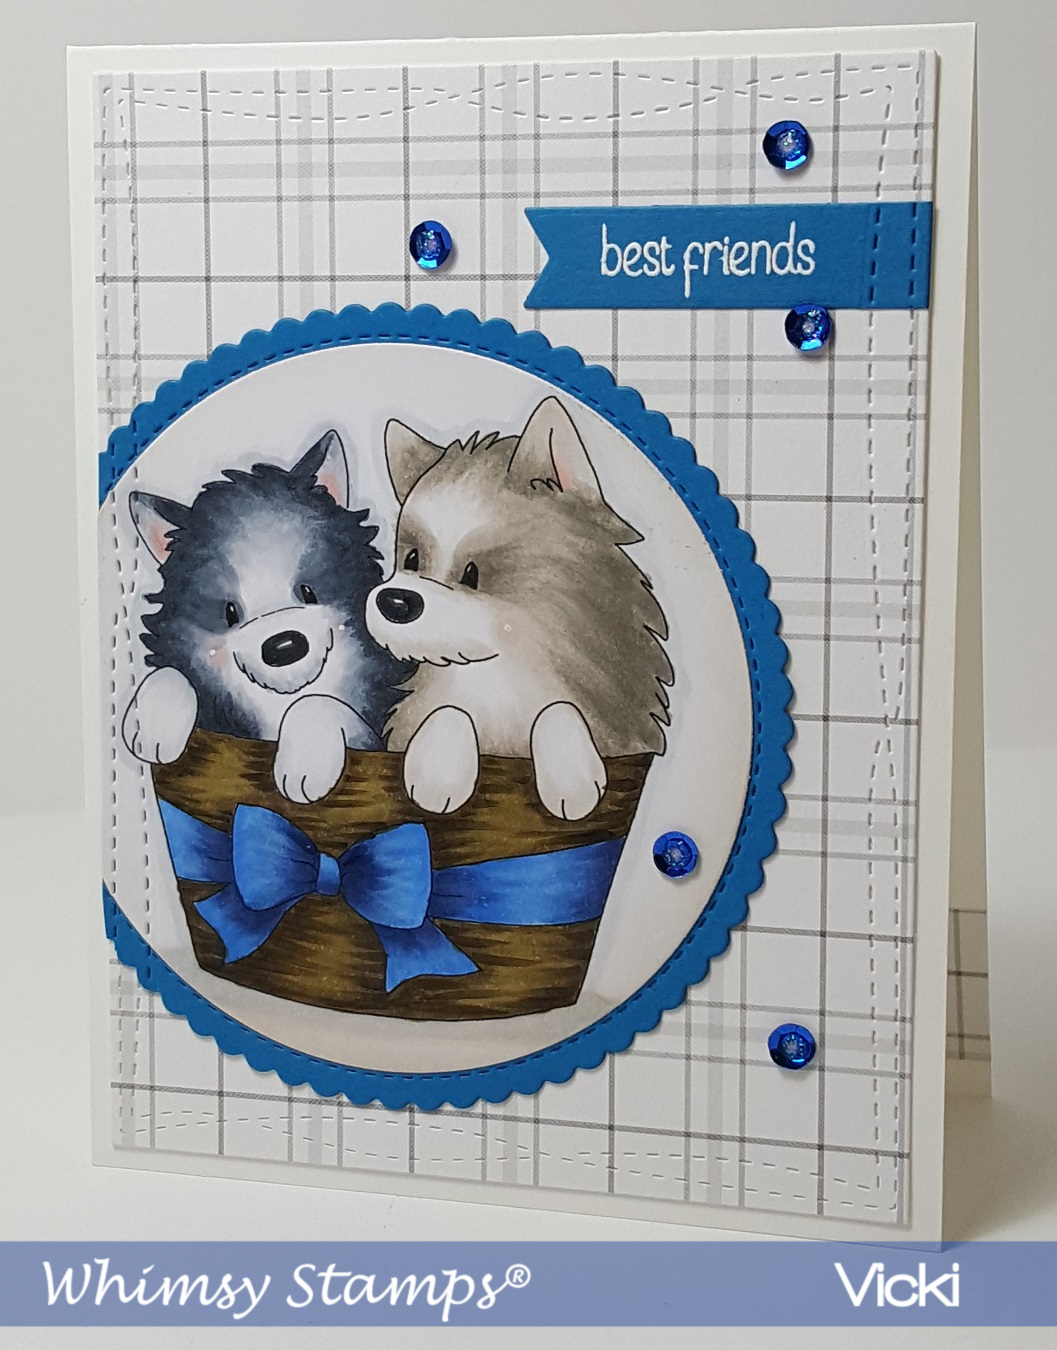
Now how adorable are these little cuties?!!  This is the newly released digital stamp called Crateful of Kittens from Whimsy Stamps.  I have also paired it with the newly released Oh Boy – Digital Papers.  I thought that the solid yellow and gingham would work nicely with this image to give it a happy feel!  For the sentiment I’ve used the Whimsy Stamps Bold Statements clear stamp set to stamp over some of the yellow solid paper and made my own fishtail banner with it.

I’ve added some white ribbon with a bow to go around the yellow papers and then attached it to an A2 sized white top folding card base.  For the banner, I’ve added a white daisy flower and placed a rhinestone in the center that I’ve colored yellow with a Y17 Copic Marker.

Vicki-CratefulKittens-close

Here’s a closer look for you on how I’ve colored up this image!  I’ve used a stitched square die to cut the image out with and additional die to layer some of the solid yellow digital papers behind it.  For the background of the image panel, I’ve used a cloud stencil and very lightly inked some clouds in the background.  I added some sparkle to the center of the flowers on the image with a glue pen and clear loose glitter.  I’ve also added some dots to their cheeks with a white gel pen.

Here are the Copics I’ve used to color with:

  1.  wooden crate:  E23, E25, E27, 0-blender
  2. Flowers, leaves, grass:  Y11, Y15, Y17, YG61, YG63, YG67, G20, G21, G24
  3. Kitties:  C1, C3, C5, E41, E43, E44, R20 (cheeks), W1, W3, W5

Hope you’ve enjoyed my creation today and see you soon!

Challenges:

  1.  My Time to Craft – Something NEW (New image, new papers and new friends!)
  2. Always Fun – Something NEW (ditto above!)
  3. A Bit More Time to Craft – Anything Goes
  4. Classic DT Challenge – open (Anything Goes)
  5. The Crafty Addicts – Anything Goes with optional:  “It’s a purrfect day!”
  6. Little Red Wagon – Hey Newbie! (new image, new papers and new friends!)

Feeling Young at Heart

Hello friends!  Stopping in to share another guest design creation that I’ve made!   Here’s another I’ve made using the very sweet digital set Doctor at Heart:

Vicki-SnSNov-YoungatHeart

Isn’t this image darling?!  My first thought on this set was to try and go a little “vintage” with my design.  I opened up a Word doc. to insert the image and sentiment and sized and arranged it how I wanted it to look.  I printed it out on some cream-colored card stock and then cut it out with the Tonic Studios Follow Your Heart die using the frame portion only.

I wasn’t sure I wanted the image to look “vintage” so in asking hubby, he told me that I needed to color him up with blue shorts, brown/tan shoes, orange top and blond hair!  He was very specific about that!! LOL!  So I colored this cute image up with my Copic markers and gave some “outlining” shadows around the sentiment too.  I took a gel Stardust Pen and colored in the ‘metal parts’ of the stethoscope and then added some Nuvo Crystal Drops Morning Dew (Gloss-clear) to the heart circle the boy is holding and let it dry.  I then used some distress inks and sponged around the edges of the heart image panel and spritzed it with water, waited a few seconds and dabbed it up with a paper towel.  I love the watermark look it gives to add that vintage flair and tie it all in together.

Vicki-SnSNov-YoungatHeart3

So when you tilt the card, you notice that the background looks like I’ve used some special glitter paper, but I did NOT!  I made my own glitter paper for the background!  I took another piece of black cardstock and covered the entire panel with VersaMark Ink and sprinkled it with some Black Magic embossing powder. Stunning sparkle!

Vicki-SnSNov-YoungatHeart2

For the look on the ribbon, I took some cream-colored seam binding ribbon and sprayed it with some water and rubbed it in some ink that I smeared onto my TH Glass Media Mat and crinkled it up and then let it dry.  I wrapped it around the embossed glitter background panel and added a bow with a button and natural twine for the center of it.  I mounted this glitter panel onto a 5 1/2″ squared cream-colored card base that I’ve ink blended around the edges in the same colors that I’ve used on the heart.  The heart image panel was then popped up over the ribbon strip and glitter background with craft foam and then the seam binding bow was attached along the edge of the heart.

Vicki-SnSNov-YoungatHeart1

For the corners of my card, I had a very old corner punch that I punched out from black card stock and attached them to the corners of the card.  I then used the  Nuvo Crystal Drops Ripened Pumpkin to add some “dot” in the middle of each punched corner piece to finish it off.  I think that the tiny bit of orange color ties in nicely with the glitter background and his orange shirt.

I really hope that you’ve enjoyed my fun ‘vintage charm’ creation as well!  Thanks so much for stopping in today and I’ll see you soon!

Challenges I’d like o enter my card for:

  1.  Little Red Wagon – “Remember When” (used Crystal Nuvo Drops – Rippened Pumpkin – meant to be for Halloween)
  2. Crafty Creations – Anything Goes
  3. The Creatie Crafters – Anything Goes
  4. Fussy and Fancy Friday – Anything Goes

Grateful We Are Friends

Hello friends!  Stopping in today to share my card using the Koi Pond Friends rubber stamp set.

Vicki-SnSNov-KoiPondFriends

I started out with a piece of watercolor paper and sprinkled three different colors of Nuvo Shimmer Powders on it:  Atlantis Burst, Green Parade and Blue Blitz.  I sprinkled all the colors at once before applying any water to it.  I sprinkled VERY little and just added a bit more here and there as I spritzed it with water.  I saturated the paper and moved it around until it was covered how I wanted it to look.  I dabbed it up with a paper towel and used a heat gun to dry it up a bit.  I just love the beautiful shimmer on this background!

Vicki-SnSNov-KoiPondFriends2

Also, for the background, I took the bubbles image from the same stamp set and stamped them in VersaMark ink around the right corner and bottom over the watercolor piece.  I heat embossed the bubbles with some Frosted Juniper and Sparkle (Semi-transparent) embossing powders.  I then mounted this watercolor background panel onto the top edge of a black A2 Sized top folding card base.

With the close-up view of the fish, I heat embossed them with the Copper Embossing Powder over some Bristol paper.  For the flower image, I just stamped it with black waterproof ink in the same Bristol paper.  Below I will share how I went about coloring both the fish and the flower.

After heat embossing the fish and stamping the flower, I took the Nuvo Glitter Markers in the following colors:  Midnight Shadows, Ember Glow and Urban Graphite and pressed the pens down onto my Tim Holtz Glass Media Mat to get a “pool” of it and then used my Water brush to blend and color the images. It leaves a beautiful shimmer and blends the colors together so nicely!

Vicki-SnSNov-KoiPondFriends3

Here’s a closer view of the colored flower with the shimmer.  I fussy cut all the colored images and glued them on the card base with glue.  For the flower image, I decided to off-set it and trim off the edges with scissors.

For the greeting, using the same rubber stamp set, I stamped it with a black pigment ink and then sprinkled it with some Sparkle (semi-transparent) and heat embossed it to give it a nice sparkly look!

Vicki-SnSNov-KoiPondFriends1

For the bottom portion of my card, I cut out a strip of cardstock the width that I wanted to go across the bottom and underneath the watercolor panel.  I covered the entire strip with Glue and then covered that up with these stunning Bronze Mica Flakes and let it dry.  After it was dried, I pressed and burnished them into the strip with my finger and bone folder.  The extra pieces will come off the sides as you rub it around or you could also trim it off if you prefer, but I found it to not be necessary.  You can see how big the flakes are in the photo as I scattered a few of them around my card in the photos.  This was by far my favorite thing to play with on my card! 🙂

I hope you’ve enjoyed my creation today and I thank you so much for stopping in!

Basket of Best Friends

Hello friends!  Hope that you had a wonderful weekend!  I enjoyed spending time with hubby as he always makes me laugh…we have fun together no matter what we do!

Today I’d like to share another new creation I made from the Whimsy Stamps new August Digital release.  I fell in love with these guys and thought it would be perfect on just a simple little design:

Vicki-WS-Aug14-Pupsinbasket

This cute image is called Pups in a Basket.  I like that you can almost create any type of color or breed with this image by coloring it however you want.  So I found this adorable image online that I wanted to try and resemble the breed/coloring of:

119

Are these guys just as cute and fluffy as can be?!   I want to pet them! LOL!   Of course, the real thing has got to be the best! 🙂  And how cute would it be to add a red handkerchief to one of these pups on the image?  So many fun things to possibly do with them!

I used some plaid papers I had in my stash, and I wanted them to be somewhat neutral in color due to the accents of blue.  I’ve white heat embossed the banner at the top with the Whimsy Stamps Everyday Mini Sentiments stamp set.  Cut out all the panels with some dies and attached them to a top folding white A2 sized card base.  Lastly, I found some blue sequins to match and added some glitter accents to the centers.

Here’s a closer look at the image:

Vicki-WS-Aug14-pups up close

I’ve used my Copic markers to color it in and couldn’t help but also add some rosy cheeks with a white dot for highlights on them too!  This was so fun to color and how fun would this be to make up for someone with a new best friend!

So what type of breed or color(s) do you see in this image?  I’d love to know what you think!

Thanks so much for stopping in today!  Hope you’ve enjoyed my card and I’ll be back again soon to share more!

Challenges:

  1.  CCEE Stampers (CCEE1831) – Coloring Book Day (colored image)
  2. Crafty Creations – Anything Goes
  3. Creative Moments – Anything Goes
  4. QKR Stampede – Anything Goes
  5. Sunny Day Crafting – Anything Goes + animal on project
  6. That’s Crafty – Animal Magic

Cute Card Thursday is Getting “Too Cute”!

Hello friends!

It’s Thursday and time for a new challenge at Cute Card Thursday!  If you are not challenged by the title of the challenge blog, then let’s get even cuter by making the challenge this week “TOO CUTE“!!  LOL!  We’re looking forward to seeing your cute creations in the gallery!

Our sponsor this week is Kinda Cute and they have kindly donated an image that I have used on my card for you today:

Vicki-CCT540-TooCute

When I saw this image, I thought this was perfect for the challenge theme!  I have used the Fairy and Snail digital stamp from our sponsor.  I printed it out and colored it in with Copic markers.  I have used a white gel pen for certain areas, and I have added some Spectrum Noir clear glitter pen over the fairy wings.  I have also used some Nuvo White Blizzard Glitter Drops for some sparkle underneath the snail where it’s wet from his ‘slithering path’.

I have also taken the Lawn Fawn stamp set Stinkin’ Cute (of course) and stamped the sentiment above the image in the top right corner.  I also decided to take the solid heart from the set and stamp a few purple hearts between the characters.  I also took some linen thread to make a tiny bow because I thought the fairy would look CUTE with one on her curly hair!  LOL!

I cut the image panel out with the My Favorite Things Stitched Mini Scallop Rectangle STAX die and then sponged some Tumbled Glass distress ink around the edges of it.  I mounted it onto a piece of black cardstock and then I wanted to add some ribbon to it so I took my slot punch and punched out a hole on each end of the image panel to slip some silk purple ribbon around it.  I tied a bow and added it over top to the right side.  I then found some purple dotted papers and cut out a panel with the Lawn Fawn Large Stitched Rectangle Stackable die to cut it out with.  The purple ribbon was secured onto the back of this piece and then mounted onto a white top folding card base.  Before sticking down the image panel, I put some fun foam on the back for a bit of dimension.

Thanks so much for dropping by!  See you soon!

Challenges:

  1.  Stamps & Fun = Creativity – Anything Goes
  2. Make My Monday – colored image.
  3. Addicted to Stamps & More – Make Your Mark
  4. Crafty Creations – Anything Goes
  5. Crafting by Designs – Anything Goes

Ribbons & Bows, Oh My!

Hello friends!  It’s Thursday time again and that means it’s time for a new challenge over at Cute Card Thursday!  This week the theme is all about Ribbon and/or Bows!

I happen to just love ribbons and think that almost everything I create “needs” to include one somewhere.  So sometimes I try to refrain from always doing it.  It’s so nice to see when a challenge comes up requesting it though! 🙂  How about you?  Are there any “ribbon lovers” like myself out there?

We are sponsored by All Dressed Up Digital Stamps this week and here’s my card using one of their images:

Vicki-CCT538-ADU

I have used this really fun image called Play Day for my card here.  Check out those cool shades! Ha!  I’ve colored it with Copic markers.  Thought she would be cute with a denim looking jacket, bow and boots!  I’ve also used some denim ribbon on my design too!

Looking through some papers in my stash, I found some pretty floral sparkly pattern and I’ve also added some stitch marks to the border of it, but I went “wonky” with it…so I decided to do a second line with more “wonky” stitch marks to even it out.

I feel like I haven’t used flowers on my cards in forever, so it was fun going through my stash to find goodies to go with this image.  The sentiment was stamped from my stash and I hand cut a banner with it to add to my card.

Hope you like my card for today!  Be sure to check out the challenge blog for more inspiration from the design team and to link up your luscious ribbon creations too! 🙂  Thanks for stopping in and I’ll see you soon!

Challenges for this card:

  1.  All Dressed Up – June Anything Goes with ADU image
  2. Tuesday Morning Sketches (TMS461)
  3. Crafty Calendar – July ‘Totally Girly’
  4. Crafting From the Heart – Anything Goes
  5. QKR Stampede #303 – Anything Goes