Seally For You

Hello there friends!

There’s something brand new in the Digi Doodle Studios store this month and it’s just perfect for making an adorable Valentine’s Day or love themed card!  Check out this sweet card I’ve made for you today:

Vicki-DDSSeallyForYou

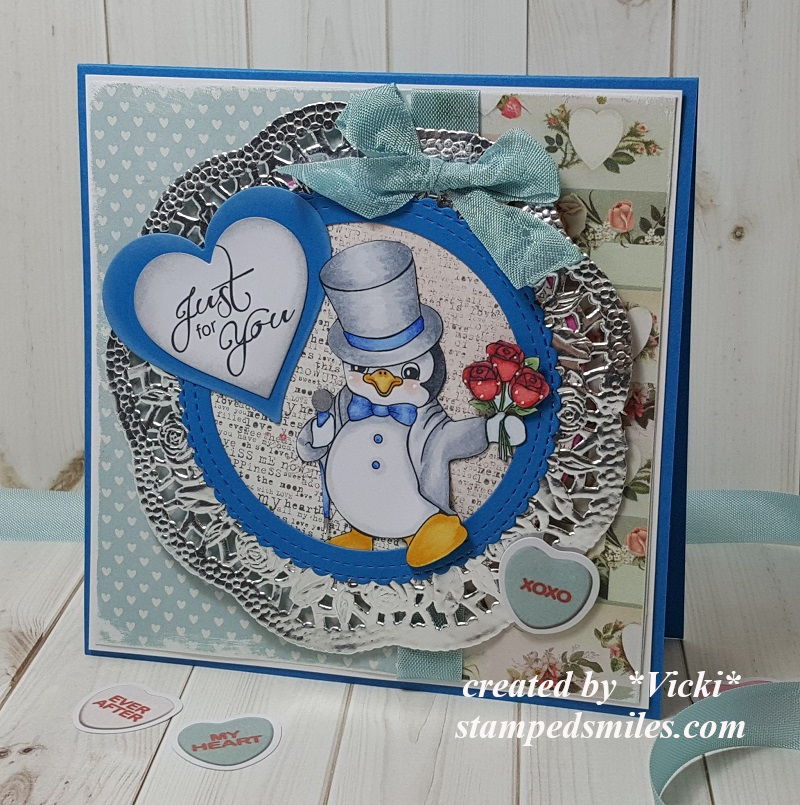
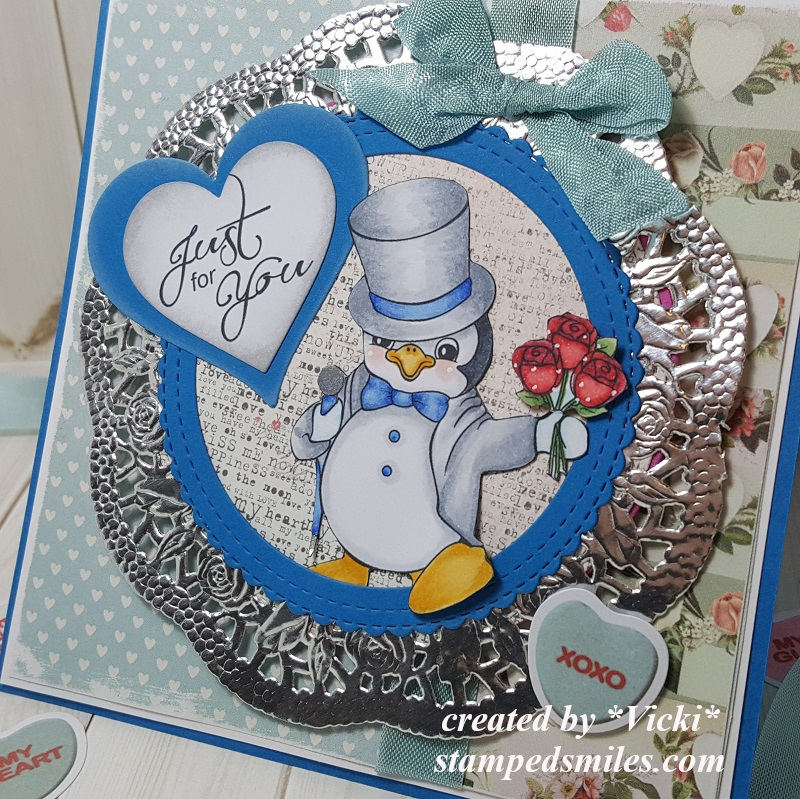
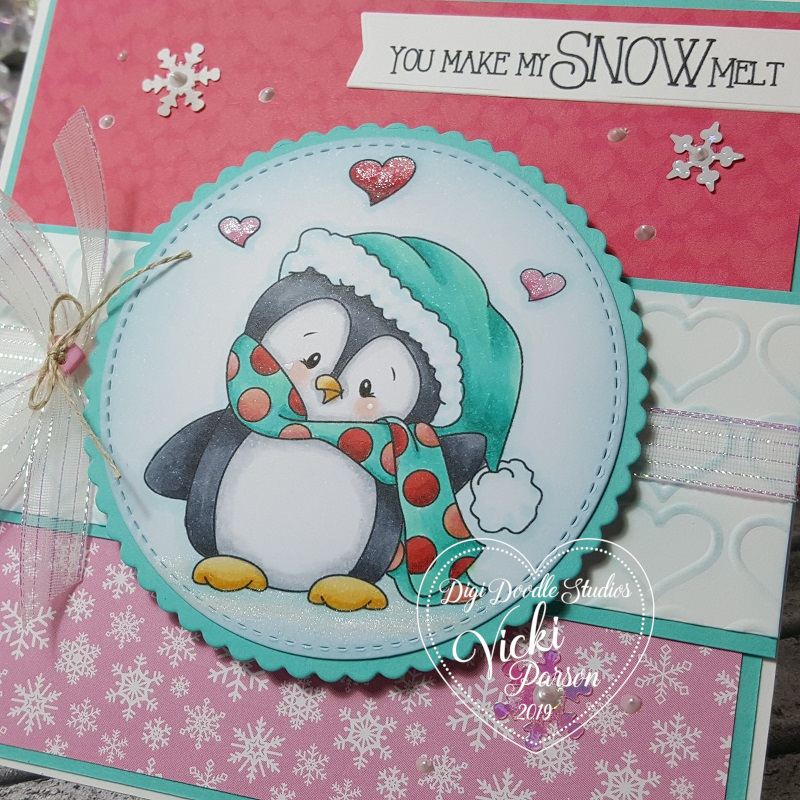
Aren’t these snow seals just the sweetest?!  I’ve used the brand new Pairables digital set called Seally for You from Digi Doodle Studios for my card here.

It’s really easy to create a scene on your computer with the images and then just print them out to color!  I have this cute couple arranged in a “Titanic” situation (If you’ve seen the movie, then you know what I’m referring to! LOL!)  on my scene here, but also have printed out a couple of extra hearts along with the fish and floating ice cube to fussy cut out and add to my scene later after assembling it.  The “water waves” that I’ve added to my scene is actually from the DDS Otterly Loves Pairables.  That is what is so cool about these Pairables sets, is that you can use the different elements together with another set to create some fun & unique scenes!

I used cut out vellum for the water and added another strip that I actually clear heat embossed the sentiment as it came out of the printer.  You can heat emboss over vellum as the ink stays wet a little longer after printing it out.  (Not for too long though!)

I added the colored up fish, hearts and ice cube to the design as well as sponged some soft pastel clouds with a stencil.  I was also trying to be different by tilting the image layer over the card.  The card front panel was embossed with a falling snow embossing folder, I wrapped some ribbon around the corner and attached this piece to an A2 sized top folding white card base.

Vicki-DDSSeallyForYou-close

I’ve colored the images with Copic markers.  You can see that I’ve fussy cut out the smaller heart and then popped up the top heart with foam tape.  I tucked the ice cube and one of the fish behind the vellum and then popped up the fish over the ice cube with foam tape.  I took one fish and attached next to the heat embossed sentiment.

You can also see the hearts long with the ice cube and ice platform that I’ve taken a glitter brush pen to add some shimmer to them.

Vicki-DDSSeallyForYou-flat

I hope you’ve enjoyed my card today or have been inspired to create your own fun digital scene to play with too!  Thanks so much for dropping by today and I’ll see you soon!

Challenges I’d like to enter my card for:

  1.  Challenge Up Your Life – Winter Landscape/Scene (6 total challenges)
  2. Crafty Friends – Love/Romance
  3. Get Creative – Use Hearts
  4. Creative Inspirations – Anything Goes
  5. C.R.A.F.T. – Love/Valentine’s
  6. Creative Moments – #184 Anything Goes with twist:  love

Just For You at 2 Crafty Critter Crazies

Hello friends!  It’s not only the weekend, but it’s also the first of February!  It’s what we call the “love dovey month”! LOL!  The first of the month also brings us a new challenge starting over at the 2 Crafty Critter Crazies blog!  It’s always an “ANYTHING GOES + ANIMAL” for your project each month.  We look forward to seeing your creations!

For this month we’re being sponsored by Jan’s Digi Stamps and here’s what I’ve come up with for my project:

Vicki-2CCC35-JansDigi-BlueRitz

Check out this dapper little penguin stepping out to hand his loved one a bouquet of flowers! 🙂  I’ve used the adorable Puttin’ On the Ritz digital set for my card here.  It had me at penguin! LOL!

I have pulled out some of those cool vintage looking papers from that SSS Valentine card kit that I had used earlier this week on my parent’s anniversary card and just loved the blue tones in them, so I went with that color scheme for my design!

The penguin was colored and fussy cut out.  The way he was positioned looked like he was popping right through an opening to hand out the flowers, so I’ve used some circle die cuts with more of the vintage papers for the background and tucked him in there with his foot and flowers outside the circle frame.  I’ve placed a silver doily behind him.

The base of the card measures 5″ square, I’ve taken a couple of strips of the papers and layered them over a white card panel that I’ve sanded the edges on before mounting it over the blue card base.  I took some seam binding ribbon to wrap around it and then attached the circle panel to the front with a bow and candy heart accent over top.

The sentiment was printed out from the same stamp set and cut out and layered with a heart die set.  I’ve also sponged around the edges of the white heart with grey ink.

Vicki-2CCC35-JansDigi-BlueRitz-close

Here’s a close view of the image and how I’ve got him all colored up with Copic markers.  I’ve used a white gel pen for dots on his cheeks as well as dots around the flowers.  Sometimes those bouquet of roses have the baby’s breath with them…for some reason I think it makes the bouquet look extra special!

For part of the penguin’s “cane” or “umbrella”…not sure, I’ve used a silver metallic gel pen to color in parts of it.

I kept his hands white as I felt like he was wearing white gloves.  LOL.

Vicki-2CCC35-JansDigi-BlueRitz-flat

I hope you’ve enjoyed my fancy little love penguin card today and have been inspired!

Thanks so much for stopping in!

Challenges:

  1.  Jan’s Digi Stamps Challenge Anything Goes
  2. Simon Says Stamp Monday – All Loved Up
  3. Cute Card Thursday – Valentines
  4. Krafty Chicks – Anything Goes
  5. As You Like It – Warm or Cool Colors (love the cool tones)
  6. Daring Card Makers – Layer it Up!
  7. QKR Stampede Anything Goes

I’m Otterly In Love

Hello friends!  Happy Friday!  Do have any plans for the weekend?  I have plans to probably stay in and color since there’s snow predicted for us! Brr!

I wanted to share a card I’ve made with this “OTTERLY” adorable brand new Pairables digital set that has come out today from Digi Doodle Studios:

Vicki-DDSOtterlyLove-Jan10

Isn’t that the sweetest little face?!  This entire scene was digitally created on my computer using the Otterly Love Pairables set from Digi Doodle Studios!  If you’d like to take a look at what’s in the entire set, then check it out in the store link or see the bottom of this post!  I will have another card coming with this same set soon, so stay tuned!

*Tip*  The “thing” I love about creating scenes digitally as apposed to regular stamping is that there’s no masking involved!  Just create on the computer and you can resize and arrange/bring forward/bring back, etc all you want without the hassle and it’s easy to start over as it’s on your computer!  It’s easier than you think if you’ve never done it!

So as I mentioned, I arranged each image on my computer how I wanted the images to be and printed it out, colored it in and sponged in some distress ink along the edges so the whole panel has color over it.

I die cut it out with a stitched rectangle die and used the same die set to cut a larger piece in the brown cardstock that was layered over an A2 sized top folding white card base.

I used my Cricut to cut out the cattails along the right side.  I popped it up with some thin pieces of foam tape to add to my design.  Lastly, I finished out the card with some gold heart sequins around the sentiment.  (This is a nice flat design so it’s easily mailable too!)

Vicki-DDSOtterlylove-Jan10-close

Here’s a closer look at the coloring I’ve done on this cutie!  I’ve used my Copic markers to color most of the panel including all of the grass blades.

I took a white gel pen to give him extra highlight on his eyeballs and cheeks.  I also covered the pond water with a glitter brush pen for some shimmer.  Not sure you can see it, but of course it’s nice and glittery in person!

I’ve also used a sponge to lightly cover the cattails with white ink.

Vicki-DDSOtterlyLove-Jan10-flat

I hope you’ve enjoyed my card today using this darling new Pairables set from DDS!  I’m seriously looking forward to sharing more with it soon as I think this has easily become my favorite!

Thanks so much for stopping in today and I’ll see you soon!

Challenges:

  1.  Country View – Love
  2. The Paper Funday – Anything Goes with optional Friendship
  3. Crafts Galore Encore – Anything Goes
  4. Creative Knockouts – Anything Goes
  5. Let’s Craft and Create – Anything Goes with optional:  Love is in the Air
  6. Lil’ Patch of Crafty Friends – Anything Goes
  7. Pammie’s Inky Pinkies– PIP2001 Anything Goes

Falling in Love With Wintertime Penguins!

Hello friends!  We are now past Christmas and getting ready for a New Year, but soon the feeling of love will be in the air!  So I thought I’d start that off with something that I personally love, which you might know, are those cute penguins!

Vicki-DDSWintertimePenguins-SnowMelt

And of course you’ve already seen me use this super fun Wintertime Penguins Pairables set from Digi Doodle Studios in a couple of different ways, but this time I’ve added the hearts above his head and sentiment from the same set to make this a “lovey dovey” style card!

I kept the colors in pink and red to go with Valentine’s Day, but you could easily make this a wonderful anniversary or “any day” card for your favorite love penguin as well!  LOL!

So I grabbed some fun papers from my stash with both pink snowflakes and red/pinkish hearts paper for my 5″ top folding white base card that I layered the turquoise colored cardstock over and then applied the papers to.  I embossed some hearts on the middle strip with a piece of white cardstock and then rubbed some turquoise colored ink lightly over them.  I layered that strip onto a piece of turquoise cardstock again and then wrapped some white/clear metallic ribbon with a bow over it before attaching it down.

The sentiment was printed out from this cute set with the penguin and then I just used a banner die to cut it out with and attach to the front of the card.

I added the penguin image that was die cut and layered with some stitched and scallop circle dies.  I’ve used some craft foam to pop it up over the center, then added a heart button with twine in the center of the bow.  Lastly, I’ve added a couple of snowflake sequins and some liquid pearl “dots” randomly over the card.

Vicki-DDSWintertimePenguins-SnowMelt-close

Here’s a closer look at this cutie and how I’ve got him colored up with my Copic markers.  I’ve used a white gel pen to dot his cheeks and then I took a glitter brush pen (Spectrum Noir) and covered the hearts above his head as well as the “snowy” ground under his feet for a bit of shimmer.

Vicki-DDSWintertimePenguins-SnowMelt-flat

I hope you’ve enjoyed my “lovey dovey” card today and have been inspired in some way!  Thanks so much for joining me on my blog today!

I can’t believe that the New Year is just about to start!!  I will most definitely be seeing you in 2020 my friends!

Challenges:

  1. Tuesday Morning Sketches – Annual Anything Goes
  2. The House That Stamps Built – Anything Goes D2519
  3. Aud Sentiments – Christmas/Winter + a sentiment (DDS is sponsoring!)
  4. Crafting By Designs – December Anything Goes
  5. Let’s Craft and Create – Anything Goes with optional Let it Snow

Check out the Digi Doodle products used on my card today – click photo below to see/purchase in the store:

Wintertime_Pairables_w_1024x1024@2x

Snow One Like You for Whimsy Stamps

Hello friends!  I hope you’re having a wonderful week so far!

Today I have creation to share with you using this really sweet image from Whimsy Stamps:

Vicki-WSTawny-Nov12

I really adore this digital stamp that came out this month for Whimsy Stamps called Tawny.  It’s one that I picked to make something with as it was a bit personal to me.  That little owl with those big eyes is so sweet and really reminds me of my grandma who passed several years ago.  She was an owl lover….so she’s like a sweet little angel with me here!  There was SNOW one like her either!

To create my card, I started with some watercolor paper and Distress Oxide Inks in Seedless Preserves, Dusty Concord, Stormy Sky and Broken China (from bottom to top order.)  I spritzed it with a water bottle and soaked it up with a paper towel.  I then took some white paint watered down and splatter it with a fan brush over the panel.  I also took some shimmer spray and covered the entire panel.  You can see it better in the photo below.

I took a Lawn Fawn die to create the tree border with woodgrain paper and then die cut a snow border with glitter cardstock and glued it behind the frame.  I also took the sentiment from the Whimsy Stamps Snow Flurry clear stamp set and white heat embossed it over a strip of vellum that I’ve attached over top of these layers (with the inked background also) by using my Xyron Sticker machine.  These pieces were die cut with a stitched rectangle die, layered over a piece of white cardstock and then mounted onto a purple A2 sized top folding card base.

Lastly, I’ve added my image and some snowflakes that were cut out with some more glitter cardstock and each snowflake was dotted with some Nuvo White Blizzard Glitter drops.

Vicki-WSTawny-Nov12-close

Here’s a closer view of the image and how I’ve got her colored up with Copic markers.

If you take a good look at the top portion of the background, you can sort of see the shimmer from the spray.  It’s really sparkly in the light.

I accidentally got a piece of the “faux snow” photo prop on her skirt. LOL!  I covered the flower on her hat with a glitter brush pen and I’ve used some Nuvo Morning Dew Crystal Drops over the owl’s eyes, but it cracked.  I don’t like it as much as the glossy accents as it doesn’t crack so easily like this does.

She was fussy cut out and popped up over the snow border with foam dots.

Vicki-WSTawny-Nov12-flat

I really like how this one turned out with the colors and I hope you like it too!  The inked snowy backgrounds are really fun to play with!

Thanks so much for dropping into today and I’ll see you again soon!

Challenges:

  1.  Shopping Our Stash – Snowflakes
  2. Crafting By Designs – November Anything Goes
  3. Cardz 4 Galz – Let it Snow
  4. Moving Along With the Times – Snowflakes
  5. Creative Moments – Anything Goes with Optional:  “Baby it’s Cold Outside”
  6. Krafty Chicks – Winter
  7. QKR Stampede – #371 Anything Goes

Cards From My Heart

Hello friends!  With this not cooler, but COLDER weather we’ve been having, it looks like it may be a hard winter ahead and I’m already feeling it in my body unfortunately.  So with the heating pad and warm slippers,  I’m still crafting!

Today I’d like to share some cards that I have made for my hubby using some of the adorable stamps from Lawn Fawn …which I love:

Vicki-LF-Anniversary

At the end of October hubby and I celebrated our 20-year anniversary, and I made this card for him to let him know how I feel about him after all these years.  This would be something that we would certainly do where we live!  We always enjoy looking at the night sky together.

I started with some watercolor paper and blended some distress inks for the background and spritzed it with water.  I then made sure it was completely dry before white heat embossing the stars that I colored in the centers with a gel pen.  I then took a white gel pen and added more “dots” in the sky.

I’ve used Upon a Star and the Winter Skies stamp sets for both the images and sentiment. I took the Little Town border die to add over top of the starry sky and layered it onto a navy card base that has some more die cut stars (from Upon a star coordinating dies) at the top sponged with white ink.

For the sentiment, I had to piece together a couple of words from different sets to get it to say what I wanted it to.  I cut it out with a long banner die from My Favorite Things.

Vicki-LF-Anniversary-close

Here’s a closer view of the sky and the images.  For the fox couple, I black heat embossed it and then used my Zig Clean Color Real Brush markers to color them with and then popped them up over the corner of the scene with foam dots.

I actually used a color palette and sketch from a challenge blog, but missed the deadline to post it, but I think it turned out great and hubby enjoyed it.  He said, “Yes, this is something we would do!”  He also likes the color blue.

Here’s another card I made for hubby as his birthday was this last Friday:

Vicki-LF-LightUpCard

Although this one is a bit simple, it has a really fun interactive element to it!  If you’ve known me for a while, then you may know that my husband is an electrician, so this card was very fitting for him!

I have used the Lawn Fawn Turn Me On stamp set and coordinating dies along with the Life is Good stamp set for the sentiment and the Push Here stamp set to make this card.  I also have a large stash of Lawn Fawn papers that I’ve used for this which I don’t think are available any longer.

I used vellum for the light bulb that was heat embossed over it and then I colored it yellow on the backside of the vellum to place behind the die cut opening from the blue panel.  That was die cut with the coordinating dies.  I stamped and colored the light switch as well and also die cut it out over the blue panel.  I then white heat embossed the sentiment and cut it out with a sentiment banner die from MFT.  It was sponged with white ink and glued over the blue panel.

Vicki-LF-LightUpCard-alight

The best part of this design is that when you push on the light switch, the light bulb turns on!  I’ve used the Chibitronics to create this feature.

You can see here what it looks like when you push on the light switch!

You can also check out this quick few second video to see it in action below:  (CLICK HERE if you want to see it on You Tube.)

Although this looks like a pretty simple card, mechanically it had its difficulties with the light up interior portion of it and it was met with some challenges and patience as I had to keep testing it to make sure it worked right!  At one point I had to tear it apart because the battery accidentally flipped over!  I also had to use like 4 layers of foam tape so that the light wouldn’t continuously be on all the time! LOL!

Vicki-LF-LightUpCard-flat

It was all worth it though as it was for the love of my life, and he really did appreciate the efforts that went into making it as he even took it to work with him so that he could show it to his fellow co-workers!  LOL!  They seemed to be pretty impressed with it and even offered some advice on how much to charge for something like this!  LOL

The card was thick due to the amount of foam on it, so it didn’t fit into a regular envelope. Since it went to hubby, I just hand delivered it to him! 🙂

Hope you’ve enjoyed my share of creations today that I made for hubby!  I will be seeing you again soon!  Thanks for dropping in friends…I will be visiting soon!

Challenges:

  1.  Lawn Fawnatics – Cards for Guys
  2. Creatalicious – Anything Goes with optional:  For a Man
  3. Crafty Friends – Anything Goes
  4. Cardz 4 Guyz – All Wrapped Up (top card with scarves)
  5.  Get Creative – Anything Goes
  6. Through the Craft Room Door – Anything Goes
  7. Retro Rubber – Anything Goes + stamps older than 1 year (ALL listed are at least 1 year or older!)

Sending Snail Mail Hugs

Hello friends!  Yippee!  It’s finally “officially” Fall now! (According to the calendar anyway.) We are very slowly starting to get lower temps at least in the evening time anyway.  I’ve gotten out my Fall decorations and I’m ready!  How about you?

Today I have a very sweet image from Whimsy Stamps to share with you:

Vicki-WSLoveSlowMuch-Sept24

Awe!  I wouldn’t normally hug a snail, but I must say, this one is SUCH a cutie don’t you think?  This digital image is called “Love You Slow Much” from Whimsy Stamps-Sylvia Zet’s Wee Stamps Collection which was previously released as a rubber cling stamp.  So now you can have the option of choosing the digital or the rubber versions!

Of course, with Fall having started, I was really inspired to create with this cutie in some orange, yellow and tan toned colors!  With the exception of that blue bow tie on the snail, I’ve colored it differently as I think that makes him really stand out especially for dispensing hugs…or perhaps receiving them! 🙂

I’ve cut out the image with a stitched circle die and then die cut another larger circle in the orange color to mat behind that.  I’ve taken a piece of decorative paper from my stash with the wording and added some stitch marks along the edge of it with a black marker and then mounted it to a piece of white cardstock.  I wrapped some white organdy ribbon around these two pieces and mounted it onto an orange 5″ square top folding card base.

I took another piece of orange cardstock and die cut a tag out from an older Whimsy Stamps die that I have and then I stamped the “hugs” sentiment from the Whimsy Stamps Everyday Mini Sentiments clear stamp set towards the bottom of the tag and added it to the bow on the ribbon.  Lastly, I took some flowers and attached them around the card design.

Vicki-WSLoveSlowMuch-Sept24-close

Here’s a closer look at the coloring I’ve done on this image and used the following Copic markers:

  • Snail Body:  W7, W5, W3, W1, R00
  • Snail Shell:  E35, E33, E31, E30
  • Snail Bow Tie:  B26, B24, B21
  • Fairy’s Dress, Hair Flowers, Shoes, Wings:  YR07, YR04, YR02, BG000, C7, C5, C3
  • Fairy’s Hair & Skin:  E47, E44, E42, E41, E21, E11, E02, E00, E000, R20
  • I used BG000 and E0000 for around image and shadows
  • I’ve also used a gold gel pen for the center of the flowers in her hair and over the tiny marks behind her wings.  I’ve used a white gel pen for highlights in the Fairy’s cheeks as well as highlights on the snail’s shell.  I took a glue pen over her wings and added some clear glitter over them.
  • I’ve also used a Copic marker (unsure of color) to color a rhinestone for the center of the orange flowers.

Vicki-WSLoveSlowMuch-Sept24-flat

I hope you’ve enjoyed my creation today and that it has inspired you in some way!

Thanks so much for stopping in today!  I always appreciate your support!  I’ll be seeing you soon!!

Challenges I’d like to enter this card in:

  1.  Creatalicious – Anything Goes with optional circles
  2. Stamps & Fun = Creativity – Anything Goes
  3. The Paper Girls – Anything Goes
  4. The Fairy & The Unicorn – Fantasy Anything Goes
  5. Creative Knockouts – Anything Goes
  6. QKR Stampede – Anything Goes #364
  7. Creative fingers – Anything Goes
  8. Always Fun – Cute Critters

Triangle Corner Pop Up Card + video tutorial!

Today I’m sharing the Triangle Corner Pop Up Card.  I have actually received several messages and comments that people wanted to see a video tutorial on how to make one.  So I thought I would come up with a version that I could share to show the many different variations that you can come up with and the fun you can have with it!

Vcki-BMBeHappy-TriCornerPop-opened

This style is a much more elegant approach which is much different than a past creation I put together.  I love that you can change the look and have fun playing with different stamps and elements to fit inside the design!

For this one, I have taken the Rose and Butterfly stamp sets to stamp and Copic color.  I fussy cut out the images on my design.  I’ve used Jurassic 100# and White 100# cardstock.  The decorative paper is from the Rustic Florals paper pad.  I stenciled the bottom of the Jurassic panel with a stencil using some Unicorn Horn Glitter Glaze.  Both of the rose images along with the small heart circle on the easel card were popped up with some foam tape.

For the circle easel design, I’ve cut out a scallop circle with the white cardstock in the size that I thought would fit within the design.  Then cut the body of the card with other circle dies in the Jurassic cardstock and then the front with some more of that Rustic Florals paper that I’ve used in the background.  The sentiment below the butterfly and the hearts on the small circle were stamped from same stamp set.  All of the white panels (with the exception of the scallop circle) was ink foam blending with some grey distress ink.  To keep the card “locked” in this position, I’ve used the Mini Disc Magnets.

If you are interested in learning how to create one of these cards for yourself, then please be sure to check out my video below.  CLICK HERE to view on You Tube.

These cards can look really intimidating, but once you see the measurements of how to put one together, they’re really easy and fun to make!

Vicki-BMBeHappy-TriCornerPop-unfolded

Here’s what the card looks like completely opened up.  You can see on the left bottom panel that I’ve taken that rose from the stamp set again and stamped it in the corner with some grey ink after ink foam blending around the edges of it.  This will be the area that I’m leaving for a personal message.

To fold it down to a 4″ square card that’s close you will start by folding down on the top and then fold it over from the right side to the left.  This will completely close it up.

Vicki-BMBeHappy-TriCornerPop-front

Here you can see that the card is completely closed to a 4″ square size minus the rose leaves sticking out which I don’t mind.

I took another panel of the Jurassic cardstock for the front of the card and sponged around the edges of it with the white Ink and then also stamped the rose again in the corner of it.  Because I had several dimensional and extra layers on this card, I had to use a ribbon to tie it together to help it stay closed up.  You might need an envelope that is slightly larger than an A2 envelope, but if you use less layers and dimension, it should fit in an A2 size envelope.

Hope you’ve enjoyed my interactive card and tutorial today!  Thanks so much for dropping in with me! 

Challenges I’d like to enter this card for:

  1.  Cardz 4 Galz Wings
  2. Crafty Cardmakers – It’s a Bug’s Life
  3. Through the Craftroom Door – Anything Goes
  4. Try it On Tuesday – In my Garden there is….

Oceans of Love for Digi Doodle Studios

Hello again my friends!  I’m back to share this card I made using this adorable image from Digi Doodle Studios:

Vicki-DDSNixie-Aug20

Isn’t she adorable with her little underwater crab friend?!  This is the Nixie Mermaid digital stamp from the Digi Doodles Studios “Under the Sea” collection.  I thought she was so cute and I actually had her colored up before I ended up hurting myself and had to leave.  I finished out the card when I got better.

I have also used some fun digital papers and a sentiment that work well with this particular image.  The pretty pink patterned papers you see in the background come from the Digi Doodle Studios Summer Breeze Card Making Paper collection.  The sentiment came from the Digi Doodle Studios Mermaid Sentiments set.  I printed out the sentiment and cut it out with a ticket die, sponged around the edges with the turquoise ink color and layered it over the same turquoise colored cardstock I’ve used throughout my layout.

The layout idea came from a sketch challenge that I’m entering for below this post.  I have several layer panels including the fun turquoise sparkly paper that I’ve used that was cut with a wave border die and then sponged with some white ink.  I added some pearls to each corner of the image panel, wrapped some white organdy ribbon around the card front base, tied a bow and added a silver bow where I have attached some silver string and a starfish charm to it.  The entire card measures 5.5″ square.

Vicki-DDSNixie-Aug20-close

Here’s a closer view of the coloring that I’ve done on this mermaid image.  Mainly colored with Copic markers, but I’ve used a gel pen to color the sprigs next to the flower in her hair and the bracelets around her wrists.  I took a glitter brush pen and covered her entire fish body and the bubbles in the water with.  (Of course it looks so shimmery in person!)  I then took some glossy accents and covered the little crabs eyeballs with and then some liquid pearls to dab a dot over the pearl inside the oyster.  This mermaid image panel was popped up with foam tape over the card front.

Vicki-DDSNixie-Aug20-flat

I hope you’ve enjoyed my underwater mermaid card today!

Thanks so much for stopping in today!  I’ll be back tomorrow with something fun!

Challenges I’d like to enter this card for:

  1.  Cheerful Sketches – August Challenge
  2. The House That Stamps Built – A1419 Tic-Tac-Toe (I used first row down)
  3. Pammie’s Inky Pinkies – PIP1933 Anything Goes