Autumn Embossed Background

Hello friends!

Here’s what I’ve made today:

Vicki-BM-Subbloghop

For my card, I stamped the image and cut it out with a circle die.  I’ve just colored mine up with Copic markers over a piece of White cardstock.

For the background, I’ve used a stencil with EP.

I took the stencil over a piece of white cardstock and covered it with the Embossing Ink and then lifted the stencil to sprinkle the embossing powder over it to heat set.  I cut out that piece and layered it over another piece of white cardstock that I die cut with a stitched scallop die.

Terracotta cardstock was used for my card base and the circle layer behind the image.

Lastly, I’ve added another circle layer with gold glitter paper, popped it up with some foam tape and added some gold thread nested behind it.  I took some gold sequins and filled them with gold glitter too.

Vicki-BM-Subbloghop-close

Here’s a closer look at the image and how I’ve colored it in.  As you know, I like to use my gel pens to add just a bit of sparkle to certain areas of the image and I’ve also added some “dots” around it with gel pens.

Vicki-BM-Subbloghop-flat

Here you can get a better glimpse of the heat embossed background on the left corner of the card.  It’s a very pretty Fall color and appropriately named “Crisp Leaves”.

Thanks so much for stopping by and I’ll see you soon!

Challenges:

  1.  Brown Sugar – Anything Goes
  2. Crafty Catz – Anything Goes
  3. QKR Stampede – #362 Anything Goes
  4. Simply Create Too – Anything Goes
  5. Crafty Calendar – Add Lots of Layers

Always Be Grateful

Hello friends!  Happy Saturday!  Yay!  The weekend is finally here! 🙂

I really love all things Fall including the beautiful colors you start seeing from the leaves on the trees.  Nothing better than a nice walk in the brisk cool air!  This is what has inspired my card today too!

Vicki-BMGrateful-Sept7

I knew I wanted to used this sentiment for a Fall theme.  I think it’s awesome just to have a sentiment be the focal of your card sometimes.  It was heat set over a piece of white cardstock and then sponged around the edges with the yellow Ink.  I wanted a bit more sparkle, so I took my Embossing Ink pad and rubbed it along the edges of the panel and heat embossed some of the Vintage Sparkle EP over it.

And of course I wanted to do some foiling too because it’s just fun especially when you have these cool Vintage Wallpaper-Foilable Washi Sheets to do it on!  I used the Deco Foil Spring Grass transfer sheets over it and then used more of that ink to sponge around the edges and also heat set some more of that Vintage Sparkle over the edges too.

For the background, I took a piece of white cardstock measuring 4″ x5.25″ and covered it with the Embossing Ink pad.  I used some more of that Golden Gourd EP and heat set this entire piece.  Then I took the foiled strips and attached them over top of this panel and layered onto a top folding A2 sized Jurassic card base.  I also layered the embossed sentiment panel over a piece of this same cardstock.

I then added the sentiment panel over the card front with some foam tape and then added some die cut leaves that I sponged with ink and then a couple of gold sequins with some gold glitter in the centers for more sparkle.

Vicki-BMGrateful-Sept7-close

Here’s a closer look at the heat embossed sentiment, background, and the sparkle around the edges where I heat embossed.

Vicki-BMGrateful-Sept7-flat

And here’s another look at the foiled washi strips too with the card laying flat.

I hope that you’ve enjoyed my Fall creation today and were inspired in some way!  Thank you for joining me today as well as the entire week!  See you soon!!

Challenges I’d like to enter this card for:

  1.  Creative with Stamps – Autumn
  2. Unicorn – #47 Autumn
  3. The Male Room – Autumn
  4. Simon Says Stamp Wednesday – Stamp It
  5. Aud Sentiments – Fall/Autumn + Sentiment
  6. Daisy Chain – Autumn is Coming

Fussy Cut Falling Flowers for Fall

Hello friends!  Happy weekend!  I’m actually excited about it being the weekend!  This weekend is a nice long holiday weekend so I can spend time with hubby!  Yay!  However, I won’t be resting on my blog as there are lots of fun things going on since it’s the start of a new month!  So be sure to keep stopping by to see what’s going on!  🙂

Today I took out some flowers and fussy cut them and colored them in happy Fall like colors.

Vicki-BM-InkedFallFlowers

I’ve taken this Flowers stamp set and settled on about 3 different sized floral images to work with along with a couple of leaves.  I’ve colored them with Copic markers and then cut them out with my scissors…I set them aside.

I took a piece of white cardstock along with some masking paper and began working in the flowers for the background with Black Ink.  I made a mask for them as a went along and worked my way up.  After I was done, I took an ink foam blending tool and some soft blue Ink to sponge around the top and side of the panel.  I attached the flowers on with glue and some foam tape.  (I used thicker foam tape for the largest flower.)

For the banner, I heat embossed the sentiment from a Sentiment stamp set  over some Black cardstock with white EP and cut it into a banner and attached it to the card.  Lastly, I attached the sequins and then added some gold glitter to the centers.

I attached the white floral panel over a piece of yellow cardstock and then mounted that over an A2 sized top folding black cardstock base.

Vicki-BM-InkedFallFlowers-close

Here’s closer look at the flowers and how I’ve colored them in.

You can better see the sequins that I’ve used.  I actually had one of them laying on my table while I was assembling this card and thought the color matched up nicely with it.  Otherwise, I would’ve never thought to get those out to use on this particular card!  You never know what could be lurking on your table un-used! LOL!

Vicki-BM-InkedFallFlowers-flat

I hope you’ve enjoyed my card today!  🙂

Enjoy your weekend and I’ll see you tomorrow!!

Challenges I’d like to enter this card for:

  1.  Inkspirational – photo challenge
  2. Addicted to Stamps and More – Anything Goes
  3. The House That Stamps Built – A2819 Anything Goes
  4. Simon Says Stamp Wednesday – Anything Goes
  5. Creative Knockouts – Something To Say

Embossing for Cute Card Thursday

Hello friends!  I hope you’re having a great week so far!  Many thanks for the kind thoughts about my post yesterday and the video tutorial.  I think I get a bit nervous thinking I’m going to mess up instructions, but perhaps I’ll get the hang of it! 🙂

Today starts a new challenge over at Cute Card Thursday!  This week it’s all about “embossing“!  Now there are a few different ways to emboss and I happen to love them all!  So you could do heat embossing, “dry” embossing with an embossing folder or even maybe do some embossing paste!  However you emboss it, we look forward to seeing what you come up with!  Here’s the card I made for the challenge:

Vicki-WSPenguinTOT-CCT596

TRICK OR TREATS?!!  Oh my word now how stinkin’ cute are these penguins?!  Don’t they look like they just rang your door bell for Halloween?! LOL!  That penguin image that I’ve used here is from Whimsy Stamps called Penguin Trick or Treaters and oh were they fun to color!

I was inspired to create with them for this embossing challenge, so I took a piece of Bristol Smooth Watercolor Paper and stamped the stars from the Whimsy Stamps Basic Christmas Backgrounds clear stamp set with a pigment black ink.  I covered it with clear embossing powder and heat set them.  Then I went over the stars with some distress inks (Mustard Seed, Carved Pumpkin, Wilted Violet & Blueprint Sketch)  and ink foam blending tool.  I also spritzed some water over it for the water droplet look.

All of the panels including the card base were cut from the Whimsy Stamps Notched Squares die set.  So I took the finished colored panel and attached it over a black die cut panel and then I took a piece of orange cardstock that was die cut and ran an embossing folder over it. I rubbed a white ink pad over it to pop out the details in the embossing and then I mounted it over the die cut black card base.

After coloring the penguins, they were fussy cut out and popped up with foam tape over the colored panel.  I had an older Halloween set of dies that I couldn’t part with from Whimsy Stamps and I cut out some bats from black cardstock and attached those to the starry background.  I also added some drops with some Tonic Studios Silver Glitter Accents for a bit of sparkle.

Vicki-WSPenguinTOT-CCT596-close

Here’s a closer look at these cute little trick-or-treaters and how I’ve colored them up.  I have used the following Copic markers to color them with:

  • Penguin bodies – C8, C3, C1, 0blender, R00, YR27, YR24, Y35, White gel pen
  • Pumpkin – YR27, YR18, YR14, YR21, R20, YG67, YG63, YG61
  • Candy Bag – E33, E31, E30, wrote letters with Copic liner
  • Sheriff Costume – E89, E87, E84, E81, W5, W3, W1, Silver gel pen
  • Pirate Costume – R39, R37, R35, R32
  • Witch Costume – V17, V15, V12, YR07, YR04, Silver gel pen

Vicki-WSPenguinTOT-CCT596-flat

I think these look like a fun group to go trick-or-treating with, don’t you?! 🙂

I hope  you’ve enjoyed my fun Halloween card today and were inspired in some way!

Windy Day Cinnamon For Whimsy Stamps

Hello friends!  Can you feel it in the air?  Autumn is on the way along with the crisp cool air and blowing leaves!  I know that some of you had said you’re not looking forward to Fall when I asked, but I absolutely love everything about it including the sweater weather season & flavors like pumpkin spice and cinnamon!  Speaking of which, I have a fun Autumn color inspired card o share with you today:

Vicki-WSWindyDayCin-Aug13

This cute image is called Windy Day Cinnamon from Whimsy Stamps.  I thought she looked as happy about Fall coming as I do, so I went with those colors in mind when creating this card.  After coloring her in with my Copics, I cut her out with a banner shaped die and went around the edges of it with tea dye distress ink and layered her onto another banner layer and set it aside.

For my card base, I took some orange colored plaid pattern paper and die cut it out with a wonky stitched rectangle die.  I took a double layer of twine and wrapped it around this piece and tied a bow towards the bottom thirds of the piece and then attached it down to the brown A2 sized top folding card base.

I took the image banner panel and added a piece of craft foam to pop her up over the card base.  I took a chipboard sentiment from my stash and added some foam tape to one side of it and glued the other side to the image panel.  I added a flower to the center of the twine bow along with a few others along the side.

Vicki-WSWindyDayCin-Aug13-close

Here’s a closer view of how I’ve colored Cinnamon with Copic markers:

  • Coat, Hat:  YG61, YG63, YG67
  • Shoes, Purse & Coat Buttons:  E31, E33, E35, E37
  • Scarf, Mittens, Hat Flower:  YR12, YR14, YR18
  • Hair:  YR30, Y32, E43
  • Skin:  E000, E00, E11, E21, R20, R00
  • Shadows:  E41, E42, E0000
  • Used a gel pen for the center of the flower on her hat and the purse closure button

Vicki-WSWindyDayCin-Aug13-flat

I hope you’ve enjoyed my Autumn color inspired card today!

Thank you so much for dropping by and I’ll see you again soon!

Challenges I’d like to enter this card for:

  1.  Creative Inspirations – Something Seasonal
  2. QKR Stampede – Anything Goes #358
  3. Pammies Inky Pinkies – PIP1932 Anything Goes

Russell is Rustling in the Leaves!

Hello friends!  Can you believe that Fall is right around the corner already?!  I so look forward to this every single year! What’s your favorite Season? Fall is my favorite season and I just love everything Fall related!   I’m excited to share this really cute and fun Autumn style card with you today using some Whimsy Stamps products!

Vicki-WSRussell-Aug6

I think he’s just having too much fun in the crisp cool Autumn air, don’t you?!  This is Russell from the Whimsy Stamps August digital release just in time to start your Autumn makes!  I can picture him colored up in all sorts of fun Autumn colors, right?!  I’ve colored him up with Copics over some X-Press It Blending Card.  (See photo below for Copic list details.)

After coloring him, I’ve cut him out using the Whimsy Stamps Notched Square dies and then cut another piece of brown cardstock to layer behind him.  I took some fun plaid papers for the background that was cut out with a rectangle stitched die.  Then I took another piece of the brown cardstock and white heat embossed a sentiment from my stash that was cut out with the Whimsy Stamps Quick Strips die set.

I took the plaid background and the brown layer behind Russell and attached them together.  Then I took a strip of score tape and wrapped it around both of these layers.  I sprinkled some pretty Autumn colored glitter over the tape and burnished it in.  Then I glued the leaves down and then popped up the image as well as the sentiment banner with foam tape.  To finish it off, I took some dimensional glue to create small “dots” randomly on the design and then I sprinkled some more of the same glitter I used for the strip over them and let it dry.  A little glitter never hurts!

Vicki-WSRussell-Aug6-close

Here’s a closer look at Russell and how I’ve got him colored up.  Here’s the Copic markers I’ve used to color him with below:

  • Leaves – R22, R24, V95, V01, YR14, YR12, Y23, E33, E31, E30, YG63, YG61
  • Grass – G24, G21, G20
  • Squirrel – E15, E13, E11, E53, E51
  • Russell’s outfit – YR18, YR15, YR12, E44, E42, E43, E41
  • Skin – E000, E00, E02, E11, E21, R20
  • Hair – Y21, Y32, E43
  • Shadows – BG10, BG000

Vicki-WSRussell-Aug6-flat

This was a really fun card to put together and color up!  Now I’m excited for all things Fall coming soon!  I hope you liked my card today and inspired you in some way!

Thanks so much for stopping in!  I’ll see you soon!

I’d like to enter this card for the following challenges:

  1.  Creative with Stamps – Dad/masculine
  2. Crafting With an Attitude – Anything Goes
  3. Love to Craft – LTCCB37 Aug Anything Goes
  4. Brown Sugar – Anything Goes
  5. Simply Create Too – Anything Goes
  6. Send a Smile 4 Kids – Thank you for Kids or Anything Goes

Crafty Retreat Results

Hello friends!  I finally found the time to make a post and gather all of my photos together so that I can share a post with you from last week’s “Crafty Retreat” that I went to at my friend’s house.

So the “theme” for the crafty retreat was called “Hats off to Painting!”  The majority of the group likes to tole paint, but we all (including myself) like to try our hands at many other crafting avenues to try different products that we may not be familiar with…so there are some “mixed” projects today I’m sharing!  I had such fun during the entire 3 days!

7558

Here we are with our decorated hats on for a group photo!  Even little ‘Gizmo’ had his hat on, but not sure he was feeling the fun like the rest of us! LOL! (Unfortunately the host was taking the photo!)  We all had our Dick Blick aprons and shirts on which was very kindly donated for our “Painting Divas” group…they were VERY generous with the bag of goodies they gave us!  We had all 3 days worth of fun, classes and prizes!

20190501_141117

So, the reason for all of the fun crafty hats is that we were to take a hat and decorate it for a challenge.  Here is a photo of all of our hats.  There were some really fun and creative ideas as you can see!  One of the girls was quite tired from all of the crafting and decided to take a little siesta during the festivities!  LOL!  It was very cool that I was the winner voted for my created hat design.  (You can see on the table above and here’s a closer look below):

Vicki-Sreampunk Hat

I guess it’s a bit hard to see in the photo above of me wearing it, but I had hubby bring home one of his hard hats from work along with a pair of goggles and then I went to decorating it in “steampunk” style!  I had fun with it and enjoyed the process!

Vicki-Configuration Spell BookVicki-Configuration Spell Book open

Here is the altered “Potions and Spells” book that I taught for the class!  Last year at the “Crafty Retreat” they saw my “altered book” that I had previously made during my time as a Splitcoaststampers.com “Dirty Dozen” DT member and asked if I could teach how to make one for this year’s class.  So instead of the “altered book” idea, I had them all use a Tim Holtz Configuration Book.

20190501_132745

Here are some of the book covers all lined up that we were waiting on to dry before we were able to start painting them.  A couple of the book covers were left at the work table, but while those were drying, we worked on the inside of the book.

20190501_175745

Here’s another photo of me standing there holding one of the books and everyone was finished with their books looking at them at the end of class.  They seemed to really enjoy this messy project!  I just loved teaching these fun ladies too!

Vicki-Santa Gourd Ornament Class

This is from my mom’s class where she taught us this cute Santa ornament that we painted on a gourd.

Vicki-PenguinChill Class

The host lady is the one that taught this cute penguin class!  I adore penguins and I’m so happy that I took the time to finish this up when I got home!

I really hope that you’ve enjoyed all of these projects as much as I enjoyed creating them!  I also had another set of calendars that I finished, but I’ll share on another post on another day as this one is pretty full!!  LOL!

7590

One more thing to share is that we have a robin’s nest with one little blue egg inside.  We have a a Prairie Fire Crab Apple tree in our backyard full of pretty blooms and I guess the robin thought it was a nice place to make a nest…so we’ll wait and see if there is a baby bird coming soon!

HAPPY MOTHER’S DAY to all of you moms out there!  Hope you have a wonderful weekend!!  Thanks so much for stopping by and I’ll see you soon!!

Birthday Wishes for Hubby

Hello friends!  Happy Friday!  I wanted to share a few things from my husband’s birthday we celebrated last night along with the card I made for him.

Vicki-MFTDeer-Bday

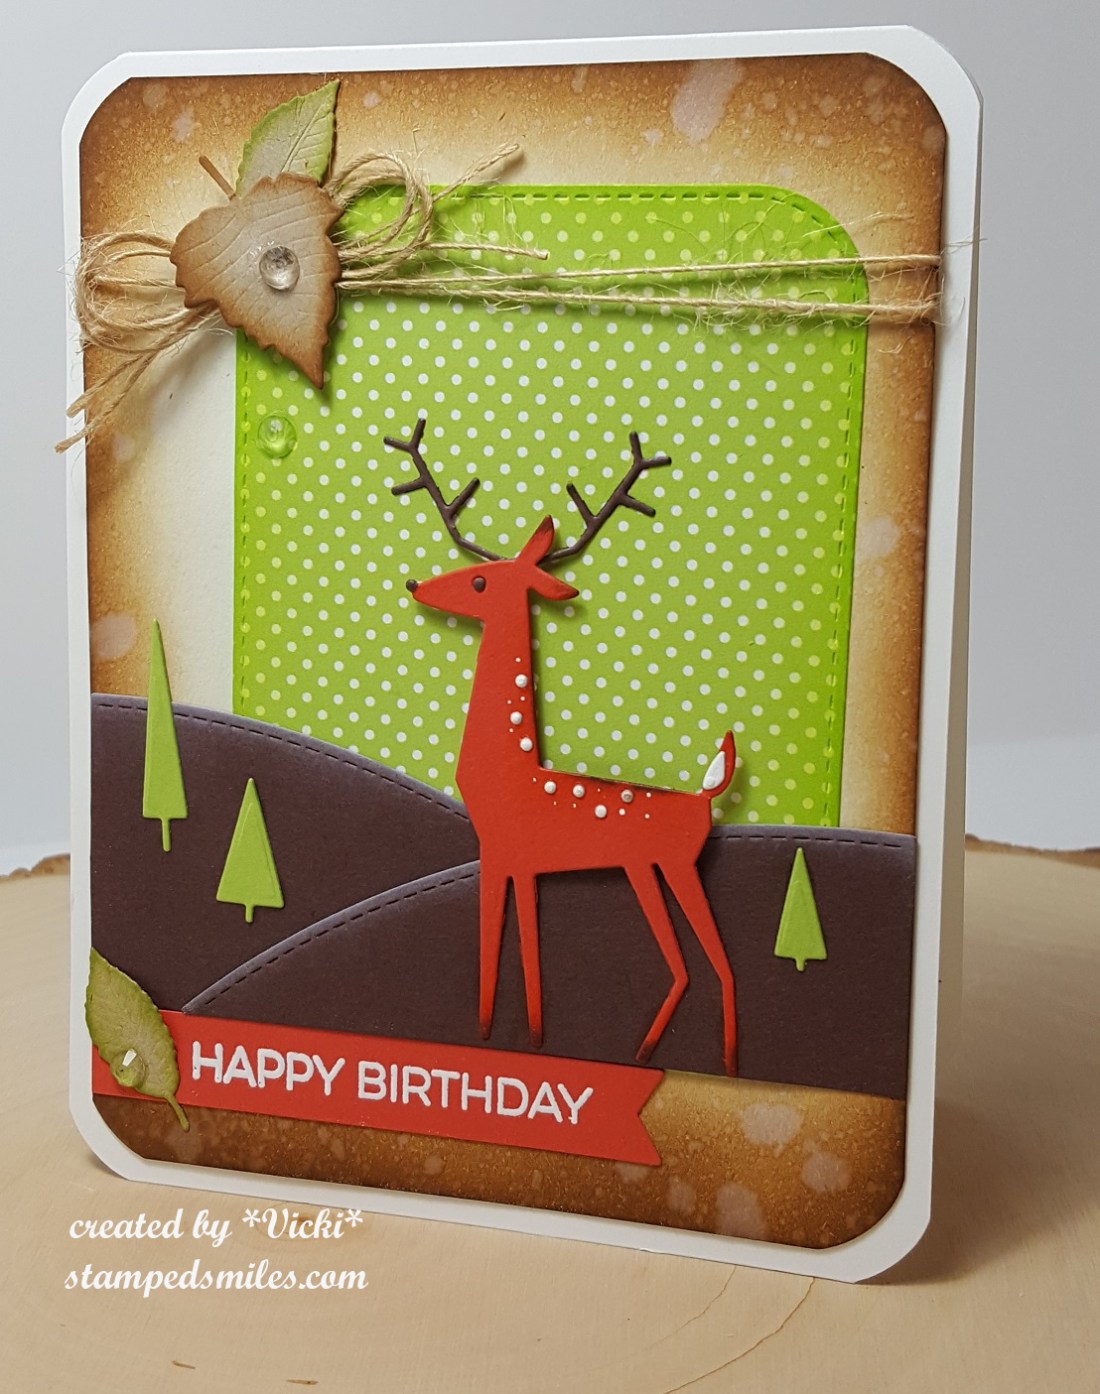
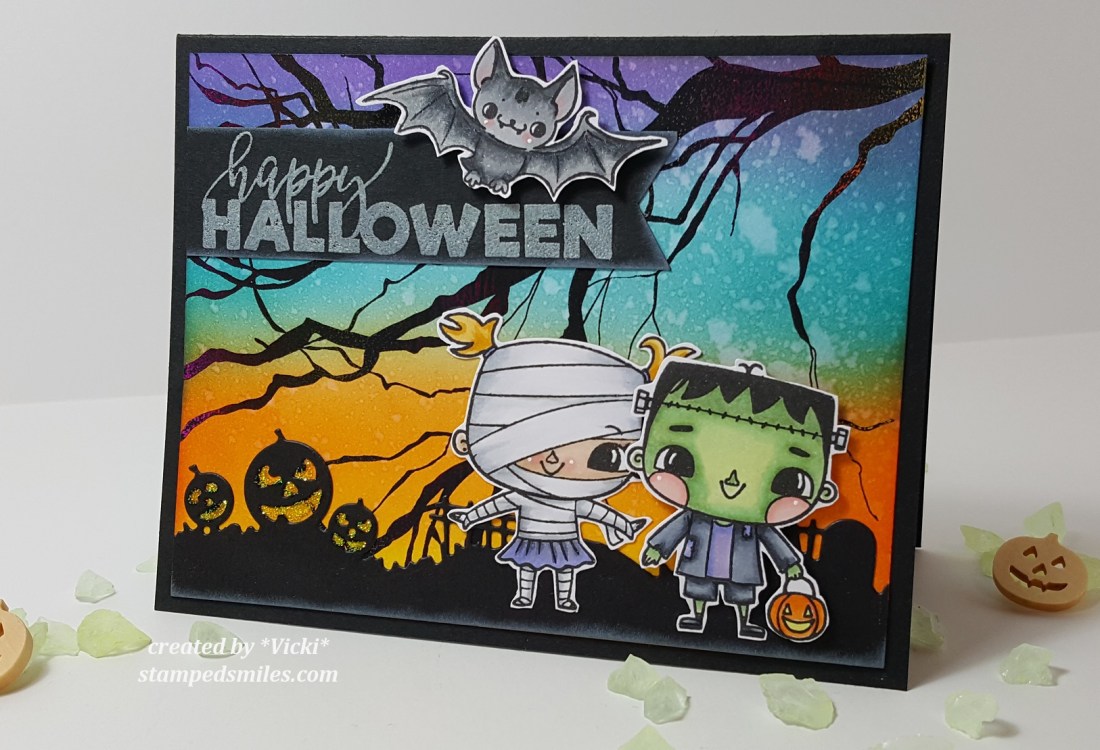
I was going for a masculine look of course and I know that he likes nature, wildlife, etc. and with his birthday being in November, I thought a Fall scheme would work out nicely.  Besides, I had gotten some My Favorite Things products and wanted to have a play with them, so I used the current color challenge when making this one.  (See challenges list below)

For my design, I went with a Natural cardstock base, rounded the corners with a corner chomper and ink blended along the edges with some Vintage Photo distress ink.  I got a little more carried away with the inking than what I wanted, but then went over it by spritzing some water and dabbing it up with a paper towel for the water marks.  (I’ve also cut out some leaves with the Falling Leaves Die-namics die set and then sponged some colors around the edges for them as well.  These were added as accents on the over-all design.)

Vicki-MFTDeer-Bday1

I was so excited about using this Delightful Deer Die-namics set.  There are some T-I-N-Y bits in there to cut out and attach! LOL!  I sponged around the edges and bottom of legs with a brown ink.  I die cut some white dots and the piece for tail as well as cut out a couple of brown dots for eye and nose as well as cutting out his antlers.  I also added a few extra “dots” with my white gel pen on the deer.  It was popped up over the scene with some foam tape.  The main deer was cut from Persimmon cardstock which is also what I’ve used to cut out a banner (from the Essential Fishtail Sentiment Strips die-namics) that I white heat embossed the sentiment from the Essential Sentiments stamp set.

Vicki-MFTDeer-Bday2

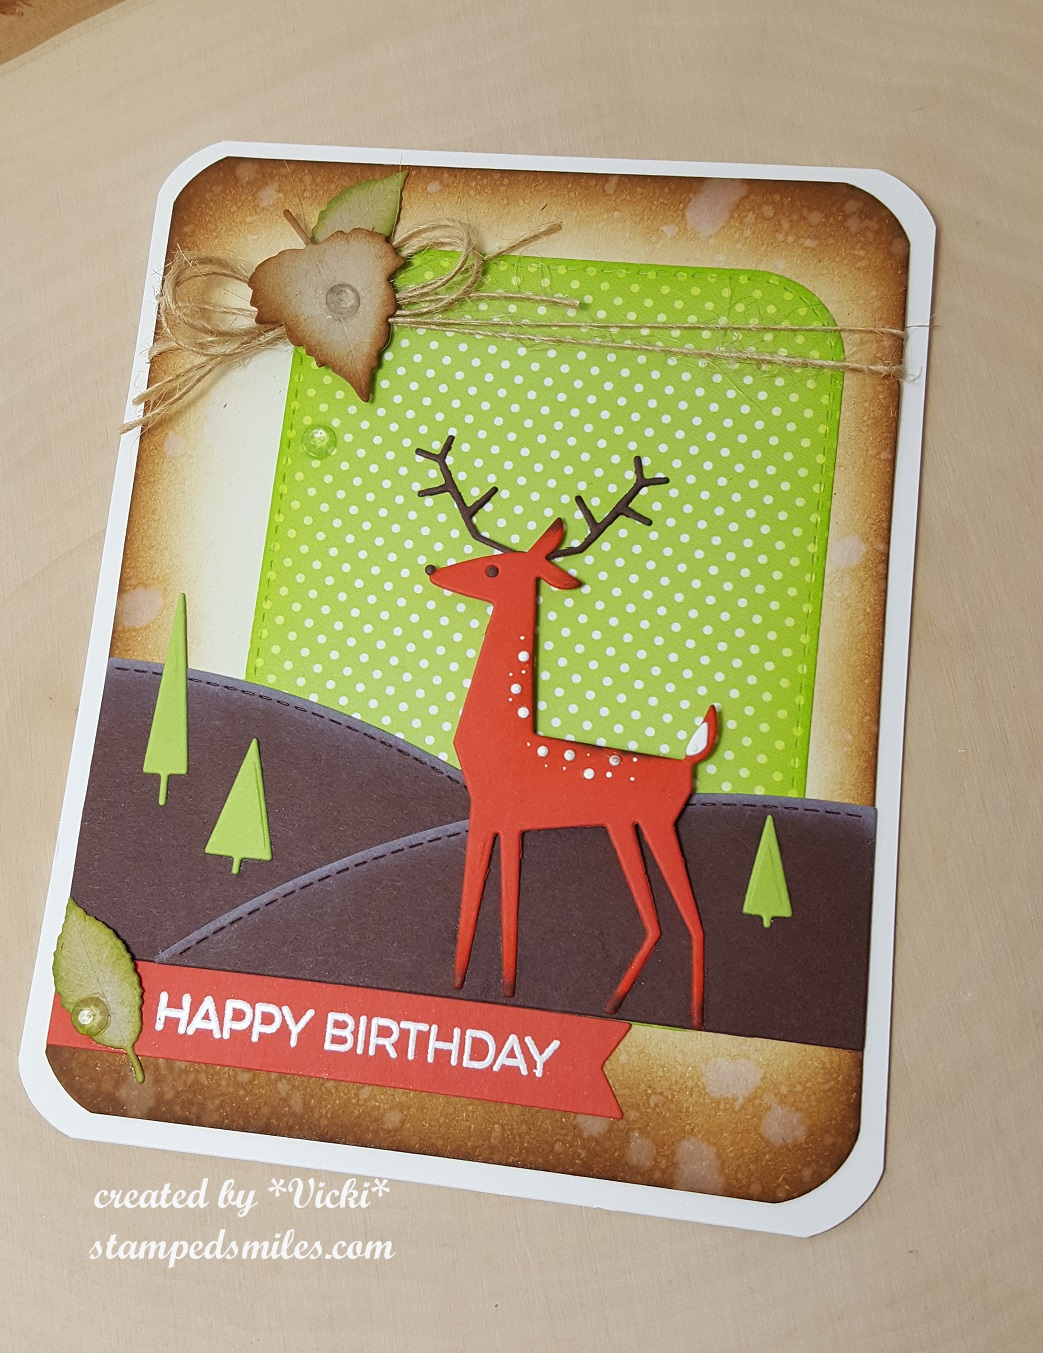
For my scene, I took some of the MFT Candy Land Paper Pack and use the dotted “Sour Apple” color piece and die cut a panel of it with the Stitched Rounded Rectangle STAX die-namics and placed it over my ink blended natural card front base.  I then used the Stitched Valley die-namics and cut some pieces from brown cardstock and lightly sponged some white ink over top of the “hills”.  I placed those over top of my natural card front base and also cut out some trees from one of the FREE die-namics dies that I received with an order from some Sour Apple card stock and attached them over the “hills”.

Lastly, I wrapped some twine around the card front base, added my die cut leaves where I wanted them, attached this panel to a top folding A2 sized white card base that I’ve also rounded the corners on with a corner chomper.  Lastly, I’ve added some clear crystal drops in random places.

I enjoyed creating this one using mainly die cuts and minimal stamping!  I hope you’ve enjoyed my masculine card design as well! 🙂

Here’s the challenges that I’d like to enter this card for:

  1.  MFT Color Challenge – Persimmon, Sour Apple, Milk Chocolate, Neutral
  2. Happy Little Stampers Anything Goes with Dies –
  3. City Crafter – #437 Woodland Animals
  4. Crafting By Designs – Anything Goes
  5. Creative Moments – Anything Goes

If you happen to follow along with me on FB, then you may have seen where I’ve had the talented lady Dina Kowal create a portrait for me using a past photo from our beloved family member Mocca that passed away this last February.  Dina is extremely talented with her pencils!  My hubby was amazed and here is a photo of him with it last night after he opened it up for his birthday present:

BertBday-11-08-2018-gift

He said, “Oh wow!” when he opened it and wanted me to tell her that she did an amazing job, it looks just like her!   I went through the photos with hubby (he’s not on social media) that Dina had shared of her on-going creative process with the portrait, and this was one from the beginning:

Mocca drawing photo 1

And this was the photo that she used for her creative process:

OLYMPUS DIGITAL CAMERA

We are thrilled and honored to have this stunning work of ‘Mocca’ art in our home and look forward to getting it framed and put up!  Thank you to Dina for sharing her talents with all of us! 🙂

Thanks for dropping by my friends!  See you soon!

Caring Thoughts Wreath

Hello friends! Sorry to be throwing so many posts out to you at once, but as you can see there are so many exciting things going on the first of the month and I’m happy to be sharing it with you!

I have come up with an easel card design that I’ve created using the digital set called Memory in Our Hearts:

Vicki-SnS-MemoryinOurHearts-OctGDT

The great advantage to using a digital set is that they come with pre-colored images as well as outlined images to create many different looks you’re wanting.  In addition to that, you can also manipulate the size and structure of your image as I have done with my card here.  (This is a great way to come up with a unique design too!)

I have taken some of the pre-colored “sprigs” in the fall theme color and sized and moved them around in a Word doc. to create my own Fall wreath with it!  I then added the beautiful sentiment to the center and placed where I wanted it and then printed it out along with a couple more sprigs that you see on the inside of this design.

Vicki-SnS-MemoryinOurHearts-OctGDT1

To step things up a notch, I’ve used a protractor to draw a circle around my wreath image as well as a larger circle for a mat behind it and fussy cut them out. (I didn’t have a circle die large enough to accommodate my wreath image.)  I took my ink blending tool and some Tea Dye and Vintage Photo distress inks to add some color around the edges.  Since I made a Fall wreath design, I wanted to add some glitter to the leaves.  So, I took the Nuvo Precision glue pen and added some glitter over them.  For the “berries”, I took some Ripened Pumpkin Nuvo Crystal Drops in random areas around the leaves.  I made a bow with some natural twine and added it to the top of the wreath.  (I did this same process for the smaller “sprigs” on the inside of the card as well.)

Vicki-SnS-MemoryinOurHearts-OctGDT2

For my card design, I have made an “easel style” card (more on that below).  My card size is a 5 1/2″ square.  I have used the same cardstock color that I’ve used to print out my wreath image and separated it in two panels to fit on the front of my card base.  I took an embossing folder from my stash to add some texture to my design and also used the distress inks again to add some color around the edges.  I used glue to add some “dots” in the corners and then sprinkled some “Autumn Medley” glitter over them and let it dry.  I have also taken some 1/4″ Tear Tape to the middle edges of the card base and burnished some of this same “Autumn Medley” glitter to that.  I think it really brings in that pretty Fall color theme with some added sparkle!

Vicki-SnS-MemoryinOurHearts-OctGDT3

And for the inside of my card, you can see that those extra “sprigs” that I’ve printed and cut out create an easel style “stopper/display” function for my card design.  It’s easy to create this look with a score mark made in the center of the card front base as you can see with the circle wreath shown fully.

I have used some of the same-colored cardstock as the printed-out wreath for the inside of my card with some more distress inks along the edges as well as another strip of 1/4″ Tear Tape along the bottom edge burnished with some more of that “Autumn Medley” glitter.  I’ve used some foam tape to pop up the “sprig” cut out images so that they create the “stopper” for the front card base to rest while being displayed.

I hope that you’ve enjoyed my interactive card today and I look forward to sharing many more projects with you during my guest design spot!

Thanks so much for stopping in today my friends!  Please be sure to check out my earlier posts from today!  See you soon!

challenges:

  1.  {Cupcake Inspirations} CIC457 – Fall
  2. Try It On Tuesday – Thankful

Happy Halloween – All Treats & No Tricks! :)

Hello friends!  I want to thank you thank you thank you from the bottom of my heart for everyone of you that has left such sweet comments full of birthday wishes and lots of kindness that you’ve shared through something we have in common which is creating and sharing smiles!  I so enjoyed the stories that you’ve left about how you share your handmade creations with others.  PLEASE continue to create doing what you love and share those smiles with as many people as you can!  It really makes the world a much better place when we can serve one another in kindness.

I have always loved Halloween as a child and have so many fond memories dressing up each year and thinking about what I would be.  I tried to pass that tradition onto my children, and I dressed up right along with them!  For me, Halloween is full of lots of fun things besides just treats!  I wanted to celebrate those memories with a card today:

Vicki-BM-HalloweenBox

I’ve stamped the trick-or-treaters and bat and then colored them up with my Copic markers and fussy cut them all out and put them aside while I worked on the rest of the card.

For the background of the card, that “tree branch” panel came in the kit, so I ran it through my laminator to foil it…it turned out awesome!  (See photo below!)  I then took my distress inks and blended in a night sky over it.  I spritzed it with water and dried it off with a towel to get the water drop look.

I took this awesome border silhouette die from Impression Obsession and attached to the bottom of the scene for the trick-or-treaters to stand on.  I sponged the bottom edge with white ink.  Speaking of white ink, this is what I used to stamp the sentiment on a piece of black cardstock as well as sponge around the edges with it.  I used the glow-in-the-dark embossing powder over top of it.  (Unfortunately, I couldn’t get a good photo of it glowing in the dark…. but it does, and it looks cool!)  I made a banner with that strip and attached it to the left side of the card and then popped the bat up over it with foam tape.

Vicki-BM-HalloweenBox-foiled

Here you can capture a better look at the foiled tree branch in the background as well as the heat embossed sentiment.  I glued down the mummy girl and then I took foam tape to pop up the Frankenstein for dimension and depth.  I also added some yellow Stickles to the eyes and mouths on the pumpkins.

This card was so fun to do!  Hope you’ve enjoyed it as well!

Wishing you all a very fun Halloween however you choose to spend it!  I think I will be watching some scary movies and eating some popcorn which is something I enjoy doing with hubby!

Challenges I’d like to enter:

  1.  Creative Moments – Anything Goes with optional twist: Spooktacular
  2. Crafty Gals Corner – Halloween Colors
  3. Simon Says Stamp Wednesday – Halloween/Spooky
  4. The House That Stamps Built (O2418) – Anything Goes
  5. Moving Along With the Times – Halloween
  6. Crafty Catz – Anything Goes with an Optional Twist:  Halloween
  7. Always Fun – Halloween