It’s Halloween On Cute Card Thursday

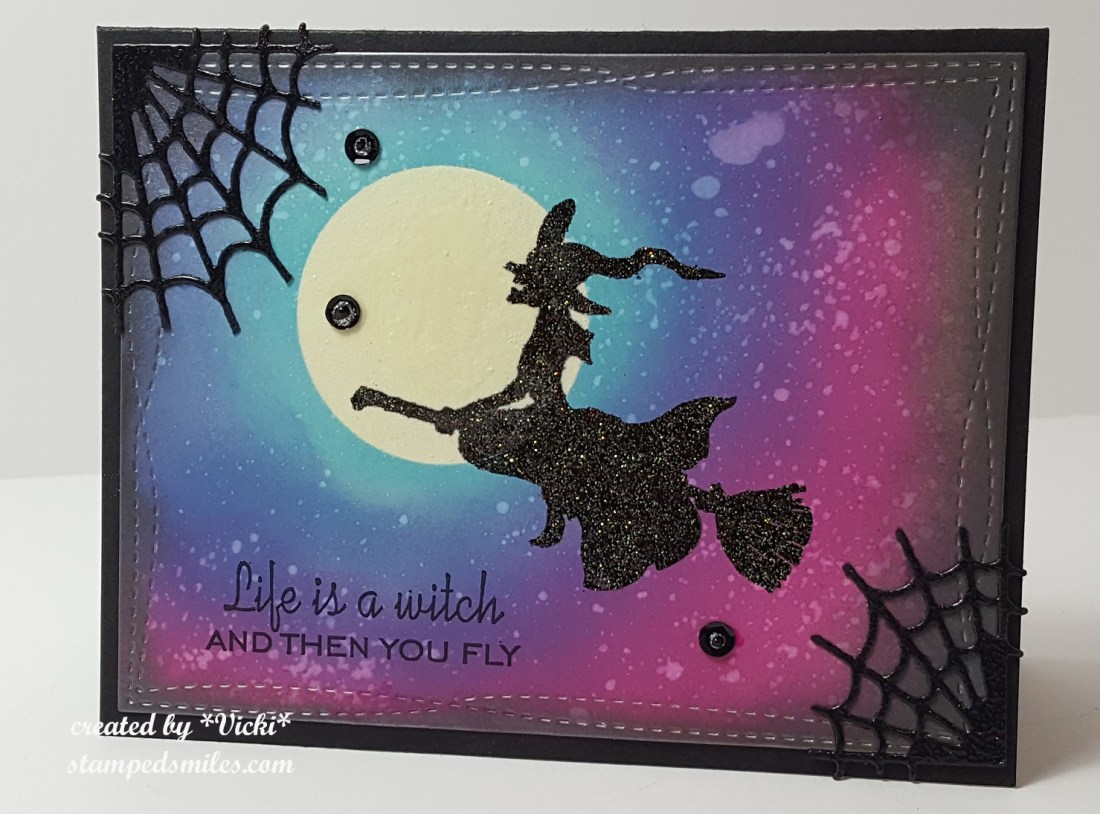
Hello friends!  Happy Thursday!  As this month creeps along and the weather slowly changes to cooler temps, the eerie feeling of Halloween comes to mind!  So get your “Halloween” on and come join us this week at Cute Card Thursday!

Vicki-CCT551-ADU

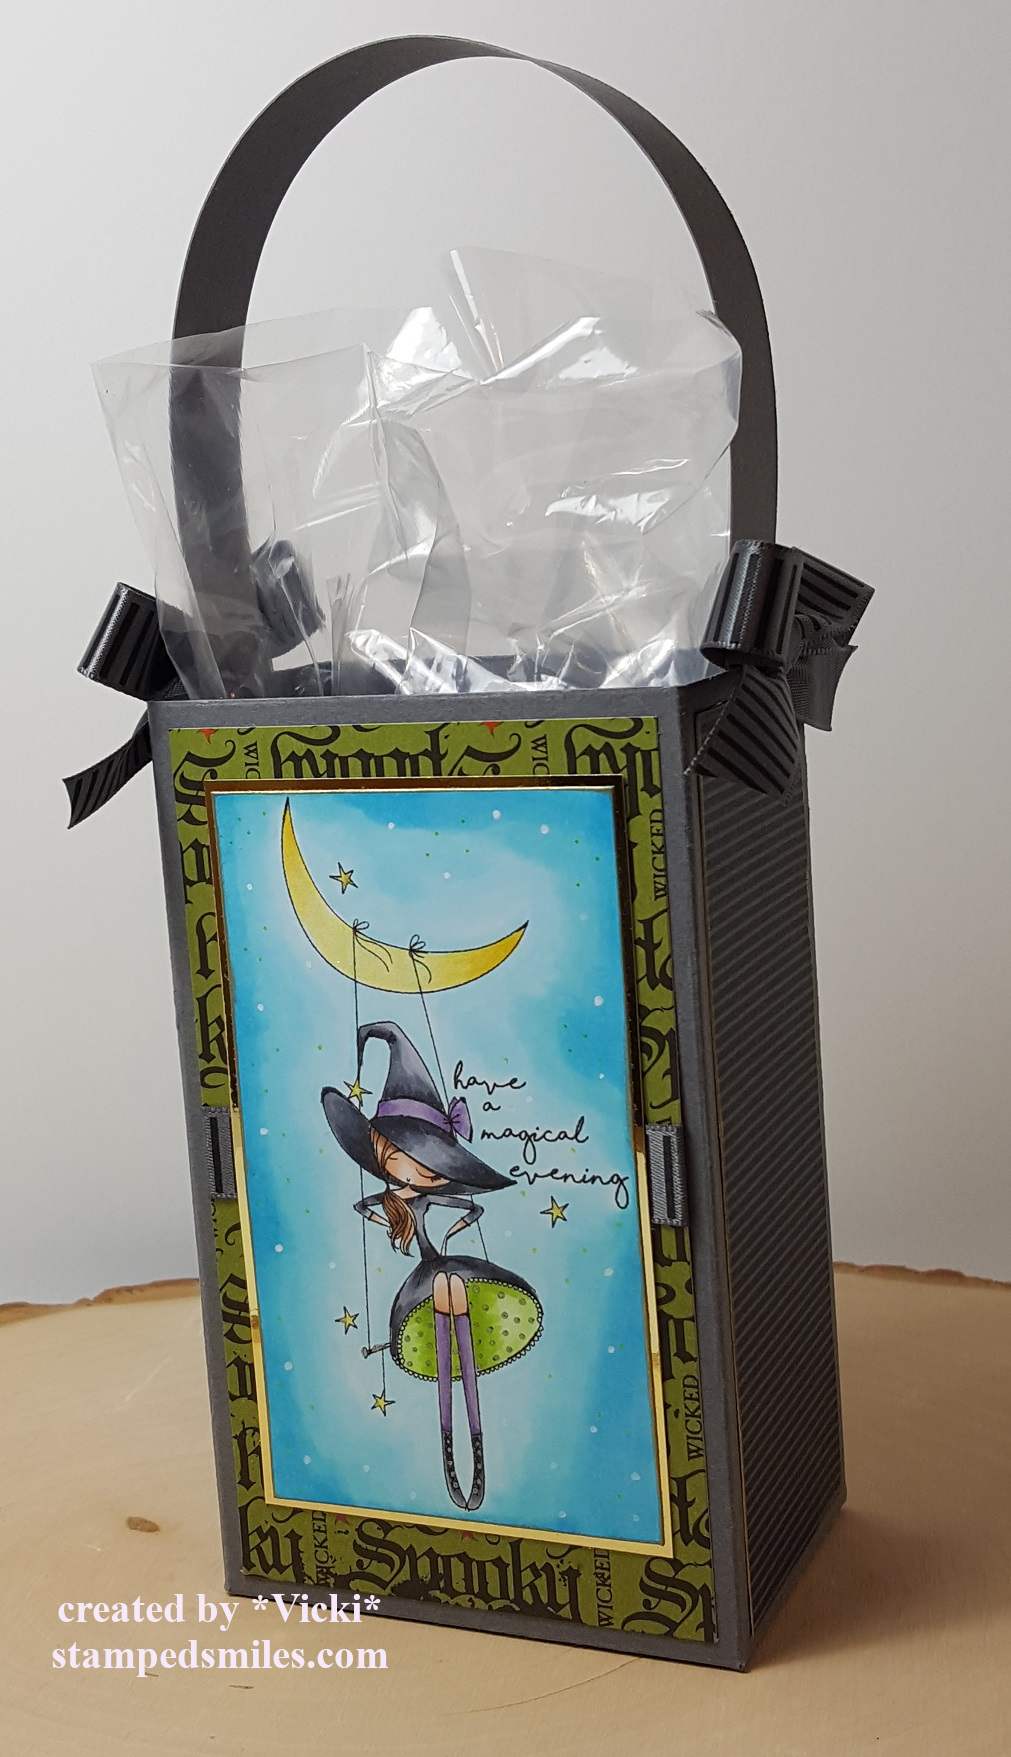
Here’s the project that I’ve made for the challenge using this adorable image from this week’s sponsor All Dressed Up!  The image is called “Have a Magical Evening” and I have colored the entire image panel including the background with Copic markers.  I have also used gel pens to color in gold details on the stars, her dress and shoes.  Then I took the gold and white gel pens to add dots for the background sky.  I’ve used a gold ink pad and rubbed it around the edges of the panel and then I mounted it over a gold foil cardstock base.

For this treat box, I’ve used the 2-5-7-10 box tutorial on Splitcoaststampers.com to create a similar version, but I cut off the flap part and made a handle for my version.  I covered the box with some fun “spooky” papers from my stash, added some gray with black stripes silk ribbon on the front panel along with making some bows with it for the sides of my box handle and glued them on.  The image panel was added over top of the ribbon strip and design paper.  It’s ready to add a nice treat inside for someone’s “magical evening”!

Vicki-CCT551-ADU-close

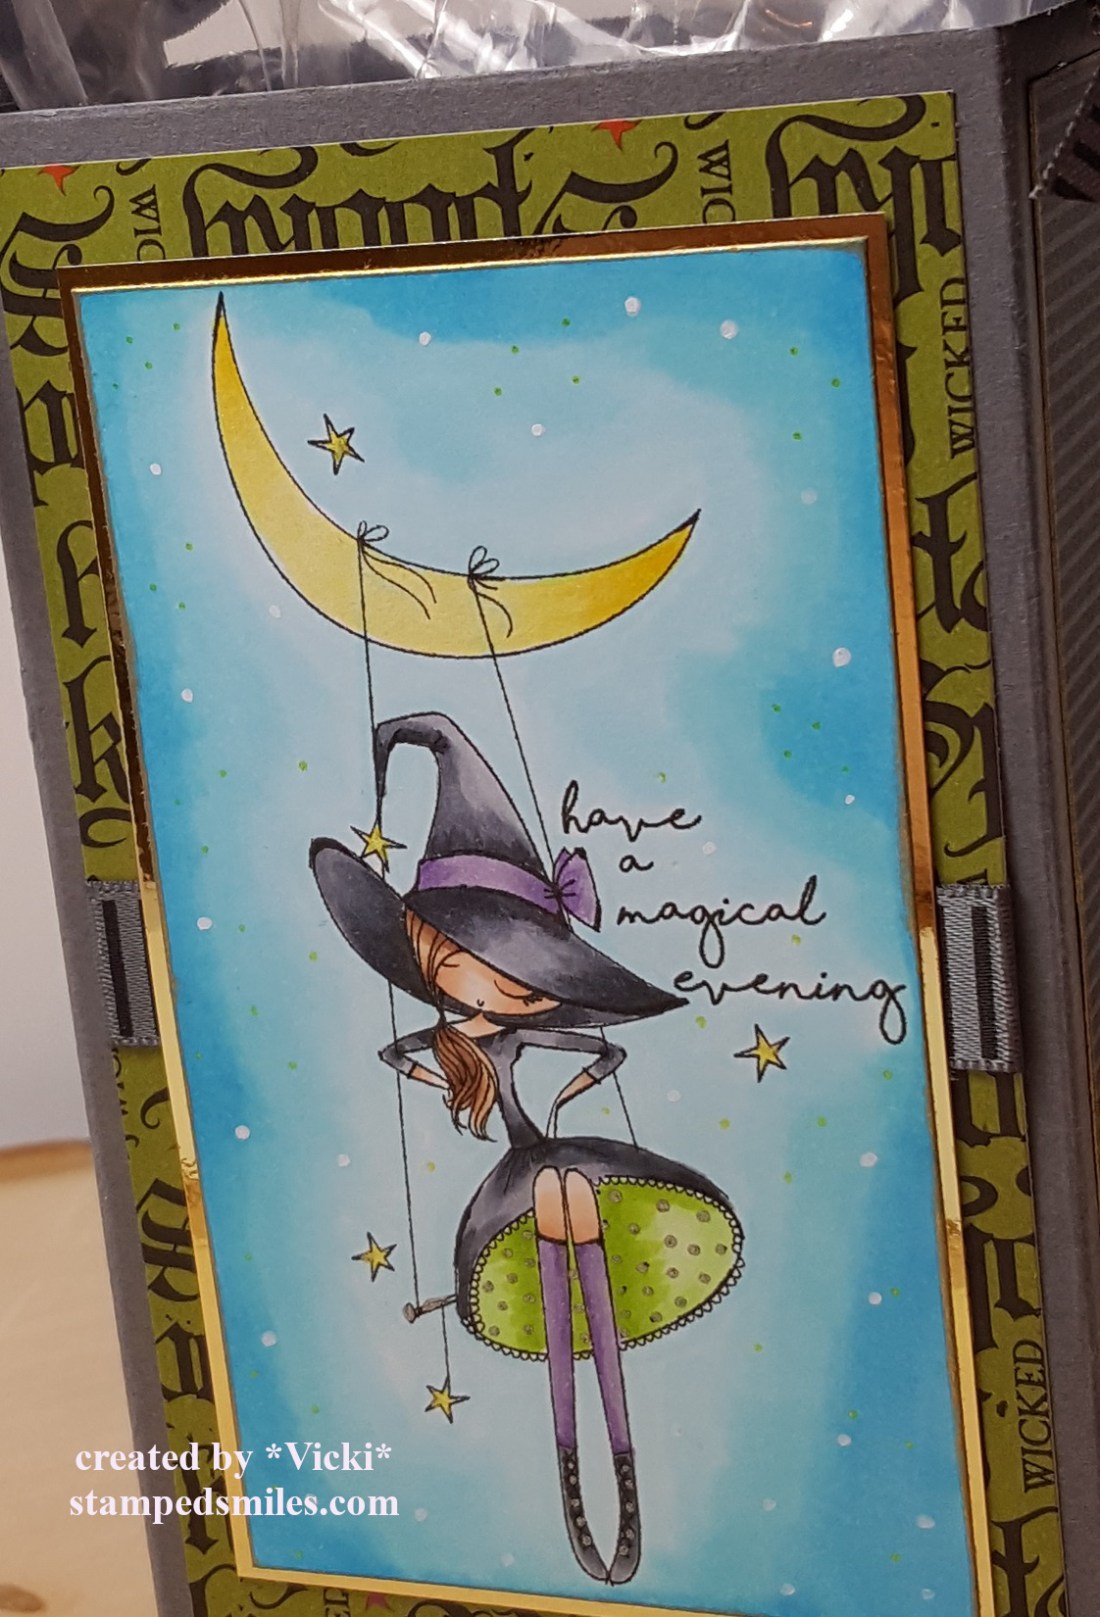
Here’s a closer look at the coloring of the image.  I have also added some shimmer to the crescent moon with a Spectrum Noir glitter brush pen which of course is hard to capture in the photo, but you can see the areas where I’ve used the gel pens.

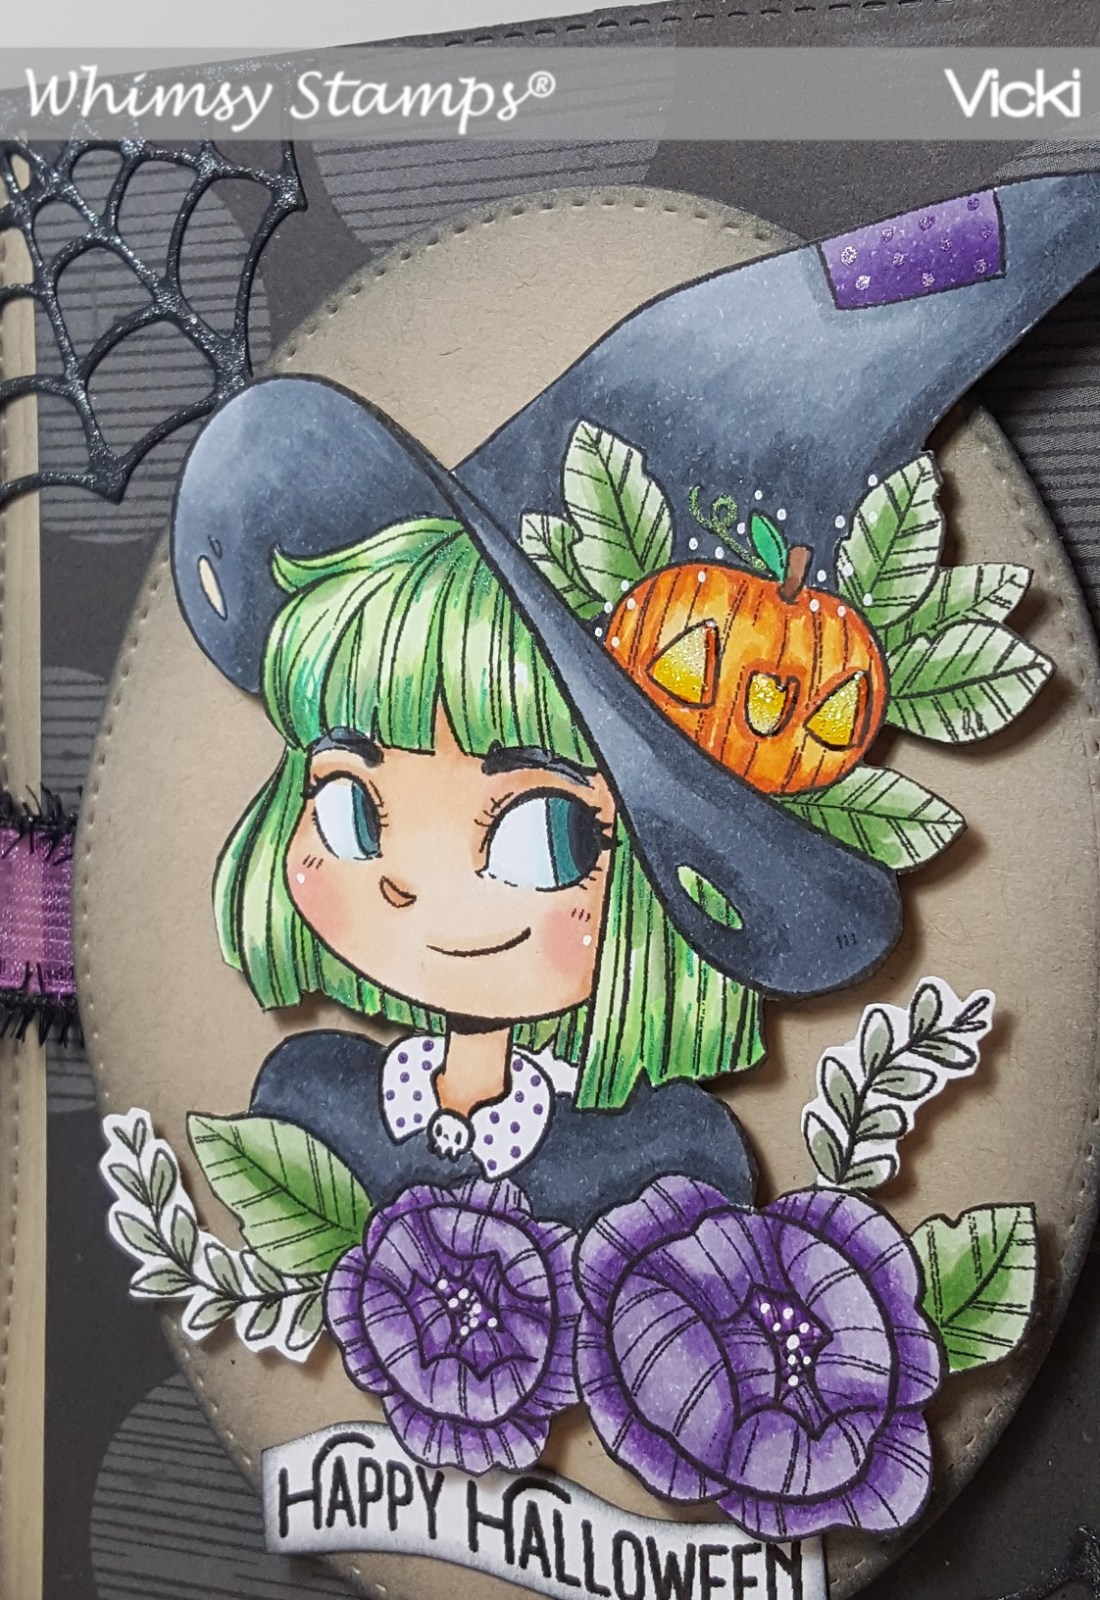
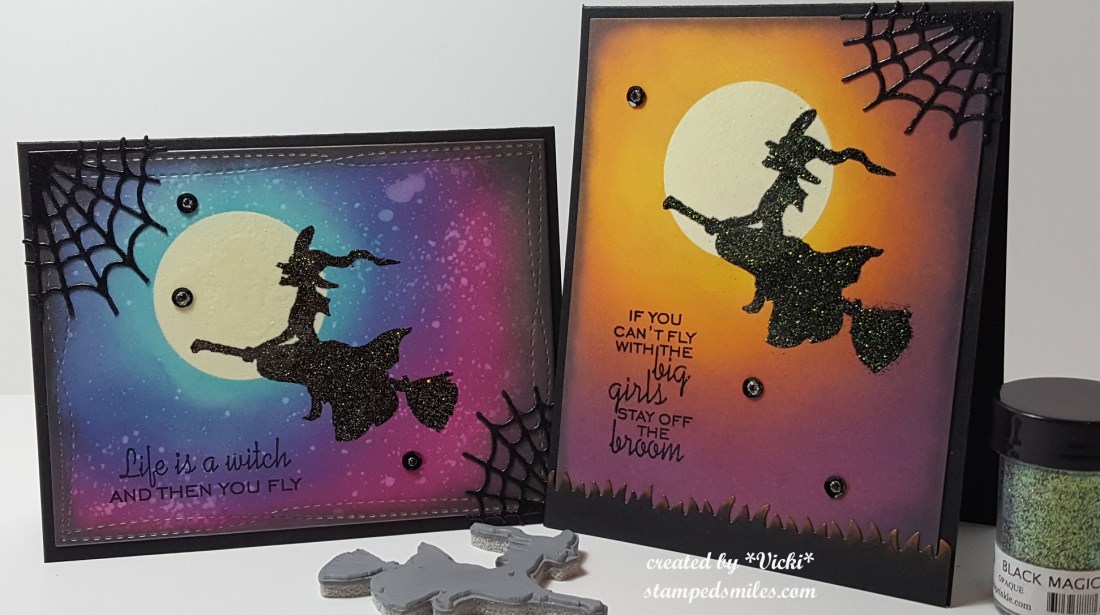
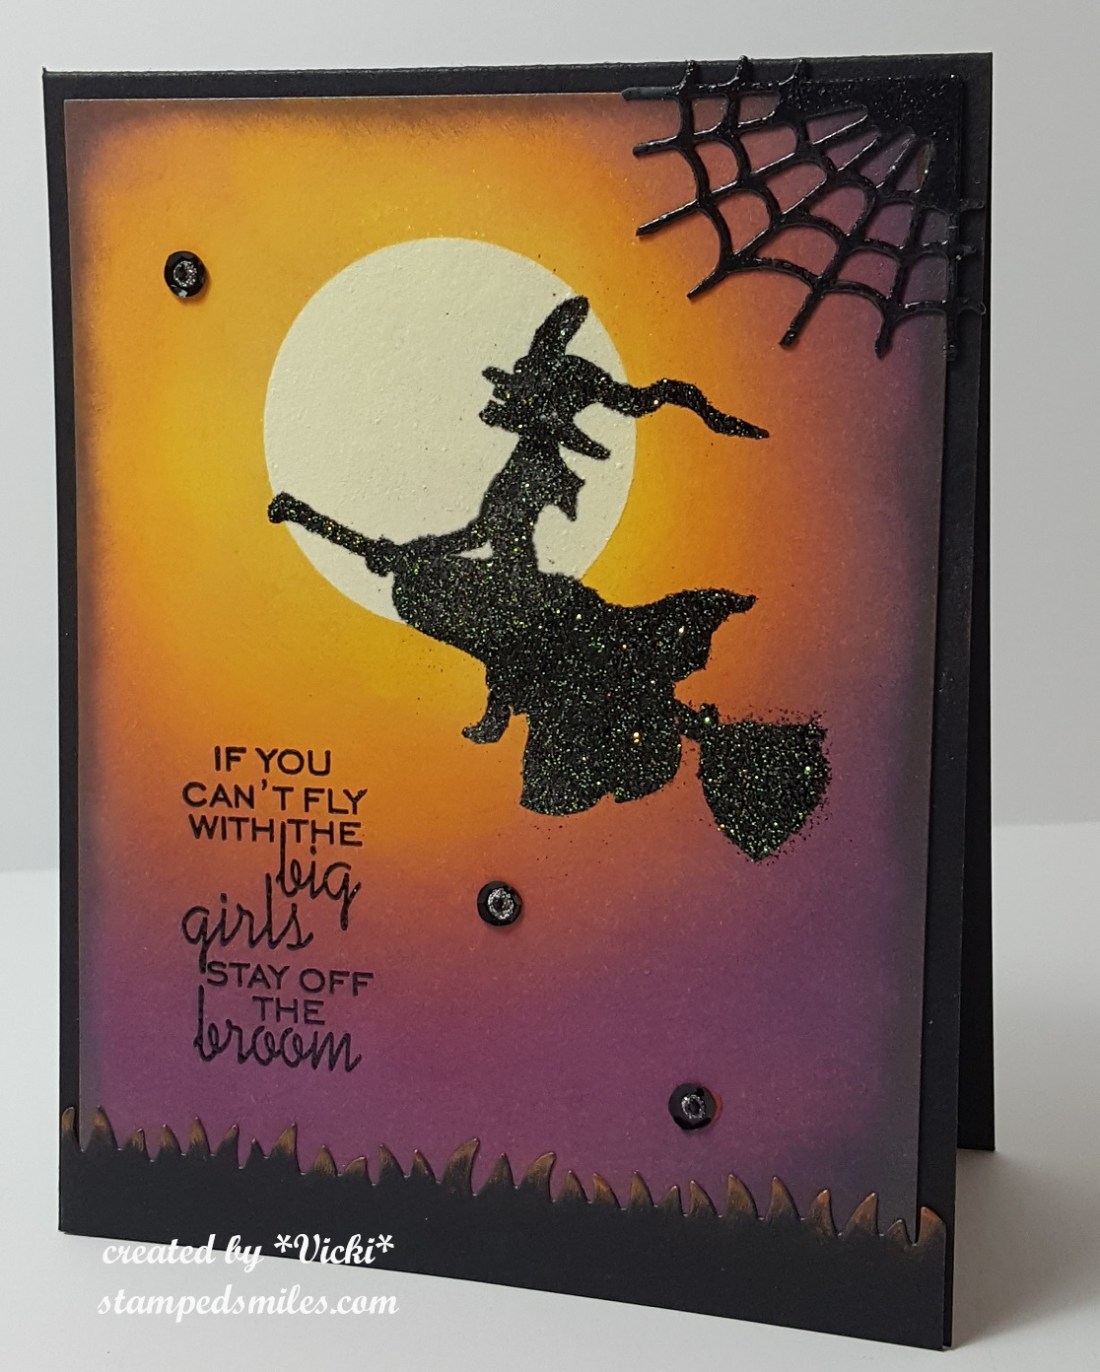
The blue background was made using my Copic markers and I blended them out so that the lighter tones were towards the witch and the darker tones to the edges.

I hope you’ve enjoyed my treat box creation and thanks so much for stopping in today!

Challenges:

  1.  Craft Rocket – Autumn/Halloween
  2. Brown Sugar – (October) Spooky Halloween and/or Autumn
  3. Use Your Stuff – Autumn/Halloween (always great to use more paper from my stash!)
  4. Tuesday Throwdown – Anything Goes
  5. Words 2 Crafty By – “Listen!  The Wind is rising, and the air is wild with leaves.  We have had our Summer evenings, now for October’s eves.”
  6. Crafty Creations – Anything Goes
  7. Simon Says Stamp Wednesday – Anything BUT a card
  8. All Dressed Up Anything Goes + use ADU image
  9. Scor-Pal (Oct) – More than one score Fall/Harvest/Halloween (Scored at the marks, 2-5-7-10 inch marks)

Happy World Card Making Day!

Hello friends!  Of course I can’t let this day go by without making a card for it, right?!

I love Halloween and when I received this image, I thought it would be so fun to create a card with it for the occasion!

Vicki-WCMD2018-Freebieimage on FB

This image is from the retired artist Kirsten Winkelbauer (for Whimsy Stamps) and she’s so cute and perfect for Halloween crafting!  I’ve colored her up with Copic markers and added a few details with my gel pens.  I’ve also put some loose glitter over the eyes and nose of the pumpkin on her hat.  I fussy cut her out and popped her up with foam squares over a Kraft cardstock cut out stitched oval that was sponged with some black ink.  I’ve also cut around the sentiment and sponged some more black ink around the edges and attached it to the oval panel.

For the card base, I used an A2 sized Kraft card base and then I took another piece of Kraft card stock and cut out a piece using the Whimsy Stamps Hand Stitched Nested dies that I’ve covered with a piece of Halloween paper from my stash and also sponged around the edges with some black ink.   I wrapped a piece of Halloween purple ribbon around it and attached it to the back and then adhered my card front to the card base.  I die cut a web twice with black card stock and glued it to the corners of the card front and then brushed over it with a clear glitter brush marker.

Vicki-WCMD2018-WSCloseup

Here’s a closer look at my coloring.  You can better see where I’ve added my gel pen dots and the glitter on my pumpkin.  Her green hair was so fun to color! 🙂

Hope that you are taking the time to have fun and create a card today!  Thanks so much for stopping by!!  See you soon!

Challenges:

  1.  {Cupcake Inspirations} – CIC455 ‘Bump in the Night’
  2. Always Fun – Dies & Punches
  3. Creative With Stamps – (CWS31) Halloween or Leaves
  4. Artistic Inspirations – Anything Goes

It’s Autumn at Cute Card Thursday

Hello friends!  It’s Cute Card Thursday again and we are going all Autumn over there this week!  Sounds like a great challenge to me…hope you will stop over and check out the inspiration and add your creation in the gallery too!  Looking forward to seeing your makes!

Here’s my card:

Vicki-CCT549-KindaCute

I thought this image was so darn cute!  I’ve used an image from our sponsor this week called Girl with Wheelbarrow from Kinda Cute Stamps.  She is busy gathering pumpkins in that wheelbarrow and looks to be on a mission with it too!  I adore that sweet little bunny along for the ride!

I’ve colored the image with Copic markers including for the ground.  I’ve taken a tiny sponge with some blue ink and very lightly sponged in a sky.  The sentiment was stamped with brown ink from an older Lawn Fawn set.  I’ve also used the Stitched Leaves die from Lawn Fawn to cut out some leaves with kraft cardstock and then sponged some color over the edges to attach to the design.

I cut out both the image panel and the orange design paper with a Stitched Scallop rectangle die set from My Favorite Things.  I’ve also cut out a tiny brown banner at the top left corner from a die set from MFT as well.  Lastly, I’ve added some gold sparkling enamel dots around the leaves.

Hope you are out and about enjoying the Autumn season!  Thanks so much for stopping by my blog today, I’m so happy to have you here!  See you very soon!

Challenges:

  1.  Sweet Stampin’ – Dies/Punches (I stamped the sentiment-hopefully this qualifies)
  2. Always Fun – Anything Goes
  3. Addicted to Stamps & More – Anything Goes #311
  4. Crafty Gals Corner – Anything Goes + Fall
  5. Mod Squad – Autumn Colors (Orange, red, purple, yellow, brown) I used all EXCEPT purple! – must use at least 3

Just A Girl and Her Pumpkin

Hello friends!  Wow, I think Fall has begun over my way as the air has changed with cooler temperatures and I absolutely LOVE it! 🙂  Although I’ve been busy crafting away in my room, I like to get outdoors for a few breaks to walk around and see signs of the leave starting to change over.

Today, I am over at the Whimsy Stamps Inspiration blog to share my card with you using one of the really adorable images from this month’s release called “A Girl and Her Pumpkin” digital stamp by Crissy Armstrong:

Vicki-WSGirlPumpkin-Sept25-blogpost

Isn’t she adorable?!  I really enjoyed coloring her up with my Copic markers.  As I was coloring, it actually reminded me of going to a near-by apple orchid with my children as they were growing up.  I would take photos of them with all of the pumpkins surrounding them as they would pick out which one they wanted to carve for Halloween.  (My oldest was not a fan of “pumpkin guts” and so we always ended up doing that part for him! LOL!)  But it must have made an impression with them because they still enjoy going as adults now!   Besides, what’s better than apple cider donuts and freshly picked apples?!  YUM!

So, after the reminiscing of memories, I cut her out with the WS Hand Stitched Nested Rectangles along with the card front base and attached to a white A2 sized top folding card base.  For the sentiment, I took a piece of vellum and heat embossed a greeting from the WS Painted Sayings stamp set and I also took some of the splatter images from the same set and stamped them randomly in the background with white ink.

Before attaching the image panels onto the card, I’ve added some gold ink around the edges, attached some leaves behind it and popped it up with foam tape.  The piece of vellum was hand cut into a banner and folded around card base and attached with glue behind the letters to hide it.  I then put some burlap ribbon around the card front base as well as the image panel, vellum banner and gold sequins filled with gold Stickles.

Vicki-WSGirlPumpkin-Sept25-close

Here’s a closer view of the image and how she’s colored.  You can also better see the gold inked edges.  And of course, the photo didn’t pick it up, but I took some Wink of Stella clear glitter brush pen to go over the pumpkin with.

I’ve also used a cloud stencil to lightly sponge in a nice Fall sky behind her.

I think she would look so cute surrounded by a field of pumpkins…so there’s an idea!  Maybe I’ll work on that for next time!

Thanks so much for stopping in today!  I appreciate you taking the time!  See you soon!

challenges:

  1.  QKR Stampeded – Anything Goes #314
  2. Just Us Girls – JUGS459 photo week
  3. Crafty Friends – Autumn Colors
  4. Stamps & Fun = Creativity – Fall
  5. Crafting From the Heart – Anything Goes

Fall is Here with Craft Show Projects

Hello friends!  I was really hoping to post this yesterday, but hubby was around and I was trying to get many different things done at once.  As you might guess, I am frantically running around trying to get a good start and handle on getting items made up for my up-coming craft table!  I will have more on that below, but first, I’d like to share a card I made for the Lawn Fawnatics challenge before it expires too! LOL

Vicki-LawnFawn-FallisHere

As you may have seen in my past posting, I had gotten MANY Lawn Fawn items recently as I just adore Fall/Halloween and of course Christmas soon to follow!  It’s hard resist so many cool things that come out each year!  (If I worked myself ahead of time, then I would be less frantic and be able to actually slowly enjoy my new items!  LOL)

So for this card, I have used the fun Thanks a Latte stamp set as well as the Forest Feast stamp set for accents and sentiment.  I’ve stamped the tree stump in brown ink at the bottom of a vanilla panel that I’ve cut out using the LF Cross-Stitched rectangle die.  I also used a cloud stencil to sponge in some clouds in the background behind the stump.  I’ve stamped and colored with my Copic markers the other elements of the design and cut them out with the coordinating dies and arranged them on the stump panel.  I stamped the sentiment under the cup on a strip of vellum with chocolate ink and then heat embossed it with clear glitter EP and wrapped it around the card base with the plaid paper as well as the twine with the white heat embossed sentiment that was cut from brown cardstock with a banner die strip.  Lastly, I’ve added some shimmer over the liquid contents in cup as well as the leaves.

challenges:

  1.  Lawn Fawnatics – Mood Board

2.  City Crafter – Fall Colors

3.  Sketch Saturday – sketch 531

4.  Words 2 Craft By (W2CB57) – “Life starts all over again when it gets crisp in the Fall” – F. Scott Fitzgerald

5.  Simon Says Stamp Wednesday – “Pop It Up” (Popped up cup, leaves and whipped topping)

6.  Aud Sentiments – Fall + a sentiment


Now I’d like to share something that I’ve been working on for my up-coming craft show next month.  It’s coming quickly and I have many things to get ready for it.  I’ve not made these before for purchase, but I find that I am always in need of them and use them every year, so I thought these would be a fun way for someone to present a gift:

Vicki-ShakerGiftCardHolders-CraftShow

These are my “Shaker Gift Card Holders”.   I had made one in a previous post that I did earlier this year, but you may already be familiar with my “Shaker Money Holders” which I did a tutorial for on Splitcoaststampers.com a couple of years back.  CLICK HERE if you’d like to see that tutorial with a video I did.

As you can see, I’ve used the same Lawn Fawn stamp set that I’ve used on my card above as well as pulled in some other of those cute little images from other sets too!

I am going to be burning the midnight oil for a while, so I will probably have to wait to share more photos after my craft show finishes up, but I will take photos as I create so that I can also keep track of what I’ve made and how it all went over.

Hope you’ve enjoyed my post this evening and I’ll see you again soon!

Fun in the Fall

Hello friends!  I can almost feel it in the air!  Fall is coming near and I’m looking forward to joining in the crisp cool air and pretty colors with the changing leaves.  These are just a couple of things that I love about this season!  How about you?

Well this sweet little penguin certainly knows how to have fun in the Fall for sure:

Vicki-PenguinFuninFall-Sept 11

Here’s another September release from Whimsy Stamps called Penguin Fun in Fall image by Crissy Armstrong.  Of course, I grabbed my purple color markers to color his hat and scarf!  LOL!  I decided to create a purple and turquoise plaid pattern.  I also gave the leaves in the air a bit of movement with my coloring as if he’s throwing them up in the air.  Trying to be a bit different with my layout, so I tilted the image panel and cut it off on the right side of my card base.

I’ve also used the September release digital papers from Whimsy Stamps called Autumn Beauty.  These are fabulous papers and I know I’m going to be using some more of these on an up-coming card!  I’ve used two different patterns on the background and the banner strip.  Lastly, I added some fun Autumn Leaves sequins from Little Things from Lucy’s Cards.  I’ve actually had it for a while and hoarded the package and not used it until now!  I filled the centers of the round ones with some gold Stickles.  I also added a twine bow at the bottom of the banner strip.

Vicki-PenguinFuninFall-Sept11-close

Here’s a closer view of the image.  Here you can see where I’ve used some foam dots to pop up the fussy cut penguin for a bit of dimension. (I’ve also colored the one underneath as you can see it peeking out a bit on the side.)   I cut the image panel out with a stitched square die, sponged around the edges with some Spiced Marmalade distress ink and then went over the edges with some clear glitter Stickles as well as put some on the penguin’s hat tassel.

I hope you’ve enjoyed my colorful Fall card today! Thanks for stopping by as I really appreciate seeing your encouraging words or knowing you’ve stopped by! 🙂

Challenges:

  1.  Creative Inspirations – Anything Goes
  2. Crafting By Designs – Anything Goes
  3. That’s Crafty – Autumnal theme.
  4. Brown Sugar – All Creatures Great & Small
  5. Use Your Stuff – Animals

Witches Fly In a Glowing Moon

Hello friends!  With Fall on the way, I was really in the mood to create some spooky fun Halloween cards! (Plus I’m trying to get ready to fill my card rack for an up-coming craft booth and I ran low on Halloween cards from last year!)  I’ve also just received my winnings from playing in a challenge on Facebook, so I thought I’d use some products to enter again! 🙂

Vicki-SnS Black Magic-Glowing Moon

I thought I’d go for two cards here with the same products but used in a slightly different way with the colored backgrounds and orientation.

I’ve picked out this cute Cackle On stamp set and the Wicked Web die cut for my winnings that I’ve used on both cards.  As you can see from the props in the photo above, I have also used the Black Magic embossing powder to heat emboss the witch image on both of them.  I just love the sparkle effect that stuff has!  I’ve also die cut the webs in black cardstock and then went over them with clear embossing powder.

Below I will share details about each one:

Vicki-SnS-BigGirls-sky

To get the moon, I die cut a circle from masking paper and used the negative from the circle cut and placed it over my card front where I wanted the moon to be.  I inked the open circle area with VersaMark and then sprinkled some Glow-in-the Dark embossing powder over it and heat set it.  For my background, I have used some Ranger Mixed Media card stock because of all of the embossing and inking that I’ve done.  I didn’t have to, but I put the circle cut from masking paper back over the moon.  (The embossing would resist the ink, but I didn’t want to take a chance and covered it anyway…although it didn’t stick very well! LOL!)  I then used my ink foam blending tool and added some distress oxide inks to create the background sky.  I even used purple over the orange color, which is something you normally wouldn’t do, but with the oxide inks…it turns out stunning!

I then added some Nuvo Black Mousse with a sponge dauber along the edges which doesn’t show in the photo very well, but it has a cool shimmer.  Then this is where I’ve added the witch over the moon by inking it up with some pigment black ink and then heat embossed the Black Magic EP on it.  (I used my stamp positioner so that I could ink it several times as it was getting inked over the embossed moon.)  I’ve also inked up the sentiment in the same way except that I used some clear EP over it.

At the bottom, I cut a strip of ground with a grass edge border die and then used some Nuvo Copper mousse to sponge some color on top to make it look like the moon is shining over it.  I mounted card front panel over a top folding black A2 sized card base.  Then lastly, I added some black sequins and filled the centers with Nuvo Silver Glitter Drops and then a smaller dot with some Nuvo Black enamel Drops.

Vicki-SnS-Lifesawitch-sky

This card pretty much was made in the same manner as the above card with the exception of the Distress Oxide colors, I’ve used for sponging.  I also took my spray bottle and added some water droplets and then dabbed it off with a paper towel.

I cut out this panel with a MFT Wonky Stitch Rectangle die before attaching it to a black card base.

Then I wanted to show how cool this embossing powder is when the lights are off:

Vici-SnS-glowingMoon

I tried to get it as dark as I could so that you could see how that embossing powder really glows in the dark!!  To get a really fabulous glow, it’s best to do a couple of layers of embossing over it.

Hope you are having a great weekend and thanks so much for stopping by today!

Challenges:

  1. {CupCake Inspirations} CIC453 – Spectacular Backgrounds
  2. Crafting With an Attitude – Anything Goes
  3. Crafty Friends – Embossing (wet or dry)

Anything Goes at Cute Card Thursday with a Shaped Apple Card

Hello friends!  It’s time for another weekly Cute Card Thursday Challenge!   For this week, since it’s the beginning of the month, we will have our easy peasy “Anything Goes” challenge for you this week!  We are sponsored by Whimsy Stamps!

Vicki-PenguinAppleBushel-Sept6-CCT546-ATG

I couldn’t resist using this cute little fellow on my card for today!  This is the Penguin Apple Bushel digital stamp from Whimsy Stamps.  I’ve colored him with Copics and pencils and then fussy cut him out and attached him on the front of my apple shaped card with foam tape.  Hard to see in the photo, but I’ve added just a wee bit of shimmer with my glitter brush pen on the bitten inside apple he’s holding.  I’ve also added some white dots for his eyes with a gel pen.

Vicki-CCT546-ATG1

For the shape of my apple card, I found a fun apple card pattern and cut it out with my Cricut Explore machine and enlarged it the size that I wanted it to be.  I’ve taken some sponges and ink to add some shading and highlighting details to the apple.  I’ve taken that CUTE stamp set from Lawn Fawn called Thanks a Bushel to stamp a couple of hearts around the penguin as well as white heat emboss the sentiment on the front.

I’ve also added a black gingham ribbon along with some twine that I’ve attached an apple charm to before attaching it to the top of the apple.

Vicki-CCT546-ATG

So of course, I wanted to show you what the inside of the shaped card looked like too!  I thought that the inside needed to “look like” the inside of an apple, so I took the Lawn Fawn Outside In Stitched Apple die and cut a piece to fit the inside of the apple and then followed the “bite marks” to cut off the end and then I took a sponge to sponge around the areas of it with brown colored ink for shadows.  I’ve also taken the same die set to add a tiny green apple on the opposite side of the inside of the card.  The purpose for that was not just to add an extra decorative element, but I also wanted to cover up the back side of the penguin sticking out from the front of the card.  I then needed to add the “apple seeds” to the inside of the apple, so I took the Lawn Fawn Stitched Apple Frames to cut out the seeds die in black cardstock and glued them to the vanilla die cut apple panel. I’ve also added some shimmer to the seeds with my glitter brush pen.

I thought that there was still plenty of room for a message below the seeds or you could also write on the opposite side as well.  It’s just a fun and unique card design to go with that darling penguin!  I will need to make a special envelope to fit the card inside for giving.

Thanks so much for joining me on my blog today!

Have a fantastic day!

Challenges:

  1.  Stamping Sensations – “I Spy with My Little Eye, Something Beginning with ‘B’!” (Bushel, bows, blue cap, bite, barrel)
  2. Crafting From the Heart – Anything Goes
  3. Artistic Inspirations – Anything Goes
  4. Crafty Cardmakers – All Creatures Great & Small
  5. Fab ‘N’ Funky – Bingo! (I’ve used the third column:  die-cuts, ribbons, red)
  6. The Crafty Addicts – Anything Goes with optional Back to School

It’s a Mouth-Full!

Hello friends!  I’m back with you again to share another fun image from the Whimsy Stamps September Digital Release!

Vicki-NutsAboutYou-Sept4

This guy is so stinkin’ CUTE and I really had fun coloring this one! 🙂  I thought this was a great image to use any time of the year really and a cute idea for also a “new home” themed card.  I have used the So Nuts About Home Digital Stamp.

After coloring the image, I went around the edges with some distress ink using my ink foam blending tool.  Mounted that onto a black layer and popped it up over the card design with some craft foam.  I die cut a leaf from kraft cardstock and used some more distress inks with the ink foam blending tool to give it a bit of color.  I then added some sparkle with some Ranger Vintage Platinum glitter and a clear shimmer brush pen.  I curled the edges a bit and attached it over the image panel in the corner.

For the background of my card, I have used the new Autumn Beauty digital papers released this month.  You can see a bit peeking out, but it really doesn’t do justice to the papers…they’re really gorgeous!  I’ve layered them onto a piece of glitter cardstock that was cut along the edge with a scallop border die and then I lined it all up along the right side of my card base.  I’ve added a piece of burlap ribbon and a button with a twine bow on the lower portion of the card before adding my image panel to it.

Vicki-NutsAboutYou-Sept4-close

Here’s a closer look at this cutie and my coloring details.  He really makes me smile! 🙂

Hope you’ve enjoyed my creation today!  Thanks for sharing part of your day with me!

Challenges:

  1.  4 Crafty Chicks – Crazy Egg Anything Goes
  2. Moving Along With the Times – Gingham and/or Buttons
  3. Alphabet Challenge – ‘L’ for leaves

Lawn Fawn Friday

Hello friends!  Yay, it’s Friday!  I have lots of fun Lawn Fawn “goodies” to share with you today and although it’s still a bit warm over my way, I am in the mood for Fall, how about you?  There’s nothing better in the Fall, for me, than a warm apple cider donut that we get every year from an apple orchid we like to visit each Fall!  It had me thinking of the current challenge going on…

Vicki-LF-FallTreats

It may be a bit of an oldie, but a goodie to me and I really enjoy using it!  I have pulled out my LF Love You a Latte stamp set to base my card for today.

I started with a white A2 sized top folding card base and added a piece of (now retired) “Perfectly Plaid Fall” mini paper stack that I’ve cut with the LF Stitched Rectangle die along with the pieces used on my image panel also cut with the same die set.  I layered that onto a white piece of cardstock that was cut from the LF “Scalloped Rectangle die” (Looks to be retired too!)  I have taken a strip of the plaid papers and used the LF Valentine Borders die to cut the edging on it.  I then wrapped some twine around it and added the LF Stitched Leaves that were cut from kraft cardstock and colored on the edges with distress ink and a foam blending tool.  I then tied a bow with the twine and placed it over the leaves.

I colored my images, fussy cut them out and placed them over my layered paper panels and then popped it up over the plaid card base with some craft foam.

Vicki-LF-FallTreats1

Upon a closer view of the image, you can see that I white heat embossed the sentiment from the stamp set.  I also added some glitter to the marshmallows in the cup and covered the donut with some glossy accents.  I added a LF Small Stitched Leaves that I made similar to the others to tuck inside with my treats! 🙂  All the leaves were covered with a glitter brush pen.

*Be sure to scroll down below for more Lawn Fawn goodies!!*

Here are the challenges I’d like to enter this card for:

  1.  Lawn Fawnatics – Coffee, Tea and Treats
  2. Retro Rubber (RRCB94) – Anything Goes + Older Stamp(s) Mine is circa 2015
  3. Watercooler Wednesday (WWC185) – Anything Goes
  4. Simon Says Stamp Wednesday – Anything Goes

I thought this was a good place to stick in this project I made and had entered into my local county fair last month.  This particular item did not place, but the category was “Hand Stamped Item Other Than a Card”…so I created this using a Lawn Fawn stamp:

Vicki-LFSkunk-Wood Slice

I found a bag of these really cute wood slices when I was out shopping with my mom earlier this Summer at Hobby Lobby.  They seemed like a perfect size to do this with!

I stamped this adorable skunk from the Lawn Fawn Stinkin’ Cute stamp set and then colored him in with my Prismacolor pencils.  Of course, the woodgrain gives it some slight imperfections, but I didn’t mind and thought it gave it more character!  (See the wood knot under his chin!)  I’ve added some green “Flower Soft” for the grass portion to give him something to stand on.  I also added some glitter to the hearts above his head.  Hubby drilled a hole in it for me so that I could add some twine for it to hang.

Vicki-LFSkunk-WoodSlice1

Here I’ve turned it at a bit of an angle so that you can see the thickness of the slice and the fun texture of the bark on it.  I thought this would be so cute on a gift bag or something.  I have it hanging in my room because he’s just too stinkin’ cute anyway! 🙂

Thanks for stopping in today and I wish you all a fabulous weekend!

P.S.  Sunday I will be sharing a post with a brand-new release…so be sure to check that out too!  Bye!