It’s Fall Y’All!

Hello friends!

For my card today I’ve used acrylic bubbles and that is one of my faves to use on pretty much ANY style of creation I’m making and here you can see why:

Vicki-BMbloghop-DD

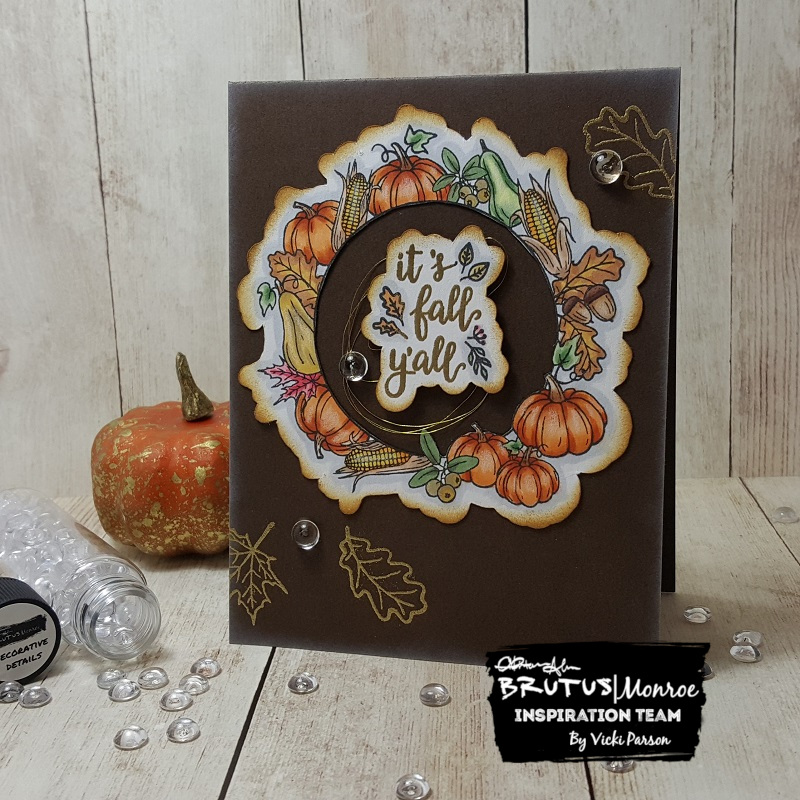
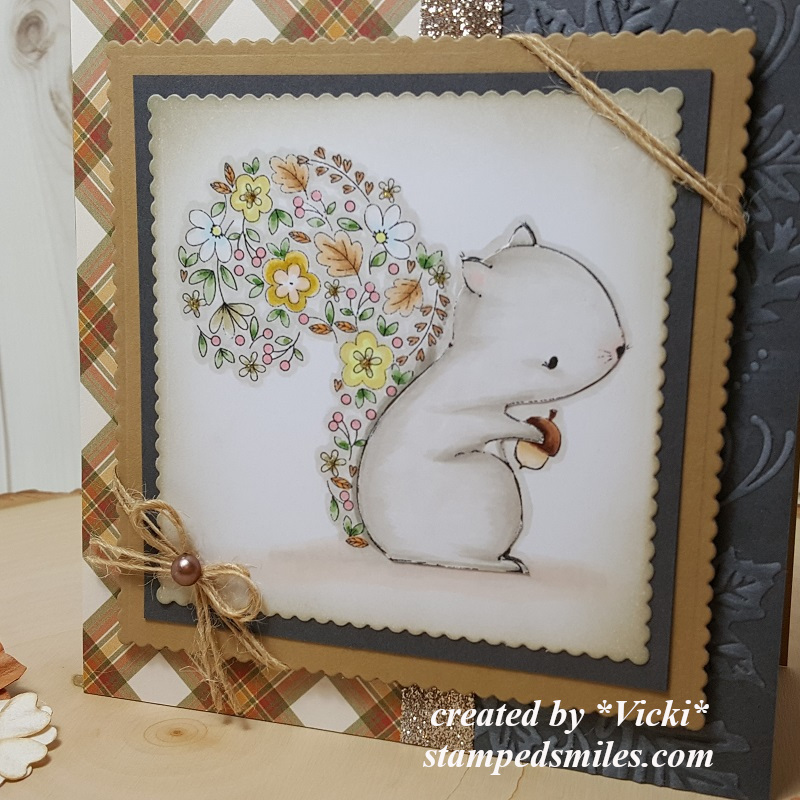
Fall is certainly my most favorite time of the year and I really enjoy creating with all of the fun Autumn style products.  The wreath and sentiment that I’ve used are from the Fall Y’All stamp set and I’ve cut it out using the Fall Y’All Cut File that you can get for your cutting machine.  I have a Cricut, so I’ve used that to cut it out with.

Now that cut file does NOT cut out the center of the wreath, so I just poked my scissors in the center of it that made a large enough hole so that I could fussy cut around the inside of it.    The cut file will also cut around for your sentiment.

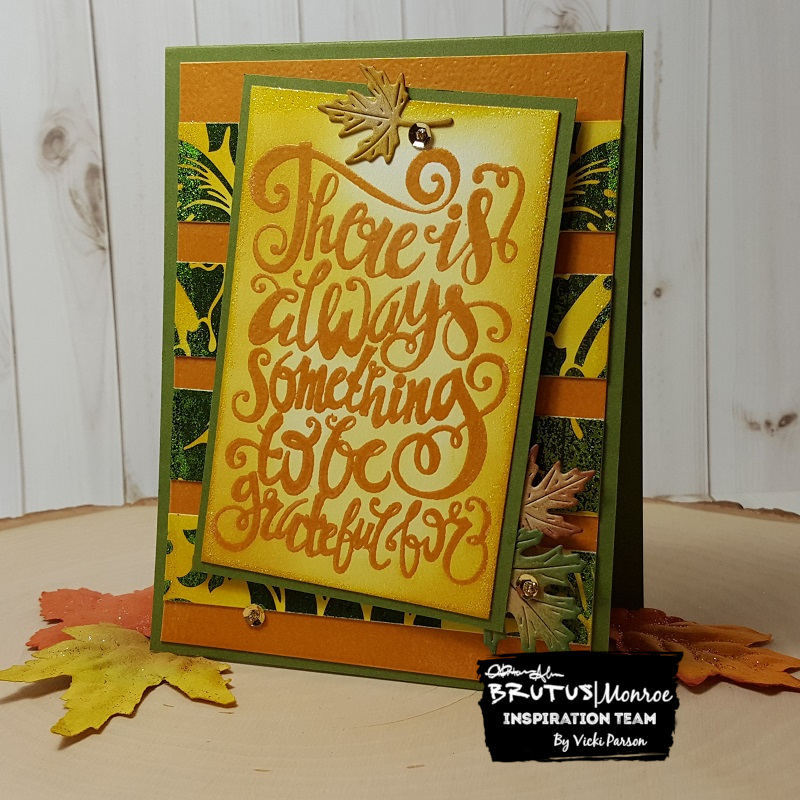
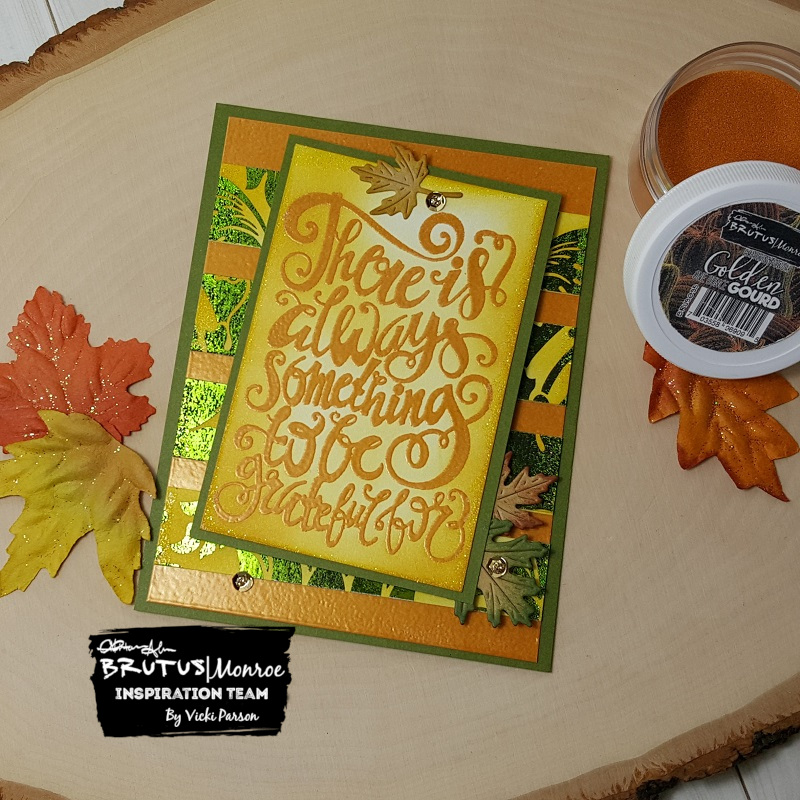
The base of the card is an A2 top folding card.  I took a couple of the leaf images from the Autumn Essentials stamp set and heat embossed a couple of them on the card base with the Gilded EP.

I then glued on the cut-out wreath image, popped up the sentiment in the center with foam tape and also added some gold thread behind it before attaching.  I took some white ink and sponged around the edges of the card base and then finally attached the acrylic bubbles over the card.

Vicki-BMbloghop-DD-close

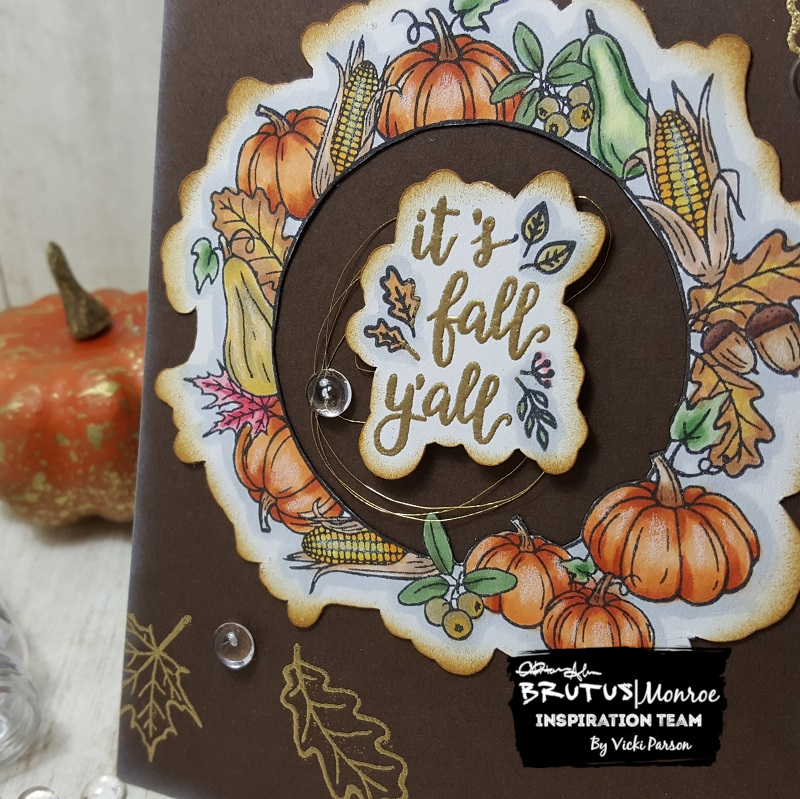
Here’s a closer look at the image and how I’ve got it colored in.  I’ve used Copic markers to color it along with the leaves on the sentiment.  I also took some distress ink and sponged around the edges of the cut images.

For the sentiment, I first stamped it with the black ink and then cleaned off the stamp and then stamped it again with the embossing ink.  I sprinkled the Gilded EP over the sentiment and then brushed off the EP on the leaf areas as I didn’t want those embossed.  I heat set only the wording.

Vicki-BMbloghop-DD-flat

I hope you’ve enjoyed my creation today and were inspired in some way!

Challenges:

  1.  Crafty Gals Corner – Fall Colors
  2. Cardz 4 Galz – Welcome Autum/Fall
  3. A Bit More Time to Craft – Anything Goes
  4. The Creative Crafters – Anything Goes
  5. Pammies Inky Pinkies – PIP1937 Anything Goes
  6. Crafty Cardmakers – Autumn Colors

It’s Time for Foiling Fun!

Hello friends!  Happy Saturday!!  I hope you have a fun weekend planned!

I’d like to share with you a couple of creations that I’ve made using some new Deco foil products:

For this card, I used both the Red and Gold Static transfer sheets and foiled it with the Ornamental Toner Sheet.  I first foiled it in red (but that sheet wasn’t used for this.)  I took the negative of that red piece and placed it over a full Deco Foil Toner Sheet and then the black areas where the ornaments are, I took the gold transfer sheet and foiled the ornaments in that.  So it’s sort of a double foiling!

I added this foiled panel over a piece of white cardstock that I wrapped some gold ribbon around and then I heat set the sentiment from the Yuletide Greetings stamp set with Gilded embossing powder.  The sentiment was stamped with Embossing Ink from a Yuletide Greetings Cut File.  I also had fun making a Halloween card:

For this card, I pretty much did the same as the card above in where I took the “negative” from the foiled Webbed Toner Sheet using the Gold Transfer Sheet which made the webbing black.  I left it like that for the background of my card.

For the “ground” I took a piece of black cardstock and ripped some strips for the “dirt” and sponged the edges of it with a gold ink.  I took the images from the Trick or Treat stamp set and colored them up, fussy cut them out and arranged a scene at the bottom.  I took a Copic liner to write in my own grave markers. 🙂

I took the silhouette bat from the stamp set and heat embossed it over the foiled background with Raven Sparkle embossing powder.  I also used this for the sentiment banner that I made from some Speckled Egg card stock.  I also took some of the same cardstock and layered it behind the card front and then mounted this over an A2 sized top folding card base.

Hope you’ve enjoyed my fun foiled cards today!   Thanks for stopping in today and I’ll see you again soon!!

Challenges:

  1.  Always Fun – Create a Scene #127 (bottom Halloween card)
  2. Pammies Inky Pinkies – PIP1936 Anything Goes
  3. Simon Says Stamp Monday – Stamp It
  4. Sweet Stampers – Use a Sentiment
  5. Through the Craft Room Door – Anything Goes
  6. Crafty Creations – Anything Goes

It’s Autumn at Cute Card Thursday

Hello friends!  Thank you for joining me!  I hope you’re all having a wonderful week so far!  It’s a tad bit warmer than what I’d like to see it be in September for sure, so I’m hoping it cools down soon!

Today starts a new challenge this week for Cute Card Thursday.  This week we’d like to see your “Autumn” creations.  We look forward to seeing what you create for it!

Here’s what I’ve made using one of our sponsor’s images:

Vicki-CCT599-ADU

This little squirrel is so sweet and I love how the tail on him was designed!  This is called “Bushy Tail” from All Dressed Up.  They’re sponsoring the challenge this week, so please be sure to play along for a chance to win!

I’ve dug out some papers from my Autumn stash of papers and picked some out that I thought would go with this image.  I layered a strip over a 5″ square piece of dark gray cardstock that I embossed with a leaf embossing folder that I was finally able to use!  I sponged a bit of white ink over the raised areas.

I also took some score tape and ran it down the center of the card and added some glitter over it and burnished it in.  The image panel was popped up over the card with foam tape.  I added some twine around each corner of the image panel along with a bow that I’ve placed a pearl in the center.

Vicki-CCT599-ADU-close

Here’s a closer look at the squirrel image that I’ve colored in with Copic markers.  I wanted to keep the squirrel looking a bit softer, so I’ve used some lighter colors.

During the fall is a good time to view all of the squirrels running around our yard trying to burry their nuts.  We seem to find them in silly places sometimes as they save them for later! LOL!

I die cut the image with a scalloped square die and sponged around the edges with some Pumice Stone Distress Ink and layered it over a piece of the dark gray and then layered it again over a piece of kraft cardstock.

Vicki-CCT599-ADU-flat

Thanks so much for stopping by and I’ll see you again soon!

Challenges:

  1.  All Dressed Up Challenge – Anything Goes + ADU image #96
  2.   Creative Fingers – Anything Goes
  3. Allsorts – Autumn
  4. Crafty Friends – Autumn Colors
  5. Creative Moments – Anything Goes with optional Fall Colors
  6. Sunday Stamps – SSC213 “Autumn Whisper” colors

Autumn Embossed Background

Hello friends!

Here’s what I’ve made today:

Vicki-BM-Subbloghop

For my card, I stamped the image and cut it out with a circle die.  I’ve just colored mine up with Copic markers over a piece of White cardstock.

For the background, I’ve used a stencil with EP.

I took the stencil over a piece of white cardstock and covered it with the Embossing Ink and then lifted the stencil to sprinkle the embossing powder over it to heat set.  I cut out that piece and layered it over another piece of white cardstock that I die cut with a stitched scallop die.

Terracotta cardstock was used for my card base and the circle layer behind the image.

Lastly, I’ve added another circle layer with gold glitter paper, popped it up with some foam tape and added some gold thread nested behind it.  I took some gold sequins and filled them with gold glitter too.

Vicki-BM-Subbloghop-close

Here’s a closer look at the image and how I’ve colored it in.  As you know, I like to use my gel pens to add just a bit of sparkle to certain areas of the image and I’ve also added some “dots” around it with gel pens.

Vicki-BM-Subbloghop-flat

Here you can get a better glimpse of the heat embossed background on the left corner of the card.  It’s a very pretty Fall color and appropriately named “Crisp Leaves”.

Thanks so much for stopping by and I’ll see you soon!

Challenges:

  1.  Brown Sugar – Anything Goes
  2. Crafty Catz – Anything Goes
  3. QKR Stampede – #362 Anything Goes
  4. Simply Create Too – Anything Goes
  5. Crafty Calendar – Add Lots of Layers

Always Be Grateful

Hello friends!  Happy Saturday!  Yay!  The weekend is finally here! 🙂

I really love all things Fall including the beautiful colors you start seeing from the leaves on the trees.  Nothing better than a nice walk in the brisk cool air!  This is what has inspired my card today too!

Vicki-BMGrateful-Sept7

I knew I wanted to used this sentiment for a Fall theme.  I think it’s awesome just to have a sentiment be the focal of your card sometimes.  It was heat set over a piece of white cardstock and then sponged around the edges with the yellow Ink.  I wanted a bit more sparkle, so I took my Embossing Ink pad and rubbed it along the edges of the panel and heat embossed some of the Vintage Sparkle EP over it.

And of course I wanted to do some foiling too because it’s just fun especially when you have these cool Vintage Wallpaper-Foilable Washi Sheets to do it on!  I used the Deco Foil Spring Grass transfer sheets over it and then used more of that ink to sponge around the edges and also heat set some more of that Vintage Sparkle over the edges too.

For the background, I took a piece of white cardstock measuring 4″ x5.25″ and covered it with the Embossing Ink pad.  I used some more of that Golden Gourd EP and heat set this entire piece.  Then I took the foiled strips and attached them over top of this panel and layered onto a top folding A2 sized Jurassic card base.  I also layered the embossed sentiment panel over a piece of this same cardstock.

I then added the sentiment panel over the card front with some foam tape and then added some die cut leaves that I sponged with ink and then a couple of gold sequins with some gold glitter in the centers for more sparkle.

Vicki-BMGrateful-Sept7-close

Here’s a closer look at the heat embossed sentiment, background, and the sparkle around the edges where I heat embossed.

Vicki-BMGrateful-Sept7-flat

And here’s another look at the foiled washi strips too with the card laying flat.

I hope that you’ve enjoyed my Fall creation today and were inspired in some way!  Thank you for joining me today as well as the entire week!  See you soon!!

Challenges I’d like to enter this card for:

  1.  Creative with Stamps – Autumn
  2. Unicorn – #47 Autumn
  3. The Male Room – Autumn
  4. Simon Says Stamp Wednesday – Stamp It
  5. Aud Sentiments – Fall/Autumn + Sentiment
  6. Daisy Chain – Autumn is Coming

It’s Anything Goes for Cute Card Thursday!

Hello friends!  Here we are with the first week of September already coming to the end!  Wow!  I think it may be time to start thinking about that “C” word! (Christmas of course!)

Today is a new challenge over at Cute Card Thursday today and we have our first of the month “Anything Goes” challenge this week!  We our sponsored again by the lovely Whimsy Stamps, so be sure to enter for a chance to win a fun prize!

Here’s what I’ve made with our sponsor’s product:

Vicki-CCT598-WSPenMistletoe-Sept5

I’ve used this really sweet digital image from Whimsy Stamps called “Penguins Under the Mistletoe” and of course Crissy’s penguins are so fun to color up!

I have followed a sketch for my design using a challenge (see below) and have pulled out some older papers in my stash that I thought looked really festive and went with the colors I have picked out.

I white heat embossed the sentiment from the Whimsy Stamps Holiday Mini Sentiments on the green colored layer and popped the image panel layered in red cardstock over top with some foam tape.

I’ve taken some silver glitter paper and die cut a few snowflakes from the Whimsy Stamps No-See All Season Tree die set along with cutting a strip for the top of the card too.

Vicki-CCT598-WSPenMistletoe-Sept5-close

Here’s a closer view of the image so you can see how I’ve colored it up.  I’ve used the following Copic colors below:

  • penguin bodies:  C8, C7, C5, C3, C1, R20, R00, Y38, Y35, Y32
  • Santa Hat and Candy Cane:  R39, R37, R35, R32, BG000
  • Mistletoe:  YG67, YG61 (berries are red Nuvo Drops)
  • Hat and Scarf:  BB26, B24, B21, BG000
  • Gift:  G09, G07, Y17, Y15, Y11
  • I used BG000 for snow ground shadows

I went around the edges of the image panel with Tumbled Glass Distress Ink and the ink foam blending tool.  I ten took my quicky glue pen and added some dots for the snow as well as underneath the penguins and sprinkled on some glitter.

Vicki-CCT598-WSPenMistletoe-Sept5-flat

Thanks for stopping in and I’ll see you again tomorrow for something fun!

Challenges I’d like to enter this for:

  1.  The Holly and Ivy Christmas Challenge – Anything Christmas Goes
  2. Sketch Saturday – Pick any sketch from 215-578 (I chose sketch #356)
  3. Merry Little Christmas – Anything Christmas Goes
  4. Love to Craft – September Anything Goes
  5. Pammies Inky Pinkies – PIP1935 Anything Goes
  6. ABC Christmas Challenge – ‘S’ & ‘T’ are for Sparkle and Texture

Fussy Cut Falling Flowers for Fall

Hello friends!  Happy weekend!  I’m actually excited about it being the weekend!  This weekend is a nice long holiday weekend so I can spend time with hubby!  Yay!  However, I won’t be resting on my blog as there are lots of fun things going on since it’s the start of a new month!  So be sure to keep stopping by to see what’s going on!  🙂

Today I took out some flowers and fussy cut them and colored them in happy Fall like colors.

Vicki-BM-InkedFallFlowers

I’ve taken this Flowers stamp set and settled on about 3 different sized floral images to work with along with a couple of leaves.  I’ve colored them with Copic markers and then cut them out with my scissors…I set them aside.

I took a piece of white cardstock along with some masking paper and began working in the flowers for the background with Black Ink.  I made a mask for them as a went along and worked my way up.  After I was done, I took an ink foam blending tool and some soft blue Ink to sponge around the top and side of the panel.  I attached the flowers on with glue and some foam tape.  (I used thicker foam tape for the largest flower.)

For the banner, I heat embossed the sentiment from a Sentiment stamp set  over some Black cardstock with white EP and cut it into a banner and attached it to the card.  Lastly, I attached the sequins and then added some gold glitter to the centers.

I attached the white floral panel over a piece of yellow cardstock and then mounted that over an A2 sized top folding black cardstock base.

Vicki-BM-InkedFallFlowers-close

Here’s closer look at the flowers and how I’ve colored them in.

You can better see the sequins that I’ve used.  I actually had one of them laying on my table while I was assembling this card and thought the color matched up nicely with it.  Otherwise, I would’ve never thought to get those out to use on this particular card!  You never know what could be lurking on your table un-used! LOL!

Vicki-BM-InkedFallFlowers-flat

I hope you’ve enjoyed my card today!  🙂

Enjoy your weekend and I’ll see you tomorrow!!

Challenges I’d like to enter this card for:

  1.  Inkspirational – photo challenge
  2. Addicted to Stamps and More – Anything Goes
  3. The House That Stamps Built – A2819 Anything Goes
  4. Simon Says Stamp Wednesday – Anything Goes
  5. Creative Knockouts – Something To Say

Be Merry for Paper Nest Dolls New Release!

Hello friends!  I hope you’ve had a wonderful weekend!  I was busy making “treats” for my husband to content him for the week!  LOL!  Speaking of treats, Paper Nest Dolls has a brand new mid-month release and it’s full of ADORABLE images!

As a matter of fact, I’ve made a card with one of them here and it’s my very first Christmas card of the year!

Vicki-PNDElfJackinBox-Aug

Isn’t she so sweet?!  This one is called “Elf with Jack-n- Box” and she is available from the store.

I thought this “elf” needed to be colored up in green and so I found some fun papers to compliment her along with a sparkly silver glitter strip of cardstock, and added some seam binding, twine with button and festive embellishments too!

Everything was mounted onto a 5×5 white top folding card base.

Vicki-PNDElfJackinBox-Aug-close

Here’s a closer look at how I’ve colored her in with my Copic markers.  I’ve used some gel pens to color in parts of the “Jack in the Box” as well.  I’ve cut her out with a stitched rectangle die and white heat embossed the sentiment over a strip of red cardstock and I cut out and attached along the side of the image panel and then I used some white ink to sponge around all the edges.  I’ve added some rhinestones on the sentiment strip and then I popped up the image panel with some craft foam before attaching it onto my card.

Vicki-PNDElfJackinBox-Aug-flat

I hope you’ve enjoyed my festive card today!

Thank you so much for stopping in today and I’ll see you soon!

Challenges:

  1. Merry Little Christmas Challenge – August Anything Christmas Goes
  2. Double D – Pearls, Gems or Rhinestones
  3. Creative Knockouts – Tic-Tac-Toe (I went diagonally from top left:  stamp, sentiment, ribbon/twine
  4. QKR Stampede – #360 Anything Goes
  5. Crafty Friends – Add embellishments

Embossing for Cute Card Thursday

Hello friends!  I hope you’re having a great week so far!  Many thanks for the kind thoughts about my post yesterday and the video tutorial.  I think I get a bit nervous thinking I’m going to mess up instructions, but perhaps I’ll get the hang of it! 🙂

Today starts a new challenge over at Cute Card Thursday!  This week it’s all about “embossing“!  Now there are a few different ways to emboss and I happen to love them all!  So you could do heat embossing, “dry” embossing with an embossing folder or even maybe do some embossing paste!  However you emboss it, we look forward to seeing what you come up with!  Here’s the card I made for the challenge:

Vicki-WSPenguinTOT-CCT596

TRICK OR TREATS?!!  Oh my word now how stinkin’ cute are these penguins?!  Don’t they look like they just rang your door bell for Halloween?! LOL!  That penguin image that I’ve used here is from Whimsy Stamps called Penguin Trick or Treaters and oh were they fun to color!

I was inspired to create with them for this embossing challenge, so I took a piece of Bristol Smooth Watercolor Paper and stamped the stars from the Whimsy Stamps Basic Christmas Backgrounds clear stamp set with a pigment black ink.  I covered it with clear embossing powder and heat set them.  Then I went over the stars with some distress inks (Mustard Seed, Carved Pumpkin, Wilted Violet & Blueprint Sketch)  and ink foam blending tool.  I also spritzed some water over it for the water droplet look.

All of the panels including the card base were cut from the Whimsy Stamps Notched Squares die set.  So I took the finished colored panel and attached it over a black die cut panel and then I took a piece of orange cardstock that was die cut and ran an embossing folder over it. I rubbed a white ink pad over it to pop out the details in the embossing and then I mounted it over the die cut black card base.

After coloring the penguins, they were fussy cut out and popped up with foam tape over the colored panel.  I had an older Halloween set of dies that I couldn’t part with from Whimsy Stamps and I cut out some bats from black cardstock and attached those to the starry background.  I also added some drops with some Tonic Studios Silver Glitter Accents for a bit of sparkle.

Vicki-WSPenguinTOT-CCT596-close

Here’s a closer look at these cute little trick-or-treaters and how I’ve colored them up.  I have used the following Copic markers to color them with:

  • Penguin bodies – C8, C3, C1, 0blender, R00, YR27, YR24, Y35, White gel pen
  • Pumpkin – YR27, YR18, YR14, YR21, R20, YG67, YG63, YG61
  • Candy Bag – E33, E31, E30, wrote letters with Copic liner
  • Sheriff Costume – E89, E87, E84, E81, W5, W3, W1, Silver gel pen
  • Pirate Costume – R39, R37, R35, R32
  • Witch Costume – V17, V15, V12, YR07, YR04, Silver gel pen

Vicki-WSPenguinTOT-CCT596-flat

I think these look like a fun group to go trick-or-treating with, don’t you?! 🙂

I hope  you’ve enjoyed my fun Halloween card today and were inspired in some way!

Oceans of Love for Digi Doodle Studios

Hello again my friends!  I’m back to share this card I made using this adorable image from Digi Doodle Studios:

Vicki-DDSNixie-Aug20

Isn’t she adorable with her little underwater crab friend?!  This is the Nixie Mermaid digital stamp from the Digi Doodles Studios “Under the Sea” collection.  I thought she was so cute and I actually had her colored up before I ended up hurting myself and had to leave.  I finished out the card when I got better.

I have also used some fun digital papers and a sentiment that work well with this particular image.  The pretty pink patterned papers you see in the background come from the Digi Doodle Studios Summer Breeze Card Making Paper collection.  The sentiment came from the Digi Doodle Studios Mermaid Sentiments set.  I printed out the sentiment and cut it out with a ticket die, sponged around the edges with the turquoise ink color and layered it over the same turquoise colored cardstock I’ve used throughout my layout.

The layout idea came from a sketch challenge that I’m entering for below this post.  I have several layer panels including the fun turquoise sparkly paper that I’ve used that was cut with a wave border die and then sponged with some white ink.  I added some pearls to each corner of the image panel, wrapped some white organdy ribbon around the card front base, tied a bow and added a silver bow where I have attached some silver string and a starfish charm to it.  The entire card measures 5.5″ square.

Vicki-DDSNixie-Aug20-close

Here’s a closer view of the coloring that I’ve done on this mermaid image.  Mainly colored with Copic markers, but I’ve used a gel pen to color the sprigs next to the flower in her hair and the bracelets around her wrists.  I took a glitter brush pen and covered her entire fish body and the bubbles in the water with.  (Of course it looks so shimmery in person!)  I then took some glossy accents and covered the little crabs eyeballs with and then some liquid pearls to dab a dot over the pearl inside the oyster.  This mermaid image panel was popped up with foam tape over the card front.

Vicki-DDSNixie-Aug20-flat

I hope you’ve enjoyed my underwater mermaid card today!

Thanks so much for stopping in today!  I’ll be back tomorrow with something fun!

Challenges I’d like to enter this card for:

  1.  Cheerful Sketches – August Challenge
  2. The House That Stamps Built – A1419 Tic-Tac-Toe (I used first row down)
  3. Pammie’s Inky Pinkies – PIP1933 Anything Goes