Purple Day Blog Hop For Epilepsy Awareness

Hello my friends!  Today starts the annual “Purple Day” blog hop and I have joined with my friend Fiki to help bring awareness about epilepsy.

Please take a moment and read important information about this special day:

Purple Day is a global grassroots event formed with the intention to increase worldwide awareness of epilepsy, and to dispel common myths and fears of this neurological disorder. Further intentions of this movement are to reduce the social stigmas commonly endured by many individuals afflicted with the condition; to provide assurance and advocacy to those living with epilepsy that they are not alone in their ongoing endurance; and to initiate individuals living with the condition to take action in their communities to achieve these aims.

The day occurs annually on March 26.  To read more about epilepsy or how you can help in the U.S., check out the Epilepsy Foundation’s website.

My card inspiration:

Vicki-DDS-purplebloghop

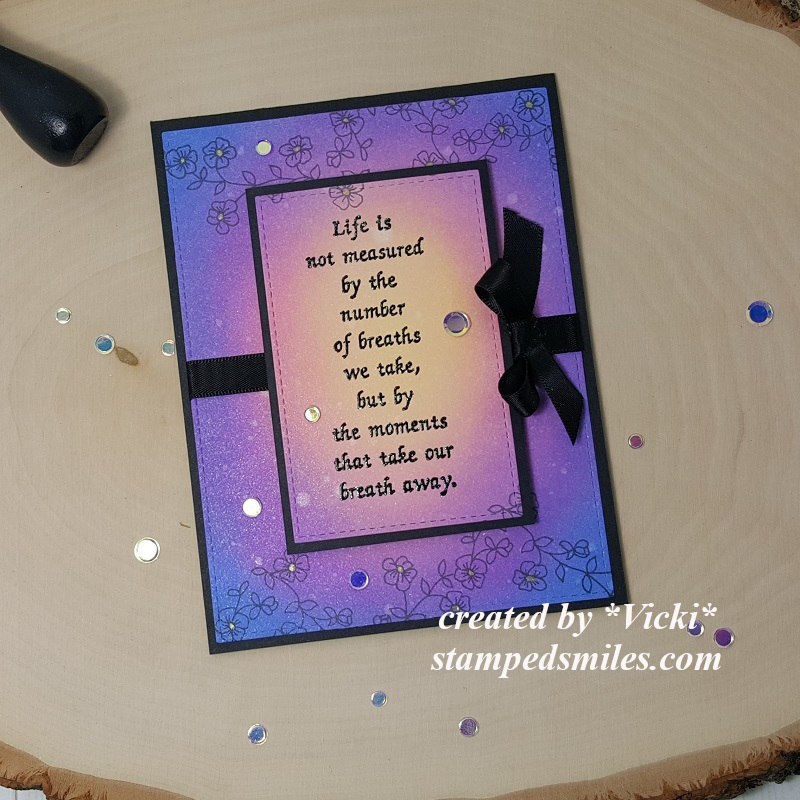
Isn’t she just the sweetest little girl with her big heart?!  So delighted, of course, to have been provided this darling image from Digi Doodle Studios which is one of the sponsors for our blog hop today!  This image is called Sweet Carlina and I’ve got her colored up in purples and pinks.  She has a little white heart tucked in her jacket pocket to go with the white hearts on my design.

I found some pretty purplish decorative papers from a recent card kit I had and then I just followed along with a sketch to complete my design. (See challenges below.)  After coloring her out, I’ve cut her out with a MFT Wonky Stitch rectangle die and then layered with a purple cardstock layer cut out with a MFT Scallop Stitch rectangle die.  I popped it up with craft foam over strips of lace, twine and accents I’ve created with the papers.  I’ve used a LF scallop border die to cut accents to go with my heart paper strips.  Extra hearts left over were used in the top corner.  I also added a purple flower button with twine to finish it off.

Vicki-DDSpurplebloghop-close

Here’s a closer view of the coloring I’ve done on her with my Copic markers.  I’ve used white gel pen to dot her checks and color the heart in her pocket.  You can barely see the shimmer that I’ve done over the heart she’s holding with a glitter brush pen.

You’ll also notice that I’ve printed out this image twice, fussy cut out just the portion of the heart she’s holding along with her hands and popped it out over the colored image to give it some depth.

Vicki-DDSpurplebloghop-flat

I hope you’ve enjoyed my inspiration for the blog hop!  I sure enjoyed creating it and helping to give support to my friend along with creating awareness for epilepsy!

Challenges:

  1. Time OutPurple (helping to support epilepsy awareness with us!)
  2.  Sketch Saturday – sketch #602
  3. Pammie’s Inky Pinkies – PIP2012 Anything Goes
  4. Arty Divas – #18 Anything Goes
  5. Through the Craft Room Door – Anything Goes
  6. Simon Says Stamp Wednesday – Anything Goes
  7. The House That Stamps Built – M2520

Birthday Card For a Painter!

Hello friends!  Hoping amid this strange time you’re finding peace and sanity among your crafty time and online community of friendly crafters as well to help uplift your spirits and keep you thinking happy thoughts!  If you’re looking for smiles, please know that this is the main purpose of why I do what I do here!  Helping to spread smiles is something that is near to my heart along with crafting.  If you’re enjoying a smile with me, that’s all I care about!  Thanks for hanging out!

Today, I have a special birthday card that I’ve made for my mom who’s a crafty tole painter and I wanted it to be a bright and cheerful design since I couldn’t celebrate with her face to face due to the current circumstances:

Vicki-SSSbirthday

So I’ve been having fun pulling out my past card kits as they’ve not been used as often as I would like to use them.  For my card here, I’ve used the Simon Says Stamp painter’s palette die that came from a past SSS card kit along with the stamp set called Sweet Birthday.  I have been hoarding some special paper made from real wood to die cut the main palette die from and then I’ve cut it out several times using some different colored specialty mirror colored cardstock from the kit for the different colors of paint.

I popped up the entire paint palette with some foam tape over a piece of watercolor paper that I took a brush and some watercolor to make the strokes for a fun and colorful background.  I then cut it out using my Lawn Fawn Cross-Stitch rectangle die which I mounted over a piece of black cardstock and mounted over a white A2 sized top folding card base.

Also for the background, I decided I wanted to include some sort of paint brush, so I dug out an old stamp I had and paper pieced some of that red mirror cardstock for the paint on the end of the brush.  (Red is my mom’s favorite color.)  I used Copics to finish coloring the brush and a glitter gel pen for an accent on the brush.  I then stamped the sentiment in black ink over the background and added some red sequins from the kit.

Vicki-SSSbirthday-close

Here’s a closer view of the palette and the real wood texture of the paper I had die cut it with.  You can see the shimmery colors of the cardstock I’ve used from the kit.  The only color that wasn’t included in the kit was the yellow, so I dug through my stash and found a piece of gold that I used for the yellow color…you can see it has a bit of texture on it, but I was fine with it.

I thought that the background was so fun and simple to create.

Vicki-SSSbirthday-flat

I hope you’ve enjoyed my colorful birthday card today!  Do you know someone that would love to receive a happy and colorful card?  I encourage you to get out some pretty colors and make a background and send it out to someone!  Not only will they enjoy receiving a handmade smile from you, but you will be smiling while having fun too!

Hope you’ve enjoyed my card today and maybe we’ll be seeing some rainbows in our future very soon friends! 🙂   I’ll be seeing you soon!

Challenges:

  1.  Shopping Our Stash – Happy Birthday
  2. Creative Knockouts – #342 Bingo (second line across, I’ve used paper piecing, image and die-cuts/punches)
  3. Penny’s Paper-Crafty – #467 Anything Goes
  4. Creative Fingers – #182 Anything Goes
  5. QKR Stampede – #390 Anything Goes
  6. Creative Moments – #187 Anything Goes

Showered Love Engagement

Hello friends!  I hope that you and your loved ones are healthy.  I also hope that you are having some inspirational crafty fun during this time.  Crafting is a great way to create and send some smiles to someone as well!  Let’s keep those smiles going!! 

Today I have another card that I made for the same son that had his birthday from my last post.  He was also recently engaged and I’m so happy for them both!  Here’s the card that I sent to them:

Vicki-LOTVshowerlove

I had seen this image came out from Lilly of the Valley last month and just fell in love with it!  I knew it would be perfect to use for this occasion!  It’s called Showered With Love and I’ve printed it out, colored with Copic markers and then cut it out using the Whimsy Stamps Zig Zag Stitched Rectangles Die set and then layered it over some light blue card stock.

I popped up this image panel with craft foam over a piece of white cardstock that was die cut from a Lawn Fawn Fancy Scalloped Rectangle die and then layered over a piece of dark brown card stock.  I then attached these layers over another piece of light blue cardstock with the same Whimsy Stamps Zig Zag Stitched Rectangles Die set.

Before attaching the image layer onto the light blue panel, I took a sentiment from the Simon Says Stamp Tiny Words and white heat embossed it over a dark brown strip.  I also added some ribbon and lace around the light blue card front panel before attaching the popped up image panel.  Lastly, I’ve added some Nuvo rhinestone water droplets.

Vicki-LOTVshowerlove-close

Here’s a closer look at the coloring I’ve done on this couple.  I’ve tried to keep the hair color likeness to the real life individuals.   Hard to see in the photo of course, but I’ve covered the hearts with a glitter pen for shimmer and the trim on the umbrella as well as the center of the heart on the umbrella and part of the handle were colored in with a clear glitter pen which also gives a bit more shimmer to it.

Vicki-LOTVshowerlove-flat

For the inside of the card, I’ve added a computer generated sentiment that said “Congratulations!  Wishing you a love together that can outlast any type of weather.” and also created a pocket that held a gift card inside.

I hope you’ve enjoyed my card today and have been inspired in some way!  Thanks so much for dropping in today!  I appreciate you being here with me!  See you soon!

Challenges:

  1.  QKR Stampede – #389 Anything Goes
  2. A Bit More Time to Craft Anything Goes
  3. The Creative Crafters – #26 Anything Goes
  4. Createful Heart Design Challenge Blog – #18 Anything Goes
  5. Creatalicious – #183 Anything Goes with optional:  Layer it up
  6. Lil’ Patch of Crafty Friends Anything Goes
  7. Pammie’s Inky Pinkies – PIP2011 Anything Goes
  8. Arty Divas – #17 Anything Goes

Hot Dog! It’s Birthday Time!

Hello friends!  As you know, I’ve been TRYING to get my MOJO flowing and I REALLY appreciate the feedback that I’ve gotten from you and others about things I can try including non-craft related things!  (Honestly, right now in this world with what is going on, it is hard to concentrate along with worrying about my own family in different ways…so that doesn’t help either!)  But I’ve been trying to find things to keep my mind focused and try new things that are interesting to me…so I will just keep going along and see what happens!!  I would like to continue with as many “stamped smiles” as I possibly can right now….we all need that at this time!

Today’s card was made for my son’s birthday that was this past Saturday:

Vicki-SSSSoPunFriends

I pulled out an older Simon Says Stamp card kit and used the So Pun Friends and the I Chews You stamp sets along with the coordinating dies.  I’ve used the cardstock and cute Doodlebug So Much Pun Papers that came with the card kit as well.  The tag was cut using the My Favorite Things Stitched Tag dies.  I created the hole at the top of the tag with circle punches and the twine is from left over packaging.

I cut the tag shape out again with more of the papers from the kit and then popped up the image tag with foam tape and added some white enamel dots.

On the inside I stamped a birthday greeting and made a pocket to hold a gift card for him.  We usually take him out to dinner for his birthday, but since he’s moved away I had to send him a gift card instead.  Bummer…

Vicki-SSSSoPunFriends-close

Here’s a closer look at the cute smile face images that I colored up with my Copic markers.  I cut out the food images with the So Pun Friends coordinating dies.  For the sentiment, I stamped the speech bubble from the I Chews You stamp set over a piece of the Doodlebug papers and then added the sentiment from the So Pun Friends stamp set in the center of the speech bubble.  I then die cut it out with the I Chews You coordinating dies.  

I used some blue distress ink to blend some color over the center of the white area on the tag and then popped up the speech bubble with some foam tape over that area.  The hotdog at the bottom was also popped up with foam tape as well.

Vicki-SSSSoPunFriends-flat

I actually had some fun pulling out this older card kit to play with and who could resist a hotdog smiling at you?!  LOL!

Thanks so much for stopping in and for your continued support!  It’s very much appreciated and I hope that I helped bring a smile or inspiration to you today! 

I actually have a couple more birthdays coming up that I need to make cards for, so I’m sure you’ll be seeing more of those in the near future too!

Challenges:

  1.  Not Just Cards – March Anything Goes
  2. Little Red Wagon – Etc, etc, etc (3 enamel dots and 3 food images with smiles)
  3. Cute Card Thursday – Celebrate!
  4. TIME OUT – Birthday with optional twist:  die cutting or fussy cutting
  5. Seize the Birthday – #185 Touch of Green or Anything Goes

Peyton is Painting Eggs for Easter!

Hello there friends!  Where have I been?  Well, I went off looking for my “MOJO” and he’s doing some disappearing acts on me for sure!  I’m having such a hard time getting motivated and feel that my creative juices have completely dried out!  Do you ever feel this way too?  What are some things you have done to help you?  I will keep trying for now!  LOL!  So sorry for being MIA lately!

Today I must share with you a card I came up with using this really adorable image from Digi Doodle Studios just in time for Easter!

Vicki-DDSPayton-March13

Isn’t he adorable?!  This digital image is called Peyton’s Painted Eggs from DDS and he’s busy at work painting up eggs to get them done in time for Easter!  I’d say he looks like myself getting messy and into the job!  LOL!

After coloring him up, I used a MFT die to cut him out and create the layered frame around him with some purple glitterstock along with some black and white cardstock.  I white heat embossed a sentiment (from Simon Says Stamp) and cut it out with a banner die to go over the image panel.

I took some white ribbon and wrapped it around the corners and attached a bow on the top corner with a flower embellishment in the center…found in my stash.

Also “found in my stash” was the fence and grass dies that I used to attach to the bottom of the card front panel.  Some of the “grass” was placed behind the image panel and some in front of it.  I also attached in the center a strip of the purple glitterstock Lawn Fawn Spring Plaid paper for the front of the card and this was layered over another piece of black cardstock which was mounted over a top folding 5″ square white card base.

Vicki-DDSPayton-March13-close

Here you can see how I’ve got him all colored up with Copic markers.  He was actually really fun to color up.  My first notion was to make him a white bunny, but I thought he would really stand out if he was brown in color instead.  I added some blades of grass around him with my markers.

I left the egg he was in the process of painting white along with the plain one on the ground…after all, he IS in the process of working on them! LOL!

I’ve only used the white gel pen for his cheeks and  I’ve used a clear metallic gel pen on the paint brush.  The “shinny” areas you see on the “fresh paint” colors are the places that I’ve covered with glossy accents.  The light is naturally highlighting them!

Vicki-DDSPayton-March13-flat

I hope that you’ve enjoyed my Easter bunny card today and it’s helped get you in the mood thinking warm Spring thoughts!  I know I’m really looking forward to warmer weather and being outdoors for sure!  Easter is just around the corner now!

Challenges:

  1.  Crafty Animals – Anything Goes + animal
  2. A Bit More Time to Craft – Anything Goes
  3. Crafts Galore Encore – #73 Anything Goes
  4. Love to Craft – LTCCB44 Anything Goes
  5. Lil Patch of Crafty Friends – #127 Anything Goes
  6. Creative with Stamps – #48 Egg
  7. Pammie’s Inky Pinkies – PIP2010 Anything Goes
  8. Crafty Creations – #407 Anything Goes
  9. Creative Fingers – #181 Anything Goes
  10. Sweet Stampers – #42 Easter or Spring
  11. The Sisterhood of Crafters – Easter

Owl-rageous Thanks

Hello friends!  We’re finally on the last Friday of February!  Yay!

Although we’ve had snow in our forecast recently, I’m feeling Spring will be in the air soon and I really look forward to it along with all of the pretty flowers and green grass!  So today, I’m sharing a card I’ve made using this adorable Pairables set from Digi Doodle Studios:

Vicki-Owlrageous2

Isn’t this little owl the cutest?!  I love how he has his little wings out for a hug!  I’ve used several of the images from the “Owl-rageous” Pairables set to create the scene on my card.   I have used Word.doc on my computer to arrange and size the different images where I wanted them for my scene and printed it out to color.  I’ve also printed out the flower image from the set along with the sentiment separately to cut out for my design.

As you can see, I’ve taken the flower image and sized it differently and arranged it around the stump for the scene.  I’ve also used it to cut it out separately to attach to the twine next to the sentiment as well as the twine bow at the bottom.

I’ve printed out the sentiment, cut it out and then cut the fish tails on each end and ink blended with brown ink around it.  I’ve matted it with the same brown cardstock that I’ve layered the image panel on and it’s also the base of my top folding A2 sized card.

I’ve pulled out some textured woodgrain cardstock as well as the Spring Plaid papers from my Lawn Fawn stash.  I thought the woodgrain and Spring-like colors worked well for this cute owl.  I’ve finished it off with some clear sequins.

Vicki-Owlrageous2-close

Here’s a closer look at the coloring I’ve done on this cutie!  I’ve used the W tones to color him in and then the E20s to color the stump.  I also end up going for the G24, G21 and G20 for coloring my grass.  I love the bright Spring green it gives I think.  I highlighted his cheeks and eyes with a white gel pen.

You can also see a subtle cloud line behind him.  I’ve used the MFT Cloud Stencil with my ink blending tool and Tumbled Glass distress ink to create the background.

You can see that I’ve wrapped some twine around the center of the card where the two different papers meet as well as wrapped around each corner of the image panel.  This is where I decided to add the cut out flowers on each end.

Vicki-Owlrageous2-flat

I feel like this owl with my arms open and ready to take in all of Spring when it comes and thank Mother Nature for bringing it around! LOL!  How about you?

Thanks so much for stopping in today my friends!  I’ll be seeing you soon! 🙂

Challenges:

  1.  Creative Fingers – #180 Anything Goes
  2. Through the Craft Room Door – Anything Goes
  3. Pammie’s Inky Pinkies – PIP2008 Anything Goes
  4. Arty Divas – #16 Anything Goes
  5. Simon Says Stamp Wednesday – Anything Goes
  6. Cute Card Thursday – Spring Fever

Seally Me!

Hello friends!  I hope that you’ve had a great weekend!  The temps actually got up high enough that I was able to take a nice walk Sunday!  Then of course since it’s February, Mother Nature says we will be getting several inches of snow today!  For some reason this month seems really long, so I’m ready to move along to March! LOL!

Since we are still getting snow, I thought it would be a great time to pull out this adorable “Seally for You” Pairables digi set from Digi Doodle Studios and make some cards:

Vicki-DDSSeallyforYou (2)

For my first card, I’ve arranged the images from the set and printed it out.  You may recognize the balloon floating in the air which is another digital image that came from the DDS Little Ones Pairables set.  (So don’t forget that you can always mix sets together to come up with some really fun scenes!)

To finish out the scene, I’ve used some masking paper and ripped up pieces of scrap paper to create the “hills” in the background along with the “water” that the seal is taking a ride on over a piece of ice.  I used some blender brushes to blend the colors for the background.

I’ve used some liquid glue around the edges of this panel and covered it with some glitter.  I printed out the sentiment from the set separately over a piece of colored cardstock and cut it out for the banner.

Since I was trying to keep this a “wintry” style card, I kept the colors more blue and purple.  I found some fun papers in my stash that worked for a fun birthday theme and then I used an embossing folder and embossed that strip of Prism paper in the center that I’ve placed the ribbon over and added the bow.  Lastly, I’ve added the heart sequins and covered the balloon and ice images with a glitter brush pen.

Vicki-DDSSeallyforYou-close (2)

Here’s a closer look at the coloring on this cute little seal as well as all of the shimmer and sparkle everywhere!  I’ve used a white gel pen for his cheeks, eyes and for lines on the water.

“Seally Me”….I’m always forgetting a birthday here and there!  LOL!  Which I guess is why I’ve decided to create another card:

Vicki-DDSSeallyBday

For this card, I’ve kept it pretty much the same in a more simplified way with less layers and details.

As you can see, I’ve printed out the scene panel with just the seal on the ice platform and then I’ve used blender brushes here again to just give the “water” a bit of color that fades out towards the center of the panel.  I printed out the “icebergs” and sentiment separately and then cut them out to place over the design.

I’ve also used a MFT balloon die to cut out with black and turquoise glitter paper and popped that up along with the “icebergs” over the panel.  Lastly I’ve added some sequins.

Vicki-DDSSeallyBday-close

Here’s a closer view of the coloring on this seal.  I’ve kept him the same colors, but for this one, it’s a bit softer in tones.  Again, I’ve used a white gel pen for this cheeks, eyes and water as well as a glitter brush pen over the icebergs and ice platform.

I honestly am not sure which one I like better than the other, but that seal is cute regardless and that face might help me “get away” with being late for a birthday when I send it along! LOL!

Really hope that you’ve enjoyed my cards or have been inspired in some way!  Still struggling with no MOJO, but trying to work through it and hopefully it’ll miss me and want to come back soon!  Until then, I will keep trying to create through it.

Thanks so much for stopping in and I’ll see you soon!

Challenges I’d like to enter:

  1.  Di’s Digi Challenge – Use a Digi Image
  2. Papercraft– #55 Winter Fun
  3. Createful Heart Design – #17 Anything Goes
  4. Jan’s Digi Stamps– #8 Anything Goes
  5. The House That Stamps Built – F1920 Winter Color Palette
  6. Aud Sentiments – #245 Anything Goes + Sentiment
  7. Penny’s Paper-Crafty – #465 Anything Goes

Full Bloom Rainbow

Hello friends!  I hope you’re having a great week so far!  I’m wondering if this cold weather has me feeling this way lately, but I’m seriously lacking in creativity and just have misplaced my MOJO lately!  If you’ve found it, please let me know! LOL!

In the meantime, I seriously needed to create a rainbow in my life and found that a young lady certainly was in need of a smile sent her way as well so I thought I would do just that:

Vicki-PinkMainCK-MMTPT604

I had received my Pink and Main Crafty Courtyard Card Kit and really loved the happy colors and pretty blooms in the stamp set and so I started out using the stencil with rainbow order inks for the background!

I’ve also used the same color of Distress Oxide inks to do the stamping on the tag and envelope as well.  I absolutely love the tag die set was included with the kit which I’ve used for the main focus of my card.  I always want to add just a bit of black to my rainbow colors, so I decided to white heat emboss the sentiment from the stamp set and then used one of the tag die elements to cut it out with and pop up over the bottom of the tag.

I’ve also used the ribbon and enamel dots included in the kit to finish it off.  (The floral sequins used for the photo prop were also included in the kit.  LOL!)

Vicki-PinkMainCK-MMTPT604-close

Here’s a closer look at the details in the tag.  For the black border around the tag, I just cut a piece down to size and then cut off the edges with my scissors to match up with the tag.  The scallop tag behind it was cut with the paper and die from the kit.  I used some circle punches to create the black re-enforcer and then I tied the ribbon together with some black twine from my own stash and topped the center with an enamel dot from the kit.

Vicki-PinkMainCK-MMTPT604-flat

This card has now been sent along to a young lady that is currently in the hospital dealing with cancer treatments and really needs some cheerful happy colors, so I hope that this will help fill her day with some cheer.

Hoping that this card has also sent some feelings of cheer today your way as well!  Thanks so much for stopping in today friends and I’ll see you soon! 🙂

Challenges:

  1.  Allsorts – Dies and/or Punches
  2. A Bit More Time to Craft – Anything Goes
  3. Pammie’s Inky Pinkies – PIP2007 Anything Goes
  4. Through the Craft Room Door– Anything Goes
  5. Fab ‘N’ Funky – For a Child (sent to a 15 yr. old in hospital)
  6. Simon Says Stamp Wednesday – Add a Sentiment
  7. Creative Knockouts – Flower Power

Guest Rock Star for Repeat Impressions POTW!

Hello friends!  I’m hoping that you’ve had a wonderful weekend!

I’m very excited to be sharing my projects today as a guest “Rock Star” for Repeat Impressions!  I’ve been asked to share a special post for their “Project of the Week” segment on their blog today!  Yay!

If you’ve been following me for a while, then you know how much I love to ink blend!  It’s something that is fun to do, and I’m always amazed at the finished colors!  I want you to get the same satisfaction when you do it too, so I thought that would take a fun photo tutorial for my guest POTW post!

Vicki-RIGDT-inkblendedscene

There is just something about this scene that makes me feel happy and relaxed!  So of course, that sentiment goes just perfectly with it!  This sentiment/saying is one of my all-time favorites and I was thrilled to use it for this design!

I’ve used the “Canoeing” (2905-G) along with the “Mountain Vista” (629-I) From Repeat Impressions for the image stamping over the ink blended scene.

Vicki-RIGDT-inkblendedscene-close

Here’s a closer look at the details in this card with how I went about creating it.  You can see the different blended colors in both the water and sky.  The setting sun was colored in with a glitter gel pen which created some shimmer to it.  The white gel pen highlighted details in the water.

Vicki-RIGDT-inkblendedscene-flat

Really had fun creating this scene with these stamps which were just perfect for an ink blended background!  I thought this would make for a wonderful retirement card!   If you want to create one of these types of cards yourself, please be sure to check out the step-by-step tutorial over at the Repeat Impressions Blog to see how I went about doing this!

I loved that sentiment stamp so much, that I just couldn’t help but create one more card using it again with another ink blended design:

Vicki-RIGDT-inkblendedlife

Really LOVE how this one turned out!

What’s fun about ink blending is all of the different color combinations you can play with and blend together for different looks!  This time, I’ve used different colors and started my ink blending in the center.  I’ve also used a die to cut out the center of the ink blended panel, heat emboss the sentiment over it, layer with a piece of black cardstock behind it, and pop it up over the rest of the ink blended background.  So even though it was cut out in the center, it’s a continuous ink blended design!

Vicki-RIGDT-inkblendedlife-close

On this ink blended panel, I’ve used some Shimmer Spray over it which gives it a really pretty shimmer with a bit of a “water droplet” effect as the Distress Oxide Inks react to water/liquids.  I think this turned out really cool as it gives it sort of a “Bokeh Effect”.

Before I cut out the center of the ink blended panel, I’ve used the “Flower Power Frame” (10202-Q) to stamp in black ink at the top and bottom of the panel. You can see that part of the stamped image was die cut on the sentiment panel.  I colored the centers of the flowers with a yellow glitter gel pen for added detail.

Vicki-RIGDT-inkblendedlife-flat

To add to the look, I thought it needed some sparkling clear sequins to finish it off!

I hope you’ve enjoyed my creations today and please be sure to stop on over at the Repeat Impressions Blog to check out the full tutorial on ink blending!

Thank you so much to Wendy and the fellow Rock Star friends for having me along as a guest!  Really enjoyed creating these projects with these fabulous stamps!!

Also thank YOU for stopping in today!  I appreciate your support so much!  I’ll be seeing you again soon my friends!

Challenges I’d like to enter:

  1.  Addicted to Stamps &More – Anything Goes
  2. Cute Card Thursday – CAS
  3. Cardz 4 Galz– Black and Bling (second card only)
  4. Daring Cardmakers – Someone or Something You Love (ink blending, words/verse)
  5. Creatalicious – #181 Anything Goes with optional embossing
  6. The Creative Crafters – #25 Anything Goes

It’s Going to be “Owl-right!”

Hello friends and welcome to the weekend!  I hope you have some great plans ahead of you and have some fun!

Today I’d like to share this card I’ve made with a darling feathered cutie and the punnyness that goes along with him….

Vicki-DDSOwlright

Isn’t this little guy the cutest owl you’ve seen?  This image was actually created on my computer with the “Owl-rageous” Pairables digital stamp set from Digi Doodle Studios.  The owl, the branch and the sentiment are all separate images, but I’ve pieced them together on my computer and printed it out to create this scene!

I’ve actually printed out an “extra” owl and flower to color in and pop up over the image for added dimension.  I used the “out-of-the-box” technique to circle die cut out the image.  The branch is sticking outside the circle.

I’ve used a woodgrain embossing folder and rubbed some white ink over it and also added a strip of yellow paper from my stash wrapped in twine along the edge.

I die cut a flower and rubbed some pink ink over it, attached a button and twine bow over it to pop up over the owl panel.  Then added some sequins filled with glitter glue in the centers.

Vicki-DDSOwlright-close

Here’s a closer look at the coloring I’ve done on the images.  I’ve used a purple glitter gel pen for the tiny hearts on the branch and then a yellow glitter gel pen for the centers of the flowers.  I’ve used some yellow ink to sponge around the circle panel.

Vicki-DDSOwlright-flat

This card actually has me longing for Spring to come with those flowers!  He’s letting us know that everything is OWLright!! ha ha ha!!  Hope you’ve enjoyed my creation today and I really appreciate you stopping in!  See you soon!

ETA:  Hubby said I should include the song….

Challenges to enter:

  1. Cheerful Sketches – Feb sketch
  2. Love to Craft – LTCCB43 Anything Goes
  3. Crafts Galore Encore – #72 Anything Goes
  4. Pammie’s Inky Pinkies – PIP2006 Anything Goes
  5. Not Just Cards – Feb Anything Goes
  6. Arty Divas Anything Goes
  7. Through the Craft Room Door – Anything Goes
  8. Alphabet Challenge – ‘W’ is for “Anything You Wish”