Hello friends! I wanted to say thank you for adding your comments from my last post about the card kits! LOL! I see that I’m not alone! You’ve all actually really inspired me to get them pulled out and use them despite how old/new they are! Loved the idea about making several cards and sending them along to charities too! Always love reading your feedback! 🙂
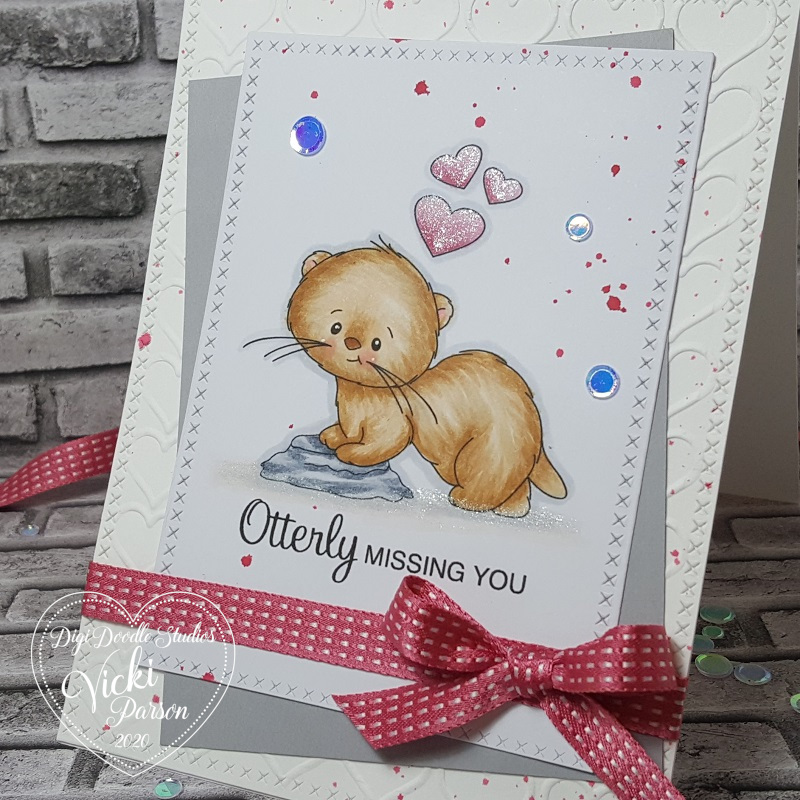
Today I wanted to share with you another card I made with the oh so adorable Digi Doodle Studios “Otterly Love” Pairables set that you may remember my card from last week that I’ve posted HERE. I’ve used it again for my card below:
His sweet little face gets me every time! 🙂 As in the previous card I made with this set, I’ve arranged the digital images from the set how I wanted them to look on my design and then just printed it out.
After coloring up my image panel, I die cut it out with a cross-stitch rectangle die and set it aside. I cut a white A2 sized top folding card base and then layered a white heart embossed (folder from Stampin’ Up!) card front panel that was also cut with the cross-stich rectangle die. I used some watered down ink (Strawberry Slush from Stampin’ Up!) and a fan brush to splatter some color over it. I also CAREFULLY took the image panel and splattered some more over that panel as well.
I then arranged the rectangle layers including the gray colored cardstock (Smokey Slate from Stampin’ Up!) panel and attached them to the embossed card front panel. I tied some of that triple stitched ribbon (from Stampin’ Up!) around all of these layers and added a bow with it before attaching it all to the card base. Lastly, I’ve added some clear sequins.
Here’s a closer view of the Copic coloring I’ve done on this cute critter posing on his little rock. (I thought he needed a bit of ‘water’ around him.)
You can see the hearts and along the bottom of his feet where I’ve added some shimmer with a clear glitter brush pen. I’ve also used a white gel pen for his cheeks and eyes.
It’s a super simple card, but oh so much fun to color him up! I thought it was a nice card to send for a ‘miss you’ to someone you love!
Thanks so much for joining me here today friends and I’ll be seeing you soon!
Hello friends! I hope you’ve had a lovely weekend!
After starting this year, I tend to “look back” on my stash items and take a good “inventory” of what I have and the things that hardly EVER get used, if have gotten used at all! And of course I try to tell myself…”no more!” LOL! I honestly just let all of my card kits just sit and don’t dive into them and use them! I get so excited about them when they come out, oooh and aaahhh over every single item in the kit and then it just sits…then before you know it, another kit comes out! It’s an endless cycle that I’d like to stop! Does anybody else have this problem?!
**This year, I hope to not only just open the boxes with content, but also make some creations with them! If I’m already suscribed and getting boxes, then why am I not using them?! You saw in a previous post the Snowflake set of creations, so I plan on doing more of that this year…so stay tuned! 🙂
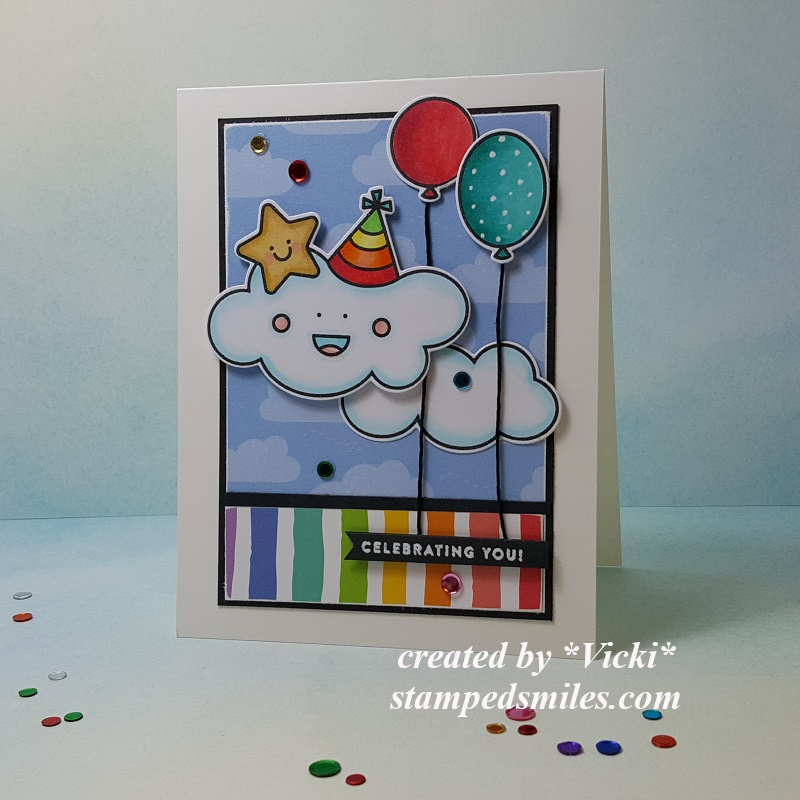
I actually have made a card from a fun special edition “Sweet Birthday” card kit from Simon Says Stamp last year that I was super excited about, but only dug in enough of it to make this one card: (Hanging head…..)
At least I made ONE with it, right?! LOL! I just thought this was such a happy, colorful and fun card kit that it was just perfect to send a birthday smile for someone that really needed some “happy” sent their way. My schedule was crazy and then I forgot to get it posted! LOL!
The stamp set used in creating this one from the SSS card kit was called Sweet Birthday and I was excited to be able to get the coordinating dies to go with it too. It’s very simple with the cardstock and pattern papers from the kit for the layout design. I used an additional piece of black cardstock to white heat emboss the sentiment from the stamp set, cut it out with my scissors and pop it up along with the party hat cloud and balloons with the black “strings” underneath them.
I used a white gel pen to add “dots” to the blue balloon and then added some sequins from the card kit over the design.
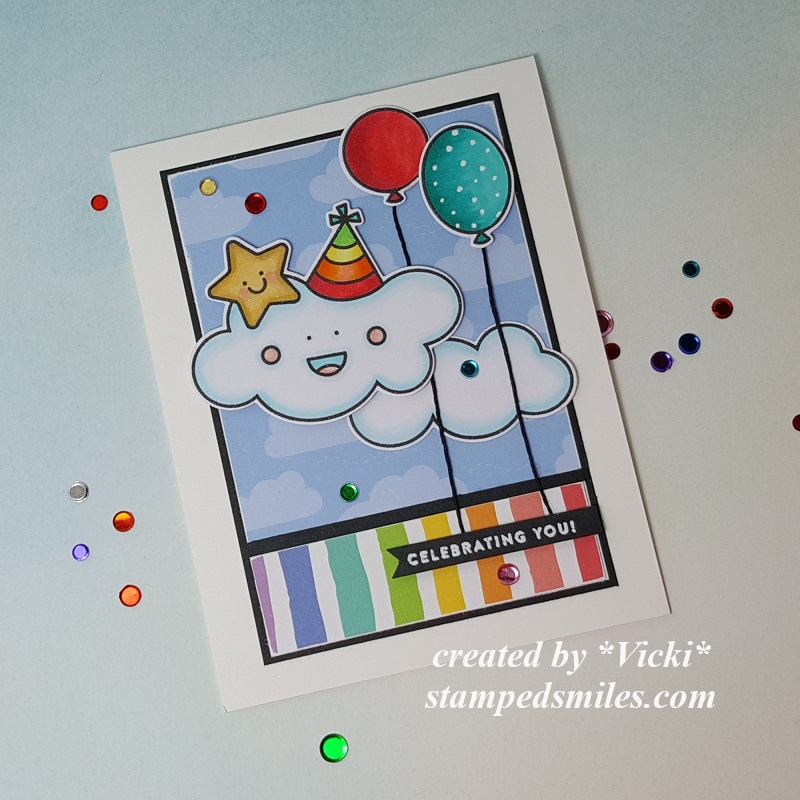
Here’s a closer look at the images and how I’ve colored them up with my Copic markers.
At this point I don’t remember if I’ve added a glitter brush pen over anything, but more than likely I probably did because I like using it! LOL!
I’ve also used a sanding block around the edges of the pattern paper as I like to distress my papers sometimes too.
I didn’t know who this person was that received this card, but a request came from a crafty friend who asked to send smiles to someone for a loved one’s birthday and of course I was happy to get creating and hope that this helped in some way to lift spirits.
And I hope that this has helped put a smile on your face too!
Thanks so much for popping over here today and I truly enjoy seeing your comments! Please let me know what you think of YOUR stash? Is it “out of control” like mine? LOL! Would you like to see me making posts using more of my card kits? Share your thoughts below! 🙂
Hello friends! Happy Friday! Do have any plans for the weekend? I have plans to probably stay in and color since there’s snow predicted for us! Brr!
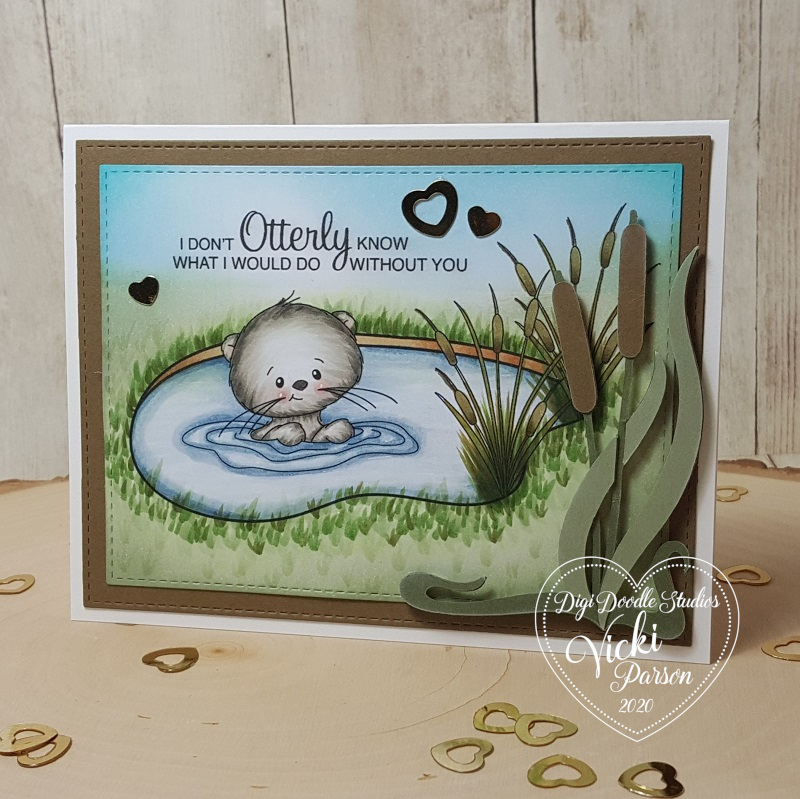
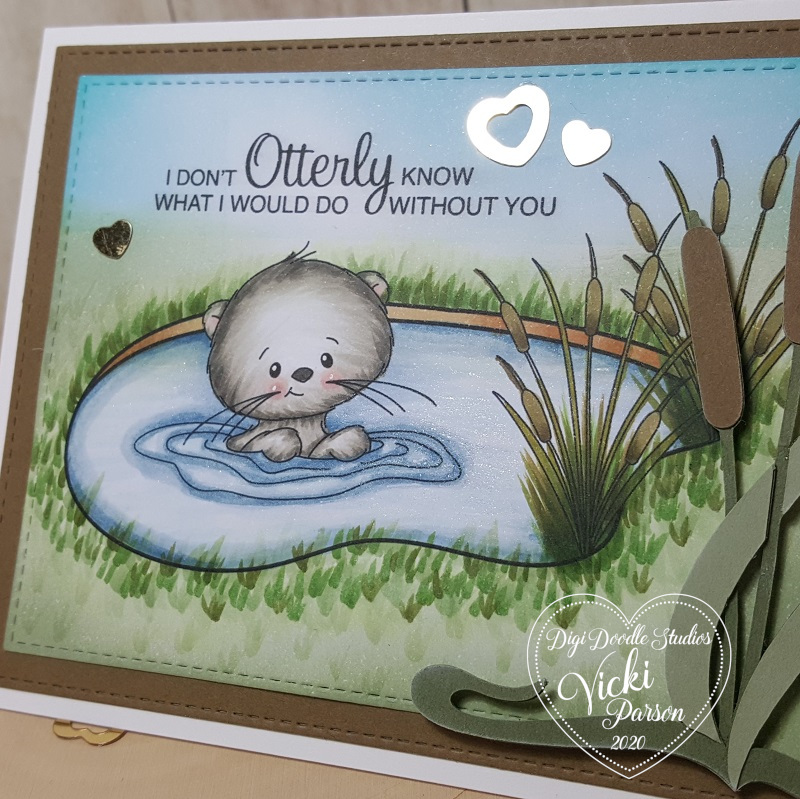
I wanted to share a card I’ve made with this “OTTERLY” adorable brand new Pairables digital set that has come out today from Digi Doodle Studios:
Isn’t that the sweetest little face?! This entire scene was digitally created on my computer using the Otterly Love Pairables set from Digi Doodle Studios! If you’d like to take a look at what’s in the entire set, then check it out in the store link or see the bottom of this post! I will have another card coming with this same set soon, so stay tuned!
*Tip*The “thing” I love about creating scenes digitally as apposed to regular stamping is that there’s no masking involved! Just create on the computer and you can resize and arrange/bring forward/bring back, etc all you want without the hassle and it’s easy to start over as it’s on your computer! It’s easier than you think if you’ve never done it!
So as I mentioned, I arranged each image on my computer how I wanted the images to be and printed it out, colored it in and sponged in some distress ink along the edges so the whole panel has color over it.
I die cut it out with a stitched rectangle die and used the same die set to cut a larger piece in the brown cardstock that was layered over an A2 sized top folding white card base.
I used my Cricut to cut out the cattails along the right side. I popped it up with some thin pieces of foam tape to add to my design. Lastly, I finished out the card with some gold heart sequins around the sentiment. (This is a nice flat design so it’s easily mailable too!)
Here’s a closer look at the coloring I’ve done on this cutie! I’ve used my Copic markers to color most of the panel including all of the grass blades.
I took a white gel pen to give him extra highlight on his eyeballs and cheeks. I also covered the pond water with a glitter brush pen for some shimmer. Not sure you can see it, but of course it’s nice and glittery in person!
I’ve also used a sponge to lightly cover the cattails with white ink.
I hope you’ve enjoyed my card today using this darling new Pairables set from DDS! I’m seriously looking forward to sharing more with it soon as I think this has easily become my favorite!
Thanks so much for stopping in today and I’ll see you soon!
Hello friends! If you live around my area, then you know that it’s in full swing Winter Weather time! We do have snowflakes in the forecast for tomorrow, but hopefully it’s not too bad!
So while we’re thinking of snow, I thought this would be a great time to share with you all of the winter style cards I’ve made using a brand new subscription card kit that I’ve got going from Pink and Main. So grab a cup of your favorite beverage and enjoy some crafty winter inspiration!
So my first card kit from Pink and Main was the December 2019 Winter Wonderland Crafty Courtyard Box which is no longer available, but they have this month’s box out which I will I get soon! Here’s what I’ve made for the December box:
Yeah, I know! That’s a lot of cards, right?! I was surprised myself how many cards I was creating from this kit and I could’ve just kept going as I still have plenty of supplies left! I needed to make a few more cards to send out after Christmas for the ones I missed and send out thank yous…so this came in handy actually!
P.S. Every single one of these cards were completed with an envelope too! (So far so good on my New Year’s Resolution! Yay!)
My first card here is a “see through” design using acetate for the center of the design. I have used a Bold Snowflake die from Pink and Main NOT included in the kit, but overlayed it with another foam snowflake and button that WAS included in the kit.
I stamped snowflakes from the stamp set in the kit and added some “dots” with Stickles over the design too.
This card was pretty simple, but I love it! I’ve used the sentiment die that was included in the kit and die cut it with the sparkle cardstock from the kit as well as the pretty snowflake papers. All I did was stamp 3 snowflakes and added another dot of Stickles to the centers. I chomped the corners at the bottom and done!
For this particular card, I’ve decided to make a ‘Z-fold’ card design and if you’d like to know the measurements and/or how to see one put together, then please check out my video tutorial on it here – “Coffee Style Z-fold Gift Card Holder“.
This is how the card folds closed. It folds down to an A2 size. I love how the colors look on this one! Everything on this card except for the greeting on the inside was from the kit.
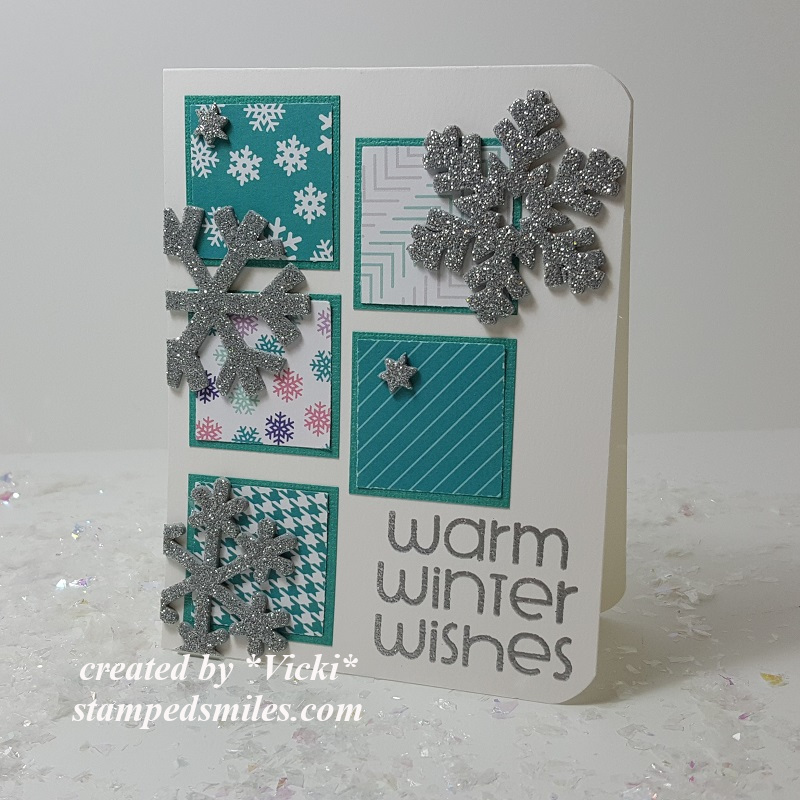
So I wanted to use lots of those papers from the paper pad included with the kit and they were double sided so I had even more choices to deal with! LOL! I decided to make square panels for my layout and use those sparkly silver snowflakes from the kit to place over top. I heat embossed the sentiment from the stamp set at the bottom.
This card was just destined to be a square design. I wanted to use my Reverse Scallop Square dies from Pink and Main for this one. I’ve also used papers from the kit as well as the silver sparkle paper and snowflake. I took a snowflake embossing folder fort he background. I used sequins from the kit and filled the centers with more of that silver Stickles. (I got a bit of the prop over my sentiment there. LOL!)
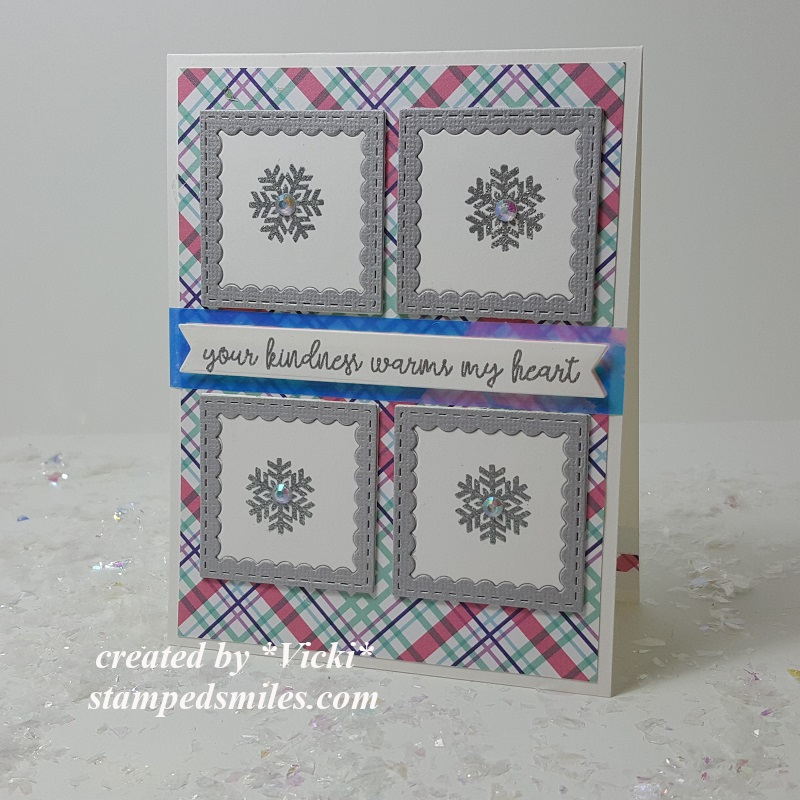
I wasn’t finished using that “Reverse Scallop Square” die set, so I took it to die cut some embossed snowflakes and layer them over some of the papers from the kit. The middle of the card has a strip of the awesome translucent tape included in the kit. I covered the middle of the snowflakes with a rhinestone and pop up the embossed sentiment with foam tape over the tape.
And this last one was hubby’s favorite. I took the largest image from the stamp set in the kit and heat embossed it over a watercolor panel. Then I took some Distress Oxide ink spritzed with water over a glass mat and brushed them over it and splattered some with with a brush as well. I die cut the sentiment from the die included in the kit with the sparkle paper in the kit and finished the design with more sequins filled with Silver Stickles.
I had “SNOW” much fun with this kit and creating these cards! I hope you’ve enjoyed it as well and have been inspired in some way!!
Thanks so much for stopping in and I enjoy seeing what you have say! I loved reading all of your New Year’s resolutions and NOT resolutions too! LOL!!
Hello friends! So now that we have celebrated the Holidays and have started the year, it’s time to look at all things “new”, right?! I have some new things to share with you today using Digi Doodle Studios products!
To me, there’s nothing better to celebrate “new” than new crafty items to play with as well as a new baby theme:
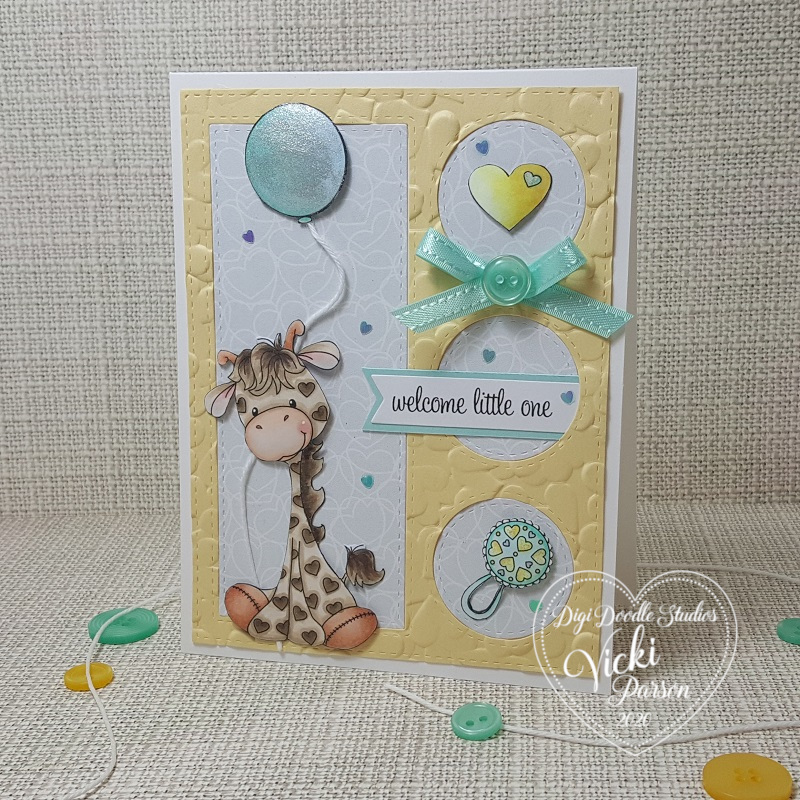
I hope you just said “Awe!” right along with me here! Absolutely fell in love with this precious digital Pairables set that’s BRAND NEW at Digi Doodle Studios called “Little Ones“!
I started by printing out the images and coloring them up. I colored the giraffe, balloon, heart and baby rattle and then fussy cut them out for my card design. There is a very soft interlocking heart grey background papers from the Digi Doodle Studios Baby Boy digital paper pack that I’ve used for the background with the frame layout.
The frame was cut out using the Whimsy Stamps Peekaboo Window 3 die from some yellow cardstock. I then took a brand new textured embossing folder from Sizzix that I got over the Holidays and embossed it. Love the texture of the hearts!
I used some pop dots to lift the images up a bit and added some white twine to the balloon and giraffe. The sentiment was printed out (also from the same Pairables set) and cut out with a banner die. Lastly, I’ve added the ribbon bow, button and some tiny heart sequins in random areas.
Here’s a closer look at the coloring I’ve done on this sweet little giraffe. I’ve used Copics to color all the images. You can see how pretty that texture from the embossing is! Lots of little hearts going on here! (Including on the giraffe in case you didn’t see that!) 🙂
You can see where I’ve added some shimmer to the balloon, tiny hearts on rattle and the tiny heart inside the yellow heart with a glitter brush pen.
I hope you’ve enjoyed my “NEW” creation for you today! Please be sure to stop in the store and check it out along with all of the other new items available!
*I wanted to take a moment to first wish all of my friends and blog readers here an extremely Happy New Year and best wishes for the most amazing 2020 you can have! I have REALLY appreciated each and every one of you for your friendship, support and comments throughout this last year…it really means so much to me! I hope to continue to inspire and spread smiles with you in the comng year as well! HUGS*
Today is obviously the first which means it’s time to start a brand new challenge over at 2 Crafty Critter Crazies! So remember that you have the entire month to play along and It’s ALWAYS an “Anything Goes + a critter” on your crafty project! Easy peasy!
Here’s the creation I made for this month:
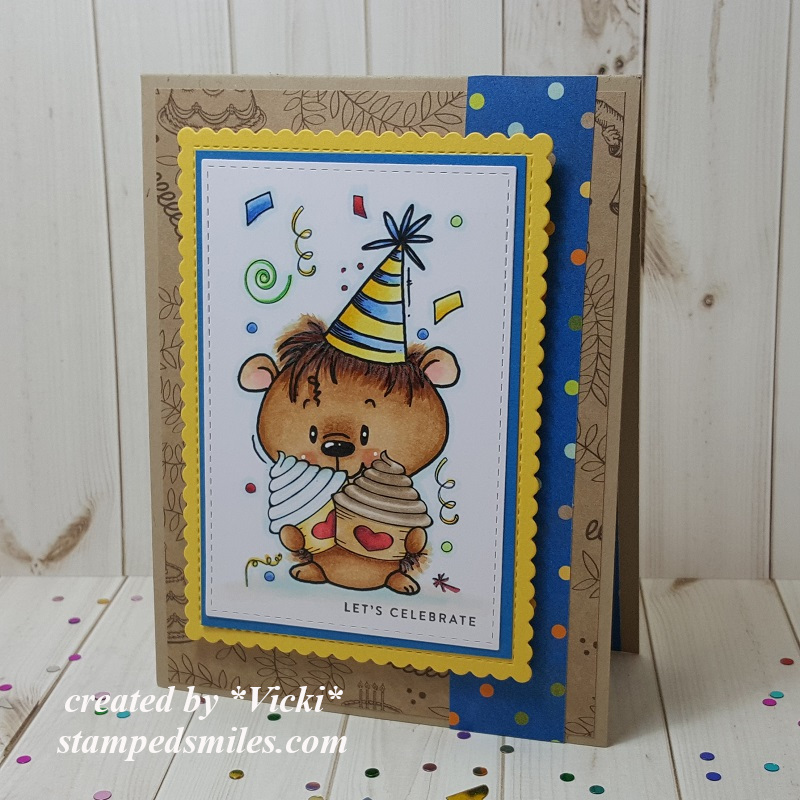
He’s such a cutie and I think he would be a fun little guy to celebrate with especially since it looks like he’s handing out cupcakes! LOL!!
The sponsor for our challenge this month is Bugaboo Stamps and the team were given some images to play with, so I have used this adorable Birthday Hedgie 02 digital stamp on my card today!
After coloring him up with Copic markers, I used a stitched rectangle die to cut him out with and then layered him onto a blue layer of cardstock along with another yellow layer that was cut from a stitched scallop rectangle die. I used some craft foam to pop him up over the card front design.
For the card base, I took a top folding A2 sized kraft card base and found some fun birthday papers in similar colors slightly cut down to go over top. I also found a matching blue dotted strip of paper to place from top to bottom of the card base design. the sentiment was stamped in black ink at the bottom of the image panel. This is a new set I got from Simon Says Stamp called Tiny Words.
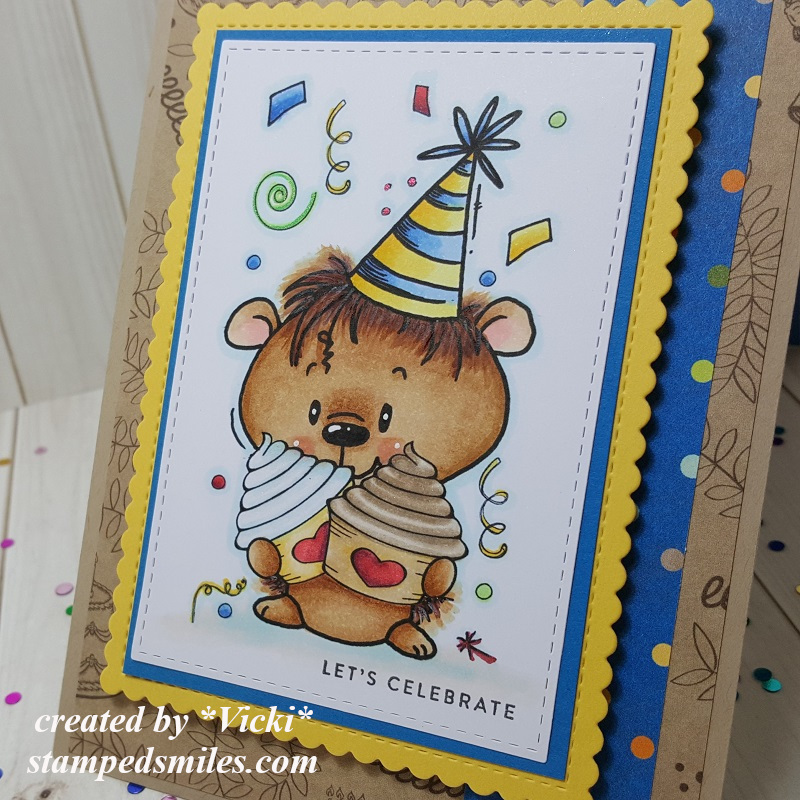
Here’s a closer look at the coloring I’ve done on this cute little guy! His “hair” actually got a bit more “fuzzy” than what I was going for, but I didn’t want to keep going over him or he might look like he partied a bit too much! LOL!
Of course it’s very hard to see unless you see it person, but I’ve added some shimmer with my glitter brush pen over the cupcakes and little hearts. I also used some colored gel pens to go over some of the confetti pieces around him. I also used a white gel pen for his cheeks and I thought he needed some eyeballs and I made those too!
I hope you’ve enjoyed my card today!
P.S. Just for fun, please share with me if you have any crafty or non-crafty “New Year’s resolutions/goals” for this year! My goal is to COMPLETELY finish each card I make this year with sentiment/decorated inside, with the envelope and signed on back! I hope it holds up! I started with this card!
Challenges:
Make My Monday – Female Birthday (Thought it could be used for anyone!)
Hello friends! We are now past Christmas and getting ready for a New Year, but soon the feeling of love will be in the air! So I thought I’d start that off with something that I personally love, which you might know, are those cute penguins!
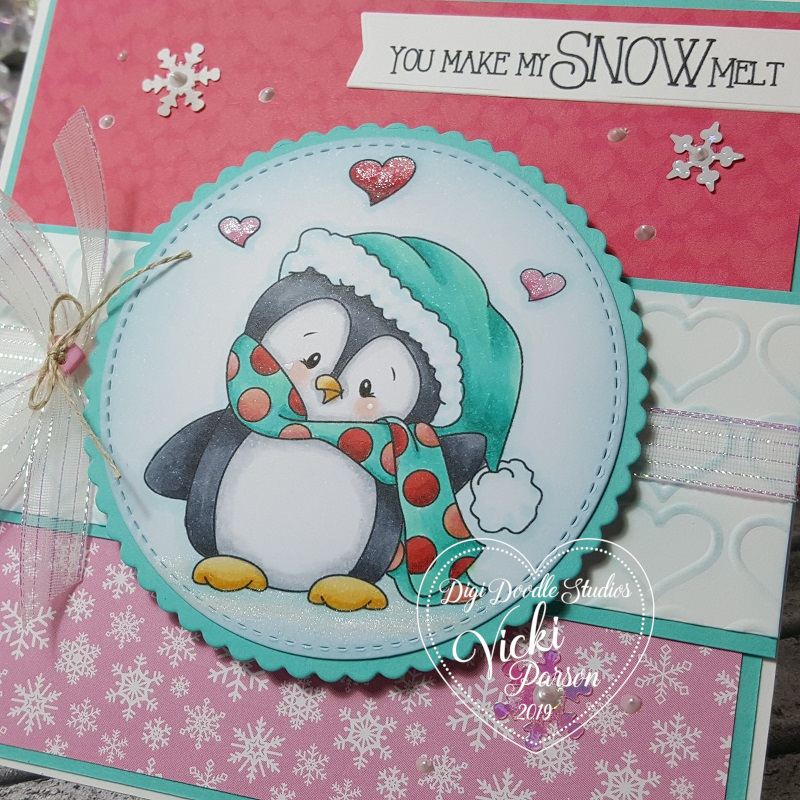
And of course you’ve already seen me use this super fun Wintertime Penguins Pairables set from Digi Doodle Studios in a couple of different ways, but this time I’ve added the hearts above his head and sentiment from the same set to make this a “lovey dovey” style card!
I kept the colors in pink and red to go with Valentine’s Day, but you could easily make this a wonderful anniversary or “any day” card for your favorite love penguin as well! LOL!
So I grabbed some fun papers from my stash with both pink snowflakes and red/pinkish hearts paper for my 5″ top folding white base card that I layered the turquoise colored cardstock over and then applied the papers to. I embossed some hearts on the middle strip with a piece of white cardstock and then rubbed some turquoise colored ink lightly over them. I layered that strip onto a piece of turquoise cardstock again and then wrapped some white/clear metallic ribbon with a bow over it before attaching it down.
The sentiment was printed out from this cute set with the penguin and then I just used a banner die to cut it out with and attach to the front of the card.
I added the penguin image that was die cut and layered with some stitched and scallop circle dies. I’ve used some craft foam to pop it up over the center, then added a heart button with twine in the center of the bow. Lastly, I’ve added a couple of snowflake sequins and some liquid pearl “dots” randomly over the card.
Here’s a closer look at this cutie and how I’ve got him colored up with my Copic markers. I’ve used a white gel pen to dot his cheeks and then I took a glitter brush pen (Spectrum Noir) and covered the hearts above his head as well as the “snowy” ground under his feet for a bit of shimmer.
I hope you’ve enjoyed my “lovey dovey” card today and have been inspired in some way! Thanks so much for joining me on my blog today!
I can’t believe that the New Year is just about to start!! I will most definitely be seeing you in 2020 my friends!
Hello friends! I hope that you all had a great Christmas! I’m still celebrating with my family over the weekend and happy to be with all of my loved ones for sure!
I have this really sweet image along with some news to share with you today.
For the news:This will be my final post as a design team member for Whimsy Stamps. I STILL adore Whimsy Stamps and of course will continue to use the products and promote the products and still use my affiliate link with them when I can, but my term has ended and it was time for me to move on is all…I will truely miss being apart of this wonderful team and working with my friends over there for sure, but will always remain friends of course!
And, perfectly, this brings me to my card for today with this darling image. This card was made and sent to a lovely teamie for our Christmas card swap and I thought it was perfect to send along to her….
I have used this adorable Wee Stamps image from Whimsy Stamps called “Winter Friends“. I just fell in love with the sweetness of it all for sure!
After coloring up the image, I die cut it out with a stitched circle die and layered it over another blue die cut circle. I then took some “Fallen Snow Glitterstock” from Brutus Monroe and cut out a piece with the MFT Linked Chain Circle Frames die and attached that piece around the die cut circle image.
I wanted to pair this image to match up with the colors from the Whimsy Stamps “Christmas So Soft” Digital Papers Collection. I used one panel for the entire background base that was mounted over a blue 5″ square top folding card base. And then I used the pink strip from the same collection mounted over another strip of blue cardstock across the middle of the card wrapped with some silver metallic ribbon.
In the bottom corner of the card is where I stamped the greeting in black ink from the Whimsy Stamps Holiday Mini Sentiments clear stamp set. The circle image was mounted over top of the card with some craft foam and then I die cut some snowflakes from the Whimsy Stamps No-See All Seasons Tree die set with more of that Glitterstock that was randomly added to the card along with placing one in the center of the ribbon bow. I’ve also added a gem to the center of that snowflake as well.
Here’s a closer view of the coloring that I’ve done on this sweet image. I’ve used my usual Copic markers and also used a white gel pen for highlights in certain places. I covered the “holly berries” in her hair with a glitter brush pen and for the snow ground, I used a glue pen and then added some glitter over top of that for sparkling snow.
A perfect image to send to one of my special DT Whimsy friends! I hope you’ve enjoyed it as I really enjoyed creating it and sending it off to my friend too. 🙂
It’s NEVER a “good-bye”, but I’ll see you again soon my friends! HUGS
Challenges I’d like to enter this card for:
As You Like It – Favorite Die and Why? (I am constantly using the circle, square and rectangle stitched dies because they’re nice basic shapes but also add that stitched detail along the edges to add more interest if needed.)
Merry Christmas to all of my friends here and I’m honored to be a little part of your life with you in some way…I hope you know that!
**This is a pre-scheduled post to wish you all a special happy day. I’m away spending time with my family right now, so sit back with your favorite beverage for a time out and I hope you enjoy today’s long post.**
Just wanted to share BATCHES of the cards and creations that I’ve made for the Holidays this year. I know that I make lots of creations, but for the purposes of mailing cards, I try to keep these particular cards as “mail friendly” as possible, so these are more simple in style for me, but really enjoyed making them and just had fun:
I tend to do bulk cards in a set of 4-6 so that I don’t get “bored” with it or run out of a certain supply or something! LOL! So this first set of 6 cards is using the gorgeous Stampin’ Up! stamp set “Winter Woods”. I stamped up the scene background and then covered the entire panel with double stick adhesive and then covered it with dazzling diamonds glitter. (The deer I added is from a favorite Newton’s Nook stamp set called Serene Silhouettes.) The white heat embossed greeting is from the Stampin’ Up! stamp set “Itty Bitty Christmas”. (I think this set was probably my favorite to do!)
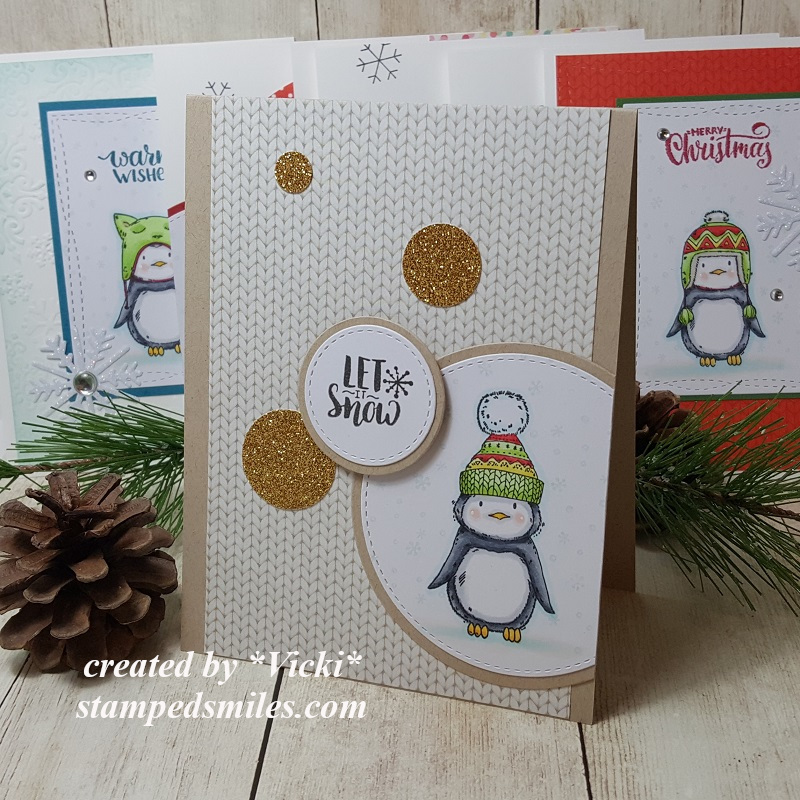
I just *had* to get these penguins in there somewhere! LOL! These set of cards are actually all just a bit different, but I colored up the penguins from the “Pablo the Penguin” free stamp set included with the Making Cards Magazine for December and cut them out in different ways and then mounted them onto cards. Some of them use some of the free papers that were also included with the issue. So this is another set of 6 cards that were mailed out. Love those cute penguins with the different hats! LOL!
Here’s another set of cards that I’ve made to send out, but because these were even more simple than the ones above with very little stamping involved, I made 8 of these. (So if you’re counting, I’ve made 20 total so far…not including some other special cards I’ve mailed out to people along the way.) – I absolutely fell in love with this die set from STAMPlorations called “Two Reindeer” and was so excited to see that I had won a gift certificate from their blog and this was something that I knew I would be getting right away! This was cut from gold cardstock and mounted over a piece of various different Stampin’ Up! pattern paper from my stash…it’s always nice to be able to use up more of my hoarded paper stash! The sentiment is again from the Stampin’ Up! “Itty Bitty Christmas” stamp set.
Now I didn’t want to leave out a couple of cards that I made especially for my boys. They know their mom likes to stamp, but they know I have to add in a bit of my goofy humor with them as well! 🙂 So of course I had to pull out this fun Simon Says Stamp “Gnome for the Holidays” card kit (sold out) to make them! I think I ended up using ALL of the wobblers in the kit too! I told my son that this is me wobbling with the presents about to drop everything and my hubby is trying to save everything! LOL!
Here’s a little wobbler action for you too…
And of course I had to make another card for my other son too…
I absolutely feel in love with all of those cute gnomes that came out everywhere this year for crafting…so I still have more that I didn’t get a chance to use, but thought this would be perfect for my son with this trendy style design…of course using a wobbler too! And I do love him GNOME matter what! 🙂
For some reason, I thought the wobbler action on this one was more fun! LOL! Not sure if it’s because of the weight/size or what…but cool to see the difference.
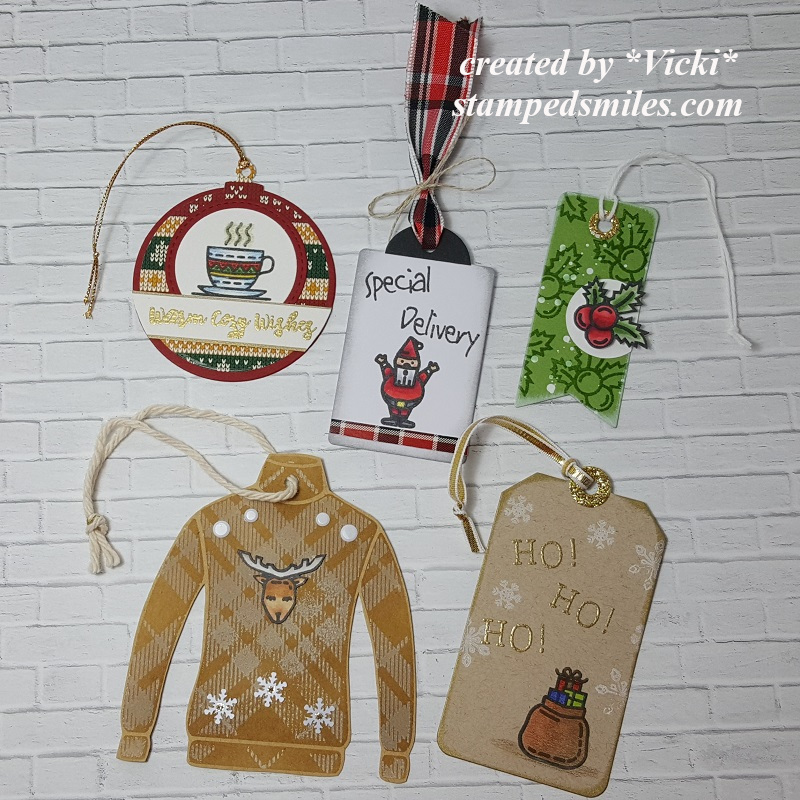
And whilst in the middle of making up all of these cards to mail out, I also had fun playing with the Christmas Advent Calendar that I had purchased a while back. Because it’s an “Advent Calendar” you start with December 1st and open each day. So each day to open was pretty cool because there was a new surprise stamp inside! So I took each day’s stamp and made a tag for each one clear up until today’s last window to open: (obviously previously opened and made to finish! LOL!)
I will show by the week. So this is week 1 with the first 5 days opened. The stamp that I received for each day is noticeably featured in each tag.
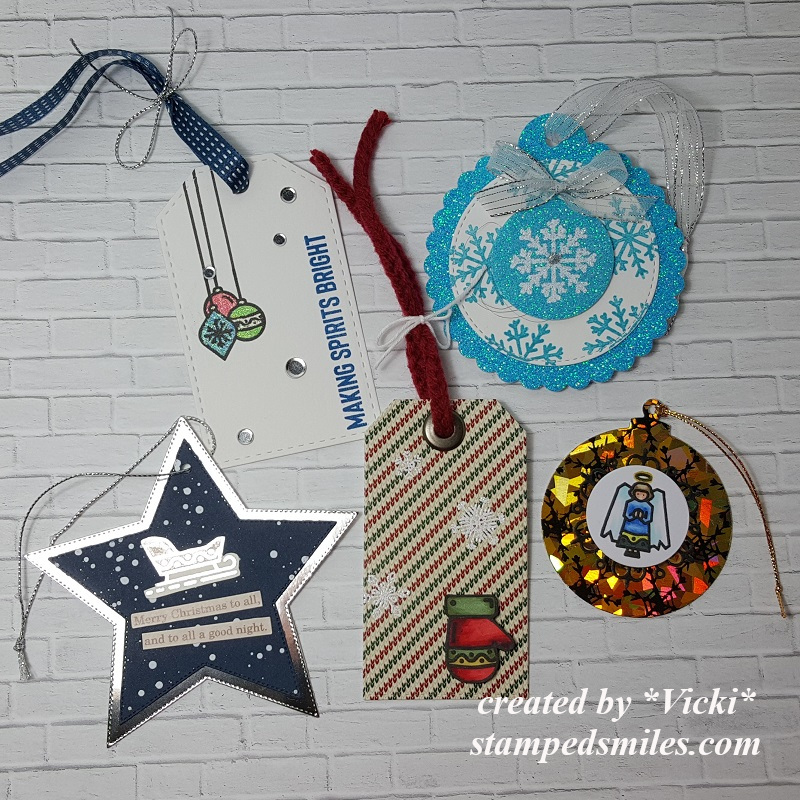
And these are the tags made for week 2. The angel tag was made with Deco Foil in the background.
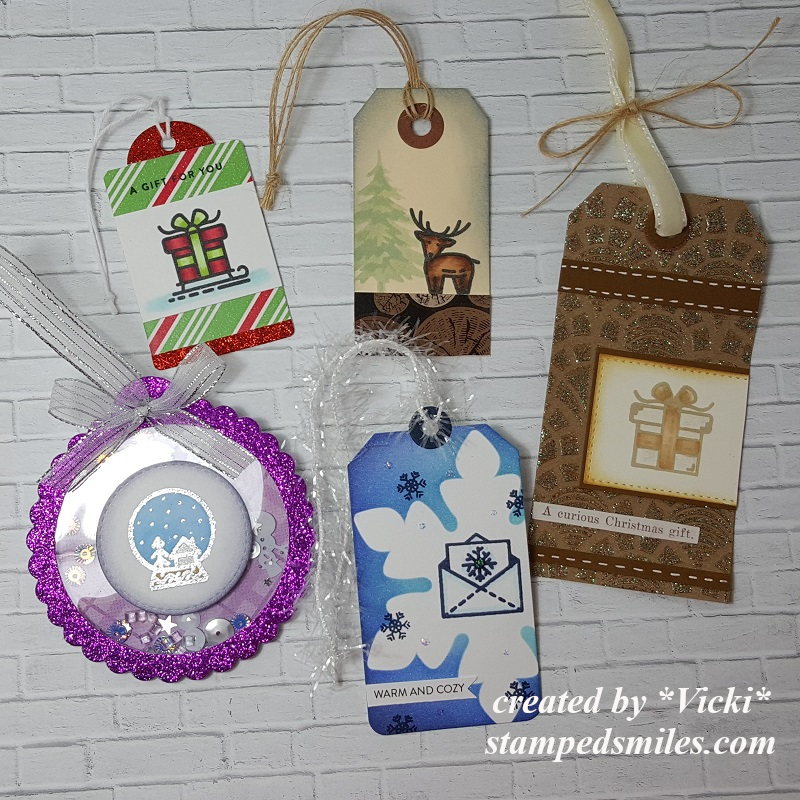
These are week 3 tags made. The purple colored tag on the left bottom is actually a shaker. The window sheet was glaring in the camera.
This is week 4 of the tags. Hubby picked out the candy canes as his favorite of all of them. Mine was the stockings tag.
And here is the final last week of the tags from the Advent Calendar. Really cool to have all of these tags on hand for gifts! I needed them! 🙂
And of course I wasn’t done with the Advent Calendar box itself because I thought I could “recycle” the little window flaps on the box because they had some cute images on them for each day…so I cut them off with my scissors after I opened that day and kept them:
So I thought it would be fun to use them to create a card! They had numbers on them, but I have covered them up in certain ways so that they’re not showing. The cover die was cut out from the same colored cardstock for the background too.
Whew! Now to get finished up with my wrapping and “merry making” before the big day! I hope you are or have enjoyed yourself a wonderfully HAPPY Christmas day no matter how you’re celebrating it! Thank you for spending some of your time here on my blog today!
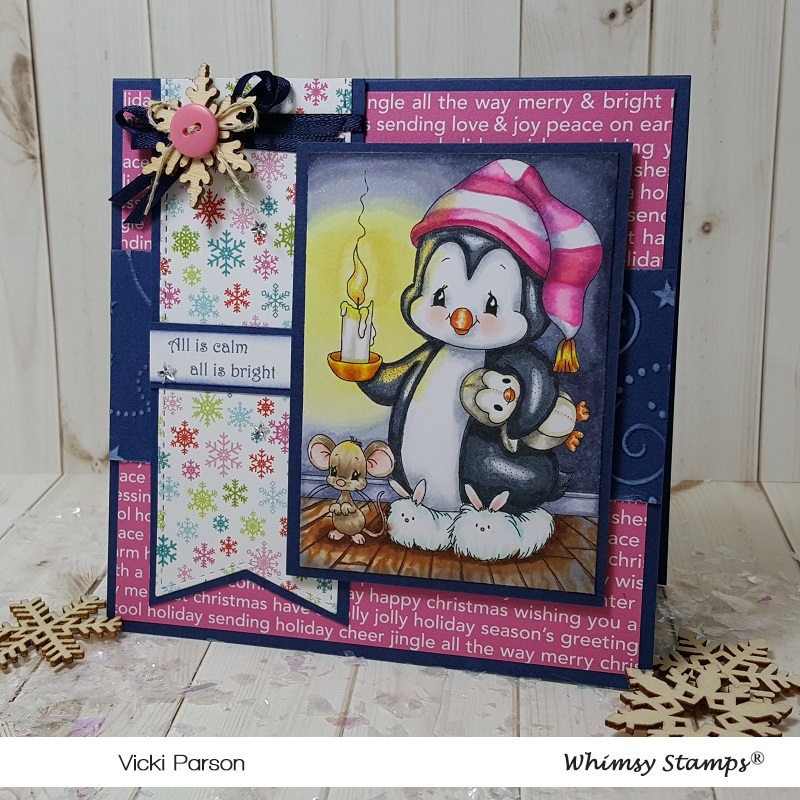
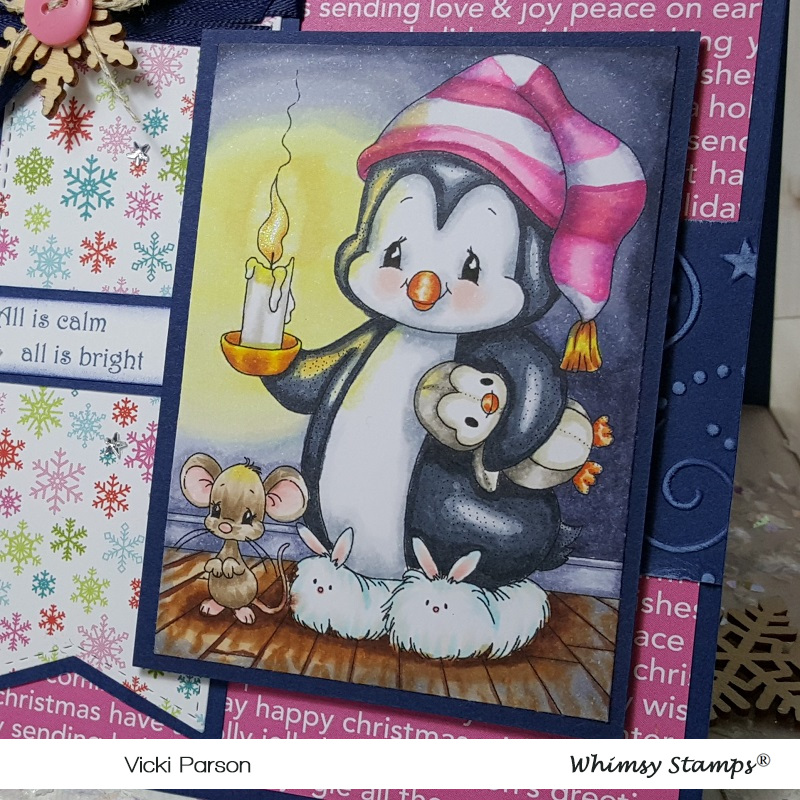
Hello friends! Are you getting ready for the big day tomorrow? It’s Christmas Eve and not a creature was stirring except for this mouse and his penguin friend….
They are up in the dark to see if they can capture a glimpse of Santa of course! LOL!
Do you remember this image from Whimsy Stamps last year? It was a special edition digital stamp especially made for a Kit and Clowder class. The name of the image was called “Penguin Candlelight“. The class isn’t available including the image with the bed scene, but this particular image is still available in the store!!
Well, I ended up getting the image which came with the entire bed scene, but there was also just this image portion as well, which I’ve used here. I had started it last year, set it aside mainly because of my confidence and decided I needed to take the time to push through the class and finish it up no matter what it ended up like. I’m glad that I did this and I plan to learn more about coloring next year to improve my skills and not only with marker, but hopefully with pencils too.
I came up with this layout for the card using pattern papers to match up with the pinks in the hat and layering it with some navy colored cardstock. I’ve used an embossing folder for the strip across the middle and highlighted with some white ink.
The sentiment was computer generated by myself. I added some ribbon, a snowflake wood veneer topped with a button and twine. I added a few tiny rhinestone stars around the snowflake banner strip.
Here’s a closer look at the coloring I’ve done on the image. The only added “extra” thing I did beyond the class tutorial was add some rosy cheeks and used a glitter brush pen over the candle flame. Everything else on the panel was colored with Copics using instruction from the class.
I hope you’ve enjoyed my calm and bright card today! 🙂
Thanks for checking in! Wishing you a very peaceful and calm evening….