Brand New Images from Digi Doodle Studios + Video!

Hello friends!  Happy Friday!  I’m happy for the weekend to get here, how about you?!  The weather has started to cool down slightly and it’s so nice to have that air conditioning turned off for a change!

Today I’m super excited to share with you some really fun and adorable new image set that Digi Doodle Studios has come out with from the brand new “Pairables” Collection!  The set that I’m sharing today is adorable and so fun to mix and match images with!  Check out the two cards I made with it:

Vicki-DDSWizardPairables-video

I absolutely had so much fun creating a little scene with the images and then printing them out for coloring and making cards with!    All of the images that I’ve used here come from the new Digi Doodle Studios Charming Enchanters Wizard Pairables Digital Stamp Set and I believe that I’ve probably used most of the images from the set on these two cards.

Vicki-DDSWizardPairables-boy

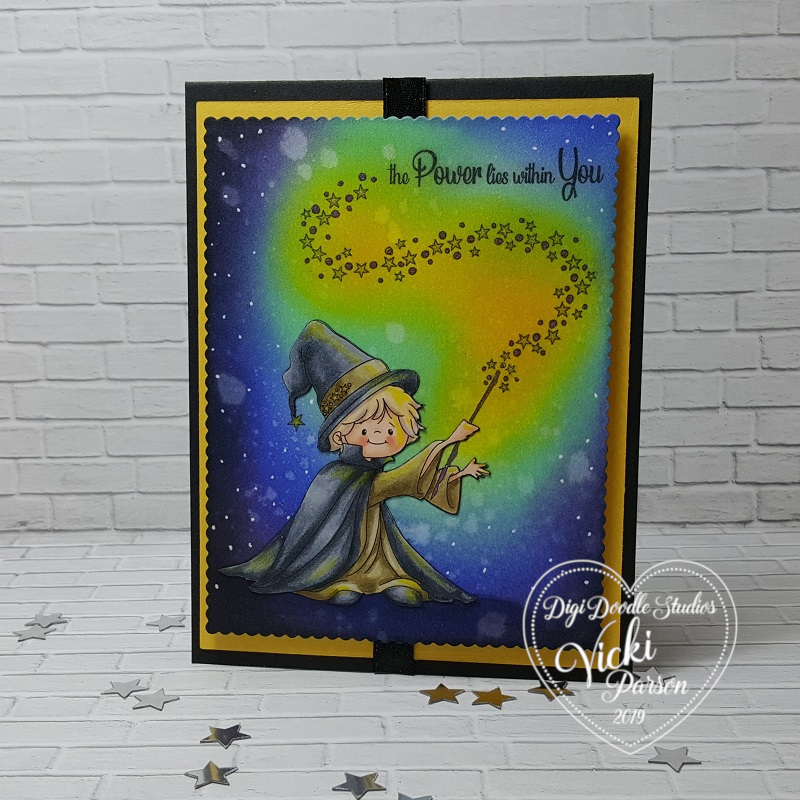
For this particular card, I’ve used my computer to arrange the stars from the wizard’s wand and the sentiment how I want them placed and then printed it out twice.  One I printed on Copic blending card and another image printed out on Neenah Solar White cardstock so that I can do the ink blended background on it.

Vicki-DDSWizardPairables-boy-close

Here’s a closer view of the coloring details on the wizard.  You can see that he has a bit of a “glow” about him.  So after I colored him in with my Copic markers, I decided that I could use a yellow color pencil to add just a bit of glow to certain parts of the image.  I’ve then used gel pens to color in other detailed portions of the image and a white gel pen for the stars in the background as well.  I’ve tried to capture a little bit of that stunning shimmer for the background, but of course it doesn’t show up as great as it is in real life!

He was fussy cut out and placed over the ink blended background that I’ve made.

Since my last video on the ink blending, I’ve had a few more questions about it, so I thought I’d share a more in-depth look into it.  To see a video of how I’ve created the background on this “wizard” card, I’ve made a video to show in detail how I’ve done it with a few tips and tricks along the way.   So check it out below or watch it on You Tube by CLICKING HERE.

I hope that this helps a little more on explaining how I achieved the look for ink blending backgrounds.  I know that I’ve had people ask me to do a video on another background I’ve made on another card, so perhaps I will share another video on that later.

If you do have any questions, please feel free to leave a comment here or on You Tube or contact me and let me know!  If you have other suggestions, I’d always love to hear that too!

Vicki-DDSWizardPairables-girl

Here’s the other card that I’ve made using the same Charming Enchanters Wizard Pairables Digital Stamp Set.  Again, I’ve arranged and sized the images how I wanted them on my computer, printed it out just the same as above and fussy cut out all of the colored images to place over my background.

I’ve mounted the image panel over a piece of purple cardstock and then placed it over a top folding 5″ square black card base.  I’ve used a piece of ribbon to run behind the layered image panel and then added some fun decorative metal corners on it.

For this card on the background, I didn’t distress it with water, I just left it ink blended.

Vicki-DDSWizardPairables-girl-close

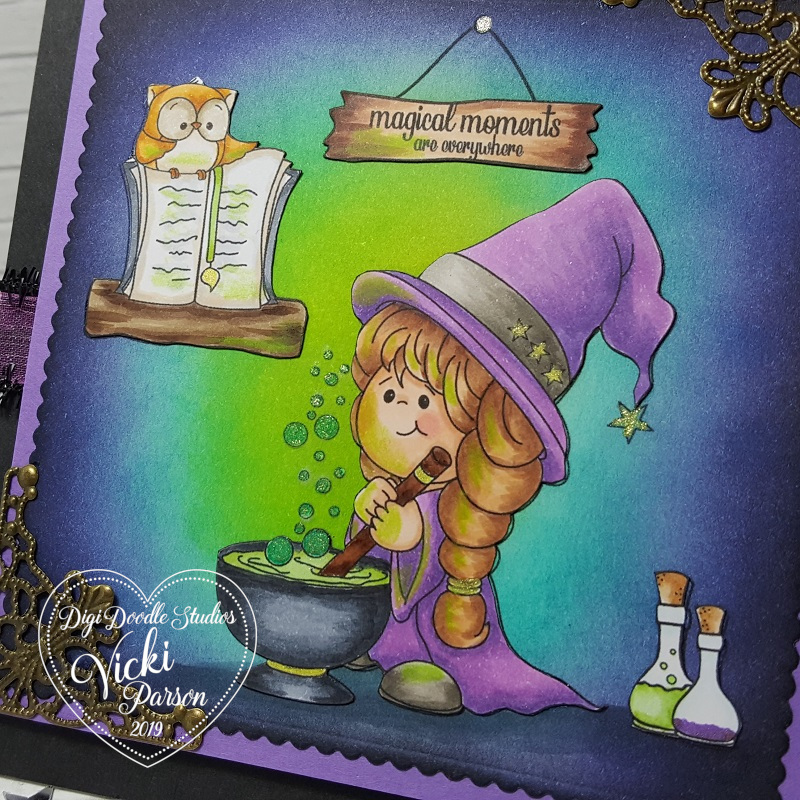
Here’s an up-close look at the coloring I’ve done on the image.  You can see again that I’ve used my gel pens to color in the tiny details like the stars on her hat, the bubbles from her cauldron, the bookmarker and the tiny nail on the wall.

To get the glow on the images, I’ve taken a green colored pencil and added it in the places that I thought her green magic potion would glow from.

Thanks so much for stopping in and hanging out with me today!  See you soon!

Challenges I’d like to enter:

  1. Get Creative – Anything Goes
  2. Through the Craft Room Door – Anything Goes
  3. Try it On Tuesday – Boys/Girls/Children
  4. Addicted to Stamps and More – Make Your Mark
  5. Crafting By Designs – September Anything Goes

It’s Anything Goes for Cute Card Thursday!

Hello friends!  Here we are with the first week of September already coming to the end!  Wow!  I think it may be time to start thinking about that “C” word! (Christmas of course!)

Today is a new challenge over at Cute Card Thursday today and we have our first of the month “Anything Goes” challenge this week!  We our sponsored again by the lovely Whimsy Stamps, so be sure to enter for a chance to win a fun prize!

Here’s what I’ve made with our sponsor’s product:

Vicki-CCT598-WSPenMistletoe-Sept5

I’ve used this really sweet digital image from Whimsy Stamps called “Penguins Under the Mistletoe” and of course Crissy’s penguins are so fun to color up!

I have followed a sketch for my design using a challenge (see below) and have pulled out some older papers in my stash that I thought looked really festive and went with the colors I have picked out.

I white heat embossed the sentiment from the Whimsy Stamps Holiday Mini Sentiments on the green colored layer and popped the image panel layered in red cardstock over top with some foam tape.

I’ve taken some silver glitter paper and die cut a few snowflakes from the Whimsy Stamps No-See All Season Tree die set along with cutting a strip for the top of the card too.

Vicki-CCT598-WSPenMistletoe-Sept5-close

Here’s a closer view of the image so you can see how I’ve colored it up.  I’ve used the following Copic colors below:

  • penguin bodies:  C8, C7, C5, C3, C1, R20, R00, Y38, Y35, Y32
  • Santa Hat and Candy Cane:  R39, R37, R35, R32, BG000
  • Mistletoe:  YG67, YG61 (berries are red Nuvo Drops)
  • Hat and Scarf:  BB26, B24, B21, BG000
  • Gift:  G09, G07, Y17, Y15, Y11
  • I used BG000 for snow ground shadows

I went around the edges of the image panel with Tumbled Glass Distress Ink and the ink foam blending tool.  I ten took my quicky glue pen and added some dots for the snow as well as underneath the penguins and sprinkled on some glitter.

Vicki-CCT598-WSPenMistletoe-Sept5-flat

Thanks for stopping in and I’ll see you again tomorrow for something fun!

Challenges I’d like to enter this for:

  1.  The Holly and Ivy Christmas Challenge – Anything Christmas Goes
  2. Sketch Saturday – Pick any sketch from 215-578 (I chose sketch #356)
  3. Merry Little Christmas – Anything Christmas Goes
  4. Love to Craft – September Anything Goes
  5. Pammies Inky Pinkies – PIP1935 Anything Goes
  6. ABC Christmas Challenge – ‘S’ & ‘T’ are for Sparkle and Texture

Projects with Patterned Papers!

Hello friends!

I have sort of went a little “crazy” with the papers, but there are lots of fun tips, techniques and even a tutorial below to help you use those left over pieces you don’t want to throw away from your patterned papers!  I ALWAYS have left over pieces and I know you do too if you’re a hoarder like myself! LOL!

Here’s what I’ve been up to:

Vicki-BM-PatternedPapers-Sept4bloghop

I have used the same Patterned Paper Collection for each one of these designs and I love how they all turned out different too!  I’ve used a Bold Rainbow Paper Pad for all of these designs.  I’ve made a couple of cards with some fun techniques and I’ve also used the same papers to decorate my two Post-It Note Holders too.

Be sure to grab a beverage and stick with me for some paper crafting fun!

Vicki-BM-PatternedPapers-Sept4bloghop-Smile

Starting with this card, I thought it would be fun to take my left over strips and create a fun background for a card!  I also tend to hoard those tiny pieces of Glitter paper too!  So I’ve cut some very thin strips and placed those between the Rainbow paper pieces too.

How I’ve done this is simply by taking a piece of white Cardstock (you could even use copy paper to keep thickness down!) and attaching each strip down laying it right up next to each one as I go.  When I’ve covered the piece, I took a rectangle die cut and cut out the panel so that it all looks uniform even though all of the strips I used were uneven to begin with.

I’ve finished off my card by attaching my paper pieced panel to a top folding A2 sized black Cardstock base and then adding the fun sentiment that was heat embossed with white EP over a piece of black Cardstock.  I took some white ink and rubbed some over it and added some stitch marks along the edge with a white gel pen for a sort of chalkboard look.

Vicki-BM-PatternedPapers-Sept4bloghop-Birthday

Here’s another card I made actually using more of the strips from the Bold Rainbow Paper Pad.  I took the strips once again and adhered them to a piece of thin paper this time and lined up two different patterns next to each other.  I then took a circle punch and punched them out and then attached these in a pattern over a black card front piece.  I took a rectangle die and cut it out for the background.

So to give it a bit of texture and sort of a “quilt” pattern look, I took a Vintage Tapestry embossing folder and embossed the background too.

Then for the sentiment, I took and heat set it with Gilded EP.  I also added a few of the tiny stars from the set with it and then cut the whole thing out with a stitched circle die.  I also took the Embossing Ink and rubbed it around the edges of the circle and then heat set it with the Gilded EP.  I attached the circle over the background panel and cut off the part hanging off the side with my Scissors.

You will also notice at the bottom of the card that I took a strip of cardstock and covered it with Embossing Ink and heat set that strip with the same Gilded EP.  I attached that to the bottom of a white A2 sized top folding card base.

I then added a gold ribbon around the paper pieced background and attached the bow.  Then I just added this background piece over the white card base.  I finished it with some gold sequins and added glitter in the center of each one.

Vicki-BM-PatternedPapers-Sept4bloghop-PostItNoteHolders

I still wasn’t finished after the cards, so I made a couple of Post-It Note Holders too!  You will notice the one with the flower on the right, I’ve also used some of these papers to create a dimensional flower with it too!

To create the flower, all I did was punch out three different sized scallop circles, then used my scissors to cut into each scallop and creating petals that I lifted up for dimension and then layered each one on top of each other and added a glittery brad in the center.  I also used some black Ink to sponge around them.

The papers were cut with a scalloped square die cut for both of them and then layered them over a piece of black Cardstock.  I die cut a piece of white Cardstock with a stitched circle die and then sponged around the edges with some orange ink.  I then die cut a piece of black cardstock with a stitched scallop circle die for layering.

For the sentiment on the left holder, I took the sentiment and heat set it with black Sparkle EP.

The base of the Post It Note Holders were made using some orange cardstock.

And if you’d like to learn how to make one of these Post It Note Holders, then check out the step-by-step photo tutorial below:  (measurements shared in photos)

Vicki-PostItNoteHolder-Tutorial

Vicki-PostItNoteHolder-Tutorial1

Vicki-PostItNoteHolder-Tutorial2

Vicki-PostItNoteHolder-Tutorial3

Vicki-PostItNoteHolder-Tutorial4

Vicki-PostItNoteHolder-Tutorial5

Vicki-PostItNoteHolder-Tutorial6

Well that’s all I have for now! 🙂

Thanks so much for stopping by today friends!  See you real soon!

Challenges I’d like to enter:

  1.  Cardz 4 Guyz – Celebrate
  2. Tuesday Throwdown – Stripes
  3. CCEE Stampers – CCEE1935 – Encouragment (sending to a friend)
  4. A Bit More Time to Craft – Anything Goes
  5. Papercraft – Handmade/Stamped flowers
  6. Love to Scrap Anything Goes
  7. Scor-Pal – Sept More Than One Fold “Back to School”

New Release Week at Whimsy Stamps!

Hello friends!  It’s “release week” for September over at Whimsy Stamps!

I’d like to share with you a really fun “steampunk” style card today:

Vicki-WSSteampunkLilith-Sept3

Oh this was so fun to create!  When you check out the line of September’s Digital Stamps in the store, you will see a new line of “steampunk” style images that came out.  The one I’m using here is called Steampunk Lilith.  I thought she looked awesome with her little attitude carrying her gun there!  LOL!

I started with a white piece of cardstock and pulled out a steampunk style stencil and inked some distress colors over it along with the image tag panel and then sponged around the edges of them as well.  (Both of the tag panels are popped up with craft foam over the card base.)  Before attaching these panels, I took some silver paste and rubbed it around the edges after distressing them.

I die cut a piece of silver foil with the same tag die cut and then I took an embossing folder and embossed a piece of copper foil.  I mounted this piece onto a piece of gold glitter cardstock and wrapped a gold ribbon around it and attached it to the base of the card.  I also used this same ribbon for the bow at the top of the tag image.

I found a sentiment to go with the image that I silver heat embossed and then cut out with the Whimsy Stamps Quick Strips die.  After I sponged around it, I added some metal brads to each end and then popped it up with foam tape under the image.

All of these layers were attached to a suede colored top folding card base.  Since the image printed out a little taller than most of my digital images tend to, I made my card base 4.25″ x 6″ in size.  I have an envelope maker, so I can create the size I need.

Lastly, I’ve glued on some metal gears including the one in the center of the gold bow.

Vicki-WSSteampunkLilith-Sept3-close

Here’s a closer look at the image and how I’ve colored her up using a combination of Copic markers and gel pens.  You can sort of see the areas that I’ve colored up with gel pens that have the shine on them.  You can also see how shinny the metallic papers look as well as the embossed sentiment.  The embossing folder I used for the Copper strip comes from a Tim Holtz Texture Fades EF.

Vicki-WSSteampunkLilith-Sept3-flat

Hope you’ve enjoyed my card today and got inspired in some way!  Thanks so much for dropping in!  I’ll see you again soon!

Challenges I’d like to enter:

  1.  Simon Says Stamp Wednesday – Anything Goes
  2. As You Like It – Favorite Way to Add Text and Why? (I like to either stamp or heat emboss a sentiment and then die cut/cut it out, this way I can decide where I want to add it and if I like it well enough to add it…then I don’t have to.)
  3. Creatilicious – Anything Goes with optional humor
  4. Sisterhood of Snarky Stampers – ‘V’ is for Violent
  5. Rainbow Card Challenge – Beautiful Brown

Birthday Wishes for Digi Doodle Studios

Hello friends!  🙂   Happy Labor Day!  I hope you’ve enjoyed your weekend and I hope you get a nice relaxing Labor Day Monday included with it!  I’m enjoying a nice relaxing long weekend hanging out with hubby.

I have a very sweet card to share with you today using an adorable image from Digi Doodle Studios:

Vicki-DDDS-PupParty-Sept2

Awe!  Such a cute pup, isn’t it?!  I love how sweet this one turned out with the colors which I thought would be great for a little one’s birthday.  I have used this adorable image called Jasper’s Cupcake for my card plus some really fun digital papers from the Let’s Celebrate Digital Background Paper Collection!

I based my card around the colors of those papers and I just love the little pops of blue in them, so I found some cardstock to match up with them and started to put together my card design.

I layered the “Birthday Streamers” paper over a piece of blue cardstock and then sprayed it with some “Shimmer Craft Spray” (Which I’ll be sharing in an up-coming video so stay tuned!)  Then I mounted these layers onto a pink A2 sized top folding card base.

I then took a strip of the “Birthday Chevron” paper and wrapped some white organdy ribbon around it and attached it to the front of the card base.  I added my colored image panel onto a piece of blue cardstock and then mounted this over a piece of pink cardstock that was cut out with a stitched scallop rectangle die.  Lastly I added a sentiment and punched it out with a circle punch and added a punched out scallop circle in pink behind it and popped it up with foam tape over the design.  As you can see both of the image panel and the circle sentiment was sponged around the edges very lightly with some blue ink too.  (I almost forgot that I took some white ink and sponged around the blue edges of the cardstock too!)

I then added my ribbon bow to the right side of the card and glued a pink pearl in the center of it and added on the sequins randomly over the card.  I really like how that blue frames this design and picks up the blues from the papers too.

Vicki-DDDS-PupParty-Sept2-close

Here’s a closer view of the image and how I’ve colored it in!  I just adore that pup and it looked like he needed a few extra “spots”, so I added one on his back and then gave him a darker colored tail and a different colored paw too!

After coloring this up, I took a glitter pen and covered the pink balloon as well as the frosting on the cupcake for a bit of shimmer.  You’ve got to make that frosting look sugary right?!  I wish you can see the shimmer more in the background because it looks really cool!  You can sort of see it at the top of the photo.  However, if you check out my up-coming video, I’m hoping the camera will do it justice!

Vicki-DDDS-PupParty-Sept2-flat

I hope you’ve enjoyed my little party pup card here today!

Thanks for checking out my post today!  I appreciate ALL of your kind thoughts!  I’ll see you again soon!

Challenges I’d like to enter:

  1.  {Cupcake Inspirations} – CIC477 Food and Drink
  2. Little Red Wagon – Foodie
  3. Watercooler Wednesday – WWC236 All About Occasions
  4. Crafty Animals Anything Goes + animal
  5. Pearly Sparkles – Add a Ribbon and/or Bow
  6. Sheepski Designs – Die Cuts and/or Punches

Bookmark for the 2 Crafty Critter Crazies September Challenge

Hello friends!  Welcome to September!  Can you believe that it is here already?!  I’m looking forward to all things Fall and seeing all the wonderful crafty inspiration from everywhere for sure!

It’s been a while since I’ve shared a post for the 2 Crafty Critter Crazies Challenge, but I’m so happy to be back with my design team friends for this month’s challenge!  The theme each month is always “Anything Goes + a critter“.  So if you make something with a critter on it, we want to see it!  We look forward to seeing your crafty critter creations this month!

Our sponsor for this month’s challenge is QKR Stampede and they’ve provided some fun images for the team to use in their creations.  Here’s my project:

Vicki-2CCCSept-QKR

September is the time we know that the kids are back at school.  I remember telling my boys that it was time for them to start “hittin’ the books!”  They never seemed to care for that too much though!  LOL!  Thinking back at those old school days, I thought it would be nice to create a school themed bookmark with this adorable image from QKR Steampede called Reading Books.

Speaking of learning, I pulled out some Distress Oxide Sprays and played around with them on my tag to see what results I got.  I was surprised at how nicely the colors blended together.  I then took a Tim Holtz stencil and inked it up with embossing ink and heat embossed the letters with a Brutus Monroe Raven Sparkle EP.

Not quite finished with my background, I knew I wanted to use some black seam binding ribbon for the top of my tag, so I grabbed some silver alcohol ink and dabbled the ribbon with it.  What was left on my glass surface, I took a fan brush and splattered some of it over the tag background.  I also rubbed it along the edges of the tag.

To give the bear image a bit of a “ground” to sit on, I took a strip of Brutus Monroe Black Glitterstock and attached it at the bottom of the tag.  Then for the word strips at the top, they’re from a cardstock sticker panel I had from an old card kit.  (They got splattered along with the background.)  Lastly, I just added a button with some twine in the middle of my seam binding bow.

Vicki-2CCCSept-QKR-close

And here’s a better look at this adorable bear image who’s studying really hard on his book!  I thought it would be funny to title the book for him.  So I took out my Copic liner pen and wrote in “Book of Honey” on the cover!  LOL!

I’ve colored up this image with Copics and fussy cut him out to attach to the bottom of the tag/bookmark.  I turned him over and rubbed a stylist over him to add some dimension to the image.  I popped him up with some foam dots over the black glitterstock strip.

Vicki-2CCCSept-QKR-flat

I hope you’ve enjoyed my bookmark/tag project today!  I had fun playing around with some media that I hadn’t had a chance to play with which was really fun!

Thanks for hanging out with me this weekend!  Hope you had fun or were inspired in some way!  I’ll be seeing you soon!

Challenges I’d like to enter:

  1. QKR Stampede – #361 Anything Goes
  2.  Simon Says Stamp Monday – ‘S’ is for…”Sprays, Stack of books, seam binding, school, study, stories, sit”
  3. TGIF Challenge – #TGIF227 Product Spotlight embossing powder

Fussy Cut Falling Flowers for Fall

Hello friends!  Happy weekend!  I’m actually excited about it being the weekend!  This weekend is a nice long holiday weekend so I can spend time with hubby!  Yay!  However, I won’t be resting on my blog as there are lots of fun things going on since it’s the start of a new month!  So be sure to keep stopping by to see what’s going on!  🙂

Today I took out some flowers and fussy cut them and colored them in happy Fall like colors.

Vicki-BM-InkedFallFlowers

I’ve taken this Flowers stamp set and settled on about 3 different sized floral images to work with along with a couple of leaves.  I’ve colored them with Copic markers and then cut them out with my scissors…I set them aside.

I took a piece of white cardstock along with some masking paper and began working in the flowers for the background with Black Ink.  I made a mask for them as a went along and worked my way up.  After I was done, I took an ink foam blending tool and some soft blue Ink to sponge around the top and side of the panel.  I attached the flowers on with glue and some foam tape.  (I used thicker foam tape for the largest flower.)

For the banner, I heat embossed the sentiment from a Sentiment stamp set  over some Black cardstock with white EP and cut it into a banner and attached it to the card.  Lastly, I attached the sequins and then added some gold glitter to the centers.

I attached the white floral panel over a piece of yellow cardstock and then mounted that over an A2 sized top folding black cardstock base.

Vicki-BM-InkedFallFlowers-close

Here’s closer look at the flowers and how I’ve colored them in.

You can better see the sequins that I’ve used.  I actually had one of them laying on my table while I was assembling this card and thought the color matched up nicely with it.  Otherwise, I would’ve never thought to get those out to use on this particular card!  You never know what could be lurking on your table un-used! LOL!

Vicki-BM-InkedFallFlowers-flat

I hope you’ve enjoyed my card today!  🙂

Enjoy your weekend and I’ll see you tomorrow!!

Challenges I’d like to enter this card for:

  1.  Inkspirational – photo challenge
  2. Addicted to Stamps and More – Anything Goes
  3. The House That Stamps Built – A2819 Anything Goes
  4. Simon Says Stamp Wednesday – Anything Goes
  5. Creative Knockouts – Something To Say

Anything BUT a Card for Cute Card Thursday – Calendars Finished!

Hello friends!  We are already here on the last Thursday of August!  I can’t believe we are already getting close to the end of the year soon!  Time seems to just go by so fast for me anymore!

Today stars a brand new challenge over at Cute Card Thursday and for this week we’d like to see your “Anything BUT a Card” creations!  We look forward to seeing what you all come up with!

So I bet you thought that I had forgotten about my finishing up those calendars?  Well as soon as I saw that this was the last week of the month, I went to try and find the next month and of course it wasn’t there!  LOL!  Then I realized that I needed to finish out these “Grumpy” calendars for the remainder of the year!  To see the past months I had already created, you can find all the posts by CLICKING HERE.  I had so much fun with these!  So here’s the last of them:

Vicki-CCT597-Calenders

I think these are fairly quick and easy to do, plus they’re so much fun putting together by creating the scenes for them and they give me giggles every time I look at it!  (There are days that we can relate to these guys, right?!)

Again, for all of these, I have used the Taylored Expressions 3×4 Calendar panels with the printed design at the top.  (of course mine are the 2019, but if you click on the link, it will take you to the 2020 calendars!)  I have slightly cut the edges off so that I could make a layered panel behind them and still keep the 3×4 size.

All images came from the Taylored Expressions Calendar Grumplings stamp set and coordinating dies.  I’ve used the sentiment from the set and made a banner with it that I’ve tucked underneath the elements from the Build-a-Scene Calendar dies.  I’ve colored all the critters with Copic markers.

Vicki-CCT597-calendars-Sept

The eyeballs on this dude are too funny!  I’ve white heat embossed the sentiment on this one over black to mimick a chalk board.  I added lines around the edges with a white gel pen.  I’ve popped up the grumpling with foam tape.  I’ve added some glossy accents over the apple in his hand.  This is my birthday month too!! Woo hoo!

Vicki-CCT597-calendars-Oct

BWHAA! HAA!!  This one is probably my fave not just because of the sentiment and the cute grumpling, but I love Halloween anyway.  I stamped the sentiment over some yellow cardstock and then punched it out with a circle punch so it looked in the shape of a moon and then die cut a couple of clouds to go around it.  I had a punch that punched out lots of stars and so I glued those on the background.  His broom handle was colored with a purple glitter gel pen and the frame was cut from some purple Glitterstock.

Vicki-CCT597-calendars-Nov

Oh yes, all of those leaves pile up about this time and there’s always tons of yard work to clean up along with all of those dead flowers before winter gets here…this is usually how I feel about it too!  The leaves at the bottom are from a sequins mix that I had.  I do love the different colors of leaves in the Fall!

Vicki-CCT597-calendars-Dec

Last, but not least is this funny “Bah Humbug” grumpling!  Things tend to get hurried this time of year for sure and by the time the end of the month rolls around, that’s about my take on it!  LOL!  I’ve used some white Nuvo Drops for the snow in the background.  The ground was die cut from Glitterstock.  The sentiment was punched out with a really old speech bubble punch I have.

Vicki-CCT597-calendars-last

I hope you’ve enjoyed catching all of the months of this year’s calendar with me as much as I had fun putting them together.  Now, the trick is to pull out the 2020 calendars and start working on that earlier than just as the time gets here! LOL!  Thanks for hanging in there with me for it!  Hopefully you’ve been inspired in some way or at least had a few smiles with the process!

Thanks for stopping by and I’ll see you soon!

Challenges:

  1.  CRAFT – Back to School (Sptember month)
  2. Always Fun – Back to School (September month)
  3. Kat Scrappiness – August Back to School (September month)
  4. Through the Crafttoom Door – Anything Goes
  5. Crafty Creations – Anything Goes

Floral Watercolor Foiled Hello

Hello friends!

Here’s what I made for today:

Vicki-BMhop-Aug28ATG

I’ve been wanting to do some coloring… so I got out several of my Aqua Pigments and Watercolor Brushes and went to town with one of these floral panels!  What I love about these card panels is not only are they all gorgeous, but I love that the lines on the images are a bit raised as if embossed which helps with the watercolor process.

Vicki-BMhop-Aug28-panels

As you can see, I’ve only used half of my card panel cut diagonally on my card.  So after coloring up the panel, I thought it was a nice way to cut the panel in half and then still have another panel left over to create another card with later!    So there’s a tip for extended more life out of your card panels!

Vicki-BMhop-Aug28-ATG-close

Here’s a closer view of my watercolor and the pretty shimmer from the Aqua Pigments!  So as you can see, I also did some foiling!  I wasn’t sure if these panels would foil correctly or not, but as you can see only a portion of the image foiled.  I was fine with that as it still adds a pretty sparkle to my card.

I did take the “hello” die and cut that from cardstock and then added some glue over it with the Deco Foil adhesive pen and then foiled over it in my laminator with some Deco Foil Rose Gold Transfer Sheets.  Love the look of the foiling and how it turned out!

Vicki-BMhop-Aug28ATG-flat

For my card, I attached the watercolor cut panel over a piece of black cardstock that I also cut diagonally with the panel and then attached it over a piece of very heavyweight white cardstock.  Then I attached my foil die cut sentiment across the card and added some Acrylic Bubbles randomly over the card. I finished it with some Nuvo Dew Drop accents as well.

I hope you’ve enjoyed my card today!  I appreciate you stopping by!

Challenges for my card:

  1.  Simon Says Stamp Wednesday – Clean and Simple
  2. Allsorts – Feminine
  3. Pammie’s Inky Pinkies – PIP1934 Anything Goes

Be Merry for Paper Nest Dolls New Release!

Hello friends!  I hope you’ve had a wonderful weekend!  I was busy making “treats” for my husband to content him for the week!  LOL!  Speaking of treats, Paper Nest Dolls has a brand new mid-month release and it’s full of ADORABLE images!

As a matter of fact, I’ve made a card with one of them here and it’s my very first Christmas card of the year!

Vicki-PNDElfJackinBox-Aug

Isn’t she so sweet?!  This one is called “Elf with Jack-n- Box” and she is available from the store.

I thought this “elf” needed to be colored up in green and so I found some fun papers to compliment her along with a sparkly silver glitter strip of cardstock, and added some seam binding, twine with button and festive embellishments too!

Everything was mounted onto a 5×5 white top folding card base.

Vicki-PNDElfJackinBox-Aug-close

Here’s a closer look at how I’ve colored her in with my Copic markers.  I’ve used some gel pens to color in parts of the “Jack in the Box” as well.  I’ve cut her out with a stitched rectangle die and white heat embossed the sentiment over a strip of red cardstock and I cut out and attached along the side of the image panel and then I used some white ink to sponge around all the edges.  I’ve added some rhinestones on the sentiment strip and then I popped up the image panel with some craft foam before attaching it onto my card.

Vicki-PNDElfJackinBox-Aug-flat

I hope you’ve enjoyed my festive card today!

Thank you so much for stopping in today and I’ll see you soon!

Challenges:

  1. Merry Little Christmas Challenge – August Anything Christmas Goes
  2. Double D – Pearls, Gems or Rhinestones
  3. Creative Knockouts – Tic-Tac-Toe (I went diagonally from top left:  stamp, sentiment, ribbon/twine
  4. QKR Stampede – #360 Anything Goes
  5. Crafty Friends – Add embellishments