Hello friends!
I have sort of went a little “crazy” with the papers, but there are lots of fun tips, techniques and even a tutorial below to help you use those left over pieces you don’t want to throw away from your patterned papers! I ALWAYS have left over pieces and I know you do too if you’re a hoarder like myself! LOL!
Here’s what I’ve been up to:
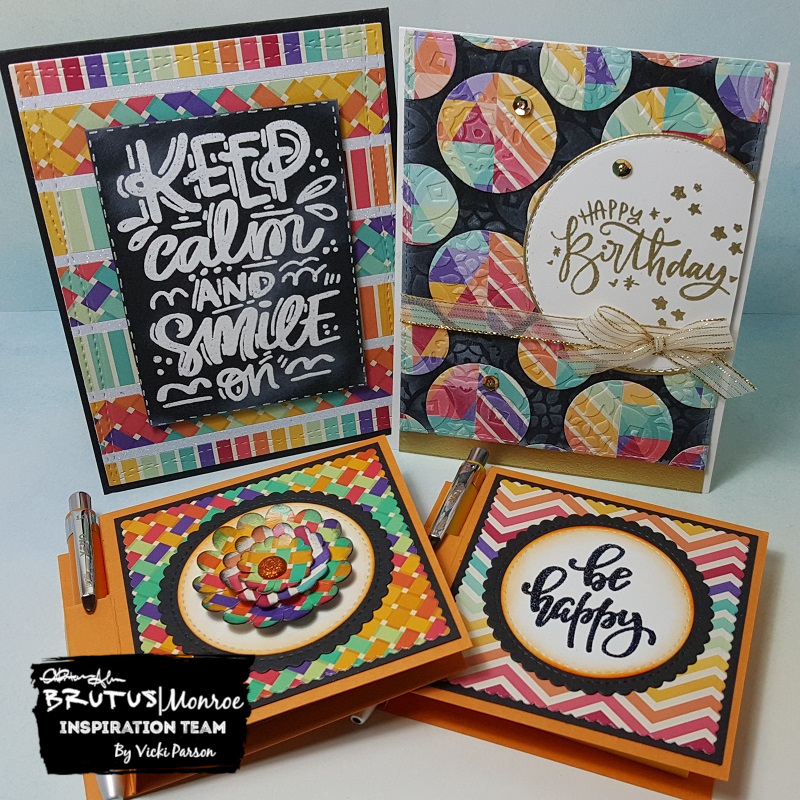
I have used the same Patterned Paper Collection for each one of these designs and I love how they all turned out different too! I’ve used a Bold Rainbow Paper Pad for all of these designs. I’ve made a couple of cards with some fun techniques and I’ve also used the same papers to decorate my two Post-It Note Holders too.
Be sure to grab a beverage and stick with me for some paper crafting fun!

Starting with this card, I thought it would be fun to take my left over strips and create a fun background for a card! I also tend to hoard those tiny pieces of Glitter paper too! So I’ve cut some very thin strips and placed those between the Rainbow paper pieces too.
How I’ve done this is simply by taking a piece of white Cardstock (you could even use copy paper to keep thickness down!) and attaching each strip down laying it right up next to each one as I go. When I’ve covered the piece, I took a rectangle die cut and cut out the panel so that it all looks uniform even though all of the strips I used were uneven to begin with.
I’ve finished off my card by attaching my paper pieced panel to a top folding A2 sized black Cardstock base and then adding the fun sentiment that was heat embossed with white EP over a piece of black Cardstock. I took some white ink and rubbed some over it and added some stitch marks along the edge with a white gel pen for a sort of chalkboard look.

Here’s another card I made actually using more of the strips from the Bold Rainbow Paper Pad. I took the strips once again and adhered them to a piece of thin paper this time and lined up two different patterns next to each other. I then took a circle punch and punched them out and then attached these in a pattern over a black card front piece. I took a rectangle die and cut it out for the background.
So to give it a bit of texture and sort of a “quilt” pattern look, I took a Vintage Tapestry embossing folder and embossed the background too.
Then for the sentiment, I took and heat set it with Gilded EP. I also added a few of the tiny stars from the set with it and then cut the whole thing out with a stitched circle die. I also took the Embossing Ink and rubbed it around the edges of the circle and then heat set it with the Gilded EP. I attached the circle over the background panel and cut off the part hanging off the side with my Scissors.
You will also notice at the bottom of the card that I took a strip of cardstock and covered it with Embossing Ink and heat set that strip with the same Gilded EP. I attached that to the bottom of a white A2 sized top folding card base.
I then added a gold ribbon around the paper pieced background and attached the bow. Then I just added this background piece over the white card base. I finished it with some gold sequins and added glitter in the center of each one.
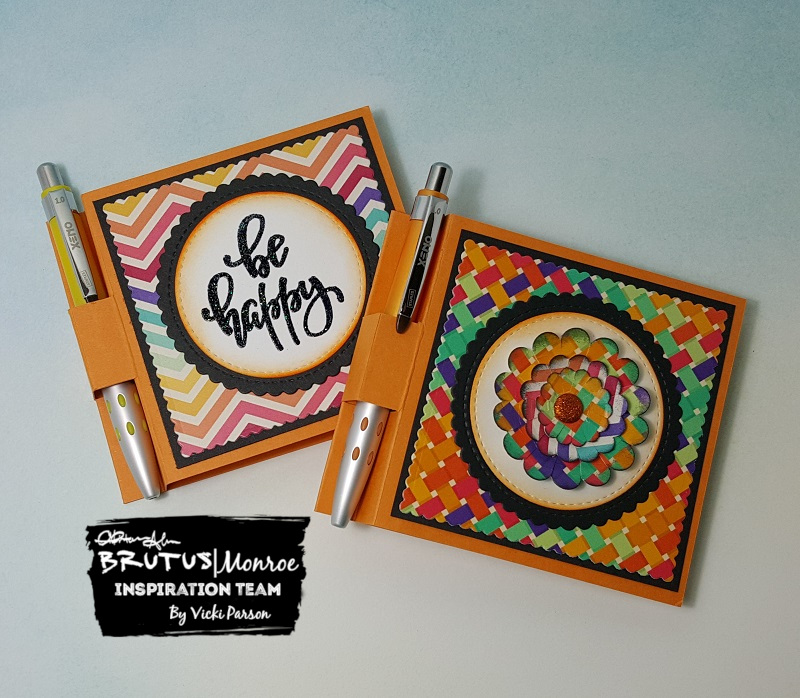
I still wasn’t finished after the cards, so I made a couple of Post-It Note Holders too! You will notice the one with the flower on the right, I’ve also used some of these papers to create a dimensional flower with it too!
To create the flower, all I did was punch out three different sized scallop circles, then used my scissors to cut into each scallop and creating petals that I lifted up for dimension and then layered each one on top of each other and added a glittery brad in the center. I also used some black Ink to sponge around them.
The papers were cut with a scalloped square die cut for both of them and then layered them over a piece of black Cardstock. I die cut a piece of white Cardstock with a stitched circle die and then sponged around the edges with some orange ink. I then die cut a piece of black cardstock with a stitched scallop circle die for layering.
For the sentiment on the left holder, I took the sentiment and heat set it with black Sparkle EP.
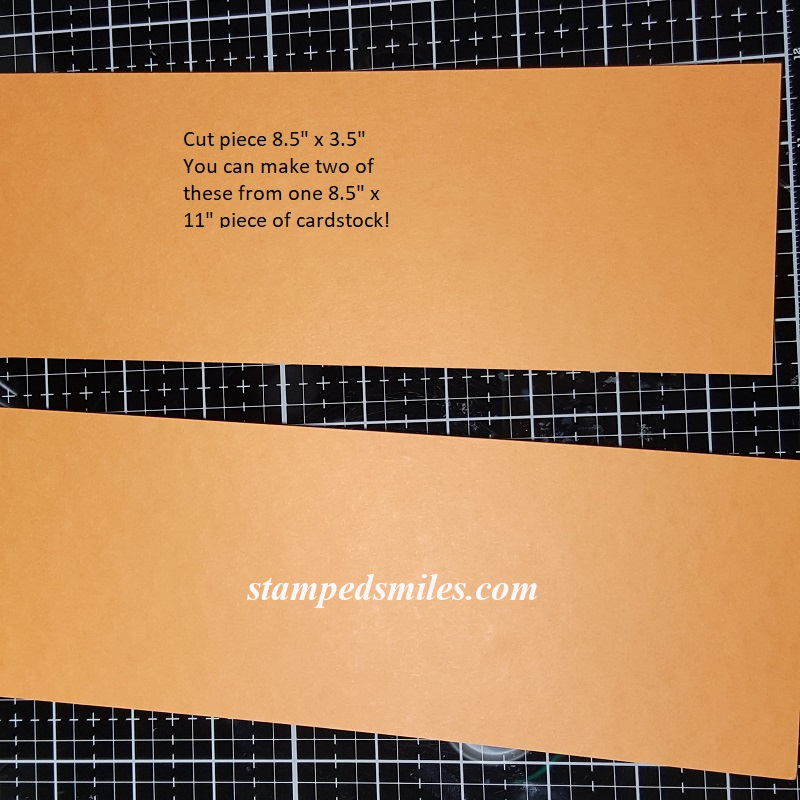
The base of the Post It Note Holders were made using some orange cardstock.
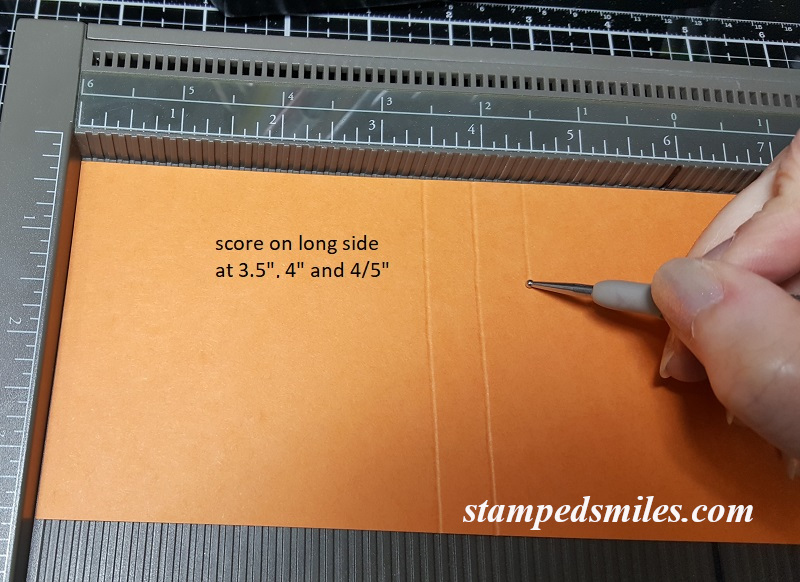
And if you’d like to learn how to make one of these Post It Note Holders, then check out the step-by-step photo tutorial below: (measurements shared in photos)


Well that’s all I have for now! 🙂
Thanks so much for stopping by today friends! See you real soon!
Challenges I’d like to enter:
- Cardz 4 Guyz – Celebrate
- Tuesday Throwdown – Stripes
- CCEE Stampers – CCEE1935 – Encouragment (sending to a friend)
- A Bit More Time to Craft – Anything Goes
- Papercraft – Handmade/Stamped flowers
- Love to Scrap – #125 Anything Goes
- Scor-Pal – Sept More Than One Fold “Back to School”

Love those papers (and also your cards and post-it note holder).
xxx Margreet
LikeLike
What a fun collection of cards and gifts. I love the bright colors of those papers and each design makes a wonderful use of them. I used to make post it note holders until I could no longer find the smaller pens to go along with them. I guess I didn’t look hard enough! Yours look great – thanks too for the tutorial!
LikeLike
These are fabulous, love the papers too, you are truely an inspiration.xx
LikeLike
Such fabulous cards and post it more holder! I will be making these, thanks for the mini tutorial! Hugs.
LikeLiked by 1 person
Thank you Donna! I can’t wait to see your holders!! 🙂
LikeLike
You really have been busy. Love all the different pieces of patterned paper too. The note holders are so cute and a great idea.
Lynn
LikeLike
I saw these on Instagram and had to come by to check out the details close up. Beautiful work Vicki. I love your style my friend.
LikeLiked by 1 person
Thanks so much sweet lady! So glad you hopped with us! 🙂
LikeLike
These were awesome! So creative and great ideas!
LikeLiked by 1 person
Thank you so much! 🙂
LikeLike
all these cards look gorgeous! Thanks for your tutorial, your post-it-book is great!
LikeLike
This would make a great gift idea. Love the beautiful and bright colors of paper. Thank you for sharing this wonderful project.
LikeLike
What a great project with the note pad holders and fabulous easy tutorial Vicki..I love your cards, the papers are brilliant and colourful.
Luv CHRISSYxx
LikeLike
Fabulous papers and love the embossing on the card -love the post it-note-holders -I have had a couple cut for over a year just waiting to be decorated lol-thank you for the reminder
carol x
LikeLike
Fabulous creations Vicki! I love all of the different papers you used and the post-it-note holders are so cute, I really love the added texture on the card!
Hugs, Tammy
LikeLike
Awesome showcasing of these patterned papers! I didn’t know that Brutus Monroe sold paper! Thanks for sharing your instructions with us, my friend! You rock! Hop over and enter at Scor-Pal too!
LikeLiked by 1 person
Thank you Patti! 🙂 Also, thank you for the reminder about the Scor-Pal challenge, I have entered!
LikeLike
What amazingly vivid colors and sensational textures on all of this exquisite designs, Vicki!! Remarkable work!!
LikeLike
Wonderful projects!
LikeLike
Gorgeous papers, my friend, and great instructions! Love the choices you made about which papers to use. Everything coordinates so beautifully.
LikeLike
What a lovely set of colourful projects. Thanks for joining us at Cardz4guyz. Love Dawn x
LikeLike
A brilliant set of cards! I love all the bright colours.
LikeLike
Some great ideas for using up snippets of paper! Thanks for joining us at Cardz for Guyz
LikeLike
Wow, love the bright colors and the cute post-it note holders. Would make nice gifts, thanks for sharing.
LikeLike
What fun bright cheery papers you got to use on this collection of cards and gifties. Love to make post it not holders, and I think somewhere I have some small pens that would fit perfectly. Thanks for the directions.
LikeLike
lovely cards! Thanks for joining us at papercraft-challenges.
LikeLike
What a fun collection of cards and gifts. I loved following along to see how you made it too, all of your techniques and materials look fabulous, thanks for the inspiration. Thanks for sharing your card at Love To Scrap! Challenge Blog! Hope to see you again soon!! HUGS!
Ann DT
LikeLike