Hello friends and happy Wednesday! We seem to be rolling well into this month of March and my thoughts are turning to Spring and being able to get outdoors again after the cold winter months get put behind us! I’m seeing a couple of buds on my daffodils…yay!
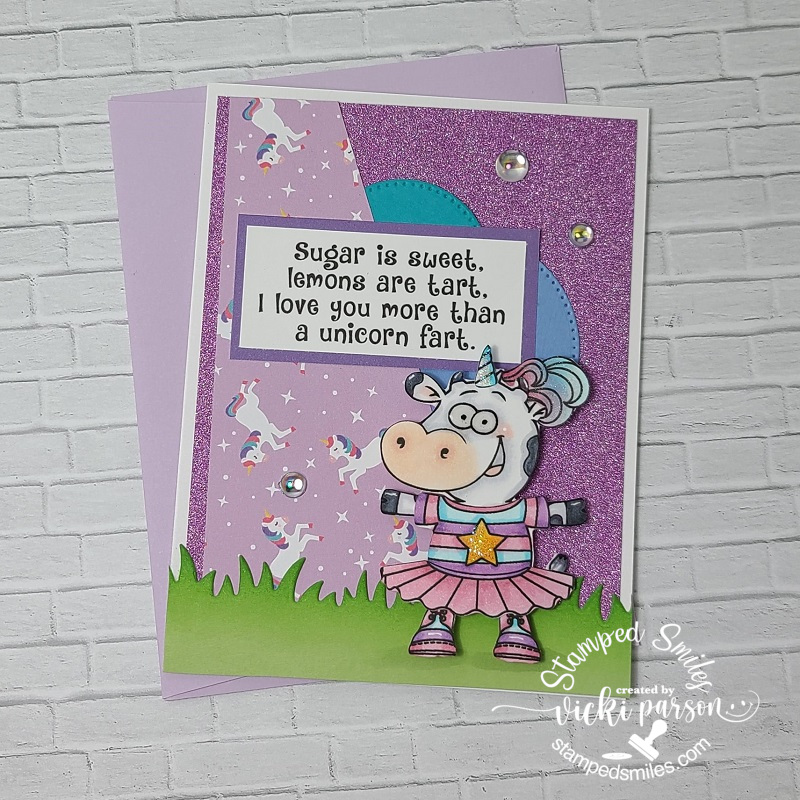
I’m super excited to be sharing a card with you today that I’ve made for Penny’s Paper-Crafty Challenge Blog as a guest designer for their #517 challenge! Last month, I had won a top pick for a prize as well as a future guest design spot with my calendar cards that I had entered. The challenge is always “Anything Goes using Paper“, so I hope you will take the time to join in the fun with us for this challenge! Here’s what I’ve created:
Isn’t this fella so cute?! I was given a few choices of images from the challenge sponsor(s) to use for my creation and I picked out this adorable image from Pattie’s Creations called, of course, “Snail Mail“. You can click on the name to get him in the store! Who doesn’t love a good snail mail especially with that adorable smile! 🐌 I colored him up with my Copic markers adding a few dotted details with my white gel pen. He was fussy cut with scissors and popped up with foam tape.
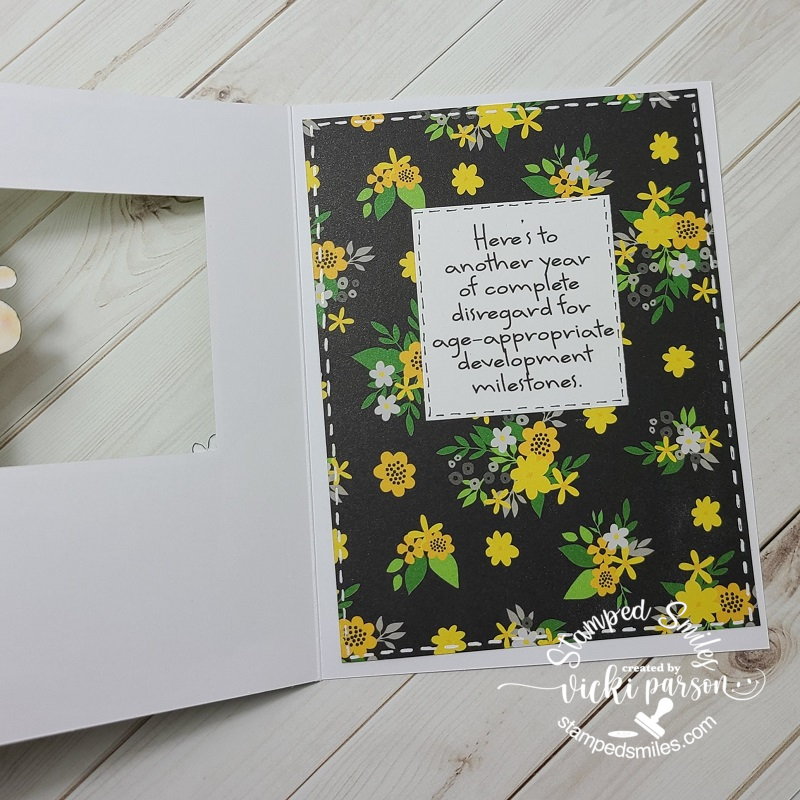
So, I thought it would be fun to create a background for him using the Taylored Expressions Sealed With Love background stamp. I used the heart stamp to give color and then colored the one envelope underneath the snail. I also used the sentiment in the clear set that comes with it and white heat embossed it over a strip of cardstock that was later added to the design.
I cut the background in half diagonally and used the Lawn Fawn Stitched Cloud Portrait Backdrop die and then sponged some blue ink over top of it. I used the top portion of it for my card front and cut this piece as well as the bottom stamped piece with the Lawn Fawn Small Cross-Stitch Rectangle Stackables die. To break up the section of where these two pieces meet on the front, I took some dark brown cardstock and cut a strip with a My Favorite Things border die. I layered this onto a piece of cardstock that was used for the sentiment and that’s where the ends of the scallop border was cut off. I then attached all of the layers onto an A2 sized white top folding card base.
I decided to die cut some hearts out with the same-colored cardstock (as the sentiment piece) to place above the snail’s head. I added some sparkle over them with some Stickles “Star Dust” glitter. I used it for the snails’ antennas and underneath his body where he’s sliding across to deliver his envelope.
I do hope that you’ve enjoyed my creation today for Penny’s challenge and will think about popping over there to see the wonderful inspiration from the design team! I sure had fun playing along too!
Hello friends! I think we’re getting closer and closer to Spring! I sure am ready for it, how about you? Let’s welcome the warmer weather and pretty flowers to come!
I had previously made a winner/top 3 for a challenge I had entered which was exciting to have also won a place to be a future guest designer for one of the challenges too.
So this month, I’m very excited to be joining my friends over at the Cheerful Sketches challenge blog as a guest and they always have a beautiful sketch along with lots of inspiration for it each month! So please be sure to check them out and play along if you can! Here’s the lovely sketch they’ve provided for me to work with this month:
This is a very nice sketch and open to lots of different interpretations as well, so I had fun playing with it along with an image that was provided to me from a current sponsor for the challenge and here’s what I came up with:
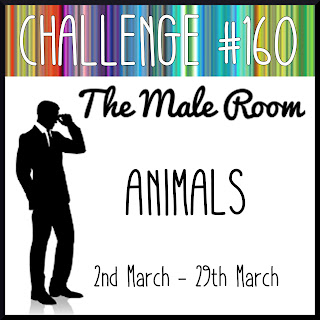
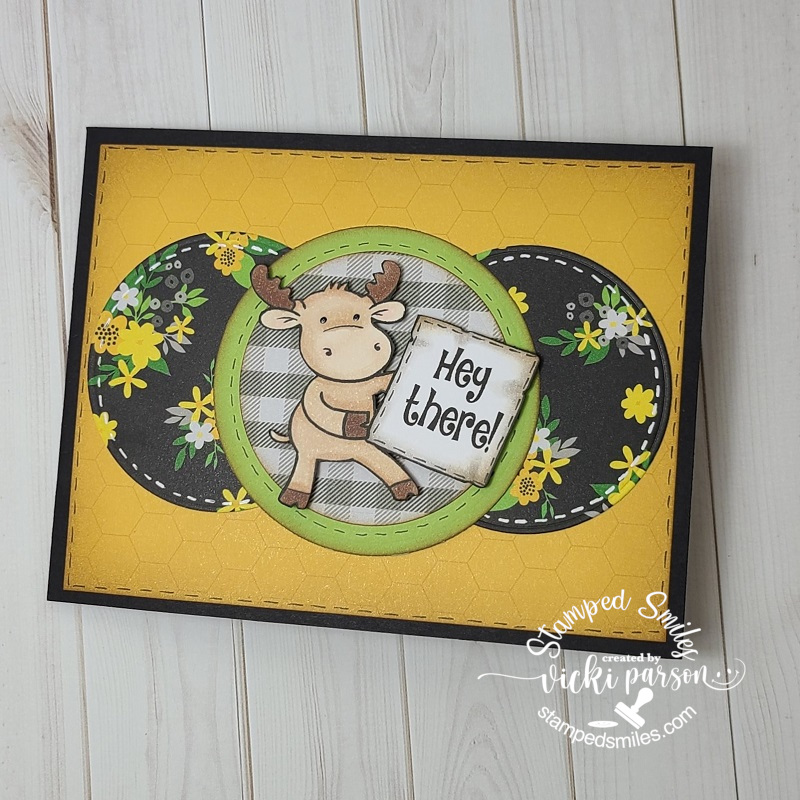
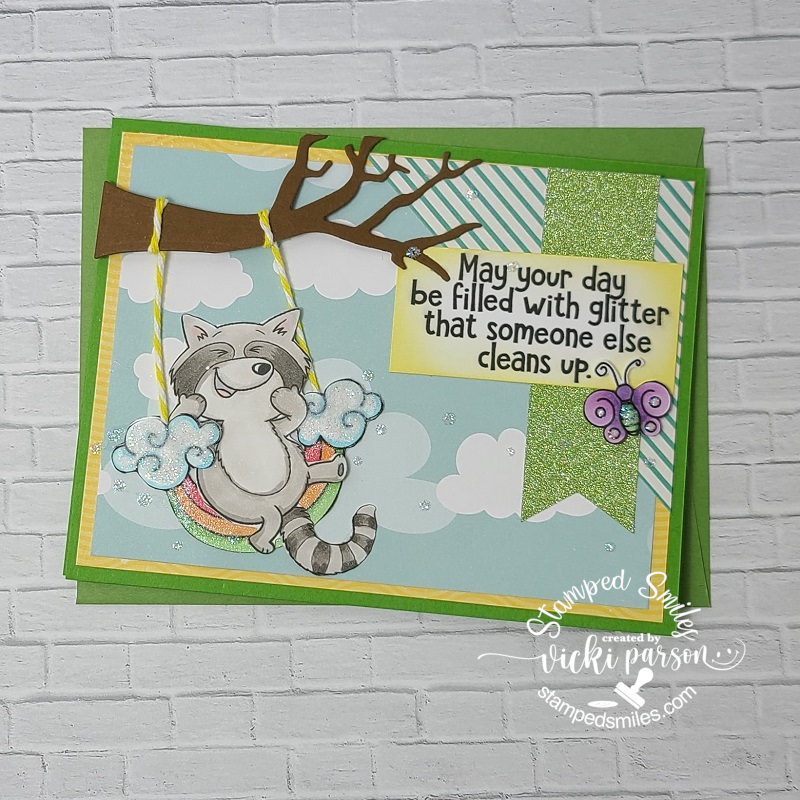
Everyone loves the gnomes and this one is too cute riding his snail friend! I’m using the “Grumblebonce Rides Again” from Dr. Digi’s House of Stamps for my card today. I’ve colored him up with Copic markers, added details with gel pens, glitter under the snail and glossy accents on the snail’s eyeballs. I die cut the image with a stitched circle die and ink blended around the edges before attached to another loopy circle die cut from brown cardstock.
I found some fun papers fitting for the image with red plaids and a strip of mushrooms that I’ve attached over another loopy die cut strip I’ve had in my stash forever. I wrapped some gold ribbon around it and attached to the red plaid papers that are attached to a 5″ square top folding brown card base. Before attaching the red plaid papers, I used a distress tool to rough up the edges. I’ve popped up the image with foam tape and added 3 gold enamel dots in the upper right corner.
With the card now laying flat, you can better see some of the shine from the sentiment at the bottom. I found these fun gnome style sentiments that can be foiled. So I used some gold foil and ran the strip through my Minc Machine. I sponged some blue and brown inks over it and then added some die cut mushrooms behind it and layered a piece of brown cardstock to layer behind it.
I placed the mushroom sentiment at the bottom with a portion of it with foam tape and the other parts just glued to the circle sentiment panel. I think it turned out pretty cute and I had fun coloring it up!
So please be sure to check out the challenge and come play along!
Thanks so much for dropping in and I’ll see you soon!
Happy Valentine’s Day friends! Today is the day all about hearts and love! Although I’ve already sent out my Valentine cards, I have a couple of lovely individuals who take a peek at my blog from time to time…so I have to wait until they’ve received their cards before I share them here!😉 It’s somewhat hard to “hide” my crafting since hubby’s now retired! LOL So here’s the cards I made:
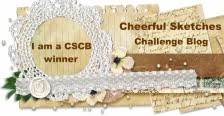
I just KNEW the minute I saw this Taylored Expressions Love Lights Stamps & Stencil Combo set that it was something perfect for making cards for my retired electrician hubby! This set also coordinates with other products and so I started by foiling the TE Foil It-Love Lights panel and then ink blending with the stencil set. I had to use blue as this is hubby’s favorite color. So, I’ve used the TE Sprinkles and Potato Chip inks. The cardstock is TE Sprinkles. (I used softer tones for the Valentine feel.) I also used the coordinating TE Mini Strips-Watt’s Up sentiment set that was silver heat embossed over the TE Sprinkles cardstock and cut out with the TE Mini Strips-Asymmetrical Die. I just love the punny sentiments that go with this set!
The tiny light bulb for the accent I used actually came from a TE ‘freebie’ with one of my orders, so I die cut the light bulb with white glitter cardstock and lightly sponged some yellow ink in the center. I die cut the center and bottom of the bulb with silver brushed cardstock and glued it onto the light bulb. I die cut a circle from some vellum and also sponged this with yellow ink and glued the light bulb on top of it and attached it to the side of the card nestled with the sentiment strips that were popped up with foam tape. He will have gotten this one this morning.
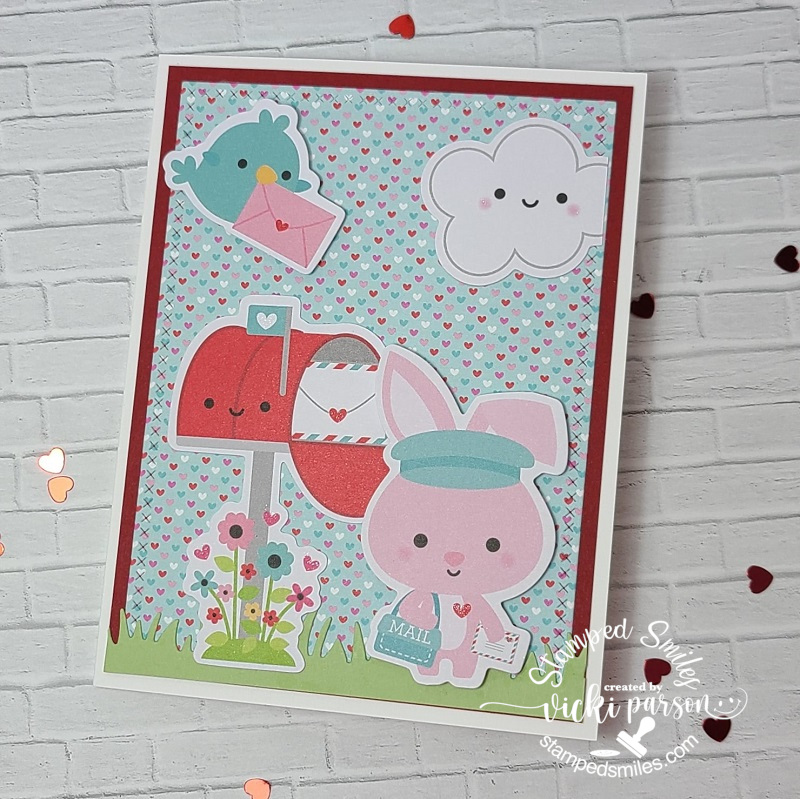
And here’s another card that I sent to someone very special! It’s a simple card, but wow it was so much fun to create with using the Simon Says Stamp Limited Edition Happy Mail Love card kit! (Looks like it’s still available at the time I’m writing up this post, but not sure how long it will stay available.) I so love those CUTE Doodlebug products and there are so many of them including the stamp set that goes together in this kit! I wanted to play some more with it, but I have so many other things to focus on, so I’ll have to come back to it later! LOL
I’ve used the Doodlebug background papers from the kit and cut it out with a Lawn Fawn Cross-Stitch die and also cut a strip of ‘grass’ with green cardstock at the bottom using the Lawn Fawn Grassy Border die. The heart papers were attached over a red piece of cardstock from the kit and layered onto a top folding A2 white card base. The grass border was attached over the red cardstock and heart background papers. This gave me the room to take the CUTE Doodlebug LOTS OF LOVE Odds and Ends Ephemera die cut shapes to create my scene with! This pack came in the kit and there are SO many pieces! I’m sure you could go on and on making cards! The bird and bunny die cuts were popped up with foam tape. It’s hard to see in the photo, but I’ve taken my glitter brush pen to all of the hearts on the images and the cheeks on the cloud.
I think these cards did what was intended which was to create smiles during this cold winter season! I sure hope that it has done the same for you as well! 😉 Wishing you a happy Valentine’s Day with all of my heart! ❤ Thanks for stopping in and I’ll be seeing you soon!
Hello friends! Hope you’re having a great week so far! I have a few cards to share with you today that I’ve made over the weekend having some fun.
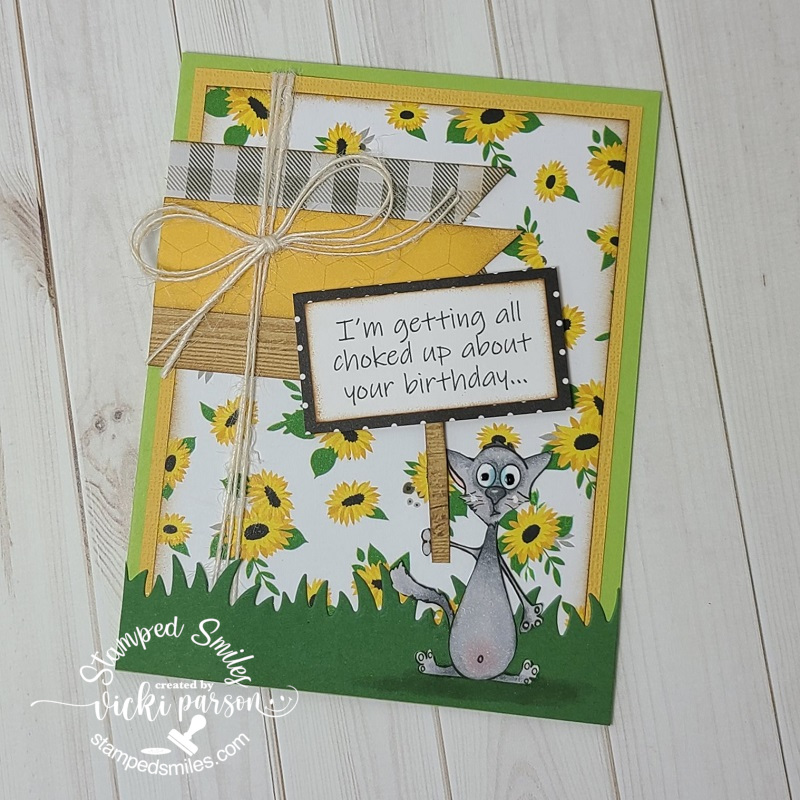
I love the cute little grin this goat has! This goat along with all of the images used are from the same stamp set by Inky Stamper. This month, the Inky Stamper FB group challenged us to create a ONE-LAYER only card…not even ribbon/twine, etc. could be used! I haven’t made one of these CAS or one-layer cards for quite some time, but I enjoyed the play with it.
So I’ve used masking paper to create this by stamping the goat over masking paper, stamping the goat over the front of the card and then placing the cut out masked goat to cover him up. I then die cut a circle over another piece of masking paper and placed the left over piece on top of my card where I masked my goat image. All that was left was the circle opening and this is where I ink blended the opening with distress inks. I also stamped the small line of grass with green ink.
I took off the circle mask along with the goat mask. I colored up the goat with Copic markers and then I stamped the triangle image from the same stamp set along with the sentiment. I then added 3 black gems and colored the inside triangles with a glitter brush pen. I also used my corner chomper to round the two bottom corners.
This last weekend there was another OOAK event and there was another fun card kit from Riley and Co. I didn’t attend the entire event, but joined in to see what the new release was about while I was making my cards from the kit. I’m pretty sure that there are no more of these kits left as they sold out of the first batch and had to make more.
The critters are so fun to color, and I really loved these papers from the kit as they have me anxiously awaiting Spring to get here! I’m bundled up, drinking hot liquids and trying to stay warm, but nothing beats a warm Spring Day! 😁
To get a better look at each one of these cards up close along with what’s going on for the insides, check out the gallery below. If you’re directly on my blog website, you can click on each photo below to enlarge it:
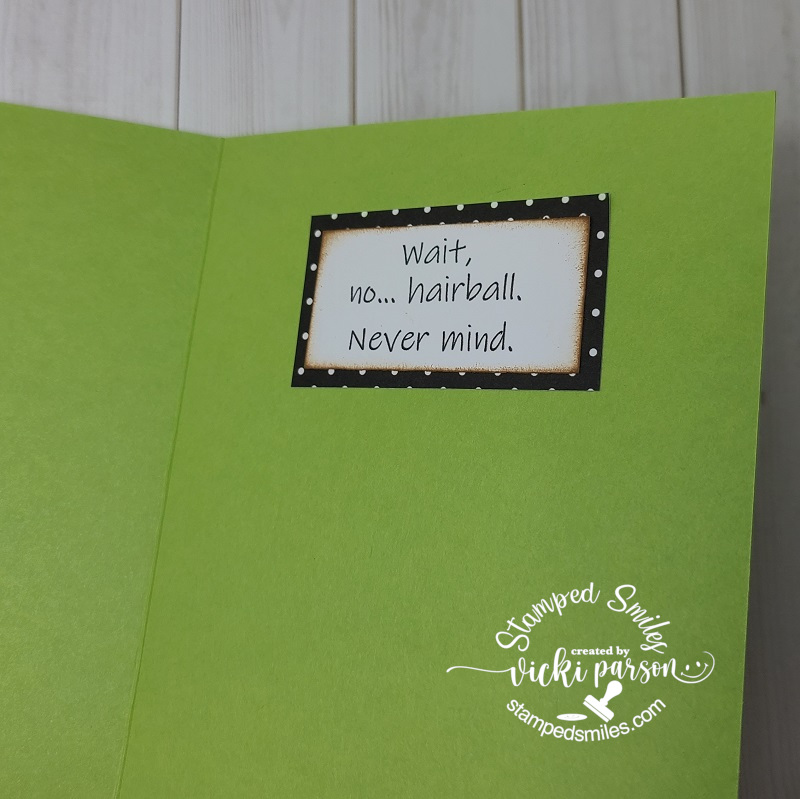
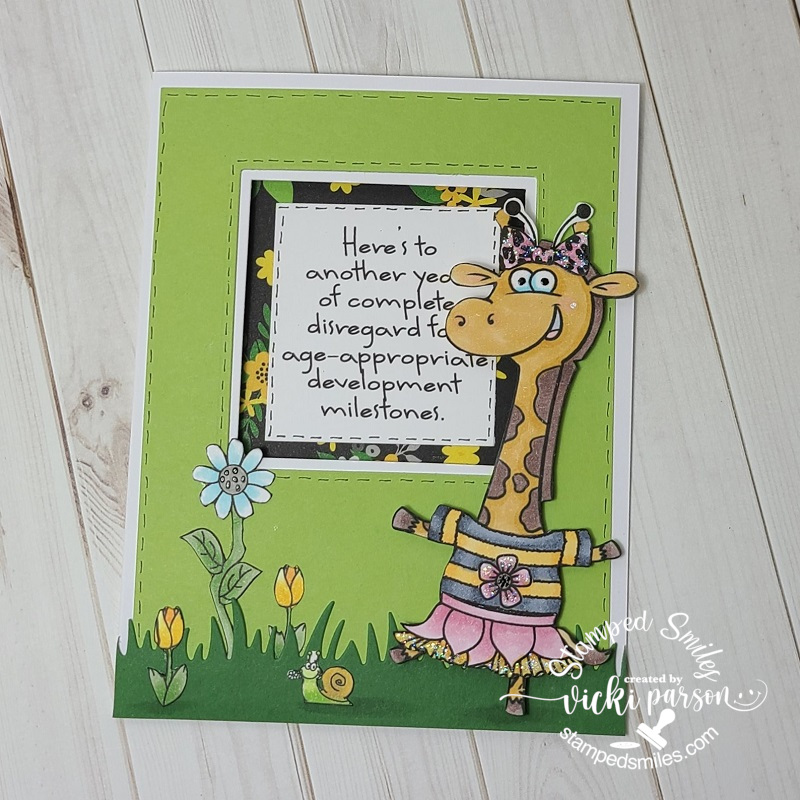
The cat’s bugged out eyeballs is too funny! I’ve used foam tape to pop up his sign.To continue with the cat sentiment on the outside, here’s what the inside part says! LOLIt may be hard to tell in the photo, but the sentiment is a window. Check out next photo to see the complete sentiment.Full sentiment for giraffe card…here you can window.This card opens along the side edge…check out next photo to see inside…I sort of messed this one up as I should’ve placed the outward fold back a little more as the card doesn’t completely open and I didn’t have room for the sentiment…so this was changed later.
Just wanted to share my recent makes as I’m still trying to work at finishing up some Valentine cards along with getting going on the wedding invites. Sure enjoy seeing the wonderful inspiration from everyone and hope that you’re all staying safe and warm friends! Thanks for stopping in and I’ll see you soon!
Hello friends! Happy Friday and I hope that you’re having a great week so far! I’ve been having some fun creating a couple of Valentine’s Day cards with a fun/snarky inside greeting.
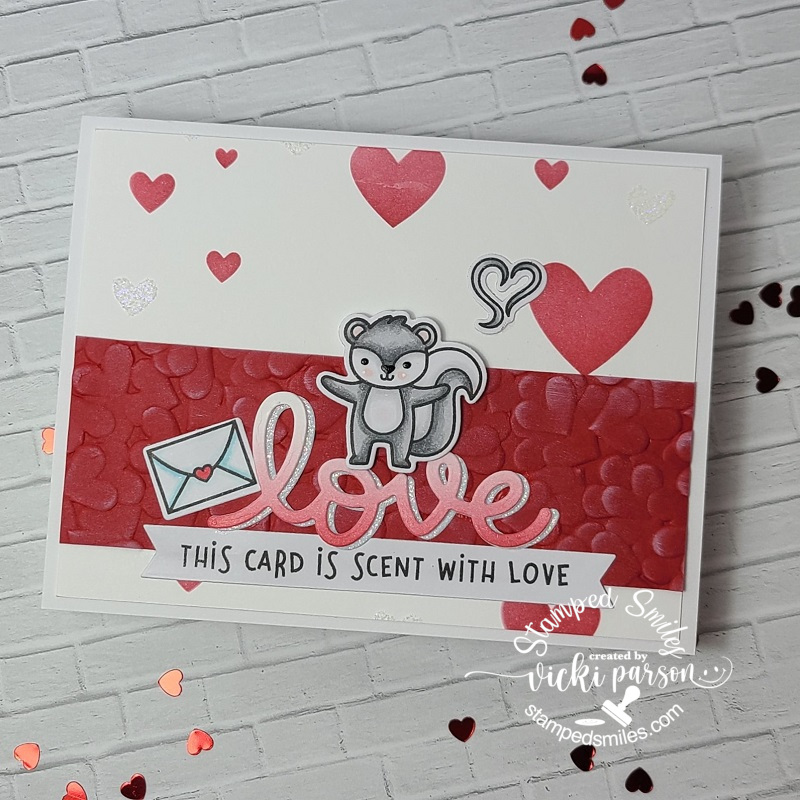
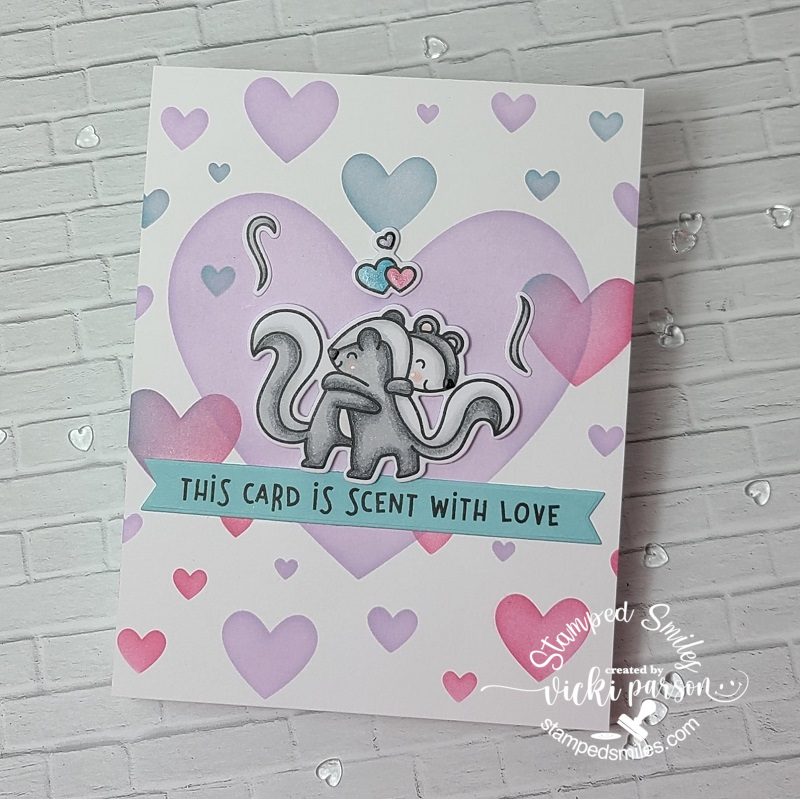
So, I absolutely fell in love with these STINKIN’ CUTE skunks from Lawn Fawn! A few weeks ago, I caught a live on FB and enjoyed the crafty products shown with these Lawn Fawn Scent with Love stamps! I wanted to play with them and decided to order it! I didn’t have them on hand during the video, but I decided to do my own spin from their cards once mine showed up in the mail.
I didn’t use the heart stencil they had as I decided to use my TE Heart of Hearts Layering Stencil on both of these cards. I’ve used some clear glitter paste over the first layer without using the largest heart, let it dry and then used some red ink for the second layer. The red strip was embossed with a 3D heart folder. I’ve used the Lawn Fawn Scripty Love die that was ink blended faded with the red ink and layered over another die cut sentiment with glitter cardstock. All of the images were colored with Copic markers and die cut with coordinating dies. I’ve used some black glaze and white gel pens for accents. I just glued all of the pieces down with the exception of the skunk that was popped up with foam tape.
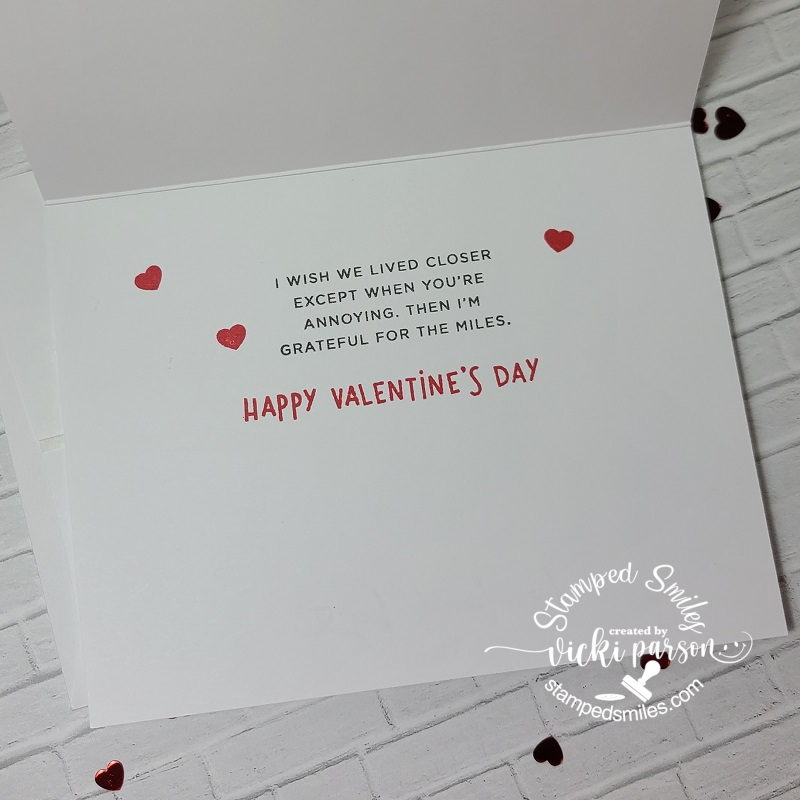
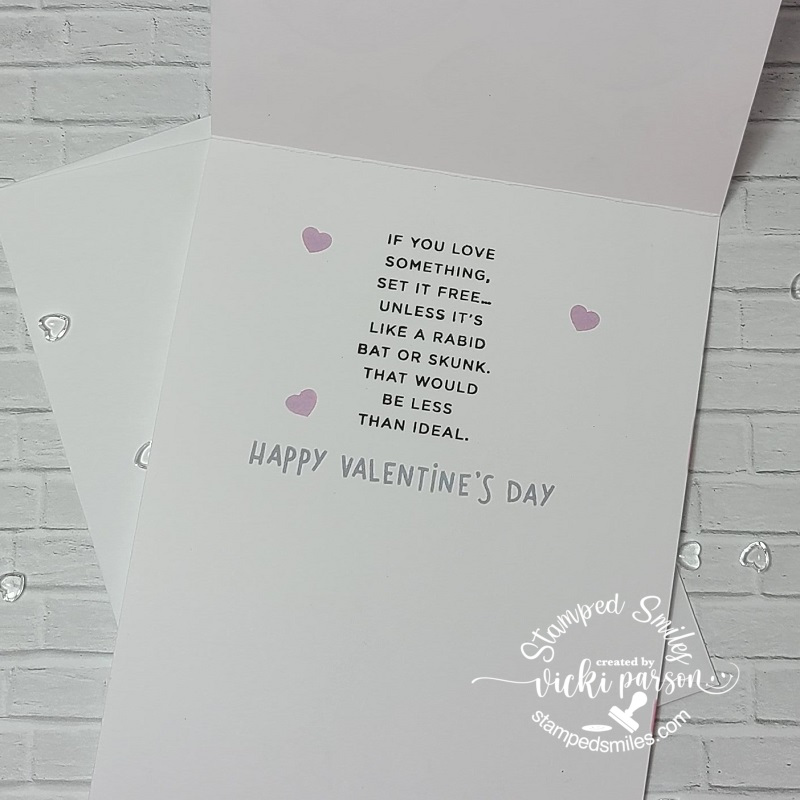
OK, I had shared the inside of the card that the recipient will be receiving as I thought they would get a kick out it. 😆 I’ve used the SSS Sassy Insides stamp set for the inside of both of these cards. I finished with the Valentine sentiment and the tiny hearts from the Lawn Fawn set.
And so this is also a “spin off” from the second card they did on the live, but I decided not to add another layer to it; instead, I used the large heart within my stencil to center these darling hugging skunks. I did about the same thing that I did on the card above with different colored inks. The only thing popped up is the skunks over the sentiment banner that I cut out using the MFT Stamps banner dies. I think this turned out so cute for a one layer simple card.
And then here’s what the inside of the card looks like with another sentiment from the same SSS stamp set that I’ve used on the above card! 😆 I think this one was so appropriate for using with the skunks!
So I’m thinking that these cards would be something fun for the recipients to receive in the mail. It’s a great time of year to get something to chuckle about especially if it’s unexpected! I hope you’ve enjoyed seeing them too!
Thank you so much for stopping in today! I wish you a happy and wonderful weekend ahead!! See you soon!
So after getting my calendars ready to start the year off, which is easy to sit and craft during the cold snowy winter where I live, my mind turned to winter when creating! Sometimes it’s nice to create with a “snowflake/winter” theme because I think they can be used interchangeable for Christmas or just a “warm winter greeting” for someone! (Or… because you might be late sending one out or for those friends overseas that won’t arrive one time!)
Today I’m sharing a card that I’ve made for this month’s Inky Stamper challenge on FB with the theme: “Shaped Cards.”
Isn’t she cute?! I was trying to come up with a different shape besides a regular circle, etc. So, I looked up “coloring pages for kids” free online and found this one that I resized to what I wanted and printed it out over some light purple cardstock. I used another printed one as a template so that I could cut another one out over a folded cardstock piece to create a shaped folded card design. (You can partly see the back piece in the photo.) The sparkly “ball” at the top was just die cut out from a scallop circle die with sparkly silver cardstock.
For the card front, I used the Inky Stamper Snow Angel stamp set to stamp the snowflakes in the background with some purple ink. I white heat embossed the sentiment over and wanted it to stand out a bit more, so I sponged some more light purple ink over top of it. I colored “Rosie” over Copic blending card and used the die to cut her out with. I’ve die cut a couple of the large snowflakes from Lawn Fawn with white cardstock and layered them over the beanie hat. You can see that “Rosie” is popped out a bit over that snowflake, which is where I’ve added a “wobbler” to her.
I finished the card with some sparkly Icicles sequins mix. I filled the centers of them with some Silver Stickles.
Because of the “ball” on top and the length of the “beanie band”, it needs to be in a 5.5″ square envelope to mail. You could also make your own envelope which I do all the time anyway. But the 5.5″ size fits perfectly.
*Speaking of Inky Stamper things, this past prior weekend there was an OOAK event (on FB) that Inky Stamper was a part of, so of course I wanted to get the kit and play along too! Here’s my results:
The top card is an interactive “Theater Fold” design. (All of the pieces were included with the kit along with an instructional video/class.) She usually always includes a mini bonus card which measures about an ATC size. (3.5″ x 2.5″) She used the “icicles” from the stamp set, but I decided to stamp and cut out another snowflake for the front of mine. I added a pretty gem to the center of it.
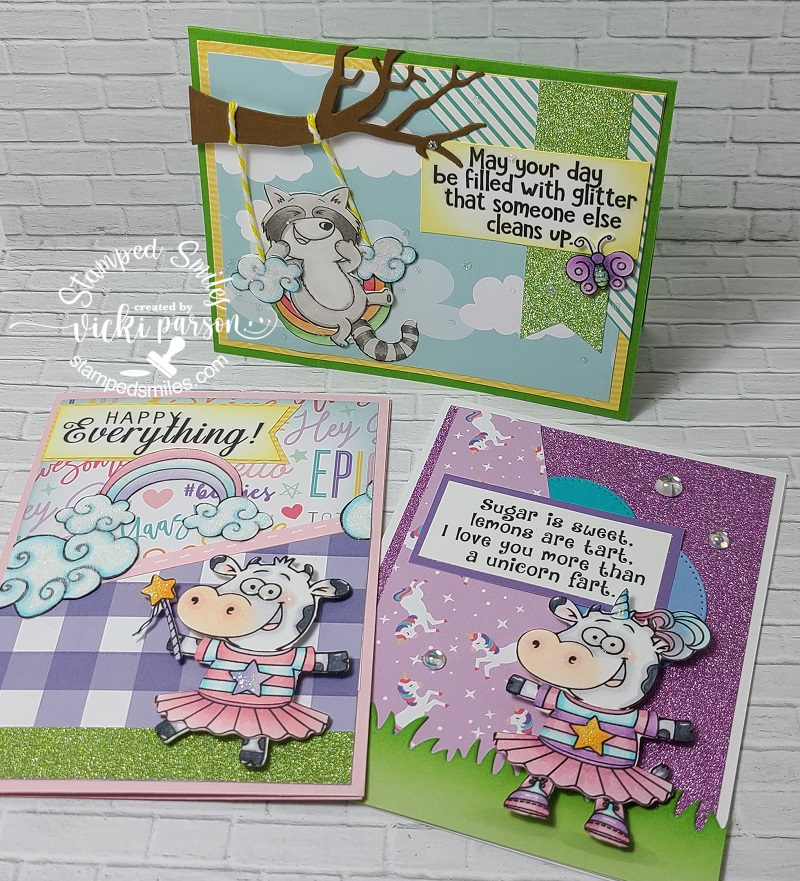
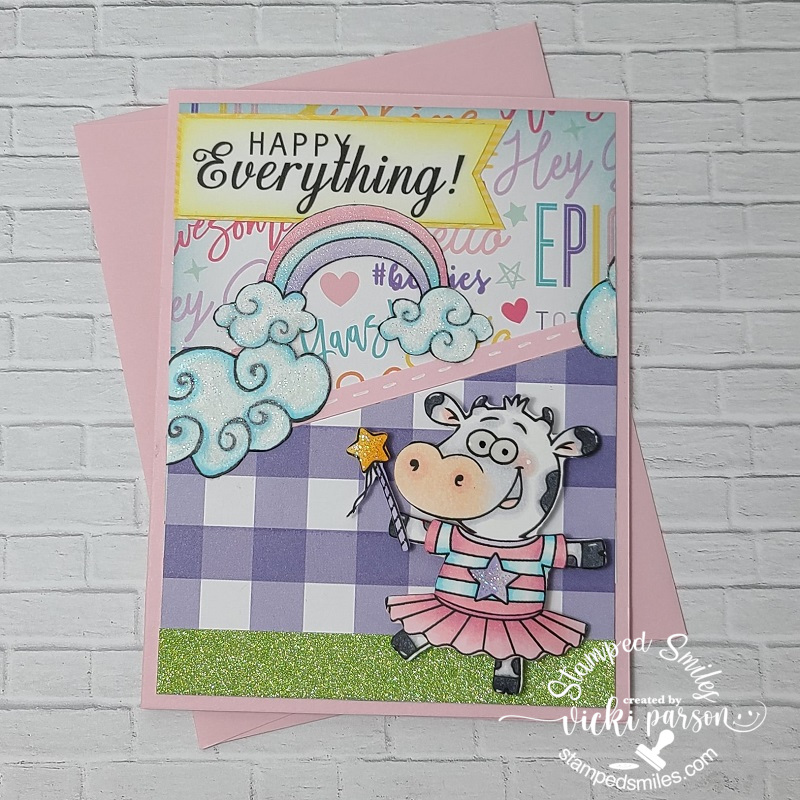
And of course, that’s not the ONLY fun I had during the OOAK event! I decided to play along with the always cute and funny Riley and Co. as well! Here’s the set of cards created from that class:
I just thought these were so cute with the cow images and their little outfits along with the “Funny Bone” sentiments! The instructions came with the kit which were really easy to follow along with. I basically looked at the photos and put together the pieces from the kit. For the clouds, I decided to pull out some sparkly white flock to cover them with. They have a nice soft feel to them! They just make me chuckle and I think it will be fun to send along to someone who needs a smile! 😉
*If you are visiting my website, then you can check out each one of these cards in the gallery below by clicking on the photos to enlarge them: (I’ve found some coordinating envelopes from my stash for each card.)
Flock was added to the clouds.purple, sparkle and funny sentiment…what more could you ask?!rainbow image was turned upside-down for the swing! So clever!
I sure hope that you’ve enjoyed my post today and have been inspired in some way! Really appreciate you stopping in and I’ll be seeing you soon!🥰 Stay warm!
Challenges (For Winter Beanie Hat Shaped card ONLY):
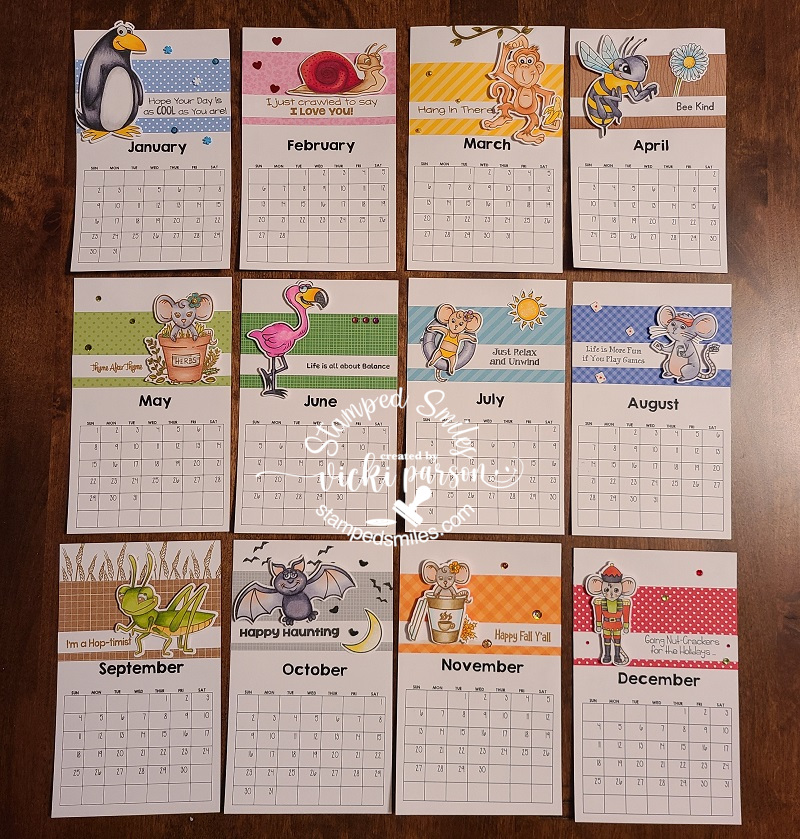
Hello friends! How are you dealing with the 2022 year so far? I hope that you have a fantastic start and look forward to a brilliant and crafty future ahead of you! Speaking of starting a New Year, I realized that I needed to start my crafty calendars…which really should’ve been started sooner!🙄 I actually enjoy putting them together, especially the coloring as it’s very relaxing for me.
I’ve had this set of calendar cards along with this stand since this last Spring from Taylored Expressions and of course I’ve waited until recently to get them finished up! I’m glad I did though as I think these will be so fun to look at and chuckle to change out each month:
Tee hee! What got me interested in Taylored Expressions from the start were these adorable and funny Grumpy characters that she has in one of her product lines! (You may have seen a “Grumpy” calendar I’ve made in the past on THIS POST.) She has LOTS of different types of calendars and accessories to choose from, but this is a set that had come out this past year. I thought this would be a fun way to help motivate me this year for creative inspiration!😁
I’ve taken a white piece of cardstock cut to size my calendar stand that would accommodate the tear-off calendar pad and hold the “snarky cards” in place with the gold clip. I’ve used some TE inks and blender brushes to blend over top of the white piece. I then used the TE Striped Squares stencil to go over it using the same colors and then mounted this piece over a black cardstock layer. (This piece and the changeable cards are held to the stand with the gold clip.)
Here are all of the completed cards in the set that I can change out each month or whenever I want. I’ve used the TE Clipboard Calendar Cards-Snarky for my own personal calendar that I’ve colored up with Copic markers. The frames were colored with coordinating colors that matched up with the rainbow stenciled background for my calendar front. Really enjoyed coloring and giggling while making this set!
I also wanted to show you the back side of this TE Walnut Wood Clipboard Stand so that you can see how I store all of the extra cards on my calendar when I need to change one out. You can choose to add a package of the TE Calendar Storage Sleeves with the stand if you get one, but I thought this whole system was a nice and sturdy option of creating a calendar that you can personalize for yourself or for a gift. I ended up creating a calendar last year for Mother’s Day and gave it as a gift. I used the TE Clipboard Calendar Cards-Sweet for that one and did some foiling on them. (Just don’t forget to purchase the next year’s tear-off calendars to replenish the recipient for next year!)
And I also wanted another calendar for my computer area which also brings a smile to me each month! I bought a calendar set last year from Inky Stamper and really enjoyed flipping the cute characters each month as the year went on. Happily, she came out with another new calendar set for this year and I happily purchased it BEFORE it ran out! (So sadly, it sold out quickly!)
With these calendar kits, the stand, the monthly calendar cards as well as all of the pattern paper strips, stamped and die cut characters and sentiment strips ALL come with this kit! I think it’s a pretty good bargain for all that was included with it. Of course, you have to color and put together each card…but THAT’S what the fun is about!
And here’s a look at the entire set of calendar cards that I colored and put together. There were instructions for each card along with the Copic markers used in the examples. For some of the cards, I already owned the stamp set, so I added a few extra details to some of them and I also added a few of my Inky Stamper Gems and Sequins mixes to some of them. Square dots and a strip of gold enamel dots were also included to decorate with.
So, I had an awesome time putting this one together as well! I look forward to seeing every single month throughout the entire year!
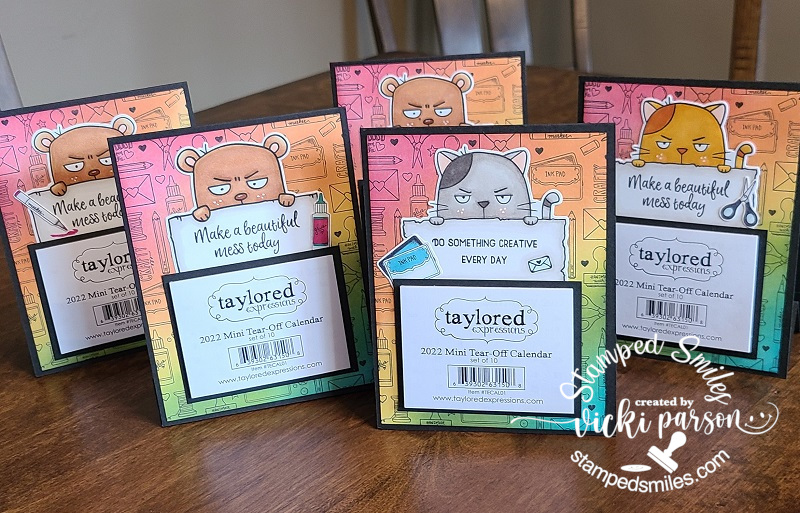
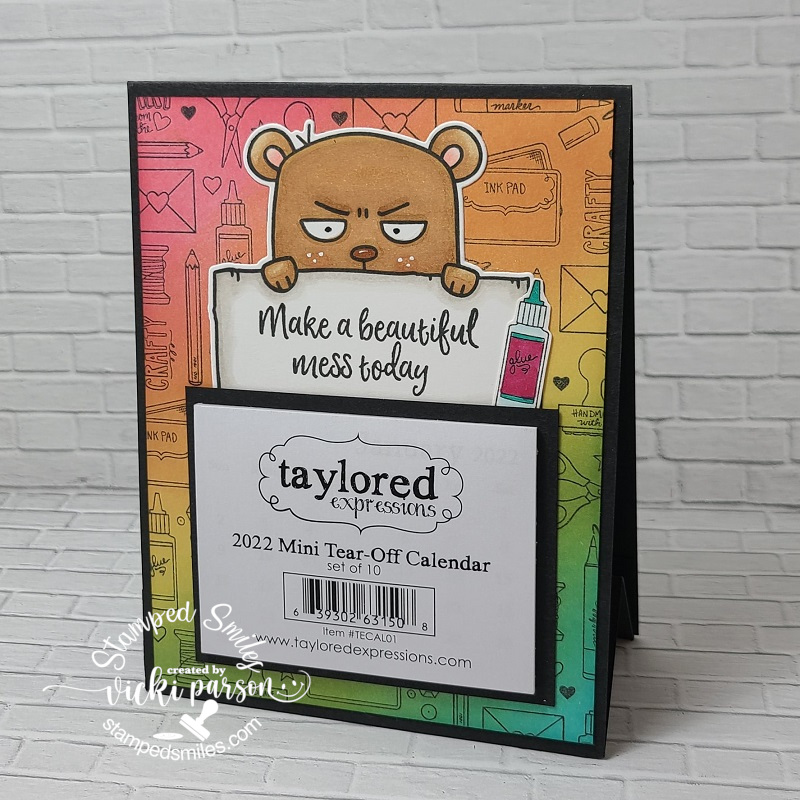
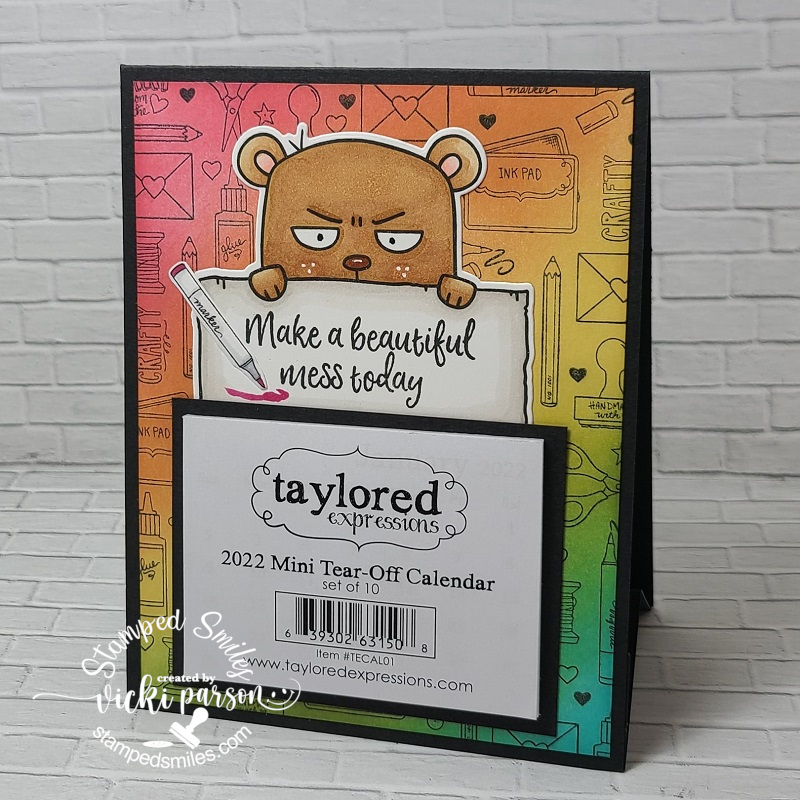
Since I had a couple of left over Taylored Expressions 2022 Tear-Off calendars, I thought it would be fun to just create a “calendar card stand” for crafters and give them out to whoever wants one!
EDITED UPDATE: All of the calendars have been claimed! Sorry if you’re looking to get one as I have no more left. Hope everyone enjoys their calendar all crafty year!
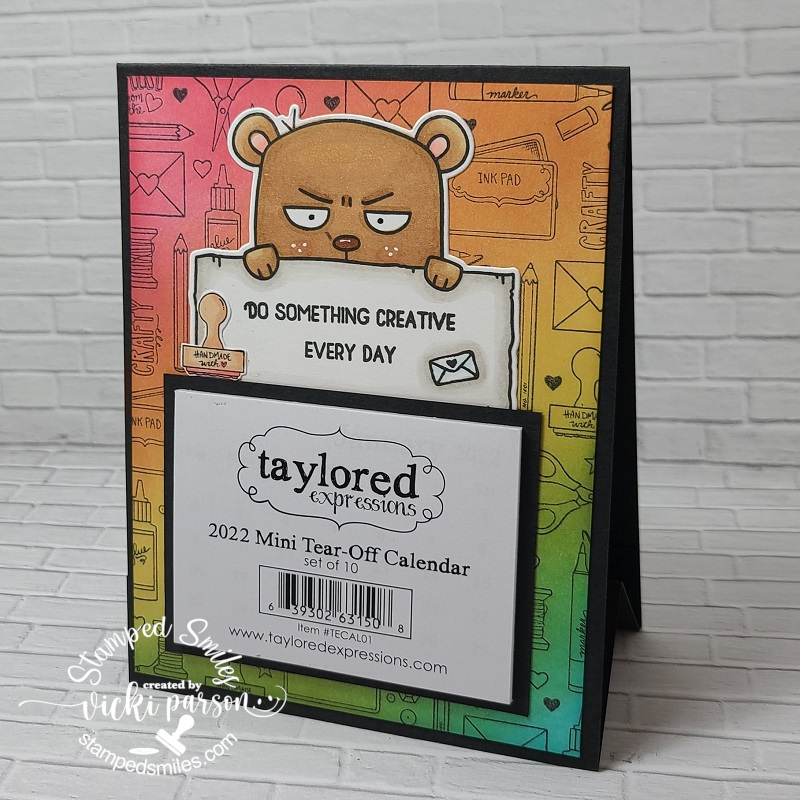
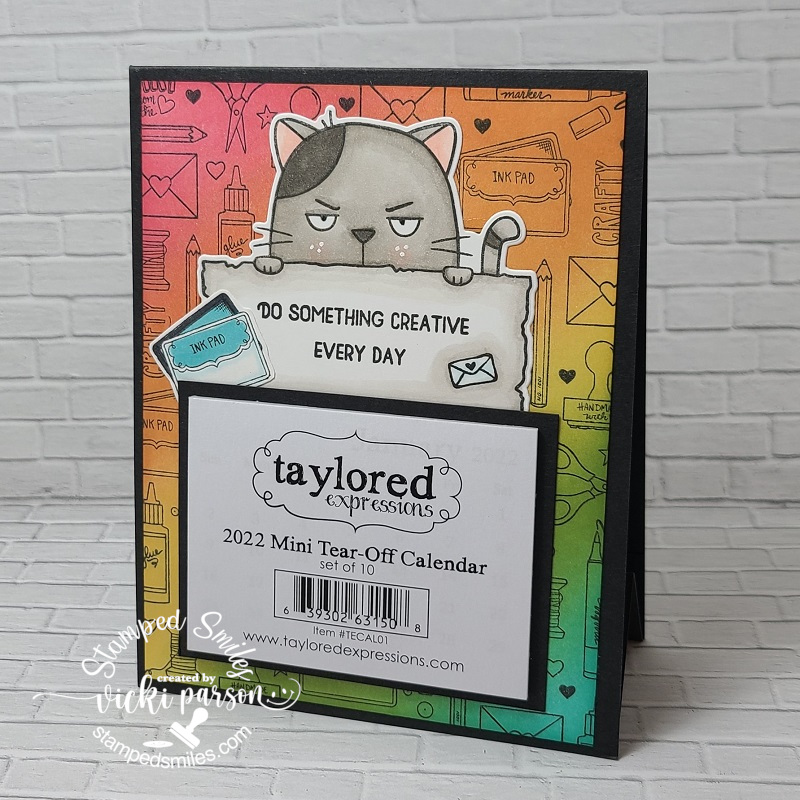
So, I had 5 of these calendars left over and I knew I wasn’t going to use them, but of course I didn’t want to just throw them out either! So, I took the TE Big Grumpy Bear and the TE Big Grumpy Cat sets to help motivate a fellow craft friend throughout the year! TEE HEE! I’ve made a rainbow-colored background for these by taking the TE Art From the Heart background stamp and stamping it with black over a white piece of cardstock. I used some TE ink and blender brushes to blend in the rainbow colors. I stamped an extra background image to color in some of the images and fussy cut them out for accents.
I attached the “Grumpies” over the background and layered the calendar with a black layered piece behind it to go over top of the “Grumpies” with their “feet” underneath so you can see them. I then added the fussy cut out images that I colored in a corner of each one.
I made a “stand” for this by creating a valley fold piece to attach in between the top folding A2 black card base. This will make for a permanent stand to display your calendar through the year! (And hopefully motivate someone’s crafty process throughout the year) I receive so much inspiration from many of you crafty friends, so it would be nice if I could possibly reciprocate that in some way!
Check out each one of these calendars I’ve made below in detail! Just click on the photos to enlarge them if you’re on my website:
Grumpy Bear with glue bottleGrumpy Bear with markerGrumpy Bear with stampGray Cat with ink padOrange Cat with scissors
So now that we’ve got the year started and in place, let’s hope for a really creative and productive one ahead!
I have some more craft projects that I’ve been working on as well as a really BIG craft project that I’m taking on for the love and excitement of it all! I look forward to sharing with you soon!
Thanks for stopping in and I wish you a happy, healthy and productive rest of your week!
Challenges:
Sweet Stampin’ – NEW (stamped New Year calendars with new products!)
Hey there friends! Wow, so my last post was Thanksgiving and I pretty much missed the entire month of December it seems like, right?! It has been a very crazy month with lots of different things (including personal) going on so pardon me for going MIA!
I HAVE been working on some projects here and there and I would be happy to share those, but for right now, let’s focus on the Christmas projects that I’ve been working on getting ready for the up-coming Holiday next week!
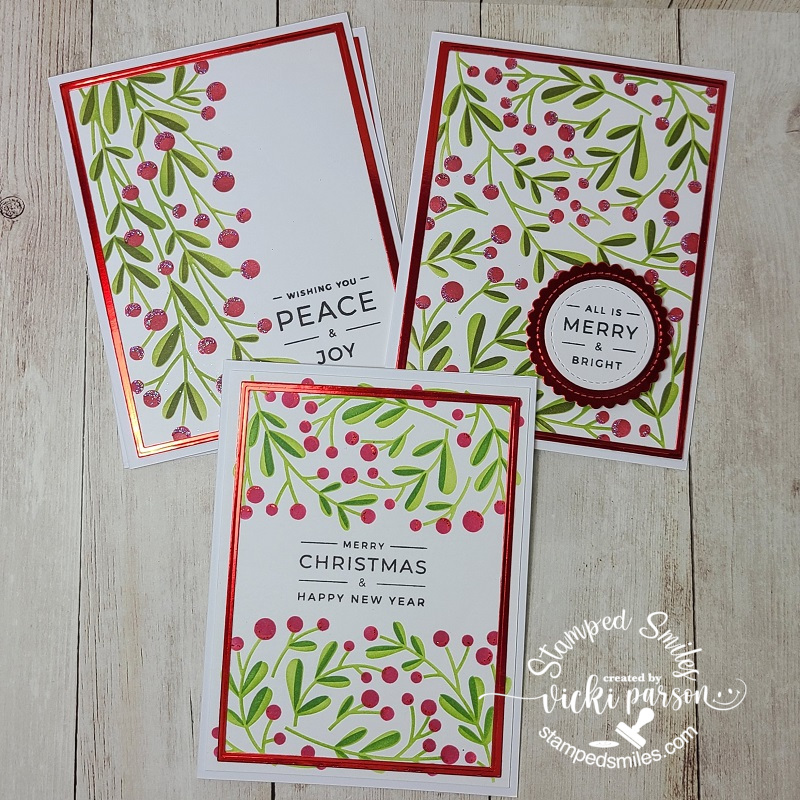
I have already sent out my Christmas cards, thank goodness, as I wasn’t even sure that was going to happen either! I was very impressed with the new Taylored Expressions Create-in-Quads Mistletoe Layering Stencil and how quickly I was able to knock out 4 card panels at a time, which was a huge time saver to get my Christmas cards finished up! There is actually a set of 4 designs here (like shown below), but I was in the middle of addressing the cards and forgot to photograph some before shoving into envelopes! LOL This set was using the white cardstock with the green and red colors which turned out very pretty. I also used the red glitter paste for the highlights on the berries.
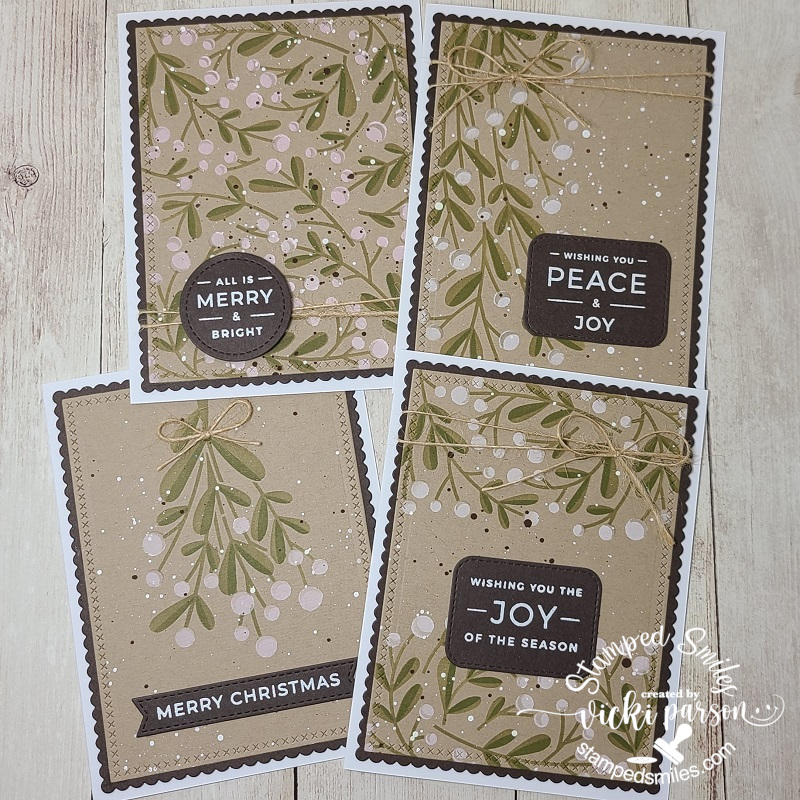
And here is the other set of four cards that I made using the Toffee colored cardstock with green and white inks for the stenciling. I’ve also splattered these with brown and white paint. The sentiments were white heat embossed over some TE Chocolate Truffle cardstock and cut out with some MFT dies. Before attaching to the pre-made white A2 card bases, I also wrapped some twine around some of the panels or added a bow with it. (I love the homespun look of the white mistletoe!)
These all turned out great because they were pretty much flat and fairly easy to mail off. I think I was short just a few which is where I’m glad that I still have a few extra cards that I had made throughout this year and I have previously given out some “extra special” Christmas cards earlier in the year as well. I think you may have already seen them from a previous post…I will have to take a look and see under my “Christmas” section!
If you’re looking for a last-minute Christmas gift/tag, these wood slice things are so quick easy and fun to create! I’ve had a huge box of these wood slices for a long time, so I pulled one out to make a project for the Inky Stamper December challenge on FB. I had hubby drill out a hole for me at the top before decorating so as I knew where to put everything.
I’ve used the Inky Stamper Christmas Bauble stamp set for the stamping on the wood and colored in with pencils and gamsol. I’ve added details with a glitter brush pen on the ornament and added some snowflakes with Nuvo White Crystal Drops. I had to mask the frog to stamp the Santa hat on him. I’ve used some silver twine for the hanging portion and then I glued a silver bow with some silver ribbon from my stash under the hole.
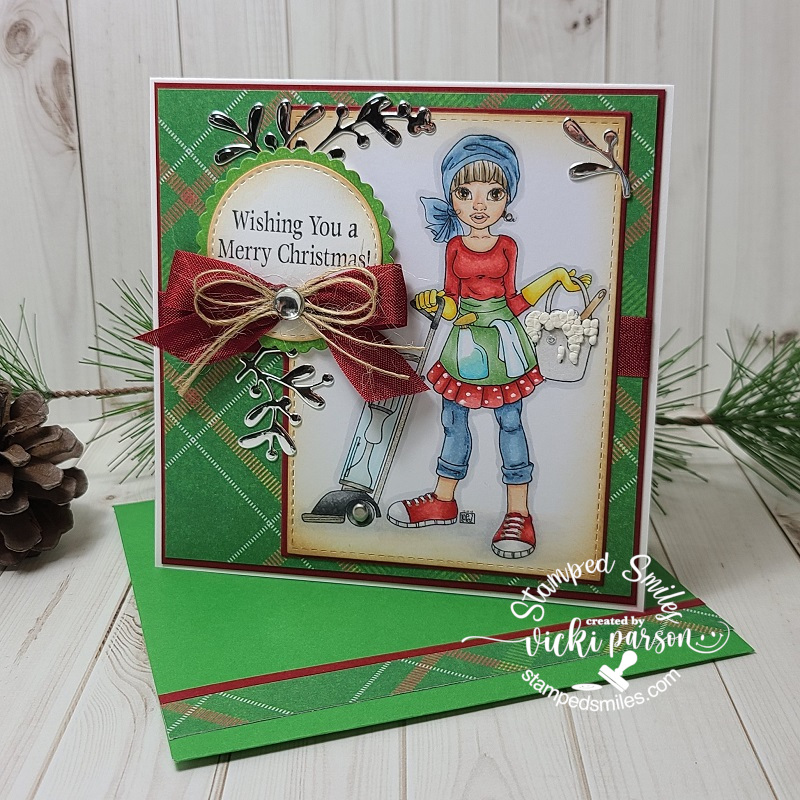
And lastly, I’ve also been working on some commissioned cards as well! Last year, I had a request from someone to create a special Christmas card for his cleaning lady. I had him pick out an image and asked about the colors…you may remember it as I had posted it last year.
a few months back, someone had asked me to re-create the same design for them with pretty much the exact design with the exception of the sentiment which I changed out for this person. This one went to another country and I was concerned about the shipping costs, but it was not a problem. The package had taken an unexpected journey because of the crazy mailing system going on at this time, but it arrived eventually and was in “perfect condition” as reported to me, so I was so thrilled with that and they seemed very pleased with it.
With the square size of the design (5″ x 5″), I’ve handmade the envelope for this one as well. I found the exact papers used in the designs for these cards, but I don’t think I have any more left after completing this one.
Here’s how I’ve decorated the inside of the card and left blank as requested for their own personal use.
So now, I just want to take this time to say THANKS SO MUCH for hanging in there and stopping in today! I don’t have too much time on my hands right now as I’m getting ready to make some Christmas treats and the Holidays will soon be over. I hope you are all doing well and I wish each and every one of you a very safe, happy and healthy Holiday Season!
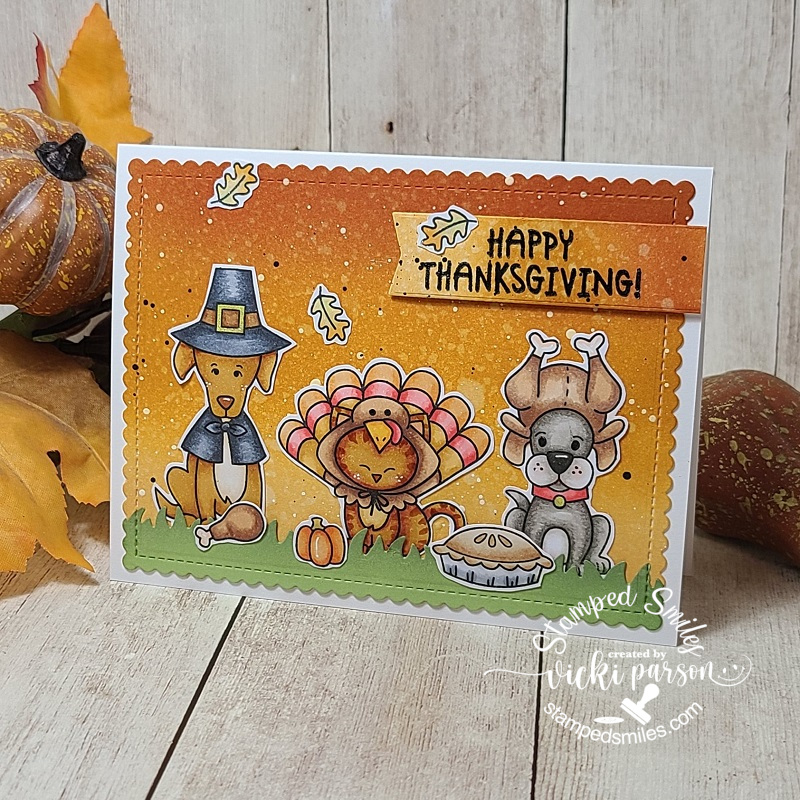
Hello! Wishing a Happy Thanksgiving tomorrow for my U.S. friends! Just wanted to pop in here to share this fun little card I made to help me get into the Thanksgiving mood and I needed a bit of a giggle which is what I was doing as I colored these fun critters:
Aren’t these guys hilarious?! This is one of the stamp sets that was released during the Simon Says Stamp STAMPtember event this year and of course if you recognize the critters, then you know it was designed by Newton’s Nook. The stamp set is called “Talk Turkey” and was only available during this event. I don’t make very many Thanksgiving cards, but when I saw this stamp set come out, it just had me giggling and so I nabbed it up! I think I would certainly enjoy a Thanksgiving dinner with this crew!
For the card, I ink blended the background with the distress inks: Rusty Hinge, Wild Honey and Scattered Straw. I spritzed with water and dried the splotches with a towel. (I’ve done the same method with the sentiment strip too.) I then used some black and white paint to splatter over it and set aside to dry.
While waiting for the panel to dry, I colored up all of the images with my Copics. I’ve added some gold and white gel pen marks in certain places and then I fussy cut them all out leaving a white border around them.
I took a strip of green cardstock and die cut a grassy border and attached to the background panel. I cut both of these layers out with a stitched scallop die and then cut out the black embossed sentiment with a banner die. I then arranged all of the images where I wanted them and glued them down. I took the banner and popped it up with foam tape. I added the leaves and covered them with a glitter brush pen for a bit of sparkle. I attached all of these layers to a white A2 card base and cut off the sentiment strip along the edge.
Hope you’ve enjoyed my card today and it made you smile! Thanks for dropping by!
Enjoy your Thanksgiving with love, laughter and lots of thankfulness in your heart. 🦃
Hello friends! Really hope that you’re having a great week as we start to dip down into cooler temps and that means that Autumn is coming to a close (sadly) and winter is upon us along with Christmas! Are you ready? I’m working on things…that’s all I can say! I need to get more motivated for sure! Many things are already done, but it’s the double checking to make sure…and sometimes it’s not! LOL
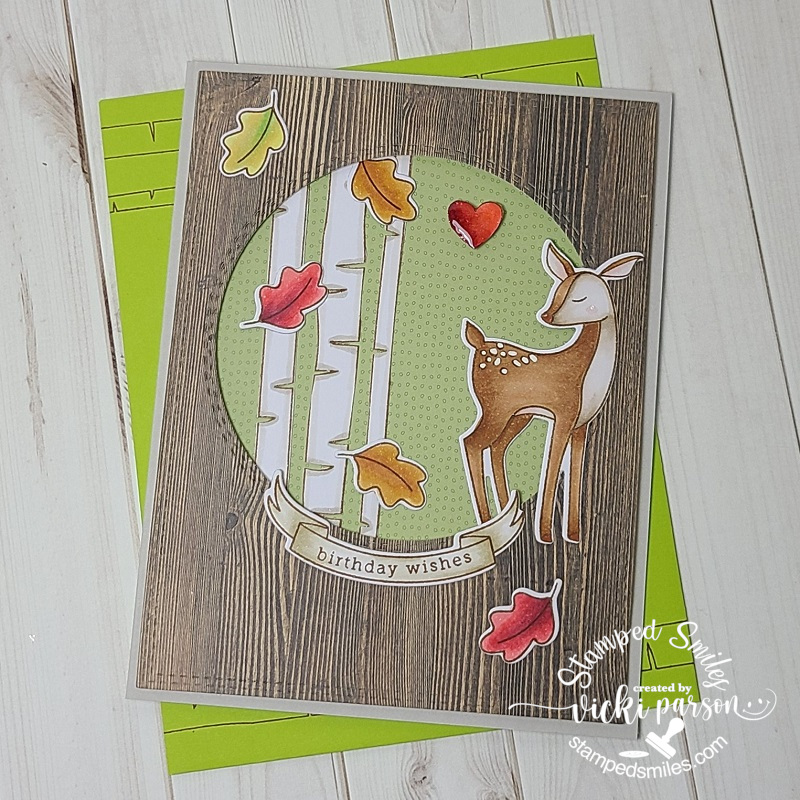
Recently, I needed to make a birthday card for hubby, so I pulled out a card kit I had from last year and came up with this one for him:
This was a really fun one to do from the Simon Says Stamp Woodland Whimsy card kit from last year. (I linked the stamp set and dies still available.) My husband is a huge fan of outdoor wilderness and especially deer in the Autumn season as they can be easier to spot with the falling leaves. So it just seemed like the type of card to make suited for him.
I’ve colored in all of the images with Copic markers and die cut them out with the exception of the birch trees as there were no dies included with the set. I placed them behind my die cut circle from the woodgrain paper included with the kit. I backed it with another piece of the paper from the kit as well. I even tucked in the back part of the deer’s feet along with a leaf to make it part of the scene. I like the banner from the set which is left blank so that you can add whatever greeting you want with it.
The little heart above the deer was also fussy cut out and then I covered it with a glitter brush pen as well as some crystal effects over top for the shine. I thought about adding some sequins, but decided it wasn’t needed. The scene was layered over a piece of cardstock included with the kit and then I stamped some of the birch trees onto a coordinating envelope as well.
Also thought I’d share some other projects that I’ve been working on since my last post. It seems that I’ve become a little addicted to taking those classes and events…honestly don’t need to be taking them, but sometimes it’s just fun to participate in the fun with fellow crafters! I do enjoy sharing with those like-minded crafters like me! 😁
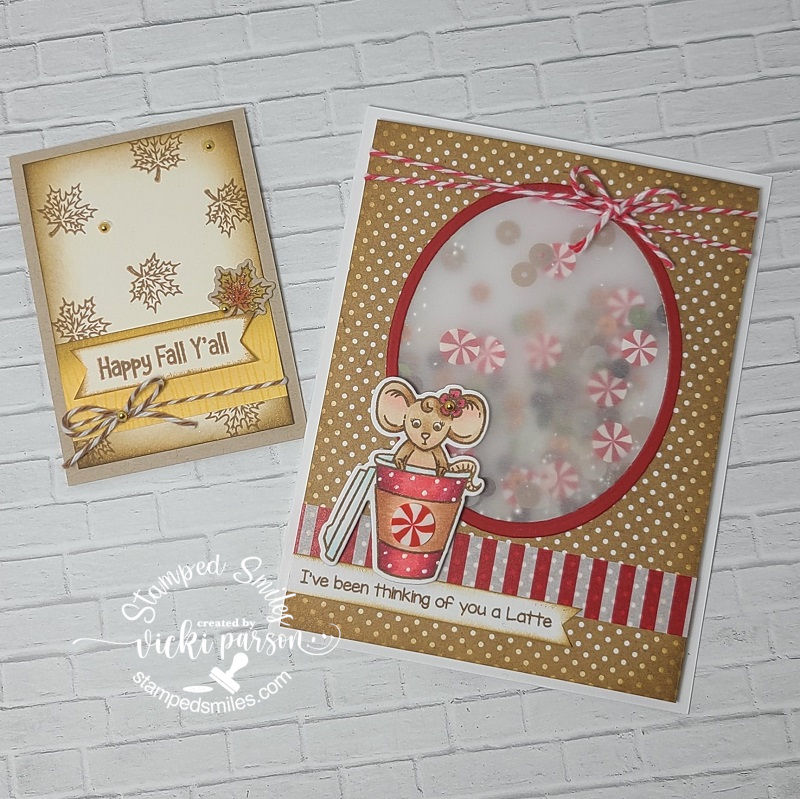
These are all projects I’ve made using products from Inky Stamper. ***If you are on my website, just click on the photos to enlarge them to see better and the wording will also be more visible.
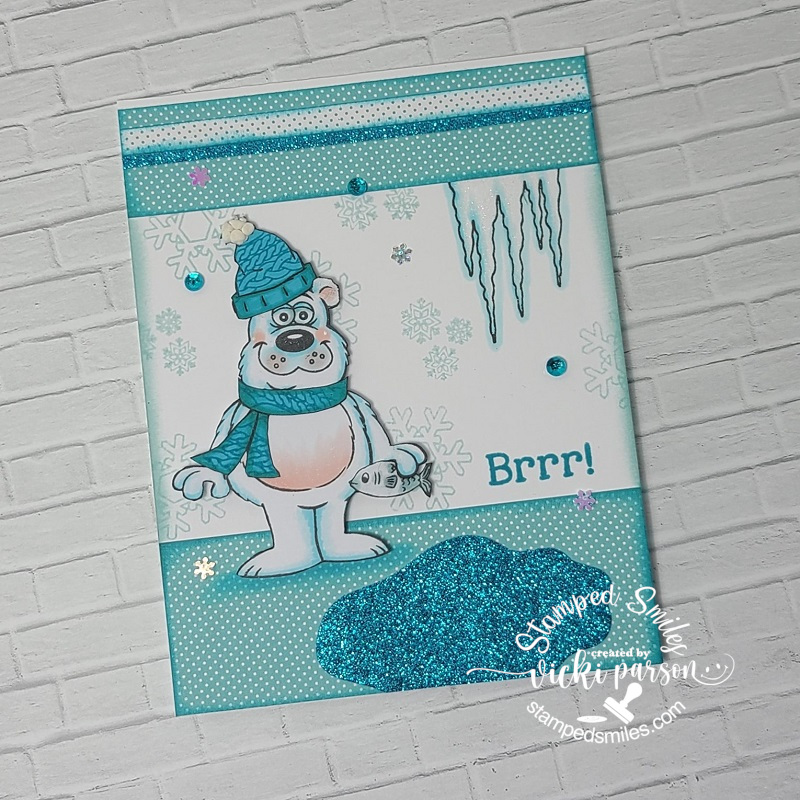
These are projects we made during a “Game Night” event! Cute fun fold card, a mini card and the little round container is decorated with a deck of circle playing cards inside! It has a magnetic closure! Super fun event!This is a set of projects made during an OOAK event class with Chelsea from Inky Stamper. We made the fun vellum shaker card and the mini Fall card with this class. The kit is still available in the store here – Peppermint Mocha Latte KitThis card was made up by me for the Inky Stamper Inkspiration FB Group using the colors Blue and White for this month’s challenge. I used “Bear” for my main image.
I’ve also been working on some Christmas things that I will share soon as well as some other requested commissioned cards that I’ve recently finished. I would like to get those Christmas cards finished up early for a change! How about you?! Are you all done creating for the Holidays yet?
Until next time, thanks for stopping in today friends!