A {Cupcake Inspirations} Color Combo Reminder with a Slimline

Hello there friends!  I hope that you’ve had a wonderful weekend!  It’s slowly getting cooler as we go along with this month and even some snow in the forecast.  I love the Autumn Season and will try to hold onto it for as long as I can!  So with that, I’d like to remind you about the halfway point of our challenge:

There are still a few days left to enter your project for the Yellow, Orange and Red color combo challenge over at {Cupcake Inspirations} so I hope that you can join along with us!

123967487_10221552730039449_8746739481814888156_n

  **Also, there is currently a design team call going on right now if you’re interested in being on the “Cupcake Sweeties” team.  CLICK HERE for more details**

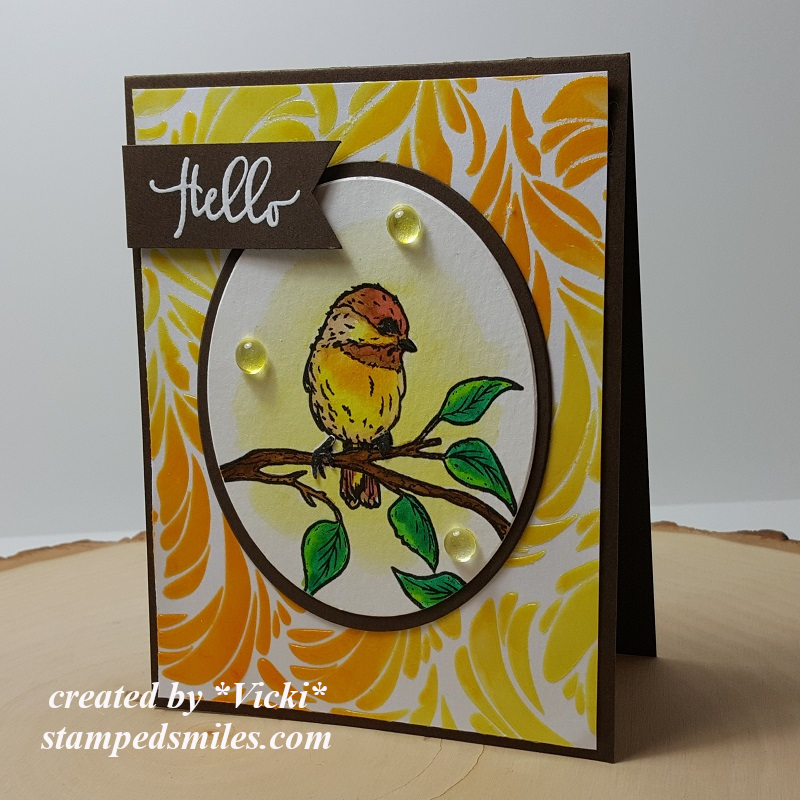
Today, I have a fun Autumn style slimline card to share with you today using the beautiful color combo:

So I’ve been wanting to pull out my Aqua Pigments to have some watercolor play time!  I pulled out a piece of Bristol Smooth watercolor panel that I cut down to a slimline size approximately 3.25″ x 8.25″ because I knew that I would be layering it over top of a Raven top folding 3.5″ x 8.5″ slimline card base.

The Aqua Pigments that I’ve used on this background have a gorgeous sparkle in them and I’ve tried to capture that in the photo, but it’s so sparkly and pretty in person!  I’ve used Sparkle Yellow, Heirloom Carrot (subscription only) and Firecracker (subscription only) Aqua Pigments that I’ve dripped randomly over my glass mat, sprayed with some water for more movement and “smooshed” the panel over it and let them run and drip together.  Once dried, I’ve splattered over it with gold and black paints.

A while back, I got me the beautiful Leafy Slimline Die from Pink and Main that I cut out with some brushed gold cardstock from my stash I’ve had for quite a while.  I also used the Blessings Slimline Dies to cut the sentiment including the shadow underneath with vellum and the words with Raven cardstock glued down over the leaves.

I’ve added the leaves frame die cut over the watercolor background and mounted it to the card base.  Lastly, I’ve added some sequins and crystals from an Autumn mix embellishment pack.  I filled the centers of the red sequins with some Nuvo Red Berry Crystal Drops.

Hope you’ve been inspired today with my slimline design!  Thanks so much for dropping in and please be sure to stop by and check out more inspiration using the color combo over on the {Cupcake Inspirations} Challenge blog to see more!  I’ll be seeing you soon!

Challenges:

  1. Make My Monday – #135 Elegant Fall/Autumn
  2. Not Just Cards – Anything Goes November
  3. Crafty Gals Corner – #213 Thankful
  4. Simon Says Stamp Wednesday – Thanks/Thanksgiving
  5. Creative Fingers – #197 Anything Goes

Add a Quote For Cute Card Thursday

Hello friends!  It’s Thursday and time again for a new challenge over at the Cute Card Thursday Blog!  The theme for this week’s challenge is to “Add a Quote” to your project!  I happen to love quotes and find them very inspirational to help lift my spirits and I think it’s a wonderful type of card to send to someone who might need a little lift.  So here’s the card I created for the challenge:

Vicki-CCT595-BMQuote

There’s always something magical about a night sky especially with some soft glowing lights hanging up in your backyard!

Starting with the background, I took some watercolor paper and the Night Shift Aqua Pigments along with some sprayed water and some acetate to move around the watercolor and mix them together to create the “night” look I wanted for the background.  I then took some circle stencils that I made myself with some circle dies and white Ink with a sponge to create the “bokeh effect” over the background in the upper portion of the design.  Then I white heat embossed with white EP using an image from the stamp set.  I also heat set the quote at the bottom.  I also added some “splatter” at the top of the card with some watered down Pearl Aqua Pigment and a brush.  I then colored in some of the open stars with it. I’ve used some Brown Aqua Pigment to color in the branch too.  I used some yellow chalk to make the “lights” around the branch glow and then covered them some glitter.  Then I took some TINY star confetti and glued them around the branch area for more sparkle.

It’s hard to photograph all of that shimmer from the Night Shift Aqua Pigments and sparkle that’s all over this card, so I thought I would share it in motion:

I want to keep replaying so that I can see that shimmer in the background!

Vicki-CCT595-BMQuote-close

Here’s a closer look at the quote I’ve used in case you couldn’t read it.   “It is important to remember that we all have magic inside of us.” – JK Rowling  … Love that!

Vicki-CCT595-BMQuote-flat

You might be able to see a little bit of that shimmer on the background here if you look at the left lower portion of the card.

I hope you’ve enjoyed my card today and I appreciate you stopping in!

Challenges I’d like to enter:

  1.  CCEE Stampers – Embossing wet/dry CCEE1932
  2. Crazy 4 Challenges – C4C497 Inspiration from a Book (Harry Potter)
  3. Allsorts – Sun, Moon and/or Stars OR something for Baby (stars)
  4. Through the Craftroom Door – Anything Goes

Class Projects

Hello friends!  Just wanted to pop in and share the projects I made for this fun class I took!

This class was full of lots of cool things and plenty to complete the projects below plus I had some things left over too:

Vicki-BMJunkieClass19-foiltag

The first project was this ginormous, very thick tag!  It measures approximately 9.5″ tall and 5.25″ in width!  I thought it would be cool on a project you frame or hang from the wall.  Thinking about a burlap or something. hmmm…..  Have any suggestions?

Everything you need except the stamps, ink and adhesive come with this class kit.  So the background was foiled (foil included in kit) and I used my own tape adhesive to do that with the stripes for the background.  The wreath was made with a chipboard circle from the kit which the flowers were attached to.   I stamped and cut out the flowers from a stamp set which were colored with some of the Aqua Pigments that were included with the kit.  I used a deco foil pen to create “dots” in the center of the flowers and used the left over foil from the kit.  I curled up some of the edges of the flowers for added dimension.

For the banner, I used one of the sentiments from the same stamp set and stamped it out with the Black Ink over the tag included with the kit.   I decided to change mine up from the way it was shown in class.  So I cut off the end and added it underneath the wreath.  Then I took the twine from the kit, doubled it up and added it as a bow on the bottom of the wreath.  I took a cute bird button and glued it to the center of the twine bow.  I thought to add a bit more color along the edges of the tag and sentiment banner with white Ink which I think softened up the edges nicely.

Vicki-BMJunkieClass19-ChromaGlazeCard

My second project was this card!  The background was created with some sample sized Chroma Glazes from the kit.  I chose to use a past stencil I had.

I decided to matt my stenciled background onto an A2 sized card base and also create an oval matt for behind my oval image panel.  There was an oval piece and full base card piece that came in the kit, but I decided with all of the Aqua Pigment coloring I did, I needed to use watercolor Paper for stability.  I used the Aqua Pigments from the kit as well as pulling in some browns and blacks from my stash.  I mixed colors together to get the look I wanted.   The image was stamped out.  I stamped the branch first, masked it off and then stamped the bird so his tail was behind the branch.  I then stamped the bird again and cut out his claws and attached them over the branch.  It makes it look more dimensional that way and so it really looks like the bird is perched.  I added some color to the background with the yellow Aqua Pigment from the kit.

I took the sentiment from this same stamp set and heat embossed it with some white EP and cut it into a banner to pop up over the card with some Foam Tape.  I took the Acrylic Bubbles that came in the kit and colored the backs of them with a yellow alcohol marker and attached them randomly to the design.

Vicki-BMJunkieClass19-minitags

The final project for the class was making up these set of tags!  These tags came in the kit along with the blue twine.  There wasn’t quite enough to string the 5th tag, so I took a piece from my stash.  Not sure if I was supposed to get 4 or 5 tags…but I got 5! 🙂

I didn’t have the same stamp set that was shown in class, so I thought it would be a good idea to make up some birthday tags that I can add to gifts and/or cards!  So I used a stamp set from my stash and colored them all in with the Aqua Pigments from the class kit.  I just cut pieces of the twine and added them to the top  of the tags.  Simple, but fun!

Hope you’ve enjoyed my project share from class!  Thanks so much for dropping in today and I’ll be seeing you soon!!  Have an excellent weekend!

Challenges I’d like to enter:

  1.  Stamping Sensations – Things With Wings (for bird card)
  2. 613 Avenue Create – Anything Goes with optional create/decorate a container
  3. Through the Craftroom Door – Anything Goes