Reminder for the Blues at {Cupcake Inspirations}

Hello friends!  Hope that you’ve had a nice weekend as your days are growing closer to Christmas.


Today I have a reminder for you about the “Shades of Blue” challenge over at the {Cupcake Inspirations} Challenge Blog and that you still have a few days left to enter your blue shaded projects!  Hope you’ll join us!  Although thoughts of winter, Christmas and snowflakes come to mind with these colors, I’ve decided to take the colors in a different direction for this week:

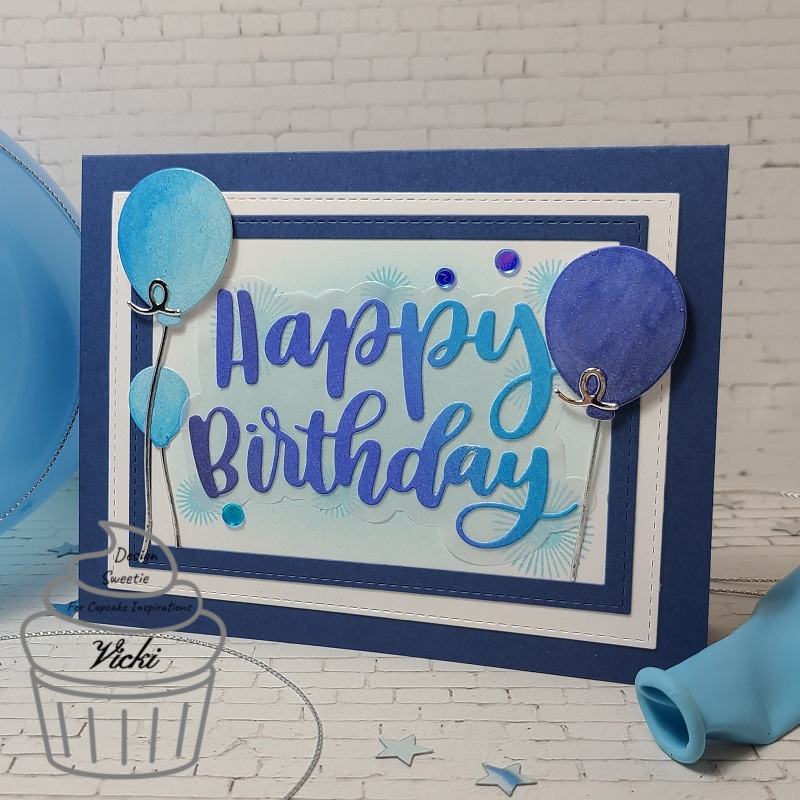
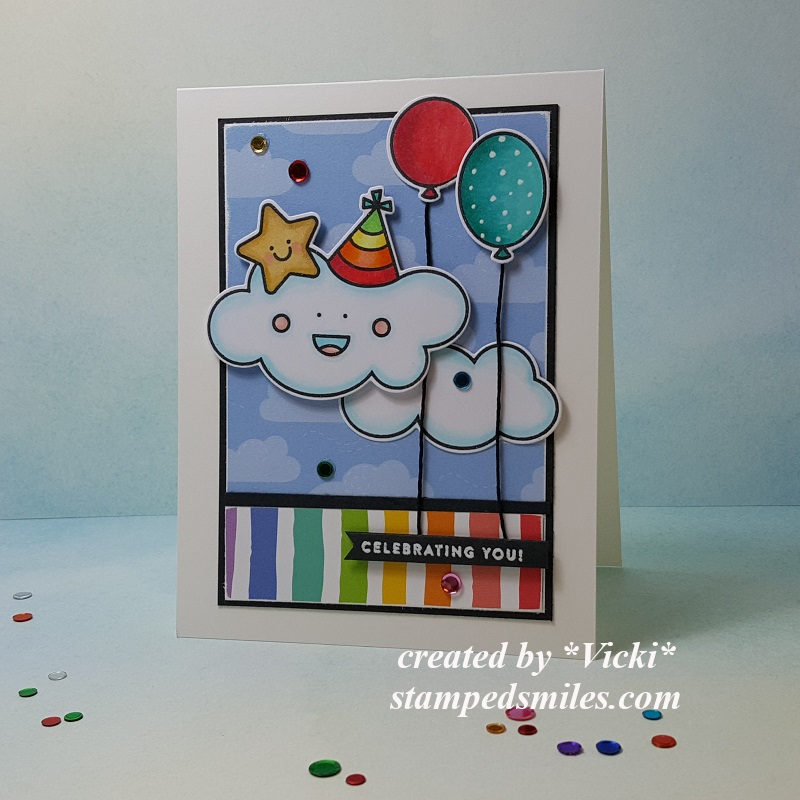
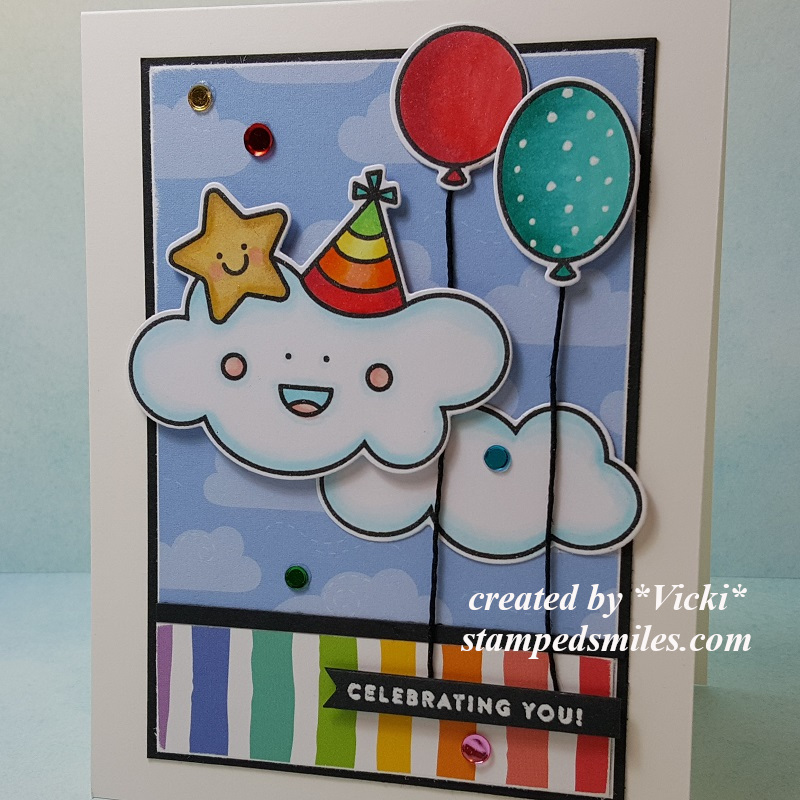
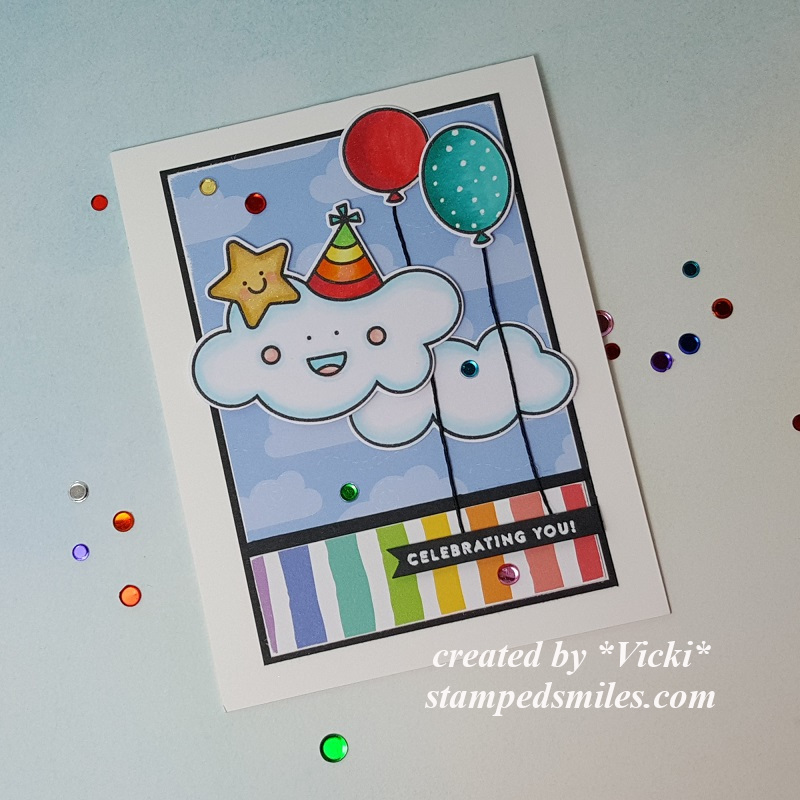
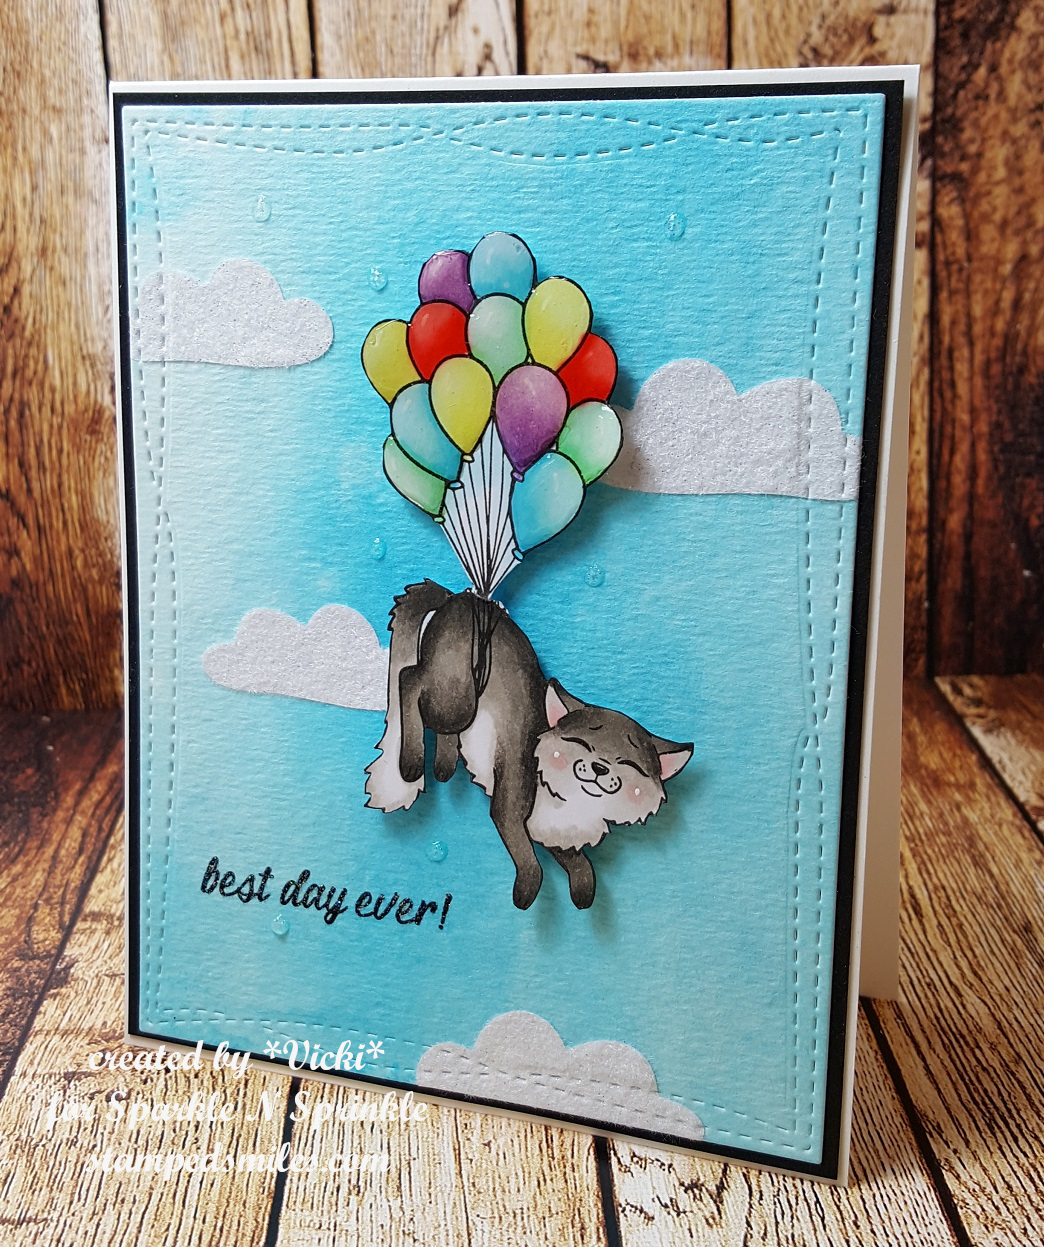
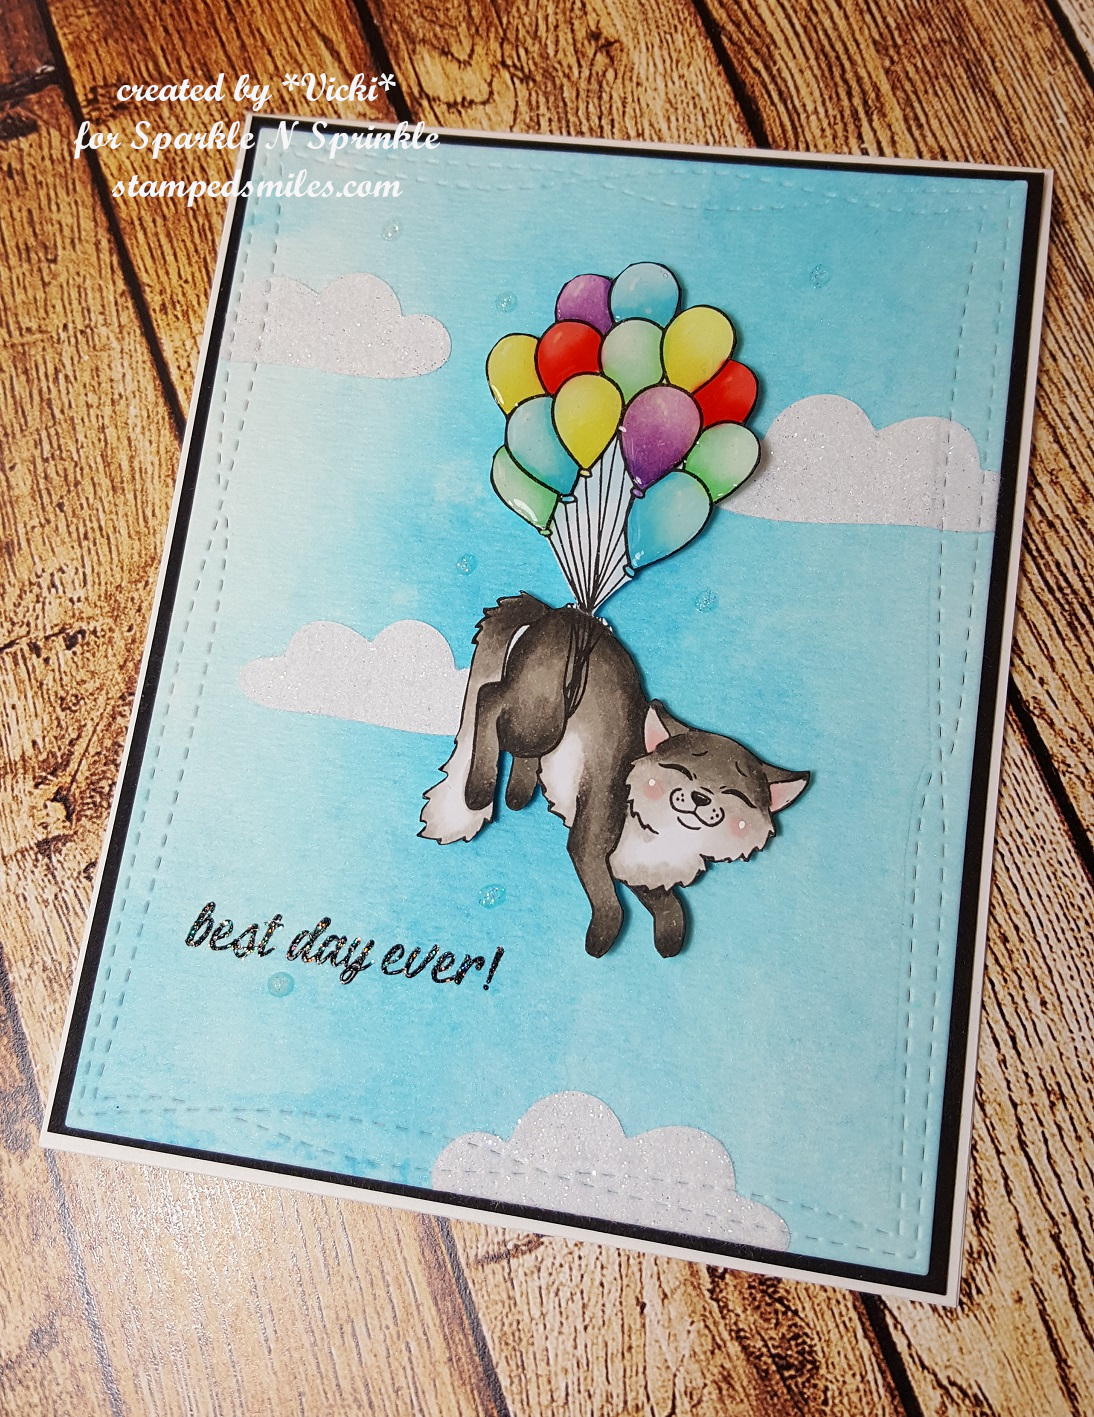
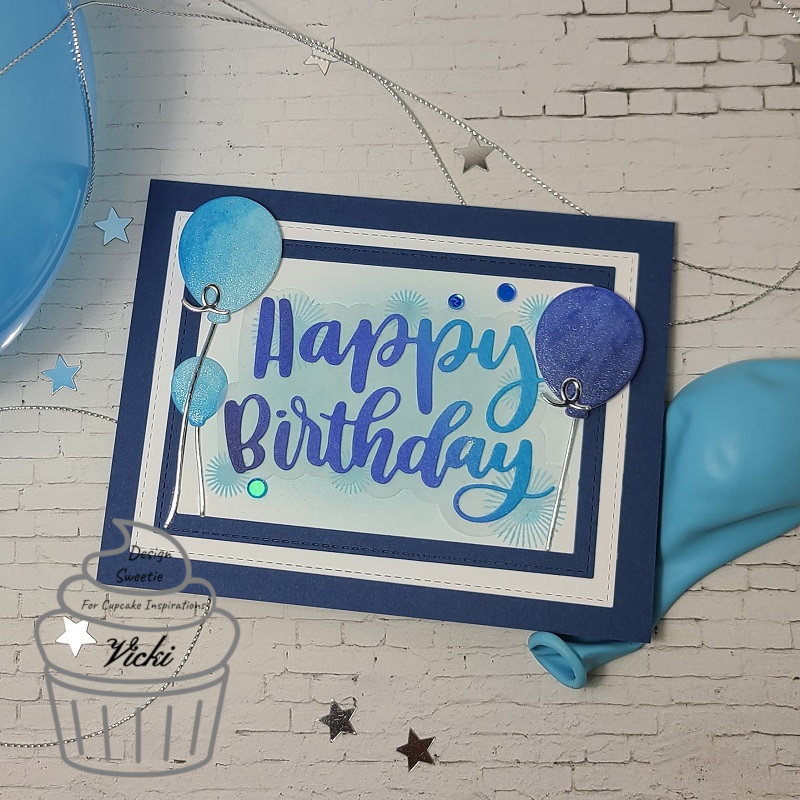
Blues made me think of a masculine birthday which is something that I needed for a birthday card for my dad this last week, so my thoughts turned to him when making this card.  He’s been having some medical issues recently and I wanted to send him a happy card along with some real balloons to help try and cheer him up a bit.  My heart is heavily with him right now as he deals with many physical issues.

For my card, I first started with a piece of Bristol Smooth watercolor paper and ink blended some blue oxide inks over the panel with Chipped Saphire, Blueprint Sketch and Salty Ocean Oxide Inks.  I die cut the large sentiment die and balloon dies from this piece and then attached the sentiment to a die cut vellum shadow behind it.

I stamped some images with the same blue inks I blended with over a white panel along with doing a very light ink blending in the center of it before attaching the die cut sentiment over top.  I then attached that panel to a blue die cut panel and again over a white die cut panel and finally attaching it to an A2 sized side folding blue card base.  Lastly, I popped up and glued the die cut balloons along with the silver strings also die cut around the sentiment panel keeping in mind the placement of the strings.  I added a few blue sequins to finish it off.

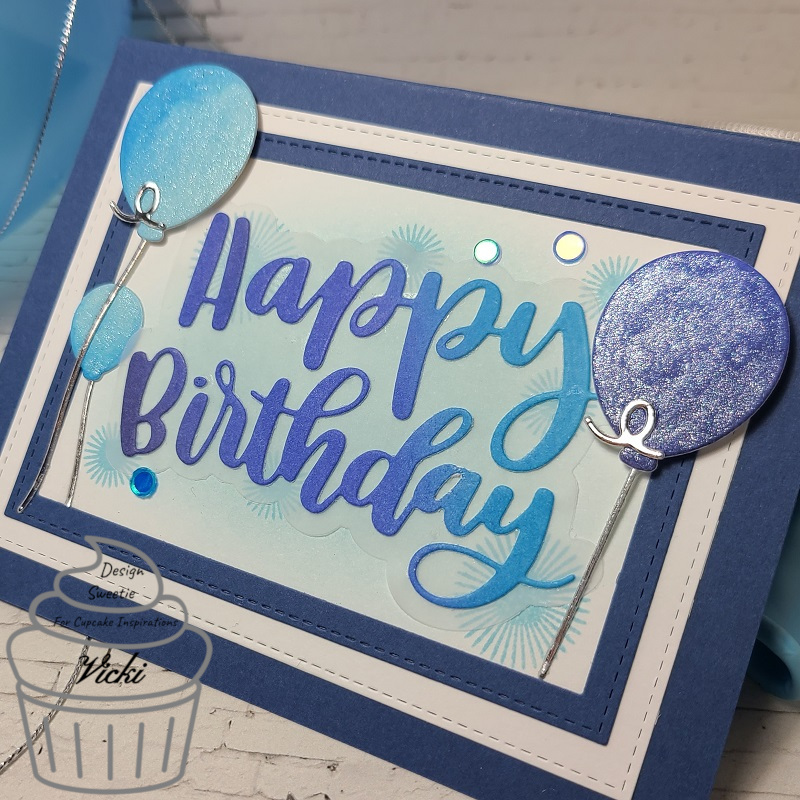
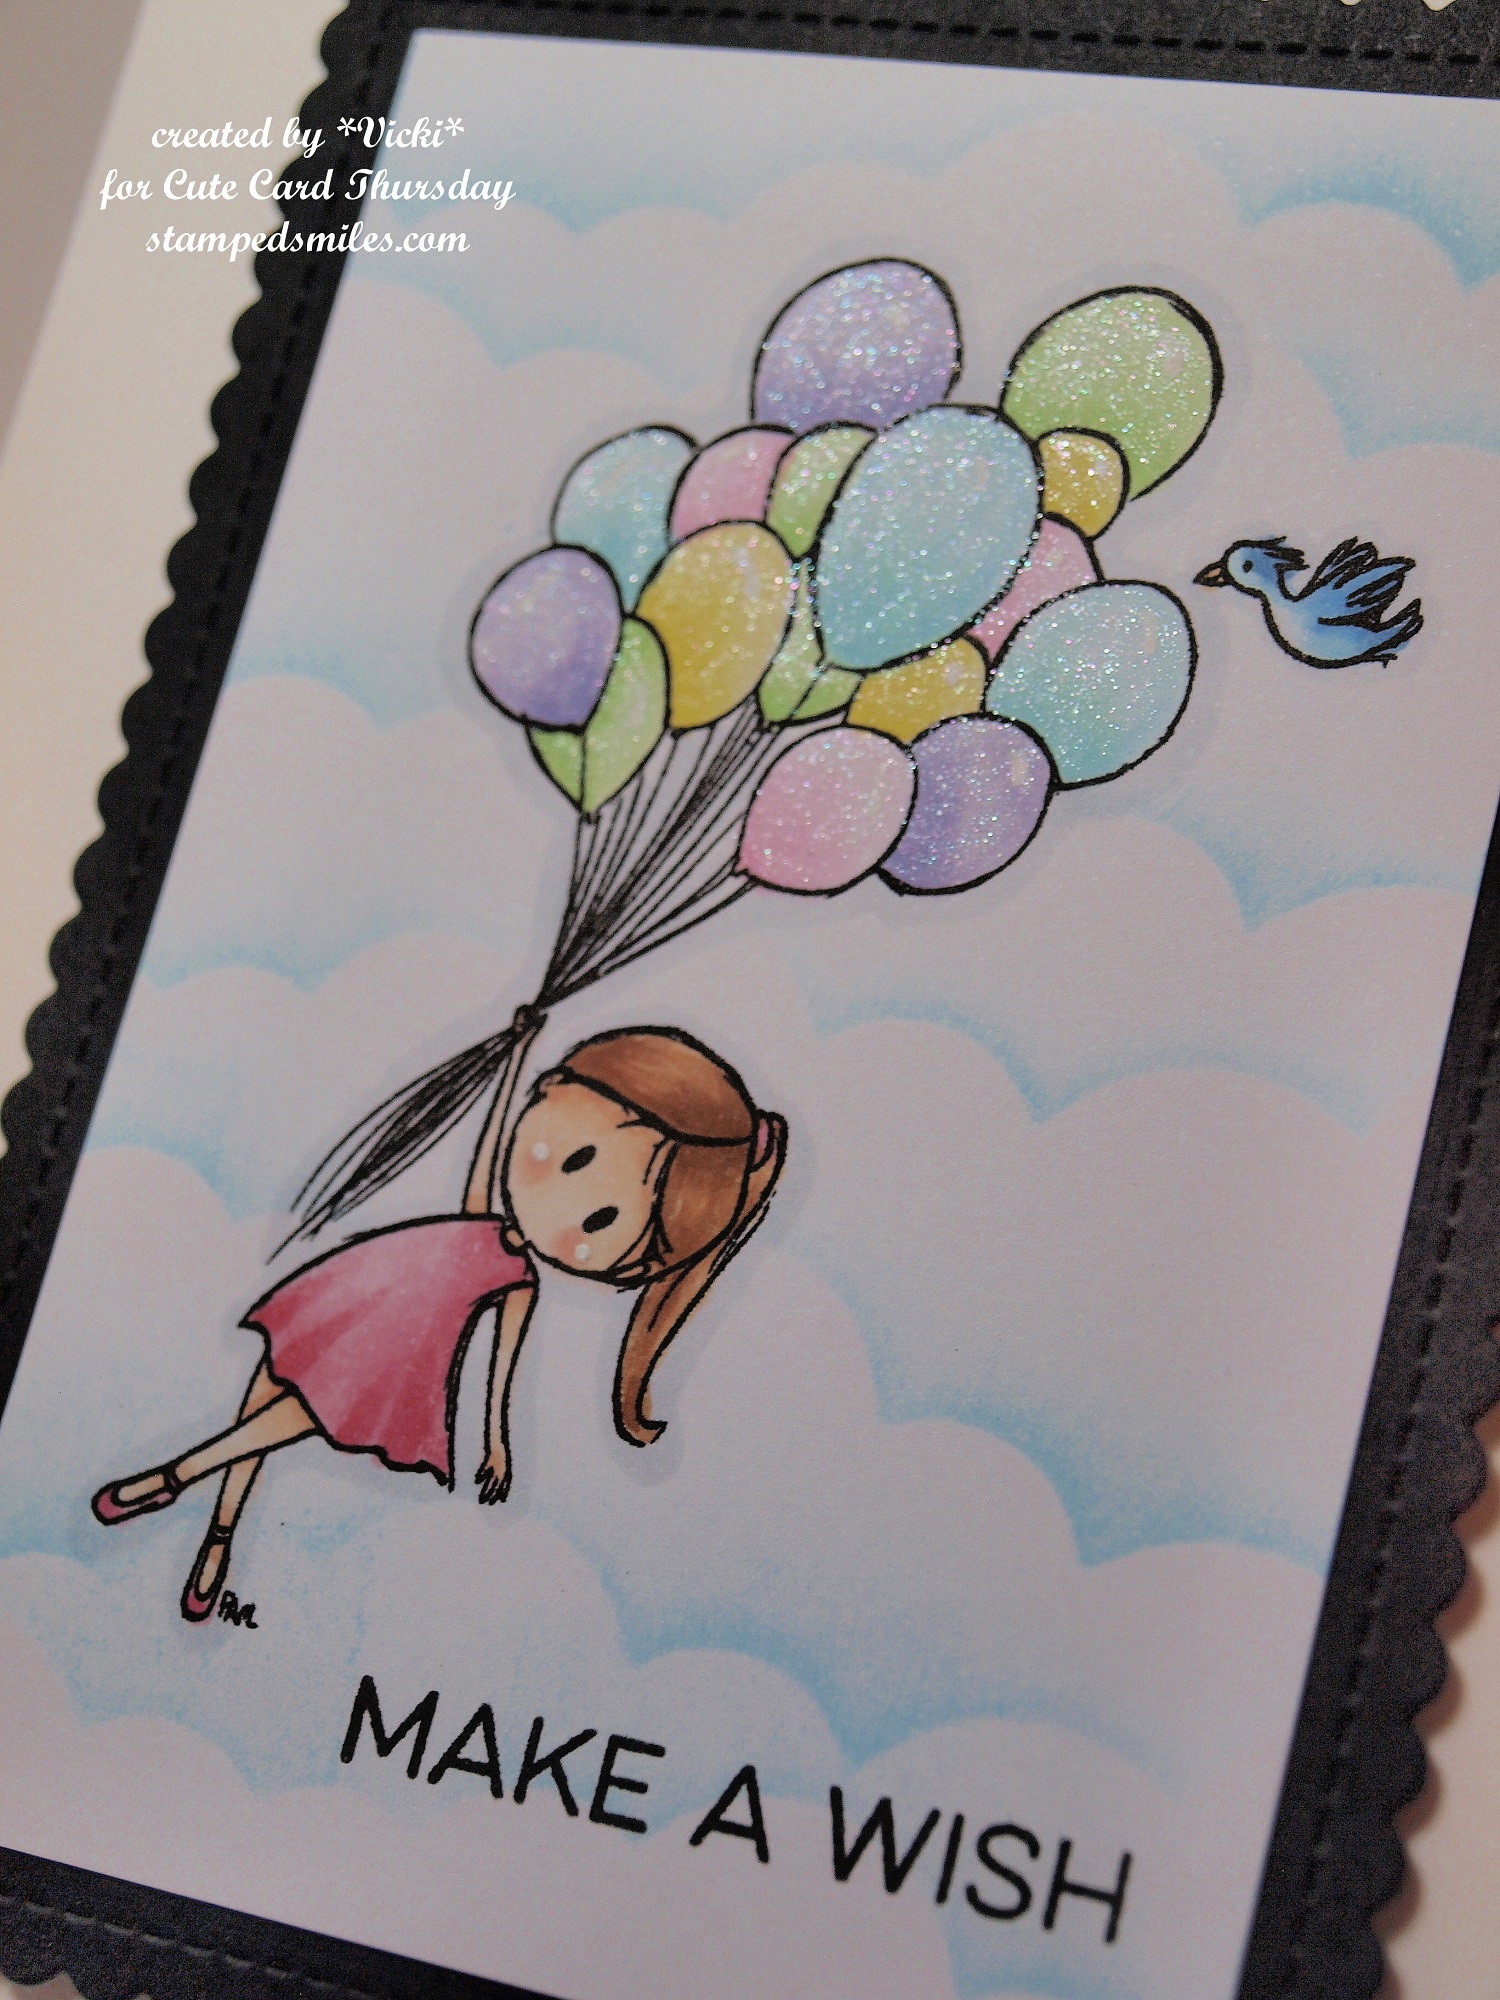
In this close-up photo, you can see the details of the background more clearly along with the shimmer over the balloons which I went over with a glitter brush pen.

So I hope that you’ve enjoyed my birthday card today and were inspired to pull out your blue shaded stash and have a play with them!  Really look forward to seeing what you come up with for the challenge!  Be sure to check out the {Cupcake Inspirations} Blog and see what the Cupcake Sweeties have to inspire you with this week as well!

Thanks so much for joining with me today and I’ll be seeing you soon!

Challenges:

  1. The Divas That Cut Paper – Dec Anything Goes + die cut machine.
  2. Lil’ Patch of Crafty Friends – #147 Anything Goes
  3. The Corrosive Challenge – #12 December Anything Goes
  4. AAA Birthday – #20 Twinkle
  5. Creative Moments – #204 Anything Goes
  6. Watercooler Wednesday – WWC301 Occasions
  7. Cute Card Thursday – Anything Goes

It’s a HAPPY Birthday!

Hello friends!  I hope you’ve had a lovely weekend!

After starting this year, I tend to “look back” on my stash items and take a good “inventory” of what I have and the things that hardly EVER get used, if have gotten used at all!  And of course I try to tell myself…”no more!”  LOL!  I honestly just let all of my card kits just sit and don’t dive into them and use them!  I get so excited about them when they come out, oooh and aaahhh over every single item in the kit and then it just sits…then before you know it, another kit comes out!  It’s an endless cycle that I’d like to stop!  Does anybody else have this problem?!

**This year, I hope to not only just open the boxes with content, but also make some creations with them!  If I’m already suscribed and getting boxes, then why am I not using them?!  You saw in a previous post the Snowflake set of creations, so I plan on doing more of that this year…so stay tuned! 🙂

I actually have made a card from a fun special edition “Sweet Birthday” card kit from Simon Says Stamp last year that I was super excited about, but only dug in enough of it to make this one card:  (Hanging head…..)

Vicki-SSSSweetbirthday

At least I made ONE with it, right?! LOL!  I just thought this was such a happy, colorful and fun card kit that it was just perfect to send a birthday smile for someone that really needed some “happy” sent their way.  My schedule was crazy and then I forgot to get it posted!  LOL!

The stamp set used in creating this one from the SSS card kit was called Sweet Birthday and I was excited to be able to get the coordinating dies to go with it too.  It’s very simple with the cardstock and pattern papers from the kit for the layout design.  I used an additional piece of black cardstock to white heat emboss the sentiment from the stamp set, cut it out with my scissors and pop it up along with the party hat cloud and balloons with the black “strings” underneath them.

I used a white gel pen to add “dots” to the blue balloon and then added some sequins from the card kit over the design.

Vicki-SSSSweetbirthday-close

Here’s a closer look at the images and how I’ve colored them up with my Copic markers.

At this point I don’t remember if I’ve added a glitter brush pen over anything, but more than likely I probably did because I like using it! LOL!

I’ve also used a sanding block around the edges of the pattern paper as I like to distress my papers sometimes too.

Vicki-SSSSweetbirthday-flat

I didn’t know who this person was that received this card, but a request came from a crafty friend who asked to send smiles to someone for a loved one’s birthday and of course I was happy to get creating and hope that this helped in some way to lift spirits.

And I hope that this has helped put a smile on your face too!

Thanks so much for popping over here today and I truly enjoy seeing your comments!  Please let me know what you think of YOUR stash?  Is it “out of control” like mine?  LOL!  Would you like to see me making posts using more of my card kits?  Share your thoughts below! 🙂

I’ll see you again soon my friends!

Challenges:

  1.  Love to Craft – LTCCB42 Jan. Anything Goes
  2. Love to Scrap – LTSCB129 Jan. Anything Goes
  3. Seize the Birthday – Anything Goes + Toppings:  Layer It!
  4. Use Your Stuff– Anything Goes
  5. Try it On Tuesday – What a Cutie/Make Someone Smile

Spots and Dots for Cute Card Thursday

Hello friends!  Hope you’re having a great week so far.  The month of October is flying right through and I know once Halloween gets here, it will be the end of the year before we know it!

Today starts a new challenge over at Cute Card Thursday this week!  We are looking for “Spots and Dots” on your creations this time!  We look forward to seeing your take on this one!

For my card, I decided to keep it rather simple:

Vicki-CCT604

This card is using items from the Simon Says Stamp Sweet Birthday Limited Edition card kit which has since been sold out, but I know that you can still purchase a few of the items that were included in the kit.

I started out by taking the SSS Celebrate stencil from the kit and spread on some Deco Foil Transfer Gel over a white piece of cardstock from the kit and let it completely dry before moving on.  After it was dry, I took the Rainbow Shattered Glass transfer foil sheet and put it through my laminator.  It looks so pretty and shinny with a wow factor to it!  I cut this piece down and layered it over a black scallop square die cut panel.  I then layered these pieces over the green colored Tim Holtz Metallic paper from the kit.

For the square card, I used a black top folding 4.25″ black card base and then layered another piece of that green metallic paper over it.  I took a ‘dotted’ piece of paper from the Honey Bee Over the Rainbow papers (included in the kit) and layered it over top of the metallic green.  Then I added my foiled balloons panel over this.

Lastly, I took the sentiment from the Simon Says Stamp Sweet Birthday stamp set and white heat embossed it over a piece of black cardstock that I trimmed down to a banner and popped up over the card with some foam tape.

Vicki-CCT604-flat

I really didn’t want to add too much more to it as it was for a male and I think with all of that foil and shine, it really didn’t need much else!  I think it’s fun, simple and really cheery looking especially with that foiling done.

I know that I’m getting this fun kit out again very soon as I am in need of another birthday card to send to someone that needs a good birthday cheer!

Challenges:

  1.  Pammie’s Inky Pinkies – PIP1941 Anything Goes
  2. Crafty Cardmakers – Sparkle
  3. Through the Craft Room Door – Anything Goes
  4. A Bit More Time to Craft – Anything Goes
  5. Watercooler Wednesday – WWC243 Masculine Anything Goes

Thanks so much for stopping in and sharing a bit of myself with you!  Wishing you a beautiful day friends!

Sweet Anniversary Wishes

Hello friends!  Hope you’re having a great week so far!  It is really cold in our area right now as we are experiencing a “Polar vortex” with a high of -11 degrees F and low of -23 degrees F without wind chill for tomorrow.  Brr!  Many schools in the area as well as city workers are taking the day off due to the severe cold weather.   Please stay warm and safe wherever you are!

Not sure if you saw that Whimsy Stamps has started carrying this new adorable line of digital stamps from CC Designs in their store.  Here’s the card I’ve made today using one of those images:

vicki-pcaimeevalentino-jan29

I’ve used this super cute image called Aimee & Valentino for a special anniversary card.

I decided to print it out twice so that I could cut out the balloons and pop them up over the image.  I have used the following Copic markers to color it in:

  1.  reds on outfits, boots, hair clip and balloon – R37, R35, R32
  2. Pink on outfit and balloon – R85, R83, R81 (girl stripes on dress – E53, E51, E50)
  3. Boy’s outfit, boots and hair – C8, C5, C3, C1, C0, C00 (stripes on shirt – BG000)
  4. Girl’s hair – E27, E25, E23, E21
  5. Skin tones – E21, E11, E00, E000 (cheeks – R20)
  6. Grass/shadows – G24, G21, G20, E0000 (around image – BG000)
  7. I used metallic gel pens to color in the middle of hair clip, buttons and cheeks

I cut this image out with a stitched square die cut and then used a cloud stencil with Tumbled Glass distress ink and ink foam blending tool to add clouds behind the couple.

As mentioned above, I cut out the heart balloons on the second print out of the image and heat embossed the stamped numbers on them.  I used a stylist tool on the back of them to curve them in a bit and popped them up over the image with some foam dimensional dots.  I then added some shimmer over top of them with a Wink of Stella glitter brush pen.

vicki-pcaimeevalentino-jan29-upclose

Here’s a closer look at the coloring on the image.  You can see a bit of the shimmer over the balloons and where I’ve added some metallic color on the heart hair clip.  I took this image panel and layered it over a piece of gold mirror cardstock.

vicki-pcaimeevalentino-jan29-flat

I thought that the January released Hearts a Flutter digital papers were the perfect backdrop for this cute couple, so I printed the pink with white hearts one out and cut a piece out using the Whimsy Stamps Hand Stitched Nested Rectangle dies for that.  I found some coordinating card stock and gold heat embossed the sentiment from the WS Everyday Mini Sentiments clear stamp set and cut it out with a banner strip die.  I also placed it where I wanted it to go and used the Hand Stitched rectangle die again to create the stitch marks over it.

I took some gold ribbon and wrapped it around the heart design paper card front, placed the image panel over top and then layered on the sentiment banner with foam tape.  This was mounted over an A2 top folding white card base.  Lastly I added a gold bow and some gold sequins filled with some Stickles Tinsel glitter glue.

I hope that you’ve enjoyed my card! 🙂  Thanks so much for dropping by today!  See you soon!

Here’s some challenges I’d like to enter this card for:

  1.  CCEE Stampers – CCEE1904 Gold
  2. Aud Sentiments – Anything Goes + sentiment
  3. CRAFT – Love/Valentines (it fits with this theme as it’s about love!)
  4. Crafty Catz – Anything Goes with optional twist:  ribbon/lace
  5. My Time to Craft – All You Need is Love

Kitty Celebrates Up in the Air!

Hello friends! I’m excited to start with this cute one for today:

Vicki-SnS-Kitty clouds

Tee hee!  Kitty got a little “carried away” with celebrating, I think!  I have used the NEW Kitty Celebrates rubber stamp set for my card.  I’ve stamped him over Copic Blending Card paper and colored him in with Copic markers and then fussy cut him out.

So before attaching him to my card, I thought it would be fun to add some Nuvo Crystal Drops in Morning Dew (Gloss-dries clear) and apply a layer over my balloons to give them a shiny balloon look!  I then set kitty aside while I worked on the rest of the card.

For the background of my card, I made a nice “blue sky” by taking some Watercolor Paper and sprinkling some Nuvo Blue Blitz Shimmer Powder over it and then spritzing some water over it and letting it run all over the panel until I achieved the look I was going for.  (LOVE the subtle shimmer over it too!) and then set it aside to let it dry.

The next thing for me to do was to create some “fluffy clouds” for the kitty to be among:

So, I took some cloud dies from my stash and cut them out with some Sticker Paper.

These sheets are sticky on one side, so I carefully peeled the release paper and handled them with some tweezers and applied some of the Twinkling Clouds Flocking over top of the sticky side, rubbed them with my finger to secure and tapped off the excess.  I now have some really cool soft and fuzzy clouds to attach to my blue sky!

So now all I have left to do is assemble everything for my card!  I started by taking the clouds and adhering them to my background with some dimensional Glue.   I then cut down the watercolor blue-sky panel with a rectangle stitched die that fit the size of my card.   Then I needed to add my sentiment, so I took the sentiment from the same stamp set and stamped it with a black pigment ink and added some Sparkle EP and heat embossed it.  I layered this die cut sky panel over a piece of black cardstock which was then layered over an A2 sized top folding white card base.  Lastly, I’ve added the fussy cut kitty over top of the sky background panel with some foam dots and then randomly added some drops with the Nuvo White Blizzard Glitter Drops over the sky panel.

Vicki-SnS-Kitty Clouds5

I think this turned out really cute and I sure had fun making it!  Here I’ve laid it down so the light catches the details of the sparkle in the clouds, the sentiment and the glitter drops in the background as well as the shine over the balloons too!

Hope you’ve enjoyed my card for you today!  Thanks for dropping in!

Here’s some challenges I’d like to enter this card for:

  1. Simon Says Stamp Monday – ‘B’ is for:  Balloons, Blue Sky, “Best Day ever”
  2. Tuesday Throwdown – Anything Goes
  3. Addicted to Stamps & More – Anything Goes
  4. The Male Room – Celebrate
  5. Little Red Wagon – House Pets

A Clean & Simple Cute Card

Hello again friends!  It’s Thursday and time for another Cute Card Thursday challenge!  Woot!  This week’s challenge is a Clean and Simple or CAS style theme!  I hope you can play along with us and share your CAS creations too!  We can’t wait to see what you come up with!  Here’s the card that I’ve made:

OLYMPUS DIGITAL CAMERA

I have used our sponsor’s image for this week from Kinda Cute called Girl and Balloons digital stamp.  I wanted to use some soft colors for the balloons and I have used my Copic markers to color in the image.

I have also taken some distress ink and a cloud stencil to create the cloudy background behind her.  I’ve also added a stamped sentiment from my stash.  I cut the image panel down to size so that it fit inside the black stitched and scallop rectangle die cut and mounted it over top.  I used some foam tape and mounted this entire piece onto a white A2 sized top folding card base.

OLYMPUS DIGITAL CAMERA

In this photo you can better see the details with the Spectrum Noir Glitter brush pen as well as the hightlights I’ve made with a white gel pen in her cheeks and balloons.  I had fun coloring this cute image!  Hope you’ve enjoyed it too!

Please be sure to stop by the Cute Card Thursday challenge blog to see the challenge details, find inspiration from the rest of the team and to add your link to the challenge this week!  Hope to see your creation there!  Thanks for stopping in and see you again tomorrow!

challenges for this card:

  1.  Addicted to CAS – Girl Power
  2. Seize the Birthday – Anything Goes
  3. Daring Cardmakers – What a Wonderful World (inspired by the “I see skies of blue and clouds of white” lyric) – this song always inspires me to look on the brighter side of the world…great challenge, thank you!
  4. The House That Stamps Built (J2718) – Anything Goes