Some Summer Session Sets

Happy August friends!  This Summer has really flown right by me this year, how about you?  Before you know it we’ll be getting ready for all things Fall…which is my favorite time of the year!🍂  I haven’t been feeling well for the last several days and haven’t done much crafting, but I do have some sets of cards that I’ve made sometime during these Summer months, but haven’t posted, so I’d like to share them with you today.

Taylored Expression had released an adorable collection of fish themed products this Summer that I thought would be so fun for several different occasions, and not just for those that like to fish, but for anyone for any occasion too!

The first white background card on the left was created with the TE Hook, Line & Sinker Stamp & Stencil Combo.  The stencil is really nice to create different effects in an easy way without lots of coloring. I like that the TE Hook, Line & Sinker Dies cut out some of the mass-produced stenciled fish background too!  (I saved one for the other card as well and still had a few more left over for another project.)  After I created a couple of the stenciled fish backgrounds, I cut out a panel with a wonky stitched rectangle die and placed it over a Kraft A2 card base.  I added some TE Drip Drops for the “bubbles” on the extra fish and you can see that I’ve covered the body of this fish with a glitter brush pen.

The second card on the right was created with the TE Just Keep Swimming Stencil with Toffee Ink color for a watermark look.  I splattered some white and black paint over the background.  The fishing pool as well as the sentiments for both cards came from the TE Reely Great Stamp & Die Combo.  (It includes the fishing pool die cut with it.)  You will also notice the tiny little sparkly fish on both of the cards which were cut from the TE Little Bits-Fish die with some blue and turquoise glitter cardstock.  The ‘frame’ around the sentiment on the first card as well as the green frame for the second card were extra pieces in my stash previously cut out with the TE A2 Thin Frame Cutting Plate. (I save the extras to use for other projects.)  

Of course, I didn’t “invent the wheel” on these as it was simple by following along with the TE “Hugs & Fishes Craft-a-Long Class” which I got for free with my stamp/combo purchase when it came out. I tweaked it slightly, but sometimes it’s nice to just create and follow along without having to think about what to do with it. 😁 


This next set of cards was actually pretty fun and easy to put together:

Continuing on with more Taylored Expressions products, I’ve used the TE Create-in-Quads Hexagon Layering Stencil Set.  Taylor had recently come with this series sometime last year I believe, and they seem to go over pretty well.  (I think I had previously made Christmas cards and some Mother’s Day type of cards earlier this Spring with other “Create-in-Quads” sets.)  It seems like a lot, but when you see how easy it is to knock out four cards at once…which I did with Christmas last year…it’s such a time saver with wonderful results!

All of these cards were finished off with the TE Oh No You Didn’t stamp set & dies (love this set)! A couple of the cards use the TE Simple Strips-Snarky stamp set that were white heat embossed and cut out.  The other cards have sentiments that were foiled from the TE Simple Strips In Reverse-Everyday Occasions and die cut.  And of course, I didn’t want to waste too much of the foiled panels, so I again took my TE A2 Thin Frame Cutting Plate to cut a couple of the frames with it.  I also stamped out a couple of extra stars here and there from another TE stamp set, but I can’t remember which one I used. (I think it was from a previous card kit I have that’s no longer available…but any star will do!)

And again, no need to reinvent the wheel as I believe this was another class I received for free from a purchase.  You can check out the Create-in-Quads Hexagon Craft-a-Long Class if you’re interested in it.  I think I changed up the colors and details a bit for mine, but very similar in style.

**👀 Be on the look-out for another TE project set from me using another Create-in-Quads I recently got and can’t wait to use!  I’m also going to have some things to give away too!  STAY TUNED!!!


I had also attended a class from Riley and Company sometime this Summer as well:

I have loved that little Riley moose character for years, but Tanya (owner) does several of these on-line class events and she comes out with some really cute class kits.  This kit had everything you need to make the projects and this one also included the sentiment die as well as a full 6×6 packet of papers in the coordinating theme.

For my projects, the giraffe was the only pre-cut image to color.  All of the other bee images came from the papers that were included with the kit that you were to fussy cut from.  Since the sentiment die was also included, I die cut all of those pieces for my card too.  I decided to step-up my cards with some glitter cardstock along the edge of the giraffe card and then I die cut the “gold glitter honey drip” on that card from the Riley and Company Corner Goo Die.  I also added little details like the “flying trail” of the bee with a marker and using a glitter brush pen on the bee wings.

Hope you’ve enjoyed my Summer Session Sets today and have been inspired or brought a smile!  Thank you so kindly for your time to stop in and have a look!  I really appreciate it!

Challenges:

  1. Pearly Sparkles – Anything Goes
  2. Moving Along With the Times – Anything Goes
  3. Pammie’s Inky Pinkies – Anything Goes
  4. Addicted to Stamps & More – Die Cuts and/or Stencils (I’ve used both!)ATSM die cut stencils
  5. Happy Little Stampers – Anything Goes With Dies challengeimage
  6. Crafty Calendar – Anything Goes
  7. Creative Inspirations – Anything Goes

Lawn Fawn Fever!

Hello friends!  I have LOTS to catch up on with all of the blogging of projects that I’ve been working on over the last few months, so I will probably share several projects within one post until I can get caught up!

I know that Christmas in July is going on everywhere right now, so I thought I’d share that along with a few other projects I had going on during my “Lawn Fawn Fever” episode!  I have loved their cute little critters for so long and hope you enjoy what I’ve made:

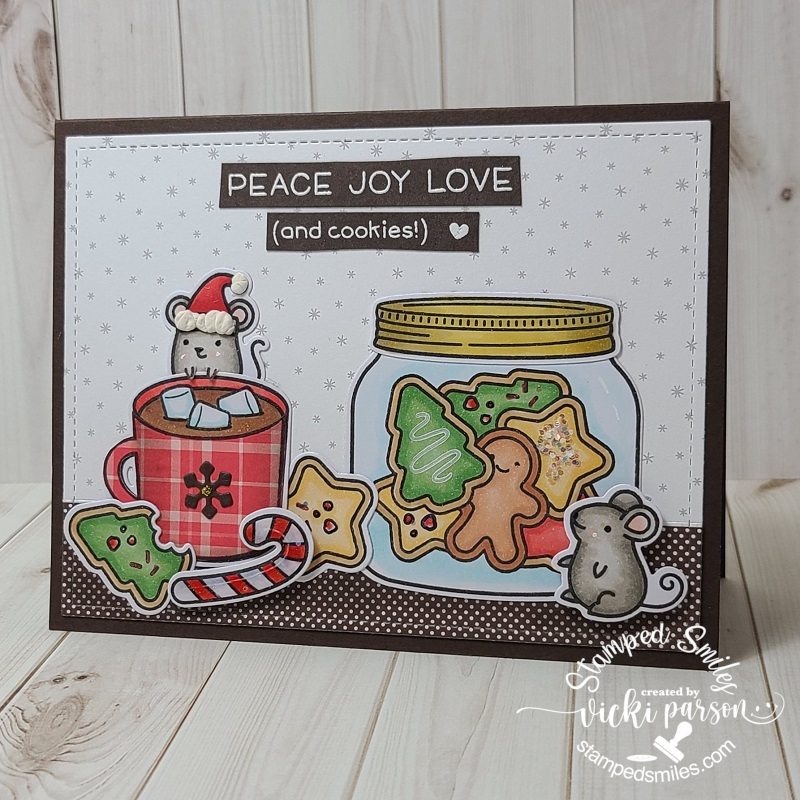
It’s been a while since I even played along with a Lawn Fawnatics challenge, so I decided to join this one which is asking to see your Lawn Fawn “Fun with Food” challenge projects.  What could be more fun than sharing Christmas cookies?!  I’m not sure I’d share any with mice…but these guys are too cute and add some more fun to the scene.  They’re a bit older and I know I’ve had the set for several years as it was one of the STAMPtember sets called “Merry Christmouse“.

I used some older Lawn Fawn papers from my stash to create the table and backdrop setting and then cut it out with the Lawn Fawn Outside In Rectangle dies.  I used the following sets which include the one mentioned above for my scene: How You Bean?, How You Bean? Christmas Cookie Add On, and Thanks a latte.  I Copic colored them and even added a few stamped images over the cookies including some Chunky Glitter

For the mouse hanging over the hot cocoa cup, I cut around his arms to fit over the cup.  I popped up the candy cane as well at the mouse next to the jar for depth on the scene.  I added some touches of glitter and then on the mouse Santa hat, I took some liquid applique and heated it up until it was puffy.  The sentiment was white heat embossed over the dark chocolate cardstock and then I just used my scissors to cut it out and attach at the top.  Really fun scene to create!

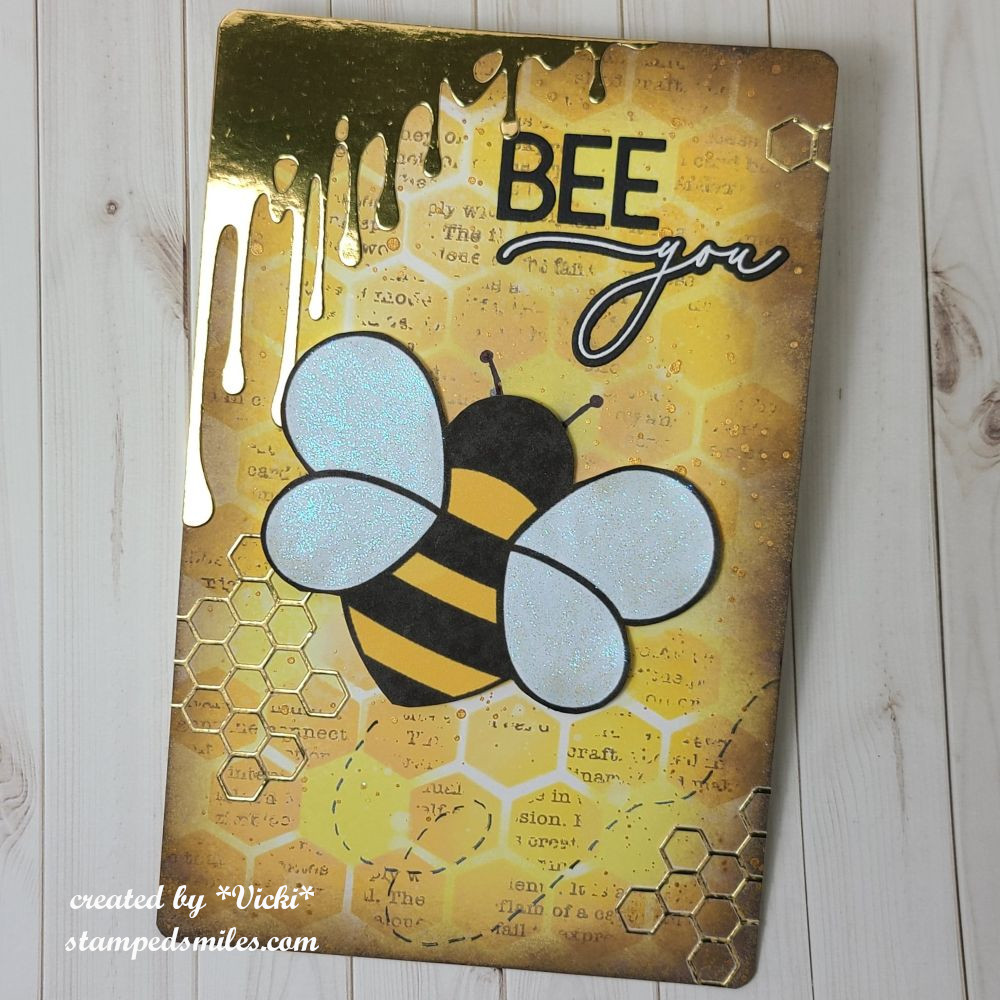
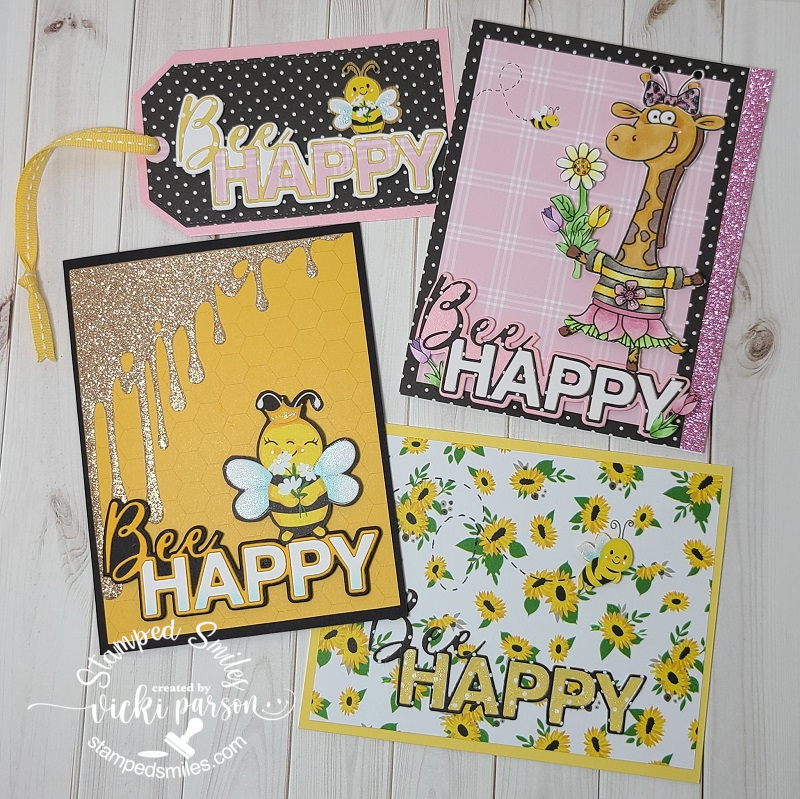
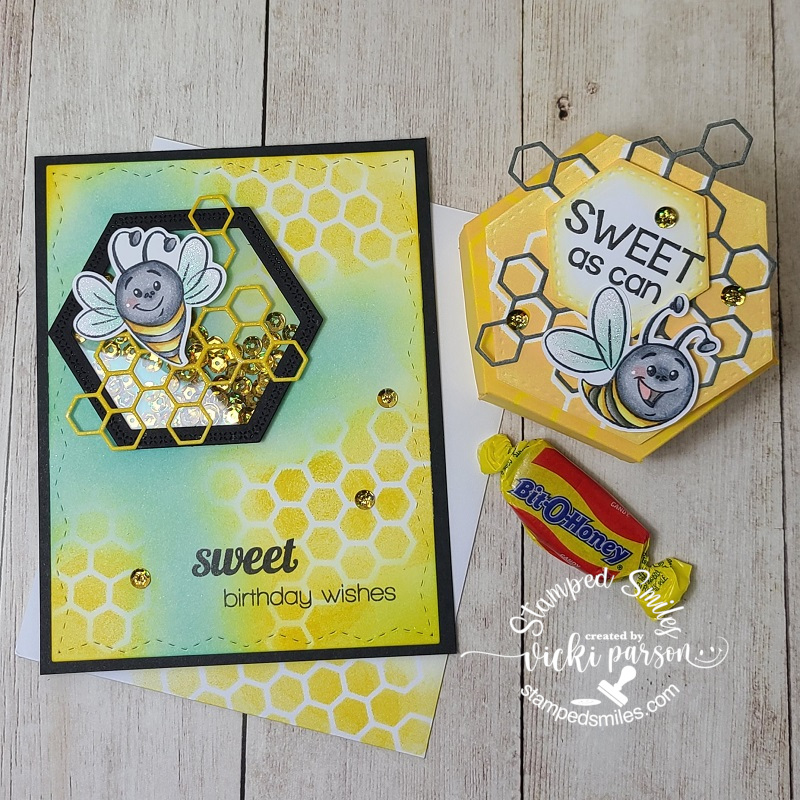
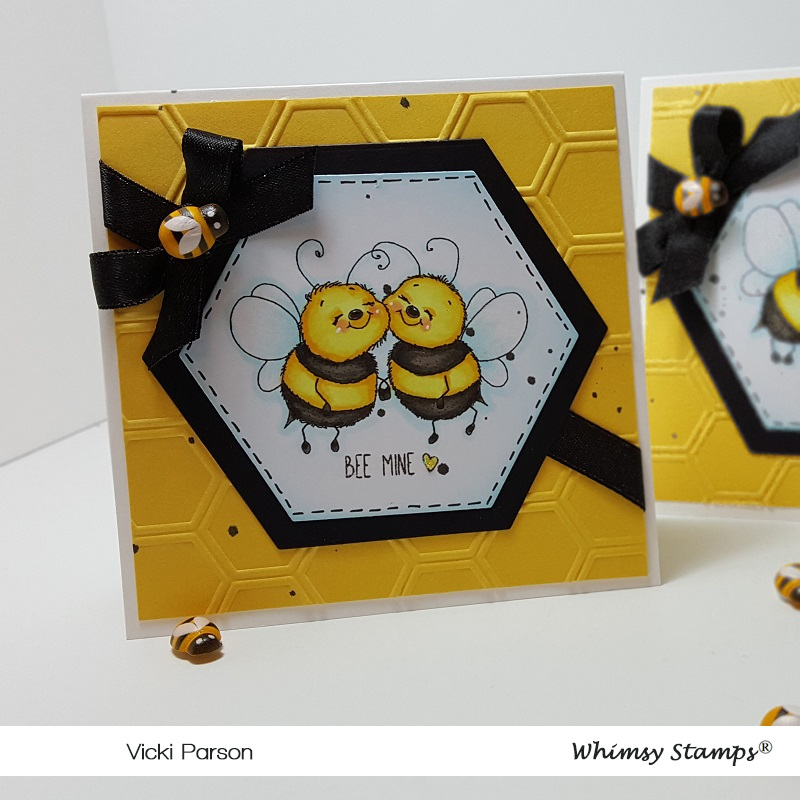
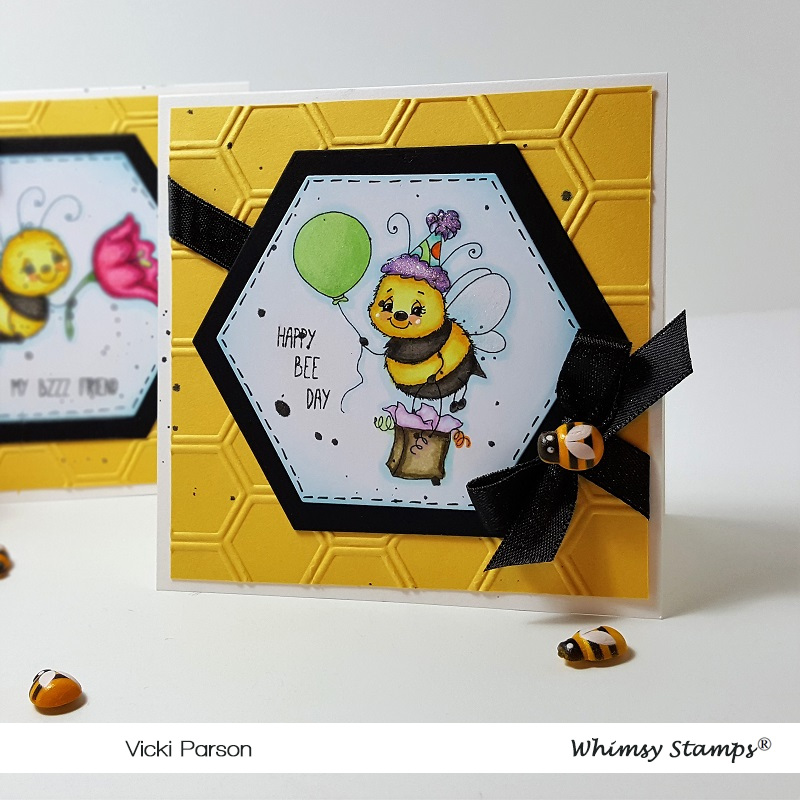
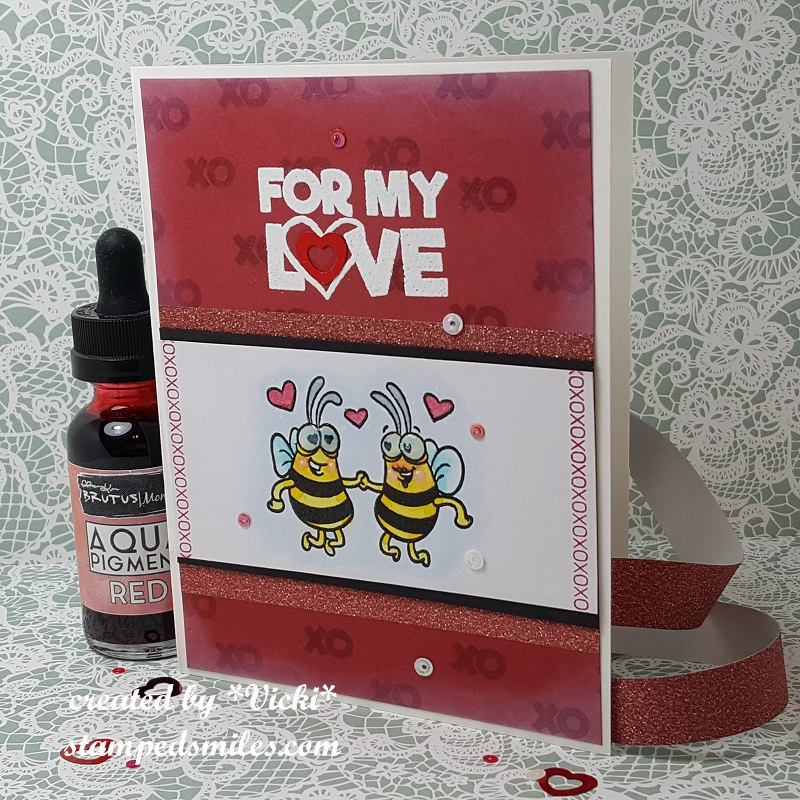
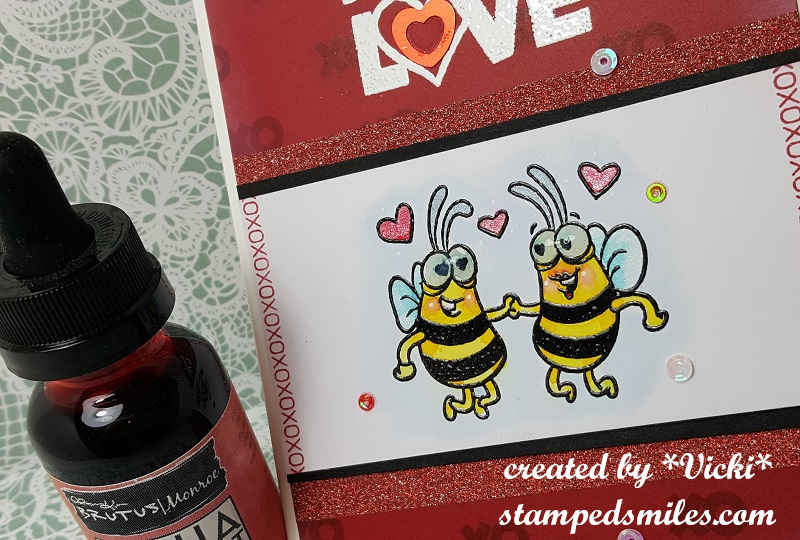
I also took part on Friday with the “Hive Five Kit” class they did using the adorable new Hive Five card kit they came out with recently. 

For the first card, I made my sentiment too high, so I had to “arrange it” how it worked for me, and I wanted it to be a birthday card instead.  The other project was just the hexagon tag.  I changed mine into a shaker and then added to a card.  I also added the speech bubble on this one.

The products included with the card kit were really fun and I’m glad I got it!

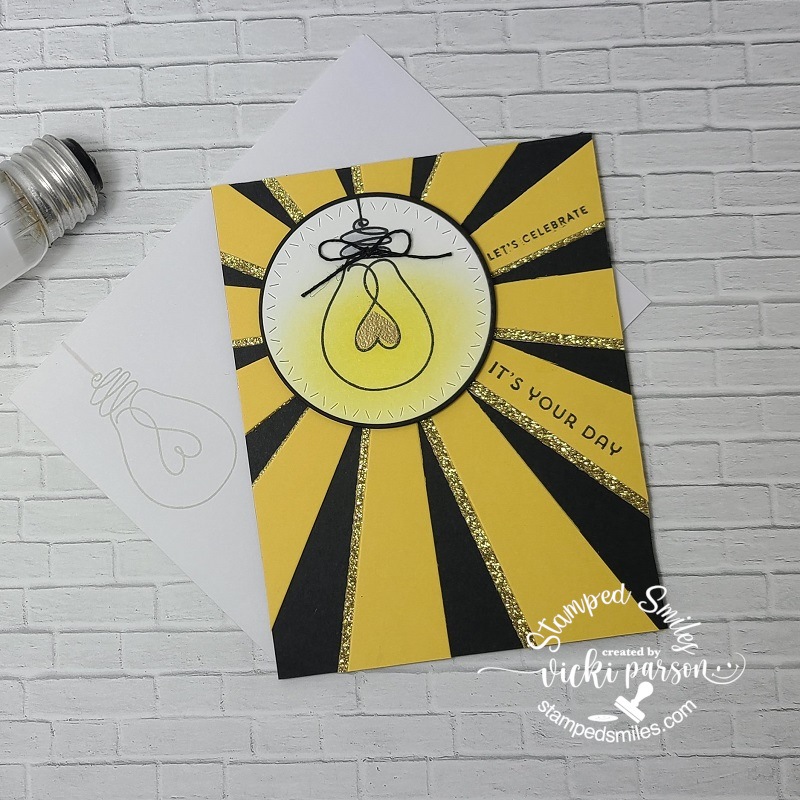
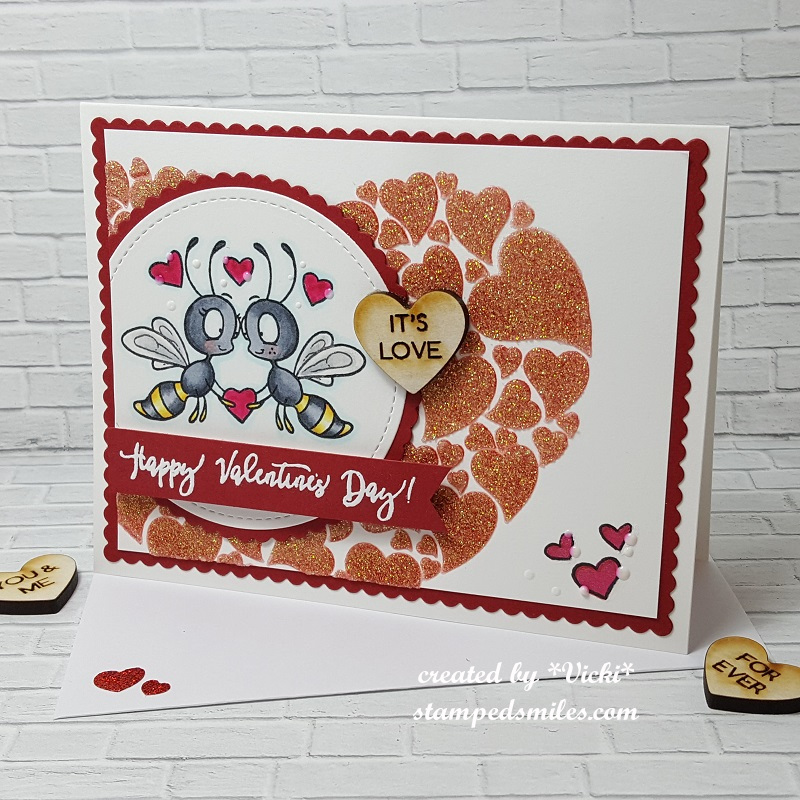
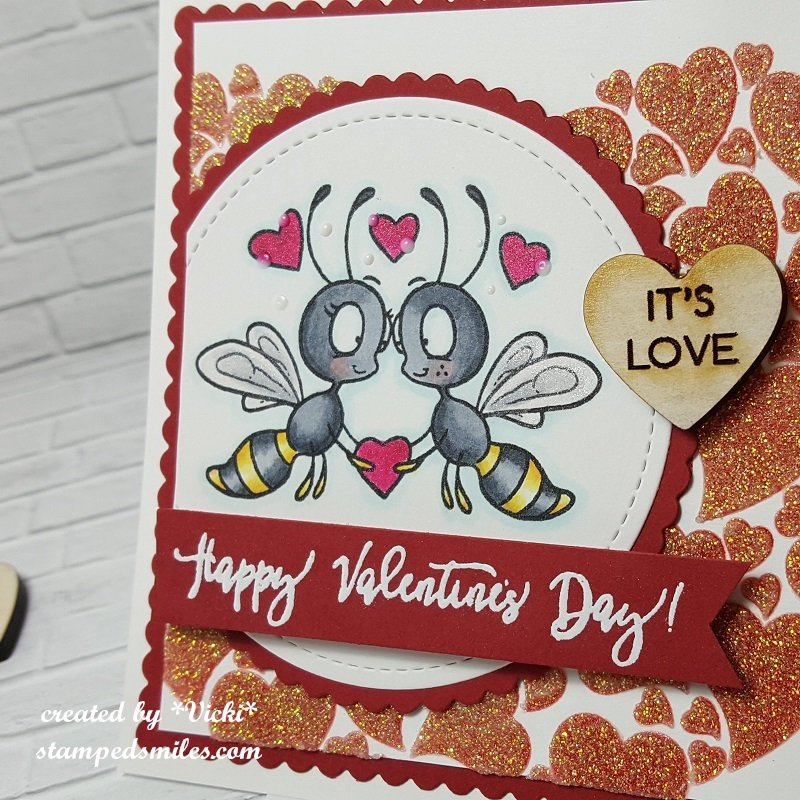
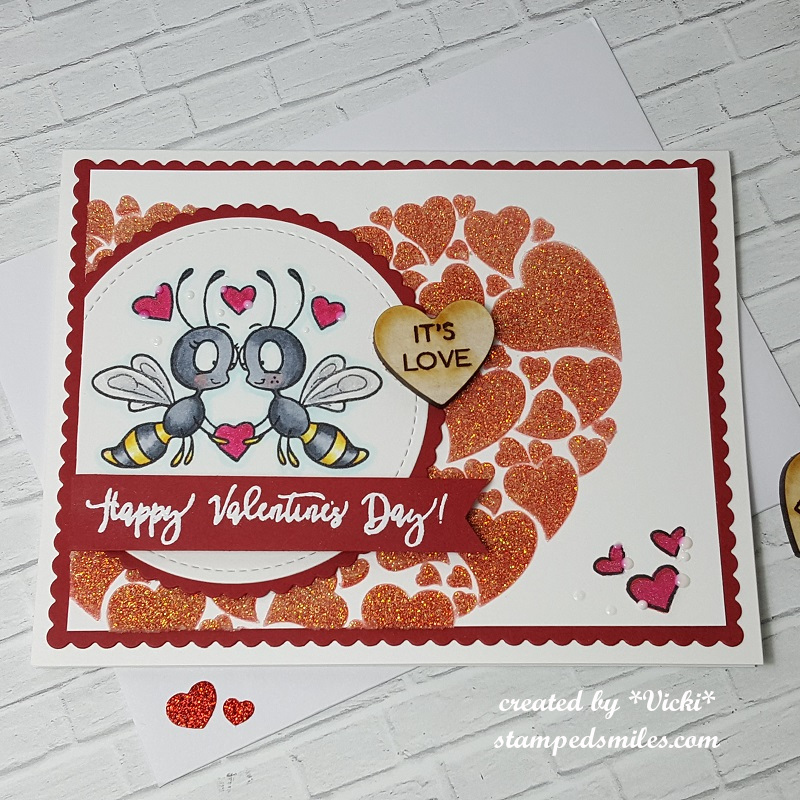
The majority of this card came from a fun little kit that my sweet blog friend Shirley gifted me included with a SWAP that I was in with her. (Details of that are below.)  Really love that she included the backdrop for the sky which worked out perfectly!  I actually already purchased this awesome Lawn Fawn Platform Pop-Up die along with the Platform Pop-Up Add-on and the Upon a Star stamp set and dies, but she was so very kind to have all of these pieces already stamped and cut out for me!  I just colored in the critters and the stars, added a few more here and there along with some glitter, white heat embossed the sentiment over the navy cardstock and put it together.

I hadn’t even broken out my Platform die at the time, so this was my first time putting one together!  It looks a little more intimidating than what it really is, so I had lots of fun with it!  Thanks so much for sharing the fun with me my friend!  I can’t wait to attempt another one soon! (Thanks for helping me with my addiction! 😁)

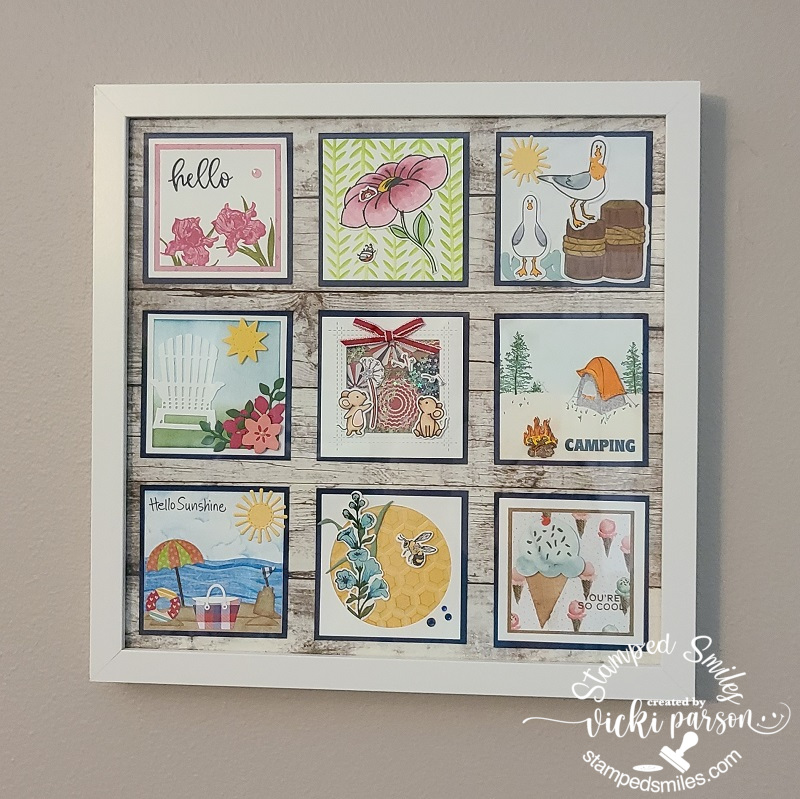
And as I had mentioned above, I was asked if I’d be interested in joining this “Summer Sampler SWAP” with my wonderful blog friends Patti, Shirley and Donna along with a few other ladies to take part with!  When it was described to me, I quickly realized that I had seen these 12″ x 12″ sized papercraft stamped samplers all over Pinterest.  Of course, I had thought to myself that would be fun to create and never did.

Each square is 3-1/4″ and we each were to use the same color for the back layer so it was all similar for the finished project to coordinate well.  So 9 of us created 9 squares, kept one for ourselves and then mailed out the others to each person in the swap.  Really fun to see everyone’s idea here with the theme of “SUMMER” too!  I love them all and thought how fun that each one is so different from the others!

This is my finished 12″ x 12″ shadow box framed piece with everyone’s squares that I’ve attached to a wood panel background paper.  I have it hanging on the wall.  I think this would be so fun for each season or even gifts!  Hope we can do another one!😉

And here’s the square that I did for the swap.  I zoomed in to take the photo and it’s behind the glass, so it’s not a real great look at it, but as you see, I’ve used Lawn Fawn again! LOL

I had some fun 4th of July papers and thought it would be neat to make somewhat of a shaker element with confetti stars.  I’ve used the Lawn Fawn Dandy Day Flip Flop set along with a mouse from the Bubbles of Joy set for the front of my square.  I was trying to give the impression that the mouse had a sparkler, and the sparks were flying while the other mouse was enjoying the show. I used glitter and die cut a star from silver glitter cardstock for the center of the dandelion.  I added a red bow at the top.  I thought with using a shadow box frame that the dimension wouldn’t be an issue and it wasn’t.  

There’s always something fun to keep me hopping, so I know you’ll see more soon including the wedding & painting class projects!  I promise I’ll get there!  Thanks for dropping by!!

Challenges:

  1. Lawn Fawnatics – Fun with Food (first card)
  2. Crafty Gals Corner – Christmas in July (first card)
  3. Krafty Chicks – Christmas (first card)
  4. CRAFT – Christmas (first card)
  5. Jingle Belles – BLING on the Holidays! (first card)
  6. Double Trouble – Christmas in July Thing 1, Thing 2 & Thing 3 (I’ve used old stamp sets, papers and added some fun bling on my cookies -plus added to the partner challenge in first card!)
  7. Alphabet – ‘H’ is for Holidays (first card)
  8. My Time to Craft – Christmas in July (first card)
  9. Papercraft – Christmas in July

Bright Birthday and More Whimsy Retreat Projects!💡

Hello friends!  Hope that you’re having a great week so far!  Hubby and I are trying to figure out how this “retirement thing” goes together! LOL!  I think we’ll be having so much fun and we’re just really excited about the future and what we’ll be doing.

Speaking of which, this past Sunday he also celebrated a birthday and of course I had to make him a card that was suited for an electrician.  I had to add a bit of humor about his age on the inside, but this is what I came up with:

I’ve had this Stampin’ Up! Sunburst die and stamp set and haven’t used it that much since I bought it. (Quite a while ago! Not quite sure how old. LOL) I thought it would make a great light beam for my VERY old Simon Says Stamp ‘Watts Up’ stamp set that was from a past card kit. (circa 2014/2015) …yep, all old!

I die cut the sunburst from some yellow and gold glitter stock that I glued together slightly off-set and then attached it over a side folding A2 sized black card base.  I stamped the sentiments over a couple of the yellow strips with black ink taking care to make room for the circle panel.

I then stamped the lightbulb over a white piece of cardstock and colored the base with Copics and used a marker draw a line above it for the string.  I took a solid heart from the stamp set and heat embossed it with some Gold Metallic Gilded EP and then sponged some yellow ink over the bulb for some glow.  I die cut it out with a circle die and then layered over another die cut circle black piece and popped it up over the sunburst layers with foam tape.

I tied a bow with some black twine and glued it to the light bulb base.  I also stamped the bulb in a lighter gray ink over the envelope and added a string to that as well with a gray marker. (The inside of the card said:  “Old is the new black.” 😆)

———————————————————————————————————–

And I also wanted to share that I’m still plugging away on the several kits that I received from the Whimsy Stamps Virtual Retreat last month!  These are really amazing projects and I’m having lots of fun putting them together still! (Christmas will be coming next. So, stay tuned for those!):

This is a fun interactive card with a pull tab at the top where this cut little dragon slides upwards towards the sky! This kit 9 came with an A2 sized envelope, but I had to make my own envelope slightly larger to accommodate for the pull tab sticking above the card. I’ve added doodle lines around the edges and shadow stamped a sentiment at the bottom for my own added details.
This set was from kit 14. The hexagon shaped box was super fun and even came with the candy! There was also an extra stamped and cut out bee, so I used it to make another card… shaker style! I used the left over honeycomb die cut piece as a stencil on the card as well. I used the envelope that was provided in the kit above and decorated it for this A2 sized card instead. (I know someone that loves these candies…so they might get a surprise at some point! 😉)
And lastly, this was from kit 15 and TOTALLY different than what was photographed in the booklet! First of all, I received a plant image with a die cut speech bubble sentiments and thought it might be cool for a Halloween card on another project, so I saved those to use later. I received an EXTRA stamped sunflower image from kit 22 that I had posted earlier and decided to use it for this card here. I colored it similar to that one and cut it out, but cut off a portion of it on this design. I also changed up the background ink blended colors and splattered some gold paint on this one. Love how it turned out. This will be for an Autumn anniversary card for someone coming soon.

Hope you’ve enjoyed all of my projects today!  Thanks so much for stopping by and I’ll be seeing you soon!

Challenges (For the Birthday Lightbulb card ONLY):

  1.  Retro Rubber – Anything Goes + stamps older than one year
  2. Cardz 4 Guys – Birthday for adult male
  3. Creative Moments – Anything Goes
  4. Crafty Calendar – Anything Goes
  5. Pammie’s Inky Pinkies – Anything Goes
  6. Shopping Our Stash – Tic Tac Toe (I used middle across: String/twine, 5 year old stamp, bright colors)
  7. Watercooler Wednesday – All About Occasions (birthday)

Bee Happy for Whimsy Stamps June Release!

Hello friends!  There is so much to “bee” happy about for sure!  It’s been sunny out lately; it’s the weekend and I have some fun creations to share with you for the Whimsy Stamps June digital release today! 🙂

Vicki-BeHappy-June1-Trio

Check out these ADORABLE bees!!  I have made 3 different cards because I just couldn’t stand not being able to color each one of these which are all included in this set!  I have used Crissy Armstrong’s “Bee Happy” digital stamp set.  This is a set that was previously released as a stamp set, but now available in digital format starting this month!  Good news that you can now choose between either format you prefer!

I’ve sized each of these bees in the format to fit onto a 4″ square card design.  I’ve cut them out with a hexagon die cut and layered another black piece of cardstock behind each one.

For the background, I’ve taken a yellow piece of cardstock slight smaller than the 4″ square top folding white card base and embossed it with a fun hexagon embossing folder.  Before attaching them to the card base, I’ve added some black ribbon at an angle over it.  I then attached the image panels and added the ribbon bow which I then placed a bee wooden accent to the center of each one.

The story with the black splatters actually came about from an accident I had!  I opened up a black shimmer pen over top one of the cards and it had a leak in it!  When I popped open the cap, it spilled all over my card!!  OH NO!!!  Obviously, I had all of my cards done at this point and I loved the way I had colored them….so I just decided to “go with it” and added some more splatters to each one.  I actually like the way it looked after I completed it!  They look like “busy bee’s” now! TEE HEE!

Vicki-BeHappy1-BeeMine

Here’s a closer look at the “couple bees” image.  For each one of the hexagon image panels, I’ve taken a black marker along the edges to make the stitch lines.  I went around the edges of the image panel with some Tumbled Glass Distress Ink and ink foam blending tool for each card.  Also, for the sentiments on each card, I found an old “bee” style stamp set and used it to go with them.  I believe that the “Bee Happy” rubber stamp set comes with sentiments that go perfectly with these cuties!

Here’s how all of the bees were colored up with the Copic colors:

  • Wings/around bees – B00, B000
  • black stripes/nose/feet and hands – W9, W7, W5
  • Yellow stripes – Y17, Y15, Y13, Y11, R20 (cheeks)
  • The tiny heart from the sentiment was colored with Y15 and then I’ve added some Nuvo Glitter Drops over it.
  • All the wings for each card were covered with the Wink of Stella Glitter Pen.

Vicki-BeHappy2-BirthdayBee

This little dude was so fun to color up with his party accents! 🙂  Here are the Copic colors I’ve used for the accessories:

  • bag – E87, E84, E81
  • hat balloon, party hat, tissue from bag – V12, V15, YG11, YG13, YG25, YR04
  • I’ve covered the purple on his hat with the Nuvo Glitter Drops
  • The wings and balloon were covered with the Wink of Stella Glitter Pen

Vicki-BeHappy3-BzzzFriend

I just love how he’s trying to hand out a flower to you! 🙂  Here’s the following Copic colors that I’ve used for the flower:

  • flower stem – YG61, YG63
  • flower middle – Y15 (I covered it with the Nuvo Glitter Drops again)
  • flower petals – R32, R35, R37
  • His wings were covered with the Wink of Stella

I hope you’ve enjoyed my bee creation today!  Please be sure to BUZZZZ on over to the Whimsy Stamps store!

Thanks so much for stopping by and I’ll see you again soon!

Challenges I’d like to enter:

  1.  Through the Craft Room Door – Anything Goes
  2. TGIF – #TGIFC214 Create a Set!
  3. Aud Sentiments – Nature + a sentiment (hoping bees are apart of nature)
  4. Creative Knockouts – Embossing Delight (embossing folder on each card)

Late Valentine Share and Looking Into Future With More Calendar Months!

Hello friends!   (Long post with lots of photos!!)

I wanted to share the Valentine card I made for my hubby on Valentine’s Day yesterday, but I couldn’t share it on my blog until after he got it because he can be known to be a “stalker” on my blog to see what I’m up to!!  LOL!

Vicki-BMLoveBug-Valentine

Vicki-BMLoveBug-Valentine-close

I’ve colored up these “wasps” with Copics and for the wings and hearts there is a bit of shimmer on them as you can see in the photo.  For that I have used the Aqua Pigments Valentine Collection plus the Aqua Pigment Pearl for the wings.   I heat embossed the sentiment from the stamp set with EP and I cut the banner myself with scissors and mounted it over the card with the Foam Tape. The little wooden Convo heart accent was added too.  Lastly, I took some Nuvo White Crystal Drops and added a few dots here and there around the hearts.

I’ve cut the “wasps” out with a stitched circle die and mounted it over some cardstock from the kit that was cut with a scallop circle die.

Vicki-BMLoveBug-Valentine-flat

So, for the background of my card, as I had mentioned above, I used the stencil in the background which is a huge heart with several hearts inside of it.  I took some Ink and sponged it over my white card front background.  I was able to take some Nuvo Moonstone Glitter Paste and go over it to add sparkly dimension to it!  LOVE how it turned out!  I stamped a couple more hearts in the bottom corner and colored them the same as the hearts with the “wasps” using the same Aqua Pigments collection.  I also added more dots with the Nuvo White Crystal Drops.  I layered this onto a piece of red cardstock and cut it out with a scallop rectangle die and then mounted this entire design onto an A2 sized top folding white card base.  The envelope underneath was used to house the card in and I embellished it with some heart glitter stickers that was included in the box as well.

Challenges I’d like to enter this above card for:

  1.  Crazy 4 Challenges (C4C470) – Valentine’s Day Card
  2. Crafty Cardmakers – Love, Love, Love
  3. Always Fun – Love/Valentines
  4. Tuesday Throwdown – Falling Hearts
  5. Try it On Tuesday – Romance
  6. Crafting By Designs – Love is in the Air
  7. Crafty Gals Corner – Love is in the Air (Add a Heart)
  8. Creative Knockouts – Love is in the Air

Now if you remember this post I had a few weeks ago where I had started (late of course) making up my calendar pages for 2019 to put in my stamp room, I needed to make up a couple more of them as the time keeps on ticking….

Vicki-TE-March and April Grumplings Calendar

LOL!  These cute Calendar Grumplings from Taylored Expressions so crack me up! 🙂

Oh, I can’t believe we are getting ready to look into the month of March soon!  I think after having so much cold, ice and snow, I’m about ready to see some pretty flowers in my back yard! Yay!

Vicki-TE-March Grumplings Calendar

So, here’s my March calendar and like the entire calendar card set, I’ve used the Taylor Expressions pre-made 3×4 Calendar set for 2019.  I’ve cut down this panel very slightly so that I could mat a black piece of cardstock behind it.

For the image area, I’ve used a rainbow die from Lawn Fawn and cut it out in several different colors to create rainbow strips which I’ve added to the backside of the black scallop frame from the TE Build A Scene – Calendar 2 die set.  I’ve also cut out a strip of grass from the Build A Scene – Calendar die set.  The sentiment (from the same stamp set) was stamped with black pigment ink and clear heat embossed over a strip of vellum which I cut into a banner with scissors and then attached it to the corner of the black frame.

Vicki-TE-March-Grumplings Calendar-close

Here’s a closer view of the image panel.  I colored the image with Copic markers and then cut it out with the coordinating TE Calendar Grumplings die set.   I’ve also added some Nuvo White Blizzard Glitter Drops over the clover.

Vicki-TE-April Grumplings Calendar

And here’s my April Calendar card using the same stamp set, coordinating dies and 2019 pre-printed calendar cards.  I slightly cut the edges to mat the blue cardstock behind it as well.  I’ve used this same color of cardstock to cut the frame from the TE Build A Scene – Calendar Dies.  I stamped the sentiment onto a strip of white cardstock and made a banner with my scissors and attached it behind the frame on the top left side.  (I’ve also used this same die set to cut a couple of clouds and sponged some gray ink at the bottom of each one.

For the bottom of the frame, I took a piece of vellum and cut out that piece from the Build A Scene – Calendar 2 dies.  I took a glitter brush pen to add some sparkle to this piece of vellum, so it makes it look like a “rain puddle” he’s standing in.

Vicki-TE-April Grumplings Calendar-close

For this elephant image, I also colored him up with Copic markers and cut him out with the coordinating dies.  I attached him along with the clouds over the panel where I wanted them to be.  I cut out some “rain drops” with vellum but ended up not being able to see them very well, so I took the Nuvo White Blizzard Glitter Drops and went over them and then created more “rain drops” with it….I ended up liking that effect better, but I had already attached the vellum and just decided to leave it and go over them.  LOL!

There you go, that just tells you that I’m either getting old and my sight is failing me or I just have been continuously crafting until I’m blinding myself!!  ha!

I hope you’ve enjoyed my crafty makes today and I will be back again tomorrow to share a special post with you for a VERY special cause and I hope you can join me to share in this event!!  So please be sure to come back tomorrow!

Have a great Friday evening and thanks for dropping by!

Sympathy & Banish the Blues

Hello friends!  Hope you have enjoyed a nice weekend.  Unfortunately, I needed to make up a sympathy card and didn’t realize that I had run out of them, so I will need to make some up in the future so I can have them on hand and not have to worry about it when the time comes again.  I had a friend who recently passed and needed a card for her family, so I pulled out a set that I hadn’t used before until now:

vicki-su blue sympathy

This is an older set from last year’s Sale-a-Bration at Stampin’ Up! called “Heartfelt Blooms”.  I think it’s so pretty and since the lady who passed was a happy crafter, I felt good about making this tribute for her.  I will miss seeing you at lunches Penny, rest in peace my friend.

I stamped the floral image several times with a Copic friendly navy color ink over some cream colored cardstock and then colored in the images with my Copic markers.  I also went around the images with some markers and blended it all out around the design.

I then took some distress ink and the foam ink blending tool to soften the edges a bit and make it look a bit more Vintage.  I also stamped the sentiment with navy ink and die cut it along with some navy cardstock with a banner die.  I sponged around the edges of this as well.  I wrapped some linen thread several times around this panel and tied it off with a bow next to the banner.  I then attached it over an A2 sized top folding navy card base.

I created a matching envelope by stamping the image in navy ink over it as well.  Lastly finished off the design with some clear sequins.

vicki-su blue sympathy-close

Here’s a closer view of the coloring on the floral image I did as well as the sponged around the front panel and banner.  I thought all of the blue colors turned out really pretty and made a nice Vintage feel.

Challenges I’d like to enter for the above card:

  1.  A Bit More Time to Craft – #84 Anything Goes
  2. The Creative Crafters – Anything Goes
  3. Crafty Catz – Anything Goes with optional:  Blue, Green plus one other color (cream)

So on another {positive} note, I’d also like to remind you that there are still a couple of days left to play along with us over at the Cute Card Thursday Challenge this week!  The theme for this challenge is “Banish the Blues” which I felt like doing in my craft room and so I decided to make this “Fun-Loving” card:

vicki-bm-lovebugs

Now how happy do these cute honey bees look?!  They almost look like they’re dancing in the air!!  I’ve used items from a February card kit for this card.

I’ve heat embossed the bees and colored them in with some Aqua Pigments. I’ve used the paper from the kit and stamped the background and the edges of the bee panel with some SU! ink that happened to match up with it.  I then white heat embossed the sentiment from the same stamp set above the bee panel.  I sponged around the edges of this red panel with white ink and attached it to a side folding A2 sized card base.

vicki-bm-lovebugs-close

Here’s a closer look at the bees and how I’ve colored them.  Some of the Aqua Pigments are shimmery and I’ve used a couple of those colors too!  I’ve added some white dots on their cheeks as well as a few around the hearts.  I topped off their eye-balls with some glossy accents.  I’ve also stamped some more “xoxo”s on each end of this image border and layered it over a piece of black cardstock.  I took two strips of glitter washi tape from the kit and added it above and below the image panel area and then attached the bees over top but between the strips.  Lastly I’ve added a heart shaped sequins to the center of the white embossed heart “O” in the sentiment and the rest of the sequins from the kit randomly placed on the card.  I topped off the circle sequins with some Nuvo White Blizzard Glitter Drops.

Hope this helped to end my post on a happier note with a smile.

Thanks so much for checking in with me today!  I’ll see you again tomorrow for more crafty inspiration!!

Here’s some challenges I’d like to enter the above “Bee card” for:

  1.  Shopping Our Stash – #SOS386 Hearts On Fire
  2. Moving Along With the Times – #89 Have a Heart
  3. QKR Stampede – #331 Anything Goes
  4. Pammie’s Inky Pinkies – #PIP1903 Anything Goes
  5. Paper Girls – #168 Sparkle and Shine
  6. Double Trouble:  #20 Thing 1 Trouble Maker – “Love is in the Air” (honey bees!), Thing 2 Double Dare – Entered the Paper Girls Challenge #168, Thing 3 Twisted Sister – “Sparkling and Shining” (I used metallic watercolor, sequins, glitter drops and glitter washi tape)