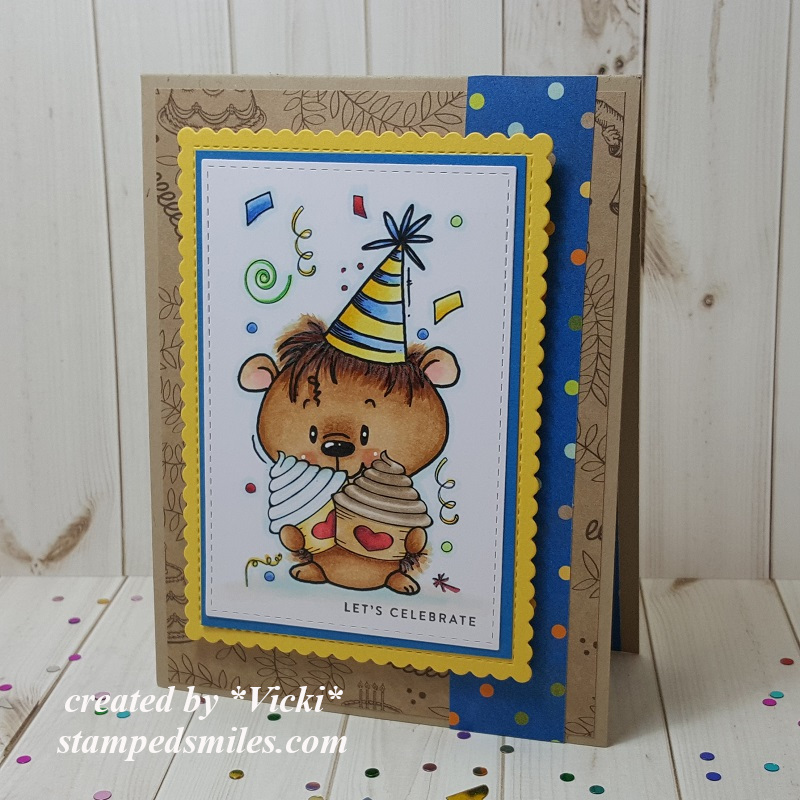
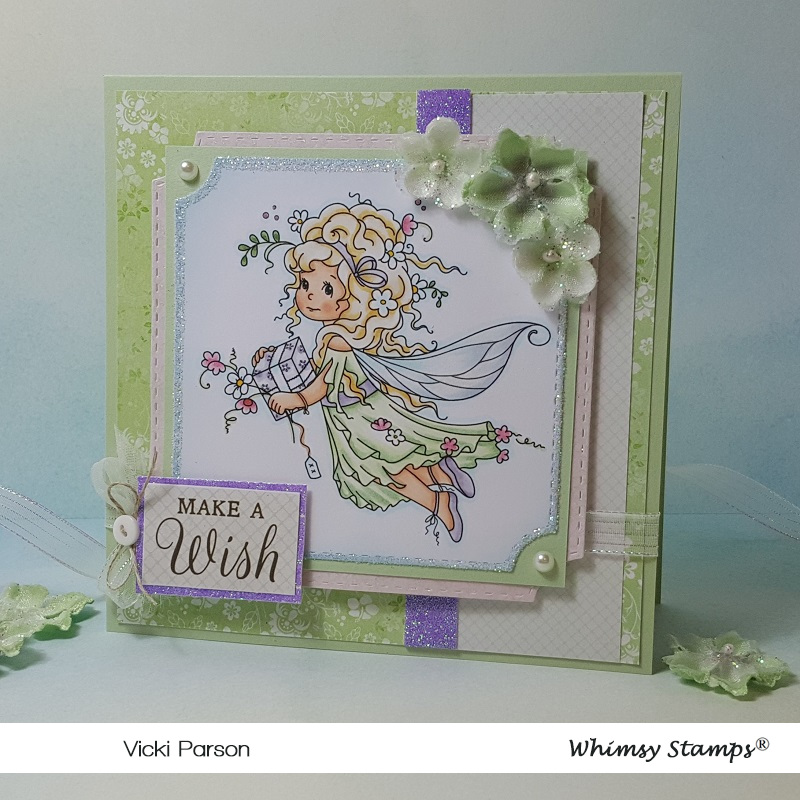
Guest Design Spot for The Paper Girls With Birthday Fun!

Hello friends!

I’m very excited to share my post with you today for The Paper Girls Challenge as I’ve been invited to be a guest designer for their current challenge of “BIRHTDAY“!  We all need birthday themed projects, so this is a great way to join in the fun and add to your birthday card stash too!  Hope you will join us!

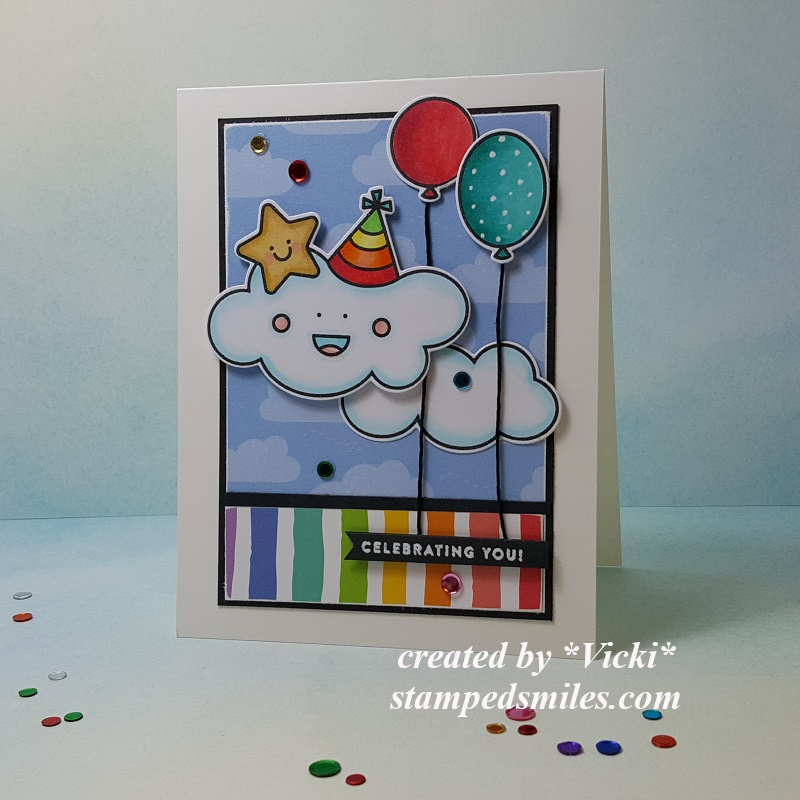
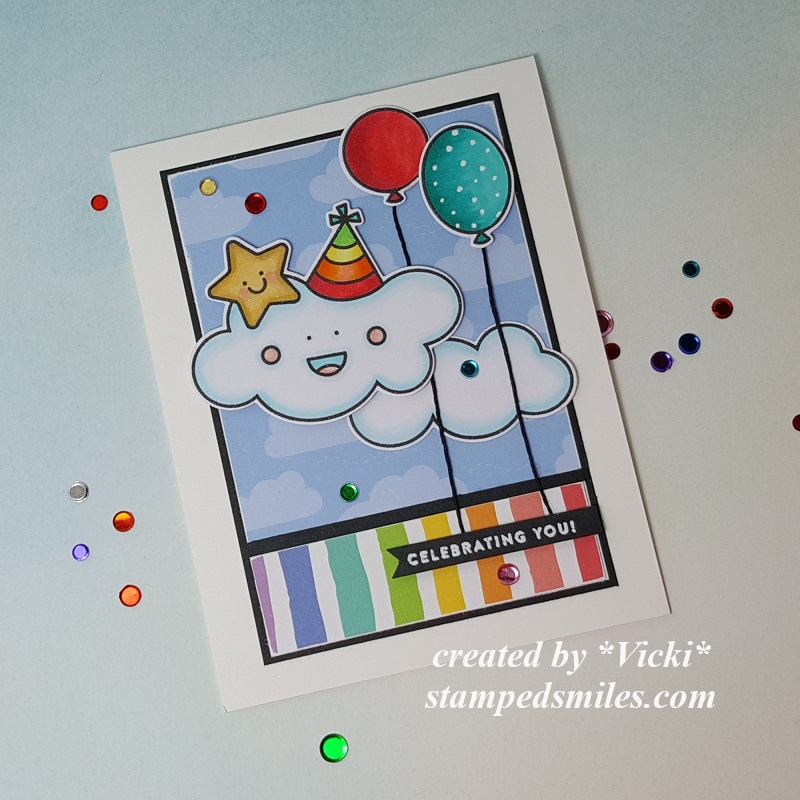
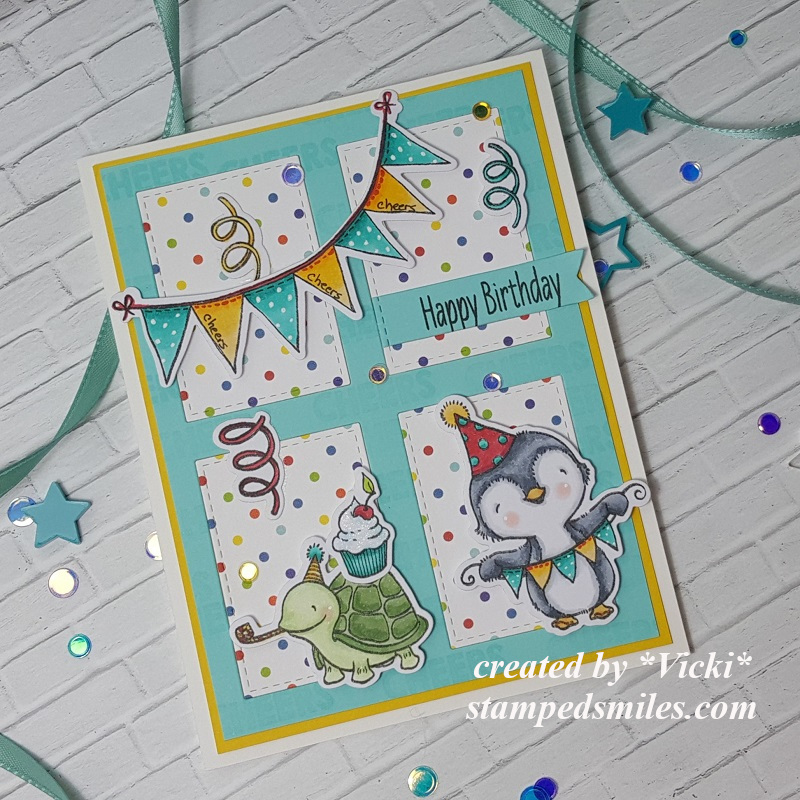
I wanted to pull out some stamps that I had bought a while back and never pulled out to use yet, so this was fun!  Here’s my card:

Vicki-PCGguestDT-MFTbday

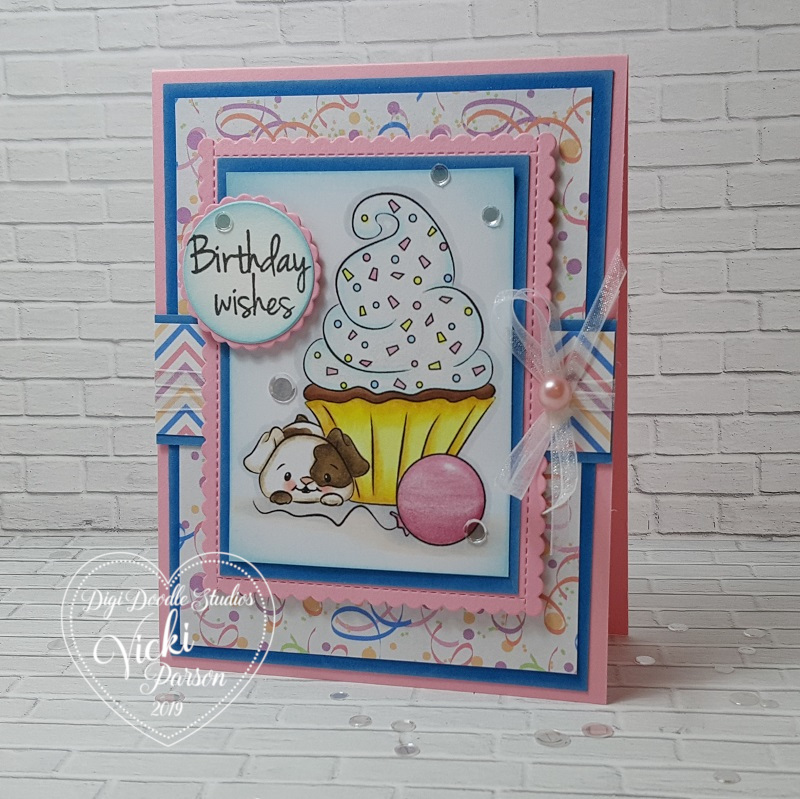
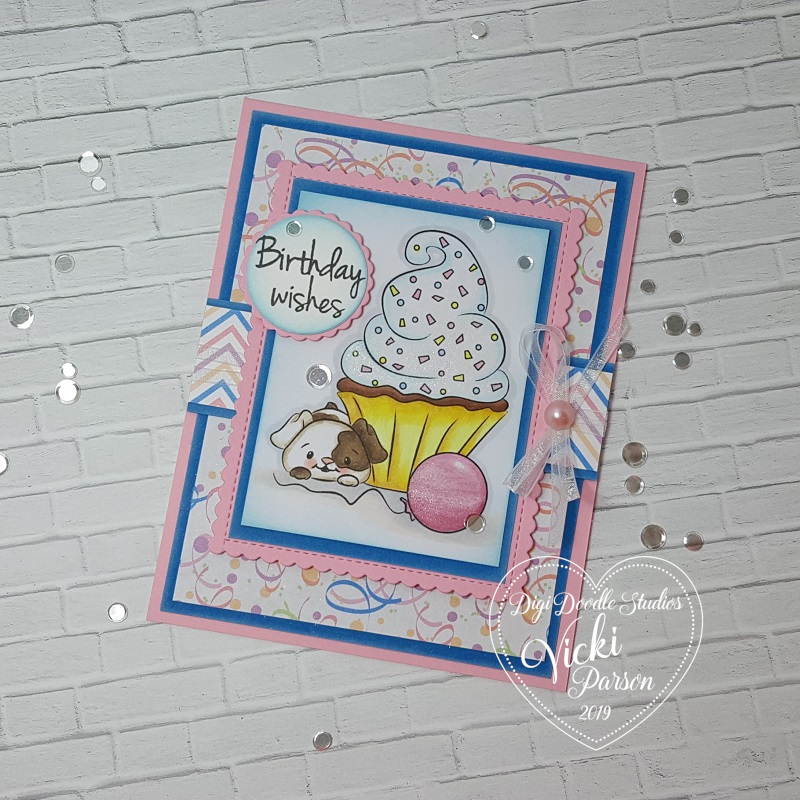
Who could resist a couple of cute party animals! LOL!  I’ve pulled out this adorable “Sending Sweet Celebration Wishes” stamp set from My Favorite Things and made a fun party scene with it!

For the card front, I’ve die cut some Summer Splash cardstock with the Gift Box Cover-Up Dienamics and then used it to also cut some older MFT pattern papers to fit inside the die cut squares.  I layered these pieces over a piece of MFT Daffodil cardstock (looks to be retired) and then mounted it over an A2 sized top folding white card base.

I’ve used the same Summer Splash cardstock to stamp the sentiment from the stamp set and used a banner die to cut it out with and used the Gift Box Cover die to cut the end of it to match with the upper right box area.

For the Gift Box Cover-Up “frame”, I took a sentiment from the MFT Penguins in Paradise and stamped the “cheers” image randomly with VersaMark ink all over it, but then decided that you couldn’t see it very well, so I added the word to the yellow banners with a black pen in my own writing.

I’ve used the coordinating die set for the Sending Sweet Celebration Wishes set to cut out the colored images and attached them to the card front.  Some I’ve popped up with foam tape and the others were glued.  I also wanted to add a little sparkle, so I’ve attached a few confetti sequins to finish it up.

Vicki-PCGguestDT-MFTbday-close

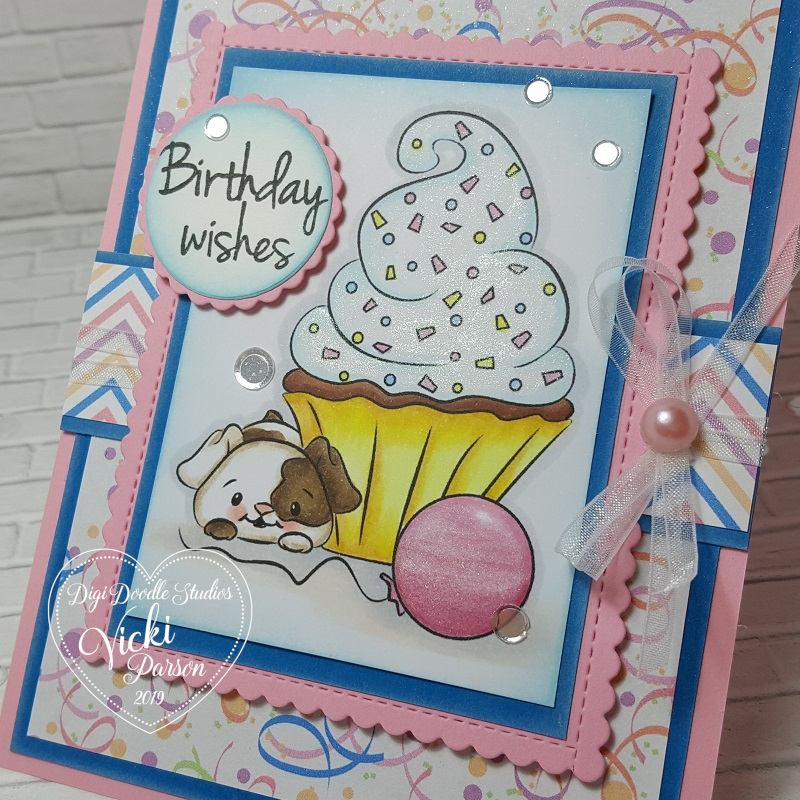
Here’s a closer look at the coloring I’ve done on these cuties.  I’ve used a white gel pen for their cheeks as well as adding some polka dots to the party banner.

You can see where I’ve used a marker to write the words on the banners and I also used it to create stitches along the top of each banner too.

I’ve also added some shimmer with a glitter pen over the cupcake frosting.

Vicki-PCGguestDT-MFTbday-flat

I hope you’ve enjoyed my birthday party animals card today and have been inspired in some way!

Thanks so much for stopping in today and I’ll be seeing you soon!!

Challenges:

  1.  MFT Birthday Project– Jan “Cheers”
  2. Crafty Calendar – Use die cuts/punches
  3. Seize the Birthday– Creatures Great & Small or Anything Goes
  4. Creative Knockouts – Birthday Wishes
  5. Crafty Animals – Anything Goes + animal(s)

It’s a HAPPY Birthday!

Hello friends!  I hope you’ve had a lovely weekend!

After starting this year, I tend to “look back” on my stash items and take a good “inventory” of what I have and the things that hardly EVER get used, if have gotten used at all!  And of course I try to tell myself…”no more!”  LOL!  I honestly just let all of my card kits just sit and don’t dive into them and use them!  I get so excited about them when they come out, oooh and aaahhh over every single item in the kit and then it just sits…then before you know it, another kit comes out!  It’s an endless cycle that I’d like to stop!  Does anybody else have this problem?!

**This year, I hope to not only just open the boxes with content, but also make some creations with them!  If I’m already suscribed and getting boxes, then why am I not using them?!  You saw in a previous post the Snowflake set of creations, so I plan on doing more of that this year…so stay tuned! 🙂

I actually have made a card from a fun special edition “Sweet Birthday” card kit from Simon Says Stamp last year that I was super excited about, but only dug in enough of it to make this one card:  (Hanging head…..)

Vicki-SSSSweetbirthday

At least I made ONE with it, right?! LOL!  I just thought this was such a happy, colorful and fun card kit that it was just perfect to send a birthday smile for someone that really needed some “happy” sent their way.  My schedule was crazy and then I forgot to get it posted!  LOL!

The stamp set used in creating this one from the SSS card kit was called Sweet Birthday and I was excited to be able to get the coordinating dies to go with it too.  It’s very simple with the cardstock and pattern papers from the kit for the layout design.  I used an additional piece of black cardstock to white heat emboss the sentiment from the stamp set, cut it out with my scissors and pop it up along with the party hat cloud and balloons with the black “strings” underneath them.

I used a white gel pen to add “dots” to the blue balloon and then added some sequins from the card kit over the design.

Vicki-SSSSweetbirthday-close

Here’s a closer look at the images and how I’ve colored them up with my Copic markers.

At this point I don’t remember if I’ve added a glitter brush pen over anything, but more than likely I probably did because I like using it! LOL!

I’ve also used a sanding block around the edges of the pattern paper as I like to distress my papers sometimes too.

Vicki-SSSSweetbirthday-flat

I didn’t know who this person was that received this card, but a request came from a crafty friend who asked to send smiles to someone for a loved one’s birthday and of course I was happy to get creating and hope that this helped in some way to lift spirits.

And I hope that this has helped put a smile on your face too!

Thanks so much for popping over here today and I truly enjoy seeing your comments!  Please let me know what you think of YOUR stash?  Is it “out of control” like mine?  LOL!  Would you like to see me making posts using more of my card kits?  Share your thoughts below! 🙂

I’ll see you again soon my friends!

Challenges:

  1.  Love to Craft – LTCCB42 Jan. Anything Goes
  2. Love to Scrap – LTSCB129 Jan. Anything Goes
  3. Seize the Birthday – Anything Goes + Toppings:  Layer It!
  4. Use Your Stuff– Anything Goes
  5. Try it On Tuesday – What a Cutie/Make Someone Smile

Let’s Celebrate at 2 Crafty Critter Crazies!

HAPPY NEW YEAR FRIENDS!!!

*I wanted to take a moment to first wish all of my friends and blog readers here an extremely Happy New Year and best wishes for the most amazing 2020 you can have!  I have REALLY appreciated each and every one of you for your friendship, support and comments throughout this last year…it really means so much to me!  I hope to continue to inspire and spread smiles with you in the comng year as well!  HUGS*

Today is obviously the first which means it’s time to start a brand new challenge over at 2 Crafty Critter Crazies!  So remember that you have the entire month to play along and It’s ALWAYS an “Anything Goes + a critter” on your crafty project!  Easy peasy!

Here’s the creation I made for this month:

Vicki-2CCC34-BugabooBday

He’s such a cutie and I think he would be a fun little guy to celebrate with especially since it looks like he’s handing out cupcakes! LOL!!

The sponsor for our challenge this month is Bugaboo Stamps and the team were given some images to play with, so I have used this adorable Birthday Hedgie 02 digital stamp on my card today!

After coloring him up with Copic markers, I used a stitched rectangle die to cut him out with and then layered him onto a blue layer of cardstock along with another yellow layer that was cut from a stitched scallop rectangle die.  I used some craft foam to pop him up over the card front design.

For the card base, I took a top folding A2 sized kraft card base and found some fun birthday papers in similar colors slightly cut down to go over top.  I also found a matching blue dotted strip of paper to place from top to bottom of the card base design.  the sentiment was stamped in black ink at the bottom of the image panel.  This is a new set I got from Simon Says Stamp called Tiny Words.

Vicki-2CCC34-BugabooBday-close

Here’s a closer look at the coloring I’ve done on this cute little guy!  His “hair” actually got a bit more “fuzzy” than what I was going for, but I didn’t want to keep going over him or he might look like he partied a bit too much! LOL!

Of course it’s very hard to see unless you see it person, but I’ve added some shimmer with my glitter brush pen over the cupcakes and little hearts.  I also used some colored gel pens to go over some of the confetti pieces around him.  I also used a white gel pen for his cheeks and I thought he needed some eyeballs and I made those too!

Vicki-2CCC34-BugabooBday-flat

I hope you’ve enjoyed my card today!

P.S.  Just for fun, please share with me if you have any crafty or non-crafty “New Year’s resolutions/goals” for this year!  My goal is to COMPLETELY finish each card I make this year with sentiment/decorated inside, with the envelope and signed on back!  I hope it holds up!  I started with this card!

Challenges:

  1.  Make My Monday – Female Birthday (Thought it could be used for anyone!)
  2. Simon Says Stamp Monday – “Party Time”
  3. Creative Knockouts – Celebrations
  4. QKR Stampede– #378 Anything goes

Make a Wish for Whimsy Stamps

Hello friends!  Wow!  We are getting so close to Thanksgiving now within a few days!  I know that most people have been full steam ahead with making Christmas and I have really been quite festive myself with my own creations!  Today, I wanted to suspend the ‘Merry Making’ for just a moment….

Vicki-SZPreciousPresent-Nov26

This little cutie digital stamp is appropriately named Precious Present from Whimsy Stamps and she’s another adorable fairy image by Sylvia Zet.  You could certainly change up the colors to make her more festive, but I just felt like taking a “wee” break (LOL..Wee Stamps…see what I did there?!) and make something soft and light.

After coloring her up, I used the Whimsy Stamps Notched Square Dies to cut her out with and then layer with more panels behind her.  I also took a glue pen and went along the edges of the image panel then covered with some clear glitter.  I did the same with the purple strip in the background and the layer behind the sentiment panel, but just used some pretty sparkly purple glitter.

The background papers including the sentiment panel came from a pretty paper pad called “Fairy Garden” by Kaisercraft that I had purchased earlier this past Spring.  Love how soft and light the colors and patterns are in it.  I also found the perfect Stampin’ Up! cardstock color for my card base and one of the image layers called “Certainly Celery”.  It’s an oldie but a goodie for sure!   I finished it off with some more of that clear metallic ribbon (my fave) with a bow at the edge of the sentiment panel along with some twine and a button.  I also added some flowers by Prima and a couple of pearls in the corners of the green layer behind the image.

Vicki-SZPreciousPresent-Nov26-close

Here’s a closer view of the coloring I’ve done for this image using Copic markers.  I kept things really soft and simple for this.  I did add some shimmer over her wings with a Spectrum Noir glitter brush pen and I used a pink metallic gel pen to color the “dots” above her head.

The layers were popped up with foam tape and I’ve also popped up the sentiment layer with foam tape over that as well.  (You can see the glitter in the pink layer that was die cut too!  This came from that paper pad I mentioned above.)

Vicki-SZPreciousPresent-Nov26-flat

I hope you’ve enjoyed my non-Christmas card today!  I think you could turn it into something festive and I thought about doing that, but then decided I wanted to use soft and light colors and turn it into maybe a birthday type card.  Besides, I love soft subtle colors and lots of sparkle…so it was fun to put together!  🙂

It already has me longing for Spring and winter hasn’t even really started over my way yet! LOL!!  I do have TONS of creations going on in my craft room and haven’t really been sharing them on my blog, but I hope to be getting to that very soon as we are approaching the December month and there will be so much to share!  I’m excited to be sharing things with you soon!

Thanks so much for stopping in and have a wonderful day!

Challenges I’d like to enter this card for:

  1.  The Fairy and Unicorn – November Anything Goes + fantasy themed
  2. Fab ‘n’ Funky – Add a Button(s)
  3. Little Red Wagon – Birthday Card
  4. Alphabet Challenge – ‘R’ is for Ribbon
  5. Creative Moments – Anything Goes with optional:  Ribbons and/or Bows
  6. QKR Stampede – #373 Anything Goes

Cards From My Heart

Hello friends!  With this not cooler, but COLDER weather we’ve been having, it looks like it may be a hard winter ahead and I’m already feeling it in my body unfortunately.  So with the heating pad and warm slippers,  I’m still crafting!

Today I’d like to share some cards that I have made for my hubby using some of the adorable stamps from Lawn Fawn …which I love:

Vicki-LF-Anniversary

At the end of October hubby and I celebrated our 20-year anniversary, and I made this card for him to let him know how I feel about him after all these years.  This would be something that we would certainly do where we live!  We always enjoy looking at the night sky together.

I started with some watercolor paper and blended some distress inks for the background and spritzed it with water.  I then made sure it was completely dry before white heat embossing the stars that I colored in the centers with a gel pen.  I then took a white gel pen and added more “dots” in the sky.

I’ve used Upon a Star and the Winter Skies stamp sets for both the images and sentiment. I took the Little Town border die to add over top of the starry sky and layered it onto a navy card base that has some more die cut stars (from Upon a star coordinating dies) at the top sponged with white ink.

For the sentiment, I had to piece together a couple of words from different sets to get it to say what I wanted it to.  I cut it out with a long banner die from My Favorite Things.

Vicki-LF-Anniversary-close

Here’s a closer view of the sky and the images.  For the fox couple, I black heat embossed it and then used my Zig Clean Color Real Brush markers to color them with and then popped them up over the corner of the scene with foam dots.

I actually used a color palette and sketch from a challenge blog, but missed the deadline to post it, but I think it turned out great and hubby enjoyed it.  He said, “Yes, this is something we would do!”  He also likes the color blue.

Here’s another card I made for hubby as his birthday was this last Friday:

Vicki-LF-LightUpCard

Although this one is a bit simple, it has a really fun interactive element to it!  If you’ve known me for a while, then you may know that my husband is an electrician, so this card was very fitting for him!

I have used the Lawn Fawn Turn Me On stamp set and coordinating dies along with the Life is Good stamp set for the sentiment and the Push Here stamp set to make this card.  I also have a large stash of Lawn Fawn papers that I’ve used for this which I don’t think are available any longer.

I used vellum for the light bulb that was heat embossed over it and then I colored it yellow on the backside of the vellum to place behind the die cut opening from the blue panel.  That was die cut with the coordinating dies.  I stamped and colored the light switch as well and also die cut it out over the blue panel.  I then white heat embossed the sentiment and cut it out with a sentiment banner die from MFT.  It was sponged with white ink and glued over the blue panel.

Vicki-LF-LightUpCard-alight

The best part of this design is that when you push on the light switch, the light bulb turns on!  I’ve used the Chibitronics to create this feature.

You can see here what it looks like when you push on the light switch!

You can also check out this quick few second video to see it in action below:  (CLICK HERE if you want to see it on You Tube.)

Although this looks like a pretty simple card, mechanically it had its difficulties with the light up interior portion of it and it was met with some challenges and patience as I had to keep testing it to make sure it worked right!  At one point I had to tear it apart because the battery accidentally flipped over!  I also had to use like 4 layers of foam tape so that the light wouldn’t continuously be on all the time! LOL!

Vicki-LF-LightUpCard-flat

It was all worth it though as it was for the love of my life, and he really did appreciate the efforts that went into making it as he even took it to work with him so that he could show it to his fellow co-workers!  LOL!  They seemed to be pretty impressed with it and even offered some advice on how much to charge for something like this!  LOL

The card was thick due to the amount of foam on it, so it didn’t fit into a regular envelope. Since it went to hubby, I just hand delivered it to him! 🙂

Hope you’ve enjoyed my share of creations today that I made for hubby!  I will be seeing you again soon!  Thanks for dropping in friends…I will be visiting soon!

Challenges:

  1.  Lawn Fawnatics – Cards for Guys
  2. Creatalicious – Anything Goes with optional:  For a Man
  3. Crafty Friends – Anything Goes
  4. Cardz 4 Guyz – All Wrapped Up (top card with scarves)
  5.  Get Creative – Anything Goes
  6. Through the Craft Room Door – Anything Goes
  7. Retro Rubber – Anything Goes + stamps older than 1 year (ALL listed are at least 1 year or older!)

Spots and Dots for Cute Card Thursday

Hello friends!  Hope you’re having a great week so far.  The month of October is flying right through and I know once Halloween gets here, it will be the end of the year before we know it!

Today starts a new challenge over at Cute Card Thursday this week!  We are looking for “Spots and Dots” on your creations this time!  We look forward to seeing your take on this one!

For my card, I decided to keep it rather simple:

Vicki-CCT604

This card is using items from the Simon Says Stamp Sweet Birthday Limited Edition card kit which has since been sold out, but I know that you can still purchase a few of the items that were included in the kit.

I started out by taking the SSS Celebrate stencil from the kit and spread on some Deco Foil Transfer Gel over a white piece of cardstock from the kit and let it completely dry before moving on.  After it was dry, I took the Rainbow Shattered Glass transfer foil sheet and put it through my laminator.  It looks so pretty and shinny with a wow factor to it!  I cut this piece down and layered it over a black scallop square die cut panel.  I then layered these pieces over the green colored Tim Holtz Metallic paper from the kit.

For the square card, I used a black top folding 4.25″ black card base and then layered another piece of that green metallic paper over it.  I took a ‘dotted’ piece of paper from the Honey Bee Over the Rainbow papers (included in the kit) and layered it over top of the metallic green.  Then I added my foiled balloons panel over this.

Lastly, I took the sentiment from the Simon Says Stamp Sweet Birthday stamp set and white heat embossed it over a piece of black cardstock that I trimmed down to a banner and popped up over the card with some foam tape.

Vicki-CCT604-flat

I really didn’t want to add too much more to it as it was for a male and I think with all of that foil and shine, it really didn’t need much else!  I think it’s fun, simple and really cheery looking especially with that foiling done.

I know that I’m getting this fun kit out again very soon as I am in need of another birthday card to send to someone that needs a good birthday cheer!

Challenges:

  1.  Pammie’s Inky Pinkies – PIP1941 Anything Goes
  2. Crafty Cardmakers – Sparkle
  3. Through the Craft Room Door – Anything Goes
  4. A Bit More Time to Craft – Anything Goes
  5. Watercooler Wednesday – WWC243 Masculine Anything Goes

Thanks so much for stopping in and sharing a bit of myself with you!  Wishing you a beautiful day friends!

Birthday Wishes for Digi Doodle Studios

Hello friends!  🙂   Happy Labor Day!  I hope you’ve enjoyed your weekend and I hope you get a nice relaxing Labor Day Monday included with it!  I’m enjoying a nice relaxing long weekend hanging out with hubby.

I have a very sweet card to share with you today using an adorable image from Digi Doodle Studios:

Vicki-DDDS-PupParty-Sept2

Awe!  Such a cute pup, isn’t it?!  I love how sweet this one turned out with the colors which I thought would be great for a little one’s birthday.  I have used this adorable image called Jasper’s Cupcake for my card plus some really fun digital papers from the Let’s Celebrate Digital Background Paper Collection!

I based my card around the colors of those papers and I just love the little pops of blue in them, so I found some cardstock to match up with them and started to put together my card design.

I layered the “Birthday Streamers” paper over a piece of blue cardstock and then sprayed it with some “Shimmer Craft Spray” (Which I’ll be sharing in an up-coming video so stay tuned!)  Then I mounted these layers onto a pink A2 sized top folding card base.

I then took a strip of the “Birthday Chevron” paper and wrapped some white organdy ribbon around it and attached it to the front of the card base.  I added my colored image panel onto a piece of blue cardstock and then mounted this over a piece of pink cardstock that was cut out with a stitched scallop rectangle die.  Lastly I added a sentiment and punched it out with a circle punch and added a punched out scallop circle in pink behind it and popped it up with foam tape over the design.  As you can see both of the image panel and the circle sentiment was sponged around the edges very lightly with some blue ink too.  (I almost forgot that I took some white ink and sponged around the blue edges of the cardstock too!)

I then added my ribbon bow to the right side of the card and glued a pink pearl in the center of it and added on the sequins randomly over the card.  I really like how that blue frames this design and picks up the blues from the papers too.

Vicki-DDDS-PupParty-Sept2-close

Here’s a closer view of the image and how I’ve colored it in!  I just adore that pup and it looked like he needed a few extra “spots”, so I added one on his back and then gave him a darker colored tail and a different colored paw too!

After coloring this up, I took a glitter pen and covered the pink balloon as well as the frosting on the cupcake for a bit of shimmer.  You’ve got to make that frosting look sugary right?!  I wish you can see the shimmer more in the background because it looks really cool!  You can sort of see it at the top of the photo.  However, if you check out my up-coming video, I’m hoping the camera will do it justice!

Vicki-DDDS-PupParty-Sept2-flat

I hope you’ve enjoyed my little party pup card here today!

Thanks for checking out my post today!  I appreciate ALL of your kind thoughts!  I’ll see you again soon!

Challenges I’d like to enter:

  1.  {Cupcake Inspirations} – CIC477 Food and Drink
  2. Little Red Wagon – Foodie
  3. Watercooler Wednesday – WWC236 All About Occasions
  4. Crafty Animals – #30 Anything Goes + animal
  5. Pearly Sparkles – Add a Ribbon and/or Bow
  6. Sheepski Designs – Die Cuts and/or Punches

Bee Happy for Whimsy Stamps June Release!

Hello friends!  There is so much to “bee” happy about for sure!  It’s been sunny out lately; it’s the weekend and I have some fun creations to share with you for the Whimsy Stamps June digital release today! 🙂

Vicki-BeHappy-June1-Trio

Check out these ADORABLE bees!!  I have made 3 different cards because I just couldn’t stand not being able to color each one of these which are all included in this set!  I have used Crissy Armstrong’s “Bee Happy” digital stamp set.  This is a set that was previously released as a stamp set, but now available in digital format starting this month!  Good news that you can now choose between either format you prefer!

I’ve sized each of these bees in the format to fit onto a 4″ square card design.  I’ve cut them out with a hexagon die cut and layered another black piece of cardstock behind each one.

For the background, I’ve taken a yellow piece of cardstock slight smaller than the 4″ square top folding white card base and embossed it with a fun hexagon embossing folder.  Before attaching them to the card base, I’ve added some black ribbon at an angle over it.  I then attached the image panels and added the ribbon bow which I then placed a bee wooden accent to the center of each one.

The story with the black splatters actually came about from an accident I had!  I opened up a black shimmer pen over top one of the cards and it had a leak in it!  When I popped open the cap, it spilled all over my card!!  OH NO!!!  Obviously, I had all of my cards done at this point and I loved the way I had colored them….so I just decided to “go with it” and added some more splatters to each one.  I actually like the way it looked after I completed it!  They look like “busy bee’s” now! TEE HEE!

Vicki-BeHappy1-BeeMine

Here’s a closer look at the “couple bees” image.  For each one of the hexagon image panels, I’ve taken a black marker along the edges to make the stitch lines.  I went around the edges of the image panel with some Tumbled Glass Distress Ink and ink foam blending tool for each card.  Also, for the sentiments on each card, I found an old “bee” style stamp set and used it to go with them.  I believe that the “Bee Happy” rubber stamp set comes with sentiments that go perfectly with these cuties!

Here’s how all of the bees were colored up with the Copic colors:

  • Wings/around bees – B00, B000
  • black stripes/nose/feet and hands – W9, W7, W5
  • Yellow stripes – Y17, Y15, Y13, Y11, R20 (cheeks)
  • The tiny heart from the sentiment was colored with Y15 and then I’ve added some Nuvo Glitter Drops over it.
  • All the wings for each card were covered with the Wink of Stella Glitter Pen.

Vicki-BeHappy2-BirthdayBee

This little dude was so fun to color up with his party accents! 🙂  Here are the Copic colors I’ve used for the accessories:

  • bag – E87, E84, E81
  • hat balloon, party hat, tissue from bag – V12, V15, YG11, YG13, YG25, YR04
  • I’ve covered the purple on his hat with the Nuvo Glitter Drops
  • The wings and balloon were covered with the Wink of Stella Glitter Pen

Vicki-BeHappy3-BzzzFriend

I just love how he’s trying to hand out a flower to you! 🙂  Here’s the following Copic colors that I’ve used for the flower:

  • flower stem – YG61, YG63
  • flower middle – Y15 (I covered it with the Nuvo Glitter Drops again)
  • flower petals – R32, R35, R37
  • His wings were covered with the Wink of Stella

I hope you’ve enjoyed my bee creation today!  Please be sure to BUZZZZ on over to the Whimsy Stamps store!

Thanks so much for stopping by and I’ll see you again soon!

Challenges I’d like to enter:

  1.  Through the Craft Room Door – Anything Goes
  2. TGIF – #TGIFC214 Create a Set!
  3. Aud Sentiments – Nature + a sentiment (hoping bees are apart of nature)
  4. Creative Knockouts – Embossing Delight (embossing folder on each card)

It’s Party Time!

Hello friends!  It’s been sort of a crazy few days with our weather!  Usually it’s pretty warm and sunny, but we’ve been having some severe rain and cooler temps.  Plus more rain coming, so I guess I’ll be in my craft room playing!  🙂

Today I have this happy party fellow from Whimsy Stamps to share with you:

Vicki-WSPenguin Bday Party-May21

Isn’t he adorable?!  This image is called Penguin Birthday by Crissy Armstrong.  This was previously released as a rubber stamp, but this month it has been released in digital format so you can have either option available!

I have cut him out with the Whimsy Stamps Notched Squares die set and cut an additional piece in black cardstock for a layer behind him.  For the base of my card, I’ve used a green colored 5″ square top folding card base and attached a piece of striped paper across the lower section and sponged some white ink along the edges of the green card base panel.  I then used a piece of 1/2″ score tape across the top of the striped strip panel and then used some fun glitter over top of it and burnished into the tape.

I’ve also used this same glitter to go over the Whimsy Stamps Happy Large Word die cut out from some double-sided sticker paper.  I white heat embossed the “birthday” over a strip of black cardstock that I’ve cut into a banner and placed it directly underneath the glittered word die.  This came from the Happy Everything Clear Stamp set.

Vicki-WSPenguin Bday Party-May21-close

Here’s a closer look at the coloring I’ve done on this cutie.  You can also see the fun details of the glitter that I’ve used on the word die.  I love the sort of “confetti flex” contained in this glitter.  It’s something I got in a sample size from a card kit a couple of months ago and it’s great for birthdays! 🙂  Hard to see in the photo, but I’ve also used a clear glitter pen to go over the balloon and present.  I sponged around the image panel with some of the same green ink that I’ve used for the card base cardstock color.  I’ve used the following Copic markers to color him with:

  • Penguin – C8, C5, C3, C1, R00, R000, YR27, YR24, Y32
  • Balloon, party hat, present – YG01, YG11, YG13, V17, V15, V12
  • Shading, shadows, ground – C3, C1, E0000

Vicki-WSPenguin Bday Party-May21-flat

It’s always nice to have a good selection of birthday cards on hand when you need to hurry up and send one out and I think this one is great for any gender or age.

Challenges:

  1.  Little Red Wagon – Happy “BIRD”day!
  2. Creative Fingers – Anything Goes
  3. QKR Stampede – #348 Anything Goes
  4. Allsorts – Happy Birthday!!!
  5. Seize the Birthday – Anything Goes + toppings=Balloons!!

P.S.  I know that many of you have been asking for updates on the bird nest situation and so here’s another photo of what we were able to capture:

20190520_185442

After the flowers were done blooming, we were able to get more of a clear shot and CAREFULLY get close enough to get the mother Robin sitting on her nest!  Like I had mentioned, she doesn’t like it when we go out there.  She chirps at us and waits for us to leave.

20190520_184645

Here is one of her standing in the nest.  We think that she may have hatched those eggs as it looks like she might be feeding the babies!  So next time we’ll check back in and see if we can get a look at those babies in there! 🙂

Hope you’ve enjoyed my post today!  Thanks for stopping by and I’ll see you soon!!

Rainbow Shaker Birthday!

Hello friends!  Yay!  It’s Friday and I thought I’d share this happy shaker card that I made.

Vicki-MFT Birthday Bear Rainbow

I saw over at My Favorite Things “Birthday Project” Challenge was a “rainbow” theme and I thought this would make for a happy and fun birthday card design!  So I pulled out the MFT Transparent Triangles Background stamp (now retired) and heat embossed it with white EP over some Bristol Smooth Watercolor paper.  I went to work with my rainbow background and sponged several colors of Distress Oxide ink in rainbow form over the heat embossed background for a “resist technique”.  I spritzed some water over it and my sprayer went a tad bit “droopy” and I ended up with a weird large droplet pattern, but I decided I wanted to keep it anyway, I liked it.

So to make sure that my shaker balloon was going to line up with my bear, I needed to stamp, color and fussy cut out this bear from the Beary Special Birthday stamp set.  I needed to fussy cut it out because the coordinating die cut would also cut out the balloon from the image, and I didn’t want to include it as I was making my own!  I’ve also white heat embossed a sentiment from the same stamp set and cut it out with the Essential Fishtail Sentiment Strips.  I also took the Mini Balloon Shaker Window & Frame Die-namics to cut out all of the pieces that I needed for the balloon.  (I used the fussy cut out bear for placement to see where I needed to die cut a hole in the background for the shaker area.)  Before attaching the bear down, I also took some green cardstock and cut out a border with the Grassy Fields Die-namics.  I sponged the edges with green ink and took a Copic marker to give a shadow around the bear.  So after I placed my “balloon hole” where I needed it on the background, I took the rainbow sequins to place inside the Mini Balloon Shaker Pouches and added a piece of black cardstock for the background, which was placed over an A2 sized white top folding card base.

Vicki-MFT Birthday Bear Rainbow-close

Here’s a closer look at the bear and how I’ve got him colored in.  I forgot that in addition to the rainbow sequins I had, I put some tiny star sequins in there as well.  At first, I thought I had gone a bit too dark for coloring the bear, but I like how he blended out and I think he really stands out on the rainbow background and doesn’t get lost with the black accents on the card.  I took a white gel pen to his cheeks and added some shimmer to his present with a glitter brush pen.

Vicki-MFT Birthday Bear Rainbow-flat

Here with the card lying flat, you can better see the shaker bits on the inside of the balloon and how they really stand out against the black balloon background.

I think I got a smile and it was passed around for the shaking.

Hope you’ve enjoyed my card today and I thank you so much for stopping in!  Wishing you a very happy and rainbow filled weekend too! 🙂

challenges:

  1.  MFT Birthday Project – Rainbow
  2. Creative with Stamps – Birthday
  3. Crafting By Designs – Anything Goes
  4. Little Red Wagon – “Shake It!”
  5. Always Fun – Birthday