Snowflakes for {Cupcake Inspirations}

Hello friends!  Happy Monday!  Hope that you’ve had a wonderful weekend and are ready for Christmas to come!  This Friday will be Christmas Day and I’m happy to have everything finished and ready to deliver the cookies and presents to family and enjoy the time with my husband.  Hoping that next year will be looking much different too!  Are you ready for Christmas or just ready for the year to be finished? 😉


Today is the start of a new challenge over at {Cupcake Inspirations} with the theme of “SNOWFLAKES“!  The only difference for this challenge is that it is only lasting for ONE week instead of the noraml 2 weeks.  Also, this will be my final post as a design team member for them as well.  I have really enjoyed being apart of this team as what’s better with crafting than with a cupcake inspired theme, right?!🧁😋  So I’m sure I’ll be inspired to play along with the challenges in the future as I have been!  Hope you’ve enjoyed my creations for this challenge.  Here is my “snowflake” cupcake inspired project for today:

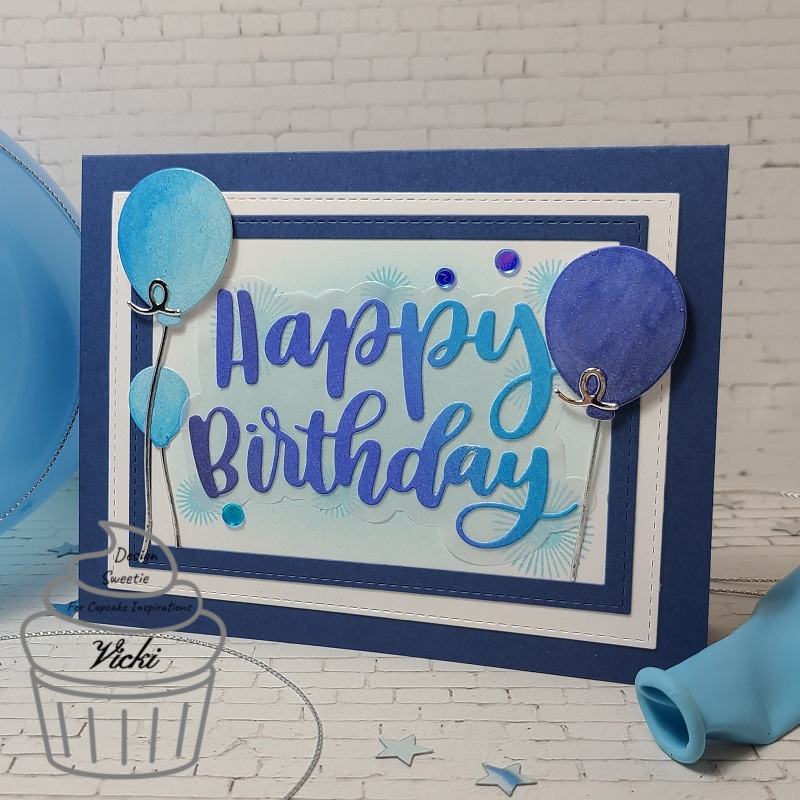
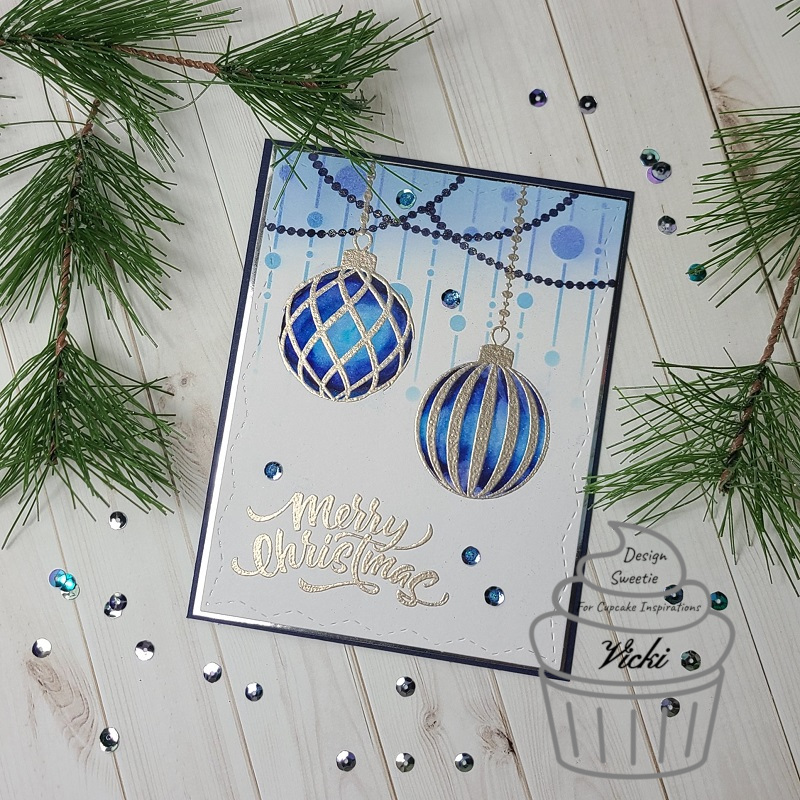
I thought it would be appropriate to create a New Year’s themed card for this challenge as I don’t really need to make any more Christmas cards, but sometimes I forget to send out a Christmas card to someone and don’t realize it until later, so that’s when a New Year’s card can come in handy! LOL!

I absolutely LOVE the fabulous slimline dies that Whimsy Stamps has!  Such a huge selection of them and I spotted this gorgeous Elegant Snowflakes and Border die and thought it would make some really incredible slimline style cards no matter what color scheme you have in mind!  I knew that I first wanted to try it out with some metallic mirror cardstock, and I was also inspired by these gorgeous Gilded Holiday papers from Whimsy Stamps with the snowflakes in gold and black colors.  It looked elegant like the die, so I pulled out a strip to fit across the top, but because it’s 6 x 6, it didn’t fit, but I decided to piece the strip together anyway and I don’t really think you can tell that much until you look up closely to know that it’s there.

So, I then layered the gold metallic die cut piece right underneath the strip that was attached to a 3.5 x 8.5 black cardstock layer.  There are also a couple of extra snowflake dies included with that border die, so I used them layered together (one in gold and another in black cardstock) on the right side of the slimline design.

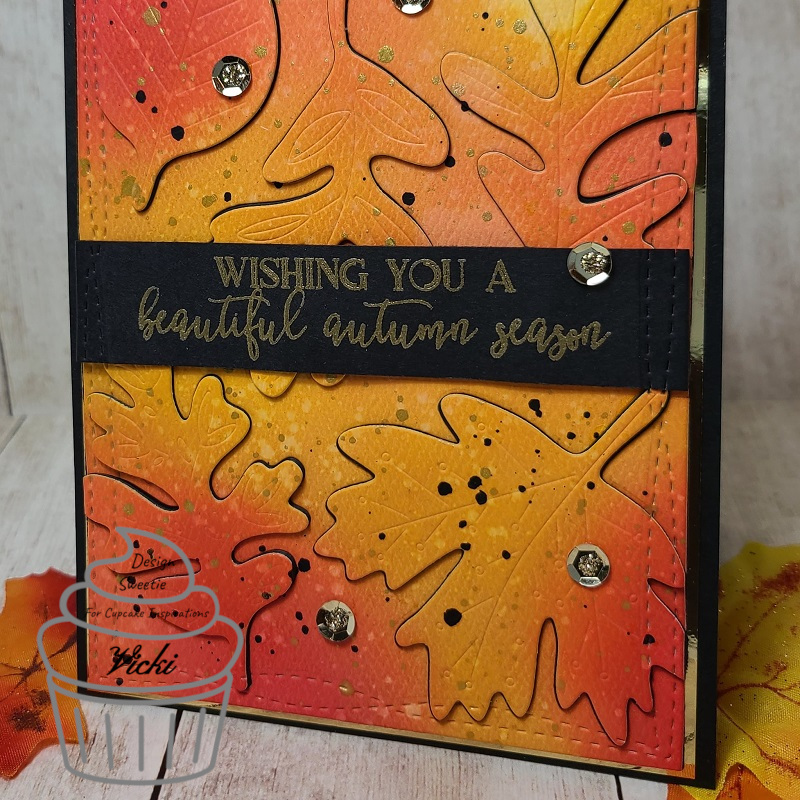
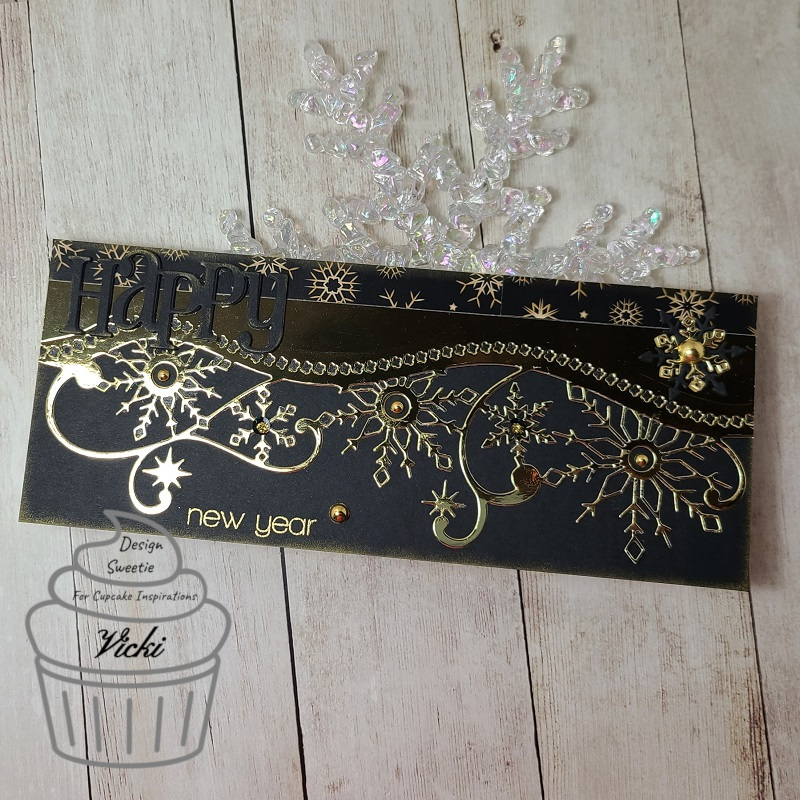
To create the sentiment on the card, I used the Whimsy Stamps Happy Sayings Clear Stamp Set and gold heat embossed it along the bottom of the black card panel. I also took the Whimsy Stamps Happy Large Word die and die cut it out in black cardstock several times to layer together for thickness.  Before attaching it to the card, I used a gold ink pad and brushed around the edges with it as well as the entire black card front panel before attaching all together.  I then layered it over a white top folding slimline card base. 

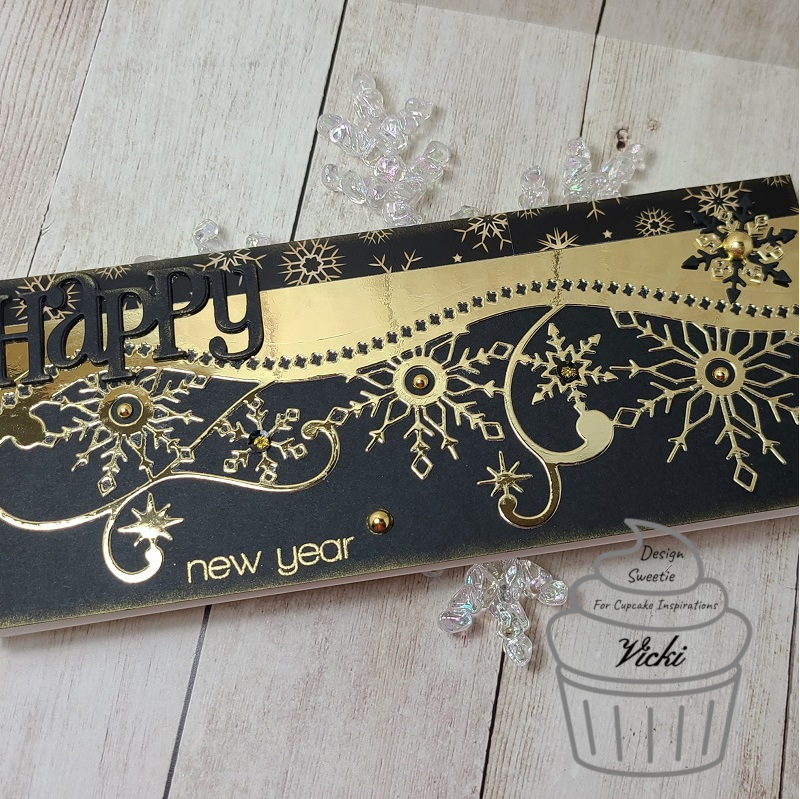
Here’s a closer view of the gold metallic die along with the gold heat embossed sentiment as well as the gold inked edges around the design.  I’ve also decided to add some gold Drip Drops from Taylored Expressions in the center of some of the snowflakes as well as a couple of black sequins that I filled the centers with some gold Stickles with.

Of course I think it looks so much more elegant, shinny and sparkly in person as it’s hard to photograph and be able to capture all of the lighting that you see when you’re holding it in your hands!

Hopefully by sharing a few different angled photos, you’re able to see some of these details in this card design.

Please be sure to stop by the {Cupake Inspirations} Challenge blog and come join us with your “snowflake” creations this week and check out the inspiration from the design team whle you’re there!  REMEMBER:  You have only ONE WEEK to enter!  Can’t wait to see what you come up with!

Thanks for stopping by today and I’ll be seeing you soon with another post soon!

Challenges:

  1. A Bit More Time to Craft – #130 Anything Goes
  2. QKR Stampede – #410 Anything Goes
  3. Watercooler Wednesday – WWC302 Anything Goes
  4. Cute Card Thursday – Anything Goes
  5. Creative Knockouts – #381 Anything Goes
  6. Crafty Catz – #532 Anything Goes optional:  Anything New (new die!)
  7. Allsorts – Sparkle and Shine

Reminder for the Blues at {Cupcake Inspirations}

Hello friends!  Hope that you’ve had a nice weekend as your days are growing closer to Christmas.


Today I have a reminder for you about the “Shades of Blue” challenge over at the {Cupcake Inspirations} Challenge Blog and that you still have a few days left to enter your blue shaded projects!  Hope you’ll join us!  Although thoughts of winter, Christmas and snowflakes come to mind with these colors, I’ve decided to take the colors in a different direction for this week:

Blues made me think of a masculine birthday which is something that I needed for a birthday card for my dad this last week, so my thoughts turned to him when making this card.  He’s been having some medical issues recently and I wanted to send him a happy card along with some real balloons to help try and cheer him up a bit.  My heart is heavily with him right now as he deals with many physical issues.

For my card, I first started with a piece of Bristol Smooth watercolor paper and ink blended some blue oxide inks over the panel with Chipped Saphire, Blueprint Sketch and Salty Ocean Oxide Inks.  I die cut the large sentiment die and balloon dies from this piece and then attached the sentiment to a die cut vellum shadow behind it.

I stamped some images with the same blue inks I blended with over a white panel along with doing a very light ink blending in the center of it before attaching the die cut sentiment over top.  I then attached that panel to a blue die cut panel and again over a white die cut panel and finally attaching it to an A2 sized side folding blue card base.  Lastly, I popped up and glued the die cut balloons along with the silver strings also die cut around the sentiment panel keeping in mind the placement of the strings.  I added a few blue sequins to finish it off.

In this close-up photo, you can see the details of the background more clearly along with the shimmer over the balloons which I went over with a glitter brush pen.

So I hope that you’ve enjoyed my birthday card today and were inspired to pull out your blue shaded stash and have a play with them!  Really look forward to seeing what you come up with for the challenge!  Be sure to check out the {Cupcake Inspirations} Blog and see what the Cupcake Sweeties have to inspire you with this week as well!

Thanks so much for joining with me today and I’ll be seeing you soon!

Challenges:

  1. The Divas That Cut Paper – Dec Anything Goes + die cut machine.
  2. Lil’ Patch of Crafty Friends – #147 Anything Goes
  3. The Corrosive Challenge – #12 December Anything Goes
  4. AAA Birthday – #20 Twinkle
  5. Creative Moments – #204 Anything Goes
  6. Watercooler Wednesday – WWC301 Occasions
  7. Cute Card Thursday – Anything Goes

Shades of Blue at {Cupcake Inspirations}

Hello friends!  Hope that you’ve had a great first weekend of December and are ready to roll on with the spirit of the Season!  I know the world is a bit different, but it’s been great to get out the Holiday decorations and try to keep things as “normal” as we can be.  We went out and drove through our local park filled with Christmas lights while sipping some Starbuks coffee and the baking of cookies always gets me in the spirit.  What do you like to do around the Holidays?

Today, I have a new challenge to share with you over at {Cupcake Inspirations}:

The new challenge for the next two weeks is a color challenge in “Shades of Blue“!  You need to be sure to use at least three different shades of blue when making your project.  So any theme or occasion you can think of just use these colors!  We look forward to seeing what you come up with for this challenge!  Here’s my project:

I think my favorite colors to decorate with for Christmas are blue and silver!  So I knew I wanted to pull out this GORGEOUS stamp set from Whimsy Stamps called Elegant Ornaments and have a play with it!

I started with a Bristol Smooth Watercolor panel and took the Whimsy Stamps Beaded Curtain Stencil and went over the top with some Blueprint Sketch, Salty Ocean and Tumbled Glass Oxide Distress Inks.  I ended with the lightest color and faded it into the white.  I took the lightest color and also went over the top of the panel too.  I then cut the panel out with the Whimsy Stamps Zig-Zag Stitched Rectangle die.

I then took a couple of the ornaments along with the sentiment from the stamp set and heat embossed them where I wanted to place them with Ranger Liquid Platinum EP.  I took my Zig CC Real Brush Markers and colored in the heat embossed ornaments and blended them together with a watercolor brush.  I then stamped the “curved beads” images in navy colored ink and then heat embossed the strings to the ornaments so that it all looked layered.

This image panel was layered over a piece of silver mirror cardstock and then layered over an A2 sized side folding navy cardbase.  Lastly, I added some blue sequins and filled the centers with some Nuvo Dazzling Blue Glitter Drops.

Here’s a closer look at the ornaments and how that pretty embossing powder looks.  I noticed that the navy beads caught some of the EP when I heat embossed the strings to the ornaments, but I don’t mind that as I think it gives a bit of shimmer over them and gives more depth to it.  The card looks very pretty and sparkly and I’m happy with how it turned out.

I hope that you’ve enjoyed my “shades of blue” creation today and it has inspired you to pull out your blue colored goodies to play along with us!  Please be sure to check out the {Cupcake Inspirations} Challenge Blog to have a look at the wonderful inspiration from the rest of the DT to help inspire you more!

Thanks so much for joining me here today and I’ll be seeing you soon!😉

Challenges:

  1. Cute Card Thursday – Anything Goes
  2. Dream Valley – #238 Christmas
  3. Winter Wonderland – Anything Christmas Goes
  4. 52 Christmas Card Throwdown – Pick a Precious 2020 Challenge – February 52CCT6-20 3 shades of blue
  5. Through the Purple Haze – #174 Holiday – Make it Blue
  6. Crazy 4 Challenges – C4C564 Elvis “A Blue Christmas”
  7. Merry Little Christmas – MLCCB29 December Anything Goes Christmas
  8. The Paper Funday – #24 December Anything Goes optional: Christmas/Holiday
  9. Crafty Calendar – December Christmas theme

HOliday Sweets Challenge Reminder for {Cupcake Inspirations}🥧

Hello friends!  Hope you had a wonderful weekend!  I first would like to say a huge thank you to those that have mentioned they were going to send out a Christmas card for Danny (mentioned in previous post below).  I think it will be so exciting to see how many cards he receives and from where around the world!  I think this will help bring him much needed cheer!


Today I have a fun creation with more inspiration for our “Holiday Sweets” challenge over at the {Cupcake Inspirations} blog!  So, I hope that you will drop on over, check out the inspirations from the rest of the sweeties and come share your delicious Holiday Sweets creations with us!

I’m still in a “cookie” mode and looking forward to making some traditional Christmas cookies in my own kitchen soon…so I’ve played around with a recent card kit I’ve received:

I’ve created a cozy and festive table scene full of delicious Christmas cookie treats using several products from an older Christmas card kit and a few other items.  First of all, the cookies from that kit were super fun to put together!  It comes with all the dies and stamps you need to decorate a (craft) cookie with!

I started my card with an A2 sized top folding kraft cardstock piece and used some of the Winter Cabin Papers to create my scene for the “table” and background. The cookies were all created with the stamps, dies and some paper from the kit, but I added some White EP for the frosting and some red Nuvo Crystal Drops for decoration.  There was a felt circle cut in the kit that I cut off to attach over my “table” to place the cookies on.  I also heat embossed the sentiment from the stamp set in the kit with Raven Sparkle EP and die cut with a banner from my stash.  I went around the edges of it with some white Ink.

The hot cocoa mug came from a previous card kit that I stamped, colored and cut out to place on my table scene.  I took the whole scene and layered it over a black piece of cardstock included in the kit and added it to my card base.

Here’s a closer look at those cookies!  You can see that the die cuts have cut the images out right up next to the image line.  I also took a glue pen and added some chunky style glitter from my stash to make some of the cookies look like they’re sugar coated.  You can also see the sparkle from the EP in my sentiment. 

Probably hard to see the bit of shimmer inside the cocoa mug and on the candy cane that I covered with my glitter brush pen, but it’s all shimmery and sparkly in person.  I colored up the mug with my Copic markers and fussy cut out the image.

I hope that you’ve enjoyed my cozy Christmas cookie scene here and are inspired to pull out your favorite Holiday sweets to play along with us too!  Please be sure to stop by the {Cupcake Inspirations} Challenge Blog to see more inspiration from the DT Sweeties!  Looking forward to seeing your creations there!

Thanks for popping in today friends!  I’ll be back very soon with a special post!

Challenges:

  1. Simon Says Stamp Monday – Food and/or Drink
  2. Simon Says Stamp Wednesday – Anything Goes
  3. Aud Sentiments – #265 Anything Goes + sentiment
  4. Creative Knockouts – #378 Christmas Delight
  5. Creative Fingers – #198 Anything Goes
  6. Christmas Kickstart – #43 ‘Twas the Night Before Christmas (cookies for Santa!)
  7. Merry Little Christmas – MLCCB28 Anything Christmas Goes

Holiday Sweets for {Cupcake Inspirations}!🥧

Hello friends!  Hope that you’ve enjoyed your weekend!  Thanksgiving is coming up this week and the full Holiday Season has begun and one of the things that most people are thinking about (at least my family anyway!) are those wonderful “Holiday Sweets“!  Yum!😋

This is also our new challenge for the next 2 weeks over at {Cupcake Inspirations}!  So I hope that you are able to start (if you haven’t already) thinking about creating something crafty with those “Holiday Sweets” in mind and join along in the fun with us!  Here’s what I’ve come up with for this challenge:

I remember times with my kids when we did the “milk and cookies” you leave for Santa along with your nice letter about some things you wish for him to bring you. We always wrote the letters to Santa and made sure that we put out the cookies…and usually hot cocoa on Christmas Eve.  There were always candy canes on the tree to pluck off to stir your hot cocoa with as well!

I remembered this fun little Simon Says Stamp Christmas card kit (Christmas Squad) that I hardly made a dent in to use at all, so it was really great to pull out these adorable Doodlebug items with a “milk and cookies” theme in the papers and images! I had unopened packages of cut out images which is the table with the lamp, Santa letter and mug on it.  I took the doggie image from the stamp set, stamped, colored and used the coordinating dies to cut it out with and popped it over the table image panel with foam tape. This panel was cut with a Wonky Stitch Rectangle die as well as the background papers.  I layered everything over an A2 sized top folding red card base.  The image panel was also layered over some of this red cardstock as well after sponging around the edges with some light blue ink.

Lastly, I took a sentiment from the same stamp set and white heat embossed it over another piece of red cardstock that was cut out with a banner die and popped up underneath the image panel with foam tape. (I thought it was the perfect sentiment to add especially for this year to someone you miss!)

Here’s a closer view of the images that I’ve put together onto this panel.  The pup was colored with my usual Copic markers and I’ve used a silver gel pen to color in his collar tag with.

I also had some Doodlebug stickers with the kit and added the bitten cookie with a smile face next to the other cookie on the table.  I also added a candy cane enamel sticker to the table as well as the heart enamel stickers above the table.

The strip of papers in the center of the card came from the backside left over piece that was cut out from the milk and cookies panel in the background.  The colors matched up nicely with the images.

I hope you’ve enjoyed my “Holiday Sweets” card today and it has brought you a smile, a special memory or inspiration.  If you need more inspiration for this challenge, please be sure to check out the {Cupcake Inspirations} Challenge Blog to see the rest of the DT sweeties and what they came up with!  Can’t wait to see what you come up with!

Thanks for stopping in and I’ll be seeing you soon!

**WISHING YOU ALL A VERY HAPPY, HEALTHY AND BLESSED THANKSGIVING**

Challenges:

  1. Simons Says Stamp Wednesday – Christmas
  2. CRAFT – Christmas
  3. Cardz 4 Galz – Cute Christmas
  4. Cute Card Thursday – Sentimental
  5. Crafty Catz – Anything Goes optional Christmas

A {Cupcake Inspirations} Color Combo Reminder with a Slimline

Hello there friends!  I hope that you’ve had a wonderful weekend!  It’s slowly getting cooler as we go along with this month and even some snow in the forecast.  I love the Autumn Season and will try to hold onto it for as long as I can!  So, with that, I’d like to remind you about the halfway point of our challenge:

There are still a few days left to enter your project for the Yellow, Orange and Red color combo challenge over at {Cupcake Inspirations} so I hope that you can join along with us!


Today, I have a fun Autumn style slimline card to share with you today using the beautiful color combo:

So, I’ve been wanting to pull out my Aqua Pigments to have some watercolor play time!  I pulled out a piece of Bristol Smooth watercolor panel that I cut down to a slimline size approximately 3.25″ x 8.25″ because I knew that I would be layering it over top of a Raven top folding 3.5″ x 8.5″ slimline card base.

The Aqua Pigments that I’ve used on this background have a gorgeous sparkle in them and I’ve tried to capture that in the photo, but it’s so sparkly and pretty in person!  I’ve used Sparkle Yellow, Heirloom Carrot (subscription only) and Firecracker (subscription only) Aqua Pigments that I’ve dripped randomly over my glass mat, sprayed with some water for more movement and “smooshed” the panel over it and let them run and drip together.  Once dried, I’ve splattered over it with gold and black paints.

A while back, I got me the beautiful Leafy Slimline Die from Pink and Main that I cut out with some brushed gold cardstock from my stash I’ve had for quite a while.  I also used the Blessings Slimline Dies to cut the sentiment including the shadow underneath with vellum and the words with Raven cardstock glued down over the leaves.

I’ve added the leaves frame die cut over the watercolor background and mounted it to the card base.  Lastly, I’ve added some sequins and crystals from an Autumn mix embellishment pack.  I filled the centers of the red sequins with some Nuvo Red Berry Crystal Drops.

Hope you’ve been inspired today with my slimline design!  Thanks so much for dropping in and please be sure to stop by and check out more inspiration using the color combo over on the {Cupcake Inspirations} Challenge blog to see more!  I’ll be seeing you soon!

Challenges:

  1. Make My Monday – #135 Elegant Fall/Autumn
  2. Not Just Cards – Anything Goes November
  3. Crafty Gals Corner – #213 Thankful
  4. Simon Says Stamp Wednesday – Thanks/Thanksgiving
  5. Creative Fingers – #197 Anything Goes

Beautiful Autumn Color Combo for {Cupcake Inspirations}

Happy Monday morning friends!  Hope you all had a great weekend!  The weather has actually been really beautiful this past week and it was wonderful to get outside and look at the pretty colors of the trees changing around us.  I know that it won’t last long, and the temperature will begin to really drop soon…so always need to enjoy it while it’s still here!


Today begins a brand-new challenge over at {Cupcake Inspirations} and there is a beautiful color palette to inspire your creativity to play along with us!  We’d love to see the colors:  Red, Orange and Yellow on your creations this time and we look forward to seeing what you come up with!  Here’s what I’ve come up with for this week’s inspiration:

I fell in love with these cool dies that were included in a past card kit and thought they would be perfect to use for pairing with some blended inks in a background!

I started with a watercolor panel and used Squeezed Lemonade, Mustard Seed, Carved Pumpkin, Crackling Campfire and Fired Brick Oxide Inks to blend over it.  I spritzed over it with water to form the droplet watermarks and once dried, I splattered the panel with both gold and black acrylic paint using a fan brush.  Once this panel was finished drying, I put each leaf die cut down to cover my panel and die cut it, but left them in place.  While leaving the leaves in place, I used the MFT Wonky Stitched Rectangle Die and cut out the panel with it.

I wanted the leaves to stand out a bit more in the background, so I die cut each of the leaves about 3 times each with black cardstock and layered them together with the ink blended ones on top.

I took the sentiment from the Autumn Bundles stamp set and heat embossed it over a strip of black cardstock with some Gilded EP.  Once I cut down the strip, I ran it through the die cut machine to get the Wonky Stitched Rectangle die marks along the edges.  I mounted this panel over a gold mirror cardstock and then over an A2 sized top folding black card base.  Lastly, I added some gold sequins that were included in the Inspiration Box and filled them with some gold Stickles in the centers. 

Here’s a closer view of the leaves and you can see the pretty embossed pattern in the leaves.

Really like how this turned out and I hope you did too!  Be sure to take a look over on the {Cupcake Inspirations} Challenge Blog to see the rest of the inspiration from the design team and join us for this fun color combo!

Thanks for stopping in today and I’ll see you soon!

Challenges:

  1.  Love to Scrap – LTSCB139 Anything Goes November
  2. Dream Valley – #236 Dies and/or Punches
  3. Arty Divas – #31 Anything Goes
  4. Crafty Creations – #415 Anything Goes
  5. The Paper Funday – #23 Anything Goes optional: Thankful

Dia de los Muertos with Monsters/Ghouls for {Cupcake Inspirations} Reminder

Hello there friends!  I hope that you’ve had a wonderful Halloween weekend!  It always go by so fast for me which is why I’m so happy that there is STILL one more week left for our {Cupcake Inspirations} Challenge with the theme “Monster/Ghouls“!  (This can be interpreted in several different ways…not just for Halloween!)

So I hope that you will be able to share something for our current challenge before it ends this week!  We look forward to seeing your makes!

Now, I realize that Halloween day is past us, BUT…my sister-in-law celebrates her Mexican tradition of Dia de los Muertos which is “Day of the Dead” and it starts on Halloween at midnight and ends November 2nd.  So I thought I would share this fun “ghoul” card representing the Holiday that I’ve made for her:

I don’t own any “sugar skull” type of stamps, but I have seen some and think they’re really cool looking!  I did have this stunning card panel from a past card Kit that is printed on toner ink so that you can foil over it.

I started by ink blending over it with Worn Lipstick, Spun Sugar, Shabby Shutters and Peeled Paint Distress inks and then I took some Rose Gold Deco Foil and ran it through my laminator to get that pretty foiled background.  I then cut it out with the MFT Wonky Stitched Rectangle die and mounted it over an A2 sized top folding black card base. 

For the Sugar Skull, I cut it out with my Cricut Explore machine in the several different colors and paper pieced it onto the white skull using a piece of sticker sheet behind it.  It was popped up over the card with foam tape.

I printed out the words on my computer and die cut it out with a MFT border die and sponged around it with some Worn Lipstick and Spun Sugar inks that I’ve popped up over the card with foam tape.  Lastly, I added some rhinestones on each side as well as the eyeballs.

I also forgot that I used some black detail stickers in the corners of the design.  I’ve added some to the inside and then printed out a Spanish poem relating to the Holiday.

Thanks so much for dropping by today friends and I’ll be seeing you soon!💀

Challenges:

  1.  Crafty Cardmakers – “Things that go BUMP in the Night” (sadly closing blog.  Best wishes)
  2. Aud Sentiments – #263 Anything Goes + sentiment
  3. Krafty Chicks – #531 Anything Goes (Happy 10th birthday!)
  4. Cute Card Thursday – #658 Sparkles
  5. Creative Fingers – #196 Anything Goes

WARNING: Spooky post with Monsters/Ghouls for {Cupcake Inspirations}

Hello there friends!  Halloween is very quickly approaching us at the end of this week and it’s one of my favorite Holidays ever since I can remember and it was such a fun memory of things I passed onto my own children to have fun with as well.  We have lots of fun memories together.  I know there are some people that don’t like it…or maybe the “scary” things that come from it, but for me, the more scary, the better! (With the exception of the little ones, I don’t like to scare people that don’t like a good scare…but for me, it’s all in fun and make believe.)  This is the reason for my warning post title…just in case you happen to not like it.  It’s totally fine if you don’t!😉 – OR clowns!! LOL!


Today starts a fun new challenge over at the {Cupcake Inspirations} Challenge Blog with the theme of “Monsters/Ghouls“.  Looking at the photo, you can opt to make a cute little colorful monster/alien type of birthday card if you’re not into the Halloween or scary, so just another way you could interpret the challenge idea if you wanted to.

But here’s my scary “monster/ghoul” creation I made for the challenge:

He is a bit on the spooky/scary side, isn’t he?!  I have been looking for a creepy clown image like this for a couple of years and finally Whimsy Stamps came out with this “Creepy Clown Sleep Tight” rubber stamp set and I knew I had to grab it up and specifically in reference to the movie “It” by Stephen King who’s a favorite author of mine.  My younger son is really into these type of things too, so this one’s going to him!

I started out the background with a piece of watercolor cardstock that I used some Black Soot Distress ink to sponge in some clouds with using a cloud stencil from my stash.  I then took some Wilted Violet Distress Oxide Spray and water and let the color run into the background with the sprayed water.  I also watered down some more Black Soot ink and made some splatters with a brush over it.  I then black heat embossed the Whimsy Stamps Spider Web Frame over top of it, cut it out with the WS Zig Zag Stitched Rectangle die and then added some more Black Soot ink around the edges.  I layered it over an A2 sized top folding black card base.

For the creepy clown image, I black heat embossed it twice over a piece of Bristol Smooth Watercolor panel and then used my Zig Clean Color Real Brush markers and a water brush to color it with.  I fussy cut it out and then just cut out the hands only of the second image, and used some foam tape to pop the hands over the image and then the entire clown image over the frame background.  I white heat embossed the sentiment from the “Creepy Clown Sleep Tight” set over a piece of black cardstock and then die cut it out using the WS Quick Strips die set.  (Note:  I used a partial die cut method to lengthen the die so that it would fit the sentiment.)  I sponged around it with white ink and then glued in place under the clown image.

If you “dare” to take a closer look at mister creepy clown here, you see how I’ve colored him and cut him out.

I did use some brighter colors as he’s a clown and I really wanted him to pop from the design.  I used a silver metallic gel pen to color in the bells on his hat and then I’ve used some glossy accents over his yellow colored eyeballs to make them pop out a bit more as well.  The teeth were left white, but I used a white gel pen to color them in a bit for more prominent whiteness.  It is such a detailed image so it was fairly easy to color.

I hope you’ve enjoyed my good Monday morning scare for you today!😱🤡😂

Other Challenges I’d like to enter “Creepy Clown” for:

  1. Double D – October:  What does it mean to you? (spooky Fall fun Halloween!)
  2. Mod Squad – Spooky Halloween
  3. Simon Says Stamp Wednesday – Layer it Up (popped up layers over clown)
  4. Creative Moments – #201 Anything Goes
  5. Cute Card Thursday – Stamping
  6. Creative Knockouts – #373 Halloween (black, green, purple, orange)
  7. Crafty Catz – #524 Anything Goes optional: hats
  8. Daring Cardmakers – Spooktacular Makes
  9. Two Old Bats – Halloween Jump Start *NEW CHALLENGE BLOG

Color Challenge Reminder Bagged for {Cupcake Inspirations}

Happy Monday morning to you friends!  As I have pre-scheduled this post, I’m sure that I’m probably worn out from a weekend of crafty fun!🥱  Sleeping is over-rated anyway, right?!😆  (I will share some fun things with you all later though!)  But for now, I’d like to remind you about our color combo challenge for {Cupcake Inspirations} and hope you will join in the fun with us using Olive, Red & Lavender:

From my last post, I’m continuing on with making Halloween treat bags for my grands so I thought I’d pull out the colors that would work for this color combo challenge too! Plus, I’m also adding this to another entry for the Whimsy Stamps 31 Nights of Halloween:


I fell in LOVE with those Whimsy Stamps Haunted papers!  I thought it would be a fun backdrop for this darling little Whimsy Stamps Frankie digital stamp to be in front of!  I colored her up with Copics and fussy cut her out and popped her up over the background paper.

Before I placed the background paper over the bag, I took the Batty Stencil from Brutus Monroe and went over the paper sack with some Black Soot Distress Ink.  I cut a couple of strips of cardstock to go with the color combo and white heat embossed the sentiment from the Whimsy Stamps Corny Candy Corns stamp set.  I’ve also added a couple of the silver mirror cardstock stars around it and then used some foam squares to pop up the Frankie girl with.

To close up the treat bag, I folded over the top and then punched a couple of holes in the top and added a tag from a paper pack in my stash, rubbed some Black Soot Distress Ink around it and tied it on the bag with the olive colored yarn string that was tied in a bow.

Here’s a closer look at the colored up image and how I’ve incorporated the colors into it.  I did use a silver metallic gel pen to color in the “bolts” on the sides of her head and then used a white gel pen to dot her eyes and cheeks with.  I think that hair is my favorite part about her!  She’s just too cute to spook, I think!😁 

Thanks so much for dropping in today!  I hope you’ve enjoyed my project and I’ll be seeing you again soon!

Challenges:

  1. The Cutie Pie Challenge – Too Cute to Spook
  2. Aud Sentiments – #262 Halloween/Fall Sentiment
  3. A Bit More Time to Craft – #126 Anything Goes
  4. QKR Stampede – #406 Anything Goes
  5. Crafty Catz – #523 Anything Goes
  6. Creative Fingers – #195 Anything Goes
  7. My Time to Craft – #443 Halloween or Cats
  8. This is Halloween – #2 Anything Goes Halloween (3rd and last entry) NEW!!!
  9. Two Old Bats Halloween – #1 Anything Goes Halloween “Jump Start” (3rd entry) NEW!!!

👻🦇🕷👁🎃(Please support the Halloween challenges and get them going!  All lovers of Halloween unite!)