Spooky Undertaker Tag for {Cupcake INspirations} Color Challenge

Hello there friends!  I’ve been a bit MIA lately but that’s because I’ve actually been having fun attending a virtual stamp event which I will be sharing some things I’ve done with you later and I’ll be doing it all over again this weekend as well!🥳  Although it doesn’t replace an in-person live event, it was lots of fun!  I’ve also been enjoying time visiting with my son who stopped by for the weekend!

CIC504

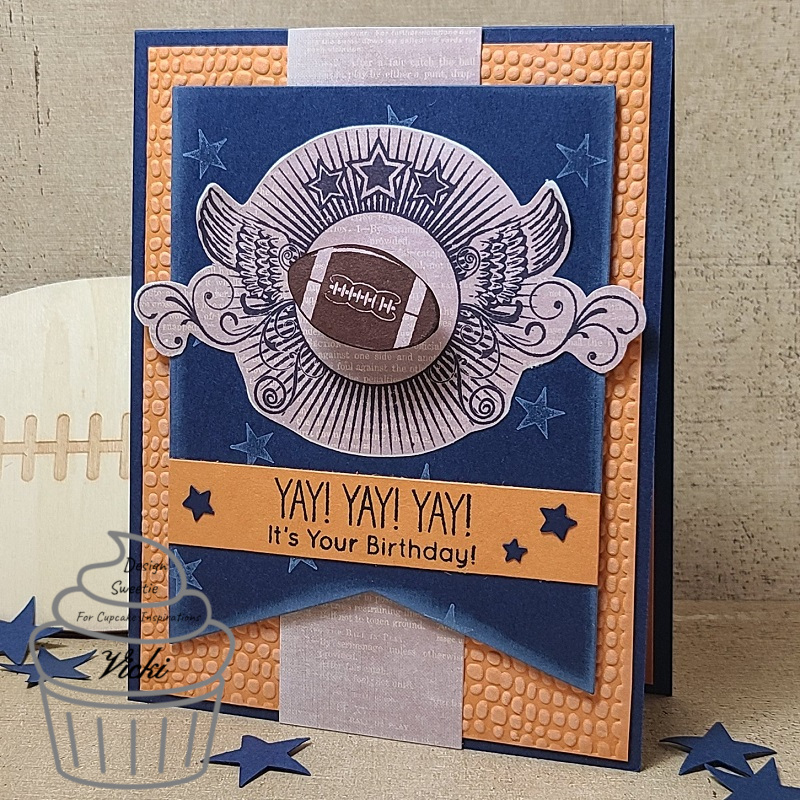
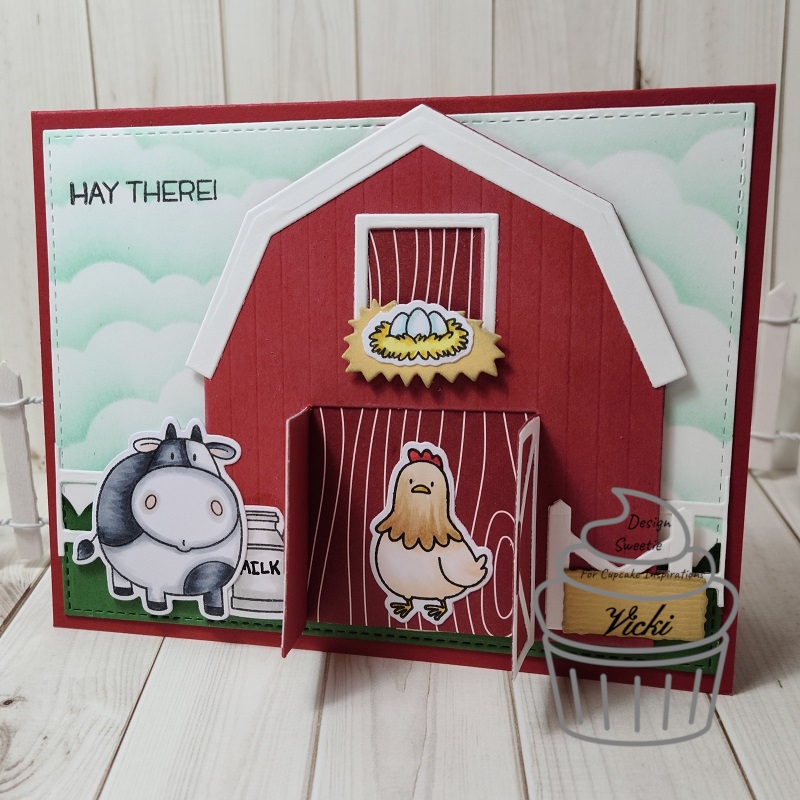
Today I’m stopping in to share my creation with you for the brand new challenge over at {Cupcake Inspirations} using this unique color combo:  OLIVE, RED and LAVENDER  The first thing I had thought of was the inspirational photo to go along with it and it reminded me of this cool Tim Holtz stamps/stencil set I bought a few years ago:

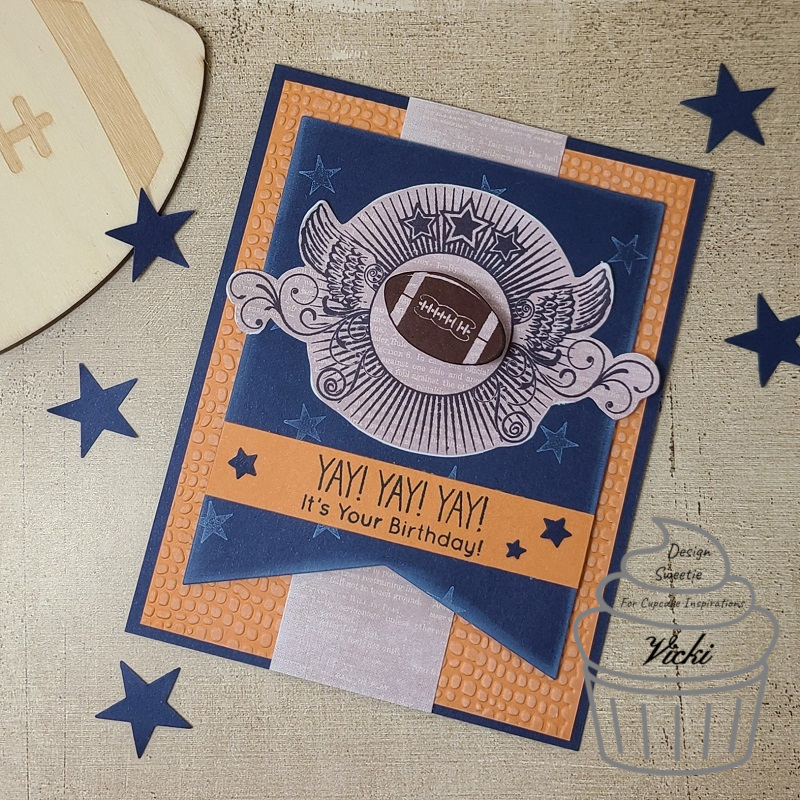
I thought it would be fun to play around a bit with my Distress Spray Stains over one of those Distress Tags.  So I sprayed a few of the colors over it and then also sprayed water over it as well to get the colors moving and blending together.  I think it turned out pretty cool.  I used the Distress Sprays I used were Crushed Olive, Fired Brick and Seedless Preserves.

I then took the stencil from the Tim Holt “Halloween 2 Stamps/Stencil” set and used some Black Soot distress ink to sponge the bats in the center of the tag.  I then used the coordinating distress ink colors and used the other portion of the stencil to sponge the colors with.  I took a thin strip of black cardstock to attach above and below the stenciled bat areas.

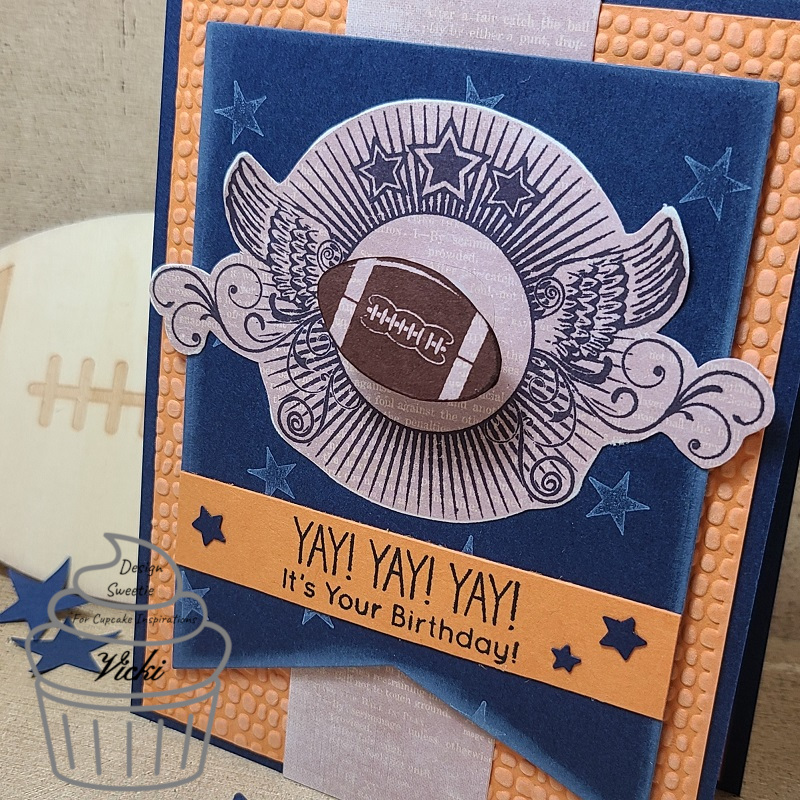
I took the skull image from the Tim Holtz “Halloween 2” stamp set and stamped it with black pigment ink over a piece of vanilla style cardstock and heat set it with clear embossing powder.  I fussy cut him out and added a piece of purple metallic ribbon around his hat and then glued on a purple flower along the side before popping him with foam tape in the center of the oval die cut piece from silver foil cardstock.

I stamped the “undertaker” sentiment from the stamp set with black permanent ink along with some scripty words in random places over the tag.  I also had some Tim Holtz Halloween rub-ons that I used for the spider and the “31” numbers.  I finished the tag with some more of that purple metallic ribbon and the key charm at the top.

Here’s a closer view of the skull with the embossed details along with the shine from the foil cardstock and ribbons.

Really had fun putting this tag together and I think it will make a fun spooky treat to share with someone I love because I have several family members that are really into the spooky Halloween theme besides myself! Yay!

Hope you’ve enjoyed my SPOOKY “undertaker” tag today and that you will stop in over at the {Cupcake Inspirations} challenge to check out the rest of the inspiration using the color combo and join the challenge with us too!

Thanks for stopping by and leaving your kind support! It’s very much appreciated and I’ll be seeing you again soon my friends!!

Challenges:

  1. Unicorn – Spooky and/or Cute
  2. Arty Divas – #30 Anything Goes
  3. Creative Craft Cottage – #134 Spooky and/or Cute
  4. The Paper Funday – #22 Anything Goes optional: Halloween/All Hallows Eve
  5. Creative Moments – #200 Anything Goes
  6. As You Like It – Fave non-card project and why? (I love making tags because I feel like you can “experiment” with different media on it and I like that I can use it for putting on gifts or even add to a card later.)
  7. This is Halloween – #2 Anything Halloween
  8. The Divas That Cut Paper – Autumn-Thoughts of Halloween + die cut/punch
  9. Crafty Cardmakers – Create a Tag
  10. Two Old Bats Halloween – Anything Halloween Goes *new challenge blog*

Sports Reminder for {Cupcake Inspirations} Challenge

Hello friends!  Stopping by with a reminder today that there are still a few days left to join our “Sports” themed challenge over at the {Cupcake Inspirations} blog!  Hope you will join in the fun with us!

It’s that time of the year over here in the U.S. for Fall football season and I have some male family members that enjoy watching it along with having birthdays around this time which brings me to making these type of cards for them!  So this challenge has worked out really well for that!  So here’s my second card for this challenge:

I’ve pulled out this older Stampin’ Up! stamp set that I refused to part with just for this reason because I knew that I would be using it down the line…which is the “Great Sport” stamp set.  (I think it’s maybe circa 2013?)  I have elected to use the colors of my brother’s favorite football team The Chicago Bears for my color scheme.  (His birthday is coming up shortly so this will work out nicely.)

I think the embossing folder is just as old if not older than the stamp sets that I’ve used as it has that pattern on it that would remind you of the football texture.  (pigskin leather as the guys say)  I’ve recently picked up some sport themed decorative papers and thought I would use a strip down the center of my design and then I’ve also used the same pattern to stamp the wings and football images over that were all fussy cut out with scissors.

For the navy banner in the background, I’ve used a die cut to cut it out with and then stamped some stars with white ink over it and then sponged around the edged of it as well.  I took another strip of orange colored cardstock and stamped a fun birthday greeting over it and then added some stars around it that were punched out from navy cardstock.  All of these layered were attached over an A2 sized top folding navy card base.  

Really thought it would be fun to add an interactive detail to this card as well by adding a wobbler to the back of the football image.  So when you put your finger along the side of the ball, it will wobble.🏈😂  (something fun for the birthday guy to play with!)

For the decorative papers I’ve used, I took a sand block to distress the edges a bit and smooth out the edges of my fussy cutting details.

Hope this will help bring a smile his way and add a bit of luck to his football team for this year to do well too!

Be sure to stop by the {Cupcake Inspirations} blog to see more inspiration from the design team and I hope you’ll be able to join in the fun with us for this challenge too!  Thanks so much for dropping in today and I’ll be seeing you soon friends!

Challenges:

  1. Watercooler Wednesday – WWC291 5th Week Anything Goes

2.  Krafty Chicks – #527 Stamp Act

3.  Love to Craft – LTCCB51 October Anything Goes

Sports🎾 for {Cupcake Inspirations}

Hello friends!  It’s been a week since my last post, but I’ve been busy cleaning up around my house to get prepared for the cooler weather ahead of us shortly and it’s starting this week to be very cold in the evening…so it’s just one of those things that need to get done is all.  I actually love all things Fall including that! (Yes, I’m weird! LOL!)

Today starts up a brand new challenge over at {Cupcake Inspirations} and the theme is….

SPORTS!!!⚽⚾🥎🏀🏐🏈🏉🎱🎳⛳⛸

That is also something else that I enjoy in the Fall season!  I like to watch football with my hubby and since I have had boys that played in several different sports along with my husband liking all things sports, I’m always involved in it in someway!🏈  I thought I’d try something a bit different with this theme that is something I like to do for myself….

Although this card may look a bit simple in style, I did spend some time putting it all together. 

I’ve used this darling image from All Dressed Up Stamps called “And Relax” that I’ve fussy cut out after printing and then I created a separate plain panel with just the words enlarged a bit more than what the image was printed.

The printed words panel was die cut with a stitched rectangle die and then I masked off the Kramer stencil from Brutus Monroe and covered it with some glitter glaze (unknown color) that was lurking in my stash and it turned out so pretty when dried!  I popped up the colored image with foam tape, added sequins filled with some Nuvo Emrald City Glitter Drops which seemed to match up with the glitter glaze nicely.  I layered the front image panel over a stitched rectangle Raven cardstock layer and attached these layers over an A2 sized top foldiing white card base.

Here’s a closer view of the coloring I’ve done on the image using Copic markers.  Since it’s an image with really tiny details and small areas, I kept the coloring light and simple.  I’ve only added dots to her cheeks with a white gel pen.

I’ve used a craft knife to cut in the areas and I left a white border around her so that all the details showed up with her hair strands and neck line.

You can also see how pretty that sparkle looks from the glitter glaze over the stencil too!  The Nuvo Glitter Drops matched up nicely with it!

It’s a Monday, so perhaps this might be something good to think about doing today, right?!😁

I hope that you’ve enjoyed my “sports” themed card and be sure to check out the {Cupcake Inspirations} blog to see all the inspiration from the design team and join along in the fun with us!  Can’t wait to see what you create!

Thank you for stopping in my friends!  I appreciate you taking the time!  I’ll have more coming soon!!  See you then!

Challenges:

  1.  All Dressed Up Challenge – September Anything Goes + ADU image
  2. Dream Valley – #233 Make it Digital (no stamps allowed)
  3. Use Your Stuff – #406 Sports
  4. The House That Stamps Built – S2320 – Anything Goes
  5. Colour Crazy Craft – Anything Goes + coloring

Color Challenge Reminder for {Cupcake Inspirations} – Hugs Enclosed

Hello friends! I hope that you’ve had a great weekend! The weather has really started to cool down over the weekend and I can feel the Autumn breeze in the air right now!

I’m swinging in today to remind you about our current color combo challenge over at {Cupcake Inspirations} and the second card I’ve made using the colors GREEN, PINK and LIME:

If you remember my card from last week, I had so much fun blending the green ink colors on the grass, I thought I’d continue with another panel of the ink blending on this backround too!  I also spritzed it with water and then once it was dry, I stamped the images from a Simon Says Stamp Crafty Friend stamp set with black ink.  I’ve used the stamp set throughout the card with the cut out scissors and envelope accents and the strip across the pink piece too.

I did white heat emboss the sentiment from the stamp set over the black strip on the heart.  I used just a set of Hero Arts Inifinity Heart dies to cut out the pink heart and another will vellum behind the heart and pink strip.  The pink heart was popped up with craft foam and so was that little envelope over top of it.  I did run the pink die cut heart through a Tim Holtz embossing folder and rubbed some white ink over it.

The blended ink and stamped background was cut out with a stitched rectangle die and layered over a black and then a green panel, which was then layered over top of an A2 sized top folding white card base.  I finished the card with some pink die cut hearts and some Studio Katia Cupid’s Kiss Crystals. (So happy to have again pulled out an older card kit!)

Here’s a closer look at the images on my card.  I just fussy cut the envelope and scissors WITH my scissors.😂  For the open areas in the handle of the scissors, I just took a small hand held circle punch to create the circle openings.

I have taken one of the pink hearts that I die cut for my background and used one over the tiny envelope on the heart.  The crystals add a nice bit of sparkle to the design too.

I think this will be a nice card to send out to one of my crafty friends!  I think maybe we could all use a crafty hug right now so maybe this will help!

Hope you will join us over on the {Cupcake Inspirations} blog to check out more inspiration from the team and join with us in this lovely color challenge too!  Thanks so much for stopping in today and I’ll see you again soon!

Challenges:

  1.  A Bit More Time to Craft – #124 Anything Goes
  2. QKR Stampede – #404 Anything Goes
  3. Creatalicious – #195 Anything Goes optional: use a punch
  4. Aud Sentiments – Anything Goes + Sentiment
  5. Creative Knockouts – #368 Anything Goes
  6. Creative Fingers – #193 Anything Goes

Color Combo for {Cupcake Inspirations}

Hello friends!  I hope that you’ve had a very pleasant weekend!  I enjoyed spending some time visiting with my son for his birthday as I haven’t seen him for a while, so it was nice to laugh with him.  If you haven’t checked out the card I made for his birthday, check out my last post for the blog hop along with a video I shared!

CIC502

Today starts a brand new challenge over at the {Cupcake Inspirations} challenge blog!  We are Playing with a fun color combination this time using the colors: Lime, Pink and Green It’s not only a yummy cupcake, but yummy colors too!  Looking forward to seeing what everyone comes up with!

Here’s my take with the colors for my first card for the challenge:

For some reason, the first thing I thought of was gnomes!  So I grabbed this really adorable Gnome Matter What clear stamp set from Whimsy Stamps and colored up that gnome and frog pair!  I fussy cut them out and made a grassy hill for them to sit on by ink blending a panel that was spritzed with water and then cutting it out with a mushroom border die from Lawn Fawn.

I also used the Lawn Fawn Watercolor Wishes paper pack in the pink shade for the background behind the grassy hill which I stamped the sentiment over and gently rubbed some more pink pastel over it.

The entire panel was cut out with my fave Wonky Stitched Rectangle die from MFT and layered over a bright pink A2 sized top folding card base.

A closer look at the images, you can see how I’ve got them colored up with Copics, but I’ve also added the usual details to the images with a white gel pen for the gnome’s cheeks and flower center.  I went over the flower with a glitter brush pen.  I’ve also added some dots to his shirt with a metallic green gel pen and then went over his buckle with a gold gel pen.

I’ve just attached the gnome with liquid glue, but I’ve used foam tape to pop up the frog pair and then I’ve added some more dots with the white and green metallic gel pens and then went over their eyes with glossy accents for shine.

I think maybe this is a fantastic message for all of us right now.  That gnome looks pretty chill!😉

Hope you’ve enjoyed my card today and will stop in over the {Cupcake Inspirations} blog to check out what the rest of the design team has for inspiration with these colors too!  Looking forward to seeing your makes!

Thanks for joining me today friends and I’ll be seeing you soon!

Challenges:

  1.  Love to Scrap – LTSCB137 Anything Goes September
  2. Crafty Catz – #518 Anything Goes optional:  gems and/or glitter
  3. Creative Craft Cottage – Include an animal (frogs)
  4. Colour Crazy Craft – Anything Goes + coloring

On the Farm Reminder for {Cupcake Inspirations}

Hello friends! I hope that you’ve enjoyed your weekend. I’m still spending some time with my husband as it’s a long Labor Day weekend for him. The weather over our way will certainly start to shift now and I’m looking forward to everything Autumn which is my favorite time of the year! Such a great time to be outdoors before the Winter sets in!

Today is our midway reminder over at the {Cupcake Inspirations} challenge blog with our “On the Farm” theme.  So if you haven’t played along with us yet, I hope you’re able to share your project with us within the next week!  We are enjoying seeing the wonderful creations so far!

Here’s my reminder project for this week:

I decided to pull out one of my past card kits that I didn’t get much a chance to play with and put together a card with that Farmhouse Friends stamp set included with it.

There were lots of different textures included with the kit including that piece of buffalo check pattern mesh fabric that I put a layer of red cardstock, included in the kit, behind it.  I ran a piece of brown cardstock through an embossing folder as well as stenciled a cloud background over one of the printed panels included in the kit.  I also took some copper DecoFoil Transfer papers and foiled over the printed barns on it.  I put together this fun layout with those different pieces, cut them up and then die cut the entire panel with a Wonky Stitched Rectangle die from MFT.  I used the die again to cut an additional panel out with some kraft cardstock. 

That layer is where I’ve added the stamped, colored and cut out images from the stamp set.  I’ve also stamped a sentiment from the set at the bottom of the panel as well.  I layered this piece over some more of the brown cardstock and popped it up with foam tape.  Before attaching it to the panel, I wrapped some twine around the front panel and added a bow next to the animal panel. I added another layer of brown cardstock behind this and attached it all to an A2 sized top folding kraft card base.


Here you can see the shine from where the printed barns were foiled over the cloud stenciled background.

There was a “stain pen” included with the kit that you could actually use on the tiny wooden fence also included in that kit which you can see as a prop in my photo.  But I used it to color in my stamped fence on the card this time.  I’ve also taken a white gel pen for highlights on the animals and then I added some glossy accents to the chicken’s head, the pig’s nose and the sheep’s eyes which you can sort of see the reflection of light over those parts.

I lastly added some real wooden dots over the design including in the center of the twine bow.

Have you ever been to a farm or are familiar with the setting of a farm?  I grew up out in the country and have pretty much lived most of my life either near a farm or in a rural small town setting, so farm surroundings are very familiar to me and I forget that not everyone has had the experience of it.  I can’t imagine not being able to hear the sound of a cow “moo” for instance.  If you’ve not been on a farm, it’s quite an experience and lots of hard labor, but also a rewarding experience at the same time…so check it out sometime in your life if you can!

Hope you’ve enjoyed my creation today friends and thanks for stopping in! Be sure to stop by the {Cupcake Inspirations} blog today and check more inspiration from the team and play along!  I have something fun to share with you coming up shortly, so stay tuned!

Challenges:

  1. 2 Crafty Critter Crazies – Anything Goes + animal
  2. Crafty Animals – Anything Goes + animal 
  3. QKR Stampede – #403 Anything Goes
  4. Arty Divas – #29 Anything Goes
  5. Crafty Creations – #413 Anything Goes
  6. Simon Says Stamp Wednesday – Stamp It! (no digis)
  7. Aud Sentiments – Anything Goes + sentiment
  8. Krafty Chicks – #523 Stamp Act
  9. My Time to Craft – #440 Embossing (Wet/dry)

We’re On the Farm for {Cupcake Inspirations}!🐄

Hello friends!  Hope that you’ve had a wonderful weekend!  I sure enjoyed my time with hubby relaxing and enjoying the cooler temps for sure!  After all the “partying”, are you ready for a new challenge?

CIC501

Today we’re starting with a brand new challenge over at {Cupcake Inspirations} with the theme “On the Farm“!  So whatever farm related project you’re working on, please be sure to link it up in our challenge!  We look forward to seeing what you all come up with!

Here’s what I’ve made for the challenge:

Vicki-CIC501-week1

I’ve been wanting to use this fun barn die from My Favorite Things for a while and this was super fun to create a farm scene with!  It even has the little embossed markings on the barn along with a bail of hay!🐓

I started out using the MFT cloud stencil and Tumbled Glass Distress Ink for the background panel, then layered over a grass border at the bottom and then cut this panel out with the stitched rectangle die.  I also stamped the sentiment as well as a few animals from the MFT The Whole Herd stamp set, colored and cut them out with the coordinating dies. (can’t find in the store!)  I then placed my fence border over top of the grass border, popped up the barn with foam tape where I wanted it and then placed all of the other images arranging them over the scene.  This front panel was attached to a top folding A2 red card base.

Vicki-CIC501-week1-close

So I love how the door on the barn can open up with that die cut!  Of course I had to add something inside the barn and with the nest of eggs sitting on top, it only felt right to place the chicken in there!  For the backing of the barn, I’ve taken a piece of paper from the MFT Woodgrain Whimsy Paper Pad and attched it from behind before popping it up with some foam tape.  I’ve also taken a pen and wrote the “milk” word over top of the colored can next to the cow.

Vicki-CIC501-week1-flat

Hope you’ve enjoyed my creation today and that you’ll stop in and check out all of the other “Farm Fresh” creations over on the {Cupcake Inspirations} blog and join in the fun with us!

Thanks so much for stopping by and I’ll be seeing you again soon!

**Don’t forget there is still a few more days left to enter my You Tube Giveaway!**

Challenges:

  1.  Cardz 4 Guyz – #252 Explore Outdoors
  2. 613 Avenue Create – Anything Goes

{Cupcake Inspirations} Bithday Celebration Day 12 -Party Ending Soon!

Here we are friends!  This is my final day of inspiration to share with you on Day 12 of the special celebration over at {Cupcake Inspirations} for our 500th “birthday celebration” challenge!!  WHAT A PARTY IT HAS BEEN!! WOW!🧁🎉

CIC500

Today, we are highlighting with our last but not least sponsor Inky Stamper – Please check out the challenge blog for more details about this sponsor.

Blog-ButtonBigger

The DT was generously given a stamp and die set to use for our creations:

Vicki-CIC500-Day12-InkyStamper

I have used this Oh so adorable Cupcake stamp and die set for my 4.5″ square card design.  So I thought it would be fun to create a fun little scene where you have the mouse coming out of his little “mouse hole” in the wall where he discovers this delicious looking cupcake with the sprinkles falling about! 😂

I started by masking off the middle of the square panel and created the “floor” by ink blending from the middle out.  I then moved my masking by covering that area up and used the negitive from an oval die cut area to ink blend the “mouse hole” on the scene.  Lastly, I wanted it to look like a “wall”, so I just took a brick stencil and inked over it to go around the “mouse hole”

I stamped, colored and die cut the image and then popped him up with foam tape over the scene and stamped the sentiment underneath him.  I just glued on the sprinkles for the card.  I mounted the image panel over a die cut scallop square and then added a strip of sparkle washi tape over the card base.  (The scallop square panel was popped up with some craft foam.)  Hard to see in the photo, but I’ve brushed some glitter over the cupcake frosting!

**REMEMBER YOU ONLY HAVE A FEW DAYS LEFT TO ENTER THE “BIRTHDAY CELEBRATION” CHALLENGE OVER AT {CUPCAKE INSPIRATIONS} TO QUALIFY FOR A PRIZE FROM ONE OF THE WONDERFUL SPONSORS WE’VE BEEN SHARING – GO ENTER AND BEST OF LUCK TO ALL!!**

Thank you so much for joining me here every day to check out the inspiration I’ve made from each of our sponsors.  I’m so glad that you took the time to celebrate right along with us!   I’ll be seeing you soon!

Challenges:

  1. The House That Stamps Built – A2620 Anything Goes
  2. Simon Says Stamp Wednesday – Anything Goes
  3. Cute Card Thursday – Inky! (used distress inks, masking and stencils for background)
  4. Creative Knockouts – #365 Anything Goes

{Cupcake Inspirations} Birthday Celebration Day 11

Today is a new day!  We are on day 11 of celebrating over at {Cupcake Inspirations} with another feature of sponsors for our 500th “birthday celebration” challenge!!  YEEOWZA!

CIC500

Today, we are highlighting Rachel Vass Designs – Please check out the challenge blog for more details about this sponsor.

Rachel Vass logo

The DT was provided with digital image sets to use for our creations:

Vicki-CIC500-Day11-RachelVassDesigns

I have the gorgeous Sunshine Daisies digital set for my design here by printing the image along with the sentiment that came with the set on a piece of Bristol watercolor paper.  I remember hubby brightening up my day a while back with some very pretty colorful rainbow of daisy flowers he brought home, so I based my colors that way.

I’ve used my watercolor markers and waterbrush to color the image with and then I took some yellow sparkle AquaPigment along with some Cream Grey Aquapigment from Brutus Monroe to splatter over top of the design before I cut it out with a Wonky Stitch rectangle die from MFT.

I layered this panel over an A2 top folding Soft Suede card base and finifhed it off with some clear sparkle sequins that I added some yellow Stickles to the centers.

Hope you’ve enjoyed my watercolor rainbow daisies today!  Thank you for stopping in to check my post today!  See you tomorrow!

Challenges:

  1. The Divas that Cut…Paper – Flowers + die cut
  2. My Time to Craft – Clean and Simple
  3. Simon Says Stamp Monday – Beautiful Botanicals
  4. Little Red Wagon – #564 Digi Do

{Cupcake Inspirations} Day 10

Hello friends!  I’m back again with more celebration fun as we continue with our celebrating over at {Cupcake Inspirations} for another feature of sponsors for our 500th “birthday celebration” challenge!!  YAY!

CIC500

Today, we are highlighting Digital Delights by Louby Lou – Please check out the challenge blog for more details about this sponsor.

Digital Delights Logo

The DT was provided with images from this sponsor to use for our creations:

Vicki-CIC500-Day10-DigiDelightsLoubbyLou

Isn’t she a cutie?!  I have used Cupcake Josie for my image here that was colored with Copics and cut out with a stitched rectangle die.  I used some fun birthday papers I’ve found in my stash to layer my design with along with a sentiment that was white heat embossed and die cut with a banner die that I’ve attached over the design.

I’ve added some glossy accents over the cherry on her cupcake as well as some dotting with a metallic gel pen for the sprinkles as well as for her bows.

Please be sure to add your birthay/celebration creations in the gallery soon before the challenge ends in a few days!  We look forward to seeing them all!

Thank you for popping over here today friends!  See you tomorrow!

Challenges:

  1.  Creative Moments – #197Anything Goes optional pretty papers
  2. Pammie’s Inky Pinkies – PIP2034 Anything Goes