Time to Celebrate at Cute Card Thursday!

Hello friends!!  I’m very excited to share my card with you today for Cute Card Thursday!  We are celebrating our 11th birthday this week!!  WOO HOO!!  So of course, the theme for this week is “CELEBRATE“!!  Hope you can pop on over and celebrate with us by sharing your creation!!

This week we are sponsored by All Dressed Up Stamps and I have used one of their adorable images for my card today:

Vicki-CCT573-ADU-Celebrate

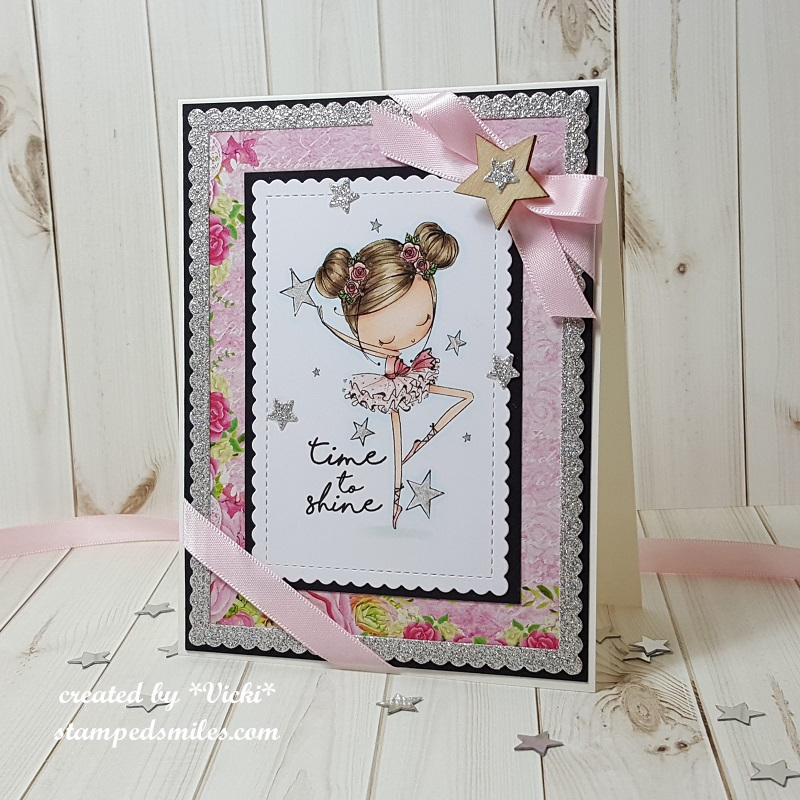
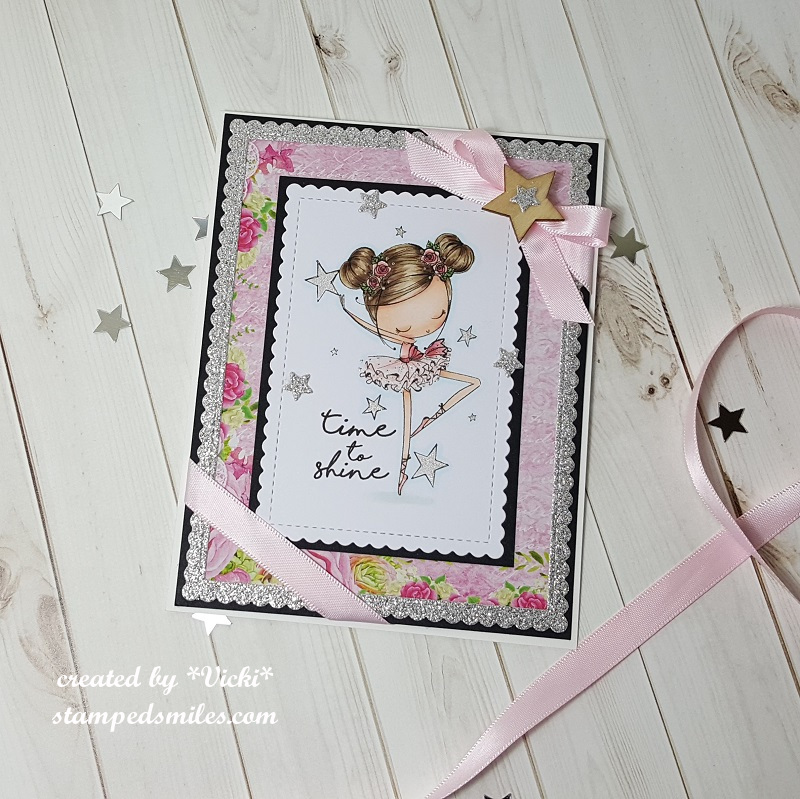
I have used this very sweet image called Time to Shine and she is having so much fun dancing around with all of the stars floating about her!

For the card, I have taken some silver sparkle cardstock and cut the stitched scallop frame and then placed some pretty papers behind it.  I mounted these pieces onto a piece of black cardstock as well as the image that was cut out with another stitched scallop rectangle die, also mounted with a piece of black cardstock and then added to the center of the sparkle framed panel.

I also took some pretty, pink, silky ribbon and wrapped it around the corners of these layers and also tied a bow with it that I’ve attached to the upper right corner of the wrapped around ribbon.  These layers were then mounted onto a white, top folding A2 sized card base.  Lastly, I’ve added some stars that were die cut from the same sparkly cardstock and I’ve also added one to the center of the wooden star veneer that was glued in the center of the pink bow.

Vicki-CCT573-ADU-Celebrate-close

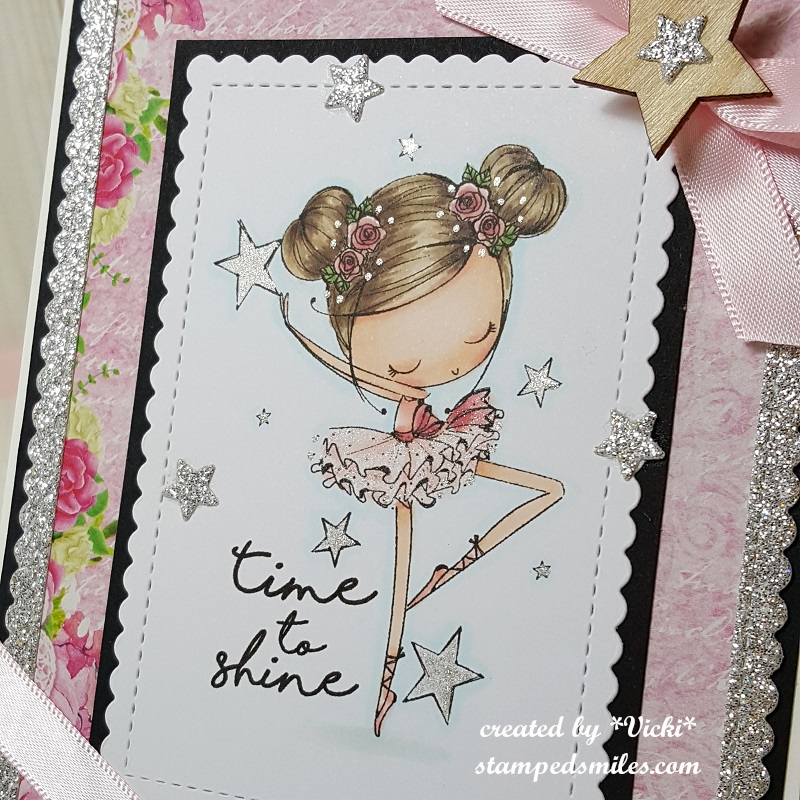
Here’s a closer look at the Copic coloring I’ve done on this image.  I have added some extra sparkly details to the image by taking a Spectrum Noir Glitter Brush Pen and went over just the bottom portion of her dress.  I then took a silver gel pen and colored in the stars around her and added some dots to her dress and hair with it as well.  I wanted to create lots of sparkle and shine to this one! 🙂

Vicki-CCT573-ADU-Celebrate-flat

Thanks so much for dropping by!  I really appreciate your kind comments and I enjoy reading them so much!  Hope you have a fabulous day!

Challenges I’d like to enter this card in:

  1. All Dressed Up Challenge – Anything goes + ADU image
  2. All Dressed Up Facebook Challenge – Girly Girls
  3.  Crafty Friends – Ladies/Girls
  4. Simon Says Stamp Monday – Feminine/Girly
  5. Crafty Creations – Anything Goes

Another Pot O’ Gold!

Hi there friends!  I guess I am really feeling the luck of the Irish this week!  I have another fun St. Patrick’s Day themed card to share today:

Vicki-SNSPotOGold

My card here may seem a bit simple, but it has a few really fun added extras to really make it shinny and glittery!  I have used Lil Leprechaun (Digital only stamp set).   I took the pre-colored versions of the set and arranged them in a blank Word.doc for how I wanted it to appear on my card front.  I used the clover images and resized them to fit around the bottom of the pot of gold area and then placed the sentiment where I wanted it off to the side.

I then printed it out and then cut it out with the Nuvo Basics Rectangle dies.

I used a couple of Copic green markers to make the “blades of grass” next to the pot of gold and clovers.  I also used some colored chalk to sponge in some colors for the rainbow behind the pot of gold.

Vicki-SNSPotOGold2

Here you can also see on the panel where I’ve taken some Super Thick Gold EP and sprinkled some in the corners of my image panel and then heat set it from underneath.

I also took a Nuvo Precision Glue Pen to add some “dots” in the center of the clovers and then of course used the Shamrock Glitter to go over them!  I also covered the coins in the pot with the glue and sprinkled some Champagne Glitter over them for some sparkle!

With the same Champagne Glitter that I used on the coins in the pot, I also took some Sticker Paper and covered an entire panel with it and burnished it in!  The shimmer and glitz on this are stunning in person and really sets off the card!  I’ve also used the Glitter Brush to take away the excess glitter particles and it’s a must have for clean up too!  (Instead of clinging to the brush, it repels it away!)  These sheets are somewhat thin, so I made sure that I’ve added some layers of cardstock in between this glitter panel for stability to the card.  (Keep this in mind if you are using the sticker paper for this idea.)

Vicki-SNSPotOGold-flat

I tried to capture some of the sparkle in the photo, but it really looks brilliant when you are holding it in person! 🙂

I hope you’ve enjoyed my card today and I really appreciate you stopping in!

Challenges I’d like to enter this card for:

  1.  Crafting With an Attitude – Anything Goes
  2. Creative Moments – Anything Goes
  3. QKR Stampede – Anything Goes #338
  4. Creative Fingers – Anything Goes
  5. Pammies Inky Pinkes – Anything Goes PIP1910
  6. Not Just Cards – Anything Goes

Whimsy Stamps St. Patrick’s Day Celebrations Week!

Hello friends!!  I’m so happy that we are into March as I hope to be feeling warmer temps and “seeing the green” very shortly over my way!  I’m more than ready for that!

In the meantime, how about we celebrate with some inspiration!

Vicki-WSPatricks Day Celebrations

I have made this super fun (mostly green) card especially for this fun event with the really adorable Little Leprechaun digital stamp by Crissy Armstrong.  I thought he was so cute sitting atop his pot of gold with his new winged friend there!  He was so fun to color up for this card! (See the Copic list below!)

For the card, I started out with some watercolor paper, and I’ve used some Aqua pigments (liquid watercolor from Brutus Monroe) and some extra water for the background of my card, then I cut it out with the Whimsy Stamps Hand Stitched Nested Rectangle Dies.  I also used this to cut out the leprechaun image too.  I’ve used some gold mirror cardstock to mat a layer of it behind the image panel.

I thought it would be fun to add a rainbow behind the image panel, so I took the WS Kinetic Curved Hills die set and cut strips with the straight curve die in the colors of the rainbow and added the strips over the background.  Then I attached the layered image panel and took the WS No-See All Seasons Tree die set to cut some grass and mushrooms to attach at the bottom of the card.  I used a white gel pen to color the spots on the tops of the mushrooms.  I also sponged some ink over all the pieces.  One of the sections of grass was popped up with foam tape.  Lastly, I took an older sentiment from Whimsy Stamps and made a banner that was popped up with foam tape over the design.  I then mounted the entire card panel over an A2 top folding white card base.

Vicki-WSPatricks Day Celebrations-close

Here you can see a close-up view of the coloring.  I have used the following Copics to color in the image with:

  •  pot, hat band, stockings, coat trims & dragonfly body:  C8, C5, C3
  • Leprechaun outfit:  C09, C07, G05, G03, Y11, Y13
  • Leprechaun gold trim and coins:  Y17, Y15 (layered over with gold gel pen)
  • hair, skin, dragonfly wings:  E09, E23, E21, E00, E000, Y11, R20, R00
  • clover on hat:  YG97, YG95
  • outline of image and “dots”:  C3, C1, C0, Y11, gold gel pen

You can also see the rainbow has some shimmer on it.  This is where I took a Spectrum Noir clear glitter brush pen to go over it.  You can also see a bit of shimmer from the Aqua pigments in the background…they’re really stunning, and I’ll be using them again in the future, so be sure to check back!! 🙂

Vicki-WSPatricks Day Celebrations-flat

I wanted to bring out some more of that gold with the mirror layer behind the leprechaun, so I brought some gold sequins into the layout and filled them with some gold Stickles.  When you hold this card up to the light, the whole thing really shimmers and sparkles!!  I loved how it turned out!  I hope you’ve enjoyed it too!

Thanks so much for dropping in today!

Challenges I’d like to enter this card for:

  1.  Double Trouble – challenge #23 – “Thing 1“:  The Wearin’ O’ the Green “Thing 2“:  Collaboration with Heart 2 Heart Challenge (entered below!)  “Thing 3“:  Include a golden touch (used gold mirror cardstock and sequins filled with gold Stickles!)
  2. Heart 2 Heart Challenge – Greens, Rainbows & Pots of Gold (3 part challenge)
  3. Daisy Chain – Spring is in the Air!
  4. Creative Inspirations – Spring Greens
  5. Mod Squad – Green, Green Everywhere
  6. Crafting By Designs – Anything Goes
  7. Three Amigos Blog Hop Challenges – Rainbow

Anything Goes for Cute Card Thursday!

Hello friends!  It’s time for an easy peasy “ANYTHING GOES” challenge over at Cute Card Thursday this week!!  Our monthly sponsor Whimsy Stamps will be joining us this week and I’m thrilled to share some of those products on my card today:

Vicki-WS-PenguinLovesBunny-March7

I have used this really sweet digital stamp on my card called “Penguin Loves Bunny“!  He is holding him ever so tightly and not wanting to let go!! 🙂

As I’m trying to get back into the swing of things here, I wanted to be sure to join some challenges and so I’ve picked out a nice sketch to start my card with here.  (See the details below the post for all challenges.)  I’ve been wanting to get out these yummy plaid papers that I’ve had for a couple of years.  This seemed like the perfect image for that too!

So I took the panel of plaid papers and layered it with some kraft cardstock.  I took some white organdy ribbon and wrapped a piece around the left side of it and tied on a bow at the top before attaching it to the upper right of my A2 sized top folding white card base.  I’ve cut out the image with an oval die and then layered another oval piece that was cut out with the kraft cardstock.  This oval panel was layered over the plaid.

I took a sentiment from the Whimsy Stamps Everyday Mini Sentiment clear stamp set and stamped the “miss you” underneath the image.  I also used the Whimsy Stamps Friend Word & Shadow die set to cut a piece of vellum with the shadow and then cut the word out with some pink cardstock and then attached them right underneath the stamped “miss you” sentiment.  Lastly, I’ve added some of the pink enamel dots from the Whimsy Stamps It’s a Party enamel dots set.

Vicki-WS-PenguinLovesBunny-March7-close

Here’s a closer look at the coloring of this image.  I’ve colored it in with Copic markers in the following colors:

  • Penguin:  C8, C5, C3, C1, Y38, Y35, Y32, R00
  • Bunny:  E47, E44, E42, E41, W5, W3, W1, R20, R11, R00

I also used a blender 0 and a white gel pen for cheeks and bunny tail.

Vicki-WS-PenguinLovesBunny-March7-flat

I thought this image would be so fun for Easter too!!  I can see it used in so many different ways!

Hope you’ve enjoyed my card today!!  Thanks so much for dropping in!!  See you soon!

Challenges I’d like to enter my card for:

  1.  Tuesday Morning Sketches – #493
  2. Crafty Animals – Anything Goes + related to animals
  3. Creative with Stamps – Friends
  4. {Cupcake Inspirations} – Plaid CIC465
  5. QKR Stampede – Anything Goes #337

Whimsy Stamps March New Release!

Hello friends!  I don’t think I ever remember being so sick before! WOW!  I was literally stuck in the bed for a couple of days there!  I’ve been taking some meds from doctor and starting to feel a bit better now, just regular cold and not so much the fever and chills any more.  Thank you SO MUCH for the very kind get well thoughts as I truly appreciate that!  So glad that’s over with now!

Have you checked out the new release over at Whimsy Stamps yet?  There are lots of really adorable digital stamps this month and I’m excited to be sharing one of those with you today:

Vicki-WSBunny-NewRelease

I have used this sweet little image by C.C. Designs for Whimsy Stamps called Bunny.  (And that little bunny is too cute wrapped up in the garden hose!!)

I have also used some fun new digital papers for the background on my card here too!  I’ve printed out a piece from the Whimsy Stamps Rustic Wood and Brick Papers digital collection and used it on the background of my green card panel.

I also used some die cuts to add some fun elements to my design as well as wrap some ribbon at the top and add a white flower with a rhinestone in the center of it.  I heat embossed a sentiment in white EP over a piece of the green cardstock and cut it out with a stitched die cut banner.

Vicki-WSBunny-NewR2

I have it all colored up with my Copic markers and then I’ve used some metallic gel pens for the dots and for the water sprinkling from the hose.

Here you can better see how I’ve colored in the image and the details of sparkle with the gel pens.  I’ve used some craft foam behind the image panel for a bit of dimension too.

Vicki-WSBunny-NewRflat

I hope you’ve enjoyed my card for today and have been inspired to go check out the rest of the new release at Whimsy Stamps!

I’ll be back again tomorrow for some more inspiration!  Thanks so much for dropping in!!  Have a great day!

Cute Card Thursday Has Wings!

Hello friends!  It’s Thursday already which means it’s time for a brand new challenge over at Cute Card Thursday!  This is a really fun one to play with!  This week we’d like to see your “Wings” things!  Can’t wait to see what everyone makes!!

This week we are being sponsored by All Dressed Up Stamps and I have used one of their lovely images for my card today:

Vicki-CCT569-ADUWings

Isn’t she the sweetest little thing?  I have used the Fairy Magic image that was kindly donated from our sponsor, and I have colored her up using Copic markers.  I’ve also sponged some light blue ink around the image panel before matting it onto a green sparkly layer cut with a scallop square die.  I also used some craft foam to pop up the image panel over my card for a bit of dimension.

I have just bought these gorgeous Fairy Garden papers from Kaiser Craft and used them on the background panel of my card.  I also used some gorgeous shimmery light green cardstock to go with it!  I’ve taken a thin strip of the glitter cardstock and attached it up against the butterfly papers and then attached some lace over it.  I then mounted this entire panel over a white top folding 5″ x5″ card base.

Vicki-CCT569-ADUWings-close

Here’s a closer view of the coloring and the little sparkly details I’ve added to her.   For the wings, I’ve taken a glitter brush pen over them and then used some metallic colored gel pens to add some dots to her wings as well as the butterfly wings along with some gold dots around her ribbons and the sentiment.

Here you can also see the wood veneer butterfly accent that I’ve added at the top.  I painted it with white gesso and then painted over it with some pretty pearl shimmer paint before attaching it to the card.

Vicki-CCT569-ADUWings-flat

Lastly, I’ve added three pearls at the bottom left corner of the card.  In this photo you can see the pretty shimmer on the light green background cardstock.  It was hard to capture in the photos, but the butterfly papers are sparkle embossed as well.

Thanks so much for dropping in today!

Challenges I’d like to enter this card:

  1.  All Dressed Up Challenge – #89 Anything Goes + ADU image
  2. Not Just Cards – Anything Goes
  3. Crafty Creations – Anything Goes

Fistful of Flowers From Whimsy Stamps

Hello friends!  Hope that you are having a great week so far!  There is plenty of ice and snow over my way for the next several days, so I thought I would bring a little ‘happy’ today with a “Fistful of Flowers” from Whimsy Stamps!

Vicki-WSFistfulofFlowers-Feb12

Isn’t she the cutest?!  This was originally released as a rubber stamp from Crissy Armstrong, but this month it has been released in digital format now as well!

I have to be honest and say that after I had colored in the image, I was struggling with the colors of cardstock I wanted to use, and it seemed that anything I picked out wasn’t quite working.  (You ever have this problem?)  My hubby came in to visit me and I told him I was struggling, so he took me over to my paper and picked out these colors and I liked it, so I went with it!  Did he do good? 🙂

I have cut a piece of yellow cardstock out and then took the WS Mom’s Layered Flowers clear stamp set and white heat embossed the background with one of the daisy images.  I wrapped a piece of white ribbon around the yellow embossed piece that was also mounted onto a white 4.25 x 5.5 card front piece.  After wrapping the ribbon around both pieces, I added a bow and this panel was then mounted onto a white top folding A2 sized card base.

The colored image panel was layered with a blue cardstock which I’ve also cut a piece for a fishtail banner and added some daisy accent flowers to it.

Vicki-WSFistfulofFlowers-Feb12-close

                    This cutie has been colored up with the following Copics:

  • Jeans & Bow tie on shirt – B97, B95, B93, B34
  • Shirt & Hair Bows – R85, R83, R81
  • Flower Petals & White Band on Shirt – BG000 (also around image)
  • Flowers – center:  Y17 – Leaves/Stems: YG67, YG63, YG61
  • Grass – G24, G21, G20
  • Hair – YR30, E41, E43, E44, V95
  • Skin – E21, E11, E00, E000, R20

I took a glue pen and added some clear glitter over the edge of the flower petals for a bit of sparkle.  You can see that the daisy accents also have some light touches of glitter on the edges as well.

Vicki-WSFistfulofFlowers-Feb12-flat

So I hope you’ve enjoyed my card today and thanks for dropping by!

Challenges I’d like to enter this card for:

  1.  Crafting With an Attitude – Anything Goes
  2. Creative Fingers – Anything Goes
  3. QKR Stampede – #334 Anything Goes
  4. Crafty Friends – Anything Goes
  5. Pammie’s Inky Pinkies – PIP1906 Anything Goes
  6. Shopping Our Stash – Make Your Mark (colored with markers)

Anything Goes at Cute Card Thursday!

Happy Thursday friends! 🙂  It’s Thursday and that means it’s time for a NEW Cute Card Thursday challenge this week!  So this week it’s our beginning of the month “ANYTHING GOES” challenge!  We can’t wait to see your creations!

Our sponsor for this challenge is Whimsy Stamps.

Vicki-WS-ThinkSpringBunnies-Feb7

Are YOU thinking Spring too?!  I am, but I don’t think it’s working very well with the snow, cold and ice we’ve been getting! LOL!  So I will stay warm inside and bring my thoughts of Spring to my craft room!

I am using this really sweet digital image from Whimsy Stamps called Think Spring Bunnies by Crissy Armstrong.  It was previously released as a rubber stamp, but now it’s available in digital format!  I have printed out this image and used the following Copic Markers for coloring:

  1.  Bunnies – W5, W3, W1, W0, E33, E31, E30, C3, C1, C0 (tails)-, E44, E42, E40, Blender 0 (spotted bunny)
  2. spotted bunny inside ears, nose face – R20, R00
  3. Wooden sign – E25, E23, E21 (E23 used for center of yellow flowers)
  4. flowers – Y17, Y15, Y11, V17, V12 – YG67, YG61 (leaves/stems)
  5. grass – G24, G21, G20
  6. butterfly – Y11, R00
  7. sky around image – B01, B00, B000, B0000

Vicki-WS-ThinkSpringBunnies-Feb7-close

Here’s a closer view of the colored image.  I have also used a white gel pen in the bunny’s tails as well as the spotted bunny’s cheeks.  I also took a Wink of Stella clear glitter brush pen to go over the butterfly and the flying bug’s wings.

It was so fun to color these furry bunny butts!! 🙂

Vicki-WS-ThinkSpringBunnies-Feb7-flat

I’ve used some of the digital papers released last month called Oh Boy…really loving the ginghams in this set!  So, I’ve cut out both these papers along with some solid yellow papers (from same set) and the colored bunny strip with the Whimsy Stamps Hand Stitched Nested Rectangles dies.  I also took a strip of gray colored cardstock and used an older border die from Whimsy Stamps to create the scalloped edge.

These were all layered onto a white A2 sized top folding card base.  I wrapped some twine along the edge and tied it in a bow and then lastly, I’ve added some yellow crystals from Pretty Pink Posh randomly over the card.

Challenges:

  1.  Crafty Animals – Anything Goes + animal
  2. A Bit More Time to Craft – Anything Goes
  3. Crazy 4 Challenges (C4C469) – Ground Hog or Critter
  4. Send a Smile 4 Kids – Anything Goes/Easter/Spring
  5. 613 Avenue Create – Anything Goes with optional: use a critter
  6. Crafting From the Heart – Anything Goes

May Day Floral Wreath

Hello friends!  With the cold weather and ice around my area, I thought it would be nice to turn my attention towards the month of May with my creation today:

Vicki-SNSFloralNosegayWreath-Feb

I have used this digital stamp set called May Day Floral Nosegay.  I have printed out the pre-colored floral images and fussy cut them out for this card.  The sentiment in the center of the wreath is also from this same set which I’ve printed out as well and then cut it out with the Tonic Scalloped Squares Basic die set and sponged around the edges with some blue ink.

For the wreath, I’ve used the Tonic Rococo Fern Garland die and cut it out once in green cardstock and another in white cardstock.  For the white one I cut the ribbon area only and covered this piece with VersaMark ink which was heat embossed with some Sweetheart EP.  (This is such a pretty EP with lots of sparkle!  See below!)

Vicki-SNSFloralNosegayWreath-Feb-close

I also heat embossed this same Sweetheart EP along the edges of a white cardstock that I cut out to layer behind the wreath panel.  The heat embossed bow was glued over the green wreath and then the entire wreath was centered over the sentiment panel.  I also then layered these panels onto a piece of black cardstock.  I also put some craft foam behind this panel for some dimension on my card.

Vicki-SNSFloralNosegayWreath-Feb-closer

For the tiny flowers behind a couple of the white flowers, I took my Clear Mark Embossing Pen and heat embossed the very tips with the same EP as above.  All of these cut flowers were attached with the Dimensional Glue onto the wreath with a couple popped up for dimension.  I also took some Nuvo Honey Gold Glitter Drops for the centers of the flowers as you can see in the photo above.

Vicki-SNSFloralNosegayWreath-Feb-flat

Lastly, for the base of my card, I cut a piece of A2 sized top folding card base with a light blue cardstock.  I also used this same cardstock color to cut out a couple of pieces using the Tonic Elegant Columns die set…so pretty!  I sponged some white ink around the edges of them and attached them to the card base.  I cut off the edges that were sticking out with my scissors.

Hope you’ve been inspired by my creation today and I thank you so much for stopping by!!  See you soon!

Challenges:

  1.  4 Crafty Chicks – Anything Goes
  2. CRAFT – Anything Goes
  3. Moving Along With the Times – Add a Sentiment
  4. A Perfect Time to Craft – Anything Goes
  5. Crafty Catz – Anything Goes + optional:  Lots of Layers
  6. Papercraft – Something New (new stamp set, dies, EP, flowers)

Whimsy Stamps New Digital Release – Willow

Hello friends!  So are you having a Super Bowl party today?  It’s always been sort of a little “thing” at our house each year since my kids were little….they were in it for the snacks of course!  LOL!

Today I want to share with you a card I made with one of the brand new February digital releases from Whimsy Stamps!

Vicki-WS-Willow-Feb3

I have used this darling little Willow girl on my card today!  Oh, those eyes are so catching on her!  (Had to make them a pretty blue!)  I have colored her up with the following Copic markers:

  1.  Dress, hair bows, shoe bows – R85, R83, R81, R00
  2. Flowers – Y17, Y15, Y11, V17, V12, YG63, YG61
  3. Shoes, Socks – E84, E81, BG000
  4. Hair – E27, E25, E23, E21
  5. Skin, Eyes – E21, E11, E00, E000, R20, R00, BG49, BG45
  6. Around image – C1 (white gel dots on cheeks and eyes)

First, I took the Whimsy Stamps Notched Rectangles die set and cut out the colored image.  Then I thought those yellow flowers she’s holding needed to be brought out a bit so I took the smaller flower image from the Whimsy Stamps Mom’s Layered Flowers clear stamp set and stamped it with yellow ink around the edges and die cut a scalloped rectangle layer with a suede brown cardstock to layer behind it.  I sponged around the edges with some Brushed Corduroy distress ink and ink foam blending tool.  I did the same to the left edge of the white A2 sized top folding card base.

For the right side of the card base, I took some of the Oh Boy digital papers from last month’s release and attached it.  Then I took the sentiment from the same floral clear stamp set as mentioned above and stamped it with some brown ink at the bottom right corner of the card.

Vicki-WS-Willow-Feb3-close

Here’s a closer view of the coloring on my image.  You can see the yellow glittered hearts and those piercing blue eyes!

I then took the layered image panel and attached it to some craft foam and added it to the center of the card design.  Lastly, I stamped a couple of hearts from the same stamp set mentioned above and filled them with some yellow glitter and added pearls to the corners.

Vicki-WS-Willow-Feb3-flat

Please be sure to stop by the Whimsy Stamps store to check out all of the brand-new February release.

Challenges:

  1.  City Crafter – Floral Background
  2. Addicted to Stamps & More – Anything Goes
  3. Watercooler Wednesday – WWC206 Anything Goes
  4. CCEE Stampers – CCEE1905 National ‘Thank You’ month
  5. Creative Knockouts – Flower Power