Spots and Dots for Cute Card Thursday

Hello friends!  It’s Thursday once again and time for another new challenge over at the Cute Card Thursday blog!  I really enjoy creating with challenges as it gives me inspiration and a push to finish a design in a way I might not have thought about doing otherwise.  If you haven’t done this yet with your card making, I encourage you to give it a try…you never know what you might come up with!

I know we are in the heat of August, but I think this month is going by fairly quickly and the Autumn Season will be here before you know it!  I was inspired by this along with another GORGEOUS image released this month from Whimsy Stamps, so check out my card for this week’s Cute Card Thursday challenge:

Vicki-CCT543spotanddots-WSAutumnHarvestRide

I have used this stunning Fall image From Whimsy Stamps called Autumn Harvest Ride by Crissy Armstrong.  I had some older Fall papers from my stash that had this fun dotted print on them and used these for the theme of the challenge to combine it with this wonderful Fall image as well.

The special card design I’ve used is called a Center Step Card.  (Click on the link to see the tutorial on how to make one for yourself on Splitcoaststampers.)

Vicki-CCT543spotsdots-WSAutumnHarvestRide

Upon a closer look at the design, I have also used a brand new (to me) elegant die cut by Spellbinders that I received as a prize winning from a fellow blog friend.  I’ve cut that with some garden green color and used that as a “back-drop” for my main image panel.  I’ve taken the Whimsy Stamps Pierced Border Trio Dies and cut another garden green piece for the image to sit.  I’ve also stamped out the sentiment with the Whimsy Stamps Everyday Mini Sentiments set and cut it out with an older Whimsy Stamps tag die to attach on the image panel with some twine.  I popped up the image panel with craft foam and layered this on the center panel of my card design.  I’ve also added a couple of Prima leaves between that.  I’ve attached some other dotted papers to the other panels including the bottom long panel and wrapped some gold ribbon around the bottom one before attaching it.  Lastly the gold ribbon and twine bows were added along with the button in the center gold bow and then I’ve added gold enamel dots on the side panels.

Vicki-CCT543spotsdots-WSAutumnHarvestRide-close

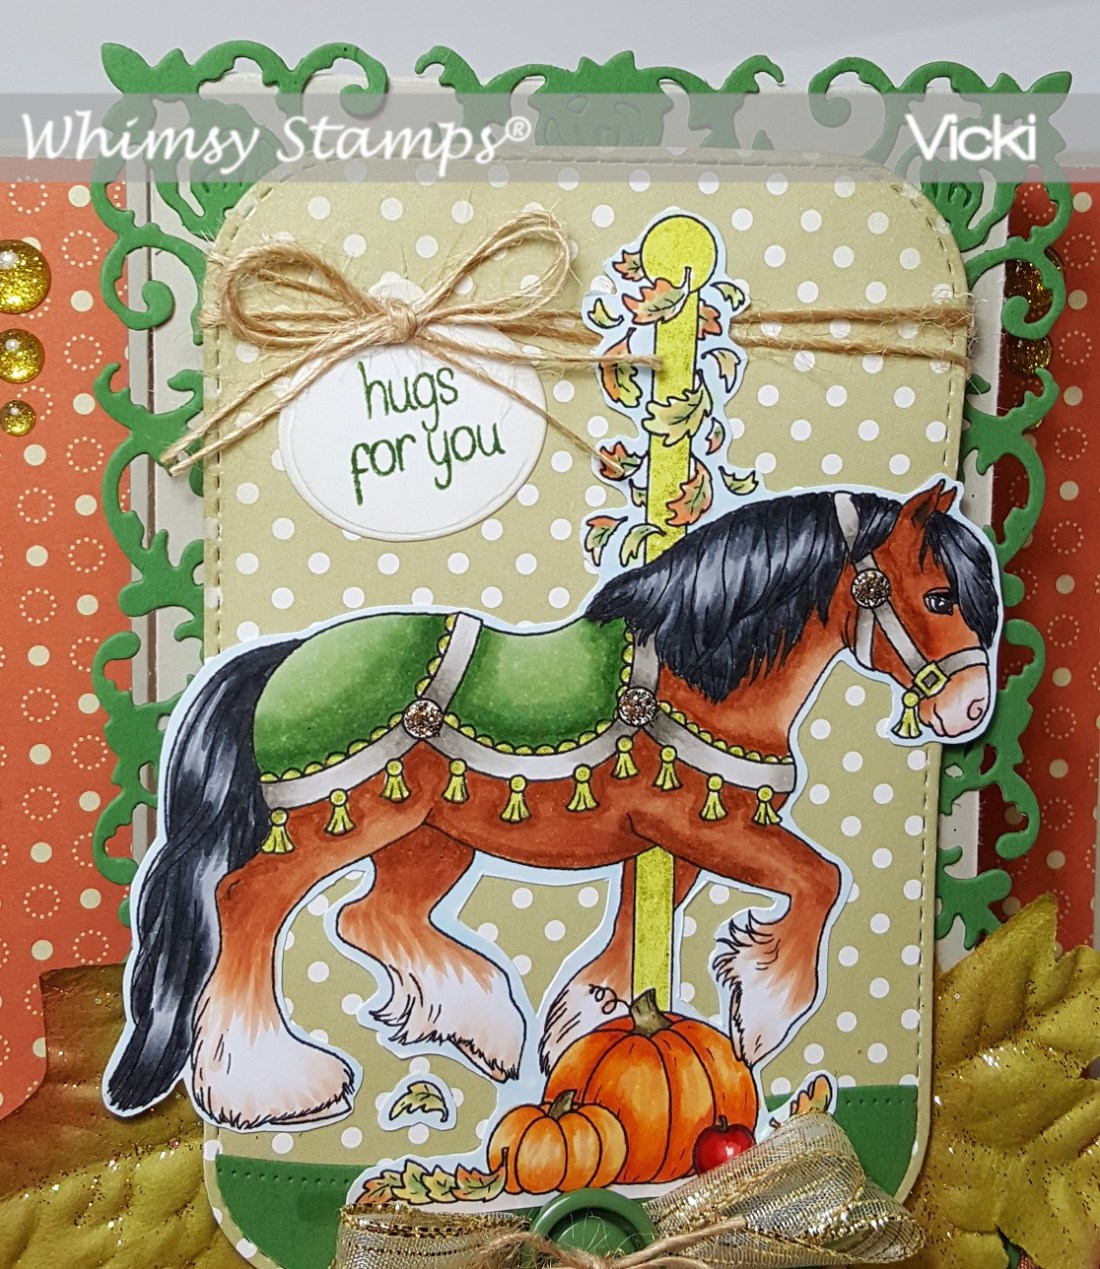
Here’s a closer look at the image and the coloring I’ve done with it.  I’ve mainly used my Copic markers to color it in and then added some gold gel pen coloring to the carousel pole, the saddle and bridle with the gold parts on them.  I took some Tinsel Stickles glitter to add to the “dots” on the saddle and bridle.  I then fussy cut it and attached it over the white dotted background and garden green border panel at the bottom.

Hope you’ve enjoyed my creation today and inspired you in some way to play.

I’ll be back again soon to share more creations!  Have a great day!

Here are the challenges I’d like to enter:

  1.  Creative Fingers – Anything Goes
  2. Crafty Friends – Anything Goes
  3. My Time to Craft – More Than One-Fold
  4. Shopping Our Stash – Leaves
  5. Crafty Gals Corner – Add Ribbon and/or Bow.

Basket of Best Friends

Hello friends!  Hope that you had a wonderful weekend!  I enjoyed spending time with hubby as he always makes me laugh…we have fun together no matter what we do!

Today I’d like to share another new creation I made from the Whimsy Stamps new August Digital release.  I fell in love with these guys and thought it would be perfect on just a simple little design:

Vicki-WS-Aug14-Pupsinbasket

This cute image is called Pups in a Basket.  I like that you can almost create any type of color or breed with this image by coloring it however you want.  So I found this adorable image online that I wanted to try and resemble the breed/coloring of:

119

Are these guys just as cute and fluffy as can be?!   I want to pet them! LOL!   Of course, the real thing has got to be the best! 🙂  And how cute would it be to add a red handkerchief to one of these pups on the image?  So many fun things to possibly do with them!

I used some plaid papers I had in my stash, and I wanted them to be somewhat neutral in color due to the accents of blue.  I’ve white heat embossed the banner at the top with the Whimsy Stamps Everyday Mini Sentiments stamp set.  Cut out all the panels with some dies and attached them to a top folding white A2 sized card base.  Lastly, I found some blue sequins to match and added some glitter accents to the centers.

Here’s a closer look at the image:

Vicki-WS-Aug14-pups up close

I’ve used my Copic markers to color it in and couldn’t help but also add some rosy cheeks with a white dot for highlights on them too!  This was so fun to color and how fun would this be to make up for someone with a new best friend!

So what type of breed or color(s) do you see in this image?  I’d love to know what you think!

Thanks so much for stopping in today!  Hope you’ve enjoyed my card and I’ll be back again soon to share more!

Challenges:

  1.  CCEE Stampers (CCEE1831) – Coloring Book Day (colored image)
  2. Crafty Creations – Anything Goes
  3. Creative Moments – Anything Goes
  4. QKR Stampede – Anything Goes
  5. Sunny Day Crafting – Anything Goes + animal on project
  6. That’s Crafty – Animal Magic

Charmed at Cute Card Thursday

Hello friends!  I thank you all so much for your latest comments on my posts, I do read them all and appreciate what you have to say. 🙂

It is Thursday once again and there is a new challenge issued over at Cute Card Thursday which is “Charms“.  You can never have too many charms, right?  So pull one out and use it to enter a project with us this week!  We would love to see what you come up with!

We are sponsored again by the lovely All Dressed Up Stamps and here’s what I’ve made for my card this week:

Vicki-CCT542-charms-ADU

I saw this sweet little image and knew I needed to put it on a card! 🙂  I have used this adorable ADU Christmas Deer image for my design today.

My card size is a 5×5 square design.  I have used a stitched square die to cut some snowflake papers from my stash to mount onto a navy piece of card stock which I then placed over a white top folding card base.  Before placing it down, I added the white ribbon around it with the bow.

As you can see the ribbon is where I have the snowflake charm attached.  I’ve attached it with some silver thread which I’ve also used in a ‘nest’ form behind my circle image panel.  I thought it would be cute to take the silver ribbon not only for the center of my white bow, but another bow around the deer’s neck.  I die cut some snowflakes with glitter paper for accents and then added some glass enamel dots to the centers.  For the circle image panel, I colored the image and cut it out with a circle die and then cut a stitched scallop circle in navy to place behind it and then popped that up with some craft foam.

Vicki-CCT542-charms-ADU1

Here’s a closer view of the intricate coloring details on the deer.  I left his antlers plain and just colored in around them.  I used white and red gel pen for the dots.  I also took a silver glitter pen to add more dots around the snowflakes.

On the bottom of the circle, I’ve attached some faux snow glitter flakes for the deer to stand on.

I hope you’ve enjoyed my card today! Thanks so much for stopping by!  I will have another fun post to share with you tomorrow! 🙂

Challenges:

  1.  All Dressed Up (ADU83) – Anything Goes + ADU image.
  2. Daisy Chain – Anything Goes
  3. Tuesday Throwdown (TT404) – Anything Goes
  4. Back to Basics & Beyond – Use a Digital Image
  5. Christmas with the Cuties – Add Some Sparkle

Splish Splash New Design Team FUN!

Hello friends!  I am VERY excited to share my first post with you today as a new design team member for the Whimsy Stamps Digital Design Team!  Woot!! Woot!

For those of you that have followed along with me for a while on my other blog know that I have previously worked with them as a DT member for other positions on the team over a period of several years.  This is simply because I adore Whimsy Stamps along with the owner and several others involved with this company.  I just love the images and working with them.  What better way to enjoy creating and coloring with the products than being apart of the team!  I’d like to share my creation today with this new image that was released at the beginning of this month:

Vicki-WS-Aug-week2

I find these penguins from Crissy Armstrong in the store absolutely adorable!  They all make me smile, but how fun is this cute Penguin Bubble Bath image! 🙂  The image was colored with my Copic markers as well as certain areas with gel pens and then I brushed over the shower cap and bubbles with a clear glitter shimmer brush pen.  I also decided to do a little paper piecing with her shower cap using the August release digital papers called Wonky Circles.

Vicki-WS-Week2Aug-close

Of course, there is so much sparkly goodness on this card that it’s hard to capture in just one photo, so I tried to angle it a bit to give you another view from the sparkly gel pens on the bubbly drink, water and claw feet on the tub.  The shimmer brush pen details can be found on her shower cap as well as the bubbles.  And if that wasn’t enough sparkle, I’ve added a strip of glitter paper along the left side of the image and then finished it off with some Studio Katia Crystal Clear Confetti sequins.

The sentiment I’ve used in the upper right corner of the image panel comes from a Whimsy Stamps clear stamp set called Everyday Mini Sentiments.

I wanted to create a special birthday card with this image in mind, so that when you lift up the penguin image, the card opens up like this….

Vicki-WS-Aug-week2-inside

I’ve taken more of these Wonky Circles digital papers and used them for the inside of my card design and created a pocket for a gift card to fit inside.  I thought a Bath & Body Works gift certificate would be fun to use with this image! LOL!

For the inside sentiment, I’ve used the Whimsy Stamps Happy Everything Clear stamp set.  I stamped the sentiment in black ink and then added the circle elements with some ink to coordinate with the paper.

Here are some challenges I’d like to enter this card for:

  1.  2 Crafty Critter Crazies – Anything Goes with a critter.
  2. Aud Sentiments – For the Girls + sentiment
  3. Craft Rocket – Anything Goes
  4. Seize the Birthday – with toppings of “water!”
  5. Crafting with an Attitude – Anything Goes

Ho! Ho! Ho! Anything Goes at Cute Card Thursday!

Hello friends!  Hope that you are having a good week.

Today is Thursday which means that it’s time for another Cute Card Thursday challenge!  Yay!  This week we have our monthly “Anything Goes” challenge, so please be sure to enter whatever you’re making this week!  We’d love to see what you come up with!

We are also sponsored by the lovely Whimsy Stamps this week and they have provided an image for each of our design team to use.  I have been wanting to get going on making some Christmas…so here’s my card:

Vicki-CCT541-ATG-Whimsy

I just adore these sweet and fun penguins that Crissy Armstrong comes up with at Whimsy Stamps.  I’m using the Penguin Light Me Up digital stamp on my card here.

I have colored it with Copic markers and gel pens.  I thought it would be fun to stamp some snowflakes in the background, so I’ve used the Whimsy Stamps Penguins Winter Adventure stamp set for the background as well as the sentiment from the same set for my tag.  My tag was cut out using a tag die from my stash and then I added some gold thread to the top and attached it to the card with foam tape.

I’ve mounted this image panel onto a gold foil cardstock piece and then attached it to a couple of layers of festive plaid papers which was mounted onto a white top folding square card base.  I sponged some gold ink around the edges and added stitching detail with my gold gel pen.  Lastly, I’ve added some gold ribbon tied in a bow at the top corner and also some dimensional snowflake accents.

Here’s a closer view of all the shimmer and glitz on this card:

Vicki-CCT541-ATG-Whimsy-close

I had so much fun coloring this image and glad that I’m down another card for the Holiday Season too! 🙂

Thanks for stopping by today and I hope you’ve enjoyed my share!  See you soon!

Challenges:

  1.  Whimsy Stamps Challenge – Anything Goes (using Whimsy Stamps image)
  2. Holly and Ivy Christmas Challenge – Anything CHRISTMAS Goes
  3. Adicted to Stamps & More! – Holiday
  4. Creative Inspirations – Holidays
  5. That’s Crafty – Animal Magic

Cute Card Thursday is Getting “Too Cute”!

Hello friends!

It’s Thursday and time for a new challenge at Cute Card Thursday!  If you are not challenged by the title of the challenge blog, then let’s get even cuter by making the challenge this week “TOO CUTE“!!  LOL!  We’re looking forward to seeing your cute creations in the gallery!

Our sponsor this week is Kinda Cute and they have kindly donated an image that I have used on my card for you today:

Vicki-CCT540-TooCute

When I saw this image, I thought this was perfect for the challenge theme!  I have used the Fairy and Snail digital stamp from our sponsor.  I printed it out and colored it in with Copic markers.  I have used a white gel pen for certain areas, and I have added some Spectrum Noir clear glitter pen over the fairy wings.  I have also used some Nuvo White Blizzard Glitter Drops for some sparkle underneath the snail where it’s wet from his ‘slithering path’.

I have also taken the Lawn Fawn stamp set Stinkin’ Cute (of course) and stamped the sentiment above the image in the top right corner.  I also decided to take the solid heart from the set and stamp a few purple hearts between the characters.  I also took some linen thread to make a tiny bow because I thought the fairy would look CUTE with one on her curly hair!  LOL!

I cut the image panel out with the My Favorite Things Stitched Mini Scallop Rectangle STAX die and then sponged some Tumbled Glass distress ink around the edges of it.  I mounted it onto a piece of black cardstock and then I wanted to add some ribbon to it so I took my slot punch and punched out a hole on each end of the image panel to slip some silk purple ribbon around it.  I tied a bow and added it over top to the right side.  I then found some purple dotted papers and cut out a panel with the Lawn Fawn Large Stitched Rectangle Stackable die to cut it out with.  The purple ribbon was secured onto the back of this piece and then mounted onto a white top folding card base.  Before sticking down the image panel, I put some fun foam on the back for a bit of dimension.

Thanks so much for dropping by!  See you soon!

Challenges:

  1.  Stamps & Fun = Creativity – Anything Goes
  2. Make My Monday – colored image.
  3. Addicted to Stamps & More – Make Your Mark
  4. Crafty Creations – Anything Goes
  5. Crafting by Designs – Anything Goes

Ribbons & Bows, Oh My!

Hello friends!  It’s Thursday time again and that means it’s time for a new challenge over at Cute Card Thursday!  This week the theme is all about Ribbon and/or Bows!

I happen to just love ribbons and think that almost everything I create “needs” to include one somewhere.  So sometimes I try to refrain from always doing it.  It’s so nice to see when a challenge comes up requesting it though! 🙂  How about you?  Are there any “ribbon lovers” like myself out there?

We are sponsored by All Dressed Up Digital Stamps this week and here’s my card using one of their images:

Vicki-CCT538-ADU

I have used this really fun image called Play Day for my card here.  Check out those cool shades! Ha!  I’ve colored it with Copic markers.  Thought she would be cute with a denim looking jacket, bow and boots!  I’ve also used some denim ribbon on my design too!

Looking through some papers in my stash, I found some pretty floral sparkly pattern and I’ve also added some stitch marks to the border of it, but I went “wonky” with it…so I decided to do a second line with more “wonky” stitch marks to even it out.

I feel like I haven’t used flowers on my cards in forever, so it was fun going through my stash to find goodies to go with this image.  The sentiment was stamped from my stash and I hand cut a banner with it to add to my card.

Hope you like my card for today!  Be sure to check out the challenge blog for more inspiration from the design team and to link up your luscious ribbon creations too! 🙂  Thanks for stopping in and I’ll see you soon!

Challenges for this card:

  1.  All Dressed Up – June Anything Goes with ADU image
  2. Tuesday Morning Sketches (TMS461)
  3. Crafty Calendar – July ‘Totally Girly’
  4. Crafting From the Heart – Anything Goes
  5. QKR Stampede #303 – Anything Goes

Sun, Sea or Sand at Cute Card Thursday

It’s that time of the week again, my friends, for another CUTE CARD THURSDAY CHALLENGE!  The theme for this week is an appropriate “Sun, Sea or Sand” challenge.  As hot as it’s going to be this weekend, I think I’d take the sea waters out of those three choices!  🙂  But since I’m inside the air conditioning, I decided to go ahead and use all three of them for my card today:

OLYMPUS DIGITAL CAMERA

Our sponsor for this week is All Dressed Up Stamps.  I have chosen to use this fun Summertime digital stamp for my card.  I first printed out my image and colored her in with my Copics.  I then used the Molotow masking liquid – (Dick Blick was the cheapest found for me in the U.S.) to cover it up (yeah, it gave me a bit of a heart attack, but it worked!) and once it dried, I used several different stencils and distress inks with a blending tool to create the beach scene behind her.

I have used a craft knife to cut a small slit in one of the waves just enough for the beach ball (MFT Penguins in Paradise) to fit inside so that it looks to be floating along the water.  I just used my Copic markers to make the dotted lines for the beach sand.  The sun (Lawn Fawn Spring Showers dies) was die cut from some glitter paper that I also colored with a yellow Copic marker.  The sentiment along the edge is from a Tim Holtz sticker book.  The front panel cut from MFT Wonky Stitched dies and mounted on a top folding A2 sized white card base.

I hope you will stop by the Cute Card Thursday challenge and check out the rest of the inspiration from the design team and join along with us this week!  Thanks for stopping by and enjoy your day!

These are the challenges I’d like to enter this card for:

  1.  All Dressed Up Challenge – Anything Goes + ADU image
  2. Stamps & Fun=Creativity – Travel/Holidays
  3. Fab ‘n’ Funky – Bring me Sunshine
  4. Crafting From the Heart – Anything Goes
  5. Addicted to Stamps & More – Anything Goes
  6. Aud Sentiments – Anything Goes + sentiment
  7. QKR Stampede – Anything Goes

Anything Goes for Cute Card Thursday

Hello friends and welcome to another Thursday!  Hope you are staying cool and enjoying your Summer so far!  I am looking forward to lots of fun in the coming months and into the Fall Season as well, so I still have many things to share with you and what I’ve been working on!

Thursday brings another challenge over at Cute Card Thursday as well!  We have a very easy ANYTHING GOES this week and we are sponsored by Whimsy Stamps!

The sponsor was kind enough to donate some images for the DT and so I’ve used one on my creation for today:

OLYMPUS DIGITAL CAMERA

I just thought this penguin was just as cute as can be!  I’ve used the Whimsy Stamps digital image called Penguin Loves Watermelon.  I had so much fun coloring in this cute image!  I actually decided to cut him away from the scene he was on so I could just pop him up by himself on my card.

Watermelon is something that I love to eat during the Summer when it’s in season.  I had this punch that made the perfect sized “seeds” and so I thought I’d add some on the image as well as on the card I made. (Looks like he’s spitting out seeds! LOL!)  I covered the watermelon that the penguin is holding with the Spectrum Noir sparkle pen.  I covered the “seeds” with some clear sparkling Nuvo drops.

I ended up just printing the template directly on my decorative papers and then cut each one out.  I just cut out the “bite” with my scissors after attaching the layers.  I sponged some coordinating ink on the edges of each layer.  I think you could also easily use a circle die cut and make your own version of this type of card as well.  My finished and folded card measures approximately 3.75 x 6.25 inches.  The sentiment comes from a retired clear Whimsy Stamps set from my stash.

Hope you’ve enjoyed my creation and I hope that you will join us this week over at Cute Card Thursday!  Look forward to seeing your creations!

Don’t forget to share some smiles today! 🙂

These are the challenges I’d like to enter for this card:

  1.  2 Crafty Critter Crazies – Anything Goes (using a critter)
  2. Crazy 4 Challenges (C4C437) – barefoot
  3. Whimsy Stamps – Anything Goes
  4. Crafting by Designs – Anything Goes
  5. That’s Crafty! – A Summer’s Day