Sending Snail Mail Hugs

Hello friends!  Yippee!  It’s finally “officially” Fall now! (According to the calendar anyway.) We are very slowly starting to get lower temps at least in the evening time anyway.  I’ve gotten out my Fall decorations and I’m ready!  How about you?

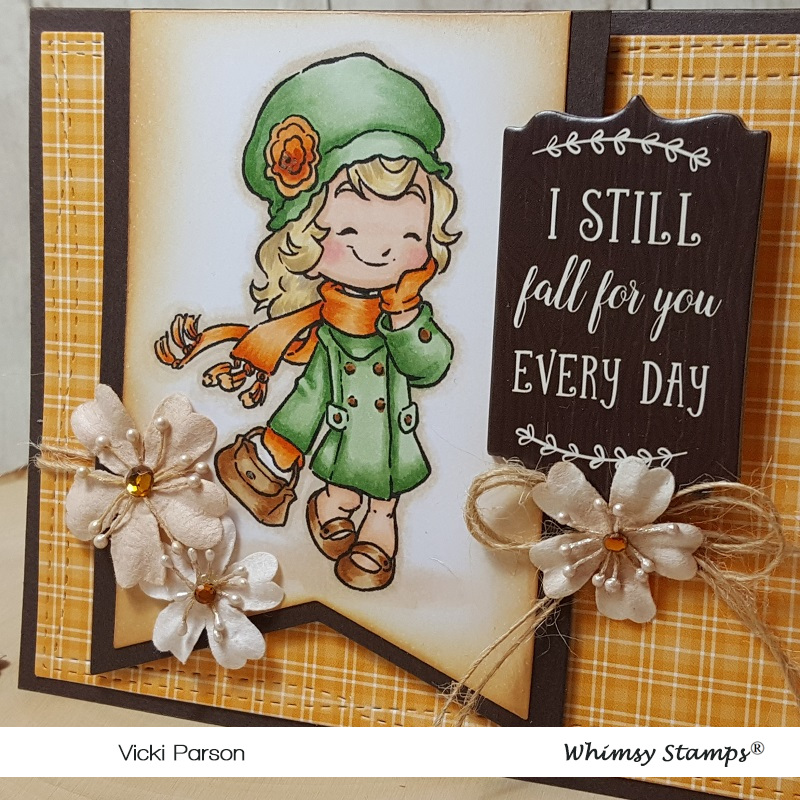
Today I have a very sweet image from Whimsy Stamps to share with you:

Vicki-WSLoveSlowMuch-Sept24

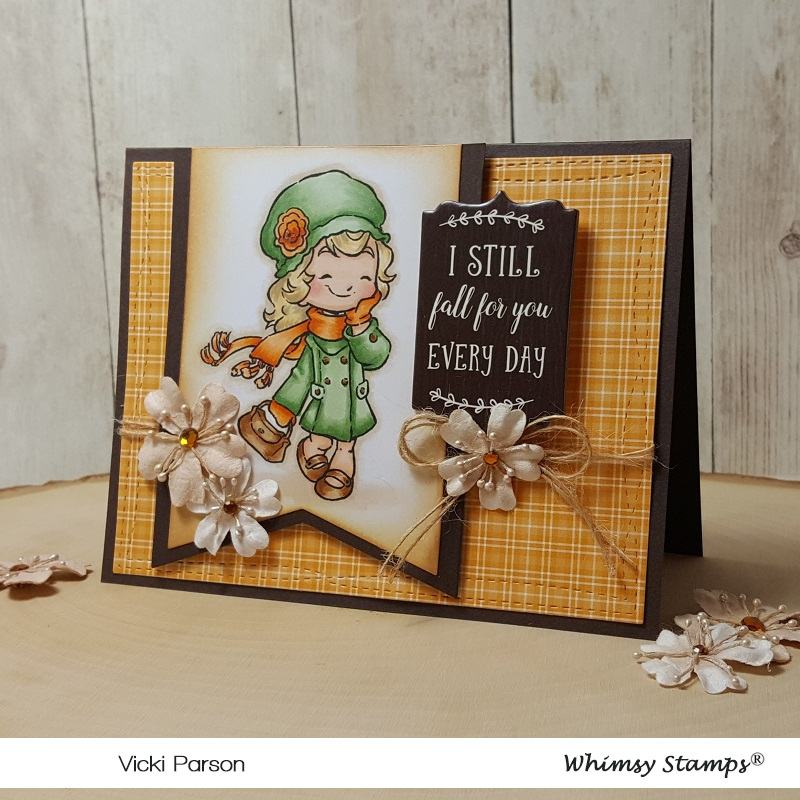
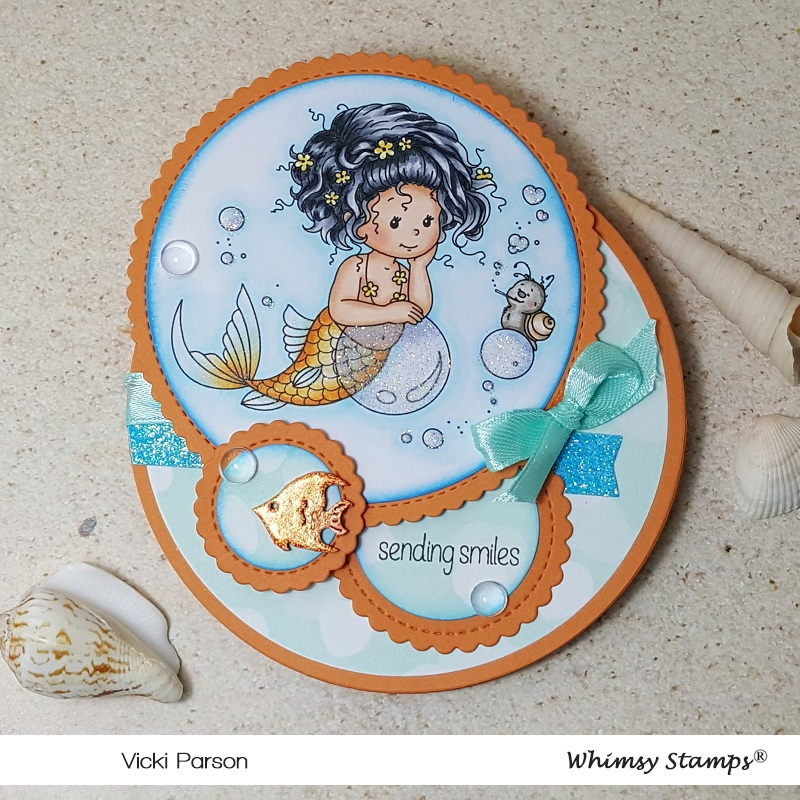
Awe!  I wouldn’t normally hug a snail, but I must say, this one is SUCH a cutie don’t you think?  This digital image is called “Love You Slow Much” from Whimsy Stamps-Sylvia Zet’s Wee Stamps Collection which was previously released as a rubber cling stamp.  So now you can have the option of choosing the digital or the rubber versions!

Of course, with Fall having started, I was really inspired to create with this cutie in some orange, yellow and tan toned colors!  With the exception of that blue bow tie on the snail, I’ve colored it differently as I think that makes him really stand out especially for dispensing hugs…or perhaps receiving them! 🙂

I’ve cut out the image with a stitched circle die and then die cut another larger circle in the orange color to mat behind that.  I’ve taken a piece of decorative paper from my stash with the wording and added some stitch marks along the edge of it with a black marker and then mounted it to a piece of white cardstock.  I wrapped some white organdy ribbon around these two pieces and mounted it onto an orange 5″ square top folding card base.

I took another piece of orange cardstock and die cut a tag out from an older Whimsy Stamps die that I have and then I stamped the “hugs” sentiment from the Whimsy Stamps Everyday Mini Sentiments clear stamp set towards the bottom of the tag and added it to the bow on the ribbon.  Lastly, I took some flowers and attached them around the card design.

Vicki-WSLoveSlowMuch-Sept24-close

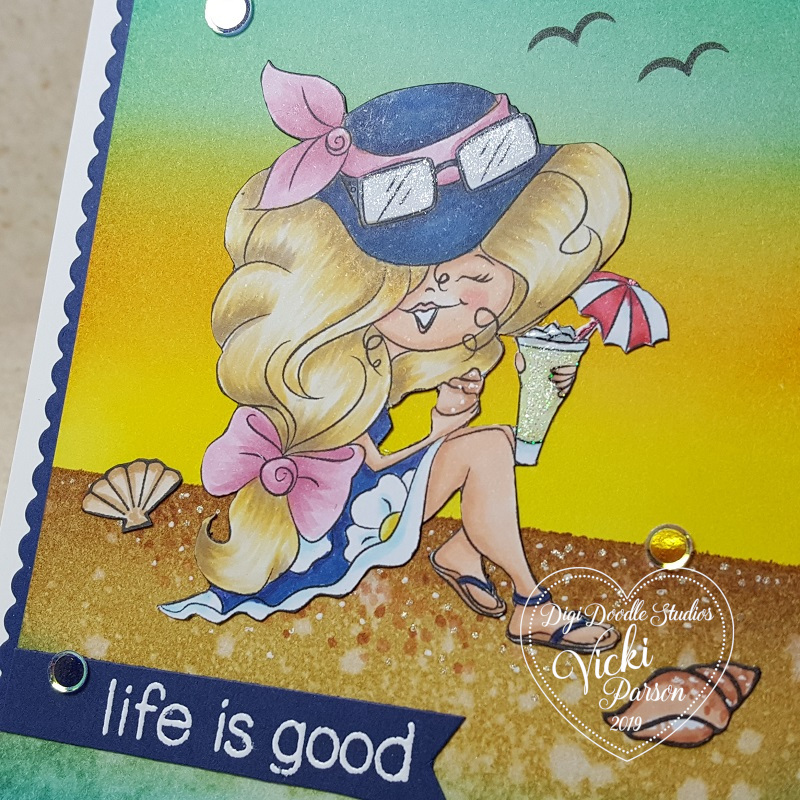
Here’s a closer look at the coloring I’ve done on this image and used the following Copic markers:

  • Snail Body:  W7, W5, W3, W1, R00
  • Snail Shell:  E35, E33, E31, E30
  • Snail Bow Tie:  B26, B24, B21
  • Fairy’s Dress, Hair Flowers, Shoes, Wings:  YR07, YR04, YR02, BG000, C7, C5, C3
  • Fairy’s Hair & Skin:  E47, E44, E42, E41, E21, E11, E02, E00, E000, R20
  • I used BG000 and E0000 for around image and shadows
  • I’ve also used a gold gel pen for the center of the flowers in her hair and over the tiny marks behind her wings.  I’ve used a white gel pen for highlights in the Fairy’s cheeks as well as highlights on the snail’s shell.  I took a glue pen over her wings and added some clear glitter over them.
  • I’ve also used a Copic marker (unsure of color) to color a rhinestone for the center of the orange flowers.

Vicki-WSLoveSlowMuch-Sept24-flat

I hope you’ve enjoyed my creation today and that it has inspired you in some way!

Thanks so much for stopping in today!  I always appreciate your support!  I’ll be seeing you soon!!

Challenges I’d like to enter this card in:

  1.  Creatalicious – Anything Goes with optional circles
  2. Stamps & Fun = Creativity – Anything Goes
  3. The Paper Girls – Anything Goes
  4. The Fairy & The Unicorn – Fantasy Anything Goes
  5. Creative Knockouts – Anything Goes
  6. QKR Stampede – Anything Goes #364
  7. Creative fingers – Anything Goes
  8. Always Fun – Cute Critters

Super Girl Starla Flying By!

Hello friends!  Happy Tuesday and I hope you’re having a wonderful week so far!  I actually can’t believe that September is already flying through this quickly!

Speaking of “flying”, I have this really cute card to share with you using another Whimsy Stamps image:

Vicki-WSStarla-Sept17

This little digital cutie is called Starla from Whimsy Stamps.  She has her arms out and so I thought it would be cute to have her appear as if she’s smiling while flying up through the clouds at us!  I also thought this would be a really nice encouragement card for a child and I’ll be sending it out to hopefully share some smiles.

I stenciled some clouds in behind her, cut the image out with a stitched square die and layered a piece of purple cardstock behind her.  I ran a piece of green colored cardstock through a star embossing folder, wrapped a silver ribbon around it and then attached it to a purple 5″ square top folding card base.

I die cut some stitched cloud borders for the bottom of the card design but sponged them with some Broken China Distress Ink before attaching them with foam tape.  I also die cut some stars to add for accents on the design with both silver glitter stock and a piece of purple to paper piece in the center of one of the silver outline stars.  I also added a rhinestone star to the center of the bow.

Vicki-WSStarla-Sept17-close

Here’s a closer look at Starla with the coloring I’ve done on her.  I’ve colored her up with Copic markers and added some details with gel pens.  I’ve also covered her headband with a glitter brush pen and also added some extra glitter over the stars at the top of her head band.  You can also see where I’ve added some “strokes” to show that she’s zooming through the clouds.  I also covered that area with a bit of shimmer with the glitter brush pen as well.    The “little girl” in me had to color some purple!

Vicki-WSStarla-Sept17-flat

The sentiment at the bottom was stamped with a sentiment from my stash with some black ink.

I hope you’ve enjoyed my card today and it’s brought you a smile or inspired you in some way!  Thanks so much for stopping in!  See you soon!

Challenges:

  1.  The House That Stamps Built – S1119 TicTacToe
  2. Daring Cardmakers – Special Thoughts
  3. QKR Stampede – #363 Anything Goes
  4. Sweet Stampin’ – Cards for Kids
  5. Addicted to Stamps – For a Lady/Girl
  6. Splitcoast Stampers Teapot challenge – Put a Smile on their face

Brand New Images from Digi Doodle Studios + Video!

Hello friends!  Happy Friday!  I’m happy for the weekend to get here, how about you?!  The weather has started to cool down slightly and it’s so nice to have that air conditioning turned off for a change!

Today I’m super excited to share with you some really fun and adorable new image set that Digi Doodle Studios has come out with from the brand new “Pairables” Collection!  The set that I’m sharing today is adorable and so fun to mix and match images with!  Check out the two cards I made with it:

Vicki-DDSWizardPairables-video

I absolutely had so much fun creating a little scene with the images and then printing them out for coloring and making cards with!    All of the images that I’ve used here come from the new Digi Doodle Studios Charming Enchanters Wizard Pairables Digital Stamp Set and I believe that I’ve probably used most of the images from the set on these two cards.

Vicki-DDSWizardPairables-boy

For this particular card, I’ve used my computer to arrange the stars from the wizard’s wand and the sentiment how I want them placed and then printed it out twice.  One I printed on Copic blending card and another image printed out on Neenah Solar White cardstock so that I can do the ink blended background on it.

Vicki-DDSWizardPairables-boy-close

Here’s a closer view of the coloring details on the wizard.  You can see that he has a bit of a “glow” about him.  So after I colored him in with my Copic markers, I decided that I could use a yellow color pencil to add just a bit of glow to certain parts of the image.  I’ve then used gel pens to color in other detailed portions of the image and a white gel pen for the stars in the background as well.  I’ve tried to capture a little bit of that stunning shimmer for the background, but of course it doesn’t show up as great as it is in real life!

He was fussy cut out and placed over the ink blended background that I’ve made.

Since my last video on the ink blending, I’ve had a few more questions about it, so I thought I’d share a more in-depth look into it.  To see a video of how I’ve created the background on this “wizard” card, I’ve made a video to show in detail how I’ve done it with a few tips and tricks along the way.   So check it out below or watch it on You Tube by CLICKING HERE.

I hope that this helps a little more on explaining how I achieved the look for ink blending backgrounds.  I know that I’ve had people ask me to do a video on another background I’ve made on another card, so perhaps I will share another video on that later.

If you do have any questions, please feel free to leave a comment here or on You Tube or contact me and let me know!  If you have other suggestions, I’d always love to hear that too!

Vicki-DDSWizardPairables-girl

Here’s the other card that I’ve made using the same Charming Enchanters Wizard Pairables Digital Stamp Set.  Again, I’ve arranged and sized the images how I wanted them on my computer, printed it out just the same as above and fussy cut out all of the colored images to place over my background.

I’ve mounted the image panel over a piece of purple cardstock and then placed it over a top folding 5″ square black card base.  I’ve used a piece of ribbon to run behind the layered image panel and then added some fun decorative metal corners on it.

For this card on the background, I didn’t distress it with water, I just left it ink blended.

Vicki-DDSWizardPairables-girl-close

Here’s an up-close look at the coloring I’ve done on the image.  You can see again that I’ve used my gel pens to color in the tiny details like the stars on her hat, the bubbles from her cauldron, the bookmarker and the tiny nail on the wall.

To get the glow on the images, I’ve taken a green colored pencil and added it in the places that I thought her green magic potion would glow from.

Thanks so much for stopping in and hanging out with me today!  See you soon!

Challenges I’d like to enter:

  1. Get Creative – Anything Goes
  2. Through the Craft Room Door – Anything Goes
  3. Try it On Tuesday – Boys/Girls/Children
  4. Addicted to Stamps and More – Make Your Mark
  5. Crafting By Designs – September Anything Goes

It’s Anything Goes for Cute Card Thursday!

Hello friends!  Here we are with the first week of September already coming to the end!  Wow!  I think it may be time to start thinking about that “C” word! (Christmas of course!)

Today is a new challenge over at Cute Card Thursday today and we have our first of the month “Anything Goes” challenge this week!  We our sponsored again by the lovely Whimsy Stamps, so be sure to enter for a chance to win a fun prize!

Here’s what I’ve made with our sponsor’s product:

Vicki-CCT598-WSPenMistletoe-Sept5

I’ve used this really sweet digital image from Whimsy Stamps called “Penguins Under the Mistletoe” and of course Crissy’s penguins are so fun to color up!

I have followed a sketch for my design using a challenge (see below) and have pulled out some older papers in my stash that I thought looked really festive and went with the colors I have picked out.

I white heat embossed the sentiment from the Whimsy Stamps Holiday Mini Sentiments on the green colored layer and popped the image panel layered in red cardstock over top with some foam tape.

I’ve taken some silver glitter paper and die cut a few snowflakes from the Whimsy Stamps No-See All Season Tree die set along with cutting a strip for the top of the card too.

Vicki-CCT598-WSPenMistletoe-Sept5-close

Here’s a closer view of the image so you can see how I’ve colored it up.  I’ve used the following Copic colors below:

  • penguin bodies:  C8, C7, C5, C3, C1, R20, R00, Y38, Y35, Y32
  • Santa Hat and Candy Cane:  R39, R37, R35, R32, BG000
  • Mistletoe:  YG67, YG61 (berries are red Nuvo Drops)
  • Hat and Scarf:  BB26, B24, B21, BG000
  • Gift:  G09, G07, Y17, Y15, Y11
  • I used BG000 for snow ground shadows

I went around the edges of the image panel with Tumbled Glass Distress Ink and the ink foam blending tool.  I ten took my quicky glue pen and added some dots for the snow as well as underneath the penguins and sprinkled on some glitter.

Vicki-CCT598-WSPenMistletoe-Sept5-flat

Thanks for stopping in and I’ll see you again tomorrow for something fun!

Challenges I’d like to enter this for:

  1.  The Holly and Ivy Christmas Challenge – Anything Christmas Goes
  2. Sketch Saturday – Pick any sketch from 215-578 (I chose sketch #356)
  3. Merry Little Christmas – Anything Christmas Goes
  4. Love to Craft – September Anything Goes
  5. Pammies Inky Pinkies – PIP1935 Anything Goes
  6. ABC Christmas Challenge – ‘S’ & ‘T’ are for Sparkle and Texture

New Release Week at Whimsy Stamps!

Hello friends!  It’s “release week” for September over at Whimsy Stamps!

I’d like to share with you a really fun “steampunk” style card today:

Vicki-WSSteampunkLilith-Sept3

Oh this was so fun to create!  When you check out the line of September’s Digital Stamps in the store, you will see a new line of “steampunk” style images that came out.  The one I’m using here is called Steampunk Lilith.  I thought she looked awesome with her little attitude carrying her gun there!  LOL!

I started with a white piece of cardstock and pulled out a steampunk style stencil and inked some distress colors over it along with the image tag panel and then sponged around the edges of them as well.  (Both of the tag panels are popped up with craft foam over the card base.)  Before attaching these panels, I took some silver paste and rubbed it around the edges after distressing them.

I die cut a piece of silver foil with the same tag die cut and then I took an embossing folder and embossed a piece of copper foil.  I mounted this piece onto a piece of gold glitter cardstock and wrapped a gold ribbon around it and attached it to the base of the card.  I also used this same ribbon for the bow at the top of the tag image.

I found a sentiment to go with the image that I silver heat embossed and then cut out with the Whimsy Stamps Quick Strips die.  After I sponged around it, I added some metal brads to each end and then popped it up with foam tape under the image.

All of these layers were attached to a suede colored top folding card base.  Since the image printed out a little taller than most of my digital images tend to, I made my card base 4.25″ x 6″ in size.  I have an envelope maker, so I can create the size I need.

Lastly, I’ve glued on some metal gears including the one in the center of the gold bow.

Vicki-WSSteampunkLilith-Sept3-close

Here’s a closer look at the image and how I’ve colored her up using a combination of Copic markers and gel pens.  You can sort of see the areas that I’ve colored up with gel pens that have the shine on them.  You can also see how shinny the metallic papers look as well as the embossed sentiment.  The embossing folder I used for the Copper strip comes from a Tim Holtz Texture Fades EF.

Vicki-WSSteampunkLilith-Sept3-flat

Hope you’ve enjoyed my card today and got inspired in some way!  Thanks so much for dropping in!  I’ll see you again soon!

Challenges I’d like to enter:

  1.  Simon Says Stamp Wednesday – Anything Goes
  2. As You Like It – Favorite Way to Add Text and Why? (I like to either stamp or heat emboss a sentiment and then die cut/cut it out, this way I can decide where I want to add it and if I like it well enough to add it…then I don’t have to.)
  3. Creatilicious – Anything Goes with optional humor
  4. Sisterhood of Snarky Stampers – ‘V’ is for Violent
  5. Rainbow Card Challenge – Beautiful Brown

Birthday Wishes for Digi Doodle Studios

Hello friends!  🙂   Happy Labor Day!  I hope you’ve enjoyed your weekend and I hope you get a nice relaxing Labor Day Monday included with it!  I’m enjoying a nice relaxing long weekend hanging out with hubby.

I have a very sweet card to share with you today using an adorable image from Digi Doodle Studios:

Vicki-DDDS-PupParty-Sept2

Awe!  Such a cute pup, isn’t it?!  I love how sweet this one turned out with the colors which I thought would be great for a little one’s birthday.  I have used this adorable image called Jasper’s Cupcake for my card plus some really fun digital papers from the Let’s Celebrate Digital Background Paper Collection!

I based my card around the colors of those papers and I just love the little pops of blue in them, so I found some cardstock to match up with them and started to put together my card design.

I layered the “Birthday Streamers” paper over a piece of blue cardstock and then sprayed it with some “Shimmer Craft Spray” (Which I’ll be sharing in an up-coming video so stay tuned!)  Then I mounted these layers onto a pink A2 sized top folding card base.

I then took a strip of the “Birthday Chevron” paper and wrapped some white organdy ribbon around it and attached it to the front of the card base.  I added my colored image panel onto a piece of blue cardstock and then mounted this over a piece of pink cardstock that was cut out with a stitched scallop rectangle die.  Lastly I added a sentiment and punched it out with a circle punch and added a punched out scallop circle in pink behind it and popped it up with foam tape over the design.  As you can see both of the image panel and the circle sentiment was sponged around the edges very lightly with some blue ink too.  (I almost forgot that I took some white ink and sponged around the blue edges of the cardstock too!)

I then added my ribbon bow to the right side of the card and glued a pink pearl in the center of it and added on the sequins randomly over the card.  I really like how that blue frames this design and picks up the blues from the papers too.

Vicki-DDDS-PupParty-Sept2-close

Here’s a closer view of the image and how I’ve colored it in!  I just adore that pup and it looked like he needed a few extra “spots”, so I added one on his back and then gave him a darker colored tail and a different colored paw too!

After coloring this up, I took a glitter pen and covered the pink balloon as well as the frosting on the cupcake for a bit of shimmer.  You’ve got to make that frosting look sugary right?!  I wish you can see the shimmer more in the background because it looks really cool!  You can sort of see it at the top of the photo.  However, if you check out my up-coming video, I’m hoping the camera will do it justice!

Vicki-DDDS-PupParty-Sept2-flat

I hope you’ve enjoyed my little party pup card here today!

Thanks for checking out my post today!  I appreciate ALL of your kind thoughts!  I’ll see you again soon!

Challenges I’d like to enter:

  1.  {Cupcake Inspirations} – CIC477 Food and Drink
  2. Little Red Wagon – Foodie
  3. Watercooler Wednesday – WWC236 All About Occasions
  4. Crafty Animals – #30 Anything Goes + animal
  5. Pearly Sparkles – Add a Ribbon and/or Bow
  6. Sheepski Designs – Die Cuts and/or Punches

Oceans of Love for Digi Doodle Studios

Hello again my friends!  I’m back to share this card I made using this adorable image from Digi Doodle Studios:

Vicki-DDSNixie-Aug20

Isn’t she adorable with her little underwater crab friend?!  This is the Nixie Mermaid digital stamp from the Digi Doodles Studios “Under the Sea” collection.  I thought she was so cute and I actually had her colored up before I ended up hurting myself and had to leave.  I finished out the card when I got better.

I have also used some fun digital papers and a sentiment that work well with this particular image.  The pretty pink patterned papers you see in the background come from the Digi Doodle Studios Summer Breeze Card Making Paper collection.  The sentiment came from the Digi Doodle Studios Mermaid Sentiments set.  I printed out the sentiment and cut it out with a ticket die, sponged around the edges with the turquoise ink color and layered it over the same turquoise colored cardstock I’ve used throughout my layout.

The layout idea came from a sketch challenge that I’m entering for below this post.  I have several layer panels including the fun turquoise sparkly paper that I’ve used that was cut with a wave border die and then sponged with some white ink.  I added some pearls to each corner of the image panel, wrapped some white organdy ribbon around the card front base, tied a bow and added a silver bow where I have attached some silver string and a starfish charm to it.  The entire card measures 5.5″ square.

Vicki-DDSNixie-Aug20-close

Here’s a closer view of the coloring that I’ve done on this mermaid image.  Mainly colored with Copic markers, but I’ve used a gel pen to color the sprigs next to the flower in her hair and the bracelets around her wrists.  I took a glitter brush pen and covered her entire fish body and the bubbles in the water with.  (Of course it looks so shimmery in person!)  I then took some glossy accents and covered the little crabs eyeballs with and then some liquid pearls to dab a dot over the pearl inside the oyster.  This mermaid image panel was popped up with foam tape over the card front.

Vicki-DDSNixie-Aug20-flat

I hope you’ve enjoyed my underwater mermaid card today!

Thanks so much for stopping in today!  I’ll be back tomorrow with something fun!

Challenges I’d like to enter this card for:

  1.  Cheerful Sketches – August Challenge
  2. The House That Stamps Built – A1419 Tic-Tac-Toe (I used first row down)
  3. Pammie’s Inky Pinkies – PIP1933 Anything Goes

Windy Day Cinnamon For Whimsy Stamps

Hello friends!  Can you feel it in the air?  Autumn is on the way along with the crisp cool air and blowing leaves!  I know that some of you had said you’re not looking forward to Fall when I asked, but I absolutely love everything about it including the sweater weather season & flavors like pumpkin spice and cinnamon!  Speaking of which, I have a fun Autumn color inspired card o share with you today:

Vicki-WSWindyDayCin-Aug13

This cute image is called Windy Day Cinnamon from Whimsy Stamps.  I thought she looked as happy about Fall coming as I do, so I went with those colors in mind when creating this card.  After coloring her in with my Copics, I cut her out with a banner shaped die and went around the edges of it with tea dye distress ink and layered her onto another banner layer and set it aside.

For my card base, I took some orange colored plaid pattern paper and die cut it out with a wonky stitched rectangle die.  I took a double layer of twine and wrapped it around this piece and tied a bow towards the bottom thirds of the piece and then attached it down to the brown A2 sized top folding card base.

I took the image banner panel and added a piece of craft foam to pop her up over the card base.  I took a chipboard sentiment from my stash and added some foam tape to one side of it and glued the other side to the image panel.  I added a flower to the center of the twine bow along with a few others along the side.

Vicki-WSWindyDayCin-Aug13-close

Here’s a closer view of how I’ve colored Cinnamon with Copic markers:

  • Coat, Hat:  YG61, YG63, YG67
  • Shoes, Purse & Coat Buttons:  E31, E33, E35, E37
  • Scarf, Mittens, Hat Flower:  YR12, YR14, YR18
  • Hair:  YR30, Y32, E43
  • Skin:  E000, E00, E11, E21, R20, R00
  • Shadows:  E41, E42, E0000
  • Used a gel pen for the center of the flower on her hat and the purse closure button

Vicki-WSWindyDayCin-Aug13-flat

I hope you’ve enjoyed my Autumn color inspired card today!

Thank you so much for dropping by and I’ll see you again soon!

Challenges I’d like to enter this card for:

  1.  Creative Inspirations – Something Seasonal
  2. QKR Stampede – Anything Goes #358
  3. Pammies Inky Pinkies – PIP1932 Anything Goes

Vivienne on the Beach with Video Tutorial!

Hello friends!  Summer is in full swing over my way and the temperature is typical for August which is hot!  So of course who wouldn’t love a nice relaxing sit at the beach with a cool iced drink on hand!  Happily continuing with my guest design spot, I have another fun creation for you today using this really cute Summer image from Digi Doodle Studios:

Vicki-DDSVivienne-Augvideo

Vivienne Beach Girl is all decked out in her cute navy blue beach outfit holding a sea shell in one hand and a cold drink in the other!  Sounds like a great idea to me!  I had so much fun coloring her in!

I have been asked by several people how I go about doing the ink blending on certain cards that I’ve made in the past.  It’s somewhat difficult to type up exactly what I’m doing when I blend and sometimes it tends to be a bit different depending upon what background and colors I’m creating with as well as the type of scene that I’m making.  So I thought it would just be easiest to create a video tutorial on how I’ve achieved this particular beach scene background:

(To view the video on You Tube, CLICK HERE or watch below)

I didn’t show the coloring of this image in the video, but let me know if this is something you’d like to see in a video from me by leaving me a comment or message somewhere.   It always helps if you let me know that you are interested in something!

Vicki-DDSVivienne-Augvideo-close

So here’s a closer look at this adorable image and how I’ve colored her with my Copics.  I fussy cut her out and went around the edges with a black marker to hide any imperfections I may have had.  As seen in the video, I’ve attached her to the background and added some shimmer to her sunglasses with a glitter pen, added some liquid glitter glue to her cup and glossy accents on her ice.

Vicki-DDSVivienne-Augvideo-flat

To add details to the card, I’ve used the Lawn Fawn stamp set Life is Good by stamping a couple of sea shells, coloring them in, fussy cutting them out and attaching to the scene. I took a sentiment from the set and white heat embossed it over a navy strip and cut it into a banner. I also took a bird and stamped it in the sky twice with black ink.  I’ve layered the beach scene onto a piece of navy cardstock that was cut with the MFT Blueprints 27 Die-namics die.  I then attached these layers onto a white top folding A2 sized card base.

Lastly, I’ve added some Crystal Clear Confetti from Studio Katia with liquid glue.

Thanks for dropping in and I’ll see you soon!

Challenges I’d like to enter this card for:

  1.  Crafty Friends – Summer Colors
  2. Through the Craftroom Door – Anything Goes
  3. Creatalicious – Anything Goes with optional “Distress It”
  4. TIME OUT – Relaxation with optional 1 layer card
  5. Cardz 4 Galz – Summer fun
  6. Pearly Sparkles – Something beginning with ‘B’ (beach)

Sending Smiles Mermaid Style

Hello friends!  Well it feels nice to get back into the swing of things here again!  I want to thank you from the bottom of my heart for the awesome welcome back I recieved from you guys!  Wish I could reach out through the screen and give you all a big hug!  🙂

Today is August 1st AND it’s on a Thursday too, so I wanted to share the card I made for the Whimsy Stamps August Digital new release as well as a brand new Cute Card Thursday Challenge too!!  Whimsy Stamps is our sponsor this week and it’s an easy “Anything Goes“, so please be sure to stop by the blog to see the wonderful inspiration from the rest of the design team and play along with us!!  We look forward to seeing what you’re working on!

Vicki-WSGoldie-Aug1

Oh aren’t these Sylvia Zet images just as cute as can be?!  I so enjoyed coloring her up!  (See the close up photo and details below.)  This is the DIGITAL version of  “Goldie” just released from Whimsy Stamps this month.  You can still also purchase the rubber cling stamp, but now it’s nice to be able to have the option to choose either one!

Since her name is “Goldie“, I had to use the orangish color palette for her!  When looking at the image, I immediately saw “bubbles”, so I thought it would be fun to make a circle easel card design with her!  This actually turned out to be a “non-traditional” circle easel card with the circled image going askew from the main area…which makes it seem more like several bubbles underwater!

I have cut several different sizes of circles, one for the main circle card base and several others with some old SU! bokeh looking papers from my stash.  I used a stitched scallop circle die set to cut out the layers behind the circles.  I sponged all circles with some blue ink for more depth.  I’ve added a strip of blue glitter cardstock on the main card front layer as well as some ribbon to attach to the front.  I arranged the circles where I wanted them and added some foam tape here and there to pop up the layers.

To hold up the card front, the inside of the easel card has another strip of that blue glitter cardstock and I stamped an anchor image over one of the circle panels using an older Whimsy Stamps clear set.  I used some foam tape to pop that up so that the front card panel would prop up.

I’ve taken the Whimsy Stamps Everyday Mini Sentiments stamp set to stamp the sentiment under the image panel with black ink.  For the accents on the card, I’ve used some clear acrylic bubbles randomly and glued them in places.  For the fish, it was a wood veneer from my stash that I heat embossed with some cool orange metallic embossing powder.

Vicki-WSGoldie-Aug1-side

Here you can see the details from the side view of the easel design and how it’s propped up with that anchor circle holding the front card panel in place.  to mail this card, you just unfold it and lay it flat as shown in the last photo below.

Vicki-WSGoldie-Aug1-close

Here’s a closer look at this really sweet image.  Below are the list of Copics I’ve used to color her in with:

  • Fins, flowers, Bubbles – Y38, Y35, Y32, BG000
  • Hair – C8, C5, C3, C1
  • Skin – E21, E11, E02, E00, E000, R20
  • Snail – W5, W3, W1, E33, E31, R20

Wink of Stella used for mermaid body, clear glitter and 2-way glue pen used for the bubbles.  I used a black gel pen to dot the center of flowers.

Vicki-WSGoldie-Aug1-front

Here’s what the folded and closed circle card looks like.  She will not quite fit into a regular A2 sized envelope because I arranged the circles differently, but a nice 5×5 size would work great.  I do have an envelope creator which is handy for those odd shaped designs that I can custom make.

Hope you’ve enjoyed my card today!

Challenges I’d like to enter this card for:

  1.  Sweet Stampers – Summer (digi and stamp used)
  2. QKR Stampede – #358 Anything Goes
  3. Addicted to Stamps & More – #352 Make Your Mark
  4. Little Red Wagon – Digital Stamps
  5. Crafty Gals Corner – 3+ layers