I is for Ink Blending

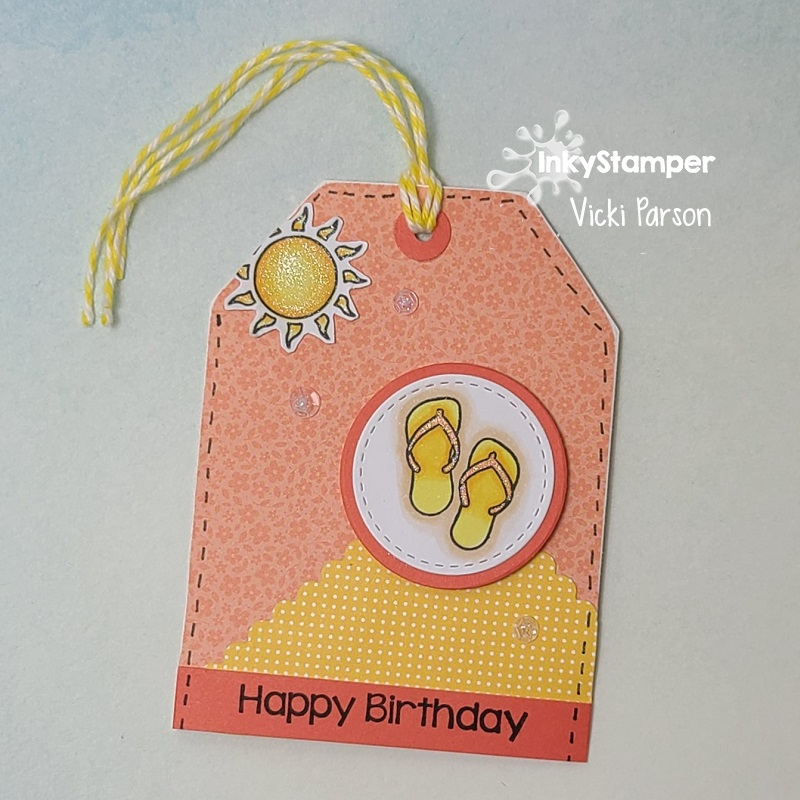
Hello friends and happy August!  Hope you’ve been having a good start to your month so far.  I thought it was supposed to be the “lazy days of Summer”, but it sure isn’t feeling that way lately! LOL Now it seems like we’re getting ready for “back to school” time!  Where is this year going?!

Just wanted to share a new challenge up today over at the Alphabet Challenge Blog!  Our next letter is “I” and the hostess has chosen “I is for Ink Blending”   *Please remember that this is a bi-weekly challenge, so you have two weeks to enter.*  I hope you’ll join in the fun with us.  Here’s the project I’ve made for this challenge:

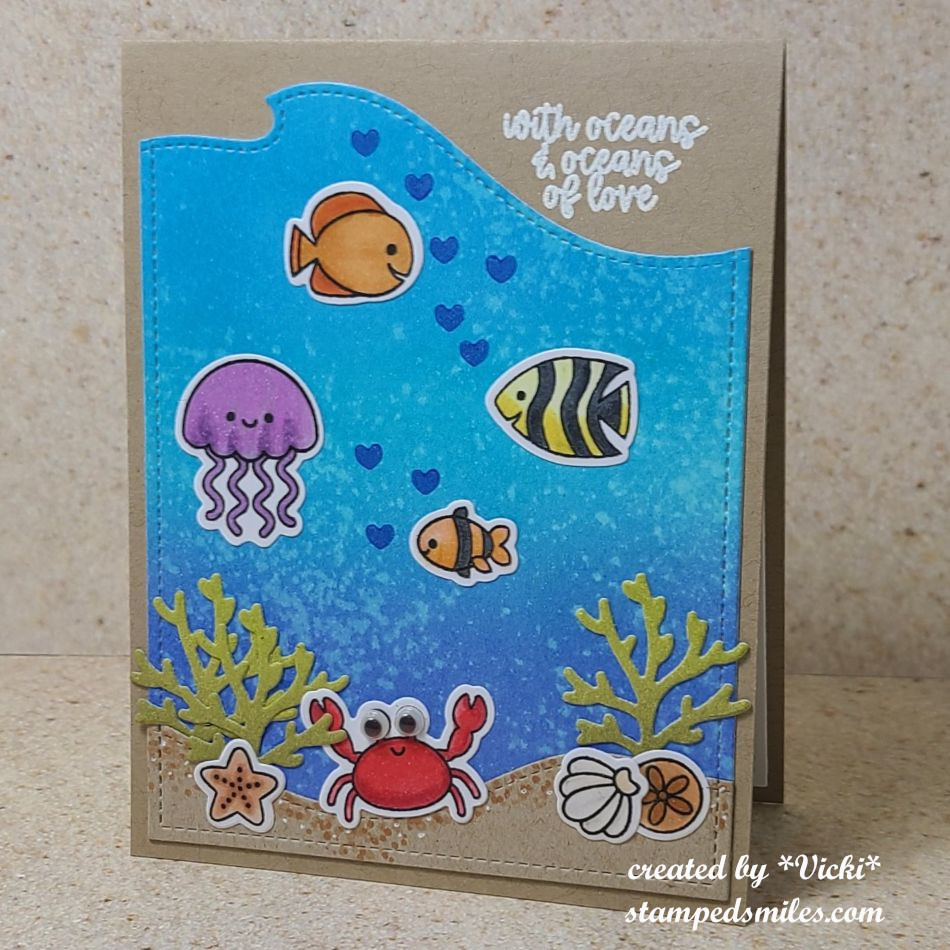
I sure love to do some ink blending!  I love doing the dark to light with a watermark effect especially for ocean scenes.  So I started with a regular blend of blue ink colors starting light at the top and then working my way down to darker blues.  I think the colors used were Tumbled Glass, Salty Ocean, Blueprint Sketch and Blue Saphire Distress Oxide inks.  I then added the “Ray of Light” stencil (MFT store closed) over and ink blended with the same colors.  It was then spritzed with water and dabbed with paper towel for the bubbly look.

BEFORE I started any ink blending at all, I had an “Under the Sea” border die cut (MFT store closed) that I used to create a mask with labeling tape so that I could leave the border at the bottom for sand.  After the ink blending was finished, I ink blended some Antique Linen and Frayed Burlap Oxide inks to create the sand.  I didn’t worry about it getting into the blue area because the colors are much lighter in tone.  After ink blending was done, I cut the panel out with a “Wavy Pierced Rectangle dies” From Whimsy Stamps.

For the rest of the scene, I pulled out these cute ocean critters from Doodlebug called “Sea Life” (purchased from Scrapbook.com) that I stamped, colored with Copics and then fussy cut.  Even though I had the coordinating dies (no longer available), I didn’t want the white border to distract from the ocean scene.  It did come with an extra “seaweed” die in the set that I just cut out in white cardstock and then ink blended some green colors over it to add to the scene.  I also used a white gel pen for highlights and dots in the sand along with a brown marker and glitter gel pen for more details to the sand.

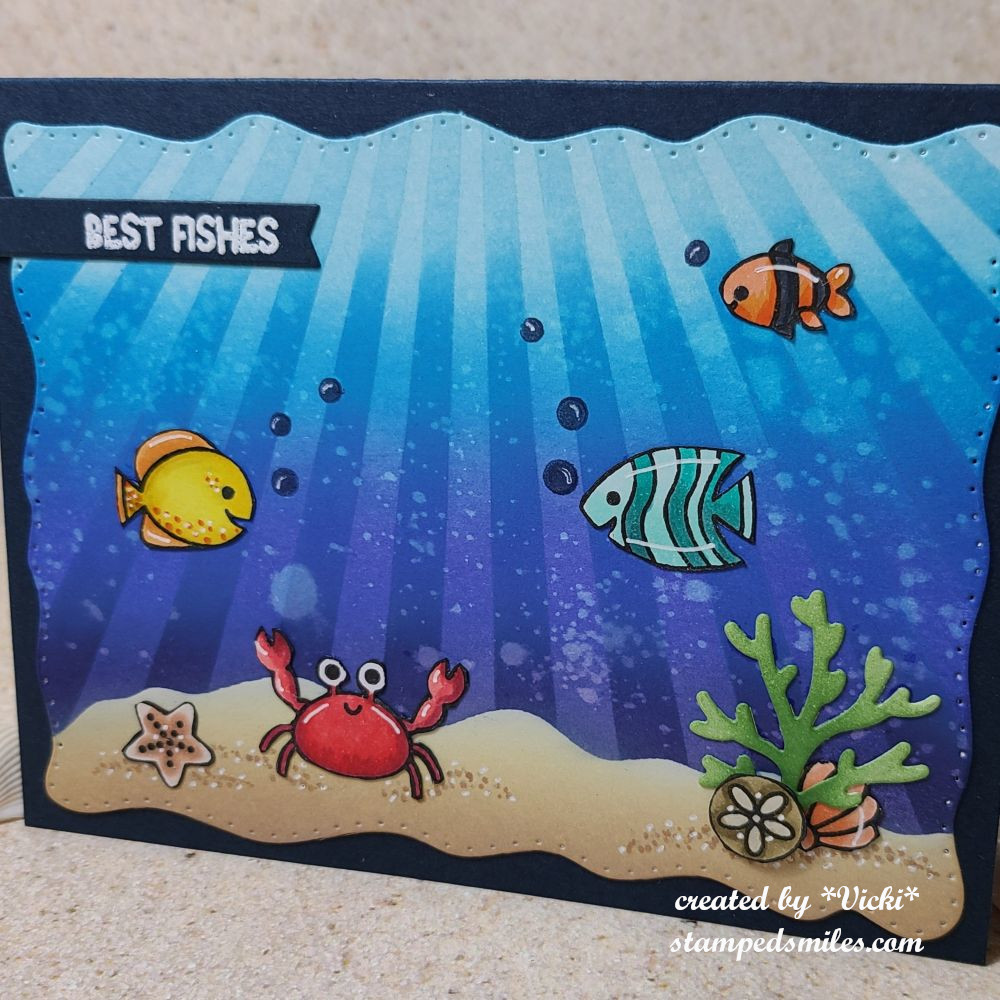
Here’s a closer view of some of the details. I tried tilting it slightly, but it’s hard to capture the sparkle from the sand with the glitter gel pen.

I know this looks really similar to my last post with the mermaid AJ page, but I think I was having some fun with these underwater projects, and I just sat and had a playing session with it.  I do hope you’ve enjoyed my card today and will join us in the challenge for some ink blending fun too!

Thanks so much for dropping by today! Have a great weekend!

Challenges:

  1. Four Season – Anything Goes Summer
  2. Critter Crazy Anything Goes with Featured Critter
  3. Pearly Sparkles Under the Sea
  4. Sweet Stampin’ – Use a Stencil + stamping
  5. Try it On Tuesday – Summer
  6. Cardz for Galz Create a Scene
  7. Crafty Animals Anything Goes with Animal(s)
  8. Allsorts Animals/Anything Goes (various products mentioned and linked throughout the post)

“U” is for Underwater

Hello friends!  It’s already closer to the end of our first month for 2025 and I hope you’re staying warm and/or cozy where you are!  

Today I’m excited to share that I’ve joined the Alphabet Challenge design team!  I’ve been playing along with the challenges for a few years, so this will be a fun one!  Please be sure to check out the challenge blog to see how to play as we go through the alphabet letters every-other week (fortnight) for each new challenge.

Blog Badge

For this challenge, we are at the letter “U” for Underwater and here’s what I’ve come up with:

Now how cute are these smiling underwater critters?!  It was hard to believe that going through my stash that I didn’t have much of any underwater critters besides mermaids, but last year I saw this adorable Doodlebug Sea Life stamp set on sale and decided to add it to my collection.  This is the first time I’ve used it.

For the background:  I’ve taken my Distress Oxide inks and ink blended the colors Salty Ocean, Mermaid Lagoon and Blueprint sketch over some Bristol Smooth watercolor paper.  I sprayed it with water and blotted it up with a paper towel.  I used a stitched wave die cut border at the top and another wavy landscape border die for the sand at the bottom with kraft cardstock.  I’ve used markers and gel pens to create “dots” for the sand and then attached it to the ink blended panel.  Once I had it all attached, I cut out the entire panel with a stitched rectangle die and then attached it to an A2 sized top folding kraft card base.

I stamped several of the images and colored them with Copic markers and die cut them out with each coordinating die.  The “seaweed” was part of the coordinating die set that I inked over in green Oxide inks and then attached all of the images to the underwater scene.

Lastly, I white heat embossed a sentiment from the stamp set (it says:  “with oceans & oceans of love”) in the top corner of the card base and stamped some blue solid hearts from the set for “bubbles”.  I couldn’t resist adding some googly eyes to the crab too.

I hope you’ve enjoyed my card today and hop on over to the challenge blog to play along with us!  I look forward to seeing your underwater creations in the gallery!

Thanks so much for dropping in and I’ll see you tomorrow for my monthly Art Journal Page!

Challenges:

  1. Allsorts – Close to Nature/Anything Goes
  2. Pammie’s Inky Pinkies – PIP2503 Anything Goes
  3. Little Red Wagon – #791 Can You Feel the Love Tonight (love theme)
  4. Critter Crazy Anything Goes with Featured Creature
  5. Crafty Animals – #90 Anything Goes with Animal(s)

Merry Christmas Makes PLUS GIVE AWAY!!!!

Hello friends!  Just wanted to pop in to wish you all a Merry Christmas and to share some final Christmas creations that I’ve made basically within the last few weeks!  Some of these are cards that I’ve sent friends and family and some are recent makes for Craft Roulette challenges.

  • Scroll below this post to see the give away!

First up are the last few weeks of the Craft Roulette challenges:

(I got out my stretchy pants to play along!)😉

(These are money holders for Christmas with recycled wrapping paper)
(This is a diagonal joy fold card design)
(Tri-Panel Card for me was 3 layer panels on the front! LOL)
(Always stepping on those tiny gems on my floor!)

Hopefully the next several cards have been received by everyone they were sent to, but if not, maybe the surprise will be which one you will get!  I don’t like making several at one time, so I’ve split up the design in sessions using the Taylored Expressions Make It Merry Stamp Set along with the Happy Half Sheets: (I’ve made my own “map” with the images)

Lastly, I’ve made several of these photo frame cards using the Lisa Horton Framed Poinsettia Stencils/Die/Embossing Folder: (Using a photo recently taken for our 25th wedding anniversary)

Hope you’ve enjoyed all of my Christmas projects this year and a very special thank you for being apart of the crafting journey with me!  I’m so thankful for the friends I’ve met along the way! 


ALERT!!  GIVEAWAY!!

Since this is the season of giving, I would like to  gift someone that would like to receive this set that I have collected myself (over the entire year as an extra) to give away to someone:

Vicki-December2024-giveawayVicki-December2024-giveawayback

If you’re NOT familiar with Taylored Expressions, this is a collection of the “freebie” rubber stamps that a person receives when placing an order. Each month the stamp image changes to something else.  I have not only collected a set for myself, but I’ve also collected another entire set (12 rubber stamps) to give to someone else that would like one!   I have included the sturdy laminated Collection card, in addition,  a sturdy plastic sleeve in which to store it all in.  Plus, I’ve also included a set of 2025 tear-off calendars in a package of ten to go with it!

You can purchase these in the store here under the Pretty Postage Collection, but I’m giving them all away in one set for the entire year as I’ve collected them.  I did NOT include the Pretty Postage die set that cuts out the images, but you can purchase your own by clicking on the link.

  • If you are interested in this give away from me (no affiliation with any company), please just leave me a comment below to tell me that you’re interested in the give away.  THAT’S ALL YOU NEED TO DO, BUT YOU HAVE TO TELL ME IF YOU’RE INTERESTED IN GIVE AWAY!   
  • You will need to leave your comment below by January 3rd, 2025 to enter.   I will announce here on my blog who won by January 5th, 2025. (The winner will need to be in contact for mailing out prize.)
  • P.S.  If you have been collecting and looking for one you’re missing, let me know which month and I’ll see if I have it as I have several months that are extras! (I know that I do NOT have any August left, though.)

Just wanted to send out a little Christmas cheer to a crafty friend!  It doesn’t matter where you live, I will be happy to mail it out…so please don’t let that stop you!  It’s just a special gift from one crafter to another to enjoy!

Thank you for making my crafting journey a special one and for joining me here to share inspiration with one another!  Looking forward to more in the coming year!

Wishing you and yours a VERY Merry Christmas with lots of joy and love! 

(I will be back after Christmas (Saturday) to share an art journal page with you!)

Mix it Up With Paper Piecing!

**THIS IS POST TWO OF TWO FOR TODAY!  SCROLL BELOW TO SEE MY POST FOR THE GDT CREATIVE ARTISTE.  THANK YOU!**

Hello friends and a happy November!  I think that the last two months completely flew by and here we are getting closer to the end of the year…what?!  I hope that you look forward to happy times ahead and lots of crafting fun too!  I’m thankful you’re here with me, so let’s get this month started.

Today begins a new challenge over at the Mix It Up Challenge Blog and it’s always “Anything Goes with an optional theme“.  The optional theme this time is “Paper Piecing“! (This challenge is open for 6 weeks, so you have plenty of time to enter!)  Here’s what I came up with using this theme:

I absolutely love the look of quilts, but I like to keep my making of quilts done with paper!  So I thought this theme would be great for making a quilt pattern design for Christmas.  I normally paper piece stamped images, but I wanted to do something different this time and pull out more stash items and use them!

Several months ago, I purchased a card kit from Taylored Expressions called “Pieced Patterns” and I loved the concept of cut out squares attached over a “map” to follow along on how/where to place the squares.  It’s really easy to piece different colors/patterns together to make a design.  Some squares were also cut diagonal and I stamped a tone on tone pattern over some of the squares before they were cut out.  Then they were placed over the “map” design and cut out with a square die.  I also cut the stitched scallop frame to go around the square pattern.  I die cut a white snowflake twice to layer in the center of the pattern and added a red gem in the middle of it.

I attached the paper pieced pattern over a white card front that was cut with the Taylored Expressions Pierced Lattice Cutting Plate that was then attached to a top folding A2 white card base.  For the sentiment, I white heat embossed it from the Taylored Expressions Jingle All the Way stamp set and cut it out with the coordinating die.  It was popped up at the bottom with thin foam tape.

I can see this might be fun with several different squares cut out ahead of time to place over the different “map” designs to create multiple design patterns ready for cards!  It’s just a matter of taking the time to cut out all of the squares.


I have decided to create a “bonus” card using the same “paper piecing” technique, but with a stamped image this time…as we all need more Christmas cards, right?!  

For this card, I pulled out an older card kit from my stash (2016) and used the Doodlebug pattern papers that was included with the kit.  The papers are too cute not to use and hoarding them is not a good idea! 

I stamped the tree onto a stitched white rectangle, then stamped the tree, star and banner over some of the pattern paper, carefully cut it out and attached it to the stamped tree and white panel.  Before I attached the stamped pattern pieces, I used my Copics to color in the tree stump and outline around the tree.  I also added some details to the pattern pieces for shading as well.

 The banner was popped up with foam tape and I attached all the layers together over a top folding red A2 card base. All the cardstock/papers were included in the kit. I’ve added some red rhinestones on the tree where the ornaments were to finish it off.

Anyway, hope you’ve enjoyed all of my projects today and I hope you will take some time to check out the challenge blog to see what the other talented designers have made.  I look forward to seeing what you make!  Have a great day!

Challenges:

  1. Inkspirational – #327 Seasonal (Winter/Christmas) 
  2. Pammie’s Inky Pinkies – PIP2443 Anything Goes
  3. Cardz 4 Galz – #237 Showcase Your Patterned Paper (second card)
  4. Crafty Catz – #681 Anything Goes with optional twist: use dies/punches (top card, but dies used on both of them!)
  5. Lil Patch of Crafty Friends – #240 Anything Goes
  6. Penny’s Paper Crafty – #583 Anything Goes Using Paper

Bon Voyage! Blog Break

Hello friends! I have a project to share which is a great send off post for an announcement of a blog break I’ll be taking for the next month🛳️🛫.

I wanted to share a project I made by request of my husband which was to recycle a plain notebook for traveling, so I pulled out some Doodlebug items and had some fun:

This is the front cover of the notebook which I covered with some Doodlebug papers, but I thought it would look way to busy, so I decided to tone down the papers by adding a wash of white paint over it.  I think it makes the stamped images stand out better.

I’ve used a wave border die to cut some blue cardstock so that the boat could be in the “water” and I’ve added the sentiment underneath it.  I stamped and colored the boat and airplane images and die cut them out with the coordinating dies.  I also die cut a few clouds to add to the scene. 

When I attached the painted pattern papers to the notebook, I decided to add an additional strip along the side of the wire spiral before adding the waves.  I then took a black marker to create stitch marks with.

On the inside cover of the notebook, I took some more of those Doodlebug papers and attached them to the inside.  I’ve made a pocket using the same papers that I’ve used on the front cover and you can see how bright and colorful they are which is why I decided to paint over them.

I added one of the cards from the paper pack to the front of the pocket and then I put a few pieces of washi tape with the airplane postage and travel stamps on the notebook paper.

And this is the inside back cover which was done similar to the inside front cover.

If you look inside the pocket of this, you can see that I’ve also made a bookmark for him that I’ve laminated.  He can use it for his notebook or for another book he may be reading.

And here is the back of the notebook.  This is where I’ve added a black elastic closure for the book BEFORE attaching any papers to it.  The strips from the paper pack help to give it a little design and I’ve also included another shallow pocket.

He seems very pleased with it and has already put it to good use including the pockets and bookmark!  He’s already wrote in it too!  I tried to be sneaky and write a secret message on one of the random pages within the book, but he found it too early!  I don’t get much past him!

I have lots of fun papers and ephemera left over from this cute Doodlebug paper pad, so I will probably be using it for a special scrapbook at some point…hopefully more on that later.


I would like to also let you know that I will be MIA for a while as we will be away on a much needed vacation time!

Thank you so kindly for stopping in and enjoy the rest of your summer!

Challenges:

  1. Ally’s Angels – Anything Goes
  2. The Creative Crafters – Anything Goes #79

Lots of Inky Stamping to Catch Up On!

Hello friends!  I hope that you’re enjoying your August so far!  Recently, we’ve been experiencing much cooler temperatures than we normally have this time of year, so it’s been great to go out for a few walks.

I’m ALMOST caught up with things that I haven’t posted, with the exception of a few birthday cards that I’ll share later.  For today, I’d like to share some projects that I’ve made at an event I attended back in April along with a class from Inky Stamper.

But first, here are a few projects I’ve made for their recent challenges:

This is a tag I’ve made for the Inky Stamper Inkspiration FB Group July challenge.  The challenge was to make a tag and I thought I’d try out a fun idea of making a pocket for my tag that held another tag inside so that you could put a message and a gift card.

I’ve used some Limeade Dots/Stripe 12×12 Doodlebug paper to cut it out with and used a border die to help with the pocket decoration.  I cut another tag to place inside the pocket for a special message and to include a gift card.  At the top of the inside tag, I’ve made little “charms” with images from the Inky Stamper Margarita stamp set.  I’ve also stamped the background of the inside tag.  I don’t usually color with pencils, but this time I decided to pull them out.

To get the sentiment to fit around the pocket border, I had to curve the stamp a bit to make it work with the tag.  


Here’s another project I’ve made using Inky Stamper products for both the August Inky Stamper Inkspirations FB Group as well as the Craft Roulette episode #226.  (If you play along with Craft Roulette, Inky Stamper is a sponsor for this month.)

So the Inky Stamper Inkspiration FB Group challenge for August was to use a white pencil.  This happens to be a favorite to use for Chelsea with her images and it does make for a nice quick highlight.  So the images were just stamped on colored cardstock and I used the white pencil to highlight them with.

I decided to combine this with last week’s Craft Roulette Episode #226 with the parameters of – Project: “See-through” (I made a see-through shaker card) Colors: “Jungle” (I used greens and browns for my jungle) Element: “Teacher(s)” (The sentiment says it all!) Random: “Tangle” (There are a tangle of leaves inside shaker element.)

For all of the images, I’ve used the Inky Stamper Monkey stamp set.  The inside of the shaker was stenciled with a Tropical Leaves stencil from Taylored Expressions with green inks.  The circle was cut out with a retired MFT die.  I found some fun monkey shaker elements to put inside.


Back in April there was an Inky Stamper Inky Escape event that I attended and here are some projects that I made from the Make-n-Takes that were provided as well as some of the projects that I was working on using the new release that came out during the event:

(If you are on my website, click each photo to enlarge it and read the captions)

There is actually another Inky Escape coming up in October that I’m attending and I’m sure it will be fun with Halloween and Christmas theme combined!

While I was there, I worked on some more of my own projects using some of the new sets:

I decided to take and use one 6×6 paper pack from my stash and it seemed to go really well with the outer space theme and I love the purple colors from this set.  I’ve used the following Inky Stamper stamps sets:  Astronaut, Big Words, & Alien.

Click on the photos below to see a close up look at each card:


Before the Inky Escape Event, there was also an on-line class from Inky Stamper that I took part in and that’s because I thought the projects were super cute!  Here are the projects that were completed for this class:

These were both created with the Inky Stamper Hedgehog stamp set. The Journal Book ,  the Doodlebug DIY Snow globe and Doodlebug dimensional stickers/shaker balls were all provided with the class.  I decided to add a few extra elements with mine.  The tiny hedgehog on top of the snow globe was included in our box, but not apart of the projects…but I thought it would be fun to add it!


Speaking of Doodlebug, while I was at the Inky Escape Event, Chelsea had a few things on sale and I snagged a kit and special ordered the Doodlebug Frame with it.  So when I got back home and the frame came in, I wanted to do my project right away:

I have this displayed in my stamp room and I love the rainbow of colors in it with the different crafty tools in smile faces!  The size is 8in. x 8in. with a glass on the front.  Although it’s not really that visible in the photo, it is actually quite dimensional.

I think it goes well with the black frame that matches my black frame with the crafty squares swap group I was in.  (You can see that post here.)

Whew!😳 I’ve been really busy this year, but I don’t think you would’ve known this without my posting about it!  I’m glad that I’ve gotten caught up with things that I’ve done and hopefully I won’t be doing posts like this in the future!  It just seems like so much all at once!

Anyway, there we go and now I need to finish and send out a few birthday cards coming up, so I will catch up with that later as well!  For now, thanks so much for stopping in and keeping tracks of my sporadic postings!  I will be back to share a DT post for a challenge coming!

Have a happy crafty day my friends!

It’s Funny and/or a Pun at Sparkles Monthly Challenge!

Hello friends!  Happy weekend!  Wow, it’s been very warm outside and I’ve been spending my time indoors.  I hope to be sharing some more posts with lots of things very soon, so stay tuned in!  Today starts another challenge over at the Sparkles Monthly Challenge blog!

This time was my turn to choose a theme and I thought with Father’s Day, masculine cards are a good way to use those “FUNNNY and/or a PUN” on our cards!  To make someone laugh or at least smile, is the main reason why I love to make cards!  If you feel like having a chuckle with your cards, make one and enter this month!  I can’t wait to see what you come up with!

Here’s my card for the challenge:

Nothing better than a hot French fry, but a French fry with a smile and bow tie is too fun!😆  (This is an American term for this food, but I know they’re called “chips” in Britain…either way, delicious and fun!)

For this challenge, I knew I wanted to pull out a large card kit I had gotten back in 2018 from Simon Says Stamp partnered with Doodlebug to create the I Chews You kit.  (Most of the items are not available any more other than the stamp set that I’ve linked.)  I fell in love with all of the cute images and puns from the Doodlebug So Pun Friends collection!  In this card kit, there was a die that cut out the box and fries.  The sentiments came from some “Chit-Chat Clippings“.

I first took a piece of white cardstock for the front panel and cut it with a wonky stitched rectangle die and placed it over a side folded A2 red card base.  I then took a wonky stitched circle die and cut a circle from the Doodlebug So Much Pun paper pad.  I placed it in the lower right and cut off part of the edge of the circle sticking out past the white panel.

I took the die cut fry box and cut it out in red and white.  I used the white strip to make the band at the top of the box.  I cut out the fries and sponged around the edges and arranged them behind the box and attached it to the circle panel.

The sentiment bubble was inked around the edges and placed in the top left above the fries.  I added a black layer behind the box sentiment strip and cut off the edge sticking out.  Lastly, I thought it would be fun to add a smile face to the fry and then I stamped, colored and die cut a bow tie from my stash to add on the one fry.  I finished it with some Doodlebug Heart Sprinkles.

I really had a great time putting this one together and I hope you’ve enjoyed it too!  Hoping to pull out this card kit again and make several cards with it as there is still so many things in this kit that I never got a chance to play with!  (I have so many things I need to do this with!)😉

Please be sure to check out the challenge blog to see the inspiration from the team and I hope you will take some time to have fun and play along with us!

Enjoy your weekend and thanks for stopping by!  I’ll catch you soon!

Challenges:

  1. Crafts Galore Encore Anything Goes
  2. Pammie’s Inky Pinkies – PIP2423 Anything Goes
  3. As You Like It – With or Without Words and Why? (I feel like this is the main reason to send a card to someone that includes a sentiment.  I especially like the fun and/or pun for sending smiles.)
  4. Tic Tac Toe – TTTC249 (I used first row down:  layers, die cut, pattern paper)
  5. Penny’s Paper-Crafty – #573 Anything Goes Using Paper
  6. Aloha Friday Masculine
  7. Creative Moments – #259 optional twist: Men and Boys

Stretching Out Inky Stamper Products

Hello friends!  I hope that you’re having a wonderful week so far!  We have experienced our very first snow accumulation this year and it was very pretty on the inside where it’s warm! LOL  It wasn’t necessary to shovel as it melted when it hit the pavement/streets, which makes it nice too!  I’m excited to be sharing some more Inky Stamper products with you today as I continue on with my Guest DT for this month.  This time it’s all about stretching out those products you purchase to get even more out of them which I’m sure we all need during this time of the year!

Isn’t this little mouse gnome the cutest?!  I don’t think I’ve seen a mouse gnome before, but this is another brand-new stamp set from Inky Stamper called Gnome, of course!

I’m not only using this same stamp set for both of my projects today, but I wanted to point out that this one above is not a card, but it’s a gift card envelope that I’ve created using the Inky Stamper Mini Envie Die.  I love this die for quickly creating the perfect sized envelope to fit your gift card inside, but Chelsea also comes up with fun mini cards in a lot of her kits that work great for tucking inside this envelope too!  (There’s a brand-new kit in the store that has just came out using one of the brand-new stamp sets making a mini card in her class.)  I also wanted to point out that this die can be cut from one of the 6×6 Doodlebug paper packs sold in the store too!

For the front of my envelope here: I thought it would be fun to create a little scene for my mouse gnome to hang up his stockings!  I took a strip from the Doodlebug Buffalo Check/Wood Grain paper pack to place along the bottom and stenciled some bricks for the background.  I stamped, colored and cut out the gnome with the coordinating die and I punched a small hole on each side of him where his hands are for the string.  I then took some of the “stockings” from the Picket Fence Fireplace Stockings sequins and attached them to the string that wraps around the back of the scene panel.  I added a sentiment from the same stamp set, popped up the gnome and attached to a piece of green glitter cardstock and then attached it to the envelope front.

Here you can see the other side of the envelope that I’ve white heat embossed the deer from this gnome stamp set and sponged some white ink around the edges.  Now to keep the envelope flap closed, you could wrap some twine or ribbon around it, but I love using the Inky Stamper Papercrafting Velcro because it’s the perfect size for this closure and it’s such a great price!  You can see how easily a gift card can fit right inside too!

And here’s another scene I’ve created using this adorable Gnome stamp set, but on a regular A2 sized card this time.

So, as I was using the Inky Stamper Mini Envie Die for my gift card envelope above, I was looking at the other die pieces that come with this set and thought that the stitched triangle die would make for some great pine trees for my little mouse gnome scene.  I pulled out some Doodlebug Gingham/Linen as well as the Doodlebug Swiss Dot paper packs to cut out the triangles and design my scene with the “ground” and “snowy sky” too.  I placed the “sky” paper down first, added a curved “ground” and tucked in my formed triangle pines.  I also tucked in the wooden sign from the stamp set and stamped the greeting over it.  This gnome stamp set also has a tiny pipe that you can die cut out which is just the right size for the gnome.  You can see that I’ve tucked that in behind the gnome’s hand on the right and I added some “smoke” with a marker on the background too.

I thought that the Picket Fence Woodlands sequins would be perfect with our gnome, so I’ve attached a few over the “ground” area.  I also added some Picket Fence Icicles sequins to the “sky” area for the appearance of snowfall in the background.  I also added another white “snowflake” to the center of my gold cord bow at the top. This is a great way to stretch your sequins by making it apart of your main scene.

For the glittery “snow”, I’ve covered the pines, sign, the gnome, the mushrooms and “ground” with some white Nuvo Crystal Drops and then covered those areas with some loose glitter while it was still wet.  The reason for that is because if you just use glitter, it will dry clear, and I wanted some white to show.

  • I hope you’ve enjoyed my mouse gnome projects today and have been inspired to see something different with the products that you have in your stash too!  Thanks so much for dropping in!  Be sure to check out the Inky Stamper Store as well as LIKE the Facebook page to see a live video on Tuesday nights.  There is also a fun InkyStamper Inkspiration Facebook Group to join for more inspiration and fun challenges each month too!

Challenges:

  1. Merry Little Christmas – Anything Goes
  2. Jingle Belles – Funny Ho, Ho (punny gnome sentiments)
  3. Crafty Friends – Christmas
  4. Creative Inspirations – Sparkle, Sparkle, Sparkle
  5. Craft Rocket – Christmas/Winter
  6. Crafty Calendar – Anything Goes
  7. Stamping Sensations – Christmas Celebrations
  8. We Love Stamping – Christmas
  9. Pammie’s Inky Pinkies – Anything Goes

An Electric Connection and Happy Mail Love For Valentine’s Day!

Happy Valentine’s Day friends!  Today is the day all about hearts and love!  Although I’ve already sent out my Valentine cards, I have a couple of lovely individuals who take a peek at my blog from time to time…so I have to wait until they’ve received their cards before I share them here!😉  It’s somewhat hard to “hide” my crafting since hubby’s now retired! LOL  So here’s the cards I made:

I just KNEW the minute I saw this Taylored Expressions Love Lights Stamps & Stencil Combo set that it was something perfect for making cards for my retired electrician hubby!  This set also coordinates with other products and so I started by foiling the TE Foil It-Love Lights panel and then ink blending with the stencil set.  I had to use blue as this is hubby’s favorite color.  So, I’ve used the TE Sprinkles and Potato Chip inks.  The cardstock is TE Sprinkles. (I used softer tones for the Valentine feel.)  I also used the coordinating TE Mini Strips-Watt’s Up sentiment set that was silver heat embossed over the TE Sprinkles cardstock and cut out with the TE Mini Strips-Asymmetrical Die.  I just love the punny sentiments that go with this set!

The tiny light bulb for the accent I used actually came from a TE ‘freebie’ with one of my orders, so I die cut the light bulb with white glitter cardstock and lightly sponged some yellow ink in the center.  I die cut the center and bottom of the bulb with silver brushed cardstock and glued it onto the light bulb.  I die cut a circle from some vellum and also sponged this with yellow ink and glued the light bulb on top of it and attached it to the side of the card nestled with the sentiment strips that were popped up with foam tape.  He will have gotten this one this morning.

And here’s another card that I sent to someone very special!  It’s a simple card, but wow it was so much fun to create with using the Simon Says Stamp Limited Edition Happy Mail Love card kit! (Looks like it’s still available at the time I’m writing up this post, but not sure how long it will stay available.)  I so love those CUTE Doodlebug products and there are so many of them including the stamp set that goes together in this kit!  I wanted to play some more with it, but I have so many other things to focus on, so I’ll have to come back to it later! LOL

I’ve used the Doodlebug background papers from the kit and cut it out with a Lawn Fawn Cross-Stitch die and also cut a strip of ‘grass’ with green cardstock at the bottom using the Lawn Fawn Grassy Border die.  The heart papers were attached over a red piece of cardstock from the kit and layered onto a top folding A2 white card base.  The grass border was attached over the red cardstock and heart background papers.  This gave me the room to take the CUTE Doodlebug LOTS OF LOVE Odds and Ends Ephemera die cut shapes to create my scene with!  This pack came in the kit and there are SO many pieces!  I’m sure you could go on and on making cards!  The bird and bunny die cuts were popped up with foam tape.  It’s hard to see in the photo, but I’ve taken my glitter brush pen to all of the hearts on the images and the cheeks on the cloud.

I think these cards did what was intended which was to create smiles during this cold winter season!  I sure hope that it has done the same for you as well! 😉 Wishing you a happy Valentine’s Day with all of my heart! ❤ Thanks for stopping in and I’ll be seeing you soon!

Challenges:

  1. Moving Along With the Times – Love/Anniversary/Wedding
  2. Creative Inspirations – With Love
  3. The Paper Funday – Anything Goes optional ‘Hugs & Kisses’
  4. 613 Avenue Create – Anything Goes optional ‘Whimsical Valentine’
  5. Everybody Art – Love and/or Heart
  6. Try It On Tuesday – ‘All Loved Up’
  7. Cardz 4 Guys – ‘Love’ cards
  8. Little Red Wagon – Be My Love/Valentines

Huge thank you to those that keep the challenge blogs going!

August GDT for Inky Stamper!

Hello friends!  Wanted to thank you for your kind comments!  Like I previously mentioned in my last post, I’ve still been crafting and following on FB by joining some classes, challenges, etc.  So, although I haven’t been active on my blog, I’ve been crafting and sharing over there once in a while.  Just having some fun while using more of my crafty stash is all!  However, while playing around on FB, this happened:


A couple of weeks ago I was invited to join as a guest designer for Inky Stamper this month! Yay!  If you haven’t heard of this company, check out the stamps…they’re too cute and the owner, Chelsea, is so fun too!  She has such an infectious excitement about her that you can see if you happen to catch her on one of her weekly FB lives every Tuesday at 7:30 pm CST. (On the Company FB Page)

So, I will be sharing my creations using Inky Stamper products every Wednesday this month and I hope that I will be able to INKspire you with something fun!  I’m starting this Wednesday with some products that just recently released:

The first thing that Summer reminds me of is flip flops!  There is a cute little image of flip flops in this Splash stamp set which inspired me to create this shaped card and birthday tag!  That’s also where that cute little mouse you see is from as well!  But the sun and chair come from the Chaise Lounge stamp set, which I’ve combined both sets to use on my creations here.  I think these two sets go hand in hand with each other and it’s probably best to just get them both!  If you choose to get the dies with these sets, it cuts out the mouse and frog separately from the floaties they’re already on so you can pop them up!  So, they work on the floaties as well as the chairs. So cute!

For my flip flop card, I’ve taken a very old template that I had found in my stash while cleaning up my craft room and thought this would be perfect to make a shaped card with!  I started by tracing the pattern for the base of my card and cutting two shapes so that I can make a card that opens from the side as you see in the photo.  The card measures approx. 7″ x 3.5″.  It’s a bit taller than a mini slimline card, but I can easily make my own custom envelopes with my envelope punch board.  This is another fabulous way to use up those hoarded papers too!

I took the smaller template and used the fun Doodlebug Floral & Graph paper pad (Available in the Inky Stamper store too!) to cut the inner flip flop pattern with. (I had to angle the template to make it fit onto the 6×6 sized paper.)  I added a couple of flowers from my stash along with the matching ribbon for the flip flop straps before attaching to the card base.  Colored the images, cut them out and added the sentiment strip at the bottom and cut it to measure with the inner flip flop edge.  I added some texture by sanding the edges of the paper too.

  • Here’s a little tip if you’re cutting out the stamped mouse image from the floatie:  When you use the die to cut it out, the edges around it will have some stamped lines on it where the white border is.  All I did was take a white gel pen to cover up those lines to that it looks like a perfect white line around the image!  P.S.  This is also a great way to cover any coloring mistakes made! 😉  This also works for fussy cutting an image as well!

I popped up “Rosie” (the mouse), as she is called, with foam tape over the chair.  I’ve also added some Doodlebug gems to the center of the flower on Rosie and for the flower at the top of the flip flop card.

I thought this would be a nice summer birthday card so I wanted to make a matching tag to go with it.  I’ve pulled out the Inky Stamper Mini Envie Die and used it for this tag design.  Again, I pulled out the Doodlebug Floral & Graph paper pad and used this die to cut my tag with making sure that the center of the envelope die would be cut out.  This is what I’ve used for the base of my tag.  I like using these papers because they’re double sided. That way the back still has a nice color/pattern to it too.

  • I used this particular die for my tag because of the size.  Putting another strip of paper on the back side of this tag will create a pocket for you to tuck a gift card inside if you want to use it for that!  See below:

Vicki-InkyStamperGDT-flipflop-tagbackpocket

Since there are score marks to make the envelope, I ignored those lines and used my paper trimmer to cut out the center which is where the orange base of my tag came from.  I cut off the top two corners diagonally and punched a hole at the top which created my tag. I also die cut the envelope tag again with the Doodlebug Swiss Dot Paper Pad this time being sure that I had a good portion of the scallop edging cut from it.  I used that piece for a design element on the tag.

I stamped the sentiment and flip flops from the Splash stamp set as well as the sun from the Chaise Lounge stamp set, colored them, fussy cut/die cut them out to add to the tag.  I used a black pen for stitch lines along the edges.  I added my own hole reinforcer circle punched out and then added some Doodlebug Bumblebee Twine to the top. Finished it off with a couple of clear sequins from the Fishy Wishes sequins mix and filled the centers with Nuvo Glitter drops.  I also covered the sun with a Sparkle Glitter Pen.

I hope that I’ve INKspired you today with my summer flip flop theme!  Thanks so much for dropping in here.  If you’d like to see more from this company, be sure to join the Inkystamper Inkspiration FB group!  Hope to see you there!  Have a great day!

Challenges I’d like to enter:

  1. Just Us Girls – Anything but a card (tag only)
  2. Daring Cardmakers – Gift Tags Galore (tag only)
  3. Moving Along With the Times – Summer Fun and/or Colors (orange/yellow)
  4. NBUS #29 – Aug “Never Before Used Schtuff” (never used new stamps!)
  5. Aud Sentiments – Anything Goes + sentiment
  6. Sparkles Monthly – Outdoor Fun
  7. 2 Crafty Critter Crazies – ATG + critter