November GDT for Inky Stamper – It’s OWLright!🦉

Hello friends and happy November!  Really excited to share that I’ve been asked to a be guest designer this month for one of my favorite companies which is Inky Stamper!  Yay!🎉   If you follow along with me, then you’ve probably already seen some of my creations using their products.  Please be sure to click the badge below to be taken to the store! (The characters are so cute!)  I will be adding this badge to the sidebar of my blog here so you can find it if you want to come back to it later.

IS GDT Badge 2022

For my first project this month, I actually pulled out an older stamp set which I think is perfect for this time of year especially when you want to give “thanks” to those special people in your life.

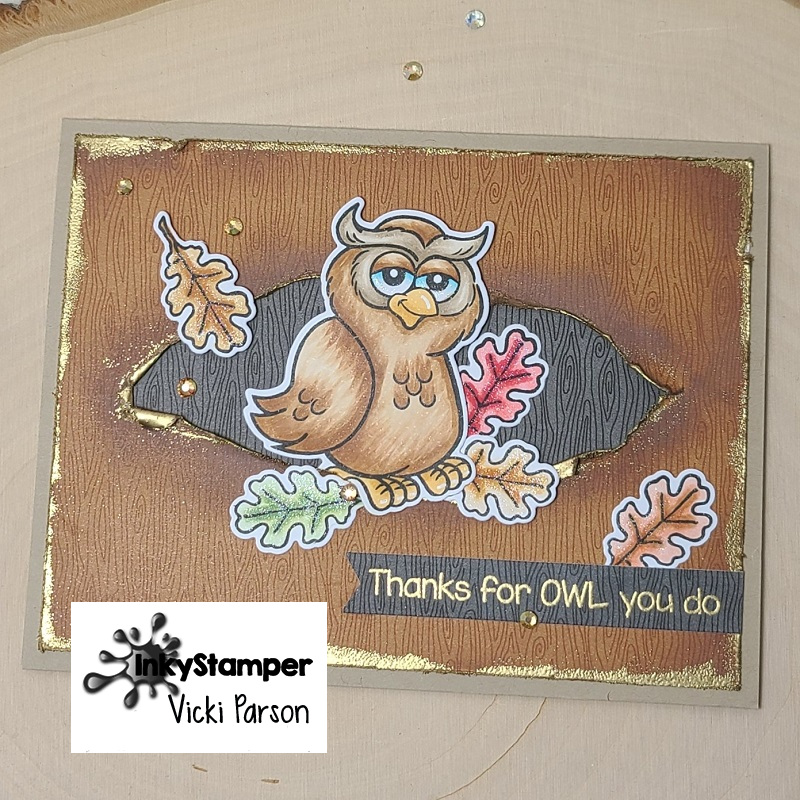
Isn’t this guy with his quirky face adorable?!  I’ve used this fun Inky Stamper Owl stamp set with dies for this card. The punny sentiments that are always with these stamp sets make perfect options!

Have you seen the “Torn Window Card” technique around social media?  I think you could probably find it just about anywhere and not sure where exactly it originated from, but I wanted to try it and give it my own spin by creating a torn hole with a slightly pulled around opening.  Which I thought was a perfect “tree hole” for my quirky owl to pop out of!  What’s fun is that you don’t need any special tools or die to do this…just rip it!

For my papers, I’ve used the Doodlebug Buffalo Check & Woodgrain 6×6 paper pad from Inky Stamper with the brown color for the outside “tree trunk” portion that I ripped the hole in the center for and then another piece of the woodgrain in black for behind the hole which makes it look like the inside of the “tree trunk”.  Plus, I think it makes the owl stand out more.  To rip the hole, I just cut through it with scissors and gauged what size to rip based on my owl image.  I used some brown ink to sponge around the edges including around the “hole”.  I then distressed the edges of the paper as well as lifted/curled the torn edges of the “hole” area.  When I did that, it exposed the buffalo check pattern on the other side of the paper, so then I took my VersaMark ink pad to rub around the edges and gold heat embossed all the distressed edging.  I also gold heat embossed the sentiment from the stamp set over some of the black woodgrain for the banner at the bottom.

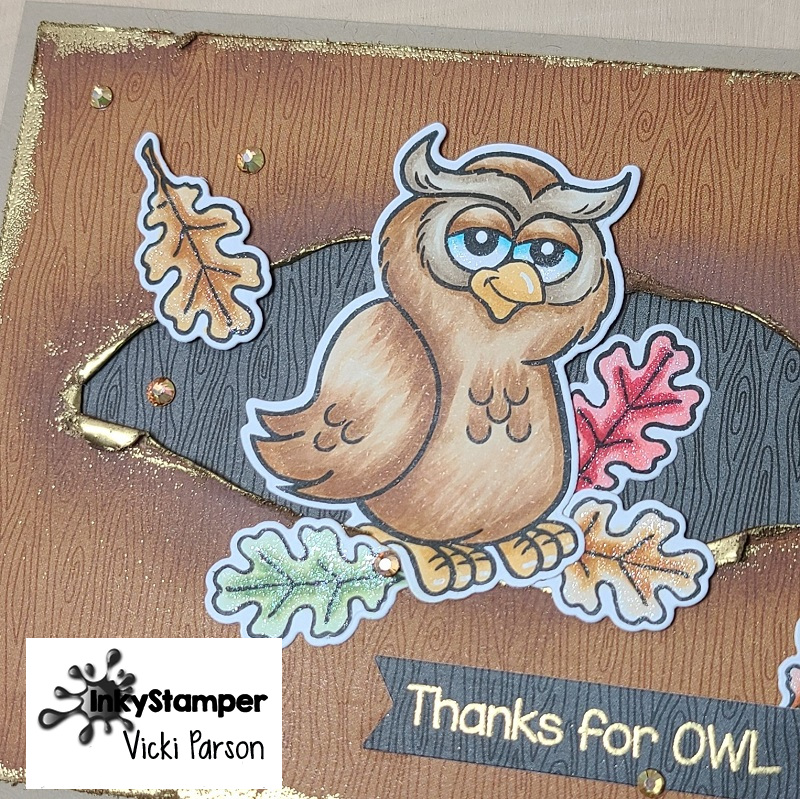
Here’s a closer look at the owl all colored up with Copic markers. I added a few white gel pen marks to his beak and feet.  I also colored up several of the leaves with this set and die cut all the pieces to attach to the card.  I glued the leaves around the owl and then for the owl, I glued the bottom of him over the leaves and then popped up his head with foam tape.  I also used foam tape for the leaf to the left of the owl.

For a little extra sparkle, I painted on (using a brush) some Liquid Pixie Dust for the leaves and the owl’s eye whites. To finish it off, I added some Picket Fence Sands of Time-Gems. (These are a couple of my personal favorite extras!)

I hope you’ve enjoyed my ripped hole owl card today and have been inspired to doing some ripping of your own!

Thanks so much for stopping in and I’ll see you soon!

Challenges:

Beautiful Autumn Color Combo for {Cupcake Inspirations}

Happy Monday morning friends!  Hope you all had a great weekend!  The weather has actually been really beautiful this past week and it was wonderful to get outside and look at the pretty colors of the trees changing around us.  I know that it won’t last long and the temperature will begin to really drop soon…so always need to enjoy it while it’s still here!

CIC506

Today begins a brand new challenge over at {Cupcake Inspirations} and there is a beautiful color palette to inspire your creativity to play along with us!  We’d love to see the colors:  Red, Orange and Yellow on your creations this time and we look forward to seeing what you come up with!  Here’s what I’ve come up with for this week’s inspiration:

I fell in love with these cool dies that were included in a past card kit and thought they would be perfect to use for pairing with some blended inks in a background!

I started with a watercolor panel and used Squeezed Lemonade, Mustard Seed, Carved Pumpkin, Crackling Campfire and Fired Brick Oxide Inks to blend over it.  I spritzed over it with water to form the droplet watermarks and once dried, I splattered the panel with both gold and black acrylic paint using a fan brush.  Once this panel was finished drying, I put each leaf die cut down to cover my panel and die cut it, but left them in place.  While leaving the leaves in place, I used the MFT Wonky Stitched Rectangle Die and cut out the panel with it.

I wanted the leaves to stand out a bit more in the background, so I die cut each of the leaves about 3 times each with black cardstock and layered them together with the ink blended ones on top.

I took the sentiment from the Autumn Bundles stamp set and heat embossed it over a strip of black cardstock with some Gilded EP.  Once I cut down the strip, I ran it through the die cut machine to get the Wonky Stitched Rectangle die marks along the edges.  I mounted this panel over a gold mirror cardstock and then over an A2 sized top folding black card base.  Lastly, I added some gold sequins that were included in the Inspiration Box and filled them with some gold Stickles in the centers. 

Here’s a closer view of the leaves and you can see the pretty embossed pattern in the leaves.

Really like how this turned out and I hope you did too!  Be sure to take a look over on the {Cupcake Inspirations} Challenge Blog to see the rest of the inspiration from the design team and join us for this fun color combo!

Thanks for stopping in today and I’ll see you soon!

Challenges:

  1.  Love to Scrap – LTSCB139 Anything Goes November
  2. Dream Valley – #236 Dies and/or Punches
  3. Arty Divas – #31 Anything Goes
  4. Crafty Creations – #415 Anything Goes
  5. The Paper Funday – #23 Anything Goes optional: Thankful

A Vintage Love

Hello friends!  I hope you’re having a great week!  I must be really wishing for flowers as this seems to be my theme this week!…along with watercolor and heat embossing! LOL!

Today I wanted to share a card I’ve made for my parent’s anniversary:

Vicki-SSSBeMyValentine-Anniversary

As you can see from the card itself, my parents have been married for 55 years.  So when I saw this Simon Says Stamp LE Valentine 2020 card kit, I knew that this would be a great way to start using the kit immediately!  (This card kit is still available as of this posting, but I think it’s going soon!)

I actually really didn’t know what direction I was going to go with this anniversary card and I just started pulling things out and swatching different items to see what I wanted to do.  I sampled the stencil with the metallic paste from the kit and really liked it, but when I pulled out my copper metallic mirror cardstock, I decided to heat emboss over the stencil with the same copper EP that I used on the sentiment for this card.

I’ve also cut out the numbers with the copper metallic mirror cardstock along with the layer behind some of the papers from the card kit.  I’ve added another heart strip of the papers from the kit at the top and used one of the butterflies from the kit to go over the piece of lace I’ve added from my stash.  The layers were all attached over an A2 sized top folding card base.  Lastly, I added some white hearts that were actually from a different card kit.  LOL!

Vicki-SSSBeMyValentine-Anniversary-close

I wanted to share a closer look at the flower.  The stamp set in that card kit is so stunning!  I’ve white heat embossed the flower and leaves over some watercolor paper and then used my Clean Color Real Brush markers to color it with.  I’ve used some foam tape to pop up the flower over the stenciled heat embossed piece that was cut out with a circle die and attached to the card front.

You can see the shimmer over the butterfly wings that I’ve covered with a glitter brush pen.  I only glued the center of the butterfly so that I could pop out the wings a bit.

Vicki-SSSBeMyValentine-Anniversary-flat

Although this card looks a bit simple, there were a few steps to the stenciling and heat embossing some of the elements.

My parents commented how pretty it was, so I’m glad they liked it!

I hope you like it too!  Please be sure to come back to visit my blog this Saturday as there will be a new challenge to share as well as a special blog hop!  Hope to see you there!  Thanks so much for stopping in and I’ll see you soon!

Challenges:

  1.  Simon Says Stamp Wednsday – Anything Goes   (Instagram:  #ssswchallenge)
  2. QKR Stampede – #382 Anything Goes
  3. Allsorts – Take Flight
  4. Creative Fingers – #178 Anything Goes
  5. Watercooler Wednesday – WWC256 All About OccasionsWWC256 - Kath's Challenge All About Occasions
  6. Lil Patch of Crafty Friends – #124 Anything Goes

Autumn Embossed Background

Hello friends!

Here’s what I’ve made for you today:

Vicki-BM-Subbloghop

For my card, I stamped the image and cut it out with a circle die.  I’ve just colored mine up with Copic markers over a piece of White cardstock.

For the background, I’ve used a stencil with EP.

I took the stencil over a piece of white cardstock and covered it with the Embossing Ink and then lifted the stencil to sprinkle the embossing powder over it to heat set.  I cut out that piece and layered it over another piece of white cardstock that I die cut with a stitched scallop die.

Terracotta cardstock was used for my card base and the circle layer behind the image.

Lastly, I’ve added another circle layer with gold glitter paper, popped it up with some foam tape and added some gold thread nested behind it.  I took some gold sequins and filled them with gold glitter too.

Vicki-BM-Subbloghop-close

Here’s a closer look at the image and how I’ve colored it in.  As you know, I like to use my gel pens to add just a bit of sparkle to certain areas of the image and I’ve also added some “dots” around it with gel pens too.

Vicki-BM-Subbloghop-flat

Here you can get a better glimpse of the heat embossed background on the left corner of the card.  It’s a very pretty Fall color and appropriately named “Crisp Leaves”.

Thanks so much for stopping by and I’ll see you soon!

Challenges:

  1.  Brown Sugar – Anything Goes
  2. Crafty Catz – Anything Goes
  3. QKR Stampede – #362 Anything Goes
  4. Simply Create Too – Anything Goes
  5. Crafty Calendar – Add Lots of Layers

Tie a Bow for Cute Card Thursday

Hello friends!  Here we are at another Thursday already!  Where does this time thing go?!  I’m trying to embrace Spring for as long as possible.

Today starts a new challenge over at Cute Card Thursday and this week we’d like to see your “Tie a Bow” creations!  I am a huge fan of ribbon and have WAY too much that I could never possibly use it all in my life time!  LOL!  How about you?  Do you have a big ribbon stash too?

Vicki-CCT581-ADU

So does it feel like we are at the salon?  She’s fashioning her “new do” which I think would be so fun to go have a spa day with mom or your favorite female person, right?!

The sponsor for this week’s challenge over at Cute Card Thursday is All Dressed Up Stamps and I have used this cute image from the store called “New Hair Do” for my card today.  Now although she does already have a bow tied to her hair, I thought this was a good opportunity for me to pull out some of my ribbon and actually tie a bow!  I thought this image would make for a wonderful feminine/mother’s day card too.

I started out by white heat embossing a piece of purple cardstock with a Simon Says Stamp Background stamp called Flower Explosion.  The sentiment on the black banner was also white heat embossed and placed over the design right above the “mom” sentiment that was die cut with silver mirror cardstock.  I layered the purple embossed panel over a piece of black cardstock.

I ran a piece of white organdy ribbon around the two layers and then added the oval cut image panels onto the card front.  I added the tied bow with the organdy ribbon off to the right side and then layered another bow I tied with some silver cord and then topped that with a pearl accent.  All of these layered were attached to a 5″ square white top folding card base.

Vicki-CCT581-ADU-close

Here’s a closer look at the coloring of the image.  I’ve used Copic markers to color her in with and brushed some Wink of Stella over her bow.  (Which is hard to see of course!)  I’ve also taken some tiny pearls and randomly added them to her hair.

The ovals were cut out with the Tonic Studios Basic Oval dies and then I also sponged some Tumbled Glass distress ink around the edges of the scallop image panel before attaching it to the black oval panel.

Vicki-CCT581-ADU-flat

By the way, I have chosen the color theme purple for my card today as it’s my favorite color.  I have actually used many of my favorite items for this card, so I hope you’ve enjoyed it too!  (purple, ribbon, metallic, heat embossing, die cut sentiment, Copic coloring, pearls, florals, background stamps…I have too many favorites! LOL!)   Do you have lots of favorites too?

Please be sure to hop on over to the Cute Card Thursday blog and have a look at the inspiration from the design team and be sure to play along with us for a chance to win something from our wonderful sponsor!  Looking forward to seeing what you come up with!  Thanks for dropping in!  I’ll be back soon with some fun pics!

Challenges:

  1.  All Dressed Up Challenge – (April) Anything Goes + ADU image
  2. All Dressed Up Facebook Challenge – ADU image + use favorite color(s) (purple)
  3. Always Fun – #109 Female/Mom
  4. Crafting By Designs – Girls
  5. Simon Says Stamp Wednesday – For a Special Lady
  6. The House That Stamps Built – Tic Tac Toe M819 (I used first across:  Moms, Black & one color, gems or pearls) or (Diagonal:  Moms, Shimmer or Sparkle & Die Cuts)m819

Imagine…You’re Home!

Hello friends!  I have to say that I’m very happy that we’ve started the month of March and I really look forward to seeing the bit of green and growth soon to come!

Today, I have a card using one of the March New Release stamp sets from Sparkle N Sprinkle!  Have you seen all of the wonderful new products released for this month?  I look forward to sharing more of them with you later on!

Vicki-SNSCottage

Today, my card features this really fun Lil Garden Cottage rubber stamp set [00-943P5] from Sparkle N Sprinkle.  I have colored it up with my Copic markers and I’ve used the packaging from the stamp set to help with color suggestions.  (I really like that when stamp sets have a colored version on their product labels!)

Since last year I’ve been noticing lots of “fairy garden” projects and I am amazed at how many “tiny” items that are available to purchase so that you can create your own little garden!  This image sort of reminds me of that!  I think I like creating my own little “fairy garden” on paper! 🙂  Do any of you like to make Fairy Gardens?

Vicki-SNSCottage1

For the base of my card, I’ve used an A2 sized top folding kraft card base.  I took my VersaMark ink to stamp the tiny mushroom images from the set along the bottom edge of the base.  I also took another piece of kraft cardstock and heat embossed part of the sentiment with the SNS White EP and then cut it out from a circle die.  I set these pieces aside while working on the rest of my card.

Vicki-SNSCottage3

After coloring in the image, I also took the other portion of the sentiment “Imagine…” and stamped it next to the cottage image, but then heat set that one with the SNS Coffee EP.  I also took an additional piece of white cardstock to layer behind the image panel.  For that piece, I took my VersaMark ink pad and sponged along the edges of it and also heat set that with the same Coffee EP as well.  You can also see at the top of the image panel that I’ve lightly blended in some distress ink to soften up the white a bit.

For the sparkly twine at the top, I created it by taking the SNS 1/4″ Tear-ific Tape and twisting it on itself and then I ran it through some SNS Shamrock Glitter.  (If you’ve not seen this before, be sure to check out one of Demo Donna’s videos to see how she does it!)  I took a piece of it to make a bow and then glued it over my design.

I took some craft foam to pop up this image panel a bit before attaching it to the kraft card base.  I also took some more craft foam to pop up the side of the circle sentiment panel as well.

Vicki-SNSCottage2

To add a bit of detail to my image and make it my own, I stamped, colored and fussy cut out each of the mushrooms as well as the snail and then attached them where I wanted them to show up on my image panel.

I used the Nuvo Precision Glue Pen to “color in” the areas where I wanted it to be green and then sprinkled some of that SNS Shamrock Glitter over those areas.  I took the Nuvo White Crystal Drops to add a few “dots” over the red mushroom.  I then took the Nuvo Morning Dew Crystal Drops (dries clear) and filled in the “window” on the cottage as well as the “snail shell” to add some shine to it.

Vicki-SNSCottage4

I hope you’ve enjoyed my card today and that you’ve been inspired to check out the new March release over at Sparkle N Sprinkle!  Be sure to join us over at the Facebook Monthly Creative Challenge group as well as join us for the Sparkle N Sprinkle Creative Challenge blog too!  We’d love to see what you’re making!

If you happen to go shopping using any of these links, please be sure to use my discount code below at checkout!

SnS discount code badge

Thanks so much for dropping in today!!  I’m so hoping that I can get back into catching up with you and getting caught up on entering challenges!  I do miss all of this!

Wishing you a happy day!

Brightening A Rainy Day

Hello friends!  Are you longing for that rainy Springtime showers with lots of flowers because you’re tired of snow?  I know that I’ve been wanting Spring to get here very soon!  I thought I’d bring some of that feeling into my blog post this morning:

Vicki-SNSMayShowersBundle-Feb20-card3

It’s my turn to post on the Sparkle N Sprinkle Blog today…so CLICK HERE to check it out if you want to see my post there or you can read details below too!

~affiliate product links used below~

I started out with my images from these gorgeous stamp sets that were released as a bundle set from Sparkle N Sprinkle this month called May Showers Spring Bundle.  (They are rubber stamp sets which contain both the Showers of Tulips rubber stamp set as well as the May Showers rubber stamp set.  You get a slight discount when you buy the bundle set of them.  There are also digital versions with the May Showers Bundle Digi Set as well as the individual Showers of Tulips digi and the May Showers digi.)

I wanted to incoporate both of these rubber stamp sets into my design, so I heat embossed the parasol image from the Showers of Tulips set and the bows from the May Showers set with SNS White EP over some Bristol Smooth Watercolor paper.  I colored them in with my Zig Clean Color Real Brush markers and fussy cut them out with my scissors and set them aside.

Vicki-SNSMayShowersBundle-Feb20-card3-close

For the background panel, I took another piece of watercolor paper and spritzed it with water to get it good and wet before sprinkling on some Nuvo Blue Blitz Shimmer Powder.  I spritzed it again to really get the water moving around and manipulted the panel so that I could get the water drips going down the panel.  Once this dried, I cut it out with the Tonic Basics Scalloped Square Dies.

Using my cut out parasol image for placement, I heat embossed the sentiment from the May Showers stamp set with the SNS Coffee EP where I wanted it over the watercolor panel.  I then took the raindrops image from the same stamp set and stamped it with VersaMark ink repeatedly over the background and heat embossed it with that SNS Magic Speckle EP.  (Remember this gorgeous pearly sheen it gave to my Winter Deer card from last week?  I told you that I would be bringing it back out for another project!  I am loving the look it gave the raindrops here.  Don’t forget that this powder is a tad bit thicker than normal embossing powder, so heat from underneath your project to help melt it so it doesn’t blow all over.)  I’ve also added some Nuvo Morning Dew Crystal Drops to the center of each drop for more dimension and shine to get a nice wet water look to it!  This was set aside to dry for a bit.

I took another piece of cardstock (slightly larger than the watercolor panel) and rubbed my VersaMark Ink pad along the edges to heat emboss it with the SNS Coffee EP.  I attached these layers together and then glued some craft foam behind it for dimension.

Vicki-SNSMayShowersBundle-Feb20-card3-flat

I’ve used a blue 5″ square top folding card base for my design and took a piece of white doily I had from my stash and glued it on with some SNS Dimensional Glue.  I then added a strip of white cardstock covered with a piece of 1/2″ Tear-iffic Tape going diagnolly across the card base and burnished some Sunny Daze glitter over it.

Finally I added the watercolor and embossed layers over top of the card base and then took my fussy cut images and added them to the design with some foam dots.

I hope you’ve enjoyed my Spring Showers card today and it’s inspired you in some way!  I thank you SO MUCH for dropping in!  I appreciate all of the kind comments and a big welcome to my new followers…love meeting fellow crafty friends!!

If you go shopping at Sparkle N Sprinkle using any of the affliate links above in my post, please be sure to add my special discount code below at checkout so that you can get 10% off your entire order:

SnS discount code badge

Challenges I’d like to enter this card for:

  1.  Cardz 4 Galz – Weather (any condition)
  2. Moving Along With the Times – Little Bit ‘Shabby Chic’
  3. The Flower Challenge – Use Latest Stamp/Dies + flowers (SNS stamps)TFChallenge#29
  4. Pammie’s Inky Pinkies – (PIP1907) – Anything Goes
  5. Try it On Tuesday – “Powder Your……..” (Shimmer powder, Embossing powder)


Find Peace with a Winter Deer for Sparkle N Sprinkle

Hello friends!  As I had mentioned in yesterday’s post, we are currently being hit with snow AND ice over my way…so I might as well embrace it, right?!   Although I’ve been trying to sneak in some Spring creations, I also enjoy creating Christmas/Winter cards throughout the year so that I can take my time and not be hurried during the rush of the Season at the end of the year which makes it more enjoyable…and peaceful! 🙂

*affiliate links used in this post*

Sparkle N Sprinkle has released this gorgeous new stamp set this month called Winter Deer [00-935P5] which I’ve used on my card for today:

Vicki-SnSWinterDeer-Feb

You can also get a Digital Version [DIGI935J] -(includes more sentiments/pre-colored) of this stamp set if you prefer that to rubber, but I have used the rubber stamp set for my card here.  I started out with a piece of watercolor paper and used the Blue Blitz [1208N] and Atlantis Burst [1213N] Nuvo Shimmer Powders to create the background by spritzing it with water until I achieved the look I wanted and set aside to dry.

(You can also see my photo tutorial on the Sparkle N Sprinkle Blog if you like.)

I cut this panel out with an oval die and using my cut out deer for reference to see where I wanted to position the sentiment,  I embossed the sentiment from the stamp set with White EP [EP166]  .  I used some Magic Speckle EP [EP175] for a really cool background effect over the watercolor panel! (You can see it better in the photos below.)  I’ve used both SNS Dimensional Glue [539] as well as foam dots to attach the deer image and oval layers together.  I’ve used both white cardstock as well as some gold mirror cardstock for the layered panels.

Vicki-SnSWinterDeer-Feb-Close

Here’s a closer look at the Copic coloring I’ve done on the deer as well as the Magic Speckle EP effect on the background!  Since it’s a thicker type of powder, I didn’t attach it with anything.  I just added “piles” of it where I wanted and melted it from underneath so it didn’t blow all over.  Loving how it has that “icy look” to it!  I’m using this same EP again soon!  So stay tuned!

For the deer, I’ve used my Tim Holtz 5″ Mini Scissors [816E] to VERY carefully cut this image out and then used a black marker to go along the edges to hide my imperfections. For the snow over the branches, I’ve used a Nuvo Precision Glue Pen [206N] to go over it and then sprinkle some Sparkling Snow Glitter [G1003] over it.  I also took the Nuvo Red Berry Crystal Drops [667N] and covered the “berries” with it.  I set this aside until dry to work on the rest of my card.

Vicki-SnSWinterDeer-Feb-Flat

So for the glittery background panel behind the oval layers, I took a piece of white cardstock and attached it with a piece of the SNS Super Adhesive Sheets [SAS02] and die cut it out with a scallop rectangle die.  I removed the release paper from it and burnished some of the same Sparkling Snow Glitter [G1003] into this panel.  I attached it over another piece of gold mirror cardstock and then wrapped some organdy ribbon around it and attached a bow along the side.

In the center of the bow, I added a snowflake sequins and then put a dot of the SNS Dimensional Glue [539] in the center of it and then added some more of the Sparkling Snow Glitter [G1003].

These layers were attached to an A2 sized top folding white card base and then the oval layers were attached over the glitter panel next to the bow.

I hope you’ve enjoyed my card today and got inspired to keep ahead of making your Christmas cards this year!  Thank you so much for dropping in!  I really appreciate your kindness and support so much!!  (Reading your comments always brightens my day more than you know! HUGS)

If you shop at Sparkle N Sprinkle using any of the links above, be sure to get an extra 10% off your entire order by using my code below:

SnS discount code badge

Challenges I’d like to enter this card for:

  1.  Winter Wonderland – Anything Christmas Goes
  2. Merry Little Christmas – (MLCCB7) Anything Christmas Goes
  3. The Holly and Ivy Christmas Challenge – Anything Christmas
  4. 4 Crafty Chicks – Lots of Layers
  5. Happy Little Stampers – Anything Goes with DiesHLS AG with Dies Badge
  6. Allsorts – Winter Sparkle

Fistful of Flowers From Whimsy Stamps

Hello friends!  Hope that you are having a great week so far!  There is plenty of ice and snow over my way for the next several days, so I thought I would bring a little ‘happy’ today with a “Fistful of Flowers” from Whimsy Stamps!

Vicki-WSFistfulofFlowers-Feb12

Isn’t she the cutest?!  This was originally released as a rubber stamp from Crissy Armstrong, but this month it has been released in digital format now as well!  Weather you like to stamp your images or print them out, you may be able to have both options!  So if you have ever wished that some of the stamps you like would come out in digital form….please be sure to check the website to see if it has been re-released as a digital!

I have to be honest and say that after I had colored in the image, I was struggling with the colors of cardstock I wanted to use and it seemed that anything I picked out wasn’t quite working.  (You ever have this problem?)  My hubby came in to visit me and I told him I was struggling, so he took me over to my paper and picked out these colors and I liked it, so I went with it!  Did he do good?  🙂

I have cut a piece of yellow cardstock out and then took the WS Mom’s Layered Flowers clear stamp set (one of my old faves!) and white heat embossed the background with one of the daisy images.  I wrapped a piece of white ribbon around the yellow embossed piece that was also mounted onto a white 4.25 x 5.5 card front piece.  After wrapping the ribbon around both pieces, I added a bow and this panel was then mounted onto a white top folding A2 sized card base.

The colored image panel was layered with a blue cardstock which I’ve also cut a piece for a fishtail banner and added some daisy accent flowers to it.

Vicki-WSFistfulofFlowers-Feb12-close

                                       This cutie has been colored up with the following Copics:                                         (Click on affiliate links below to purchase from Whimsy Stamps)

I took a glue pen and added some clear glitter over the edge of the flower petals for a bit of sparkle.  You can see that the daisy accents also have some light touches of glitter on the edges as well.

Vicki-WSFistfulofFlowers-Feb12-flat

So I hope you’ve enjoyed my card today and check out all of the fun things going on and coming up with Whimsy Stamps!

WS month of love

Right now there is a fun challenge over in the Whimsy Stamps & Inspiration Facebook Group:  The challenge is to create a love/Valentine’s card using any Whimsy Stamps image that you would NOT typically associate with love or Valentines.  You can enter up to 3 times and it closes on February 28th….click on the link or badge above to go check it out!

AdOpt-Campaign-2019_d28bd22e-f4ef-41ba-b354-ab998355ef51_large

You may have seen this on the sidebar of my blog as I’m happy to help promote this wonderful cause from Whimsy Stamps and wanted to be sure to share with you! (Click on the badge for more information about this fundraiser!)

And don’t forget to check out the Whimsy Stamps & Inspiration Facebook Group to join us in a special event starting February 14th – February 17th

There will be games, giveaways and lots of inspiration to share!  So be sure to click the link above to add your name and share with your friends so they can join us too!  If we reach 250 people “going” to the event, there will be a FREE DIGI to be given away too!!  Hope you can join!!

Here are the Whimsy Stamp Products (affiliate links) used on my card today:

fistful_of_flowers_color_display_1024x1024

moms_20layered_20flowers_20display_1024x1024

WS-Copic display

versamark_clear_1024x1024

EPJ36678_big_1024x1024

Challenges I’d like to enter this card for:

  1.  Crafting With an Attitude – Anything Goes
  2. Creative Fingers – Anything Goes
  3. QKR Stampede – #334 Anything Goes
  4. Crafty Friends – Anything Goes
  5. Pammie’s Inky Pinkies – PIP1906 Anything Goes
  6. Shopping Our Stash – Make Your Mark (colored with markers)


Enjoy the Changes Life Brings

Hello friends!  Back with you today to share a card I’ve made using the January release stamp set from Sparkle N Sprinkle called Early Spring Nest!

vicki-earlyspringnest-cardep-project2

I had so much fun playing with this pretty Spring image and playing with some new embossing powders on this one!

To get the background, I’ve taken a piece of watercolor paper and sprinkled it with some Nuvo Blue Blitz Shimmer Powder and spritzed it with water to also move it around the paper until I got the look I was wanting for it.  I set it aside to work on the rest of my card until it was COMPLETELY dry.  After it dried, I took my Static Free Bag to rub over the area and prep for heat embossing.  I stamped the Crackle Background stamp (Really love the versatility of this image!) with VersaMark and heat set the image with the SNS Robin’s Egg embossing powder.  (Sounded like the perfect product to use for my card!)  I also used my corner chomper to round the corners on this panel.

For the scallop layer behind this panel as well as the layer behind the sentiment, I took my VersaMark ink pad and smeared on a layer around the edges and heat embossed them with the SNS Coffee embossing powder.  I also used this for the sentiment as well as the nest image, so this also works for a nice detailed embossing powder!   I made the fishtail banner layer before I did the embossing with my Tim Holtz 5″ scissors.  I took some craft foam and attached the front base panel to the embossed scalloped layer which was mounted onto a white A2 sized top folding card base.

vicki-earlyspringnest2

Here’s a closer look at the stamped Crackle background with the Robin’s Egg heat embossing over the watercolor background.  I just love the shimmer it has in it!  You can also see the Coffee heat embossed layers.  I love the pretty Copper sheen it has as well as the dark brown flecks in it!  You can also see how well it embossed the fine detailed stamped images too.

There are so many different things going on with the embossing powder on this design that you really need to capture all the different angles throughout the design to see it!

vicki-earlyspringnest1

For the coloring of the image, I just used some Clean Color Real Brush markers for it.  I like to heat emboss the images when I do this sort of coloring as it helps to keep the watercoloring inside the lines and acts as sort of a “well” so that the colors stay where you want them.

For the eggs inside the nest, I took a VersaMarker pen and colored them in with it.  Then I took the same Robin’s Egg embossing powder and heat set the eggs with it.  It really creates a fun and unique look with the blue tint and speckle flakes in it, plus it gives it a nice embossed shine for an “egg like” appearance!

After coloring in the image, I used my scissors to fussy cut it out and then added a couple of feathers from my stash and attached this image over the card front panel with some foam tape.  I finished off my design by adding a few random drops with some Nuvo Dazzling Blue Glitter Drops.

I hope that you’ve enjoyed my card today and thank you so much for stopping in!

Don’t forget to use my code below at checkout when shopping:

SnS discount code badge

Here’s quick list of Sparkle N Sprinkle products used today:

Stamps:

Embossing Powders:

Ink:

Coloring Mediums:

Embellishments:

Tools:


Challenges I’d like to enter:

  1.  Fab ‘N’ Funky – New Beginnings  MISS IT!!!
  2. Not Just Cards – Jan Anything Goes
  3. Crafty Friends – New Beginnings
  4. Stamps & Fun = Creativity – #338 Anything Goes
  5. Pammies Inky Pinkies – PIP1902 Anything Goes