Clean & Simple at Sparkles Monthly

Hello friends!  I hope you’re having a wonderful week so far!  We’ve been getting some rain, which is great for the freshly planted flowers.  I enjoy being able to sit on my covered porch and listen to it rain as long as it doesn’t get too stormy!

Today starts a new challenge theme over at the Sparkles Monthly Challenge!  For this month, we’d like to see your CAS (clean & simple) creations!  I look forward to seeing the inspiration in the gallery, so I hope you can join!  Here’s what I’ve made for this challenge:

Sometimes I can really struggle with a clean and simple design because I always feel like I need to add something more.  The end result is in the minimal embellishments and design.  This one got stuck in my head and came together rather quickly and I like how it turned out.

Most everything used on my card came from My Favorite Things.  I started with watercolor (Bristol Smooth) paper and the Watercolor Wash stencil and blended a rainbow of colors over it.  While the stencil was still in place, I took a water bottle to spritz water droplets over it and removed the stencil.  I let it dry and then clear heat embossed the sentiment that was stamped in a black pigment ink.  (The key to this is to make sure the watercolor area is completely dry before you heat emboss anything over it.)

I cut out the panel with a wonky stitched rectangle die.  I’ve attached it to an A2 side folding black card base.  I was pulled to splatter over this, but thought I needed to keep it simple, so I took some drip drops in “cosmic” color and added them randomly to the design.  

  • So, what do you think?  Simple enough you can do it too and enter it in the challenge, right?  If you need more inspiration, check out the challenge blog to see what the other design team members came up with for CAS.

Thanks so much for stopping in today!  I hope you have an amazing week!

Challenges:

  1. AAA Birthday – #61 CAS birthday card
  2. CRAFT – Birthday (Happy 15th birthday!)
  3. AAA Cards – #265 Anything Goes Birthday (Happy 10th birthday!) 
  4. Pammie’s Inky Pinkies – PIP2419 Anything Goes
Art Journal Inspiration-Fireflies and Gallery full of card classes!

Hello friends!  I hope that your week has been going great!  I had planned on posting earlier in the week, but I got so focused on completing my classes that I ran out of time!  (Check out the gallery below…LOTS of cards!)  I thought while I’m working on laundry today, I’d make a post sharing some things I’ve been doing…so grab yourself a beverage and take some time to enjoy!  First up is my art journal page:

  • Remember that I’m a guest host over at Art Journal Journey this month and the theme that I’ve chosen is “LIGHT“.  I hope you’ll stop over to see all of the wonderful inspiration that everyone has been creating with this theme and join in the fun!  

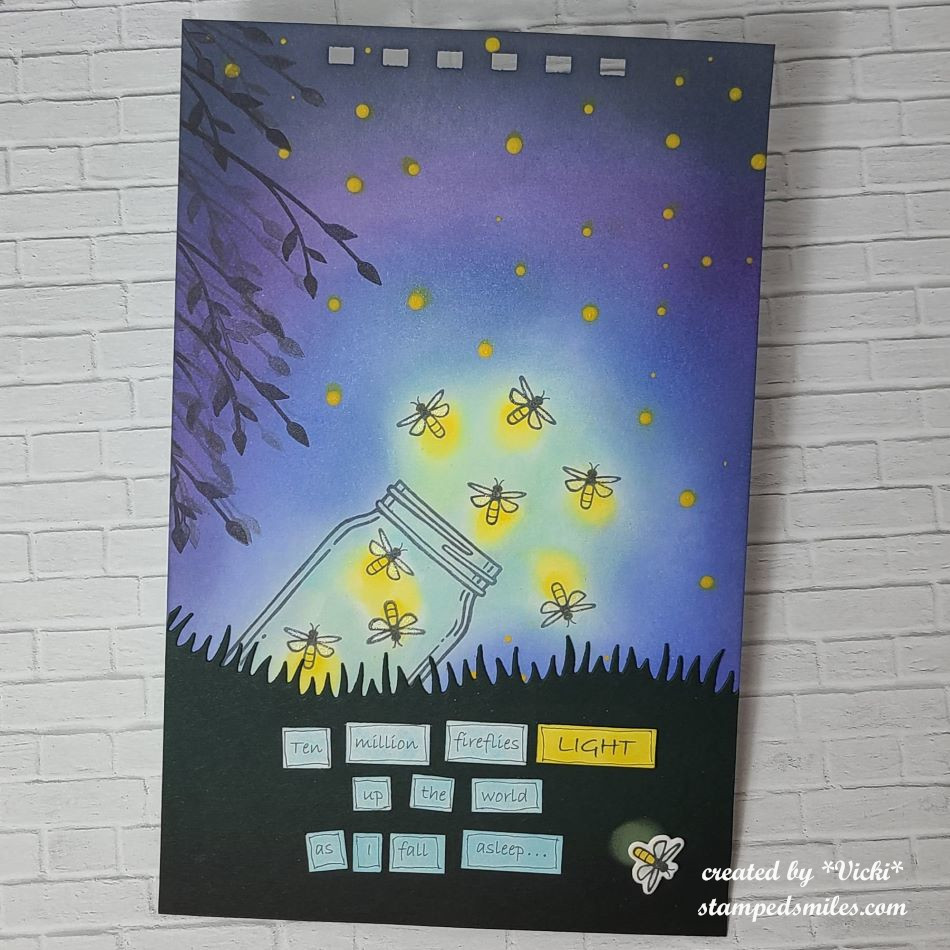
This so reminds me of Summer!  Remember as a child going outside in the dark and seeing tons of those flashing lights going off?!  I was always amazed that when I ran over to chase that flashing light, it disappeared on me and I was forever trying to capture those lights!

For the background:  I’ve chosen some Bristol Smooth cardstock in 5.5″x8.5″ pre-punched holes at the top cut with my Zutter machine.  I have started with stamping the jar and placing it where I thought it needed to be and then stamped those fireflies around it.  Starting with the fireflies, I dabbed on some yellow where they emit light and then used some soft blue around them working out with darker shades of blues as I reached the edges.  Bristol cardstock works great for ink blending with Distress Oxides.  To make sure that the yellow light was showing over the dark ink (without smudging it), I took some yellow paint and the end of my paint brush to make various sized yellow dots for the look of those fireflies in the distance.

I decided to take a leaf branch to generation stamp it along the edge for the illusion of a tree being there.  Although it looks black, I die cut a grass border in very dark green cardstock for the bottom portion of the page.  I also added another firefly at the bottom that was die cut and popped up with foam tape.  I used yellow ink for underneath his light glow.  The firefly wings have been covered with a glitter brush pen.

For the bottom lettering:  I printed it off my computer and then cut out each word, added some color with inks over them and then doodled around each word with a pen.  These words and this AJ page was totally inspired from a song called “Fireflies” by Owl City.  If you’re interested in listening to the song, check out the video below:

I learned that this song artist has insomnia and came up with this song during one of those times he had trouble sleeping.  I can relate and so it inspired my light page.


Next, I would like to share with you a card class event that I took part in called “Celebrations Delivered” provided by Scrapbook & Cards Today magazine.   It was a one day event with virtual live learning class videos and each instructor provided at least 3 different projects.  I have listed below each photo who the class instructor was.  

  • If you are on my website, just click on each photo to enlarge it and see the details about each one underneath the photo.  I have made 15 total cards from this:

Really had fun making these and using the products provided to us.  This also reminds me that I have more classes coming soon that I’ll be doing and that I’ve also forgotten to share some things that I had done last year, but hadn’t posted!  If anything else, you can hopefully enjoy or be inspired in some way as I post!  But more will come soon if my arms don’t fall off!😉

Thank you so much for stopping in today and I’m happy you’re here!  I will be dropping around to see what everyone is up to and I will be back on Saturday for our “Smash Your Stash” AJ inspiration!  Have a wonderful day!

Challenges:

  1. Art Journal Journey – LIGHT/KEEPING IT LIGHT 
  2. Simon Says Stamp Monday – NOT a card (art journal page at top)
  3. Try It On Tuesday – Spotlight It!  (Fireflies are spotlighted with yellow dots)  Hopefully this works for the challenge!

Guest Design for Try it On Tuesday

Hello friends!  I hope that you’ve had a great start to your December month!  I promise I haven’t been hiding, but it’s a busy time of the year and I’ve been doing all of the Holiday things, so my time has been limited.  I’m glad to have just now finished up some Christmas cards!😉

Speaking of Christmas cards, I have something fun to share with you today!

TioT Guest Designer 2023

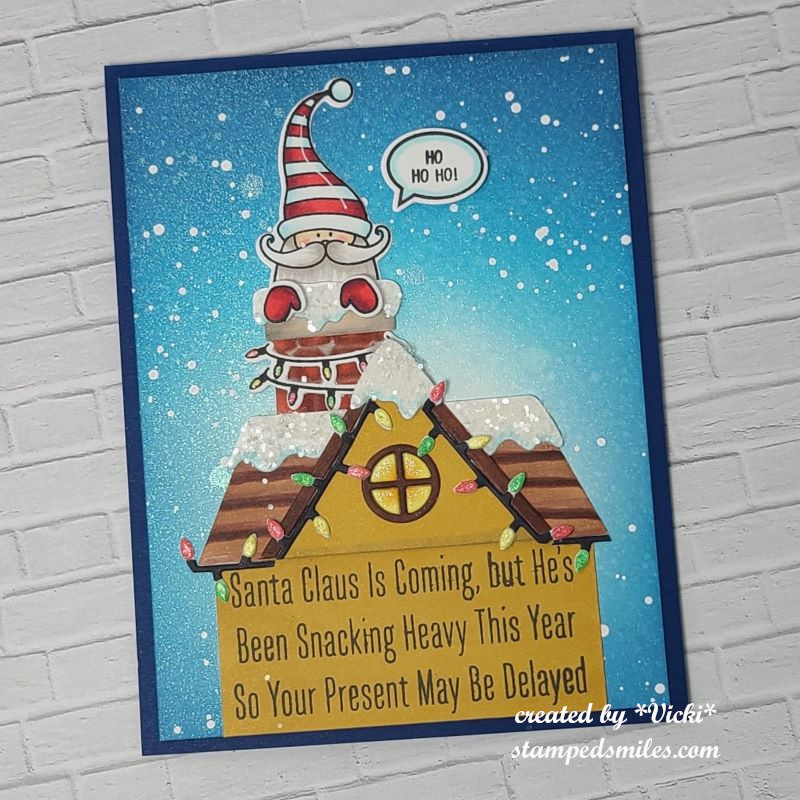
Last month I had won a top 5 in a challenge and was asked to be a guest designer for this Try it on Tuesday challenge!  I really enjoy playing along in the challenges to keep motivated, so I was thrilled!   For THIS challenge, the theme is “Santa Claus is Coming to Town” which inspired me to pull out this fun Santa stamp for a chuckle:

So, this is Santa’s excuse for being late!  Like me, he’s NOT hiding…just delayed!😆

The stamps and die cuts came from an older My Favorite Things card kit I had called “Stuffed Santa“.  I had fun putting this one together and was the beginning of the cards made to send out this year. (It was my plan to be early, but you know how THAT goes!)

For the background:  I ink blended in a couple of blue oxide colors with the center panel fading to the lightest color.  I sprayed the panel with some shimmer spray for that cold frosty shimmer sky.  I then splattered some white opaque Copic mixed with water for the snowfall.

The Santa, hands, sentiment bubble, and lights around the chimney were all stamped and colored with Copic markers.  I die cut them out along with the chimney, snow and rooftop pieces.  I die cut the pieces with white and used my Copic markers to color in the chimney, roof, window and lights around the roof line.  For the sentiment panel on the house at the bottom, I cut it to size and used my Copic markers to color the same as the roof peek.   I added the sentiment to it, and made this the “base” for the house.

To finish it off, I added some chunky glitter to the die cut snow on the chimney and roof.  I also used a glitter pen to add some sparkle to the inside window panels and the Christmas lights.  I also used some foam squares to pop up the sentiment bubble and Santa’s mittens.

Hope you’ve enjoyed my card today and that you’ll play along with this fun challenge over at Try it on Tuesday as well!  Thanks so much for dropping by!

Challenges:

  1. Pammie’s Inky Pinkies – 2349 Anything Goes
  2. Ally’s Angels – Anything Goes
  3. Crafty Catz – #662 Anything Goes
  4. Daring Cardmakers – One Word Prompt: LIGHT (Christmas lights and window light)
  5. Gem of a Challenge – Anything Goes
  6. Inkspirational – Designer’s Choice: Add Glitter
  7. Krafty Chicks – Stamp Act

Grateful & Encouraged

Hello friends!  It’s Thanksgiving tomorrow for us in the United States and I’d like to send a heartfelt Thanksgiving greeting to you all!  I would also like to say a huge thank you to everyone for your kindness and friendship.  I’m very grateful for you and encouraged by your support!

I’ve been working on several things and haven’t spent the time to photograph and share everything yet, but I will be sharing soon.  In the meantime, I’d like to share a few projects that I’ve made in lieu of the Thanksgiving holiday:

I don’t normally send Thanksgiving cards, but it’s a great way to say thank you to someone that hosted a dinner or brought something to share or just spend time with you!  That is the ONLY turkey stamp I own!  The stamp set is called “Sassy Thanksgiving” by CZ Designs at Simon Says Stamp.  I thought the sentiments in it were too cute and funny.  You certainly could make this any type of thank you as well.

This is also a fancy/fun fold card called a “Swing Easel Card”.  I found a tutorial using a vertical style on You Tube here – SWING EASEL TUTORIAL (I also used the same detail of embossing an additional panel with leaves and went over the texture with some gold paste.)

I made another panel for the center area and ink blended some blue that faded out and then splattered some gold paint over it.  I then layered it over a piece of gold that fits in the center panel of the easel.  I gold heat embossed the large sentiment and cut it out with the die.  It was popped up over the leaves.  I also cut an additional strip with the gold for the “catcher” of the front panel of the easel card.  I added the turkey and leaves along with the stamped sentiment on the inside bottom.


Autumn is my favorite time of the year and I enjoy using the colors and images in the cards I make, so here’s more that I’ve made:

I’ve made a couple of encouragement cards to send out to some people and I’ve used a favorite card kit from my stash by Taylored Expressions.  The images come from the stamp set Wheatfield Dreams.  I’ve used an oval die and oval mask to do some ink blending and just cut out the colored image to pop them over top.  Both sentiments were copper heat embossed.

I kept the backgrounds simple with the one on the left stamped with a background stamp from TE and the other was cut out with a wonky stitch die and layered over a green card base.

Hope you’ve enjoyed my creations, and I am so grateful you’ve chosen to stop by!❤️

Challenges:

  1. Creative Fingers – Anything Goes
  2. Lil Patch of Crafty Friends – Anything Goes
  3. Pammie’s Inky Pinkies – Anything Goes
  4. Crafting Happiness – Thanksgiving/Harvest #148
  5. Four Seasons – Fall Season
  6. The Crafty Addicts – Anything Goes
  7. Crafts Galore Encore – Anything Goes
Winter Animals for Sparkles Monthly Challenge

Hello friends!  I hope you’ve had a great start to your November so far!  It’s been a few minutes since I’ve posted, but I have to say that I’ve been pretty busy in the background!  Hoping to share what I’ve been up to soon!

Today begins a new challenge over at the Sparkles Monthly Challenge!  This month, we’re looking to see some WINTER ANIMALS!  I hope you can join in the fun with us!  A reminder that this will be the final challenge for the year as we’ll be on Holiday break until January.  Here’s my take on the theme:

My first thought of a winter animal is a penguin of course!  I’m a huge fan of them and have so many in my collection…including other than stamp related!  These guys are really enjoying winter on this scene!  I’m using the My Favorite Things Playful Penguins stamp set and I started with a stencil from MFT that has “pond” shapes and lightly stenciled the soft blue for a place for my “ice platform” to be.

After creating the “ice pond”, I used some tape to mask off the bottom portion so that I could ink blend a sky at the top.  I used some White Opaque Copic and splattered it over the sky area.  I then used another MFT stencil to create some snow drifts in the background.

The two penguins, igloo, ice pad and sign were stamped, colored with Copic markers and die cut out to be placed over the scene.  I added the flattened penguin to the ice pad and then had the igloo in the background while the sign and penguin are waiting at the side of the pond.  I used a pen and wrote “FREE RIDES” on the sign.

I finished it off with a glitter pen over the “ice pad” and igloo and then used some Stardust Stickles over the snow on the sign.  I thought it needed some more snow falling down, so I took some sequins and added it to the scene.

If I were on that scene, I would probably be more like the flattened penguin on the “ice pad”!😆  How about you?  Do you like the snow?

Thanks so much for joining me here!  I hope you like my penguin card and will sharing your favorite winter animal in the challenge too!  Have a great day!

Challenges I’d like to enter this card for:

  1. Pearly Sparkles – #90 Christmas/Winter
  2. Craft Rocket – #109 Wintertime (No Christmas)
  3. Crafty Animals – Anything Goes with animal(s)
  4. Critter Crazy – Anything Goes featuring a critter(s)
  5. Love to Scrap – #164 Anything Goes
  6. Crafty Calendar – Anything Goes
  7. Creative Moments – Winter
  8. Penny’s Paper-Crafty – Anything Goes

Mixing It Up with a New DT!

Hello friends!  Happy November!  The time is getting closer and closer for Christmas to arrive and so the Christmas cardmaking ramps up!  Have you started on yours or have them done?

new-miucb-designer-badge

I’m very excited to announce that I’ve joined up as design team member over at the MIX IT UP CHALLENGE BLOG!  Woot! 🎉 Really happy to be supporting a fellow blog friend Leslie with one of the many challenges she runs!  Thanks for having me along!  So, I hope you’ll go check it out and play along with us!  The challenges run for 6 weeks which is plenty of time to enter and these challenges are always “Anything Goes” with an optional twist involving a technique of some sorts.  Sounds fun to me!  And I can use any products I like!  Count me in!

For the November challenge this month, we have “Anything Goes with optional stamping (use clear or rubber – no digis)” This is my first creation with the team, and I look forward to seeing what you come up with for the challenges too, so I hope you can join!

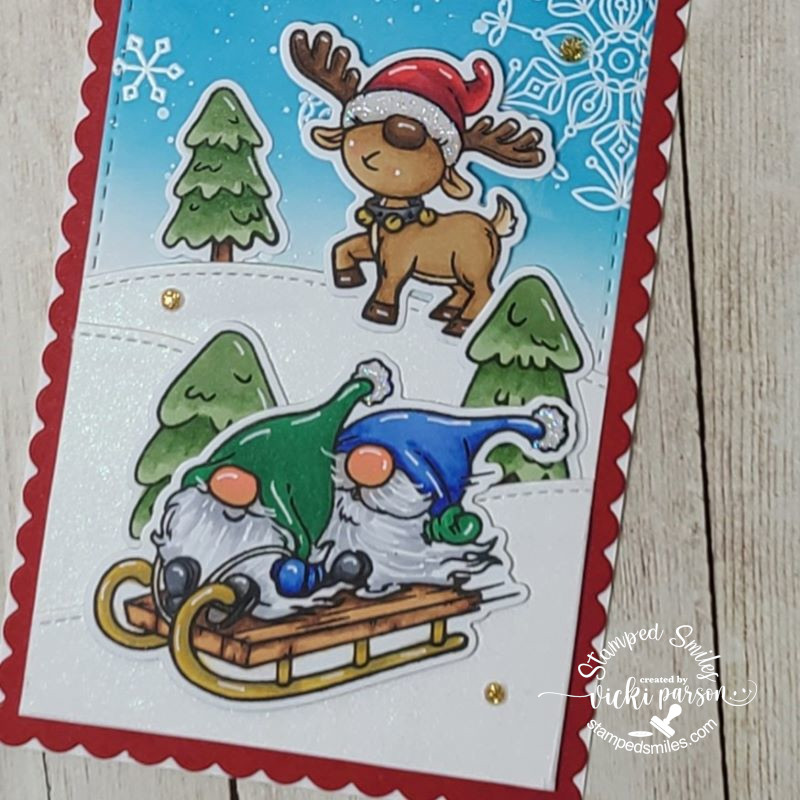
Of course, I love to stamp!  I have SO many and why not use them?!  I was lucky enough to have gotten the STAMPtember Trinity Stamps set called: “Sledding Gnomes” (no longer available) and it was so fun to play with for this card.  I also decided to make it a slimline card which I haven’t made in quite a while.

For the background:  I white heat embossed some snowflakes from the Simon Says Stamp “Frozen Fractals” stamp set (no longer available).  Then I took some Oxide Inks in Mermaid Lagoon, Blueprint Sketch and Chipped Sapphire to ink blend over the embossed snowflakes for an embossed resist technique.  Lastly, I’ve splattered some Copic Opaque white with water and a fan brush.  This panel was cut out from the Trinity Stamps Stitched Card Panels & Window Slimline dies.

I stamped, colored and die cut the characters and cut out some white cardstock using a Lawn Fawn Stitched Hillside Borders die set.  I arranged the slopes and tucked in the trees behind each layer and popped up the characters with foam tape.  I also white heat embossed the sentiment with red cardstock and die cut it out, which was popped with foam tape.

Here’s a closer look at the coloring: (using Copic markers)

Before attaching the stitched slopes to the bottom of the heat resist snowflake panel, I sprayed some shimmer spray to give it a snow look.  I attached this panel to a red piece that was cut from the Trinity Stamps Scalloped Card Panels & Banners Slimline die set.  I then layered both of these panels to a white side folding slimline card base measuring 8.5″ x 3.5″.

Lastly, I’ve added some Stickles Stardust glitter to the gnome hat ends and the hat on the reindeer.  You can see where I’ve added some white highlights with a gel pen and then I took some gold glitter gems and attached randomly.

I hope you’ve enjoyed my project today and will stop by the Mix It Up challenge blog to check out the rest of the inspiration and play along with us this month!  Remember you have 6 weeks!

Thanks for stopping in today!

Challenges:

  1. Crafty Catz – Anything Goes optional: 4-legged critter (reindeer)
  2. Daring Cardmakers – A Bit of Bling (shimmer spray, Stardust Stickles, and gold glitter gems)
  3. Allsorts – Embossing Heat/Dry (heat embossed snowflakes & sentiment)
  4. ABC Christmas – ‘U’ is for “Use it Up” & ‘V’ is for “Vertical” (I made a vertical slimline card and I used up my supplies of sprays, glitters and gems!)

It’s Halloween!

Hello friends!  Tomorrow is Halloween and so I thought I’d share some cards that I’ve made that were sent out to people. 

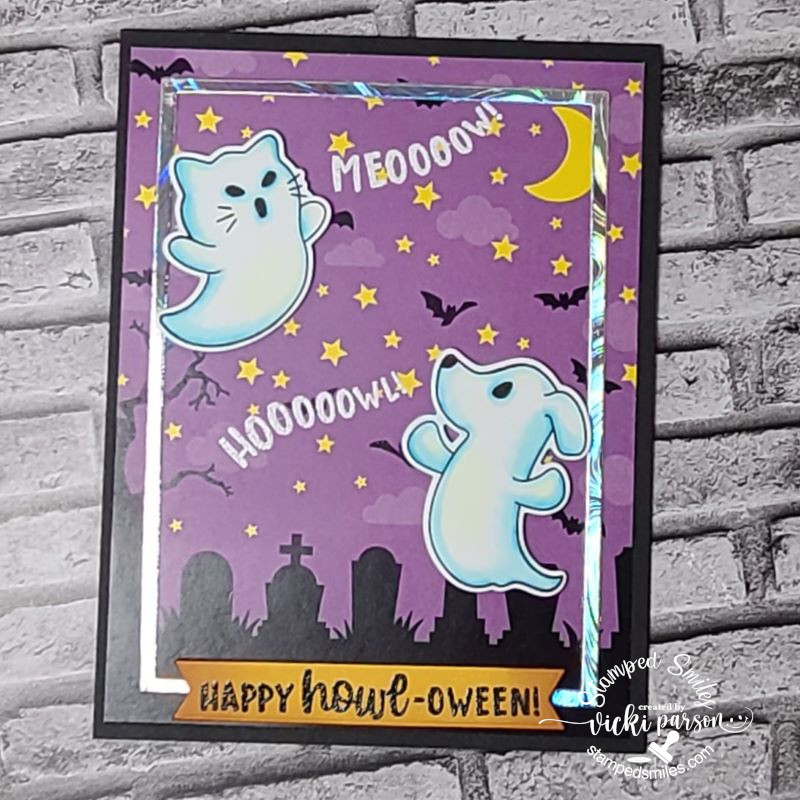
The dog and cat ghosts are too cute from Newton’s Nook!  I love their “howling”!  Not much to color and I’ve used the dies to cut them out and pop over the background with the paper pad from NN as well.  I heat embossed the sentiment over a die cut banner and then added a frame around the edges with some holographic paper.

I made this for someone who loves Halloween almost as much as I do and also has both a dog and cat.  The cat’s name is Spooky! LOL

And here’s another card I’ve made using some Taylored Expressions products.  I first ink blended the background in a couple of blue tones with dark blue around the edges and then splattered some silver watercolor for the stars.  I used a layered moon stencil to the moon effect and then die cut the witch in glitter black cardstock.  The sentiment was white heat embossed and cut out with a banner die.  I’ve also used another frame of the holographic cardstock.

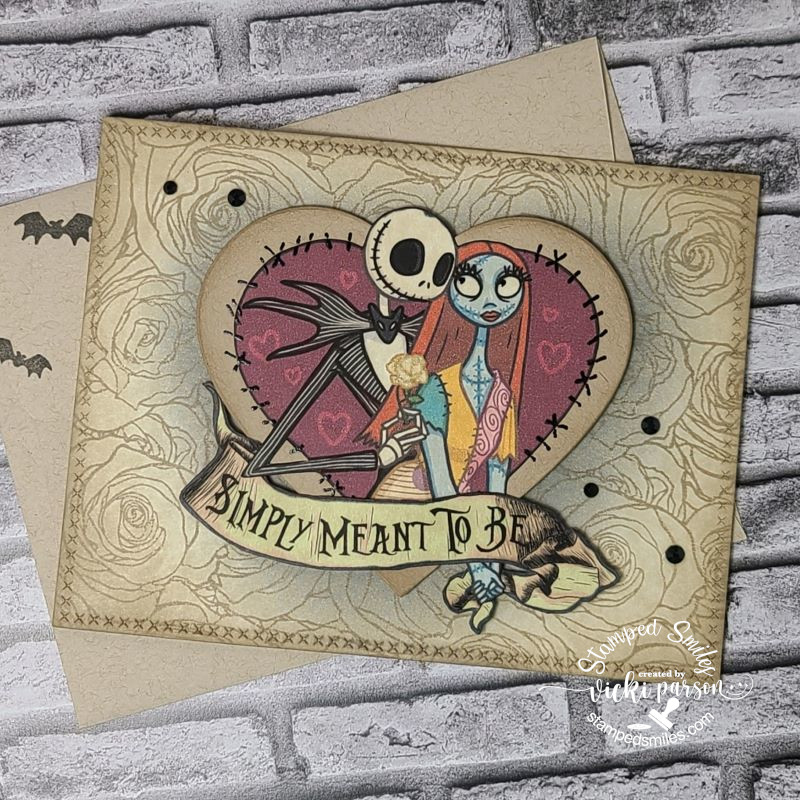
And last but not least, I’ve made this card and not necessarily for Halloween, but this was made for my husband’s anniversary card.  We’ve been married 24 years and we both feel the same about Halloween/spooky things! LOL  I found these fun digital images from Etsy to print out and then I fussy cut part of one to add to another.  I stamped the background with a background stamp I had covered with roses and blended some inks around the heart.  I also added some black gems around it and covered the rose “Jack” is holding with a glitter pen.


Hope you’ve enjoyed my post today!  Thanks for dropping in and I hope you all have a wonderfully fun and spooky Halloween!👻

Challenges:

  1. Little Red Wagon – Trick or Treat
  2. Papercraft – Happy Halloween
  3. Creative Crafting Uncles – Halloween
  4. Penny’s Paper-Crafty – Anything Goes using paper
  5. Simon Says Stamp Wednesday – Anything Goes
  6. Krafty Chicks – All Occasions (bottom card anniversary)
  7. Sweet Stampin’ – All Hallow’s Eve

Alice in Wonderland for Sparkles Monthly

Hello friends!  Hope you’re doing well and have had a great start to September!  It’s hard to believe we’re almost into Autumn already!  I’ve been enjoying the outdoors for as long as I can and Autumn around my area is so pretty, so I need to go out in it!  Crafting will be waiting for me soon!

Today starts a new challenge for Sparkles Monthly with the theme of: Alice in Wonderland!  So I hope that you will stop by the blog to check out the inspiration and join us this month!  Here’s what I’ve come up with:

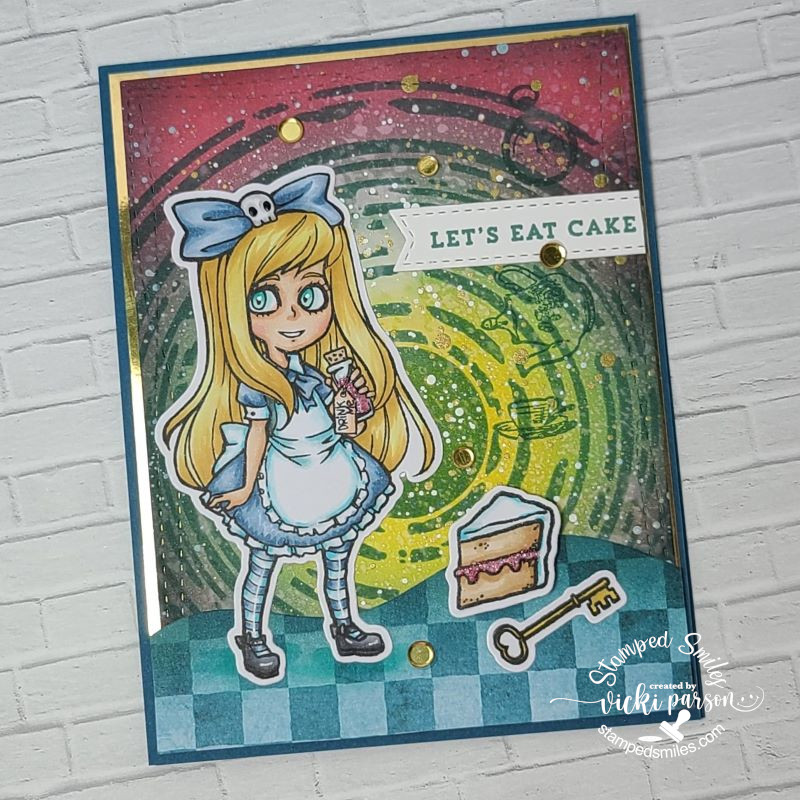
This was really fun to put together!  I have always loved the Alice in Wonderland stuff and I actually have quite a bit of it for crafting, but this stamp set by Visible Image was new to me and something that I had gotten from a win for a challenge I entered a few months back.  I also used the Supernova Stencil for the background from the same company.

For the background:  I ink blended several colored and then spritzed with water for the watermark effect.  I went over it with the stencil in a darker blue ink and spritzed it again.  I then added some gold and white ink splatters over top for more texture.  It was cut out with the wonky stitch rectangle die and layered over mirror gold cardstock.

I had some Alice in Wonderland papers and used s strip of the blue checks to cut out a wavy border and attached it to the bottom of the stenciled panel.  I added these layers to an A2 top folding blue card base.  I had some old-fashioned looking stamps which I had for years and stamped a few on the background in blue ink.

I colored “Alice” with Copic markers along with the piece of cake and key and then used the coordinating die to cut them out and attach to the card front.  I added some pink glitter to Alice’s drink in her hand and the filling in the cake.  I also added some gold sequins over the card.  The sentiment was cut out with a banner die which I thought would make for a fun birthday card.

Thanks for stopping by to check out my card and I hope you’ve got some inspiration with it!  (I’m a bit behind with so many things, so I will be checking out to see what you’re up to!)

Challenges: 

  1. Crafter’s Cafe – Clothing Styles for Children
  2. Lil’ Patch of Crafty Friends – Anything Goes
  3. Alphabet – ‘L’ is for Literature (inspired by a book) Alice in Wonderland
  4. Creative Fingers – Anything Goes
  5. Pammie’s Inky Pinkies – Anything Goes
  6. Penny’s Paper-Crafty – Anything Goes using Paper
  7. Love to Craft – Anything Goes

Sparkles Monthly Challenge-Things with Wings

Hello friends!  I hope you’ve had a lovely Mother’s Day weekend and are enjoying the month of May so far!  I look forward to seeing those beautiful blooms and digging in the garden! 

Today starts a brand new challenge over at the Sparkles Monthly Challenge and the theme is “Things with Wings“!  This is a good one as there’s several ways to interpret it!  Be sure to check out the blog to see what the design team has come up with for inspiration!  Speaking of design team, Caz is looking to add to the team, so be sure to check out the details if you would be interested in joining.  Here’s what I’ve made for the challenge this month:

I thought the butterfly from this Taylored Expressions stamp set called Endless Joy would be so fun to color and use for this challenge.  They were stamped with Copic markers and cut out with the coordinating dies.

For the background, I’ve taken the rectangle masking stencil and blended some blue ink over the center and then I’ve added an additional stencil over top of it and blended bluer to get the pattern.  I then added some raw umber paint and opaque white Copic to splatter over top of it.  I cut out a stitched frame and added it over the blended area.

I added the flowers and butterfly to the card by gluing and popping out the smaller flower as well as the wings on the butterfly.  The sentiment was gold foiled and cut out with a coordinating die that was glued at the top.  I added some highlights on the butterfly with a white gel pen and added some Stickles glitter to the center of the flowers.  The white panel was attached to a top folding A2 white card base.

I hope that you have enjoyed my card today!  I hope that you will stop into the challenge and play along with us this month!  Looking forward to seeing the gallery of wings!!

Have an amazing day and see you again soon!

Challenges I’d like to enter this card for:

  1. Four Seasons – Spring Season
  2. Triple B (Birds, Blooms &/or Butterflies) – Spring 
  3. Love to Scrap – Anything Goes
  4. Unicorn – Flowers
  5. Crafty Animals – Anything Goes + animal
  6. Critter Crazy – Anything Goes + featured critter
  7. Fab ‘n’ Funky – Things with Wings
  8. The Crafty Addicts – Anything Goes

Batty Anniversary

Hello friends!  I wanted to share the anniversary card I made for hubby this year.  Now that I’m posting this (without him knowing), I think I made a bat style card last year too!  It just happens to fit with this time of the year and we got married close to Halloween…so it works, right?!😉  I’m just thankful that we BOTH like Halloween!

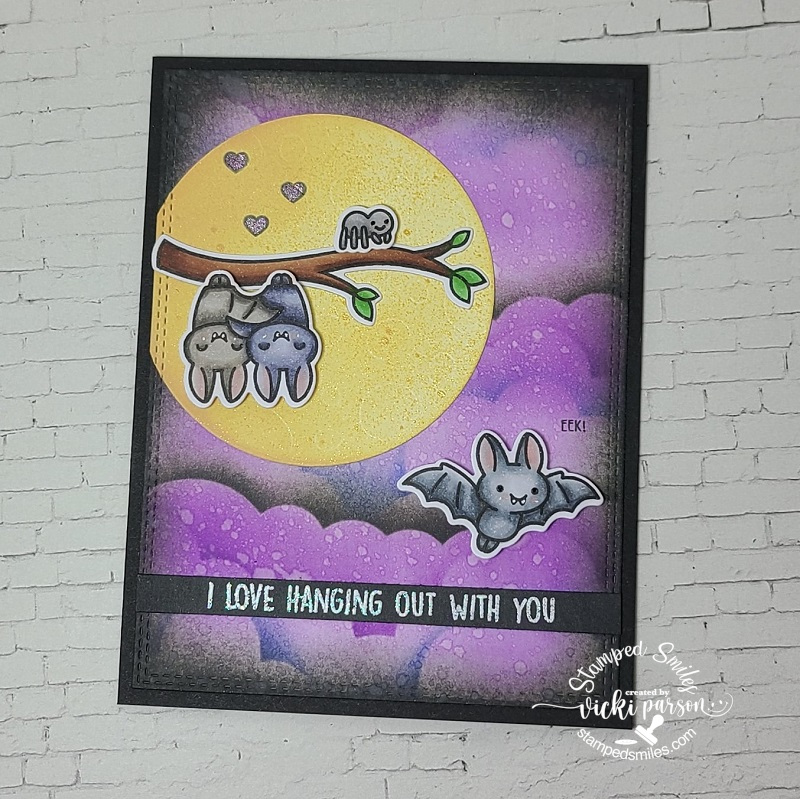
So, I fell in love with these cute cuddly bats (Yep, I said that!) from Lawn Fawn called Fangtastic Friends.  I stamped, colored and die cut out the images that I wanted before I started to work on the background.

For the background, I pulled out a cloud stenciled and mixed purple, black and blue oxide inks to blend in a night sky.  I spritzed it with water for the water droplets.  I then die cut the full moon from the LF Full Moon die set and then used some Distress Mica Stain Harvest Moon and sprayed over it, so it has a bit of a shimmer to it.  I placed it where I wanted to go over my sky background and then cut them both out with a double-stitched rectangle die and attached the panel to a side folding A2 black card base. (The sentiment strip was added before attaching)

The sentiment was heat embossed over a black strip of cardstock using some white glitter embossing powder.

I attached this strip at the bottom of the sky panel and cut off each end.  I added the rest of the elements and images to my scene and stamped the “eek!” by the bat on the right and a couple of hearts on the moon above the hanging couple.  I added some shimmer to the hearts with a purple glitter gel pen.

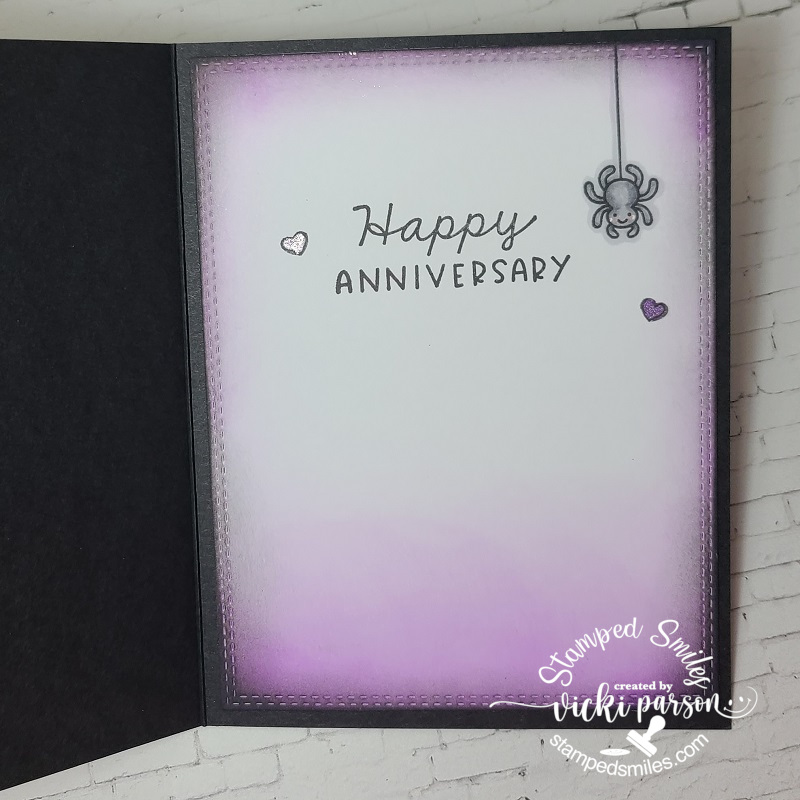
I thought I would share the inside of the card with the stamped hanging spider, the sentiment and the hearts I stamped around it with some more of the purple glitter gel pen coloring.  I also used some purple and black distress oxide inks to blend around the edges of my white inside panel which was also cut out with the double-stitched rectangle die.

I certainly do love hanging out with my husband, but hopefully not in the manner on the card!😅

  • We’re enjoying time together right now as this has been scheduled to post, so I hope you enjoy and thanks for dropping in!  I’ll see you soon!