Winter Animals for Sparkles Monthly Challenge

Hello friends!  I hope you’ve had a great start to your November so far!  It’s been a few minutes since I’ve posted, but I have to say that I’ve been pretty busy in the background!  Hoping to share what I’ve been up to soon!

Today begins a new challenge over at the Sparkles Monthly Challenge!  This month, we’re looking to see some WINTER ANIMALS!  I hope you can join in the fun with us!  A reminder that this will be the final challenge for the year as we’ll be on Holiday break until January.  Here’s my take on the theme:

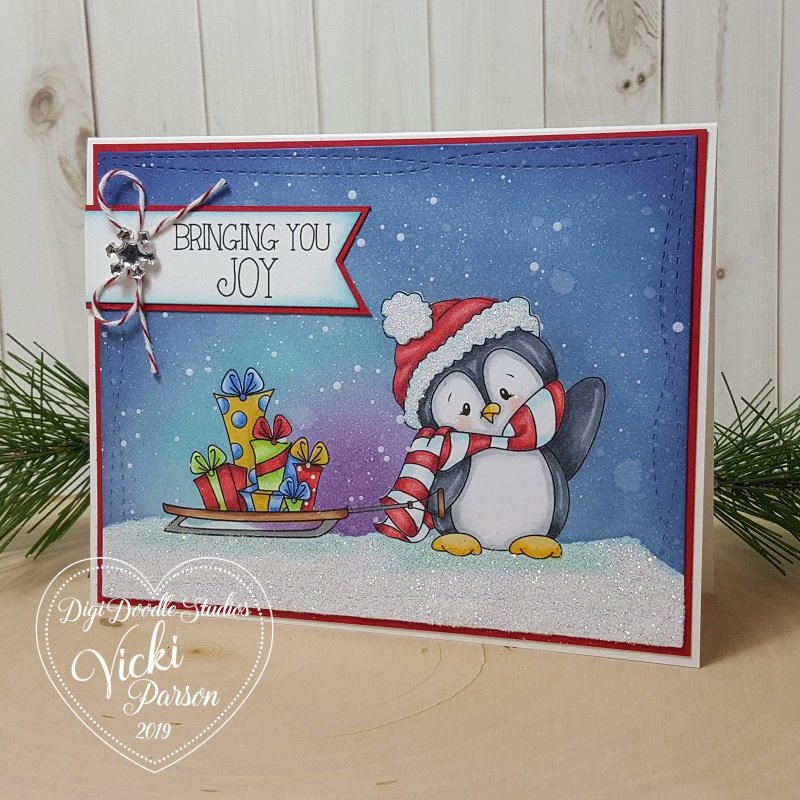
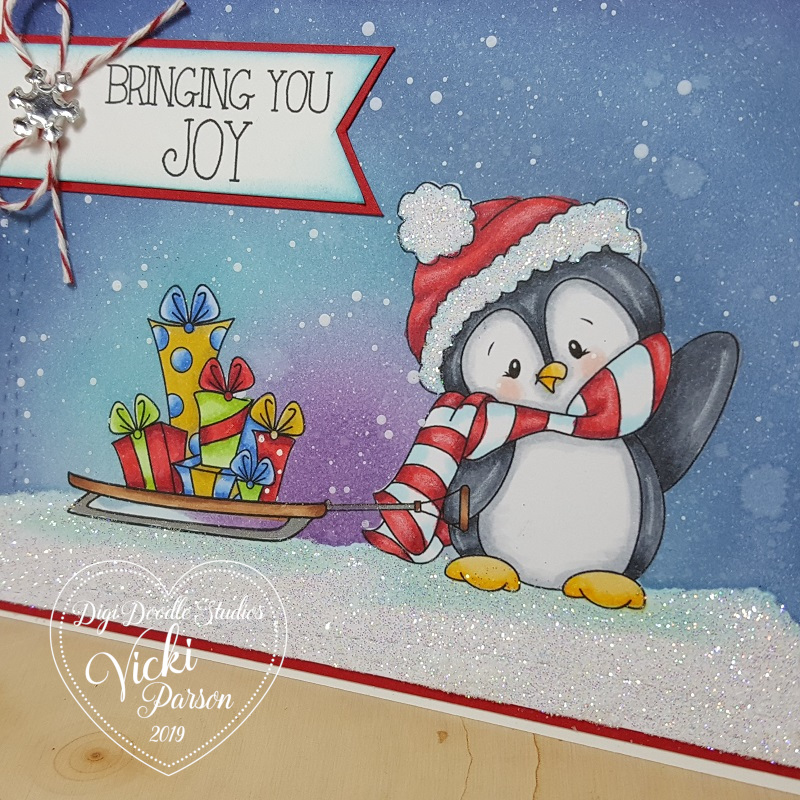
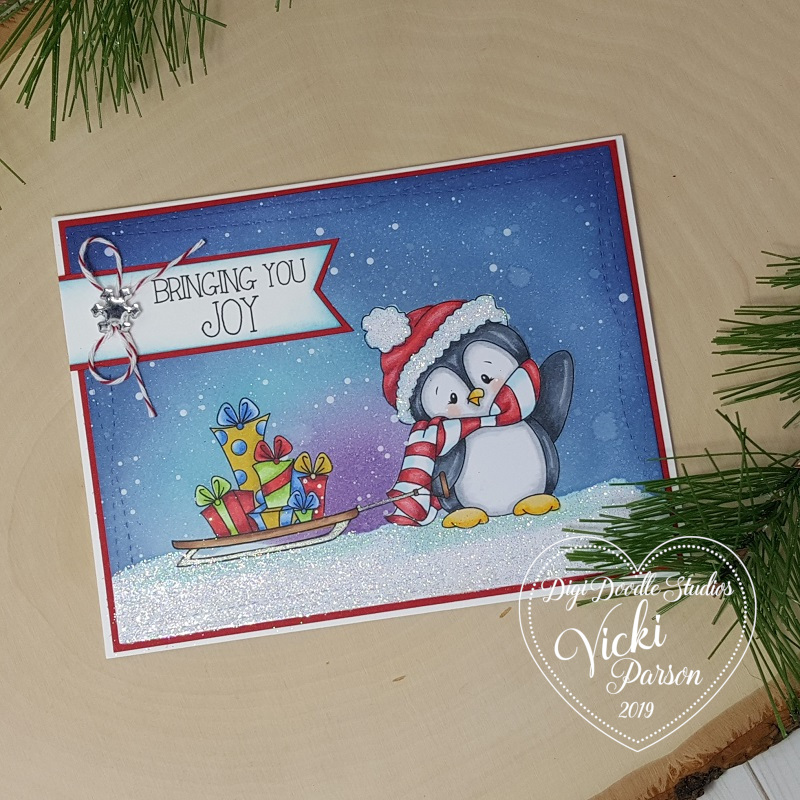
My first thought of a winter animal is a penguin of course!  I’m a huge fan of them and have so many in my collection…including other than stamp related!  These guys are really enjoying winter on this scene!  I’m using the My Favorite Things Playful Penguins stamp set and I started with a stencil from MFT that has “pond” shapes and lightly stenciled the soft blue for a place for my “ice platform” to be.

After creating the “ice pond”, I used some tape to mask off the bottom portion so that I could ink blend a sky at the top.  I used some White Opaque Copic and splattered it over the sky area.  I then used another MFT stencil to create some snow drifts in the background.

The two penguins, igloo, ice pad and sign were stamped, colored with Copic markers and die cut out to be placed over the scene.  I added the flattened penguin to the ice pad and then had the igloo in the background while the sign and penguin are waiting at the side of the pond.  I used a pen and wrote “FREE RIDES” on the sign.

I finished it off with a glitter pen over the “ice pad” and igloo and then used some Stardust Stickles over the snow on the sign.  I thought it needed some more snow falling down, so I took some sequins and added it to the scene.

If I were on that scene, I would probably be more like the flattened penguin on the “ice pad”!😆  How about you?  Do you like the snow?

Thanks so much for joining me here!  I hope you like my penguin card and will sharing your favorite winter animal in the challenge too!  Have a great day!

Challenges I’d like to enter this card for:

  1. Pearly Sparkles – #90 Christmas/Winter
  2. Craft Rocket – #109 Wintertime (No Christmas)
  3. Crafty Animals – Anything Goes with animal(s)
  4. Critter Crazy – Anything Goes featuring a critter(s)
  5. Love to Scrap – #164 Anything Goes
  6. Crafty Calendar – Anything Goes
  7. Creative Moments – Winter
  8. Penny’s Paper-Crafty – Anything Goes

Sparkles Monthly Challenge-Things with Wings

Hello friends!  I hope you’ve had a lovely Mother’s Day weekend and are enjoying the month of May so far!  I look forward to seeing those beautiful blooms and digging in the garden! 

Today starts a brand new challenge over at the Sparkles Monthly Challenge and the theme is “Things with Wings“!  This is a good one as there’s several ways to interpret it!  Be sure to check out the blog to see what the design team has come up with for inspiration!  Speaking of design team, Caz is looking to add to the team, so be sure to check out the details if you would be interested in joining.  Here’s what I’ve made for the challenge this month:

I thought the butterfly from this Taylored Expressions stamp set called Endless Joy would be so fun to color and use for this challenge.  They were stamped with Copic markers and cut out with the coordinating dies.

For the background, I’ve taken the rectangle masking stencil and blended some blue ink over the center and then I’ve added an additional stencil over top of it and blended bluer to get the pattern.  I then added some raw umber paint and opaque white Copic to splatter over top of it.  I cut out a stitched frame and added it over the blended area.

I added the flowers and butterfly to the card by gluing and popping out the smaller flower as well as the wings on the butterfly.  The sentiment was gold foiled and cut out with a coordinating die that was glued at the top.  I added some highlights on the butterfly with a white gel pen and added some Stickles glitter to the center of the flowers.  The white panel was attached to a top folding A2 white card base.

I hope that you have enjoyed my card today!  I hope that you will stop into the challenge and play along with us this month!  Looking forward to seeing the gallery of wings!!

Have an amazing day and see you again soon!

Challenges I’d like to enter this card for:

  1. Four Seasons – Spring Season
  2. Triple B (Birds, Blooms &/or Butterflies) – Spring 
  3. Love to Scrap – Anything Goes
  4. Unicorn – Flowers
  5. Crafty Animals – Anything Goes + animal
  6. Critter Crazy – Anything Goes + featured critter
  7. Fab ‘n’ Funky – Things with Wings
  8. The Crafty Addicts – Anything Goes

One Layer Challenge and More Riley Fun!

Hello friends!  Hope you’re having a great week so far!  I have a few cards to share with you today that I’ve made over the weekend having some fun.

Vicki-InkyStamper-FebCAS

I love the cute little grin this goat has! This goat along with all of the images used are from the same stamp set by Inky Stamper. This month, the Inky Stamper FB group challenged us to create a ONE-LAYER only card…not even ribbon/twine, etc. could be used! I haven’t made one of these CAS or one-layer cards for quite some time, but I enjoyed the play with it.

So I’ve used masking paper to create this by stamping the goat over masking paper, stamping the goat over the front of the card and then placing the cut out masked goat to cover him up.  I then die cut a circle over another piece of masking paper and placed the left over piece on top of my card where I masked my goat image.  All that was left was the circle opening and this is where I ink blended the opening with distress inks.  I also stamped the small line of grass with green ink.

I took off the circle mask along with the goat mask.  I colored up the goat with Copic markers and then I stamped the triangle image from the same stamp set along with the sentiment.  I then added 3 black gems and colored the inside triangles with a glitter brush pen.  I also used my corner chomper to round the two bottom corners.

This last weekend there was another OOAK event and there was another fun card kit from Riley and Co.  I didn’t attend the entire event, but joined in to see what the new release was about while I was making my cards from the kit.  I’m pretty sure that there are no more of these kits left as they sold out of the first batch and had to make more.

The critters are so fun to color, and I really loved these papers from the kit as they have me anxiously awaiting Spring to get here!  I’m bundled up, drinking hot liquids and trying to stay warm, but nothing beats a warm Spring Day! 😁

To get a better look at each one of these cards up close along with what’s going on for the insides, check out the gallery below.  If you’re directly on my blog website, you can click on each photo below to enlarge it:

Just wanted to share my recent makes as I’m still trying to work at finishing up some Valentine cards along with getting going on the wedding invites.  Sure enjoy seeing the wonderful inspiration from everyone and hope that you’re all staying safe and warm friends!  Thanks for stopping in and I’ll see you soon!

Challenges (Top Goat card ONLY):

  1. Challenge Up Your Life – Triangles
  2. Happy Little Stampers CAS – “Inky”
  3. CAS on Friday – Male
  4. Krafty Chicks – Stamp Act
  5. Just Add Ink – Minimalist 

{Cupcake Inspirations} Bithday Celebration Day 12 -Party Ending Soon!

Here we are friends!  This is my final day of inspiration to share with you on Day 12 of the special celebration over at {Cupcake Inspirations} for our 500th “birthday celebration” challenge!!  WHAT A PARTY IT HAS BEEN!! WOW!🧁🎉

Today, we are highlighting with our last but not least sponsor Inky Stamper – Please check out the challenge blog for more details about this sponsor.

The DT was generously given a stamp and die set to use for our creations:

Vicki-CIC500-Day12-InkyStamper

I have used this Oh so adorable Cupcake stamp and die set for my 4.5″ square card design.  So I thought it would be fun to create a fun little scene where you have the mouse coming out of his little “mouse hole” in the wall where he discovers this delicious looking cupcake with the sprinkles falling about! 😂

I started by masking off the middle of the square panel and created the “floor” by ink blending from the middle out.  I then moved my masking by covering that area up and used the negative from an oval die cut area to ink blend the “mouse hole” on the scene.  Lastly, I wanted it to look like a “wall”, so I just took a brick stencil and inked over it to go around the “mouse hole”

I stamped, colored and die cut the image and then popped him up with foam tape over the scene and stamped the sentiment underneath him.  I just glued on the sprinkles for the card.  I mounted the image panel over a die cut scallop square and then added a strip of sparkle washi tape over the card base.  (The scallop square panel was popped up with some craft foam.)  Hard to see in the photo, but I’ve brushed some glitter over the cupcake frosting!

Thank you so much for joining me here every day to check out the inspiration I’ve made from each of our sponsors.  I’m so glad that you took the time to celebrate right along with us!   I’ll be seeing you soon!

Challenges:

  1. The House That Stamps Built – A2620 Anything Goes
  2. Simon Says Stamp Wednesday – Anything Goes
  3. Cute Card Thursday – Inky! (used distress inks, masking and stencils for background)
  4. Creative Knockouts – #365 Anything Goes

{Cupcake Inspirations} Birthday Celebration Day 2

Hello friends!  The celebration continues over at {Cupcake Inspirations} with our feature of sponsors for our 500th “birthday celebration” challenge!!  Woot!!

Today, we are highlighting STAMPlorations & Rachelle Anne Miller Creative Studios – check out the challenge blog for more details about these sponsors.

The DT was provided with an image from STAMPlorations to use:

Vicki-CIC500-Day2-Stamplorations

What could be more fun and happy for a celebration than rainbow colors?!

I was provided with this lovely Framed Tea Cups stamp to use for my card which I’ve colored up with Copic markers using the traditional ROYGBV rainbow colors for the cups.

I also decided to mask off the image and using the ARTplorations Weaving Stencil, I inked over with some Pumice Stone Distress Ink and then cut out the panel with the CUTplorations Crazy Double Running Stitch Rectangle die that was barely trimmed along the edges so that I could layer it over a black A2 sized top folding card base.  I also took one of the images from the Scribbly Splattery Grunge stamp set and randomly stamped it a few times with black ink before attaching the panel to the card base.

Lastly, I used the CUTplorations Celebrate Word die to cut out the sentiment with silver foil cardstock and attached it to the bottom of the card and then I added some silver sequins to the design.

Thank you for stopping in today friends!  See you tomorrow!

Challenges:

  1.  STAMPlorations Never-Ending Challenge – Anything Goes + STAMPlorations product
  2. Crafty Friends – #142 Anything Goes
  3. Creativ Fusion Arts & Crafts – #20 Anything Goes
  4. Cute Card Thursday – Bright Colors
  5. Seize the Birthday– Rainbow Colors or Anything Birthday

Nautical for {Cupcake Inspirations}⚓

Hello friends!  Happy August!  Really hope you’ve had a nice weekend!

Today starts a brand new challenge over at {Cupcake Inspirations} and the theme this time is “Nautical”!

I love the nautical theme and looking through my stash, I came across this older stamp set that someone had gifted to me and I thought I’d pull it out to play with:

Vicki-CIC499-nautical

This image is from Inkadinkadoo called “Down by the Seaside” that I’ve inked up in black ink over a piece of white cardstock.  I used some masking tape to mask off the areas around the lighthouse to make the “light beams” and then used my ink blending tool to go around the edges with blue inks with the darkest color closest to the edges.

I’ve die cut it out with a Taylored Expressions Frayed Edge Stacklets dies and then I popped it up with foam tape over a hand ripped red piece of cardstock that was sponged around the edges with white ink.  Before attaching the top layer over the red, I’ve added some twine around it and made a bow with a compass charm (by Tim Holtz) attached over top of the image panel.

These layers were attached to an A2 top folding Navy card base that I’ve stamped a compass image from a Stampin’ Up! stamp set called “Wherever You Go” with white ink.  I’ve also used a sentiment from this same stamp set and stamped it over the image panel in the top right corner with black ink.

Vicki-CIC499-nautical-close

Here’s a closer look at the image where you can see the sponging I’ve done on the background.  The rest of the image was colored in with Copic markers in certain areas.  I didn’t want to use too much color as I didn’t think it really needed it.

Hard to tell in the photo, but I’ve covered the water, sun and lighthouse “light beams” with a glitter brush pen.  You really notice it IRL when you pick it up and move it around and see the sparkle.

Vicki-CIC499-nautical-flat

I hope that you’ve been inspired with my creation today!

Thanks so much for stopping in and I’ll be seeing you soon!😉

Challenges:

  1.  Arty Divas – #27 Anything Goes
  2. Watercooler Wednesday – WWC282 Anything Goes
  3. Simon Says Stamp Wednesday– Anything Goes
  4. Krafty Chicks– #518 Anything Goes
  5. Creative Knockouts – Tic-Tac-Toe #361 (I used bottom row across: distressing, sentiment, twine)

Bringing You Joy With Digi Doodle Studios

Hello friends!  I hope you are having a wonderful weekend!  It’s getting closer to the big day now!  Only 11 more days until Christmas!  If you’re like me, then you wait until the last possible minute to mail out all of your Christmas cards!   So guess what MY plans are this weekend?! LOL!  Have you got all of your Christmas done and ready to go?  I keep telling myself that NEXT year I will be prepared! LOL!

To help inspire those that are still looking for a fun and simple Christmas card, I have a cute one to share with you today using a Pairables set from Digi Doodle Studios:

Vicki-DDSWintertimePenguins-Joy

You probably remember not too long ago the fun tags I made on THIS POST.  I’ve used that same Pairables Wintertime Penguins digital set that I’m using on my card today!  I love that you can get a whole set of digital stamps that coordinate together so that you can use them to create fun scenes or have them doing different things!  Do you recognize the sled that this penguin is pulling full of gifts?  I took that same sled image and used it as “ice skates” for the penguins feet on my tags in the previous post!  That’s how fun and versatile this set can be!

This time my card is really simple.  I just arranged the images how I wanted them on my computer and printed it out.  I printed it again over some masking paper so that I could mask off the images to create my background.

To create the background, I ripped a piece of the masking paper to go along the bottom of the die cut panel after I masked off the images.  I used ink blending for the background and then spritzed with water and dried it with a towel.  I then took watered down white paint and splattered it for the snow effect.

Once it was dry, I removed the masks and colored up the images, made the sentiment (also from this same digital set) banner and mounted both pieces with some red cardstock which was mounted over an A2 sized white card base.  I added some glitter to the snow ground at the bottom and on the penguin’s hat.  Topped it off with some twine and a snowflake rhinestone.

Vicki-DDSWintertimePenguins-Joy-close

Here’s a closer look at the coloring details of the penguin and his sleigh full of gifts.  I used a white gel pen for dots on the one present and his cheeks.  I also took some pencils for a few highlights.

I kept this card flat except for the sentiment banner so that I can mail it better.  You could even leave it more flat than that if you prefer.

Vicki-DDSWintertimePenguins-Joy-flat

If you know me, then you know how much I love penguins.  I have a special collection of stamps and will probably always keep them around.

I hope you’ve enjoyed my card today and perhaps this little cutie has brought you some joy too!

Thanks so much for stopping in today friends!  See you soon!

Challenges:

  1.  Arty Divas – Anything Goes
  2. Tales From the Craft Room – It’s Christmas!
  3. Penny’s Paper Crafty– Anything Goes
  4. Cardz for Galz – Cute Christmas
  5. CRAFT – Christmas Present
  6. Let’s Craft and Create – Anything Goes with optional:  “Let it Snow!”
  7. Crafting With an Attitude – Anything Goes
  8. Winter Wonderland– Anything Christmas Goes

Fussy Cut Falling Flowers for Fall

Hello friends!  Happy weekend!  I’m actually excited about it being the weekend!  This weekend is a nice long holiday weekend so I can spend time with hubby!  Yay!  However, I won’t be resting on my blog as there are lots of fun things going on since it’s the start of a new month!  So be sure to keep stopping by to see what’s going on!  🙂

Today I took out some flowers and fussy cut them and colored them in happy Fall like colors.

Vicki-BM-InkedFallFlowers

I’ve taken this Flowers stamp set and settled on about 3 different sized floral images to work with along with a couple of leaves.  I’ve colored them with Copic markers and then cut them out with my scissors…I set them aside.

I took a piece of white cardstock along with some masking paper and began working in the flowers for the background with Black Ink.  I made a mask for them as a went along and worked my way up.  After I was done, I took an ink foam blending tool and some soft blue Ink to sponge around the top and side of the panel.  I attached the flowers on with glue and some foam tape.  (I used thicker foam tape for the largest flower.)

For the banner, I heat embossed the sentiment from a Sentiment stamp set  over some Black cardstock with white EP and cut it into a banner and attached it to the card.  Lastly, I attached the sequins and then added some gold glitter to the centers.

I attached the white floral panel over a piece of yellow cardstock and then mounted that over an A2 sized top folding black cardstock base.

Vicki-BM-InkedFallFlowers-close

Here’s closer look at the flowers and how I’ve colored them in.

You can better see the sequins that I’ve used.  I actually had one of them laying on my table while I was assembling this card and thought the color matched up nicely with it.  Otherwise, I would’ve never thought to get those out to use on this particular card!  You never know what could be lurking on your table un-used! LOL!

Vicki-BM-InkedFallFlowers-flat

I hope you’ve enjoyed my card today!  🙂

Enjoy your weekend and I’ll see you tomorrow!!

Challenges I’d like to enter this card for:

  1.  Inkspirational – photo challenge
  2. Addicted to Stamps and More – Anything Goes
  3. The House That Stamps Built – A2819 Anything Goes
  4. Simon Says Stamp Wednesday – Anything Goes
  5. Creative Knockouts – Something To Say

Anything Goes at Cute Card Thursday With Curly

Hello friends!  I hope you’re all having a wonderful week so far!!  It’s really starting to feel like Summer now with the warmer temps!

Today is a new challenge this week over at Cute Card Thursday!  This week we have our “Anything Goes” challenge with our sponsor Whimsy Stamps!  So of course, I am using a cute image from Whimsy Stamps for my card today:

Vicki-WSCurly-June6

Tee hee!  This little guy holding the tiny “sea creature” makes me smile and giggle!  I’m not really sure what reaction he has about it!  His name is just as cute too!  This is Curly from Whimsy Stamps.  I thought he needed a scene, so I made one for him.

I started with some Bristol Smooth watercolor paper and masked off the line between the sky and the sand.  I used my Distress Inks to blend in the colors.  After doing the sky, I thought that it was a bit too dark, so what I did was take a baby wipe and swiped it across which lightened up the colors the way I wanted them for the sky.  The bottom “sand” portion was also masked, and I blended the bottom blue color into the sandy colors which created a nice shoreline.  I then took a water bottle and spritzed some water droplets over it to create “texture” for the sand.  I also took some Copic markers to create more texture with the pointillism technique, plus added some white ones with a gel pen.  the water at the bottom was covered with a glitter pen.  (You can see better details in the photos/description below.)

Vicki-WSCurly-June6-close

So, I’ve got him all colored up in the following Copic markers:

  • Flippers/water gear – B32, B34, B37, Y11
  • Swim Trunks – R32, R35, R37, Y11, Y15
  • Sea Creature – BV23, BV29
  • Hair – E41, E43, E44, E47
  • Skin – E000, E00, E02, E11, E21, R20
  • I used gel pens to color lines on trunks and cheeks, I’ve used a glitter pen over the “sea creature” and his flippers along with the bottom water area.

I fussy cut this image and used some liquid glue to attach over my scene.

Vicki-WSCurly-June6-flat

For the scene, I stamped the birds in the sky and a star fish image from an older Whimsy Stamps clear stamp set. I then took the sentiment from the WS Everyday Mini Sentiments and white heat embossed it over a black strip of cardstock and then used my scissors to cut out a banner to attach over the scene.  I layered this over another piece of black cardstock that was attached to an A2 sized top folding white card base.

Lastly, I’ve taken some WS It’s a Party enamel dots and added them to the card.

Hope you’ve enjoyed my card today! Thanks for stopping in!  I’ll be seeing you tomorrow for some fun news!

Challenges for this card:

  1.  A Bit More Time to Craft – Anything Goes
  2. Crafty Friends – Men/Boys
  3. Sweet Stampin’ – World Ocean’s Day/Anything Goes
  4. Use Your Stuff – Summer Fun
  5. Always Fun – Summer Fun
  6. Unicorn – For the Men/Boys

Animal Star Gazers

Good evening friends!  Just swinging by to share a card I made with some cute animal star gazers! 🙂  I thought evening would be an appropriate time to post it:

Vicki-LFUponaStar-Com

When this set first came out from Lawn Fawn called Upon a Star, I knew I had to get it as I fell in love with it.  I really hadn’t used it all that much, so it was great to get it out for a play as I needed to make a commissioned card.  I have created a scene for these critters using masks that I made with my circle die set and some ink blending with my distress inks.  For the stars, I took a brush and splattered some “Super Sparkle Lumiere Paint” watered down a bit while masking off the moon and hill.  The moon was created with some watered-down distress inks and a brush.

I then stamped the critters sitting on top of the grassy hill where I wanted them and colored them in with my Copics.  I took a brush filled with clear water to “take out” the inks on the critters before I did that.  I also took a gray Copic marker to create shadows on the animals as well as draw in my own shadows on the hill.  I took a white gel pen to add some highlights on the animals where I thought the moon would be shining on them.  I also put dots in the center of the bunny’s eyes to make it appear as if a star is reflected in them.

To cut out the image panel, I have used a rectangle frame die which was used to cut out some watercolor cardstock.  I then used the same die and cut out a piece of this gorgeous black glitter cardstock and popped the frame up with foam tape to go around the edges of the image panel design.  I mounted everything over a black A2 sized top folding card base.

Vicki-LFUopnaStar-Com-close

Here’s a closer look at the details.  Here you can better see the shimmer on the moon.  As always you have to get just the right angle for the photograph, but I covered the moon with a Spectrum Noir Glitter Brush Pen.

I took a couple of the tiny solid stars from the stamp set and heat embossed them with Sparkle N Sprinkle Vanilla Ice EP.  Love the way it gives a bit of extra sparkle!  I think the stars really show up beautifully and it always looks better in person of course! 🙂

I do not have a sentiment on this as waiting for instruction on how to proceed with that if necessary.  I’m happy with the way this turned out and look forward to playing with more starry sky creations!

Thanks so much for stopping by this evening and I wish you a wonderful weekend my friends!

Challenges:

  1.  Lawn Fawnatics – Bling It Out!
  2. AAA Cards – Moonlight
  3. Sunny Day Crafting – Animals
  4. The Creative Crafter – Anything Goes
  5. Simon Says Stamp Monday – Starry Night
  6. Simon Says Stamp Wednesday – Animal Antics