Art Journal Inspiration-Fireflies and Gallery full of card classes!

Hello friends!  I hope that your week has been going great!  I had planned on posting earlier in the week, but I got so focused on completing my classes that I ran out of time!  (Check out the gallery below…LOTS of cards!)  I thought while I’m working on laundry today, I’d make a post sharing some things I’ve been doing…so grab yourself a beverage and take some time to enjoy!  First up is my art journal page:

  • Remember that I’m a guest host over at Art Journal Journey this month and the theme that I’ve chosen is “LIGHT“.  I hope you’ll stop over to see all of the wonderful inspiration that everyone has been creating with this theme and join in the fun!  

This so reminds me of Summer!  Remember as a child going outside in the dark and seeing tons of those flashing lights going off?!  I was always amazed that when I ran over to chase that flashing light, it disappeared on me and I was forever trying to capture those lights!

For the background:  I’ve chosen some Bristol Smooth cardstock in 5.5″x8.5″ pre-punched holes at the top cut with my Zutter machine.  I have started with stamping the jar and placing it where I thought it needed to be and then stamped those fireflies around it.  Starting with the fireflies, I dabbed on some yellow where they emit light and then used some soft blue around them working out with darker shades of blues as I reached the edges.  Bristol cardstock works great for ink blending with Distress Oxides.  To make sure that the yellow light was showing over the dark ink (without smudging it), I took some yellow paint and the end of my paint brush to make various sized yellow dots for the look of those fireflies in the distance.

I decided to take a leaf branch to generation stamp it along the edge for the illusion of a tree being there.  Although it looks black, I die cut a grass border in very dark green cardstock for the bottom portion of the page.  I also added another firefly at the bottom that was die cut and popped up with foam tape.  I used yellow ink for underneath his light glow.  The firefly wings have been covered with a glitter brush pen.

For the bottom lettering:  I printed it off my computer and then cut out each word, added some color with inks over them and then doodled around each word with a pen.  These words and this AJ page was totally inspired from a song called “Fireflies” by Owl City.  If you’re interested in listening to the song, check out the video below:

I learned that this song artist has insomnia and came up with this song during one of those times he had trouble sleeping.  I can relate and so it inspired my light page.


Next, I would like to share with you a card class event that I took part in called “Celebrations Delivered” provided by Scrapbook & Cards Today magazine.   It was a one day event with virtual live learning class videos and each instructor provided at least 3 different projects.  I have listed below each photo who the class instructor was.  

  • If you are on my website, just click on each photo to enlarge it and see the details about each one underneath the photo.  I have made 15 total cards from this:

Really had fun making these and using the products provided to us.  This also reminds me that I have more classes coming soon that I’ll be doing and that I’ve also forgotten to share some things that I had done last year, but hadn’t posted!  If anything else, you can hopefully enjoy or be inspired in some way as I post!  But more will come soon if my arms don’t fall off!😉

Thank you so much for stopping in today and I’m happy you’re here!  I will be dropping around to see what everyone is up to and I will be back on Saturday for our “Smash Your Stash” AJ inspiration!  Have a wonderful day!

Challenges:

  1. Art Journal Journey – LIGHT/KEEPING IT LIGHT 
  2. Simon Says Stamp Monday – NOT a card (art journal page at top)
  3. Try It On Tuesday – Spotlight It!  (Fireflies are spotlighted with yellow dots)  Hopefully this works for the challenge!

Feeling Tropical at Sparkles Monthly

Hello friends!  I hope that whatever state you’re finding yourself right now, that you’re able to find a bright spot in your day somewhere.  In watching the news, there are so many variable patterns in the weather and my heart goes to those in Hawaii dealing with the wildfire disaster.  My card today is not only for the DT challenge, but also a tribute to our tropical friends in Hawaii.

There’s a new challenge today over at the Sparkles Monthly Challenge with the theme of: TROPICAL and/or BEACH

Since I live in the Midwest area, I don’t get a chance to see too many scenes like this, but maybe someday hubby and I will get a chance soon!  The inspiration for my card came from my computer background photo and I loved the look of the water with the setting sun.  Everything I’ve used on my card today came from Lawn Fawn.

The entire background was done with stenciling using the LF Beach Sunset Stencils and inks.  I added that mice couple from a freebie stamp set that came with one of my orders.  I colored them pretty dark with cool grey tones so that they blended into the beach and looked like a silhouette.  The sentiment at the bottom was white heat embossed from the LF Butterfly Kisses set.   I’ve used a glitter brush pen over the sun and purple reflective water.  I think I got a little carried away with the white gel pen, but I was trying to make it look like the dark areas were highlighted with some of that setting sun over it and there’s just no removing any lines! (If you’ve done this, then you know what I’m saying!)

I hope that you’ve enjoyed my Tropical themed card today or found some inspiration with it.  Thanks so much for dropping in and please check out the challenge details with inspiration from the DT and play along!

Challenges I’d like to enter this card for:

  1. Four Seasons – Anything Goes Summer
  2. Crafts Galore Encore – Anything Goes
  3. The Paper Funday – Anything Goes optional: Great Outdoors
  4. Penny’s Paper-Crafty – Anything Goes using paper
  5. Get Creative – Summer Nights
  6. My Time to Craft – Stenciling
  7. Creative Fingers – Anything Goes

Lawn Fawn Fever!

Hello friends!  I have LOTS to catch up on with all of the blogging of projects that I’ve been working on over the last few months, so I will probably share several projects within one post until I can get caught up!

I know that Christmas in July is going on everywhere right now, so I thought I’d share that along with a few other projects I had going on during my “Lawn Fawn Fever” episode!  I have loved their cute little critters for so long and hope you enjoy what I’ve made:

It’s been a while since I even played along with a Lawn Fawnatics challenge, so I decided to join this one which is asking to see your Lawn Fawn “Fun with Food” challenge projects.  What could be more fun than sharing Christmas cookies?!  I’m not sure I’d share any with mice…but these guys are too cute and add some more fun to the scene.  They’re a bit older and I know I’ve had the set for several years as it was one of the STAMPtember sets called “Merry Christmouse“.

I used some older Lawn Fawn papers from my stash to create the table and backdrop setting and then cut it out with the Lawn Fawn Outside In Rectangle dies.  I used the following sets which include the one mentioned above for my scene: How You Bean?, How You Bean? Christmas Cookie Add On, and Thanks a latte.  I Copic colored them and even added a few stamped images over the cookies including some Chunky Glitter

For the mouse hanging over the hot cocoa cup, I cut around his arms to fit over the cup.  I popped up the candy cane as well at the mouse next to the jar for depth on the scene.  I added some touches of glitter and then on the mouse Santa hat, I took some liquid applique and heated it up until it was puffy.  The sentiment was white heat embossed over the dark chocolate cardstock and then I just used my scissors to cut it out and attach at the top.  Really fun scene to create!

I also took part on Friday with the “Hive Five Kit” class they did using the adorable new Hive Five card kit they came out with recently. 

For the first card, I made my sentiment too high, so I had to “arrange it” how it worked for me, and I wanted it to be a birthday card instead.  The other project was just the hexagon tag.  I changed mine into a shaker and then added to a card.  I also added the speech bubble on this one.

The products included with the card kit were really fun and I’m glad I got it!

The majority of this card came from a fun little kit that my sweet blog friend Shirley gifted me included with a SWAP that I was in with her. (Details of that are below.)  Really love that she included the backdrop for the sky which worked out perfectly!  I actually already purchased this awesome Lawn Fawn Platform Pop-Up die along with the Platform Pop-Up Add-on and the Upon a Star stamp set and dies, but she was so very kind to have all of these pieces already stamped and cut out for me!  I just colored in the critters and the stars, added a few more here and there along with some glitter, white heat embossed the sentiment over the navy cardstock and put it together.

I hadn’t even broken out my Platform die at the time, so this was my first time putting one together!  It looks a little more intimidating than what it really is, so I had lots of fun with it!  Thanks so much for sharing the fun with me my friend!  I can’t wait to attempt another one soon! (Thanks for helping me with my addiction! 😁)

And as I had mentioned above, I was asked if I’d be interested in joining this “Summer Sampler SWAP” with my wonderful blog friends Patti, Shirley and Donna along with a few other ladies to take part with!  When it was described to me, I quickly realized that I had seen these 12″ x 12″ sized papercraft stamped samplers all over Pinterest.  Of course, I had thought to myself that would be fun to create and never did.

Each square is 3-1/4″ and we each were to use the same color for the back layer so it was all similar for the finished project to coordinate well.  So 9 of us created 9 squares, kept one for ourselves and then mailed out the others to each person in the swap.  Really fun to see everyone’s idea here with the theme of “SUMMER” too!  I love them all and thought how fun that each one is so different from the others!

This is my finished 12″ x 12″ shadow box framed piece with everyone’s squares that I’ve attached to a wood panel background paper.  I have it hanging on the wall.  I think this would be so fun for each season or even gifts!  Hope we can do another one!😉

And here’s the square that I did for the swap.  I zoomed in to take the photo and it’s behind the glass, so it’s not a real great look at it, but as you see, I’ve used Lawn Fawn again! LOL

I had some fun 4th of July papers and thought it would be neat to make somewhat of a shaker element with confetti stars.  I’ve used the Lawn Fawn Dandy Day Flip Flop set along with a mouse from the Bubbles of Joy set for the front of my square.  I was trying to give the impression that the mouse had a sparkler, and the sparks were flying while the other mouse was enjoying the show. I used glitter and die cut a star from silver glitter cardstock for the center of the dandelion.  I added a red bow at the top.  I thought with using a shadow box frame that the dimension wouldn’t be an issue and it wasn’t.  

There’s always something fun to keep me hopping, so I know you’ll see more soon including the wedding & painting class projects!  I promise I’ll get there!  Thanks for dropping by!!

Challenges:

  1. Lawn Fawnatics – Fun with Food (first card)
  2. Crafty Gals Corner – Christmas in July (first card)
  3. Krafty Chicks – Christmas (first card)
  4. CRAFT – Christmas (first card)
  5. Jingle Belles – BLING on the Holidays! (first card)
  6. Double Trouble – Christmas in July Thing 1, Thing 2 & Thing 3 (I’ve used old stamp sets, papers and added some fun bling on my cookies -plus added to the partner challenge in first card!)
  7. Alphabet – ‘H’ is for Holidays (first card)
  8. My Time to Craft – Christmas in July (first card)
  9. Papercraft – Christmas in July

Challenge Up Your Life-Fun in the Sun

Happy June 1st friends!  This month will bring us into the Summer months which means it’s time for all of those fun outdoor activities!  I’m also getting ready for lots of things going on this month including my son’s wedding!  So I know I’ll be busy!  How about you?

This is my last time to be joining the “Challenge Up Your Life” challenge blog as a guest designer.  I’ve had a great time with them as a guest for the past three challenges and appreciate being asked!  Today their new monthly challenge for June is “Fun in the Sun“.  Hope you can share your lovely creations with us this month!  (Check out the challenge blog for details and inspiration!)  And here’s my take on this theme:

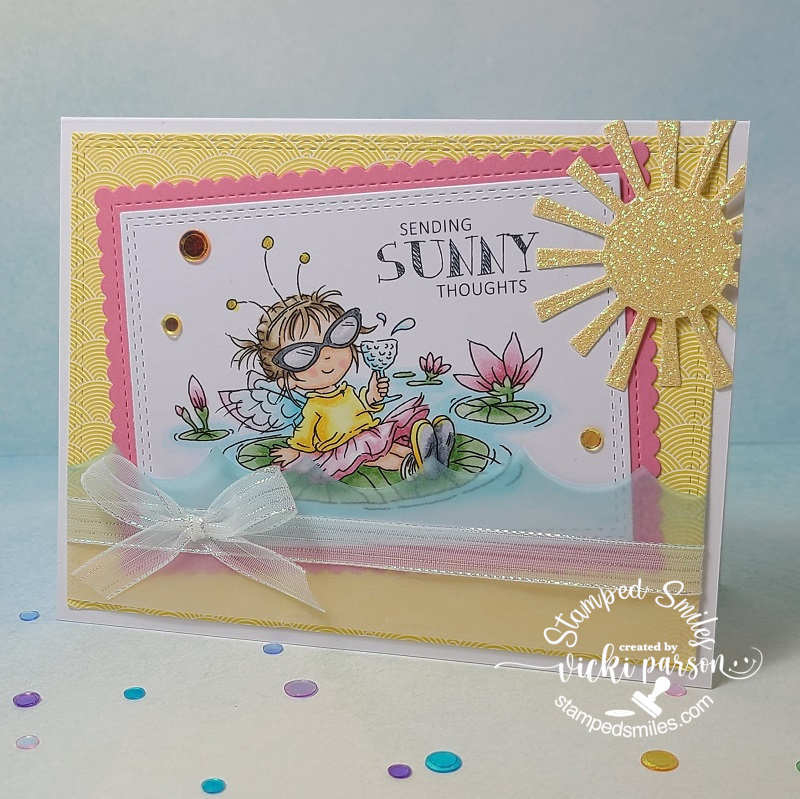
What could be more fun than a cute little fairy sipping a drink floating on a lily pad?!  Love those shades too!

There happened to be a good sale on a few digital stamps from LOTV recently and so I snatched a few and this was one of them that I fell in love with.  This one is called Water Lily, of course.  (The sentiment also came from the same company.)  She looked like she was having some “fun in the sun” for sure, so I colored her up with my Copic markers and die cut the panel out with a stitched rectangle die.  I’ve also used a scalloped stitched die to cut out a piece of pink cardstock to go with some of the colors in the image.

For the background papers, I’ve found some great *yellow rainbow paper from Lawn Fawn and then I used a *sun die from My Favorite Things and cut out with some yellow glitter cardstock. (*These items have retired) I took a wave die from Lawn Fawn and cut out a strip from vellum and used my blue marker to add some color towards the top of the waves.  To attach the strip, I wrapped it around the layers and glued it from behind.  I then added the ribbon with the bow and attached these layers to an A2 top folding white card base.

Here’s a closer look at the image with the coloring I’ve done.  I’ve used a gold gel pen to color in her head band and then a silver one to color in the little “dots” on the ends of her glasses.  I used a glitter brush pen over her sunglass lenses as well as her wings.

I finished the card off with a few colorful sequins.

So does that look like something you’d be having some “Fun in the Sun” with?!  I know I sure would!😎

I sure hope to see you playing along with us this month with your creations!  I also hope that you’ve enjoyed my inspiration as guest designer for these challenges the last few months.  Thanks for your support friends!

Challenges:

  1. Creative Knockouts – For the Kids
  2. Colour Crazy Craft – Anything Goes with coloring
  3. Crafty Catz – Anything Goes optional “All About the Girls”
  4. Creative Fingers – Anything Goes
  5. Allsorts – Anything BUT birthdays
  6. Everybody Art – Glitter and/or Pearls
  7. Creatalicious – Anything Goes optional: lots of bling/glitter
  8. Creative Moments – Summer is Here

Soaking it All in!

Hello friends!  Really hope your week is going well.  My thoughts go out to all of those that are experiencing difficulties in their life and hope things turn better for you very soon.  I hope to bring a smile for you today.

I’ve really had such a fun time playing around as a guest designer this month for Inky Stamper and this will be my final project for them this month.  Chelsea has some really cute stamps and I hope you’ll check them out!  (I have the badge on the sidebar of this blog if you need to come back later to find it.  Just click on the badge to get to the store.)

For my final project, I’ve decided to create a mini slimline card with an interactive component!  If you’re not familiar with a “mini slimline” size, you take a piece of cardstock measuring 6″ x 7″ and then fold it in half on the 7″ side so that your card base is 6″ x 3.5″.  I really don’t mind any size of card really as I have been known to make my own envelopes too.  But I first learned about this “mini slimline” size from Taylored Expressions as she has many products in this size including the envelopes.  (I have used one of the “slimline stitched dies” from TE to cut one of my panels on this card.)

I’ve used BOTH of the Chaise Lounge stamp set with “Freida the Frog” (as she is named) as well as the Splash stamp set with “Rosie” (as she is named) from Inky Stamper on my card here today!  I think they’re so CUTE!  Ever have those moments with a friend floating around in the swimming pool and just soaking in the sun and some secrets?!! LOL!  That sounds like a fantastic summer event to me!

For the “water” background, I took some Bristol Smooth cardstock and white heat embossed the “water wave” image (both stamp sets have one of these images in it).  I took out some of the Nuvo Shimmer powders from my stash and made a fun watercolor panel with them.  I haven’t used these in quite some time, so it was fun to play with and I forgot how shimmery they are!  Obviously, the white embossed waves resisted the watercolor.

I cut out the panel with the TE slimline stitched die and mounted it over a piece of dotted paper from the Doodlebug Swiss Dot Paper Pad. I stamped and colored the images, die cut them out and popped them up over the floaty tubes.  (Remember the tip about using a white gel pen to go around the edges to get rid of those lines you see when you cut them out.) I then punched a hole on this watercolor panel where I wanted the images to be, so they weren’t too close to each other to freely spin around!  Inky Stamper has these awesome interactive elements called “Clear Move-Its” and I LOVE them!  They snap together and voila!

You can see bits of the shimmer from the watercolor background here too!

I popped up this panel with foam tape and then layered it over my black mini slimline card base so the spinners could move freely.  I’ve also added a black sentiment banner that was white heat embossed with the Chaise Lounge stamp set.

I couldn’t resist adding a bit more “bling” so I also pulled out the Picket Fence Mermaid Water sequins being careful not to interfere with the spinners and then filled the centers with some Stickles from my stash.  I could just keep spinning these all day long! LOL!

Really hope that you’ve enjoyed my projects this month as a guest designer for Inky Stamper and you’ll pop by to check them out!  Super fun stuff!  (Be sure to join the InkyStamper Inkspiration FB Group for more fun!)  I’m sure I’ll play with their stuff again in the future!

Thanks for popping in today and finding my posts!  Glad you’re here!

Challenges to play in for fun:

  1.  Dragonfly Dreams – Summer Fun
  2. Penny’s Paper-Crafty – Anything Goes using Paper

What’s Up With Washi and Camping Fun!

Hello friends!  Hope you’re having a great week so far!  Today, I have some cards I made for my GDT month at Inky Stamper using washi tape!  I have loads of washi tape because I have a “squirrel moment” when I see it and think how pretty…and it’s not that expensive and easy to craft with and whatever excuse I can come up with!😁  Then it sits around unused!  

This is why I’m glad that the “Washi Tape Challenge” came up for this month in the InkyStamper Inkspiration FB Group!  You just need to use at least 1 Inky Stamper product and your washi tape…any you have!  I decided to go for 2 cards:

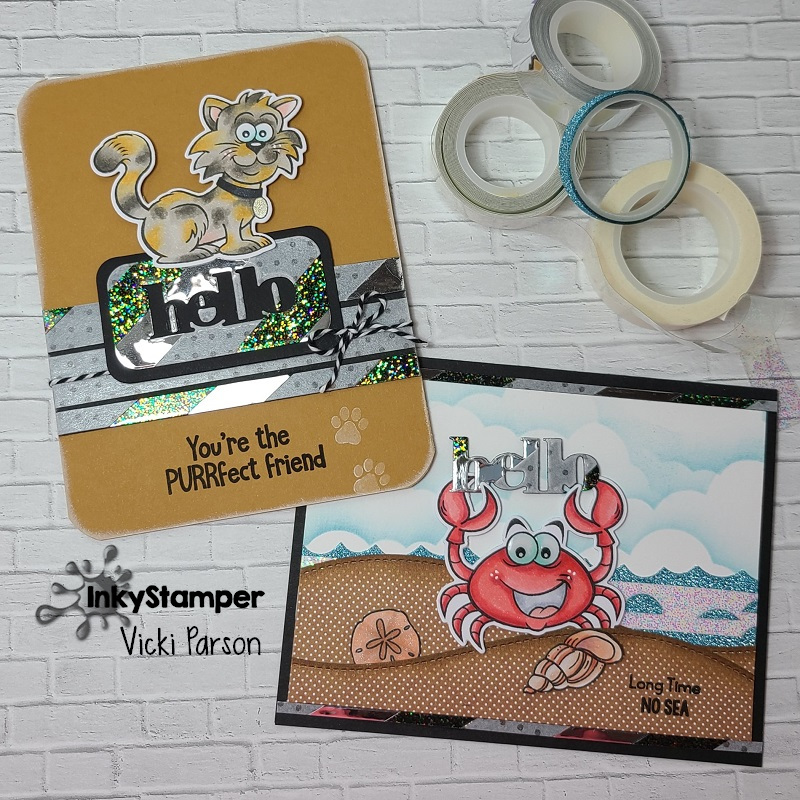
For both I cards, I took a scrap piece about 4.25″ x 5.5″ of black cardstock and covered it diagonally with 3 different types of washi tape.  One was from the Inky Stamper Doodlebug Lily White Swiss Dot washi tape, another from some metallic shiny silver washi tape and another from some clear sparkly washi tape in my stash.  The white turned up almost grayish over the black and the clear sparkle turned up differently as compared to it on the crab card in the background over white cardstock.  I thought it was cool the different looks I got with it.

I then decided to use some dies to cut it out with and then cut the remainder in different sized strips for my cards as well so I wouldn’t have to waste the rest of it…

Vicki-InkyStamperGDT-Washi Challenge-cat

For this card, I took a “hello” die from my stash and cut it out of the washi tape piece I created on the black cardstock piece.  I then cut out the “negative” sentiment with a rounded corners rectangle die and layered another piece of black cardstock behind it that was cut out slightly larger and popped up over an A2 card base that I’ve also layered with more of the washi tape strips I cut out from the left over.  I added this cute kitty from the Inky Stamper Cat stamp set along with the sentiment at the bottom.  I thought it would be fun to add a couple of paw prints at the bottom in white ink from the Inky Stamper Dog stamp set.  Lastly, I thought it needed some Doodlebug Twine too!

Vicki-InkyStamperGDT-WashiChallenge-crab

And for this card, you see that I’ve taken the die cut “hello” sentiment from above and added it to the crab’s claws to hold up in the air…so fun!  I still had a couple more left-over strips from above and added that to the top and bottom of the scene I’ve created on this card. 

So, for the scene, I’ve used the cute Inky Stamper Crab stamp set along with the sentiment at the bottom.  The sparkly looking “sea” in the background comes from a couple of different glitter washi tapes I had in my stash.  I then used a border die cut to cut it out to go across the card front.  Die cut some waves for the sand and tucked in all of the stamped and colored elements over a stenciled cloud background.  I added this card front scene to an A2 sized black card base.

How about you?!  Do you hoard your washi tapes?  I sure had fun playing around with it making these cards and I think it’ll be fun to sit and play some more with it as I have so much of it!  I think it was fun to die cut too! 


Just wanted to share some projects with you I’ve made this past weekend from a Craft Camp that I went to with Inky Stamper.  We made lots of fun projects: (click on photos to enlarge!)

Thanks so much for stopping by today!  Really hope you’ve enjoyed my washi tape cards and you can come join in the challenge with us this month!  Have an amazing crafty day!

Challenges:

  1. Aud Sentiments – Anything Goes + sentiment
  2. Allsorts – Add some sparkle 
  3. Sweet Stampin’ – Feature an animal
  4. Lil Patch of Crafty Friends – Anything Goes
  5. Crafty Sentiments – Anything goes

August GDT for Inky Stamper!

Hello friends!  Wanted to thank you for your kind comments!  Like I previously mentioned in my last post, I’ve still been crafting and following on FB by joining some classes, challenges, etc.  So, although I haven’t been active on my blog, I’ve been crafting and sharing over there once in a while.  Just having some fun while using more of my crafty stash is all!  However, while playing around on FB, this happened:


A couple of weeks ago I was invited to join as a guest designer for Inky Stamper this month! Yay!  If you haven’t heard of this company, check out the stamps…they’re too cute and the owner, Chelsea, is so fun too!  She has such an infectious excitement about her that you can see if you happen to catch her on one of her weekly FB lives every Tuesday at 7:30 pm CST. (On the Company FB Page)

So, I will be sharing my creations using Inky Stamper products every Wednesday this month and I hope that I will be able to INKspire you with something fun!  I’m starting this Wednesday with some products that just recently released:

The first thing that Summer reminds me of is flip flops!  There is a cute little image of flip flops in this Splash stamp set which inspired me to create this shaped card and birthday tag!  That’s also where that cute little mouse you see is from as well!  But the sun and chair come from the Chaise Lounge stamp set, which I’ve combined both sets to use on my creations here.  I think these two sets go hand in hand with each other and it’s probably best to just get them both!  If you choose to get the dies with these sets, it cuts out the mouse and frog separately from the floaties they’re already on so you can pop them up!  So, they work on the floaties as well as the chairs. So cute!

For my flip flop card, I’ve taken a very old template that I had found in my stash while cleaning up my craft room and thought this would be perfect to make a shaped card with!  I started by tracing the pattern for the base of my card and cutting two shapes so that I can make a card that opens from the side as you see in the photo.  The card measures approx. 7″ x 3.5″.  It’s a bit taller than a mini slimline card, but I can easily make my own custom envelopes with my envelope punch board.  This is another fabulous way to use up those hoarded papers too!

I took the smaller template and used the fun Doodlebug Floral & Graph paper pad (Available in the Inky Stamper store too!) to cut the inner flip flop pattern with. (I had to angle the template to make it fit onto the 6×6 sized paper.)  I added a couple of flowers from my stash along with the matching ribbon for the flip flop straps before attaching to the card base.  Colored the images, cut them out and added the sentiment strip at the bottom and cut it to measure with the inner flip flop edge.  I added some texture by sanding the edges of the paper too.

  • Here’s a little tip if you’re cutting out the stamped mouse image from the floatie:  When you use the die to cut it out, the edges around it will have some stamped lines on it where the white border is.  All I did was take a white gel pen to cover up those lines to that it looks like a perfect white line around the image!  P.S.  This is also a great way to cover any coloring mistakes made! 😉  This also works for fussy cutting an image as well!

I popped up “Rosie” (the mouse), as she is called, with foam tape over the chair.  I’ve also added some Doodlebug gems to the center of the flower on Rosie and for the flower at the top of the flip flop card.

I thought this would be a nice summer birthday card so I wanted to make a matching tag to go with it.  I’ve pulled out the Inky Stamper Mini Envie Die and used it for this tag design.  Again, I pulled out the Doodlebug Floral & Graph paper pad and used this die to cut my tag with making sure that the center of the envelope die would be cut out.  This is what I’ve used for the base of my tag.  I like using these papers because they’re double sided. That way the back still has a nice color/pattern to it too.

  • I used this particular die for my tag because of the size.  Putting another strip of paper on the back side of this tag will create a pocket for you to tuck a gift card inside if you want to use it for that!  See below:

Vicki-InkyStamperGDT-flipflop-tagbackpocket

Since there are score marks to make the envelope, I ignored those lines and used my paper trimmer to cut out the center which is where the orange base of my tag came from.  I cut off the top two corners diagonally and punched a hole at the top which created my tag. I also die cut the envelope tag again with the Doodlebug Swiss Dot Paper Pad this time being sure that I had a good portion of the scallop edging cut from it.  I used that piece for a design element on the tag.

I stamped the sentiment and flip flops from the Splash stamp set as well as the sun from the Chaise Lounge stamp set, colored them, fussy cut/die cut them out to add to the tag.  I used a black pen for stitch lines along the edges.  I added my own hole reinforcer circle punched out and then added some Doodlebug Bumblebee Twine to the top. Finished it off with a couple of clear sequins from the Fishy Wishes sequins mix and filled the centers with Nuvo Glitter drops.  I also covered the sun with a Sparkle Glitter Pen.

I hope that I’ve INKspired you today with my summer flip flop theme!  Thanks so much for dropping in here.  If you’d like to see more from this company, be sure to join the Inkystamper Inkspiration FB group!  Hope to see you there!  Have a great day!

Challenges I’d like to enter:

  1. Just Us Girls – Anything but a card (tag only)
  2. Daring Cardmakers – Gift Tags Galore (tag only)
  3. Moving Along With the Times – Summer Fun and/or Colors (orange/yellow)
  4. NBUS #29 – Aug “Never Before Used Schtuff” (never used new stamps!)
  5. Aud Sentiments – Anything Goes + sentiment
  6. Sparkles Monthly – Outdoor Fun
  7. 2 Crafty Critter Crazies – ATG + critter

Slimline Waving Hello🧜‍♀️

Hello there friends!  Hope you’re having a wonderful week!  Just wanted to stop in with a Slimline style card I had made with a fun underwater scene.  (I’m thinking a magical place like this would be great to be in right now!  How about you?)

Vicki-BRM-mermaidslimline

These slimline cards are really great for creating scenes like this on and I was also having fun being able to “experiment” with my different products too!

I’ve the stamp set called Sea You Soon along with the background paper (mermaid skin) and the Lilac Shimmering Sand Paste were all items from a past card kit.

I created my underwater scene basically using the mermaid skin paper as the background.  Although it has a cool texture and smoothness to it, I was able to take the School of Fish stencil and add that Lilac sand paste over it.  Love that extra texture and purple hue it gave!  I also took the silhouette images from the stamp set and heat embossed them over this paper with black EP.

I stamped and colored the rest of the images from the stamp set with Copic markers and then fussy cut them out to arrange for my scene and popped some up with foam tape and then lastly added some clear acrylic bubbles over it.

Vicki-BRM-mermaidslimline-flat

You can see now that it’s lying flat how the color shifts and changes on the paper!

I’ve used some stitched wave border dies to help create the scene using some Kraft cardstock where I’ve also fit in to arrange the sand castle image that I colored and cut out.  I used Copic markers and gel pens to help fit the borders and image together.

I cut out the background paper with the Trinity Stamps Slimeline Stitched Card Panels and Windows die set.  I layered it over a piece of blue paper that was included with the kit and then layered that over a Slimline style card base measuring 8.5″ x 7″ folded in half from a piece of Aubergine Cardstock.  The sentiment was actually stamped from the Merfriends stamp set using black Ink.

You can see parts of the images with shimmer on them which have been colored with metallic gel pens.  I’ve also covered the mermaid tail and jelly fish with a Spectrum Noir Glitter Brush Pen.

The bubbles are looking a bit white instead of clear because my glue wasn’t quite dry enough when taking my photos, so my apology on that, but it took a couple of days to completely dry up clear for some weird reason!  Those babies aren’t going anywhere though!! LOL!

Hope you’ve enjoyed my magical underwater slimline card today!  Thanks so much for joining with me today and I’ll SEA you again soon!😁

Challenges:

  1.  Just Us Girls – #544 Trend Week:  Long & Skinny
  2. Crafting Happiness– #57 Anything Goes
  3. Pammie’s Inky Pinkies – PIP2028 Anything Goes
  4. Mod Squad – Slim Line Scene
  5. Little Red Wagon – #558 Fantasy
  6. Papercraft – Fantasy
  7. There’s a Stamp For That FB Challenge –  #2 Summer and/or Slimline
  8. Not Just Cards – July Anything Goes

Vivienne on the Beach with Video Tutorial!

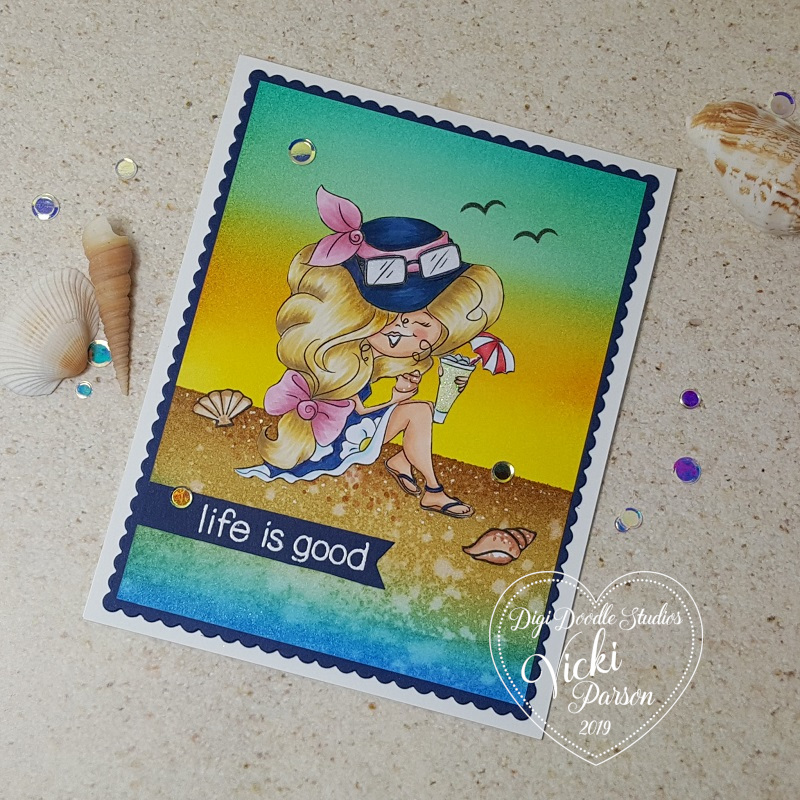
Hello friends!  Summer is in full swing over my way and the temperature is typical for August which is hot!  So of course who wouldn’t love a nice relaxing sit at the beach with a cool iced drink on hand!  Happily continuing with my guest design spot, I have another fun creation for you today using this really cute Summer image from Digi Doodle Studios:

Vicki-DDSVivienne-Augvideo

Vivienne Beach Girl is all decked out in her cute navy blue beach outfit holding a sea shell in one hand and a cold drink in the other!  Sounds like a great idea to me!  I had so much fun coloring her in!

I have been asked by several people how I go about doing the ink blending on certain cards that I’ve made in the past.  It’s somewhat difficult to type up exactly what I’m doing when I blend and sometimes it tends to be a bit different depending upon what background and colors I’m creating with as well as the type of scene that I’m making.  So I thought it would just be easiest to create a video tutorial on how I’ve achieved this particular beach scene background:

(To view the video on You Tube, CLICK HERE or watch below)

I didn’t show the coloring of this image in the video, but let me know if this is something you’d like to see in a video from me by leaving me a comment or message somewhere.   It always helps if you let me know that you are interested in something!

Vicki-DDSVivienne-Augvideo-close

So here’s a closer look at this adorable image and how I’ve colored her with my Copics.  I fussy cut her out and went around the edges with a black marker to hide any imperfections I may have had.  As seen in the video, I’ve attached her to the background and added some shimmer to her sunglasses with a glitter pen, added some liquid glitter glue to her cup and glossy accents on her ice.

Vicki-DDSVivienne-Augvideo-flat

To add details to the card, I’ve used the Lawn Fawn stamp set Life is Good by stamping a couple of sea shells, coloring them in, fussy cutting them out and attaching to the scene. I took a sentiment from the set and white heat embossed it over a navy strip and cut it into a banner. I also took a bird and stamped it in the sky twice with black ink.  I’ve layered the beach scene onto a piece of navy cardstock that was cut with the MFT Blueprints 27 Die-namics die.  I then attached these layers onto a white top folding A2 sized card base.

Lastly, I’ve added some Crystal Clear Confetti from Studio Katia with liquid glue.

Thanks for dropping in and I’ll see you soon!

Challenges I’d like to enter this card for:

  1.  Crafty Friends – Summer Colors
  2. Through the Craftroom Door – Anything Goes
  3. Creatalicious – Anything Goes with optional “Distress It”
  4. TIME OUT – Relaxation with optional 1 layer card
  5. Cardz 4 Galz – Summer fun
  6. Pearly Sparkles – Something beginning with ‘B’ (beach)

Sending Smiles Mermaid Style

Hello friends!  Well it feels nice to get back into the swing of things here again!  I want to thank you from the bottom of my heart for the awesome welcome back I recieved from you guys!  Wish I could reach out through the screen and give you all a big hug!  🙂

Today is August 1st AND it’s on a Thursday too, so I wanted to share the card I made for the Whimsy Stamps August Digital new release as well as a brand new Cute Card Thursday Challenge too!!  Whimsy Stamps is our sponsor this week and it’s an easy “Anything Goes“, so please be sure to stop by the blog to see the wonderful inspiration from the rest of the design team and play along with us!!  We look forward to seeing what you’re working on!

Vicki-WSGoldie-Aug1

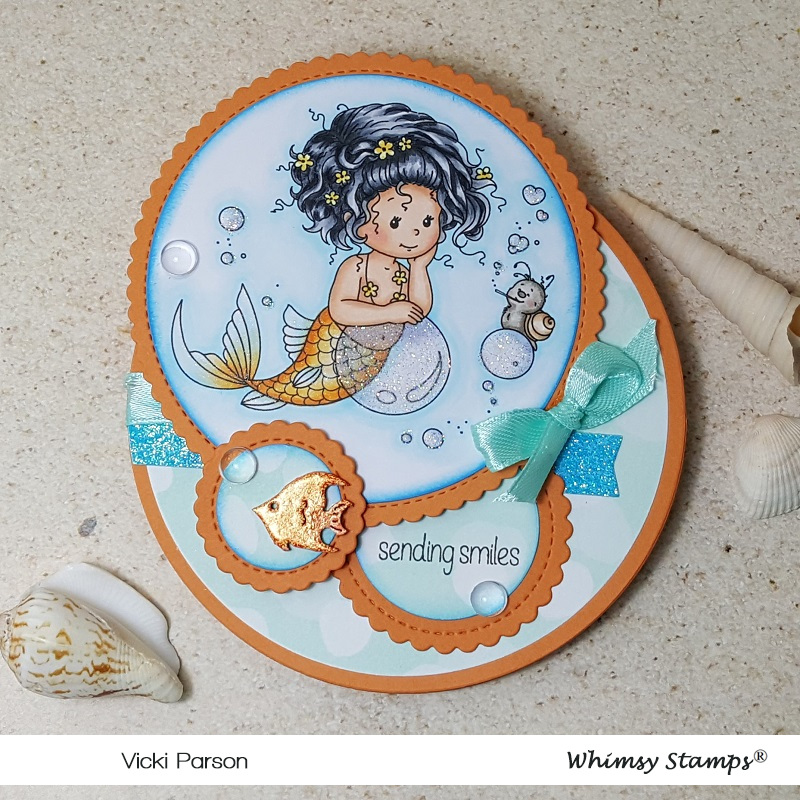
Oh aren’t these Sylvia Zet images just as cute as can be?!  I so enjoyed coloring her up!  (See the close up photo and details below.)  This is the DIGITAL version of  “Goldie” just released from Whimsy Stamps this month.  You can still also purchase the rubber cling stamp, but now it’s nice to be able to have the option to choose either one!

Since her name is “Goldie“, I had to use the orangish color palette for her!  When looking at the image, I immediately saw “bubbles”, so I thought it would be fun to make a circle easel card design with her!  This actually turned out to be a “non-traditional” circle easel card with the circled image going askew from the main area…which makes it seem more like several bubbles underwater!

I have cut several different sizes of circles, one for the main circle card base and several others with some old SU! bokeh looking papers from my stash.  I used a stitched scallop circle die set to cut out the layers behind the circles.  I sponged all circles with some blue ink for more depth.  I’ve added a strip of blue glitter cardstock on the main card front layer as well as some ribbon to attach to the front.  I arranged the circles where I wanted them and added some foam tape here and there to pop up the layers.

To hold up the card front, the inside of the easel card has another strip of that blue glitter cardstock and I stamped an anchor image over one of the circle panels using an older Whimsy Stamps clear set.  I used some foam tape to pop that up so that the front card panel would prop up.

I’ve taken the Whimsy Stamps Everyday Mini Sentiments stamp set to stamp the sentiment under the image panel with black ink.  For the accents on the card, I’ve used some clear acrylic bubbles randomly and glued them in places.  For the fish, it was a wood veneer from my stash that I heat embossed with some cool orange metallic embossing powder.

Vicki-WSGoldie-Aug1-side

Here you can see the details from the side view of the easel design and how it’s propped up with that anchor circle holding the front card panel in place.  to mail this card, you just unfold it and lay it flat as shown in the last photo below.

Vicki-WSGoldie-Aug1-close

Here’s a closer look at this really sweet image.  Below are the list of Copics I’ve used to color her in with:

  • Fins, flowers, Bubbles – Y38, Y35, Y32, BG000
  • Hair – C8, C5, C3, C1
  • Skin – E21, E11, E02, E00, E000, R20
  • Snail – W5, W3, W1, E33, E31, R20

Wink of Stella used for mermaid body, clear glitter and 2-way glue pen used for the bubbles.  I used a black gel pen to dot the center of flowers.

Vicki-WSGoldie-Aug1-front

Here’s what the folded and closed circle card looks like.  She will not quite fit into a regular A2 sized envelope because I arranged the circles differently, but a nice 5×5 size would work great.  I do have an envelope creator which is handy for those odd shaped designs that I can custom make.

Hope you’ve enjoyed my card today!

Challenges I’d like to enter this card for:

  1.  Sweet Stampers – Summer (digi and stamp used)
  2. QKR Stampede – #358 Anything Goes
  3. Addicted to Stamps & More – #352 Make Your Mark
  4. Little Red Wagon – Digital Stamps
  5. Crafty Gals Corner – 3+ layers