Hello friends! I hope that you’re staying cool during these Summer days! For the most part, it’s too warm, humid or both outside, so I spend most days in the air condition. Trying to organize things is what I’m attempting, but I end up crafting instead! LOL
I’m stopping by today to share that we have a new challenge over at Sparkles Monthly and we have the theme of “SUMMER DAYS” this month. This seems rather appropriate right now, so I hope you’ll join us. Here’s what I came up with:
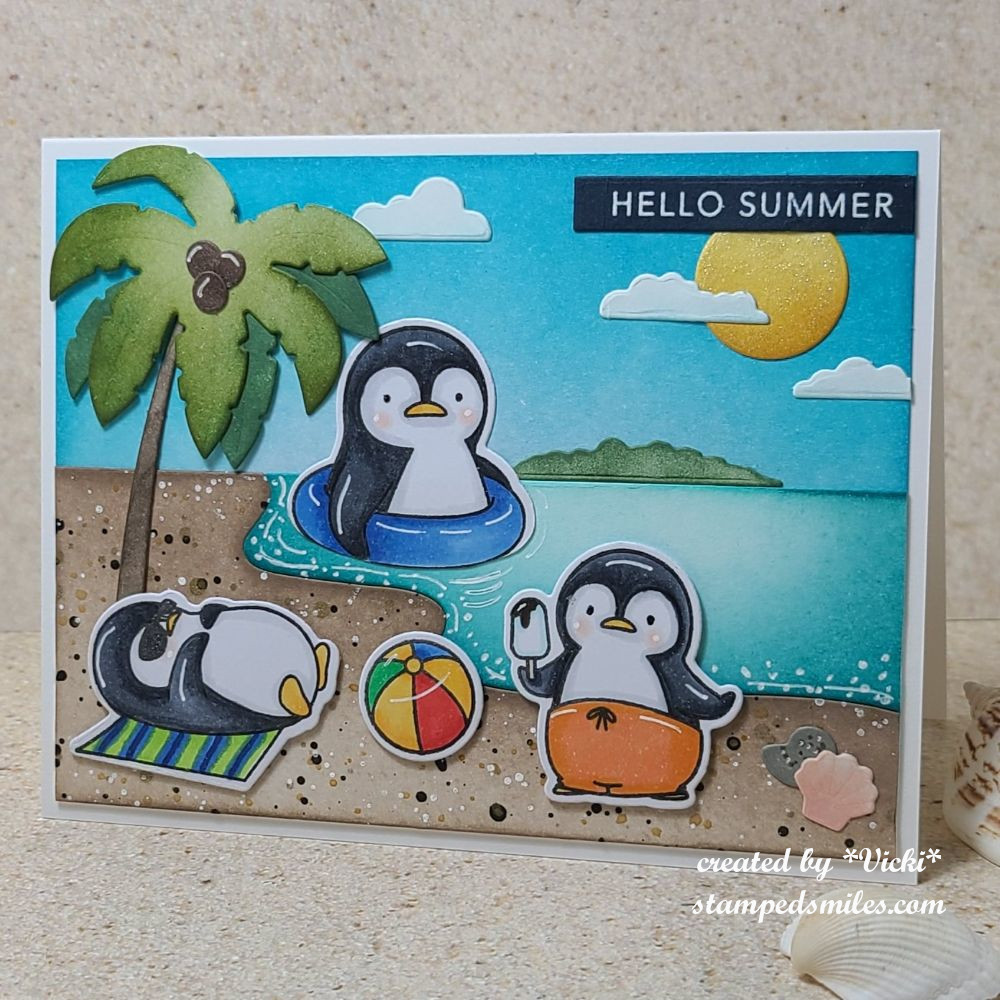
I have used these penguins many times and I just love them! This is an older set called “Penguins in Paradise” from My Favorite Things (store closed). I thought they’d be perfect to use for this theme and I wanted to make a scene for them to do all of those fun Summer things that we do!
I started with another My Favorite Things die set called “Beach Scene Starter” that cuts out the sand/water/palm tree/shells/sun/clouds/land and then I used inks to ink blend them in various colors. For the sand, I splattered several different watercolor colors and Copic Opaque White.
After placing my scene together, I stamped, colored (with Copics) and die cut the three penguins and beach ball that I added to my beach scene and popped up with thin foam tape.
I used a white gel pen to add highlights to the images as well as details to the water shore area, coconuts, beach ball and the shells. I also took a glitter brush pen and went over the sun as well as the penguin’s shades for some shimmer. The sentiment is from the Taylored Expressions Mini Strips-Hello Summer that was white heat embossed over dark blue cardstock and cut out with the mini sentiment strips die.
I hope you’ve enjoyed my card today and will join us for the challenge this month! Please be sure to stop by the blog to check out the inspiration from the rest of the team!
Hello friends! I have a mix of projects that I’ve recently been working on and wanted to share my latest since I’ve gotten all caught up with the projects that I hadn’t posted.
I had a few birthdays come up and of course I forgot to take photos of a few of them before I sent them out the door and now they’re long gone! (DOH!) But I did remember to take photos of these:
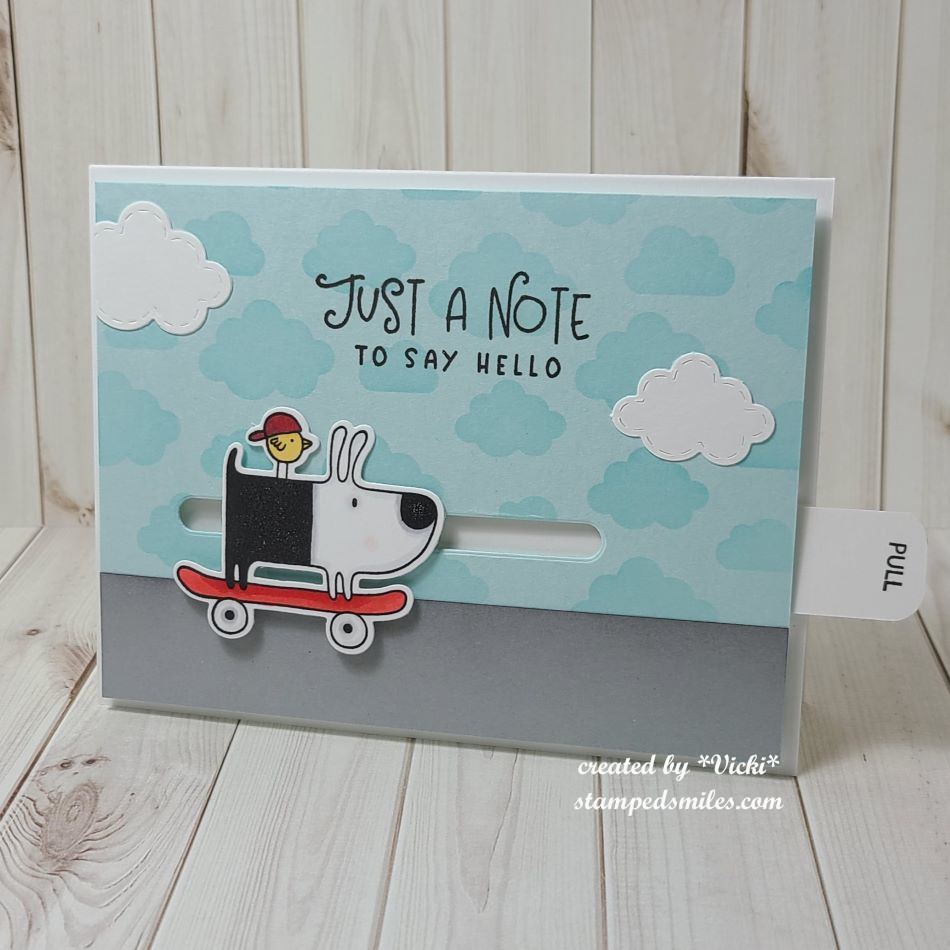
I fell in love with the stack of party pups from Newton’s Nookand I always wanted to try out one of those cool card layout dies! The person that I’m sending this to loves his dog and I know the dog also has some “friends” she visits with, so why not a “PAW-ty” of them together!
I’ve used the NN Birthday Barks stamps & diesand colored it out with Copic markers. I stamped and heat embossed the sentiment in the top right square and added a stamped paw print from the stamp set. All the images were popped up with foam squares.
For the background, I took the NN A2 Card Layout 2 die and cut the frame with all of the stitched pieces using the NN Birthday Woofs Paper Pad. These dies make for some quick and easy cards without much thinking involved which is great when you’re in a hurry!
Next card was made as a thank you for a pizza night using one of those Ooni Pizza outdoor grills. I’ve never had one and so of course being the pizza lovers that hubby and I are, we gladly excepted! Very good pizza it was! I wanted to thank them for having us and made this card:
I’ve used this really cute pizza set from My Favorite Things and I was happy to pull some papers I had for years and years to help pull it together.
I’ve used the MFT A2 Stitched Rectangle dies to cut the checkered pattern paper as well as the light blue panel. I’ve used the MFT Stitched Mini Scallop Rectangle dies to cut the white piece behind the blue panel. (The red and white checkered paper is so old…got it at a stamp event so many years ago and hoarded it of course!)
Decorating the pizza was so much fun and I used the same ingredients we received on our Ooni pizza which was a handmade crust, tomatoes, pepperoni, Canadian bacon, cheese and sprinkled with basil leaves. All of the cut pieces to make the pizza came from the MFT Pizza Maker dies and the sentiment came from the MFT Pizza My Heart sentiment set (I don’t see it on the website, so I’m not sure if it’s available any longer?) I stamped it with black pigment ink and heat embossed with clear embossing powder. I’ve also used the same size stitched rectangle die as the blue panel to cut off a portion of the pizza to make it fit into design.
Lastly, this is a card made hot off the press tonight using the current Craft Roulette parameters! So if you missed it, go catch tonight’s latest episode #228 and play along! This is the card that I’ve made with tonight’s parameters:
I decided I wanted to also use the image from Beccy’s Place August Freebie challenge and add myself another challenge on top of the 4 parameters! I loved the image as it looked so refreshing! I played around with the image on my computer and added an extra one next to it, but flipped it around and placed it behind the other one. I also typed up my own sentiment underneath to go with the “Monday” parameter with Craft Roulette.
Project: I used a Geometric Square stencil for the background with yellow ink and to fit Beccy’s extra twist challenge which was to use something old from your stash, I did dust off those square sequins and brads that I’ve had for years and years to add on the front of the cups. (Now the image reminds me of those Recesses Peanut Butter shakes! YUM!)
Colors: Bee Garden colors are obviously the black and yellow and I had to add in some orange for the guest Irene who is a #teamorange color person.
Element: Monday was typed up within the sentiment.
Random: Use A Marker(s) which the image was colored in with Copic markers.
Ok…so that’s it for me this weekend! I needed to get this posted this evening because I would be missing out on a challenge that I wanted to be sure to play in before time runs out and that will be in like a couple of hours!
Thanks for dropping by today friends! I hope you have an amazing weekend!!
Hello friends! I hope you’re having a wonderful week so far! We’ve been getting some rain, which is great for the freshly planted flowers. I enjoy being able to sit on my covered porch and listen to it rain as long as it doesn’t get too stormy!
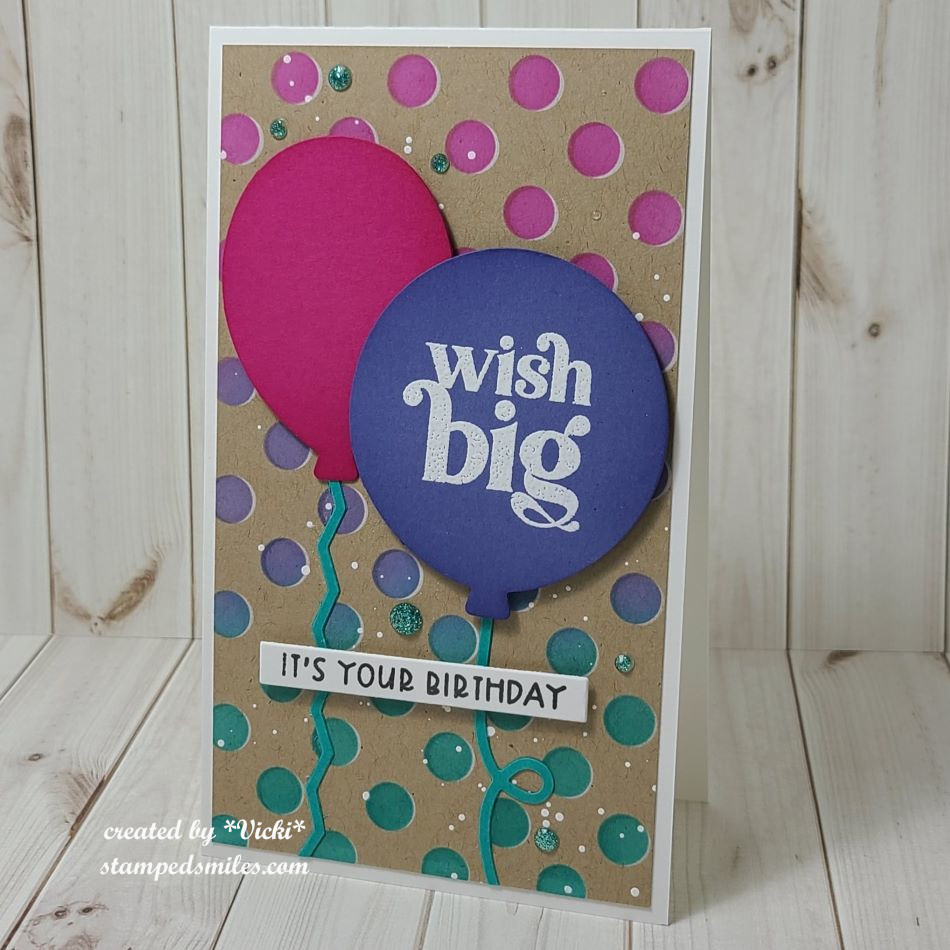
Today starts a new challenge theme over at the Sparkles Monthly Challenge! For this month, we’d like to see your CAS (clean & simple) creations! I look forward to seeing the inspiration in the gallery, so I hope you can join! Here’s what I’ve made for this challenge:
Sometimes I can really struggle with a clean and simple design because I always feel like I need to add something more. The end result is in the minimal embellishments and design. This one got stuck in my head and came together rather quickly and I like how it turned out.
Most everything used on my card came from My Favorite Things. I started with watercolor (Bristol Smooth) paper and the Watercolor Wash stenciland blended a rainbow of colors over it. While the stencil was still in place, I took a water bottle to spritz water droplets over it and removed the stencil. I let it dry and then clear heat embossed the sentiment that was stamped in a black pigment ink. (The key to this is to make sure the watercolor area is completely dry before you heat emboss anything over it.)
I cut out the panel with a wonky stitched rectangle die. I’ve attached it to an A2 side folding black card base. I was pulled to splatter over this, but thought I needed to keep it simple, so I took some drip drops in “cosmic” color and added them randomly to the design.
So, what do you think? Simple enough you can do it too and enter it in the challenge, right? If you need more inspiration, check out the challenge blog to see what the other design team members came up with for CAS.
Thanks so much for stopping in today! I hope you have an amazing week!
Hello friends! I hope that this Spring weather hasn’t gotten too crazy for you. I know that this is a season of storms and tornadoes where I live in the Midwest, and I saw Iowa get some tornadoes come through. It’s windy here, but luckily not that bad. So, I thought this would be a good time to catch up sharing some things I’ve been working on!
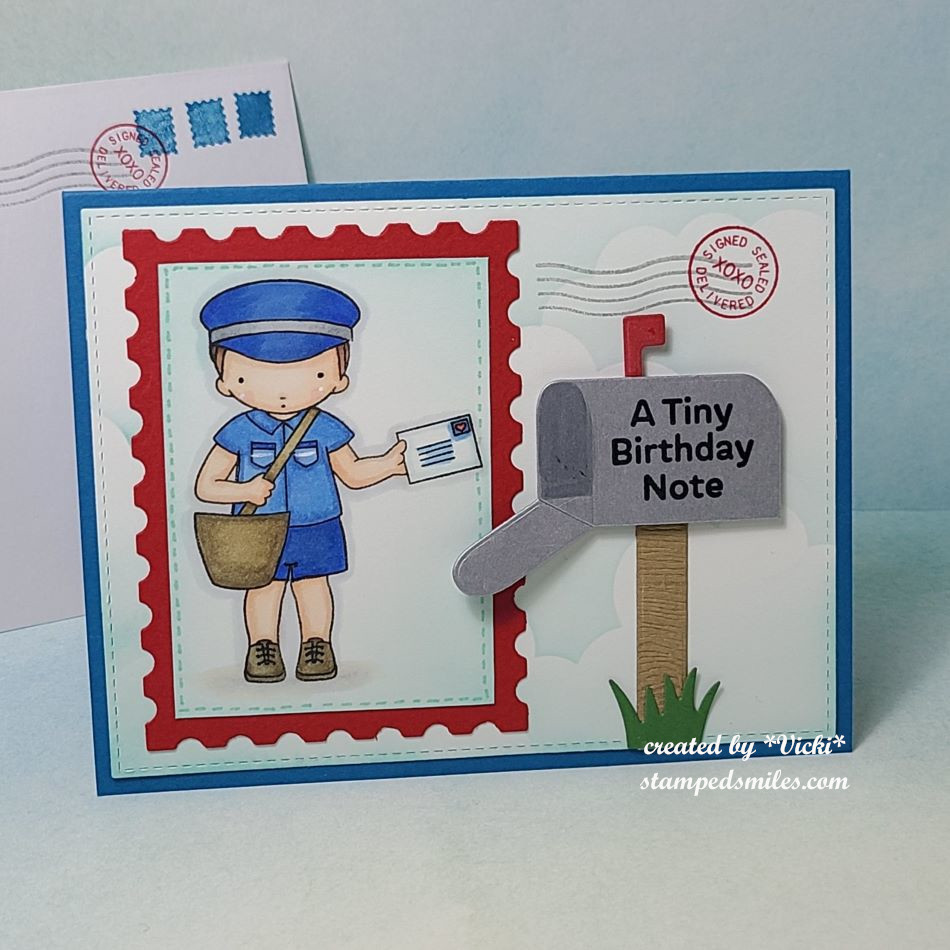
My first project is a birthday card that I made for my son last month. He’s a mail carrier and so I thought this would be fitting for him. The mail carrier came from a MFT Birdie Brown stamp set (retired) that was actually a female with ponytails and a dress. So, I’ve altered it and masked off the ponytails and drew in some shorts. The mailbox die (retired) and other postal related stamps/dies all came from MFT as well.
For the background: I’ve used a MFT cloud stencil and cut it out with a stitched rectangle die. After coloring the image with Copics, I cut it out with another rectangle die and placed it over the red postage stamp rectangle. I cut out the mailbox pieces and put it together over the cloud panel and added a few postal imagesat the top right corner along with the envelope in the background. I finished it out with the birthday sentiment on the mailbox (retired) and a few white gel pen details on the image.
Although he’s a mail carrier, I didn’t have to mail this card to him, and I got to see him smile when he opened it…which is better than mailing it!😊
Last month, I also participated in the Taylored Expressions Virtual Stamp Joy. I also just realized when registering for this event that I have participated in every single one of these since she started it during the pandemic in 2020! I think the pandemic has really changed the world in several different ways, but I’m glad that this was one of them as I have enjoyed doing these. There’s just something about getting a class event mailed to you and attending in your PJs while having snacks and crafting that I find appealing, I guess! 😉
Of course, doing virtual, I have lots of time to finish up projects, but I think I had them all completed within a week after the event…I just had to photograph everything and now I’m finally getting them on this post to share: (IF YOU ARE ON MY WEBSITE, CLICK EACH PHOTO TO ENLARGE IT-CLASS INFO AT BOTTOM OF PHOTO)
This was the “Strip Class” where we used the TE Strip dies in various ways…I made a few extras!This was the “3D embossing Class” with a few new to me techniques…so fun!mini slim balloonscoloring class with mini slim size calendarink blend background and I made an extra with left over circle from panel.set of 4 using TE “Happy Half Sheet” which back in the day were called “maps”.super cute interactive card with a pull tab slider!multiple masking techniques used on thisfun card with stenciled lunar paste background
I had a busy month for sure! I’m also in the middle of another session of classes that I’ve been working on and having to go back in my spare time to get through each one. During the exact same time as Stamp Joy was going on, there was another freebie class weekend that was going on, so now I’m going back and watching the replays to do little bits at a time…I have a little way to get through it still, but when I finish, I will share those results too.
I hope you’ve enjoyed my catch-up post today and have been inspired to have some fun even if you can’t be outside! I’m sure when it gets a bit warmer, I will want to enjoy it, but for now, I’m going to play in my craft room!
Thanks so much for stopping in and have a great day!
Hello friends! Happy March! I’m happy to see this month come as signs of Spring start popping out everywhere! Pretty soon the flowers will start coming up too! Are you ready for Spring?
Today starts a new challenge over at the Mix It Up Challenge Blog! There is always lots of wonderful inspiration from the team, so please go check it out and play along! The challenges are always ANYTHING GOES with an optional theme. This month’s theme is FANCY FOLD! For these challenges, you have plenty of time to enter as they run for 6 weeks! I look forward to seeing what you come up with! Here’s the project I made:
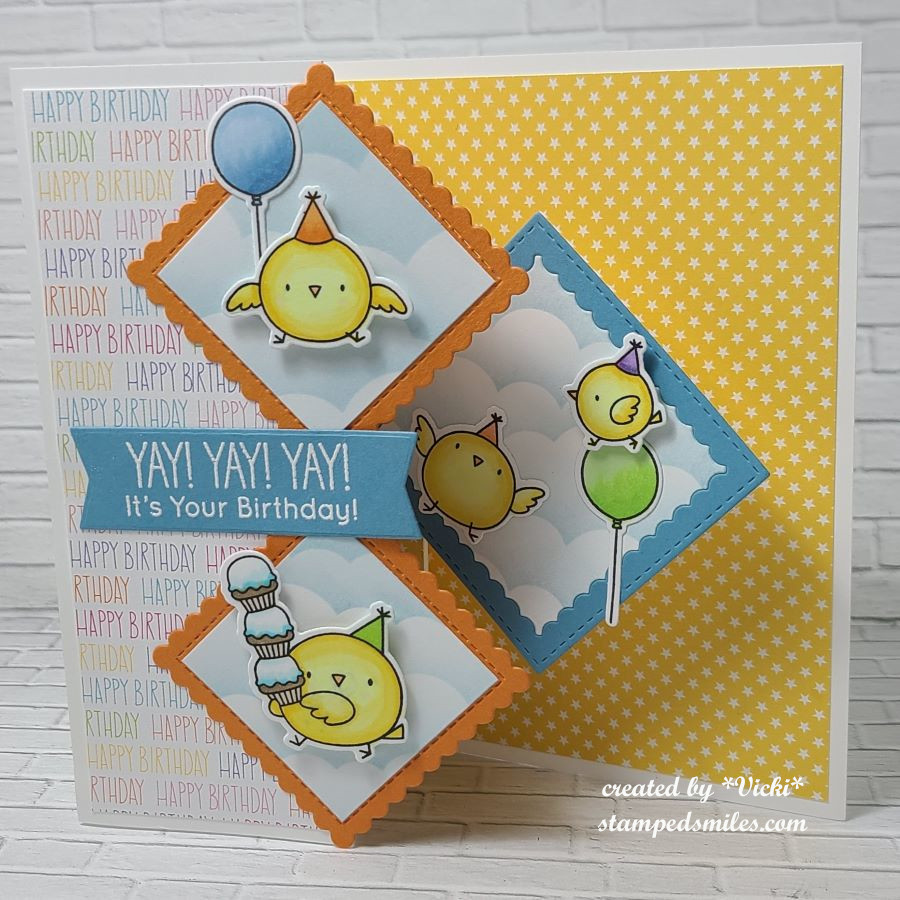
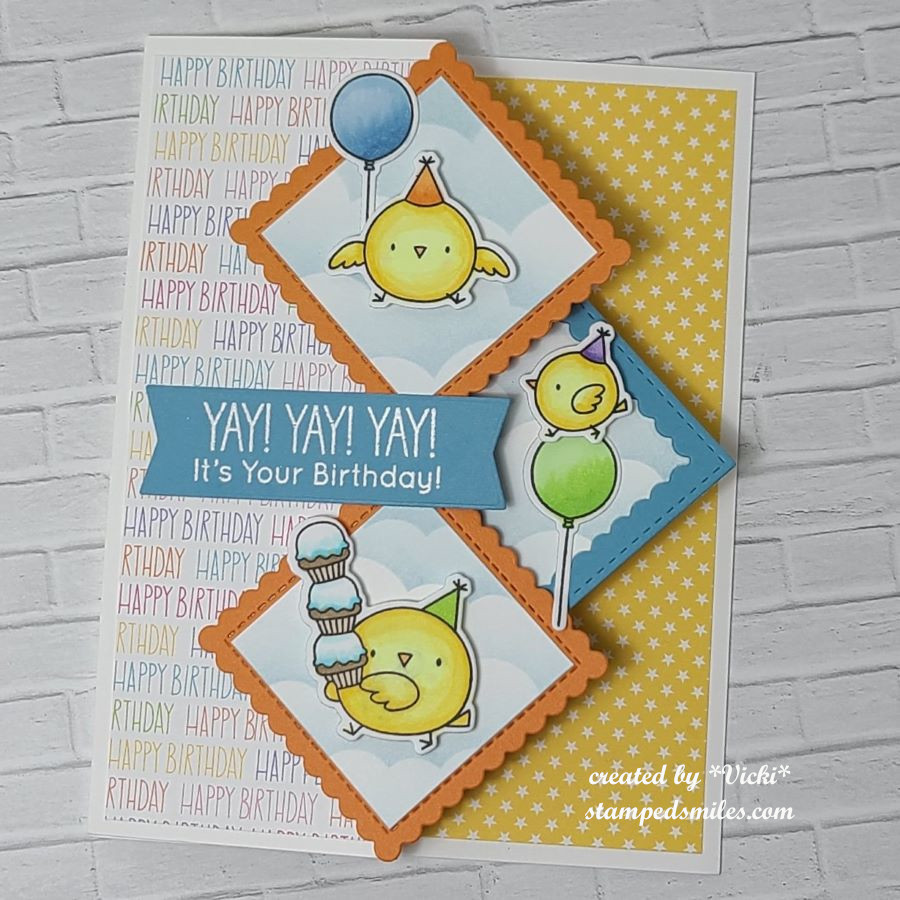
These birds are ready to party! How fun are those party hats?! I’ve found this really cool take on a “Z” fold card, but this one has been named “Diamond Z Fold Pop-Up Card“. There are so many variations of this that I found on You Tube, but they’re all the same concept of the two diamond shapes on front and then an additional diamond pop-up mechanism on the inside that moves when you open the card. (Click on the card name for a tutorial.) The only thing I did differently than hers was using scallop square die cuts and I covered the pop-up mechanism on the inside with pattern paper so it’s not as noticeable.
I’ve used the My Favorite Things (retired) Birthday Chicks that I stamped, colored and die cut out and arranged over the design. I’ve also used the My Favorite Things (retired) pattern papers and of course the same for the scallop stitched squares. For the white squares, I’ve used a MFT cloud stencil with blue ink for the clouds and the sentiment was white heat embossed and cut out with a banner die.
When this card is closed, this is what it looks like. Notice that you do not see the bird on the inside panel next to the bird on top of the balloon as he is hidden until you open it.
It folds up just like a Z fold would and it’s A2 and ready for a regular A2 envelope. I’ve placed an extra panel on the back of the card for a special handwritten message and decorated it a strip of pattern paper and another party bird. I didn’t put anything on the inside stars pattern because I thought it took too much away from the front of the card and you don’t want an inside message to show on the front of the card. It takes a bit of maneuvering to decorate images and sentiments as to where to put them strategically on the card, but it was so fun!
I hope you’ve enjoyed my card today and go check out the challenge to come and play along with us! I really look forward to seeing all of the different fancy fold projects in the gallery this month!
Thanks so much for dropping by and I’ll see you soon!
Hello friends! I hope that you’ve had a great start to your December month! I promise I haven’t been hiding, but it’s a busy time of the year and I’ve been doing all of the Holiday things, so my time has been limited. I’m glad to have just now finished up some Christmas cards!😉
Speaking of Christmas cards, I have something fun to share with you today!
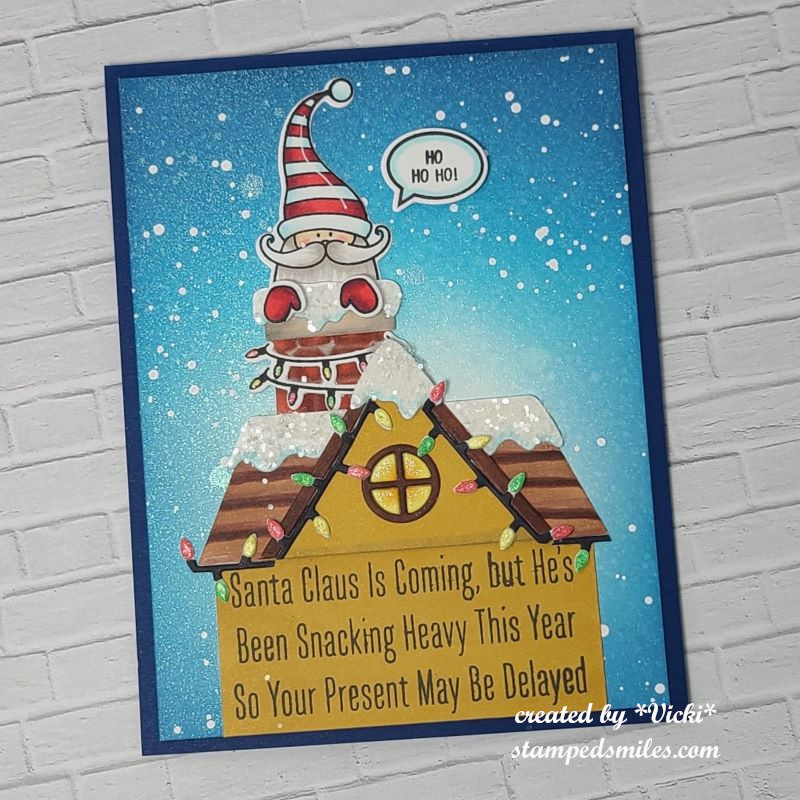
Last month I had won a top 5 in a challenge and was asked to be a guest designer for this Try it on Tuesday challenge! I really enjoy playing along in the challenges to keep motivated, so I was thrilled! For THIS challenge, the theme is “Santa Claus is Coming to Town” which inspired me to pull out this fun Santa stamp for a chuckle:
So, this is Santa’s excuse for being late! Like me, he’s NOT hiding…just delayed!😆
The stamps and die cuts came from an older My Favorite Things card kit I had called “Stuffed Santa“. I had fun putting this one together and was the beginning of the cards made to send out this year. (It was my plan to be early, but you know how THAT goes!)
For the background: I ink blended in a couple of blue oxide colors with the center panel fading to the lightest color. I sprayed the panel with some shimmer spray for that cold frosty shimmer sky. I then splattered some white opaque Copic mixed with water for the snowfall.
The Santa, hands, sentiment bubble, and lights around the chimney were all stamped and colored with Copic markers. I die cut them out along with the chimney, snow and rooftop pieces. I die cut the pieces with white and used my Copic markers to color in the chimney, roof, window and lights around the roof line. For the sentiment panel on the house at the bottom, I cut it to size and used my Copic markers to color the same as the roof peek. I added the sentiment to it, and made this the “base” for the house.
To finish it off, I added some chunky glitter to the die cut snow on the chimney and roof. I also used a glitter pen to add some sparkle to the inside window panels and the Christmas lights. I also used some foam squares to pop up the sentiment bubble and Santa’s mittens.
Hope you’ve enjoyed my card today and that you’ll play along with this fun challenge over at Try it on Tuesday as well! Thanks so much for dropping by!
Hello friends! I hope you’ve had a great start to your November so far! It’s been a few minutes since I’ve posted, but I have to say that I’ve been pretty busy in the background! Hoping to share what I’ve been up to soon!
Today begins a new challenge over at the Sparkles Monthly Challenge! This month, we’re looking to see some WINTER ANIMALS! I hope you can join in the fun with us! A reminder that this will be the final challenge for the year as we’ll be on Holiday break until January. Here’s my take on the theme:
My first thought of a winter animal is a penguin of course! I’m a huge fan of them and have so many in my collection…including other than stamp related! These guys are really enjoying winter on this scene! I’m using theMy Favorite Things Playful Penguins stamp set and I started with a stencil from MFT that has “pond” shapes and lightly stenciled the soft blue for a place for my “ice platform” to be.
After creating the “ice pond”, I used some tape to mask off the bottom portion so that I could ink blend a sky at the top. I used some White Opaque Copic and splattered it over the sky area. I then used another MFT stencil to create some snow drifts in the background.
The two penguins, igloo, ice pad and sign were stamped, colored with Copic markers and die cut out to be placed over the scene. I added the flattened penguin to the ice pad and then had the igloo in the background while the sign and penguin are waiting at the side of the pond. I used a pen and wrote “FREE RIDES” on the sign.
I finished it off with a glitter pen over the “ice pad” and igloo and then used some Stardust Stickles over the snow on the sign. I thought it needed some more snow falling down, so I took some sequins and added it to the scene.
If I were on that scene, I would probably be more like the flattened penguin on the “ice pad”!😆 How about you? Do you like the snow?
Thanks so much for joining me here! I hope you like my penguin card and will sharing your favorite winter animal in the challenge too! Have a great day!
Hello friends! Hope you had a great weekend and maybe did some crafting? Did you participate in the World Card Making Day events? There were so many things going on, so I basically opened up the You Tube video marathons and watched while I did a bit of crafting.
I was inspired by the Craft Roulette WCMD event with several crafters showcasing their version of the parameters they were to use for that event. It was several hours long!
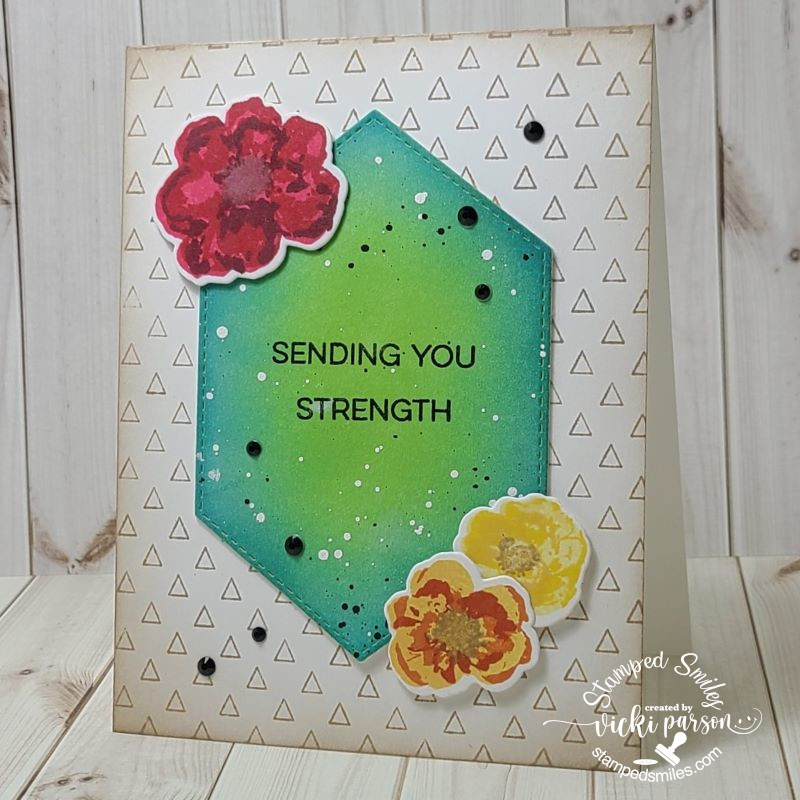
Here’s the card that I made with the Craft Roulette World Card Making Day parameters of – PROJECT: A2 card, COLORS: rainbow, ELEMENT: nature, and RANDOM: black dots
I also combined my card using one of the sponsor’s products which I’m entering for this week’s sketch challenge from My Favorite Things.
I’ve had these stamps in my collection for quite a while and it was nice to pull them out for this card. I actually needed a card for an elderly woman who recently fell and broke her hip, so she’ll be recovering with therapy for a while.
For my card, I used the MFT Watercolor flowers and stamped them in red-, orange- and yellow-colored layers and cut them out (This was my nature element parameter). The middle was cut with the MFT Stitched Hexagon diesthat I ink blended with green and blue inks (These colors make up the rainbow parameter). I splattered the shape with white and black. *Before I splattered, I stamped the sentiment from the MFT Essential Sentiments set with black pigment ink and heat embossed it with clear EP. (The sentiment was cut in portion to fit my design.)
For the A2 sized card base (makes up project parameter), I used a MFT Triangle background stamp (retired) in the same kraft color that I inked the centers of the flowers with. I also used this color to ink around the edges of the card. I than layered two more cut out shapes for the ink blended sentiment panel for dimension and attached to the stamped card base. I used foam tape to pop up the flowers and lastly added some black gemstones (for the black dots parameter).
Thanks so much for stopping by today! Hope you’ve enjoyed my inspiration! See you soon!
Hello friends! We’re here! We made it to Christmas Eve!😀 My cards have been sent out, my cookies are done and delivered as well as my other little gifts. This is quite a long post, so grab your hot cocoa or whatever your favorite beverage is and a Christmas cookie or treat and let’s see what I’ve been doing this past week:
So, starting with my Christmas cards, I usually make around 40ish cards each year give-or-take and I only like to make a handful of them at a time for not only boredom of the same design, but for product depletion as well.
So back in July, I purchased this really adorable card kit from Taylored Expressions (included was the Frosty Background Cling and Clear Combo set + more.) that came with coordinated colored envelopes as well as the seals. So, I made a set of four different colored designs in two of each one. The snowmen were popped up with foam squares over the backgrounds and I added some fun Snowflake bits that were included with the kit as well.
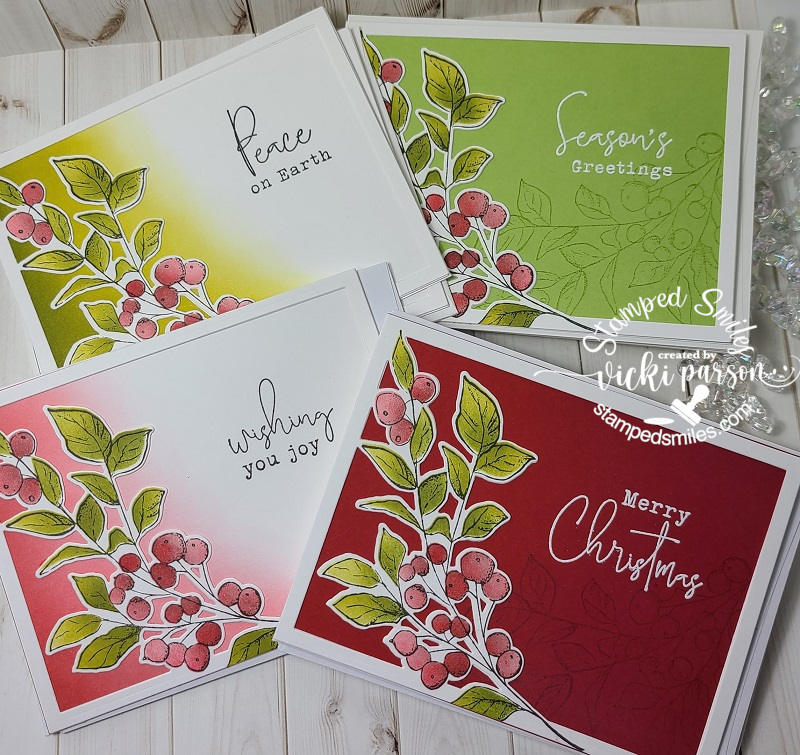
Next up is another set of cards I made using some more gorgeous products from Taylored Expressions. I’ve used the Seasonal Sprig stamp and die combo along with the stencil to color them in with. Some of these I ink blended the backgrounds, so I just used cardstock with a watermark effect and a white heat embossed sentiment. I used the die to cut an extra frame behind the stamped one for added stability. I made 4 of each design shown here for a total of 16.
I then made another set of four using the same products, but for these I gold heat embossed the image and sentiment and then used some watercolor for coloring it in with. I also got some of these coordinating envelope seals to use on about 10 of the 16 cards. (No longer available in store.) I’ve also partially ink blended the background behind the frame on these as well.
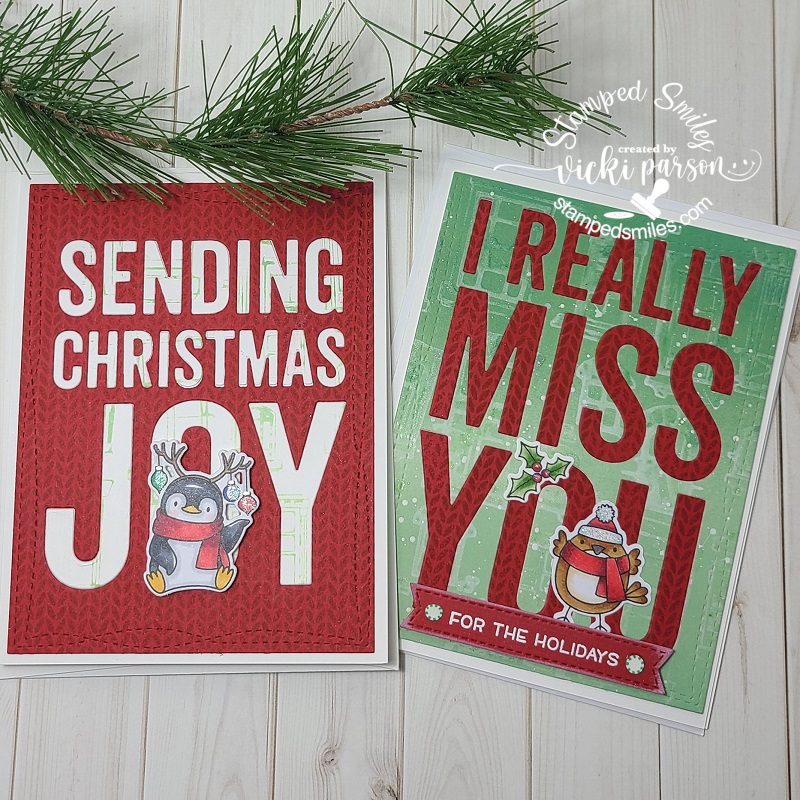
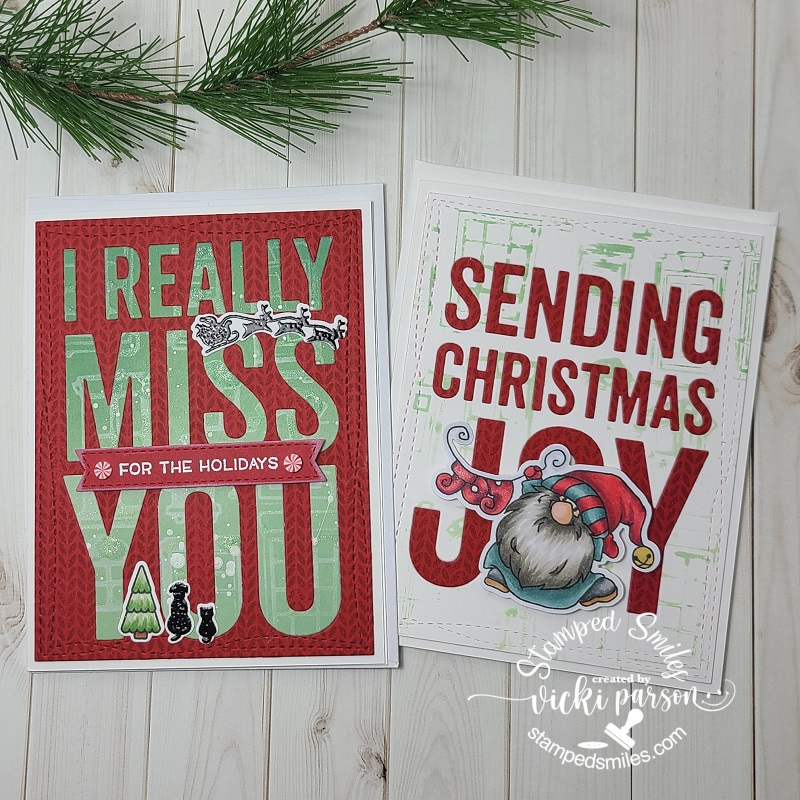
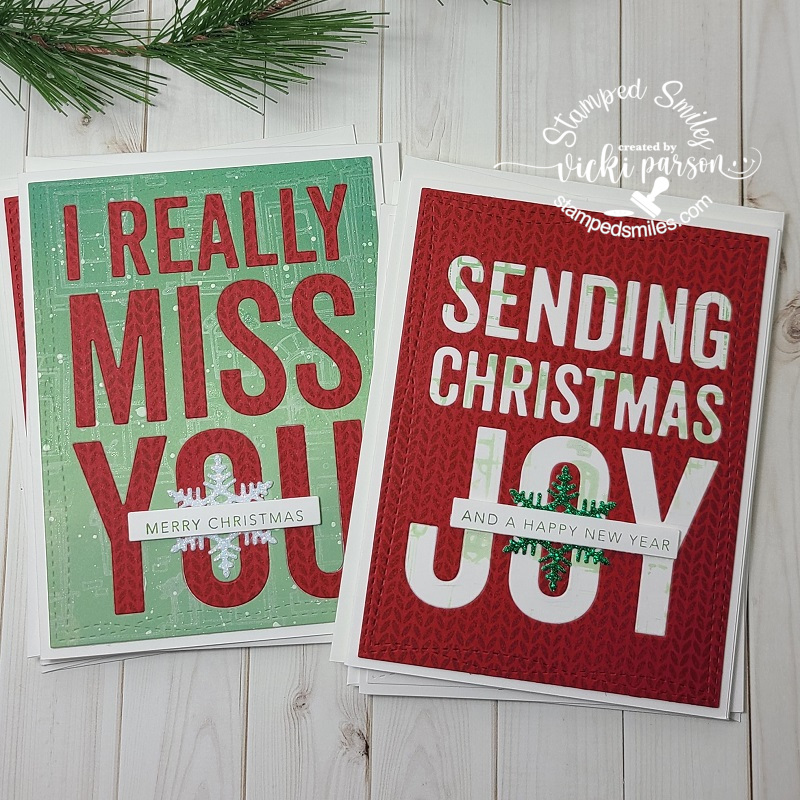
Here are some cards that I’ve actually made a total of 8 similar designs using the large wording background dies from My Favorite Things. I’ve used the “Sending Christmas Joy” and “I Really Miss You” dies for all eight of these, but only after I stamped the backgrounds. I used the MFT Knitted Sweater BG stamp and the Alley Cat BG stamp for a couple of backgrounds before I die cut them. Then I used the die cut letters to place into the other backgrounds on the cards to get that look. So it was like creating 2 cards with one cut and filling it all in. (For the Alley Cat background stamp, I ink blended the background and stamped it as a watermark effect over it and then took the “left over” ink from that to stamp it again to create an additional BG.) I then cut out each of the panels with the MFT Wonky Stitched Rectangle die and placed over a white A2 sized side folding card base. The penguin image is from the MFT Holiday Penguins set and the bird on the other one is from the MFT “Tweet Holidays” (Not found in store.)
And then of course you don’t want to waste any backgrounds you’ve made, so you make more cards! I’ve used a couple more images to personalize the design for people too. I combined the sets Newton’s Nook Whispering Pines and the Lawn Fawn Winter Skies. I think I took a set from them to create a sentiment to fit my cards as well. (not sure from which set.)
For the other card, I took this cute image from the Whimsy Stamps Gnome for Christmas stamp set, colored him up with my copics and cut him out with the coordinating die to pop him up over my card.
And then for these set of 4 cards, I’ve just die cut a snowflake from some glitter paper and glued in the center of the “O” on each design and popped up a sentiment over that with foam tape stamped and die cut from the Taylored Expressions Mini Strips – Holiday and Mini Strips die.
And as you remember in a previous post those “recycled Crystal Light containers” that I make, I made another set of three of them here. This time, I’ve used this snowman stamp. I just used my scissors to fussy cut those cute snowmen out as they were pretty simple to do and then I popped them up over an ink blended tag using the stencil over them. I used coordinating cardstock and silver heat embossed the sentiment strip at the bottom and of course added my “snowman soup” poem on the back of the containers. I’ve also added a layer of silver mirror cardstock behind the tags.
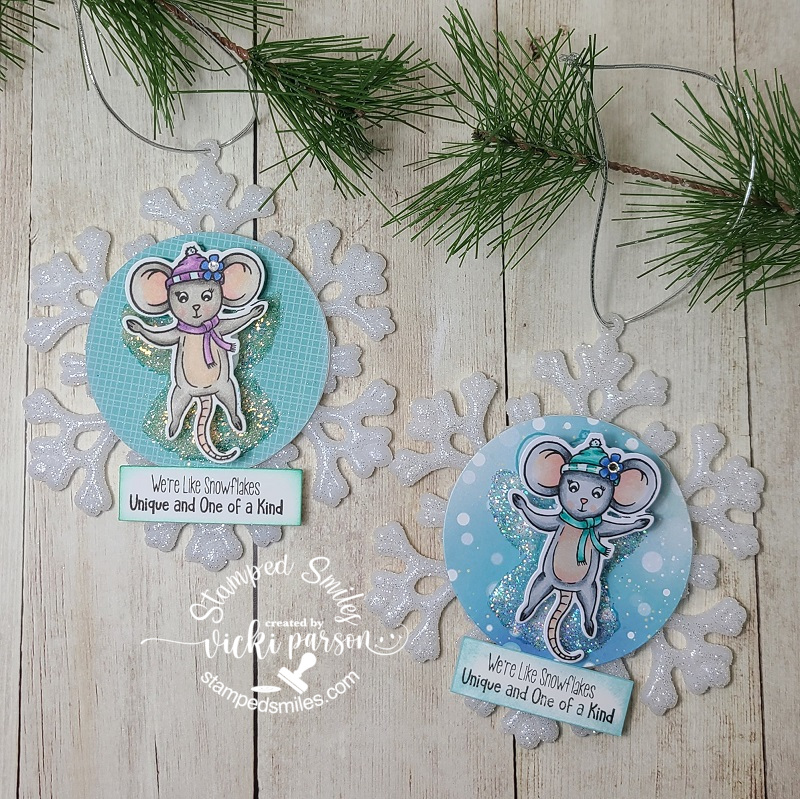
And I made a couple of these darling ornaments from a fairly “new to me” company that I was actually introduced to with product during my time as a {Cupcake Inspirations} sweetie DT when they sponsored a challenge a while back. P.S. There are a few more days left to enter their current challenge of “SNOWFLAKES” if you want to pop on over to join us too!!
But I was so taken with this darling image and kit from Inky Stampers from this Snow Much Fun Kit. You get the snowflake ornament (with string), the stamp set and die, papers, wobbler, along with glitter to complete it too! Well, I wanted to make more than one, so I grabbed another set of Snowflake Ornaments from the store and just added my own papers and glitter from my stash to make it.
Whew! I’m ready for that “Looong winter’s nap” now!!🥱 I hope you’ve enjoyed my post today and it has brought you some inspiration and/or a smile somehow! I have received some beautiful Christmas cards and I so appreciate them and have them all displayed by being pinned around my garland in our pass-through in the living room/dining area. I think after a bit of rest, I need to finish up my projects for the “Bugaboo Christmas Chaos” that I halted in the middle for to finish up Christmas projects….so I’ll be back soon with that.
In the meantime, I wish a MERRY CHRISTMAS TO ALL AND TO ALL A GOOD NIGHT!!🎅
Hello friends! Hope that you’ve had a wonderful weekend! I sure enjoyed my time with hubby relaxing and enjoying the cooler temps for sure! After all the “partying”, are you ready for a new challenge?
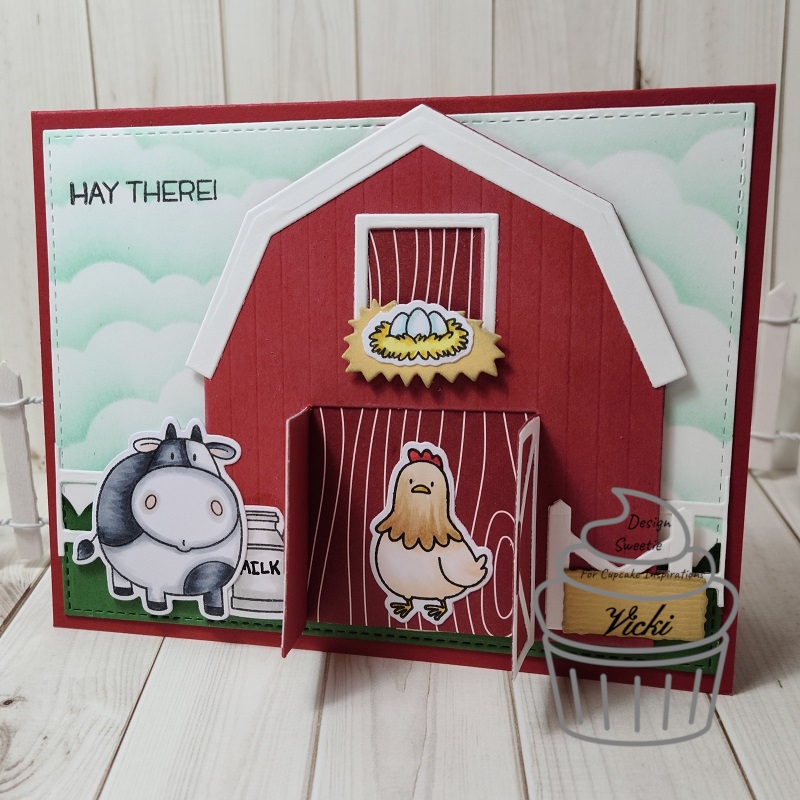
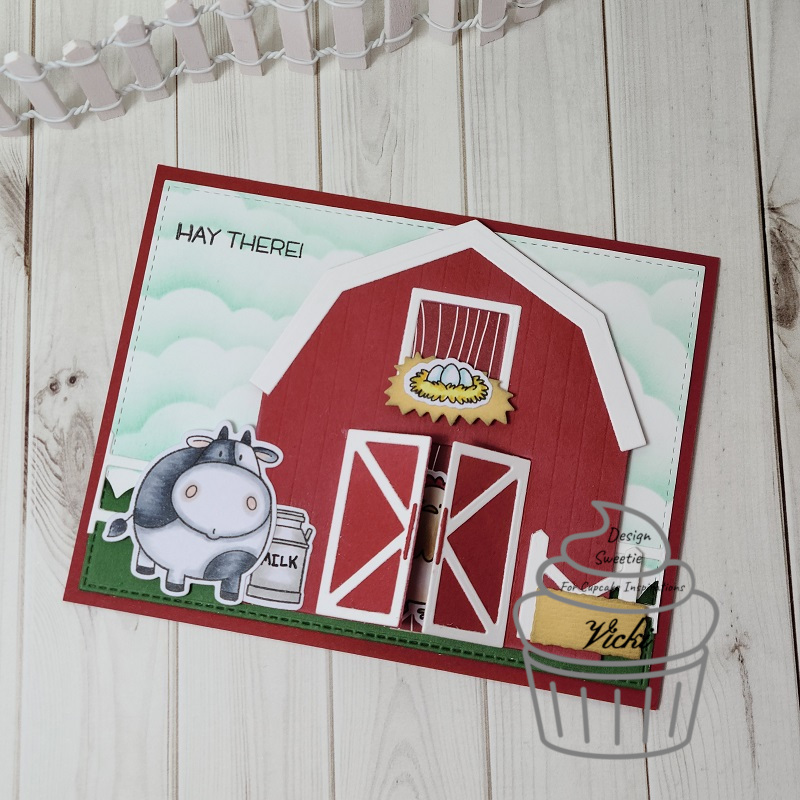
Today we’re starting with a brand new challenge over at {Cupcake Inspirations} with the theme “On the Farm“! So whatever farm related project you’re working on, please be sure to link it up in our challenge! We look forward to seeing what you all come up with!
Here’s what I’ve made for the challenge:
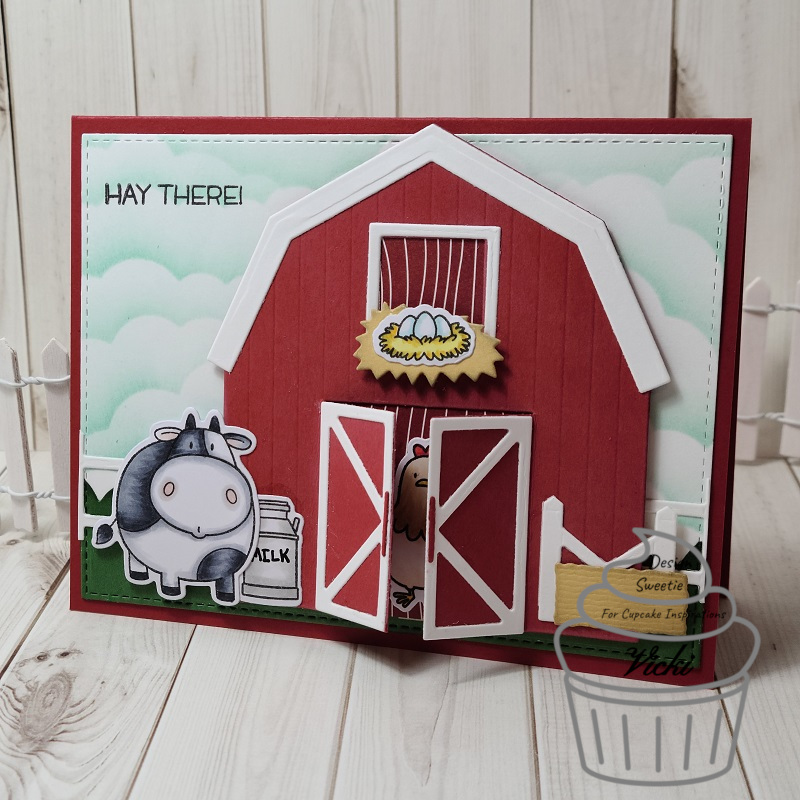
I’ve been wanting to use this fun barn die from My Favorite Things for a while and this was super fun to create a farm scene with! It even has the little embossed markings on the barn along with a bail of hay!🐓
I started out using the MFT cloud stencil and Tumbled Glass Distress Ink for the background panel, then layered over a grass border at the bottom and then cut this panel out with the stitched rectangle die. I also stamped the sentiment as well as a few animals from the MFT The Whole Herd stamp set, colored and cut them out with the coordinating dies. (can’t find in the store!) I then placed my fence border over top of the grass border, popped up the barn with foam tape where I wanted it and then placed all of the other images arranging them over the scene. This front panel was attached to a top folding A2 red card base.
So I love how the door on the barn can open up with that die cut! Of course I had to add something inside the barn and with the nest of eggs sitting on top, it only felt right to place the chicken in there! For the backing of the barn, I’ve taken a piece of paper from the MFT Woodgrain Whimsy Paper Pad and attached it from behind before popping it up with some foam tape. I’ve also taken a pen and wrote the “milk” word over top of the colored can next to the cow.
Hope you’ve enjoyed my creation today!
Thanks so much for stopping by and I’ll be seeing you again soon!