Sending a Smile to a Hunter and Winner on You Tube!

Hello friends! Welcome to the month of September! I cannot believe that Fall is at the door here! The weather has already started to cool us down a bit and Summer is starting to fade as you can see the flowers starting to die off. Now I will look forward to the changing color of leaves which is always amazing.

Today I have a project to share that I’ve made for the Splitcoaststampers Teapot “Make it Pop” challenge. This card is in need of a special SCS friend’s father who is having some difficulties with health and I wanted to help with a smile for him if I could:

“Pop” as he is lovingly called, enjoys the outdoors and hunting which is something that several men in my own life enjoy, so I knew that this would be a direction I was going in with some stamps I have from Newton’s Nook.

For the background, I took a woodgrain embossing folder before fully assembling the card.

Since this is a hunting theme, I thought it would be fun to make a camouflage background and so I’ve used the fabulous tutorial on SCS HERE to create the look.  I also cut off a thin strip towards the bottom to add some interest to the design as well.  Over top of the background, I layered the sentiment from MFT and also cut it out with a banner die.  I used a grassy feilds border die from MFT for the strip at the bottom of the panel and stamped the “Pop…” over it in brown ink.  I stamped and cut out the deer from the Newton’s Nook Serene Silhouettes set with coordinating dies.  I also die cut a few green leaves with an older MFT die for a few accents inside and out.

When you open up the card…
vicki-mmtpt632-forpop-open-1

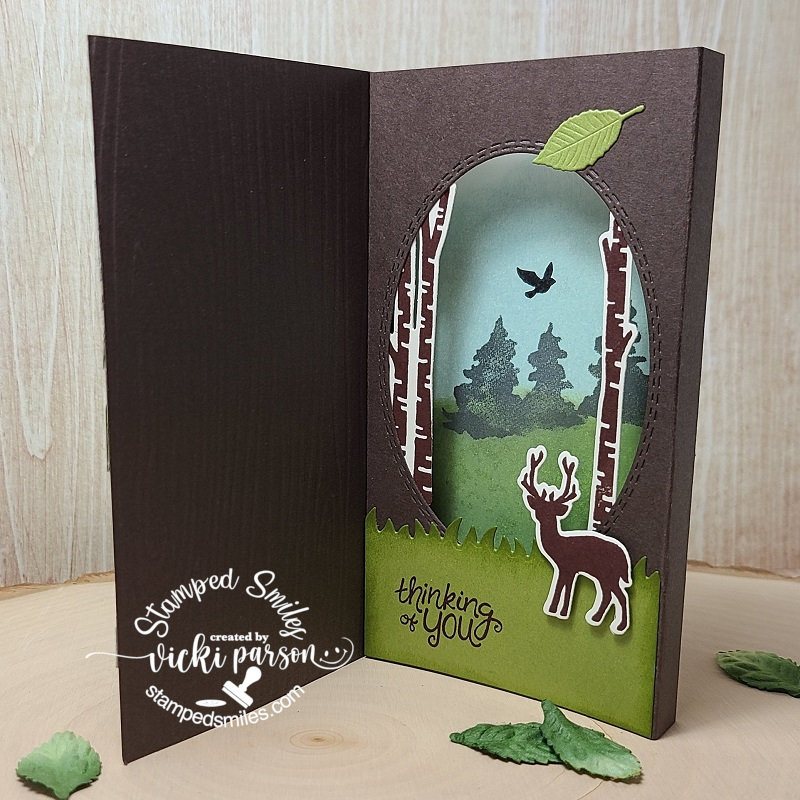
Because of the name “Pop”, the challenge was “Make it Pop”, we needed to show some sort of element like this on our design.  So I found this really fun “Pop-Up Diorama” card tutorial on SCS for my design.

I’ve used an oval die to cut the center of my card and then used a piece of cardstock for the background to attach behind it.  On this panel, I created a scene with blending inks and adding stamped and die cut elements from the Newton’s Nook Whispering Pines stamp set that I’ve also used the sentiment from on the inside.

For the rest of the card, I’ve used the same stamp set that I used on the outside of the card and arranged them to create this scene with different layers that are popped up.

Hope this helps bring a smile over to “Pop”.  Thanks so much for stopping in today and I hope you were inspired in some way too!

Have a great day friends and I’ll see you soon!

Challenges:

  1.  Splitcoaststampers Teapot Tuesday – Make it Pop
  2. International Art & Soul – Include an animal
  3. Crafting Happiness – #64 Anything Goes
  4. 2 Crafty Critter Crazies – Anything Goes + animal
  5. Moving Along with the Times – Create a Scene
  6. Crafty Animals – Anything Goes + animal

Guest Rock Star for Repeat Impressions POTW!

Hello friends!  I’m hoping that you’ve had a wonderful weekend!

I’m very excited to be sharing my projects today as a guest “Rock Star” for Repeat Impressions!  I’ve been asked to share a special post for their “Project of the Week” segment on their blog today!  Yay!

If you’ve been following me for a while, then you know how much I love to ink blend!  It’s something that is fun to do, and I’m always amazed at the finished colors!  I want you to get the same satisfaction when you do it too, so I thought that would take a fun photo tutorial for my guest POTW post!

Vicki-RIGDT-inkblendedscene

There is just something about this scene that makes me feel happy and relaxed!  So of course, that sentiment goes just perfectly with it!  This sentiment/saying is one of my all-time favorites and I was thrilled to use it for this design!

I’ve used the “Canoeing” (2905-G) along with the “Mountain Vista” (629-I) From Repeat Impressions for the image stamping over the ink blended scene.

Vicki-RIGDT-inkblendedscene-close

Here’s a closer look at the details in this card with how I went about creating it.  You can see the different blended colors in both the water and sky.  The setting sun was colored in with a glitter gel pen which created some shimmer to it.  The white gel pen highlighted details in the water.

Vicki-RIGDT-inkblendedscene-flat

Really had fun creating this scene with these stamps which were just perfect for an ink blended background!  I thought this would make for a wonderful retirement card!   If you want to create one of these types of cards yourself, please be sure to check out the step-by-step tutorial over at the Repeat Impressions Blog to see how I went about doing this!

I loved that sentiment stamp so much, that I just couldn’t help but create one more card using it again with another ink blended design:

Vicki-RIGDT-inkblendedlife

Really LOVE how this one turned out!

What’s fun about ink blending is all of the different color combinations you can play with and blend together for different looks!  This time, I’ve used different colors and started my ink blending in the center.  I’ve also used a die to cut out the center of the ink blended panel, heat emboss the sentiment over it, layer with a piece of black cardstock behind it, and pop it up over the rest of the ink blended background.  So even though it was cut out in the center, it’s a continuous ink blended design!

Vicki-RIGDT-inkblendedlife-close

On this ink blended panel, I’ve used some Shimmer Spray over it which gives it a really pretty shimmer with a bit of a “water droplet” effect as the Distress Oxide Inks react to water/liquids.  I think this turned out really cool as it gives it sort of a “Bokeh Effect”.

Before I cut out the center of the ink blended panel, I’ve used the “Flower Power Frame” (10202-Q) to stamp in black ink at the top and bottom of the panel. You can see that part of the stamped image was die cut on the sentiment panel.  I colored the centers of the flowers with a yellow glitter gel pen for added detail.

Vicki-RIGDT-inkblendedlife-flat

To add to the look, I thought it needed some sparkling clear sequins to finish it off!

I hope you’ve enjoyed my creations today and please be sure to stop on over at the Repeat Impressions Blog to check out the full tutorial on ink blending!

Thank you so much to Wendy and the fellow Rock Star friends for having me along as a guest!  Really enjoyed creating these projects with these fabulous stamps!!

Also thank YOU for stopping in today!  I appreciate your support so much!  I’ll be seeing you again soon my friends!

Challenges I’d like to enter:

  1.  Addicted to Stamps &More – Anything Goes
  2. Cute Card Thursday – CAS
  3. Cardz 4 Galz– Black and Bling (second card only)
  4. Daring Cardmakers – Someone or Something You Love (ink blending, words/verse)
  5. Creatalicious – #181 Anything Goes with optional embossing
  6. The Creative Crafters – #25 Anything Goes

Cute Card Thursday Has Spring Fever!

Hello friends!  Hope you are having a great week so far!  It is Thursday already and we are getting closer to the weekend and even closer to the end of March already! WOW!

Since it’s Thursday, it’s time for a new challenge over at Cute Card Thursday!  The theme of the challenge this week is “Spring Fever“!  I can feel it for sure!  Hope you can join us this week with your Spring creations!  Here’s what I’ve made for the challenge:

Vicki-CCT574-SpringFever-BM

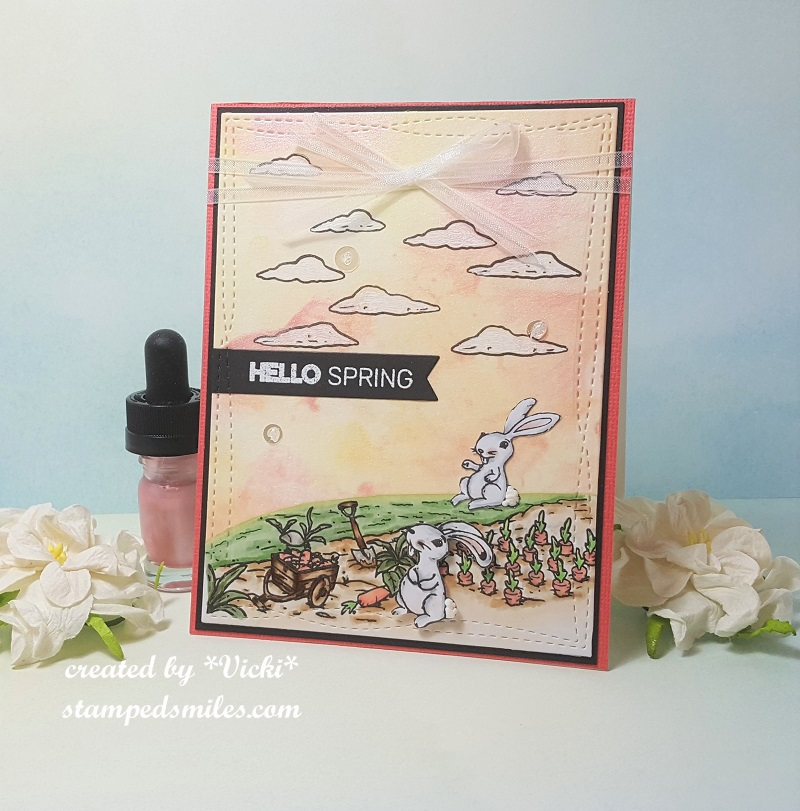
For this card, I did the “smooshing” technique with a couple of distress inks and the little Aqua Pigment bottle from the kit (see photo) for an added color and shimmer.  I set that aside and worked on the images.

Taking a couple of the scene images from the stamp set, I put them together to create this scene over some X-Press It Card and colored everything in with Copics.  I then cut it out and sponged along the edge where the grass is and attached it over the smooshed watercolor panel.  I took both the bunnies from the set, colored them as well and fussy cut them out and popped up the one in the front with foam tape and glued the one in the back.  I cut both of these panels with the MFT Wonky Stitched rectangle die.

I stamped the clouds in the upper portion and colored them with a white gel pen.  I then took a sentiment from the same stamp set and heat embossed it with EP and die cut a banner strip.  I layered this piece over a piece of black cardstock and then took some of the paper from the kit and layered it behind the black.  This is where I took the ribbon and wrapped around the layers and added the bow too.  This was all attached to a white A2 top folding card base.

Vicki-CCT574-SpringFever-BM-close

Here’s a closer look at the image panel.  You can see the pretty shimmer in the background.  I also took some liquid applique and put it on the bunny tails so that when I heat set them, they puffed up.  Always hard to photograph, but I’ve added some shimmer to the carrots with a clear glitter brush pen and colored the shovel parts with a silver gel pen.  Lastly, I’ve attached some sequins from the kit and filled the centers with some Nuvo White Blizzard Crystal Drops.

Vicki-CCT574-SpringFever-BM-flat

From a different angle you may be able to see more of the shimmer on the card.  I love how it turned out and it certainly has me getting that “Spring Fever” where I can’t wait to go outside!!  How about you?  What do you look forward to in the Spring?

Thanks so much for dropping in today my friends!!  Have a wonderful day and I’ll see you soon!

Challenges I’d like to enter my card for:

  1.  Alphabet Challenge – ‘Z’ is for Zesty Colors (I’ve used Squeezed Lemonade and Spiced Marmalade distress inks for background)
  2. Pammie’s Inky Pinkies (PIP1911) – Anything Goes
  3. Allsorts – Favorite image, stamp or die (I love using stamps and coloring them!)

Birthday Wishes for Hubby

Hello friends!  Happy Friday!  I wanted to share a few things from my husband’s birthday we celebrated last night along with the card I made for him.

Vicki-MFTDeer-Bday

I was going for a masculine look of course and I know that he likes nature, wildlife, etc. and with his birthday being in November, I thought a Fall scheme would work out nicely.  Besides, I had gotten some My Favorite Things products and wanted to have a play with them, so I used the current color challenge when making this one.  (See challenges list below)

For my design, I went with a Natural cardstock base, rounded the corners with a corner chomper and ink blended along the edges with some Vintage Photo distress ink.  I got a little more carried away with the inking than what I wanted, but then went over it by spritzing some water and dabbing it up with a paper towel for the water marks.  (I’ve also cut out some leaves with the Falling Leaves Die-namics die set and then sponged some colors around the edges for them as well.  These were added as accents on the over-all design.)

Vicki-MFTDeer-Bday1

I was so excited about using this Delightful Deer Die-namics set.  There are some T-I-N-Y bits in there to cut out and attach! LOL!  I sponged around the edges and bottom of legs with a brown ink.  I die cut some white dots and the piece for tail as well as cut out a couple of brown dots for eye and nose as well as cutting out his antlers.  I also added a few extra “dots” with my white gel pen on the deer.  It was popped up over the scene with some foam tape.  The main deer was cut from Persimmon cardstock which is also what I’ve used to cut out a banner (from the Essential Fishtail Sentiment Strips die-namics) that I white heat embossed the sentiment from the Essential Sentiments stamp set.

Vicki-MFTDeer-Bday2

For my scene, I took some of the MFT Candy Land Paper Pack and use the dotted “Sour Apple” color piece and die cut a panel of it with the Stitched Rounded Rectangle STAX die-namics and placed it over my ink blended natural card front base.  I then used the Stitched Valley die-namics and cut some pieces from brown cardstock and lightly sponged some white ink over top of the “hills”.  I placed those over top of my natural card front base and also cut out some trees from one of the FREE die-namics dies that I received with an order from some Sour Apple card stock and attached them over the “hills”.

Lastly, I wrapped some twine around the card front base, added my die cut leaves where I wanted them, attached this panel to a top folding A2 sized white card base that I’ve also rounded the corners on with a corner chomper.  Lastly, I’ve added some clear crystal drops in random places.

I enjoyed creating this one using mainly die cuts and minimal stamping!  I hope you’ve enjoyed my masculine card design as well! 🙂

Here’s the challenges that I’d like to enter this card for:

  1.  MFT Color Challenge – Persimmon, Sour Apple, Milk Chocolate, Neutral
  2. Happy Little Stampers Anything Goes with Dies –
  3. City Crafter – #437 Woodland Animals
  4. Crafting By Designs – Anything Goes
  5. Creative Moments – Anything Goes

If you happen to follow along with me on FB, then you may have seen where I’ve had the talented lady Dina Kowal create a portrait for me using a past photo from our beloved family member Mocca that passed away this last February.  Dina is extremely talented with her pencils!  My hubby was amazed and here is a photo of him with it last night after he opened it up for his birthday present:

BertBday-11-08-2018-gift

He said, “Oh wow!” when he opened it and wanted me to tell her that she did an amazing job, it looks just like her!   I went through the photos with hubby (he’s not on social media) that Dina had shared of her on-going creative process with the portrait, and this was one from the beginning:

Mocca drawing photo 1

And this was the photo that she used for her creative process:

OLYMPUS DIGITAL CAMERA

We are thrilled and honored to have this stunning work of ‘Mocca’ art in our home and look forward to getting it framed and put up!  Thank you to Dina for sharing her talents with all of us! 🙂

Thanks for dropping by my friends!  See you soon!

Card Results For Dare to Get Dirty Event

Good evening friends!  I don’t normally post in the evening, but I had been working on some other things this weekend and today and hadn’t had a chance to create a post to share my creations with you for the “Dare to Get Dirty” challenge on Splitcoast Stampers!

And of course since the challenges are exclusively for the SCS fan club members only, I cannot share the details with you about what the challenges are about…so please keep that in mind when you see my creations for this without full details! 🙂

The first three cards that I’m sharing were created for my challenge during this event.  It went “live” yesterday and there are really so many wonderful and creative entries in the gallery for this!  I’m so glad everyone has been having fun playing along with it!

Vicki-DTGD18basementstamper-paperpeicing

I couldn’t stand how stinkin’ CUTE this My Favorite Things stamp set was, so of course I HAD to go grab it!  I had been holding off on it for quite a while and then finally broke down and just got it!  That cow in there just kills me! LOL!!  I am talking about the MFT BB The Whole Herd stamp set.  I’ve used a ton of different paper from my stash to create a scene for the pigs.  I’ve also used various MFT dies to put everything together.  I have handwritten the words that are on the trough the little piggy is standing in.

Vicki-DTGD18basementstamper-paperpeicing1

My next card is made using the tutorial on SCS called the Herringbone technique. (You do NOT have to be a fan club member to see this technique…it’s open for everyone.)   It’s been around for a while, but I really love the results it can bring to a background on a card!  I have used the flower image from a retired Lawn Fawn stamp set and a greeting set and die from Impression Obsession.

Vicki-DTGD18basmentstamper-paperpiecing2

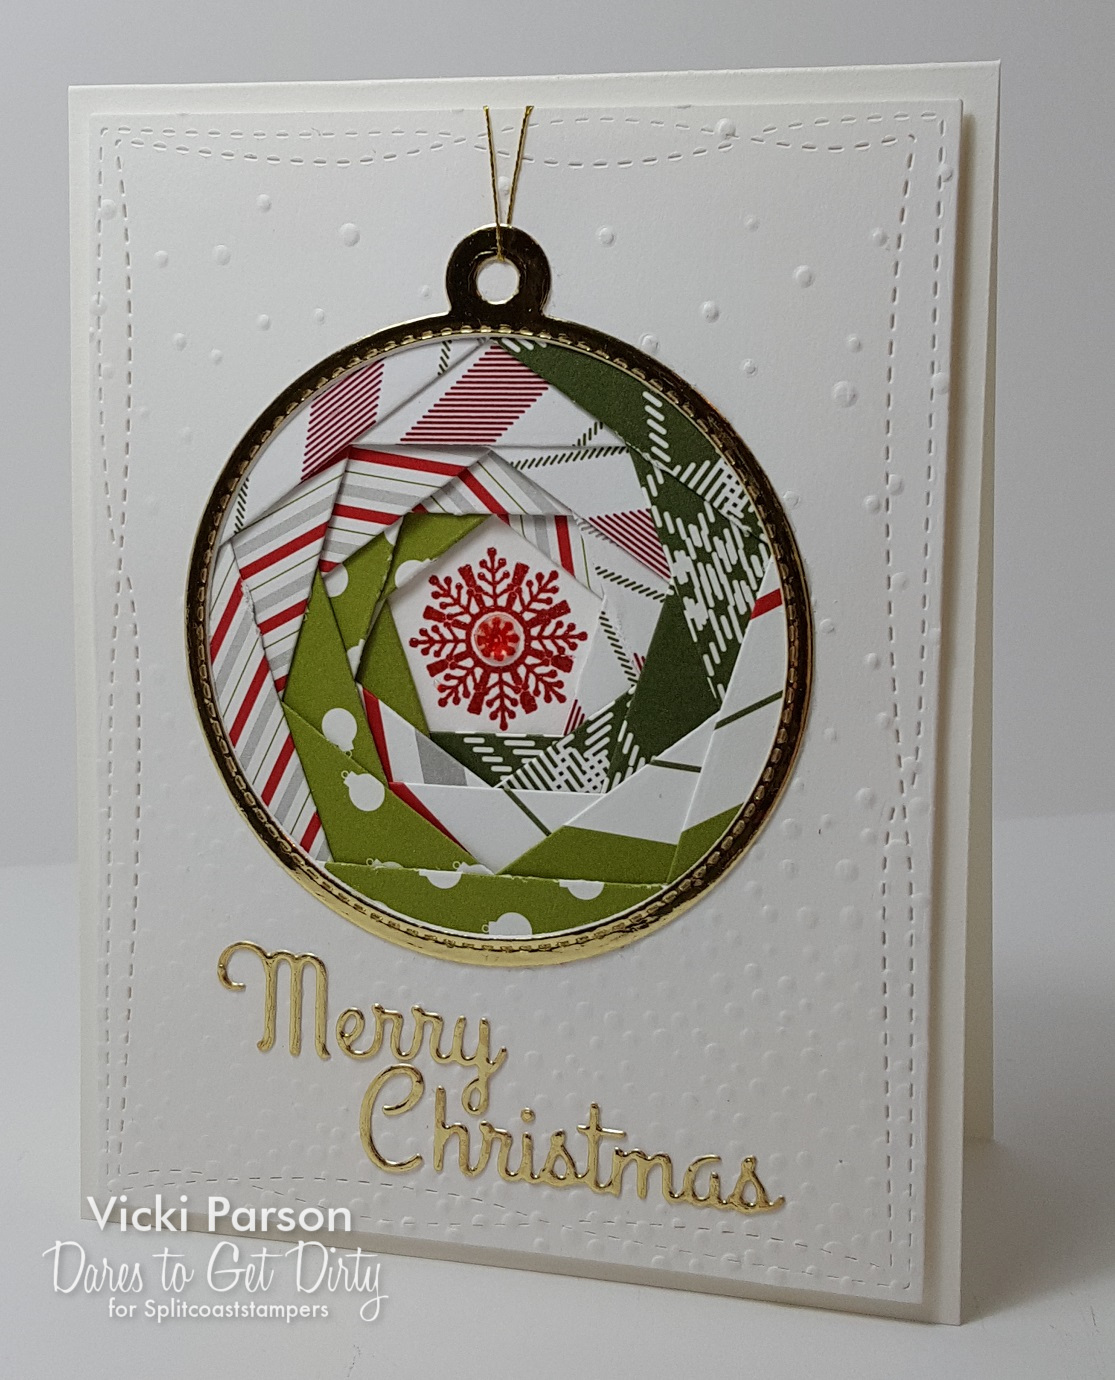
This final card for my challenge is done using an ‘Iris Fold‘ technique.  I have used a circle die cut to create my design and then went around the circle with a tag die from Lawn Fawn that I also used an additional circle die that I’ve used to cut out the center of it for a framing effect and so that it looks more like an ornament.  I used an embossing folder from SU! as well as the snowflake image in the middle of the ornament along with a wonky stitched rectangle die to cut the panel out with and then added a sentiment cut with a die from CAS-ual Fridays with gold foil card stock.  The gold thread was added through the tag hole at the top and secured around the back of the main image panel and lastly, I added a crystal in the center of the snowflake.


Another card I wanted to share was for another challenge issued from a fellow Dare to Get Dirty Dozen design team member.  This one took me a while to grasp how to make it happen, but once figured out, it turned out pretty cool:

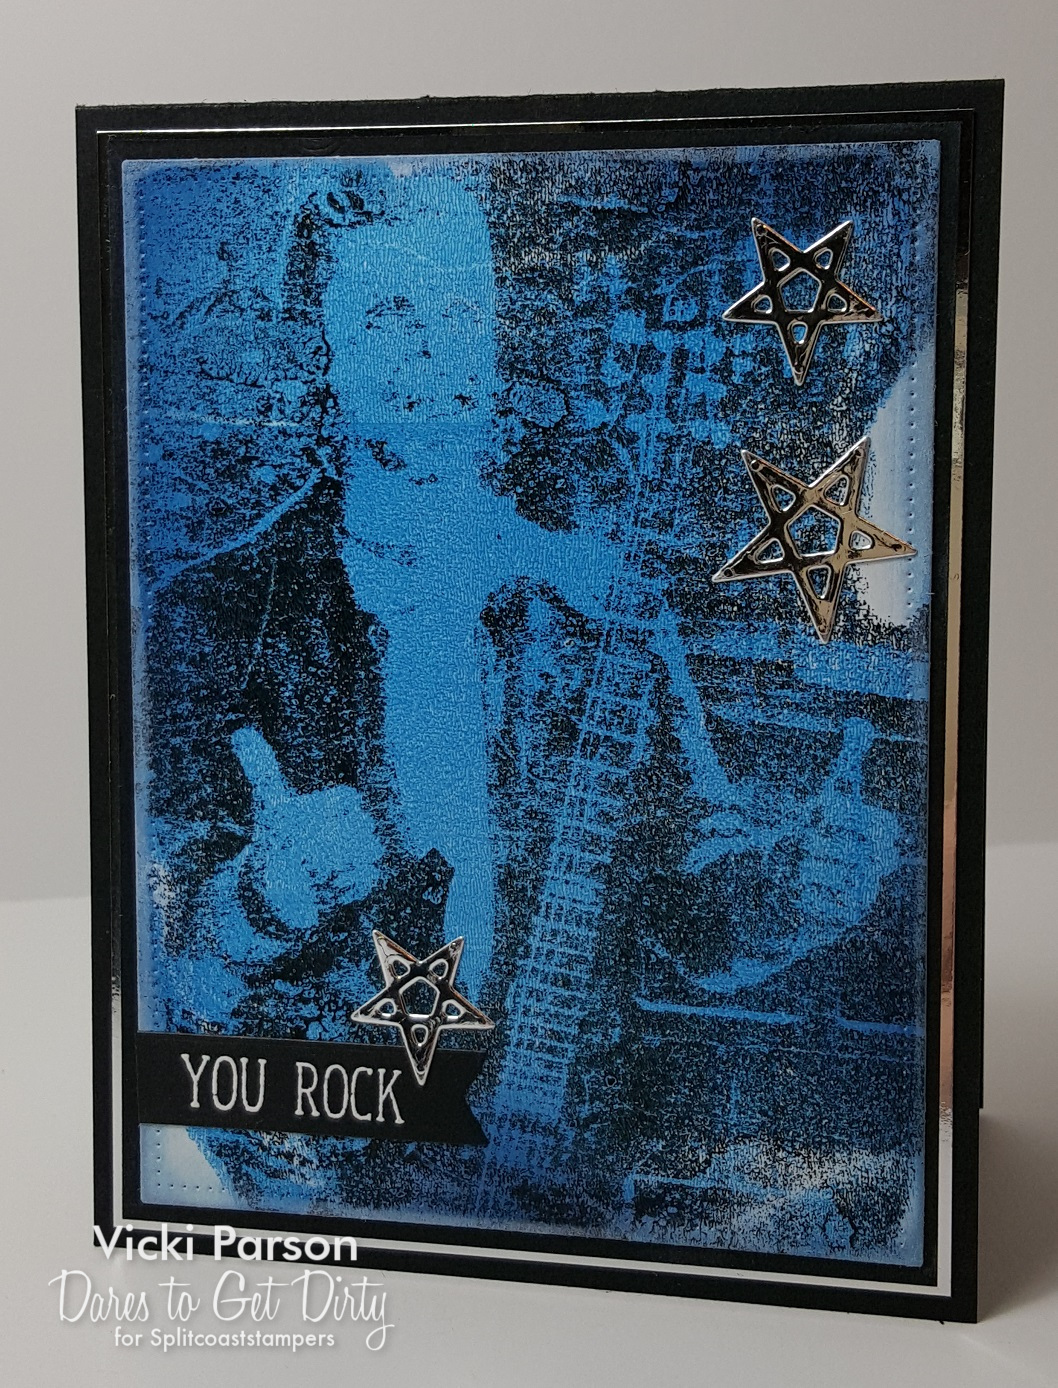
Vicki-DTGD18KelliJoA-pulledpopart

Again, I can’t share with you the details about the challenge, but it’s sort of a ‘mixed media’ based design! 🙂  I’ve die cut some stars using some silver foil card stock and added a sentiment to go with it embossed with white EP over a black banner strip.

Thought this would make for a fun masculine style card.

Be sure to stop by again tomorrow!  I have something fun to share with you!!!

Father’s Day Makes

Hello friends!

Hope that you had a good weekend!  Since the celebration is over and there are no “peekers” to worry about anymore, I can post the cards that I’ve made!

OLYMPUS DIGITAL CAMERA

This truck image is part of my purchase from the Stamp Convention that I went to from the Rubber Cottage booth.  As a matter of fact, I purchased a kit from them which is where the embossing folder and silver metallic paper comes from on my card.

I just colored the truck with Copics, cut it out with the die and popped it up over the “tree scene” with foam squares to make it look like the truck is driving into the scene.  The papers in the background along with the tree image and rest of the card comes from some old Stampin’ Up! products in my stash…too numerous to count all the old! LOL!

This next card was made especially for my husband:

OLYMPUS DIGITAL CAMERA

This one took me a bit out of my comfort zone as I basically watercolored the entire scene.  The only set of watercolors that I own are the Kuretake Gansi Tambi ones.  I really do like using them, but the pans are starting to empty out on a few colors now.  So I’ve been looking into different kinds to see if I will try some new ones.  Do any of you have watercolors that you like using?

I did have a bit of help with the trees from the Newton’s Nook Whispering Pines stamp set.  I took the images, scribbled some watercolor crayons (very old SU! ones!) over them, misted them with water and stamped them where I wanted them to be.  I used my paint brush to move around the colors a bit so they blended with the scene a bit more.

I stamped the silhouette images from the Newton’s Nook Serene Silhouettes and the greeting from the Winton’s BBQ set with black ink using my MISTI tool several times as it was watercolor paper which is always hard to get a complete impression on.  I also used a Spectrum Noir clear glitter pen to go over the blue for the water area.  Layered onto a piece of black and then onto a white side folding A2 sized card.

Sometimes it can be a challenge making masculine cards appropriate for each male you need a card for, but I think I did fine keeping in mind the people they went to and they were really fun to make!  Hope you’ve enjoyed them too!

I would like to enter these challenges:

  1.  Try it On Tuesday – For the boys
  2. Crafty Creations – Anything Goes
  3. Creative Moments – Anything Goes
  4. Watercooler Wednesday (WWC174) – All About Occasions – Father’s Day
  5. Crafty Catz – Anything Goes
  6. Crafty Friends – Anything Goes