Believe Tag

Hello friends!  I hope you all had a wonderful Thanksgiving and maybe even took advantage of some great Black Friday deals today?!  I was happy about shopping a little bit this morning and almost forgot to post about my tag here! LOL!

Vicki-NNTag-Day3

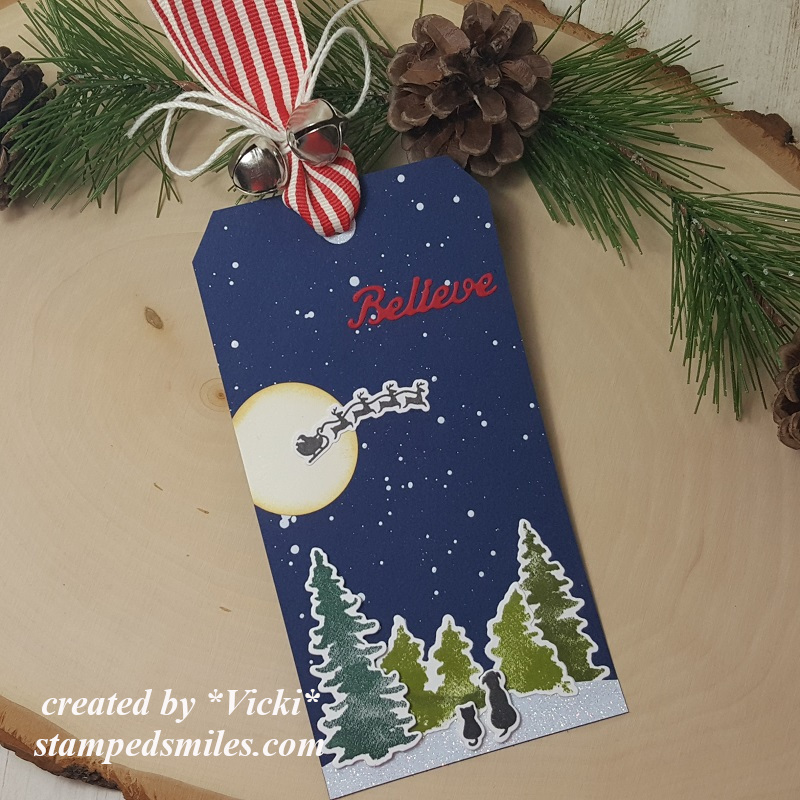
The scene on this tag was always a fun vision in my head from a child!  I would imagine Santa in his sleigh flying over the moon under a snowy night sky.  I love the peace and magic of it all with even little critters stopping to watch and listen to the magical sleigh bells ringing in the night.

I constructed my own tag the size I wanted and snipped off the top edges to make it look like a tag.  It was made with Navy cardstock.  I punched a hole at the top and made a reinforcer with white Glitterstock.  I then took some white watered down paint and splattered it over the background for a snow fall effect.

I bought this set a few years back from Newton’s Nook called Whispering Pines and I’ve used the coordinating dies to create the scene at the bottom.  I took some white Glitterstock for the snow the critters are sitting on.

For the “moon” I punched out a circle from vanilla cardstock and sponged around the edges of it.  I took a glitter brush pen to go over it.  The Santa’s sleigh was given to me from a fellow blog friend that I’ve attached over the tag.  I die cut the sentiment from red cardstock.

Lastly, I’ve added some red striped ribbon from my stash and tied on a couple of silver bells with white twine around it.  Those bells make a fun jingle sound like I imagine from my scene! 🙂

Vicki-NNTag-Day3-closer

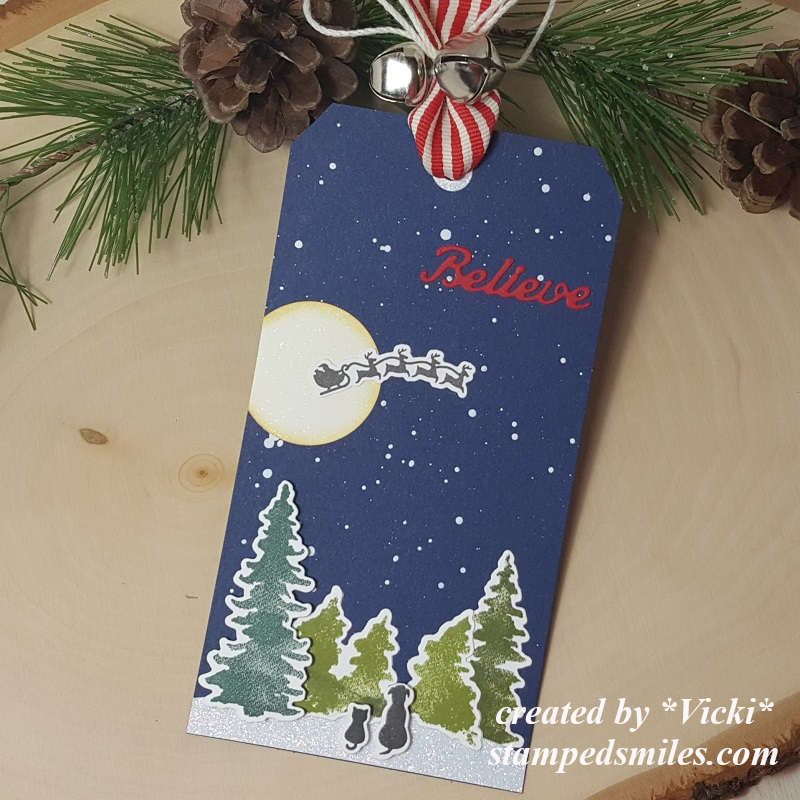
Here’s a tad bit closer view of the tag.  Here you can some what see the shimmer on the moon and the sparkle on the snow ground where the critters are.

Have a great evening my friends!  I’ll see you soon!

Challenges:

  1.  Crafty Creations – Anything Goes
  2. Little Red Wagon – Snow
  3. The Sisterhood of Crafters – Trees
  4. My Time to Craft– Christmas Scene

Come Aboard the Penguin Polar Express!

Hello friends!  I hope that you are having a wonderful week so far!  I have a cute wintry card to share with you today:

Vicki-WSPenPolXpress-Nov19

Isn’t this the cutest little clan you’ve ever seen?!  It looked to me that the polar bear was sliding around and having fun on the ice, so the penguins decided they wanted in on the fun too and are trying to hitch a ride! LOL!!

As you may recognize the sweet penguins from artist Crissy Armstrong, this image has come out this month in digital format called Penguin Polar Express.  I really adore her sweet images.

For my card, I have followed a sketch to make my card and thought it would be nice in blue colors and sparkle.  So I printed out some papers from the Whimsy Stamps Winter’s Magic Blues digital papers and used them for my design.  I’ve also cut out some white Glitterstock for some of the layers as well as some blue cardstock for a finished top folding 5.25″ square card.  The scallop square panel was popped up with foam tape and the circle image panel was popped up with a die cut piece of craft foam.

I finished it off with some clear metallic ribbon and snowflake sequins that was dotted with some Nuvo White Blizzard Glitter Drops.

Vicki-WSPenPolXpress-Nov19-close

Here’s a closer view of the “gang” I’ve colored up with Copic markers.  I was concerned about the colors of all of the different hats the penguins were wearing, but thought the colors really make the image stand out from the card.  I dotted their cheeks with a white gel pen.

You can see where I’ve taken a glue pen and added some sparkle to the left penguin’s hat trimming.  I also took the glue pen and went around the circle of the image and added some glitter there too.  I colored the bottom of the image with Copics and covered it with a shimmer brush pen to make it look like ice.  (You can see it better below.)

Vicki-WSPenPolXpress-Nov19-flat

I hope you’ve enjoyed my card today and have been inspired in some way or at least been amused with this sweet image on my card!

I thank you so much for stopping by today!  I look forward to seeing you soon!

Challenges:

  1.  Cheerful Sketches – November sketch
  2. Try it On Tuesday – Cold, Cold, Cold!
  3. A Bit More Time to Craft – Anything Goes
  4. The Creative Crafters – Anything Goes
  5. QKR Stampede – #372 Anything Goes
  6. Creative Fingers – Anything Goes

Snow One Like You for Whimsy Stamps

Hello friends!  I hope you’re having a wonderful week so far!

Today I have creation to share with you using this really sweet image from Whimsy Stamps:

Vicki-WSTawny-Nov12

I really adore this digital stamp that came out this month for Whimsy Stamps called Tawny.  It’s one that I picked to make something with as it was a bit personal to me.  That little owl with those big eyes is so sweet and really reminds me of my grandma who passed several years ago.  She was an owl lover….so she’s like a sweet little angel with me here!  There was SNOW one like her either!

To create my card, I started with some watercolor paper and Distress Oxide Inks in Seedless Preserves, Dusty Concord, Stormy Sky and Broken China (from bottom to top order.)  I spritzed it with a water bottle and soaked it up with a paper towel.  I then took some white paint watered down and splatter it with a fan brush over the panel.  I also took some shimmer spray and covered the entire panel.  You can see it better in the photo below.

I took a Lawn Fawn die to create the tree border with woodgrain paper and then die cut a snow border with glitter cardstock and glued it behind the frame.  I also took the sentiment from the Whimsy Stamps Snow Flurry clear stamp set and white heat embossed it over a strip of vellum that I’ve attached over top of these layers (with the inked background also) by using my Xyron Sticker machine.  These pieces were die cut with a stitched rectangle die, layered over a piece of white cardstock and then mounted onto a purple A2 sized top folding card base.

Lastly, I’ve added my image and some snowflakes that were cut out with some more glitter cardstock and each snowflake was dotted with some Nuvo White Blizzard Glitter drops.

Vicki-WSTawny-Nov12-close

Here’s a closer view of the image and how I’ve got her colored up with Copic markers.

If you take a good look at the top portion of the background, you can sort of see the shimmer from the spray.  It’s really sparkly in the light.

I accidentally got a piece of the “faux snow” photo prop on her skirt. LOL!  I covered the flower on her hat with a glitter brush pen and I’ve used some Nuvo Morning Dew Crystal Drops over the owl’s eyes, but it cracked.  I don’t like it as much as the glossy accents as it doesn’t crack so easily like this does.

She was fussy cut out and popped up over the snow border with foam dots.

Vicki-WSTawny-Nov12-flat

I really like how this one turned out with the colors and I hope you like it too!  The inked snowy backgrounds are really fun to play with!

Thanks so much for dropping into today and I’ll see you again soon!

Challenges:

  1.  Shopping Our Stash – Snowflakes
  2. Crafting By Designs – November Anything Goes
  3. Cardz 4 Galz – Let it Snow
  4. Moving Along With the Times – Snowflakes
  5. Creative Moments – Anything Goes with Optional:  “Baby it’s Cold Outside”
  6. Krafty Chicks – Winter
  7. QKR Stampede – #371 Anything Goes

Anything Goes at Cute Card Thursday with Holiday Wishes

Hello friends!  I hope you’re having a great week so far!  I’m trying to enjoy the warmer temps while I still am able to before it starts getting too cold out!  I wish I wasn’t feeling achy either, so hopefully that will improve too!

Today starts a new challenge for Cute Card Thursday and this week is our monthly “Anything Goes” challenge!  We’re sponsored by Whimsy Stamps and of course you know I’m using one of those images for my card today:

Vicki-WS-CCT607

How sweet is this one!  This digital stamp is by Sylvia Zet called Wintry Fairy from Whimsy Stamps.  Really love coloring up her sweet images!

For the background white layer, it’s hard to see, but I have used a snowfall embossing folder over it.  I also took a couple of the Whimsy Stamps Christmas Fun digital papers, printed them out and cut some sections for my card layout.  I layered them with some brushed gold cardstock and put them over the white embossed layer.  The piece at the bottom also has some gold ribbon wrapped around it that I added before attaching to the white layer.  These layers were mounted over a piece of red 5″ square top folding card base.

I also white heat embossed the sentiment from the Whimsy Stamps Holiday Mini Sentiments clear stamp set and then cut it out with the Whimsy Stamps Quick Strips die set.  I cut it twice so that I could get the length that I wanted and then glued it over the bottom of the layered image panel.

I then added a gold ribbon bow with some gold thread nested underneath a snowflake button that I covered with a rhinestone.  I also attached some white poinsettia flowers from my stash.

Vicki-WS-CCT607-close

Here’s a closer view of the image and how I’ve got her colored up with Copics.

I used a white gel pen for the bird’s cheeks and the berries as well as places on her coat.  You can see that I also took a gold gel pen and added details to her coat as well as her wings.  I then covered her wings and the flowers in her hair with a glitter brush pen.

For the snow t the bottom, I took a glue pen and loose clear glitter over top.

I used a square die cut to cut her out with and layered onto a piece of brushed gold cardstock and then another layer of red cardstock that was cut with a scallop square die.

Vicki-WS-CCT607-flat

I hope that you have enjoyed my card today!  It’s always great to get another Christmas card done before the rush gets going!

Please excuse me for a few days as I’m not feeling well, but hopefully will be around to visit with you soon!  Thanks so much for stopping in as I enjoy reading and smiling and sometimes giggling over your comments! 🙂   I will see you soon!

Challenges:

  1.  Love to Craft – Nov Anything Goes LTCCB40
  2. Sheepski Designs – Christmas is Coming!
  3. The Fairy and The Unicorn – Nov Anything Goes + Magical/Fairy
  4. Creative Fingers – Anything Goes
  5. Pammie’s Inky Pinkies – PIP1944 Anything Goes
  6. Unicorn – Christmas/Winter
  7. Daisy Chain – Christmas/Winter

It’s SNOW Fun for Whimsy Stamps!

Hello friends!  Welcome to the weekend and I hope you are having a great one so far!

Today I’m sharing this adorable image from the November Digital New Release for Whimsy Stamps!  Be sure to check them all out in the store!  They’re so cute!!!!

Vicki-PenguinSnowFun-Nov2

How fun and cute are these guys?!!  I’m using the Penguin Snow Fun image for my card today!  Now you already know how I love these penguins, but how cute are they especially that one in the middle with the mouth open! LOL!

For my card I started with a watercolor panel and then white heat embossed the snowflakes over it from the Whimsy Stamps Snow Flurry stamp set.  I then went over this panel with water and added some colors over it with Distress Oxide ink pads smooshed down on my glass mat and picked up with a brush and water.  I’ve used Peacock Feathers, Stormy Sky, Dusty Concord, Chipped Sapphire and Salty Ocean for the colors.  I tilted my panel to get the water to run down a bit and heat set it.

I cut a piece of glitter cardstock with the Kinetic Curved Hills die set as well as some snowflakes from the No-See All Seasons Tree die set.  I placed the hill at the bottom of the watercolor panel and randomly attached the snowflakes to the background.

For the sentiment banner, I white heat embossed it from the same WS Snow Flurry stamp set and added a snowflake in the center of the ‘O’.  I trimmed it into a banner with my scissors and added to the card.

I then took some foam tape and popped up the image over the hill and then added some gems to the center of each die cut snowflake.

Vicki-PenguinSnowFun-Nov2-close

Here’s a closer look at this adorable image that I’ve got all colored up with Copic markers.  For the bear and everyone’s cheeks, I’ve used a white gel pen and for the band on the penguin’s earmuffs, I used a clear glitter gel pen.

For the penguin’s red hat trimmings, I used a glue pen and some loose clear glitter over top.  I fussy cut out the image and popped it over top of the glittery snow hill.

OOPS…a bit of the snowflake staging stuck to the glittery snow hill a bit! LOL!

Vicki-PenguinSnowFun-Nov2-flat

Really had a great time coloring this sweet image and getting messy creating the background too!  Hope you’ve enjoyed my creation today as well!

Thanks so much for checking in with me today my friends!  I appreciate it very much and I’ll be seeing you soon!

Challenges:

  1.  Happy Little Stampers Watercolor Challenge – Anything Goes (using watercolor) + optional: animals
  2. Christmas Crafts All Year ‘Round – Stockings or other Winter Clothing
  3. Crafty Animals – Anything Goes + animal
  4. Crafty Catz – Anything Goes with optional: snow
  5. Brown Sugar – November Anything Goes

Let it Snow for 2 Crafty Critter Crazies

Hello friends!  Happy November!  The weather has come in full force with the several inches of snow that came over our area on Halloween!  I blinked and Fall was over!   I don’t ever remember it snowing this early before, but I guess it’s very fitting for my card today then! LOL!

Since today is the first of the month, we begin a new challenge over at 2 Crafty Critter Crazies and the theme is always “Anything Goes + use a CRITTER” and it can be any type of crafty project you like to make!  Hope you will join us this month and share your lovely critter creations!

We are sponsored this month by The Paper Shelter and here’s the card I made:

Vicki-2CCC32-TPS

We were provided an image set to share for the team, and this beautiful set is called “Holy Night” and it comes with both the regular digital image, plus a colored version as well as some beautiful background scenes to go with it.

For my card, I printed out the “non-colored” image and used my Copic markers to color it and then used some oval dies to cut it out.  I also stamped a sentiment from Whimsy Stamps at the bottom of the oval.

I printed out the background scene paper and sponged around the edges with some blue ink that I’ve also sponged around the oval edges as well.  I added some silver metallic ribbon around the background layers and slipped the brown oval layer behind the ribbon.  I die cut some MFT snowflakes with silver glitter paper and added them around the card design.  These background layers were then mounted over a top folding white 5″ square card base.

I popped up the oval image panel with craft foam and then added a few rhinestones in the center of the snowflake over the oval and the one in the center of the bow.

Vicki-2CCC32-TPS-close

She looked a little Vintage to me and with the wintry papers, so I wanted to color her outfit in blue tones and accent with browns. For the “spots” on the deer, I used my blender 0.

I wish you could see it better in the photo, but I’ve used a gel pen for accents around her outfit trimmings including the lines of the inside of her cloak.  I also used the gel pen for the “berries” in the holy around the deer’s neck and her hair piece.

For the snowfall, I took a glue pen to add the “dots” over the image and lined the ground with it and then sprinkled some glitter over the entire oval image.

Vicki-2CCC32-TPS-flat

I hope you’ve enjoyed my wintry card today and were inspired in some way.

Thanks so much for stopping in today and please stay tuned for another post coming up from me today!!

Challenges:

  1.  The Paper Shelter – #404 Make it Square (square card)
  2. Aud Sentiments – Anything Goes + a Sentiment
  3. CRAFT – Winter

Snowman’s Birdie Friend For Whimsy Stamps

Hello friends!  I really can’t believe how COLD it’s been our way especially for October!  We even have SNOW in the forecast!  Eeek!  Now that’s scary for Halloween!

So since Christmas is on the way, I suppose it’s a good time to get into the spirit of the cold with a cute little snowman and his friend from Whimsy Stamps:

Vicki-WSSnowmanBirdie-Oct29

This guy looks so happy that his bird friend found a place to rest on his hat! 🙂  This image is called Snowman’s Birdie Friend by Crissy Armstrong for Whimsy Stamps.

I wanted to make a nice little “snowy scene” for the image, so I took out the Whimsy Stamps Snow Flurry clear stamp set and stamped some of the snowflakes from the set around the top of the image panel.  I then die cut the image out along with creating a red “frame” with the Whimsy Stamps Notched Rectangles die set.  (To do this, I just glued the red frame made with the die onto a piece of white cardstock and then glued the image panel inside the red frame.  It’s the same size, so it fit into each other.)  At this point, I added some glue to the bottom area under the snowman and sprinkled on some chunky white glitter for the snow-covered ground.

Since I was following a card sketch (see challenges below), I took out some papers from my stash and cut them on a diagonal and attached them over a piece of white cardstock and then wrapped some white organdy ribbon around it before attaching it to the top folding red 5″ square card base.

I took the Whimsy Stamps Holiday Mini Sentiments clear stamp set and white heat embossed the sentiment over the red cardstock and cut it out with a banner die from my stash.  I popped this up with foam tape over the image panel.  I also had a snowflake die and a border snowflake die that I cut with some glitter cardstock and attached around the card design and added some rhinestones in different areas.  (I thought this helped add to the wintry scene of the image too.)

Lastly, I’ve added a brown button and natural twine over top of my white organdy bow.

Vicki-WSSnowmanBirdie-Oct29-close

Here’s a closer view of how I’ve colored in the image.  As you can see, I’ve done a bit of paper piecing on the image by taking the same paper from the right edge of the card design and using it for the scarf, mittens and hat band.  (I’ve used Copics to give it a bit of shading too, which you can see details below.)

Maybe a bit hard to tell in the photo, but I’ve added just a small dot of Glossy Accents to his blue nose.  There are also highlights with a white gel pen on his nose, cheeks and the bird’s cheeks.

Here’s the Copic markers I’ve used to color the image with:

  • Snowman’s Hat – E89, E87, E84
  • Bird & Buttons – E39, E37, E35, E32 (Y17 for beak)
  • Snowman’s nose – B26, B24 (R00, R000 for cheeks)
  • Snowman’s Shadows – B00, B000, B0000
  • Scarf and Mittens Shadows – W3, W1

Vicki-WSSnowmanBirdie-Oct29-flat

Hope you’ve enjoyed my card today and it has brought you joy in some way! 🙂  I sure had lots of fun putting it together!  Thanks so much for joining me today and I’ll see you soon!

Challenges:

  1.  Sketch Saturday – Sketch #587
  2. Crafty Creations – Anything Goes #401
  3. Jingle Belles – Rudolph and Friends
  4. Crafty Catz – Anything Goes
  5. Winter Wonderland – Merry and Bright
  6. QKR Stampede – Anything Goes

Merry and Bright for Whimsy Stamps

Hello friends!  Hope you all had a wonderful weekend!  I had another great weekend out with hubby, but this time we visited Starved Rock National Park.  Really amazing nature hike we took and I’m wore out!  I sure wish I was able to do more hiking than what we did, but what we did do was amazing.  I will share some photos soon of our last two weekends out.

For today I have a sweet image from Whimsy Stamps to share with you and another Christmas card that I was able to add to my pile which is always nice to have!

Vicki-WSPolarBearXmasTree

This little guy is so sweet trying to decorate his poor “Charlie Brown” Christmas tree here! LOL!!  This is another adorable Crissy Armstrong image called Polar Bear’s Christmas Tree.

I’ve cut out the image the whole length of the card front panel and layered it over a piece of black cardstock and then some red cardstock.  I was placed over a piece of digital paper that I printed out from the Whimsy Stamps Rustic Wood and Brick Digital Paper Collection.  I ran the edge of some scissors along the edges of it and then added some of the plaid ribbon along the left side.  I then mounted this over a 5.25″ square top folding black card base.

I die cut some pine boughs from green cardstock and arranged and glued it down over the strip of plaid ribbon.  I then added a plaid ribbon bow over top and then attached a black button with a twine bow in the center of that.

Vicki-WSPolarBearXmasTree-close

I’ve put a lot of detail into this image which is why I wanted this to be the main focus of the card.  I actually didn’t use too many different colors of Copic markers, but it took a while to get the “fur” looking the way I wanted.  (See list below.)

I started the scene by ink blending around the top edges and a bit around the sides with Weathered Wood distress ink.  After the ink blending, I took the sentiment from the Whimsy Stamps Holiday Mini Sentiments clear stamp set and white heat embossed it over the top right edge of the image panel.

For finishing details, I took some yellow chalk for around the star at the top of the tree for a glow look and then covered the star with some gold Stickles.  I brushed the red ornament with a glitter brush pen and then the “hook” was colored with a gel pen.

I covered the entire bottom of the image panel with a glue pen and then sprinkled on some clear glitter for the snow.  Lastly I’ve added some red “berries” to the garland that the polar bear is holding with some Red Nuvo Drops.

Here’s the list of Copic markers that I’ve used to color in the image with:

  •  Polar Bear – W9, W7, W5, W3, W1, W0, blender 0, R00 and white gel pen
  • Tree and Garland – E25, E23, YG67, YG63, YG61, R39, R37, R35
  • Snow Ground and Shadows – BG000

Vicki-WSPolarBearXmasTree-flat

I love the “woodsy” look to this image and I was trying to capture it in my design too.  I hope that you’ve enjoyed my Christmas card today and were inspired or helped bring you a smile!

Thank you so much for stopping in with me today and I’ll be seeing you soon!

Challenges:

  1.  Merry Little Christmas – Anything Christmas Goes
  2. Crafty Animals – Anything Goes + animal
  3. Christmas at Sweet Stampin’ – Anything Goes with optional: stars
  4. Crafty Creations – Anything Goes
  5. Simon Says Stamp Wednesday – Christmas
  6. CRAFT – Christmas
  7. Crafty Catz – Anything Goes

Find Peace with a Winter Deer

Hello friends!  As I had mentioned in yesterday’s post, we are currently being hit with snow AND ice over my way…so I might as well embrace it, right?!   Although I’ve been trying to sneak in some Spring creations, I also enjoy creating Christmas/Winter cards throughout the year so that I can take my time and not be hurried during the rush of the Season at the end of the year which makes it more enjoyable…and peaceful! 🙂

I’m using a stamp set called Winter Deer which I’ve used on my card for today:

Vicki-SnSWinterDeer-Feb

I started out with a piece of watercolor paper and used the Blue Blitz and Atlantis Burst Nuvo Shimmer Powders to create the background by spritzing it with water until I achieved the look I wanted and set aside to dry.

I cut this panel out with an oval die and using my cut-out deer for reference to see where I wanted to position the sentiment, I embossed the sentiment from the stamp set with White EP.  I used some Magic Speckle EP for a really cool background effect over the watercolor panel! (You can see it better in the photos below.)  I’ve used both Dimensional Glue as well as foam dots to attach the deer image and oval layers together.  I’ve used both white cardstock as well as some gold mirror cardstock for the layered panels.

Vicki-SnSWinterDeer-Feb-Close

Here’s a closer look at the Copic coloring I’ve done on the deer as well as the Magic Speckle EP effect on the background!  Since it’s a thicker type of powder, I didn’t attach it with anything.  I just added “piles” of it where I wanted and melted it from underneath, so it didn’t blow all over.  Loving how it has that “icy look” to it!

For the deer, I’ve used my Tim Holtz 5″ Mini Scissors to VERY carefully cut this image out and then used a black marker to go along the edges to hide my imperfections. For the snow over the branches, I’ve used a Nuvo Precision Glue Pen to go over it and then sprinkle some Sparkling Snow Glitter over it.  I also took the Nuvo Red Berry Crystal Drops and covered the “berries” with it.  I set this aside until dry to work on the rest of my card.

Vicki-SnSWinterDeer-Feb-Flat

So for the glittery background panel behind the oval layers, I took a piece of white cardstock and attached it with a piece of the Adhesive Sheets and die cut it out with a scallop rectangle die.  I removed the release paper from it and burnished some of the same Sparkling Snow Glitter into this panel.  I attached it over another piece of gold mirror cardstock and then wrapped some organdy ribbon around it and attached a bow along the side.

In the center of the bow, I added a snowflake sequin and then put a dot of the Dimensional Glue in the center of it and then added some more of the Sparkling Snow Glitter.

These layers were attached to an A2 sized top folding white card base and then the oval layers were attached over the glitter panel next to the bow.

I hope you’ve enjoyed my card today and got inspired to keep ahead of making your Christmas cards this year!  Thank you so much for dropping in!  I really appreciate your kindness and support so much!!  (Reading your comments always brightens my day more than you know! HUGS)

Challenges I’d like to enter this card for:

  1.  Winter Wonderland – Anything Christmas Goes
  2. Merry Little Christmas – (MLCCB7) Anything Christmas Goes
  3. The Holly and Ivy Christmas Challenge – Anything Christmas
  4. 4 Crafty Chicks – Lots of Layers
  5. Happy Little Stampers – Anything Goes with Dies
  6. Allsorts – Winter Sparkle

Anything Goes for Cute Card Thursday!

Hello there friends!  Have you been busy with your Christmas festivities?  I am doing a “run-run Rudolph” right now and trying to finish up my Christmas cards let alone some baking, preparing for a Christmas dinner and finish wrapping up presents!!   It is the fun of the Holiday Season and I enjoy spending time with my family, so I look forward to seeing them all!

It’s a new challenge today over at Cute Card Thursday!  Since it’s that time of year and busy, we made this any easy “ANYTHING GOES” challenge for you!!  We are looking forward to seeing what you’re making!

Since I am trying to finish up some Christmas cards, I thought I’d try and work on some doing “mass production” of a design.  I only do so many of these before I have to switch things up, but I thought these turned out pretty cute:

Vicki-CCT561-Snowman Joy-mass produce

I have used the My Favorite Things “Filled with Joy” card kit (sold out) to make these plus I have pulled out the MFT “Simply Snowflakes” stamp set (retired) to clear heat emboss the background and then rubbed some Tumbled Glass Distress Oxide ink over it.  The panel was cut out with the MFT Die-namics Blueprints 27 and the heat embossed sentiment strip was cut out with the MFT Die-namics Essential Fishtail Sentiment Strips.

Vicki-CCT561-Snowman Joy

Here you can see how I’ve pieced together the snowman.  The die in the card kit cuts out everything including the letters.  I’ve cut his top hat with some black felt paper that was also included in the kit and then I decided to cut out the snowman head so that I could cut out those tiny eyes and mouth with the felt paper as well!  So, if you happen to get this card from me, please be sure to rub your finger over the felt pieces in his hat and face!!  I very carefully and lovingly placed each tiny felt dot in!! 🙂  I think that the blue snowflake background really makes him stand out even more!

Vicki-CCT561-Snowman Joy-close

On an even closer look at the card, you can see that I’ve added a sequins snowflake to each snowman’s hat and then added some sequins to the card background.  I filled each one of these with some silver Stickles.  The snowman head was popped up with a foam circle and the rest is just glued down.

Thanks for dropping by and I’ll be back again soon!

Challenges I’d like to enter:

  1.  Daring Cardmakers – Snowflakes Falling
  2. A Bit More Time to Craft – Anything Goes
  3. Always Fun – Snowman
  4. The Creative Crafters – Anything Goes
  5. Double D – Let it Snow!