Anything Goes for Cute Card Thursday!

Hello there friends!  Have you been busy with your Christmas festivities?  I am doing a “run-run Rudolph” right now and trying to finish up my Christmas cards let alone some baking, preparing for a Christmas dinner and finish wrapping up presents!!   It is the fun of the Holiday Season and I enjoy spending time with my family, so I look forward to seeing them all!

It’s a new challenge today over at Cute Card Thursday!  Since it’s that time of year and busy, we made this any easy “ANYTHING GOES” challenge for you!!  We are looking forward to seeing what you’re making!

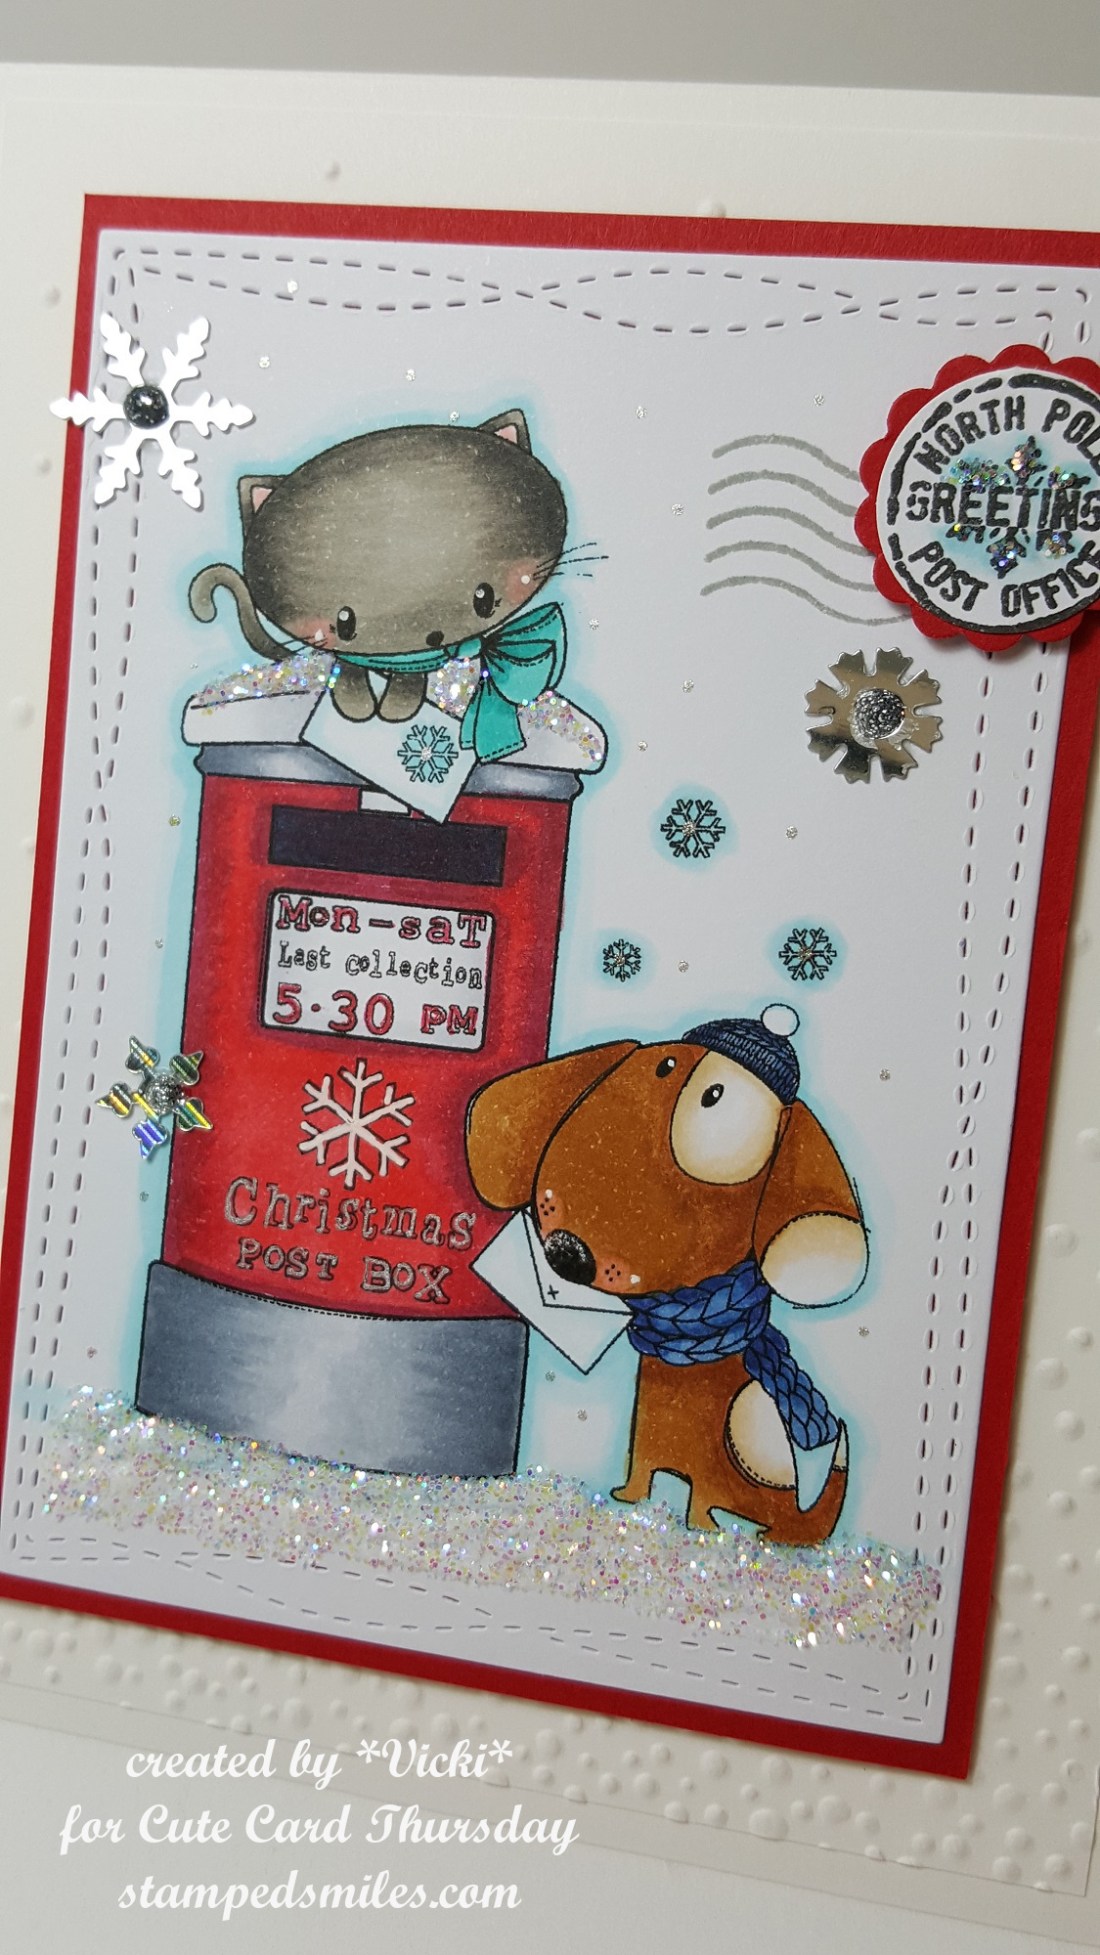
Since I am trying to finish up some Christmas cards, I thought I’d try and work on some doing “mass production” of a design.  I only do so many of these before I have to switch things up, but I thought these turned out pretty cute:

Vicki-CCT561-Snowman Joy-mass produce

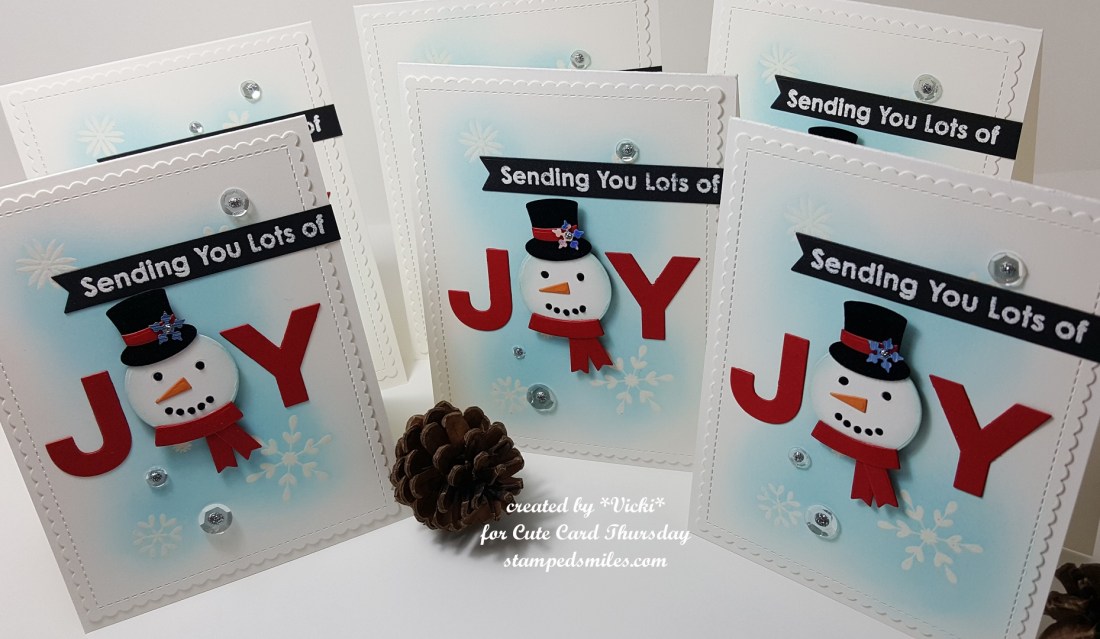
I have used the My Favorite Things “Filled with Joy” card kit (sold out) to make these plus I have pulled out the MFT “Simply Snowflakes” stamp set (retired) to clear heat emboss the background and then rubbed some Tumbled Glass Distress Oxide ink over it.  The panel was cut out with the MFT Die-namics Blueprints 27 and the heat embossed sentiment strip was cut out with the MFT Die-namics Essential Fishtail Sentiment Strips.

Vicki-CCT561-Snowman Joy

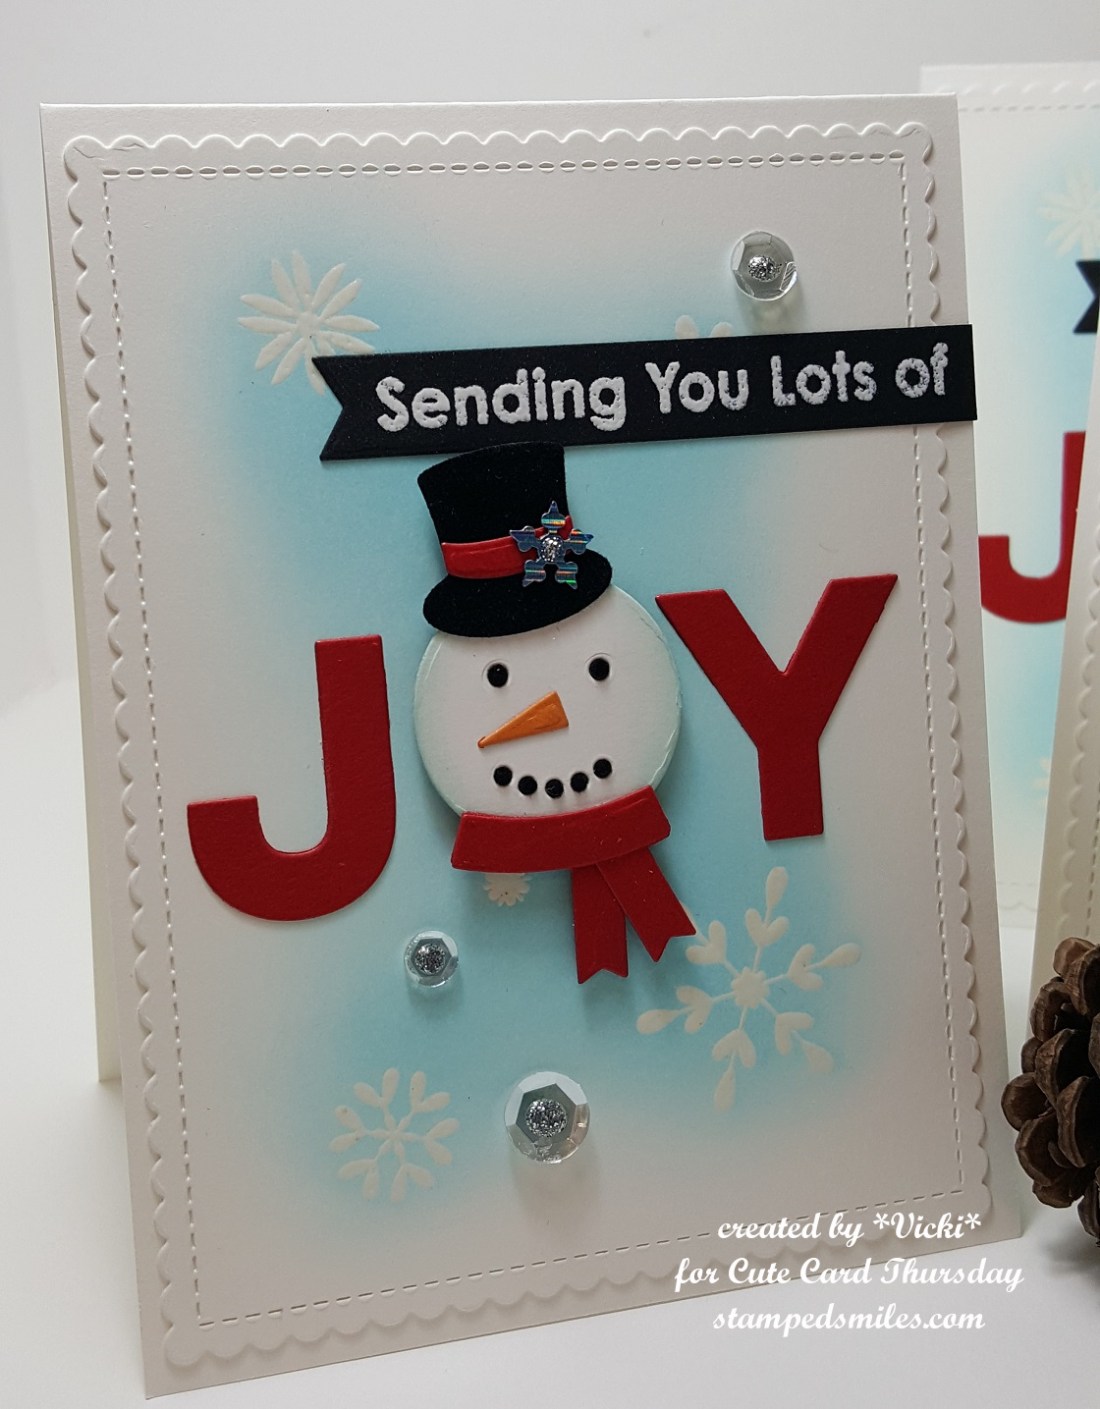
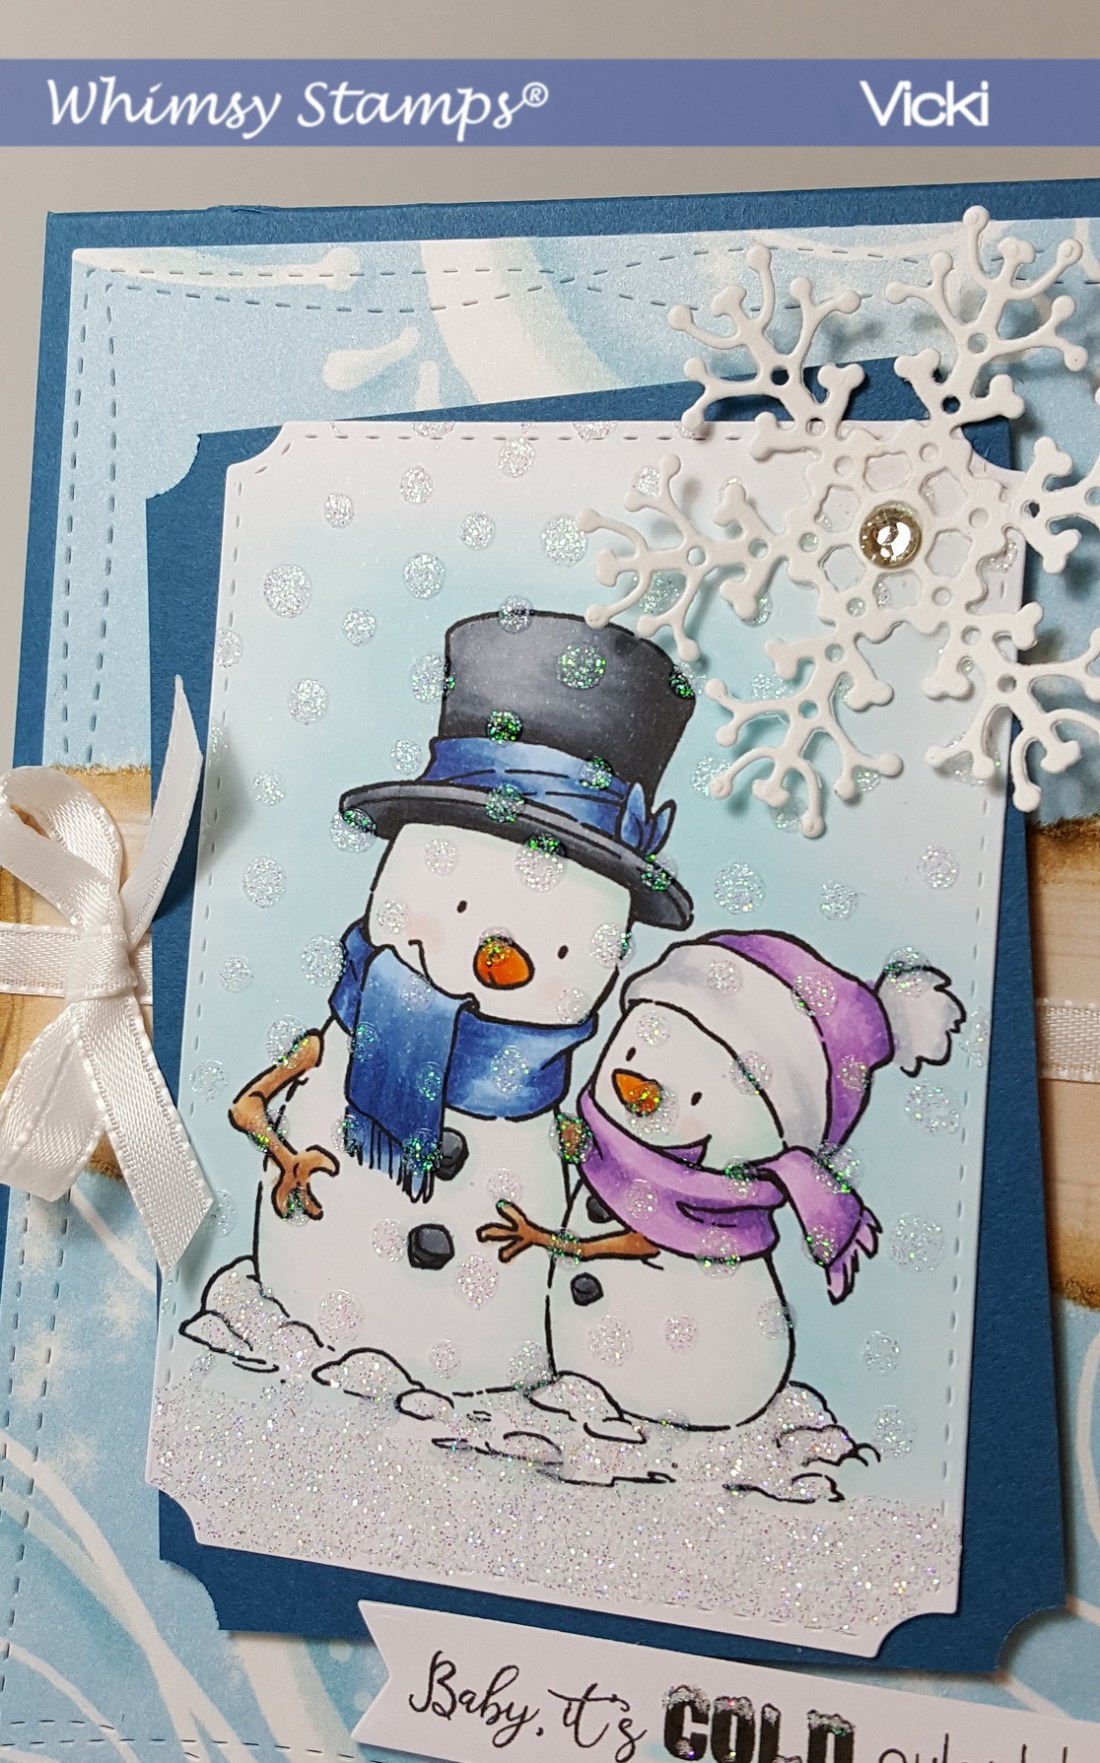
Here you can see how I’ve pieced together the snowman.  The die in the card kit cuts out everything including the letters.  I’ve cut his top hat with some black felt paper that was also included in the kit and then I decided to cut out the snowman head so that I could cut out those tiny eyes and mouth with the felt paper as well!  So, if you happen to get this card from me, please be sure to rub your finger over the felt pieces in his hat and face!!  I very carefully and lovingly placed each tiny felt dot in!! 🙂  I think that the blue snowflake background really makes him stand out even more!

Vicki-CCT561-Snowman Joy-close

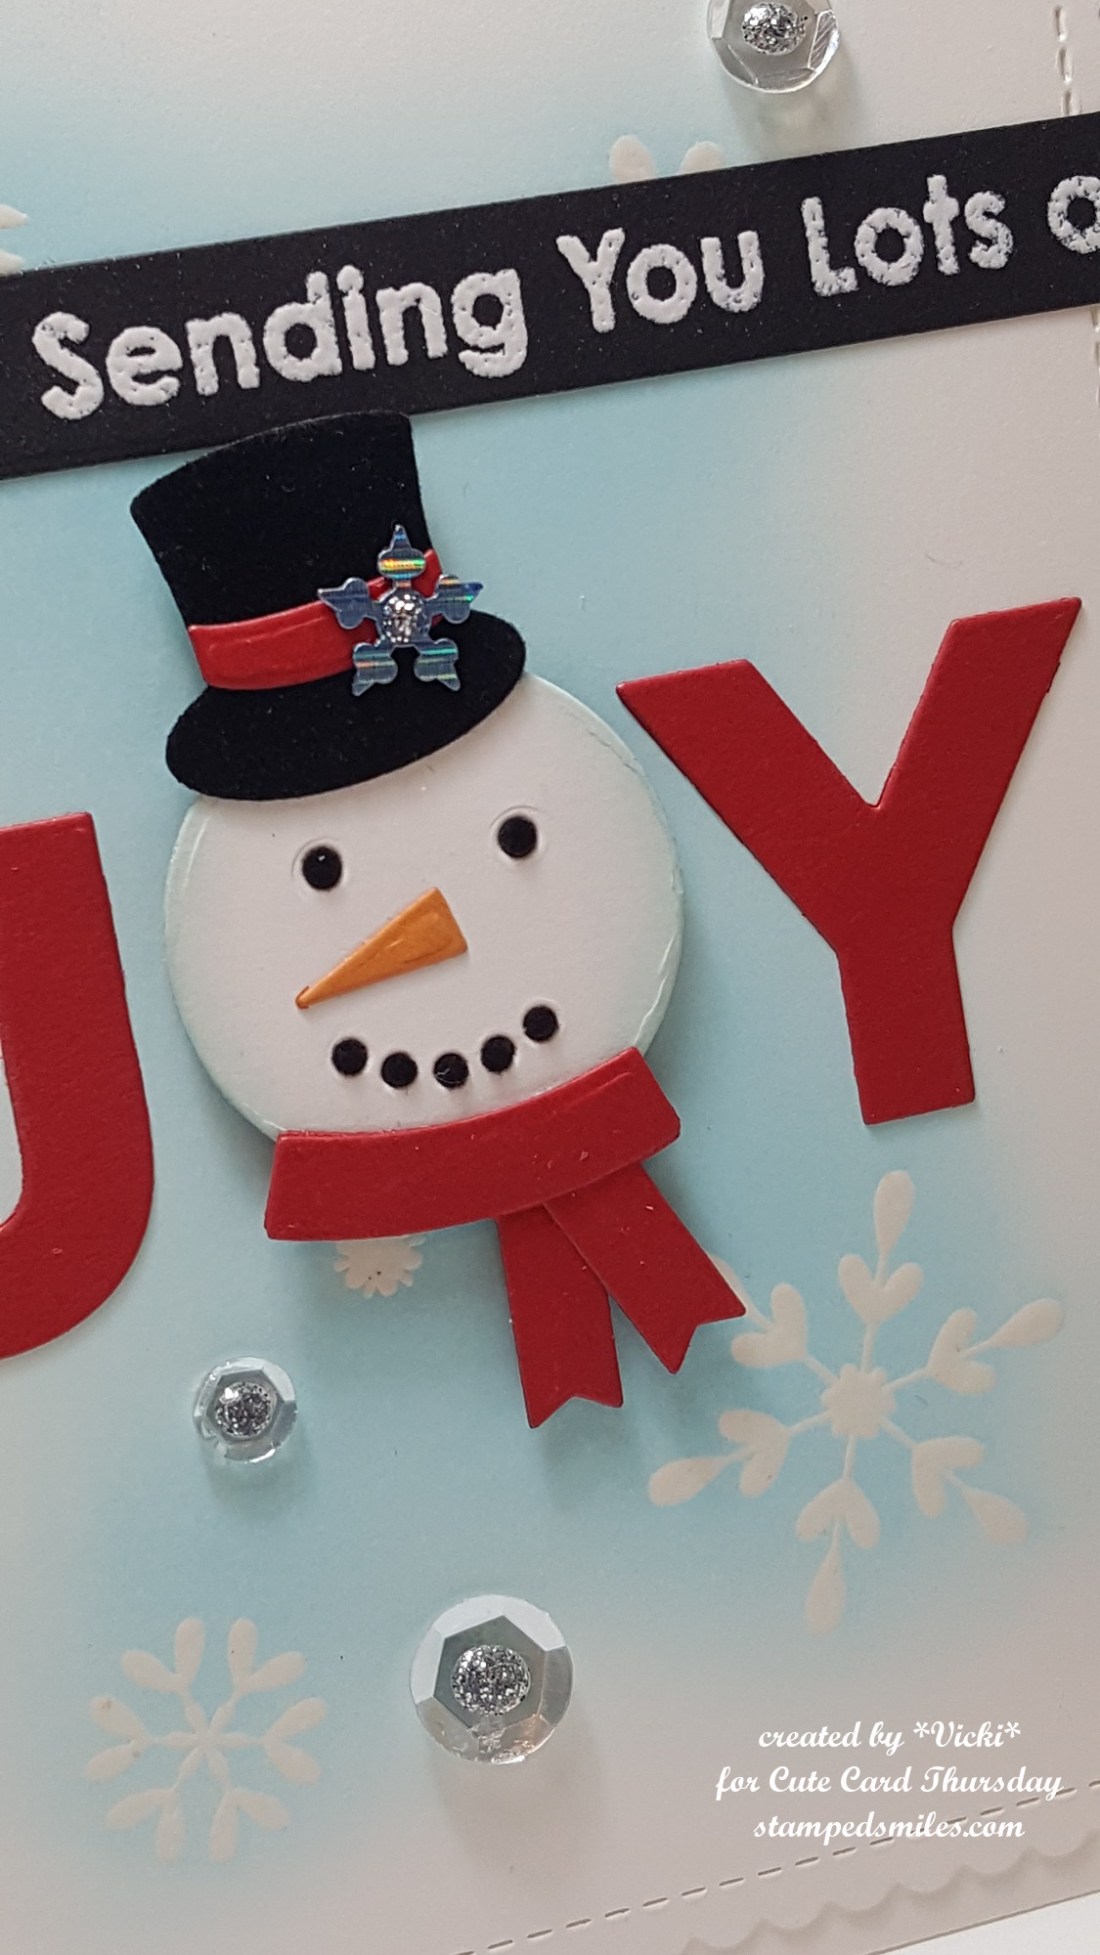
On an even closer look at the card, you can see that I’ve added a sequins snowflake to each snowman’s hat and then added some sequins to the card background.  I filled each one of these with some silver Stickles.  The snowman head was popped up with a foam circle and the rest is just glued down.

Thanks for dropping by and I’ll be back again soon!

Challenges I’d like to enter:

  1.  Daring Cardmakers – Snowflakes Falling
  2. A Bit More Time to Craft – Anything Goes
  3. Always Fun – Snowman
  4. The Creative Crafters – Anything Goes
  5. Double D – Let it Snow!

Whimsy Stamps New Release Snowman Couple

Hello friends!  I’m thinking after the several inches of snow we received last week; this is a really “time appropriate” creation to share with you!! LOL!  The first of the month is always a brand-new release for Whimsy Stamps.

Vicki-WS-SnowmanCouple-Dec3

For my card today, I’m using this darling new image called Snow Couple for my design!  Super quick and easy image to color up, so adding more details to it is always something fun! 🙂  I’ve taken the Whimsy Stamps Notched Rectangle dies to cut it out with.  I’ve also cut out a separate navy cardstock layer to mount behind it.

For my card front base, I’ve used the Whimsy Stamps Christmas Azure digital papers and cut it out with the Whimsy Stamps Hand Stitched Nested Rectangles die for the background and then mounted this over a navy A2 sized top folding card base.  Then I’ve also cut a strip of the musical papers from the Whimsy Stamps Christmas Traditions digital paper collection and then ripped each side of it.  I took some distress ink and sponged around the edges of it and mounted it over the card front base along with some white ribbon.

I took the image panel and navy layer and added some craft foam to the back of it and attached it to the front of my card base layer.  I took some more of the white ribbon and made a bow to attach to the side of the image panel.  I’ve also taken a sentiment from the Whimsy Stamps Penguin Christmas Sentiments 1 digital set and cut it out with a banner die that I then placed over the Hand Stitched Nested Rectangle die to make the stitch lines in it.  I then took some foam tape and attached it on the bottom corner.  For the sentiment, I’ve taken a Copic marker to go around the “cold” word and added some glitter for the snow details on it.

Lastly, I’ve taken an old Whimsy Stamps Snowflake die and cut out a piece from white card stock to attach at the top as an accent.  I put a rhinestone in the center of it.

Vicki-WS-SnowmanCouple-Dec3-close

For coloring up this image, I’ve used the following Copic markers:

  1.  Snowman top hat/coal buttons:  C8, C5, C3
  2. Snowmen bodies/arms:  BG000, R00 (cheeks), E33, E31 (arms), YR24, YR15 (noses)
  3. Snowman top hat trim/scarf:  B39, B37, B34
  4. Snowwoman hat/scarf:  V17, V15, V12, C1, C0
  5. Background Sky/Ground:  B01, B00, B000

After coloring this image, I’ve taken a snowflake stencil and then added some Nuvo Glimmer Paste Moonstone over top of it with a palette knife which created these cool glittery snowflakes over top of the image.  You can still see through to the image which is exactly what I was looking for.

I then took some glitter and added it to the ground, the snow around the snow couple as well as the letters on the word “cold” within the sentiment with both a Nuvo Medium Tip Glue Pen (for the ground), as well as a Nuvo Precision Glue Pen for the snow on the lettering.

Hope you’ve got inspired with my creation with the new Whimsy Stamps digital release this month!  Be sure to come back for more inspiration later on in the week!  Thanks for stopping by!

Here are some challenges that I’d like to enter my card for:

  1.  Try it On Tuesday – Winter Wonderland
  2. Crafty Catz – Anything Goes with optional twist:  Too cute
  3. A Perfect Time to Craft – Anything Goes
  4. Sisterhood of Snarky Stampers (SOSS124) – ‘W’ is for Winter
  5. That’s Crafty! – Winter Wonderland
  6. Stamps & Fun = Creativity – White/Blue

A Snowy Shaker

Hello friends!  I’m back again today to share a shaker card I’ve made using the CUTE digital stamp from Whimsy Stamps called “Snowy“!

Vicki-WS-Snowy Shaker-Nov25-blog

I had “snow” much fun making this shaker card!  Hope you’ve enjoyed it for inspiration as well!

Thanks so much for stopping in at my blog today!  I appreciate your kind thoughts and encouragement more than you know!  I’ll see you soon!

Challenges I’d like to enter this card for:

  1.  Simon Says Stamp Monday – “Let it Snow”
  2. Creative Moments – Anything Goes optional twist:  put sentiment on creation.
  3. Simon Says Stamp Wednesday – “Baby It’s Cold Outside!”
  4. Aud Sentiments – Winter or Christmas Sentiment
  5. Creative Knockouts – Snow Much Fun
  6. Winter Wonderland – Christmas or Winter Characters (people only)
  7. Crafty Catz – Anything Goes with optional twist:  “All Wrapped Up”

Snow One Like You

Hello friends!  Stopping in to share a card I’ve made with an adorable Whimsy Stamps image and to remind you of the December challenge going on over on the Whimsy Stamps Inspiration Facebook Group.  If you are creating with any of your Whimsy Stamps products, I hope you will stop by and add your creation to the gallery!

Vicki-WS-CoffeePenguin-Nov20

This is the really adorable Penguin Coffee Break Digital stamp set by Crissy Armstrong…always LOVE using her adorable penguin images! 🙂  You actually get THREE digital images within this set.  You get the penguin alone like I’ve used on my card here, you also get one with the winter scene background behind him as well as just the scene by itself!  Pretty nice deal for one low price if you ask me!

I’ve made this a pretty simple card by printing out the image, coloring it up with Copics and then for the “snowflake” on the penguin’s shirt as well as the sentiment and the sparkly snowflakes in the background, I’ve pulled out the Whimsy Stamps Snow Flurry Clear Stamp Set.  I have heat embossed the smallest snowflake on the penguin’s shirt with white embossing powder and then I heat embossed the snowflakes in the background with some Sprinkle Embossing Powder and lightly ink blended some Tumbled Glass distress ink over top of it.  I wrote the “snow” letters over the cup with a white gel pen and then stamped the sentiment from the Snow Flurry stamp set underneath the cup.  I’ve cut this panel out with a cross-stitch rectangle die and then layered it over some red cardstock and then mounted this onto a top folding A2 sized white card base.

Vicki-WS-CoffeePenguin-Nov20-close

Upon a closer view, you can sort of see the sparkly embossed snowflakes in the background as well as the coloring details.  For coloring up my penguin, here’s the Copics that I’ve used:

  1.  hat/scarf/mittens:  BG78, BG75, BG72
  2. sweatshirt/hat & scarf trimmings:  R39, R37, R35 for trimming: C3, C1, blender 0
  3. Penguin Body:  C8, C7, C5, C3, C1 for feet/beak:  Y35, Y21, Y11 cheeks:  R00, R000
  4. Cup:  W9, W7, W5, W3 liquid/steam:  E29, E25, E50
  5. Snow/shadow around and under penguin:  B00, B000, B0000

I’ve also covered the trim on his hat along with the trim on shirt with a Spectrum Noir glitter brush pen.  I added a dot of Nuvo White Blizzard Glitter Drops to the center of the snowflake on his shirt as well as the liquid in his cup.

Vicki-WS-CoffeePenguin-Nov20-flat

It’s hard to capture the shimmer on his white hat trimmings, but you can see the sparkle in his cup and the center of his snowflake.   I was thinking of all of the things that you could add to his shirt besides a snowflake…so that would be fun to play with too!

Hope you’ve enjoyed my card today!  Thanks for dropping in!  I’ll be back soon!

Here are some challenges I’d like to enter this card for:

  1.  CAS Colors & Sketches – color challenge:
  2. Fab ‘N’ Funky – With an Animal
  3. 4 Crafty Chicks – Snowflakes
  4. QKR Stampede – Anything Goes

SNOW Place Like Home

Hello friends!  Hope you are having a great week so far!  Well I have to say that this card certainly does feel like home where I’m at right now as it’s pretty cold and a bit snowy over my way!  I tried to hold onto Fall for as long as possible!

Whimsy Stamps has come out with another line of really cute digital stamps from CC Designs and this is the first time that I’ve colored one from the new line and I think they’re really cute!  Check out this card I’ve made for you today:

Vicki-WS-Iggy-Nov13

This darling image is called “Iggy” and I just love these sweet little penguins with her! 🙂  Here are the Copics that I’ve used to color her with:

  1.  Coat/fur trimming – BV04, BV02, BV01/W3, W1, W0, blender, white gel pen for dots, blue gel pen to color hearts
  2. boots – W9, W7, W5
  3. Penguins – C8, C5, C3, C1, Y17, R00
  4. Skin/Hair – E23, E21, E11, E00, E000, R20, R00, white gel pen for cheeks
  5. Igloo/Snow – B04, B01, B00, B000

I fussy cut the image long with the ‘ground snow’ and left a spot at the bottom for the sentiment.  I outlined the image with a black marker and attached it to my winter snow background that I’ve made.

To make the background, I took the Stormy Sky, Peacock Feathers and Dusty Concord Oxide inks and a water brush to swirl a pretty winter sky pattern.  I dried it and then took a toothbrush to flick some white paint over it for the snow.  I then took a couple of the snowflake images from the Whimsy Stamps Snow Flurry clear stamp set and white heat embossed them in places on the background.  I’ve also used this same set to heat emboss the “snow” sentiment over a piece of black cardstock that was popped up with foam tape over the image panel and then the rest of the sentiment was stamped in black ink right below the image.

Vicki-WS-Iggy-Nov13-close

Here you can better see a closer look at the details of the coloring.  I’ve also put some shimmer over the entire igloo with a Spectrum Noir glitter brush pen.    Thought I could see it when I took the photo, but of course it’s not showing up!

Vicki-WS-Iggy-Nov13-2

I took the snowy image panel and mounted it over a piece of black cardstock and then took a very thin strip of silver glitter cardstock to lay right next to it over a piece of white card stock.  I took this white card front base and attached it to the left side of a top folding A2 card base.  Lastly, I’ve taken some sequins and attached them to the snowy background for a bit more sparkle.

I hope you’ve enjoyed my card today!  Thanks for dropping in!

Here are the challenges I’d like to enter this card for:

  1.  Creative Inspirations – November Chill
  2. That’s Crafty – Winter Wonderland
  3. QKR Stampede – #321 Anything Goes
  4. Crafting From the Heart – Anything Goes
  5. Artistic Inspirations – Anything Goes

Snowflakes at Cute Card Thursday

Hello friends!  It’s time already for a new challenge over at Cute Card Thursday and as I can feel it growing even cooler by the day outside, I find that this challenge is very fitting and a great way to keep going on my Christmas pile!  We would like to see some “Snowflakes” on your creations this week!  We look forward to seeing what you come up with!

Our sponsor for this challenge is All Dressed Up Stamps.  They’re kind enough to provide an image to use for this challenge, so here’s what I’ve come up with:

Vicki-CCT555-ADU-Snowflakes

This image is so sweet with the pup and kitty delivering their letters to Santa for Christmas is coming soon! 🙂  The image I’ve used is called Christmas Post from All Dressed Up Stamps and it already had some snowflakes within the image, but I always feel that snowflakes are big, small and fall everywhere, so I decided to add a few more with items from my stash.

I’ve colored my image with Copic markers and used some gel pens for the eyes, cheeks, parts of the mailbox lettering, center of snowflakes as well as adding some adding some random dots in the background for tiny snowfall flakes.  I’ve also had this Christmas Postmark stamp set in my stash and thought it was perfect to use as a sentiment for my card.  I stamped the circle, punched it out and layered it with another scallop circle that was punched from red cardstock.  I stamped the wavy lines post mark image behind that on the image panel.  The image panel was cut with a Wonky Stitched rectangle die.

Vicki-CCT555-ADU-Snowflakes1

Here’s a closer look at the image and how I’ve colored it.  For the top of the mailbox, the snowflake on the circle postmark and for the snow-covered ground, I used some glue in those areas and then sprinkled some Diamond Dust glitter over top of it for some nice sparkling snow coverage.  (I love using that stuff for snowfall!)

You can also see the silver snowflake sequins that I’ve attached and then I’ve added some silver Stickles to the centers of each one.  I’ve layered this image panel to a red cardstock layer and then added some foam tape to the back of it and mounted it over my card front.

Vicki-CCT555-ADU-Snowflakes2

So, for the card front panel, I took a white piece of cardstock measuring 4″ x 5-1/4″ and ran it through my die cut machine with a snowfall embossing folder and then I mounted this to a white top folding A2 sized card base and added the layered image panel over top.

Thanks for stopping by and have a fabulous day!

Here’s the challenges I’d like to enter this card for:

  1.  Daisy Chain – Christmas/Winter
  2. Crafting From the Heart – Anything Goes
  3. The Holly & Ivy Christmas Challenge – Anything Goes Christmas
  4. Shopping Our Stash (SOS379) – Raining Cats and Dogs
  5. Creative Craft Cottage – Christmas is Coming
  6. All Dressed Up Challenge –  Oct Anything Goes + must use ADU image

Whimsy Stamps Seal On Ice

Hello friends!  Back with you today to share another image from the November brand new digital release from Whimsy Stamps!  Check it out:

Vicki-WSSealonIce-Nov2

These seals by Crissy Armstrong have stolen my heart!  I had to create with this Seal on Ice digital image too and share it with you today!

I started with my image by coloring it up with the following Copic marker colors:

seal:  C5, C3, C1, C0 W1, W0, R00 – Hat/scarf:  BG49, BG45, E53, E51, E50

I fussy cut him/her out and went along the edges with a black Copic friendly marker.

For the card design, I found some matching cardstock to go with the seal’s outfit and used it as the 5×5 Top folding card base as well as a mat layer behind the image panel.  I took the Whimsy Stamps Pierced Border Trio Dies to cut some pieces for the snow with some glitter paper.  I put one strip at the bottom of the card base and another on the bottom of the woodgrain paper I’ve used to place the seal on.

Before adding the seal to the snow border with foam tape, I took the Whimsy Stamps Snow Flurry clear stamp set and stamped some of the snowflakes with pink ink over the woodgrain paper.  I added this layered panel onto a piece of the new digital papers this month called Christmas Roses & Snowflakes which I’ve cut out with a square stitched die along with the woodgrain paper.  I took a sentiment from the Whimsy Stamps Holiday Mini Sentiments clear set and white heat embossed it and cut it out with a portion of the square stitched die as well and attached it to the design.

I’ve finished it off by adding a bow to the corner of the woodgrain paper panel with some clear sparkly ribbon and added another one of those snowflake gems to the center of it!

Vicki-WSSealonIce-Nov2-close

Here’s closer look at the coloring details.  Isn’t this a cutie?!  I love the feminine look to it by adding in the pink snowflake digital papers and sparkly ribbon.

Thanks so much for stopping by today!!  See you soon!

challenges:

  1.  Cardz 4 Galz – Let’s Go Digital
  2. Addicted to Stamps and More! – Anything Goes
  3. Watercooler Wednesday (WWC194) – Anything Goes
  4. Crafty Animals – Anything Goes + animal/teddy bear
  5. CRAFT – Winter

It Sparkles at Cute Card Thursday!

Hello friends!  Yes, that quick and we are ready for a new challenge over at Cute Card Thursday!  This is a really fun one too!  This week we’d love to see your “Sparkles” on your creations!  We look forward to seeing what you come up with for it!

Here’s the creation I made:

Vicki-CCT553-KC-Sparkles

I have used one of our sponsor’s image this week called Reindeer and Snowman from Kinda Cute Stamps.  Now how cute is that reindeer making a snow reindeer?!  I just had to give them both a red nose! 🙂

I printed out the image on white blending card and cut it out with a wonky stitched rectangle die, and then cut out some snowflakes with silver sparkle paper along with layering the image panel over some as well.  I took a sentiment from a new My Favorite Things stamp set and silver heat embossed it over the top of the image panel.  I’ve also dotted the center of the snowflakes along with making some additional dots with some silver Stickles.

Vicki-CCT553-KC-Sparkles1

Here’s a closer view of the image.  You can see where I’ve taken a glue pen and covered the snow-reindeer with loose glitter.  I’ve also taken a Spectrum Noir Glitter Brush Pen and covered the noses as well as the snow on the ground.  I used a glitter pen to color the charm on the reindeer’s collar.

Thanks for dropping in!  See you soon!

Challenges:

  1.  Jingle Belles – Animals (Christmas Flock)
  2. Christmas with the Cuties – Wrap Up Warm
  3. City Crafter – Silver Bells (lots of silver)
  4. Crafty Creations – Anything Goes
  5. Fab ‘n’ Funky – Christmas
  6. Watercooler Wednesdays (WWC193) – Holidays

Top O Morning Snowman Wishes

Hello friends!  Well, it’s certainly not morning, but maybe it is where you’re from or it’s morning when you see this post! 🙂

I have a really fun Whimsy Stamps digital image to share with you today appropriately named to coincide with my post title:

Vicki-Oct16

This really sweet, faced snowman is called Top O the Morning Snowman which is a digital image created by Crissy Armstrong for Whimsy Stamps.  I thought it was so cute with the little birdie joining him and his little heart buttons!  I had fun coloring him up!

I’ve colored him with Copics and cut it out using the Hand Stitched Nested Rectangles die and matted some black cardstock behind that panel.  I’ve also used the October Digital papers release called Christmas Red, Gold and Green and attached it to the front of an A2 sized white card base.  I then took the wavy die from the Pierced Border Trio dies and cut a piece of glitter cardstock to add at the bottom of the decorated digital paper panel.

I then added the snowman panel over top and then stamped the sentiment below the snowman with the Holiday Mini Sentiments stamp set.  I then added the twine bow and button as well as a few snowflake sequins and filled the centers with some Nuvo Crystal Drops to finish it off.

Here’s a closer view of the coloring:

Vicki-Oct16-close

I have used all Copic markers to color this image in the following colors:

  1.  Hat and Snowman body/snow:  C8, C5, C3, C1, C00
  2. Hat Band, buttons, bird hat/scarf:  R37, R35, R32
  3. Holly:  YG67, YG63, YG61, (hollies colored with pink glitter gel pen and covered with Nuvo Crystal Drops
  4. Snowman Scarf:  G24, G21, G20 + green glitter gel pen for lines and ends
  5. Snowman nose and cheeks:  R20, R00, R000, YR18, YR15, Y11
  6. Bird:  B34, B32, R00, E000, Y21, Y11

I’ve also used a white gel pen for the cheeks on both the snowman and bird as well at the eyes on the snowman and to randomly add some dots for falling snow effect.  I also went around the outside of the image with a B000 marker for a bit of sky behind him.

Thanks so much for stopping by today!  Hope you’ve enjoyed my card!  See you soon!

Challenges:

  1.  CRAFT – Christmas
  2. QKR Stampede – Anything Goes #317
  3. Allsorts – Christmas
  4. The Merry Christmas Challenge – Anything Christmas Goes
  5. The Creative Crafters – Anything Goes

Anything Goes For Cute Card Thursday!

Hello friends!  It’s Thursday and time for a new challenge over at Cute Card Thursday!

This week is an easy “Anything Goes” challenge!  So please share with us what you are working on this week weather it be a card, a scrapbook page, journal page or altered item, etc.  We look forward to seeing what you’re doing!

I’ve decided to use another newly released image from Whimsy Stamps (our sponsor this week) on my design today:

Vicki-CCT550-WS-Oct 4

Isn’t this cat just too stinkin’ CUTE?!   I’ve used the newly released October digital stamp Scruffy Cat by Crissy Armstrong for Whimsy Stamps on my card today.

*Edited to Add Copic marker colors I’ve used! *

For hat:  R59 for darkest shadows blended out with R29, R27 and R24.  I’ve used a white Prismacolor pencil for some highlighting.  I did use some B000 for shadows on the hat trimmings, but the loose glitter I glued on covers it up in the photo.

For cat:  I used W5, W3, W1 and W0 and started with the darkest color along edges and flicked in with the other colors.  R20 blended out with R00 for his ears and cheeks.

Collar:  G07 and G05.  I used a glitter gel pen for the tag.

I have used the Whimsy Stamps Notched Rectangles die set to cut him out with and mount him over a piece of red card stock.  I’ve also used a strip of red card stock cut with the same die and white heat embossed the sentiment from the Whimsy Stamps Holiday Mini Sentiments clear stamp set and attached under the kitty.

Before attaching the kitty panel, I’ve used some of the Whimsy Stamps Christmas Cool Mix digital papers and added a white organza ribbon around it.  I also sponged around the edges with some white ink using a sponge dauber and then I attached that to the front of a red top folding card base.  Lastly, I’ve attached the kitty panel along with the ribbon bow underneath and finished the card with snowflake sequins and silver glitter in the centers.

Vicki-CCT550-WS-Oct 4-close

Here’s a closer look at my coloring as well as the glittery details on the kitty collar tag and the loose fine glitter on the hat trimmings.

Please be sure to check out the challenge blog to see the details of the challenge and catch the inspiration from the rest of the design team!

Hope you’ve enjoyed my card today and look forward to seeing what you come up with!  Thanks so much for stopping in!

Challenges:

  1.  QKR Stampede – Anything Goes #315
  2. The Paper Players (PP412) – Tic-Tac-Toe:  Green, any embossing, sequins/glitter
  3. Crafty Animals – Anything Goes
  4. Crafty Cardmakers – Lace or Ribbon