Hello friends! I hope that you’re enjoying this month so far! The weather has really started to warm up now and it’s been nice and sunny to be outside. I have so many projects that I’m working on, so my blog has been a bit neglected lately. I will be able to share with you all of the things that I’ve been working on later…but for now, let’s talk about flowers!
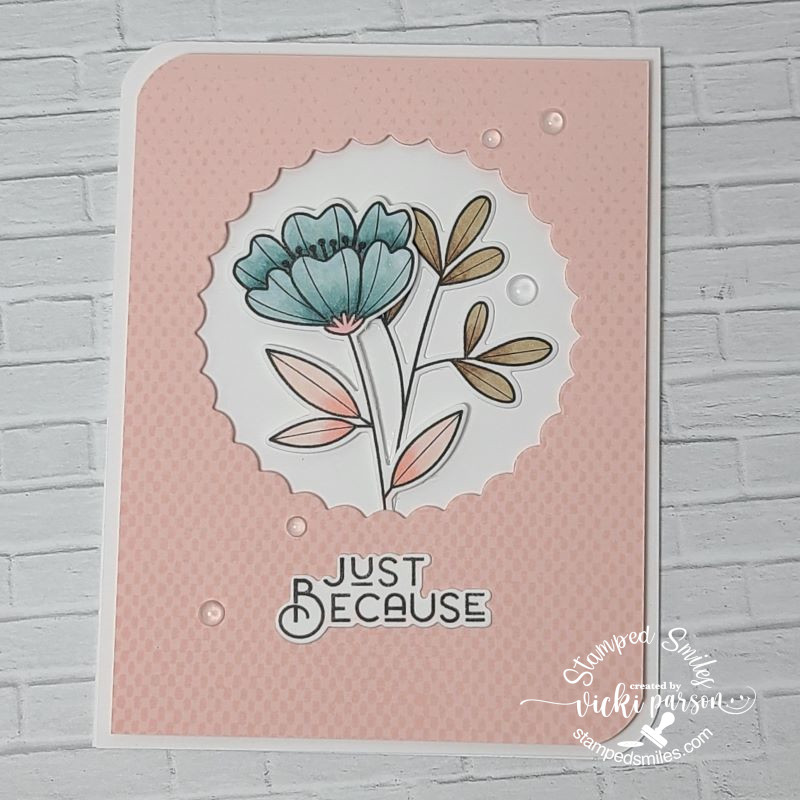
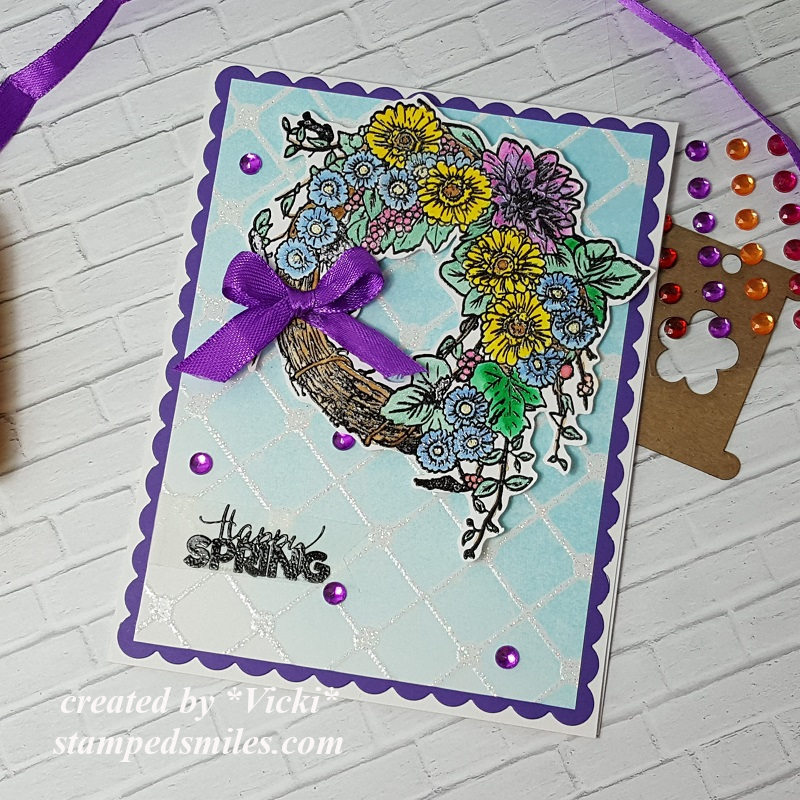
Today starts a new challenge over at Sparkles Monthly and this time it’s my turn to pick a theme and I have chosen “FLOWER(S)” for this month. Flowers seem to work for so many occasions which is why I chose it. Here’s the project that I came up with:
I needed a card for Mother’s Day this last weekend, so I thought I’d pull out my stash of die cut flowers from Taylored Expressions and create several pieces in different colors to place inside my wheel barrow.
I’ve die cut several pieces from the Fresh Cut Flowers die set in pineapple, guava, dried fig, chocolate truffle (centers) and green tea (stems and leaves). I used the same color of ink to sponge a bit of dimension over the centers and then splattered some white Copic ink over just the flowers and the toffee background that was stamped in toffee ink with the Weathered Words Background stamp.
I arranged all of the die cut flowers and leaves behind the Farmhouse Wheelbarrow die cut from chocolate truffle, toffee and woodgrain textured cardstock. I also used the Building Blocks Happy Additions to white heat emboss over a piece of chocolate truffle and cut out with the coordinating die. The toffee background was placed over an A2 sized top folding white card base and then I added a white frame die cut from the A2 Thin Frame Cutting Plate for an “anchor/ground” for the wheelbarrow to sit on. The sentiment greeting was popped up with a foam strip and then I’ve added a few enamel dots including in the center of the wheel.
Thank you so much for stopping in today! Hope you’ve enjoyed my card and that you will stop by the challenge blog to see the rest of the inspiration from the team. I look forward to seeing what floral creations you share in the gallery with us!
Hello friends! I hope you all had a wonderful Easter and have been enjoying the wonderful Spring weather outside! We have all sorts of blooms and buds everywhere which is really exciting to see! I think I need to trim some lilacs from my bush to put in a jar and enjoy the lovely smell from them!
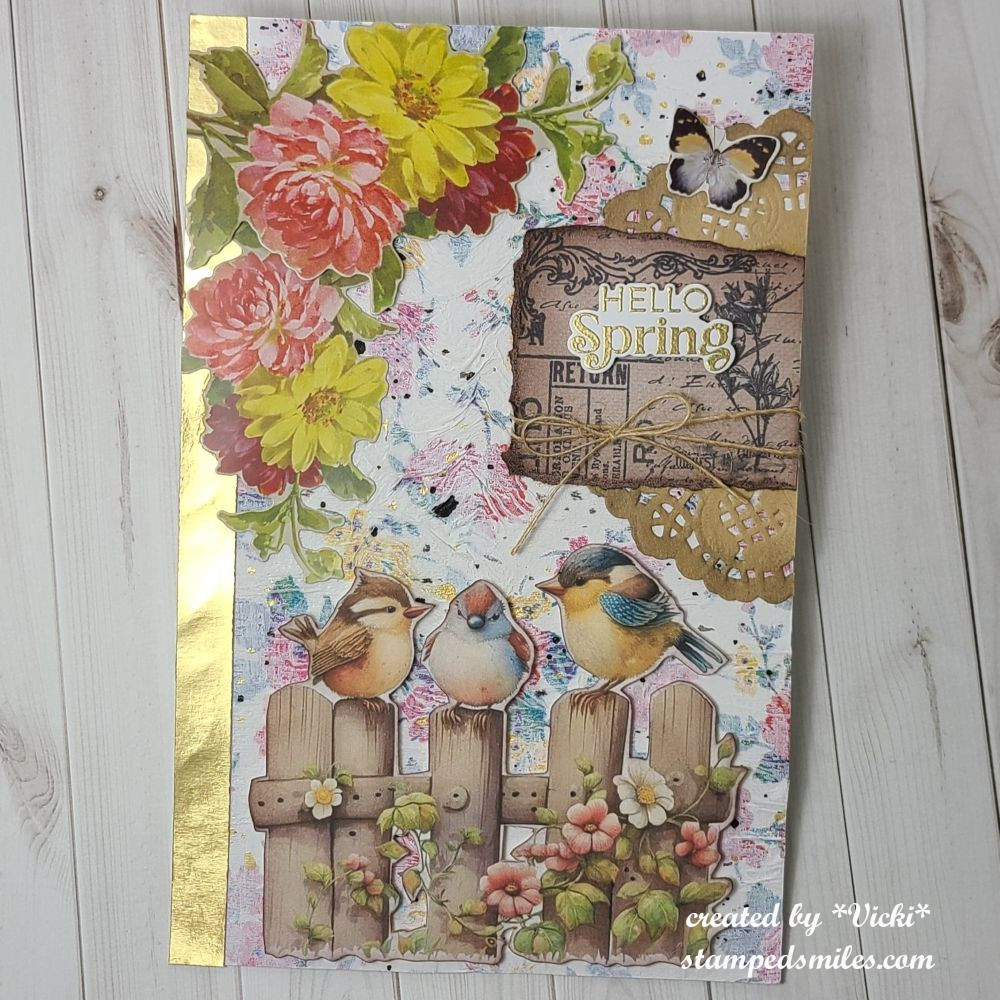
Today is our monthly AJ page with my crafty friend Carol (from Crafty-Stamper) who is collaborating with me to “SMASH OUR STASH”! We get creative trying to use up our never-ending stash piles along with a prompt for each month. I know she always has great inspiration to share, so please check out her blog too! Here’s my AJ page with the “SMASH OUR STASH” April prompt of “RECYCLE/UPCYCLE”:
Flowers are everywhere, so I thought I’d place them all over my page today too!
For my “recycled” elements, I have used a floral napkin in the background which gives it some wonderful texture and I’ve also painted some white paint over it for a “wash” so that it wasn’t so bright and vibrant and too busy for the background. I splattered some black and gold watercolor over it as well.
I found a darling image with these gorgeous Spring birds perched on the fence, cut it out and popped it up at the bottom with foam tape.
I thought that a strip of gold cardstock (left over from a project) would make a nice bright accent to go with my gold embossed “HELLO SPRING” sentiment and gold splatter.
I’ve also “recycled” an old part of an ATC project and half of a doily to add on the side with the sentiment and I’ve tied some old twine around that ATC panel.
Lastly, I’ve added some flowers and a butterfly from my old collection of ephemera pieces left over from years ago!
I hope that you’ve enjoyed my art journal page today and it gives you all the feels of Spring in the air! I had fun putting this one together! Thanks so much for dropping in!
(Feeling a little bit under the weather this week and I’ll catch up as I can! Thanks for understanding!)
Happy April friends! We have finished March already and onto Easter very quickly approaching! I hope you’re enjoying all things Spring coming up your way! We’ve had several storms and we’re in the tornado season as well, so I hope everyone is staying safe out there whatever the weather. I do have some things that I had previously finished and wanted to share:
First, I wanted to share about the Virtual Stamp Joy Event by Taylored Expressions that I participated in a few weeks ago. I always have so much fun and enjoy the motivation that it seems to generate! I’m sharing them in the gallery below, so if you’re on my website post, then just click on each photo to enlarge it.
The first four photos were from a class using the same floral stamp set and the others are from the next day of make-n-take projects. Please let me know if you have any questions about any of them!
The last set of four cards were a “mass production” using a background stamp in different colored cardstock panels and clear heat embossing over them. The class sample had “hello” sentiment on each one, but I changed up the sentiments and have placed them in a card box to give them out with envelopes as a gift for someone.
Hope you’ve enjoyed the inspiration as much as I enjoyed putting them all together!
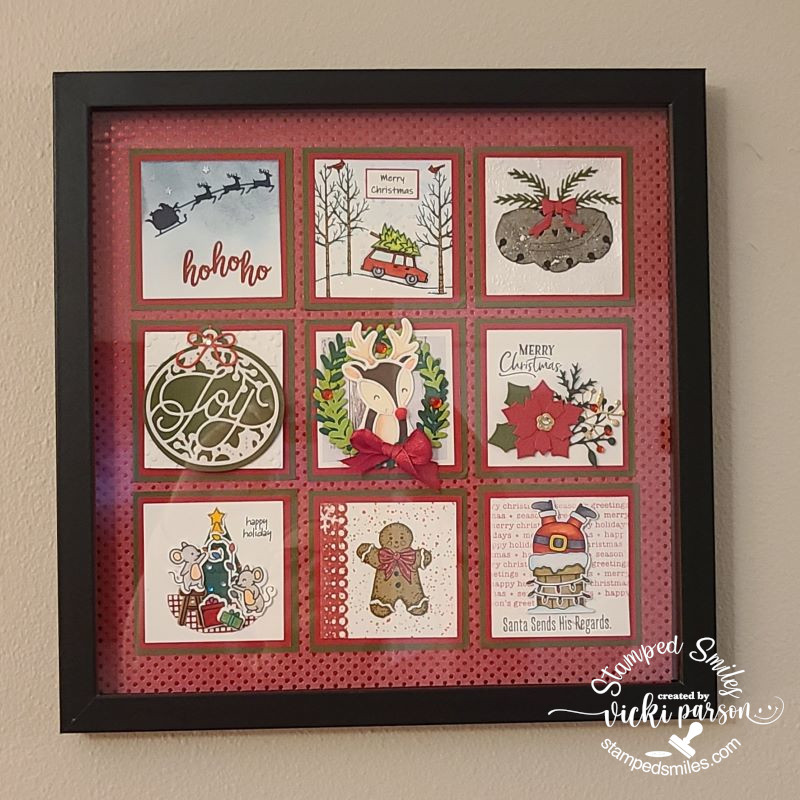
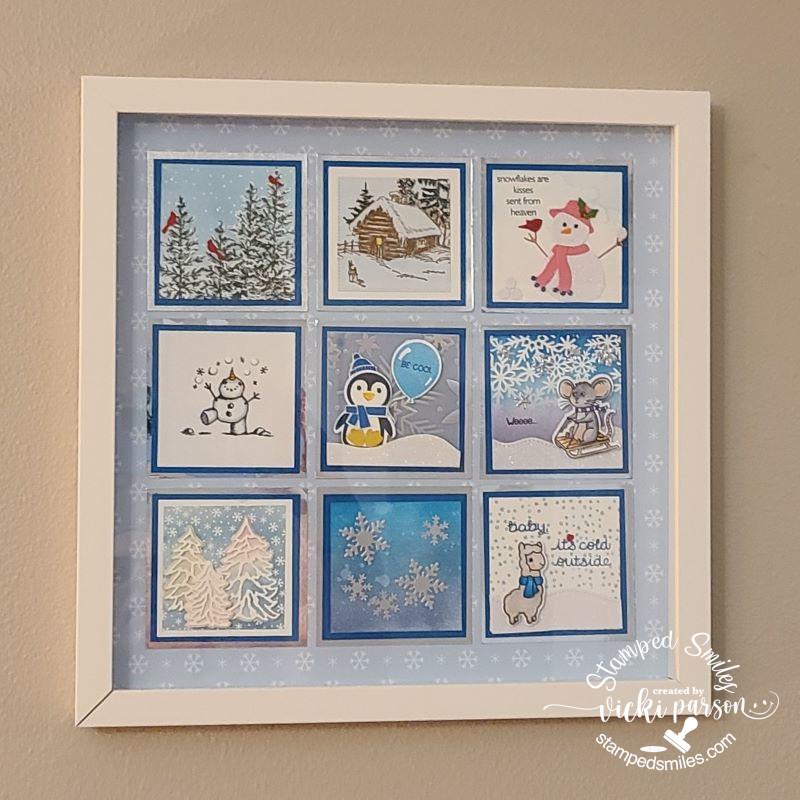
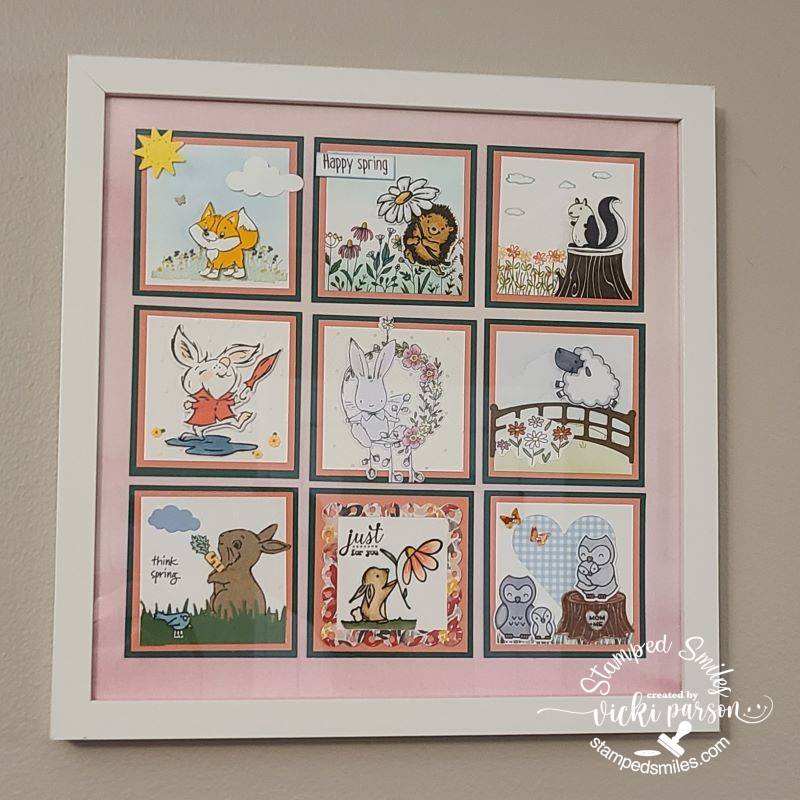
From the end of last year up until this last month, I didn’t have much time with the Holidays and everything going on, but as you may have seen in previous posts, I participate in a “square sampler swap” and when everyone sends out their squares, we then complete a home décor piece with all of the squares, so I thought I’d share mine finally completed:
CLICK PHOTOS BELOW TO ENLARGE
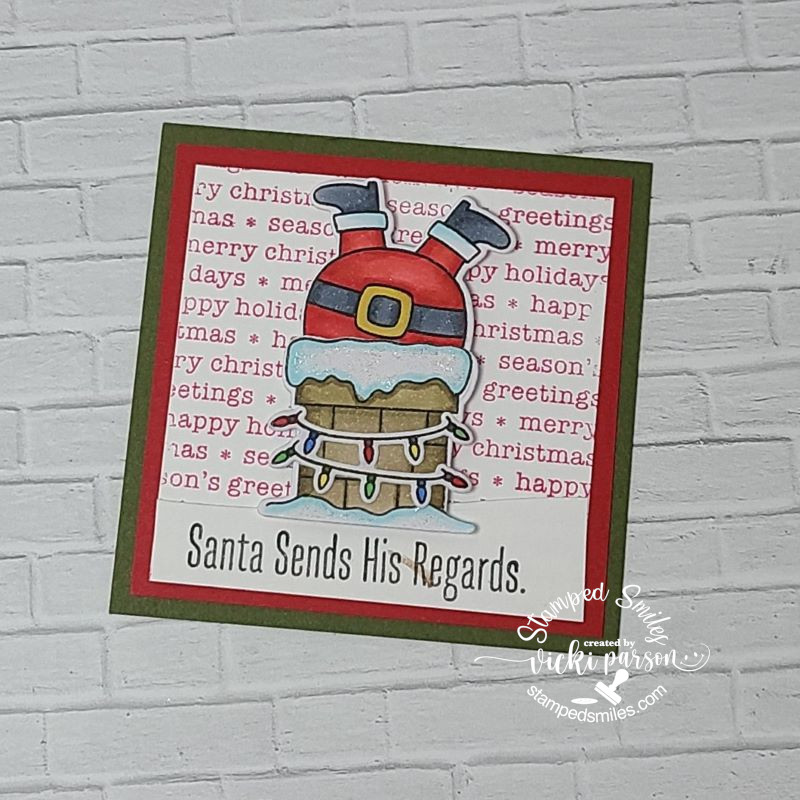
This was for the Christmas Sampler SWAP and you can see that I’ve used a black shadow box frame for my sampler and placed some red with red metallic dotted paper behind it. The square on the right is the one that I made. (I’ve used My Favorite Things products for my square.)
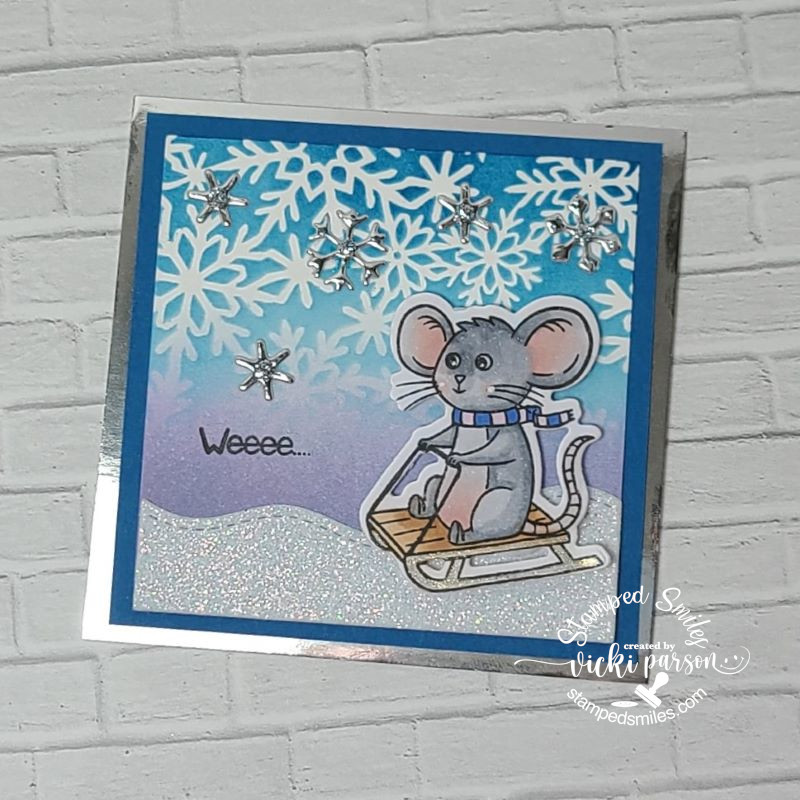
This was for the Winter Sampler SWAP and I went with a white shadow box for this one. I’ve placed some soft blue snowflake papers for behind my sampler as I thought it was soft enough to not look too busy. The square on the right is the one that I made. (I’ve used Inky Stamper products for my square.)
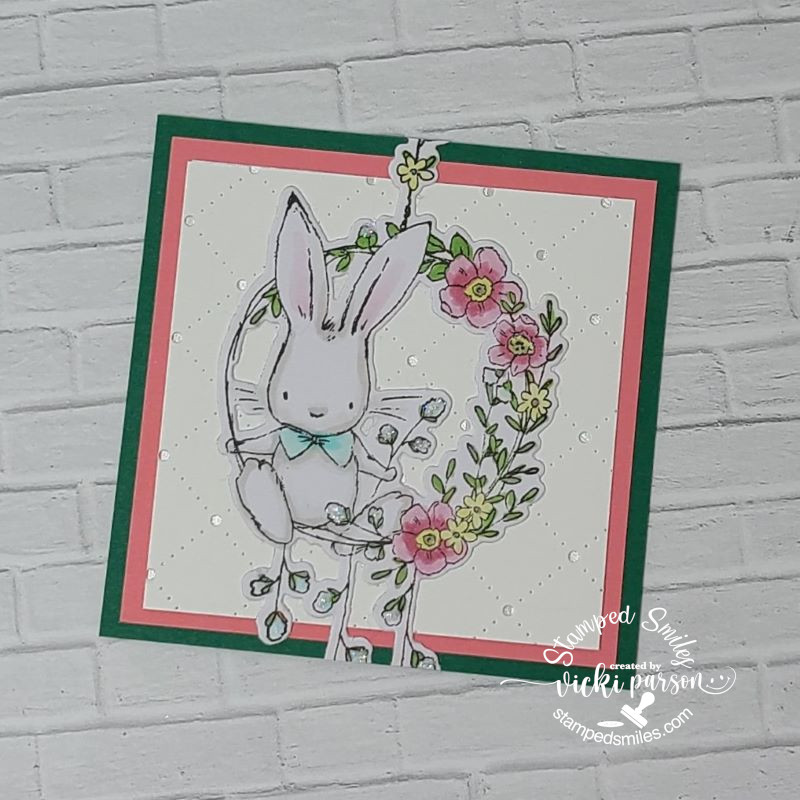
And recently we finished up our Spring Animals Sampler SWAP that I used another white shadow box for the sampler. I’ve added a piece of pink colored “Watercolor Wishes” paper from Lawn Fawn behind it. It looks a little off in the photo, but it looks better IRL. The square on the right is the one that I made. (I used Taylored Expressions products for my square.)
Not sure if we’re doing any more or not, but I had so much fun making the squares to swap with friends!
Lastly, I have a fun little thing to give to whoever is interested in these Taylored Expressions dies + foil-it panels package. (It’s not sold in stores anywhere as it was a free gift with purchase) I have an extra and so I thought I’d give it away to someone! Just leave me a comment below if you’re interested and I’ll pick someone from the comments.
Leave a comment below if you’re interested!
That’s all I have for today! Thanks so much for stopping in! I’ll be seeing you soon!
Hello friends! I hope that you’ve had a wonderful week so far and looking forward to the up-coming July 4th weekend for those of us celebrating in the U.S.! Just came back a few days ago from my son’s wedding which was really beautiful and a remarkable time celebrating with all the family! (I will share on that in the future here.)
Today I’m very excited to share my mixed media project as the July guest designer over at the Creative Artiste Challenge Blog! So if you enjoy creating with mixed media, please check out the blog and have some fun playing along with us this month!
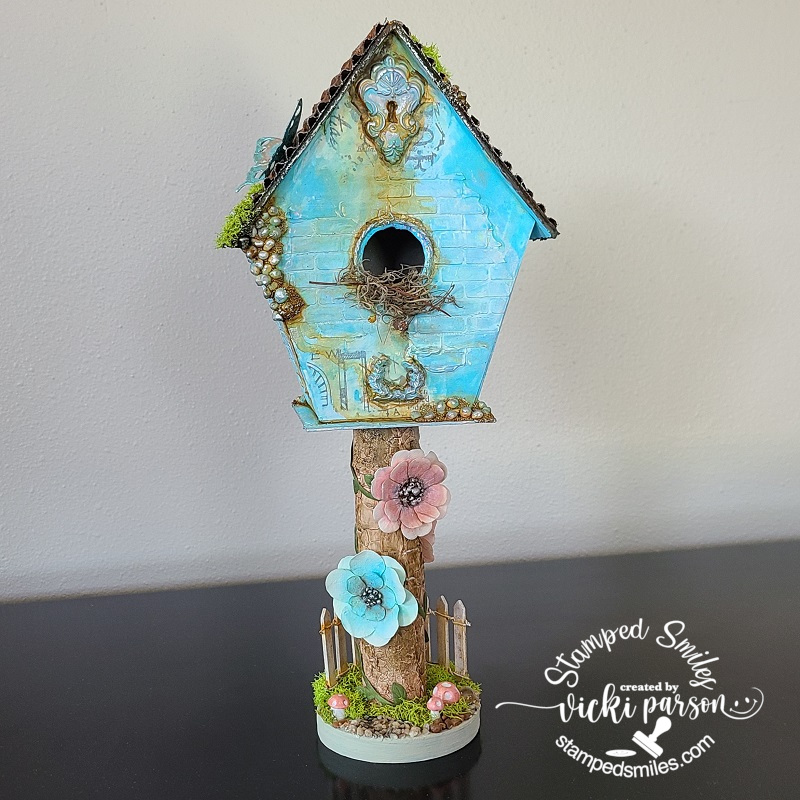
I wasn’t required to create anything specific for this challenge as it’s always an “Anything Goes Mixed Media” theme. So I thought this would be a great time to share the project that I made and taught recently for a crafty friends retreat. (I will share more on my completed projects in the future here too!)😉
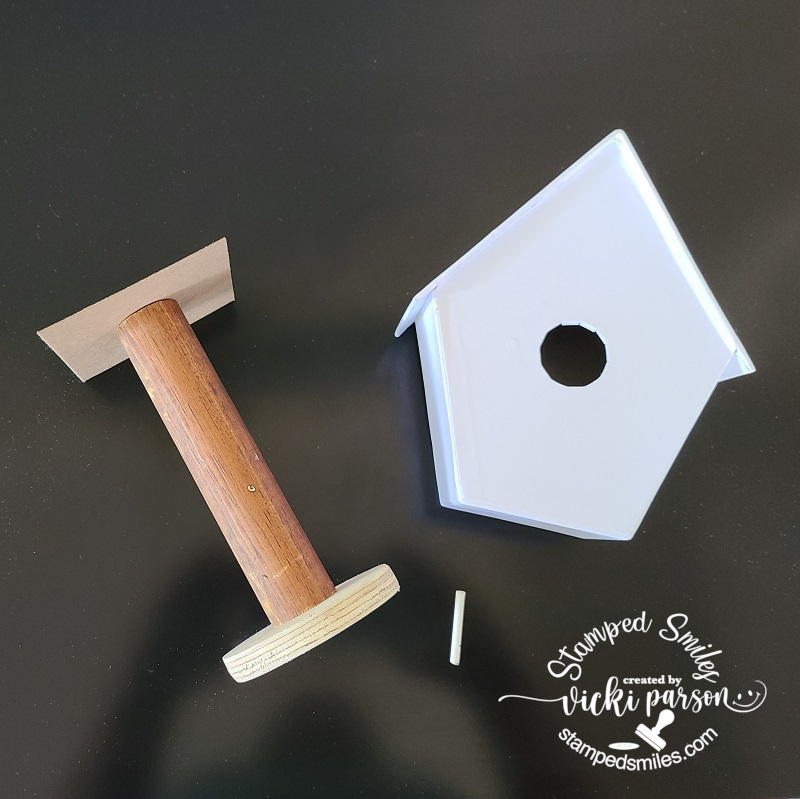
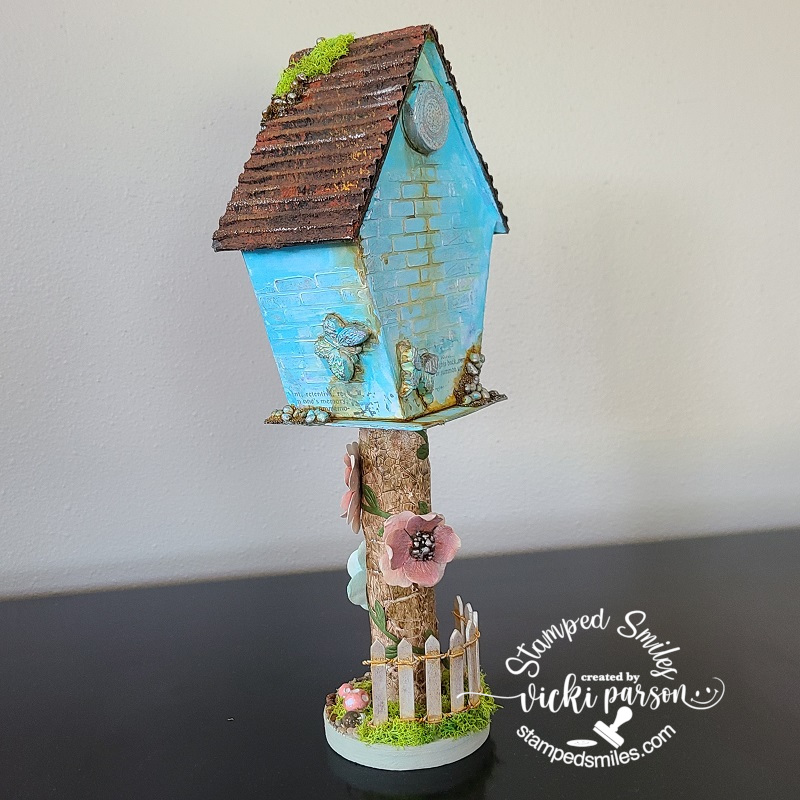
I have made a mixed media birdhouse with a “stand” that is approximately 14″ tall with a width of about 6″ across the birdhouse roof edges.
I purchased a paper mache birdhouse that came without the square layer underneath it or the “perch”. I added those using my own chipboard and craft stick from my stash. The “tree stand” was constructed from an old stairway post from my house that had been stored in our shed out back. We had no use for it, so I had my husband cut down the length that I wanted for the birdhouse, attached the square chipboard piece to it and glued the birdhouse on top of that. The very bottom was created with my husband’s saw and pieces of left over wood he had which was then screwed to the stairway post. Here’s what the items looked like unassembled…
For the “tree bark” look on my post, I covered the entire post with some crackle paste and let it dry along with all of the glue and white gesso to prime everything. For the “roof” of the birdhouse, I took a couple of pieces of regular cardboard that you would throw away from a box. I cut it to size for the roof, ripped off the layer to expose the corrugated texture underneath and glued it to the roof. This was primed with black gesso.
Here’s a closer view of the roof. To get that “rusty” texture look, I used the Finnebair Rust Affect Pastes. Not only does it give that look, it also gives the texture too. The class seemed to enjoy that part. I’ve also added some more textures with the art stones, wax and moss. You will also notice that I’ve used this same method with the “perch” too.
The other side of the roof also has added texture with art stones as well as a tin mechanical butterfly that was painted up with some Sparks sparkle paints.
For the “tree post” I added some paint(s) mixed with touches of water to make the texture stand out to get that “tree” look to it. It was wrapped with a vine ribbon and flowers that were painted to coordinate with the project and then attached to the vine. The centers of the flowers were made with beads, painted and waxed over them.
And here’s a closer view of not only the post and flowers, but the fence which was also painted with watered down paint as well as painted mushrooms that were actually a bright red color. I wanted to customize it to coordinate with the project. I’ve attached some decorative rock and a little crystal ball at the bottom of the platform along with the green moss which covered up the rest of the areas.
As for the birdhouse areas, I ripped up pieces of printed vellum and randomly attached those pieces as desired. I also took some texture paste and a brick stencil to go over areas of the birdhouse being careful where I wanted to place my different clay molds. I made all of the clay molds shown and enough for everyone in class too. This is where all of the art stones were attached too. At this point is where the clear gesso comes in because of the printed vellum that you don’t want to get covered up with the white. Once attached glue pieces and paint dried, this is where I painted with watered down blue Pasto Paint so that the vellum is still visible through it. I also painted a very light washing of white paint to go over the brick areas for highlights.
And lastly, to create the “runny rust” colors around the clay and textured areas, I used a couple of different paints that were sprayed with water to let them drip down over the areas. This gives shadows to the texture and the illusion of your rusty roof affecting the sides of the birdhouse.
All of the textures were lastly highlighted with silver wax paste and the rest was just adding the green moss and the Spanish moss in the hole of the birdhouse. I have a photo of the class finished pieces that I will share in an up-coming post along with other projects I made for my classes during the retreat.
**Really hope you’ve enjoyed my mixed media birdhouse project and given you some inspiration in some way! Please be sure to stop in at the Creative Artiste Mixed Media Challenge for more inspiration by the team…hope you can join in the fun with us this month!**
Thanks so much for stopping in and I’ll be seeing you soon!
Hello friends and a happy weekend! I really can’t believe that we’re already on the last Saturday of March right now! This month flew by, but I’m so happy to get even further into the Spring months, how about you? The chirping birds seem more intense as Spring gets into her song!
Today I’m sharing my monthly Art Journal page and collaborating with my blog friend Carol as we both try and get creative with journaling by using up our never-ending stash piles! So please pop on over to her blog to see some more inspiration with our “SMASH YOUR STASH” prompt of: “Die cuts/punched out pieces/tags(unfinished to decorate)“! Let’s get to creating!
Well, I don’t know about you, but I sure do have TONS of those punches that I hardly ever use any more. I also keep piling up tons of die cuts too! So this was my focus on my page today by pulling out lots of those to come up with a Spring theme in mind…
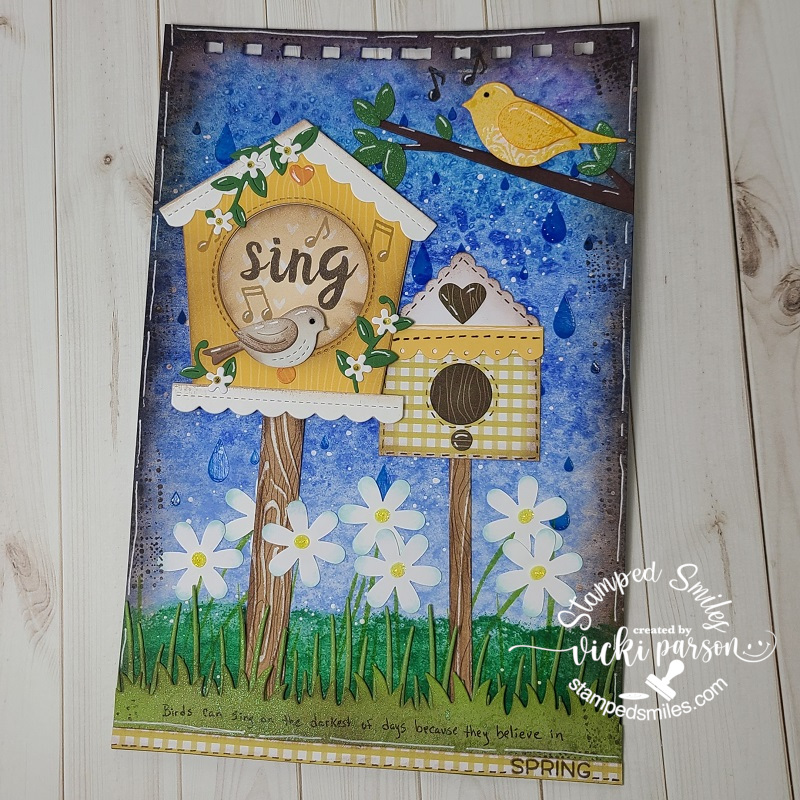
I started out with my usual 6×9 thick watercolor paper with the binder holes at the top. My first thought was to create a blue “watery” background by using my Zig Kuretake Gansai Tambi watercolors to paint an ombre blue. It was nice to pull these out to play with as I haven’t used them in quite a while. While it was still wet, I covered the panel with some Sea Salt crystals and let it dry. After it dried, I scrapped off the salt. If you’ve never tried it, it makes for a really unique look. I then took a raindrop stencil and went over it with some blue Chroma Glaze. I really like how the glaze makes it look shinny. I mixed some blue and yellow Deco Media Fluid Acrylics to make the green color and sponged it over the bottom to create my grass scene. I also had a tall grass stamp that I stamped over it with green ink. Lastly, I used white paint to splatter over the background.
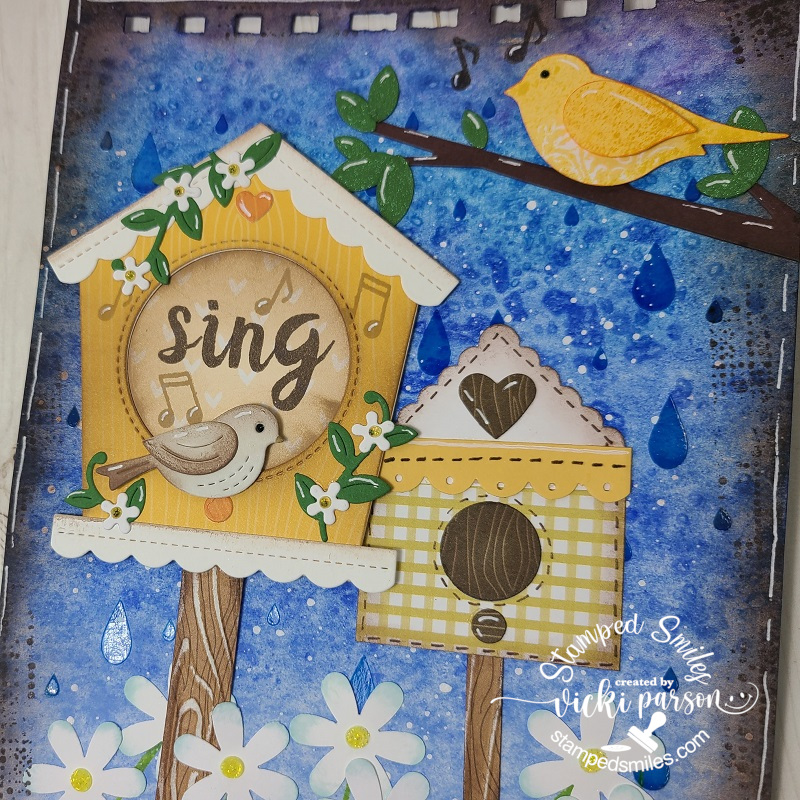
So this is where I moved onto the rest of my separate pieces to create my scene. I pulled out circle, square, heart, scallop border, birds, leaves, flowers, branch, grass borders, etc and began cutting out all of my pieces! The yellow bird at the top was stamped and then punched out. The birdhouse on the right is all punches and the daisy flowers at the bottom are all punches. The larger birdhouse with the bird and flower vines is a die set by Lawn Fawn, the branch and leaves at the top right is a die set from My Favorite Things and I’ve also used a couple of different grass die cut borders at the bottom from My Favorite Things. This is my very first time using that birdhouse die set and I’ve had those grassy border dies forever but use quite often.
I was also quite happy that I was able to pull out several pieces of scrap papers from my stash to punch and die cut all of them too! That’s a good way to use up more of your stash when you’re using punches and dies!
Trying to zoom in a bit so you can see the background and how it looks with the watercolor salt technique as well as the shine from the raindrops. For the birdhouse posts, those are just strips of woodgrain looking pattern paper that I’ve cut into strips and then ran through an embossing folder. I used a sander to bring out the texture.
I stamped the music notes next to the birds and also stamped the “sing” letters in the center of the birdhouse. I’ve got both of the birds popped up with foam tape. I’ve glued the birdhouse posts to the page, but popped up the large birdhouse with foam tape as well. You can also see where I’ve went all the way around the edges and I sponged brown ink around everything. I also stamped a random image around the edges with brown ink too.
At the bottom of the page, you can see that I’ve taken a brown marker to write “Birds can sing on the darkest of days because they believe in” and then I stamped “SPRING” over a strip of pattern paper and attached at the bottom and used the brown marker to create the dash lines. Also did this on my made up punched birdhouse.
Both the last grassy border and the leaves above on the branch were die cut from green cardstock, but I’ve also used some green mica spray and sprayed over top of them which gives a pretty shimmer to them. Before popping up the yellow bird at the top, he was also sprayed with a yellow mica spray.
To finish it off I’ve added all of the white gel pen details and along the edges of the page. Lastly, I used some yellow Stickles to center each of the daisy flowers as well as the flowers on the birdhouse. I used black Stickles to the bird’s eyeballs.
Really enjoyed putting this one together and playing around with more stash items! Hope that you’ve enjoyed as well and have been inspired in some way! I thank you so much for stopping in! Have a great weekend!
Hello there friends! Where have I been? Well, I went off looking for my “MOJO” and he’s doing some disappearing acts on me for sure! I’m having such a hard time getting motivated and feel that my creative juices have completely dried out! Do you ever feel this way too? What are some things you have done to help you? I will keep trying for now! LOL! So sorry for being MIA lately!
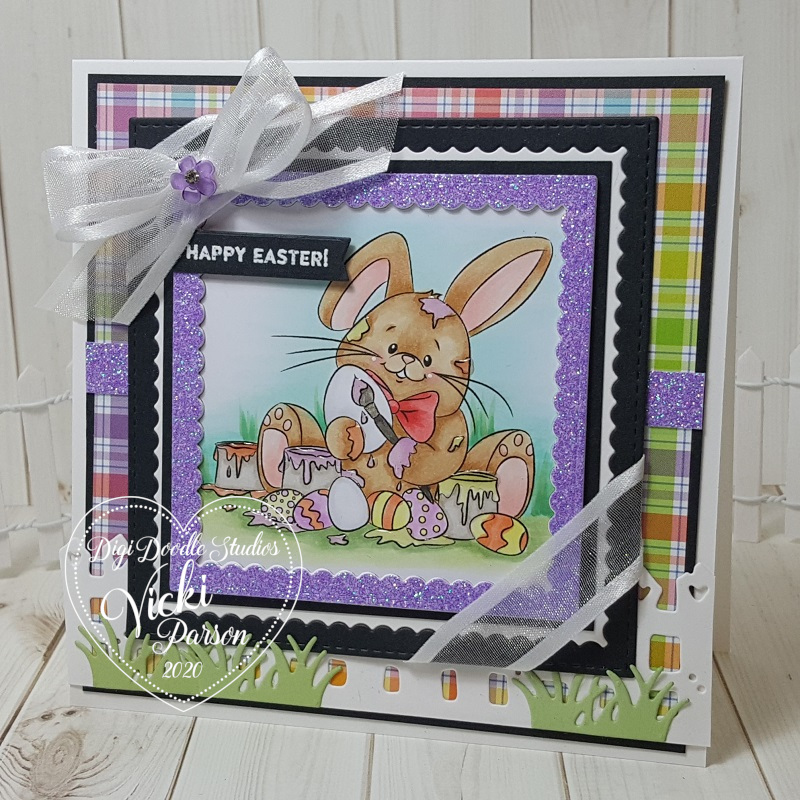
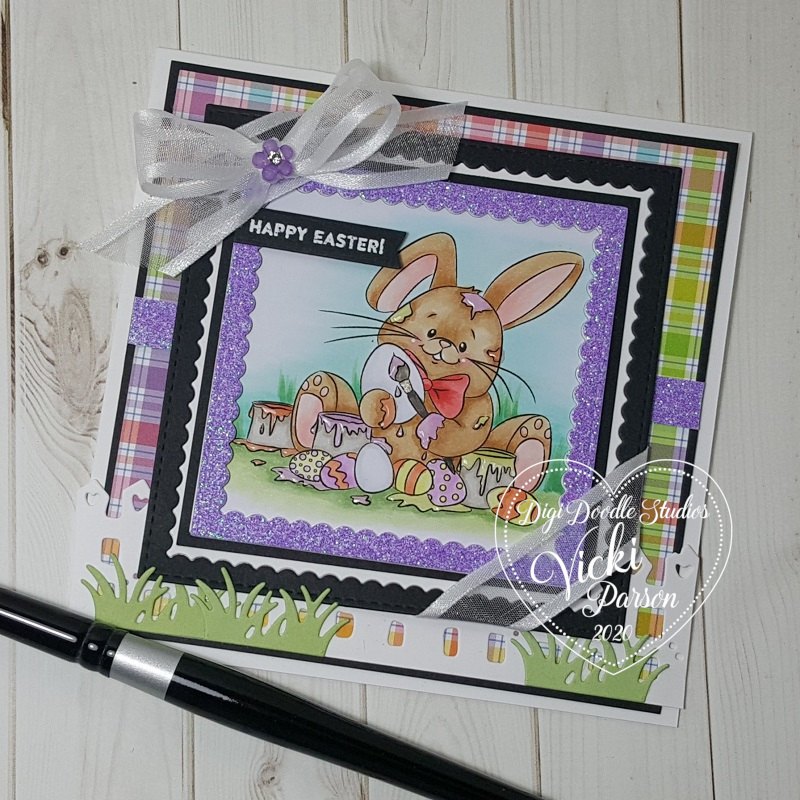
Today I must share with you a card I came up with using this really adorable image from Digi Doodle Studios just in time for Easter!
Isn’t he adorable?! This digital image is called Peyton’s Painted Eggs from DDS and he’s busy at work painting up eggs to get them done in time for Easter! I’d say he looks like myself getting messy and into the job! LOL!
After coloring him up, I used a MFT die to cut him out and create the layered frame around him with some purple glitterstock along with some black and white cardstock. I white heat embossed a sentiment (from Simon Says Stamp) and cut it out with a banner die to go over the image panel.
I took some white ribbon and wrapped it around the corners and attached a bow on the top corner with a flower embellishment in the center…found in my stash.
Also “found in my stash” was the fence and grass dies that I used to attach to the bottom of the card front panel. Some of the “grass” was placed behind the image panel and some in front of it. I also attached in the center a strip of the purple glitterstock Lawn Fawn Spring Plaid paper for the front of the card and this was layered over another piece of black cardstock which was mounted over a top folding 5″ square white card base.
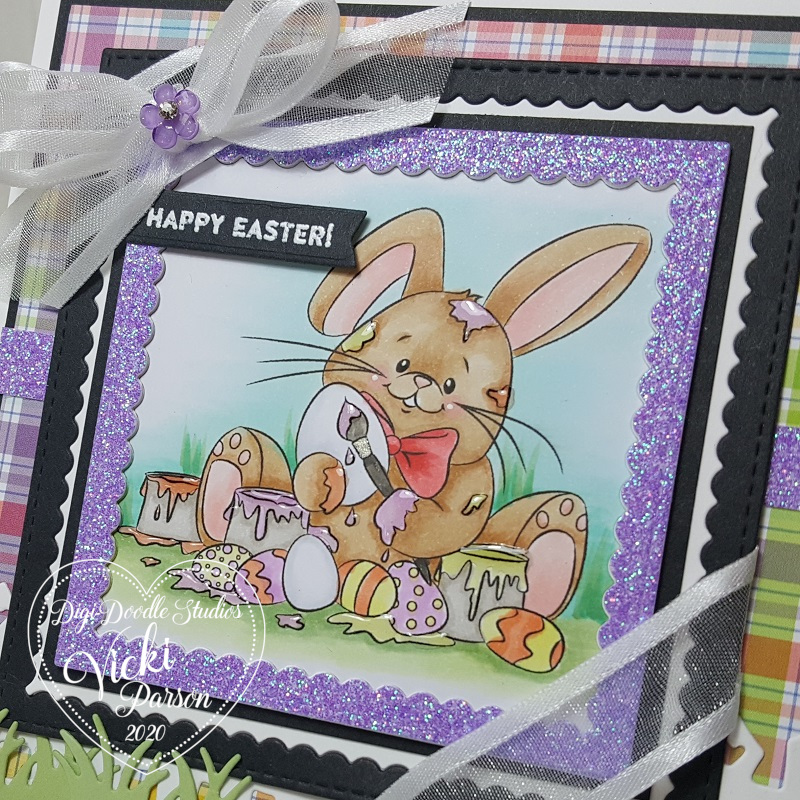
Here you can see how I’ve got him all colored up with Copic markers. He was actually really fun to color up. My first notion was to make him a white bunny, but I thought he would really stand out if he was brown in color instead. I added some blades of grass around him with my markers.
I left the egg he was in the process of painting white along with the plain one on the ground…after all, he IS in the process of working on them! LOL!
I’ve only used the white gel pen for his cheeks and I’ve used a clear metallic gel pen on the paint brush. The “shinny” areas you see on the “fresh paint” colors are the places that I’ve covered with glossy accents. The light is naturally highlighting them!
I hope that you’ve enjoyed my Easter bunny card today and it’s helped get you in the mood thinking warm Spring thoughts! I know I’m really looking forward to warmer weather and being outdoors for sure! Easter is just around the corner now!
Hello friends! We’re finally on the last Friday of February! Yay!
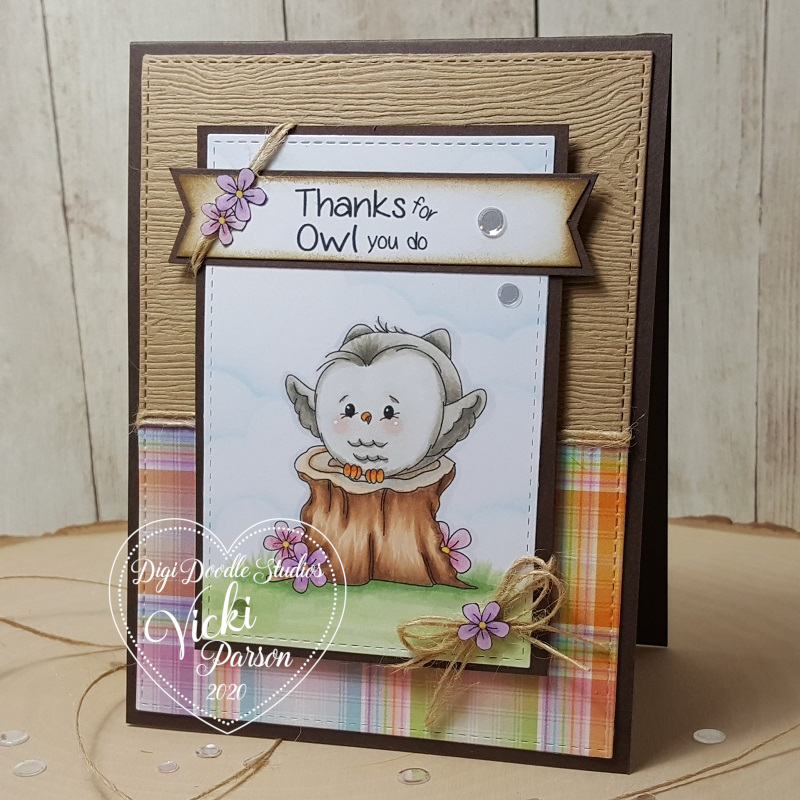
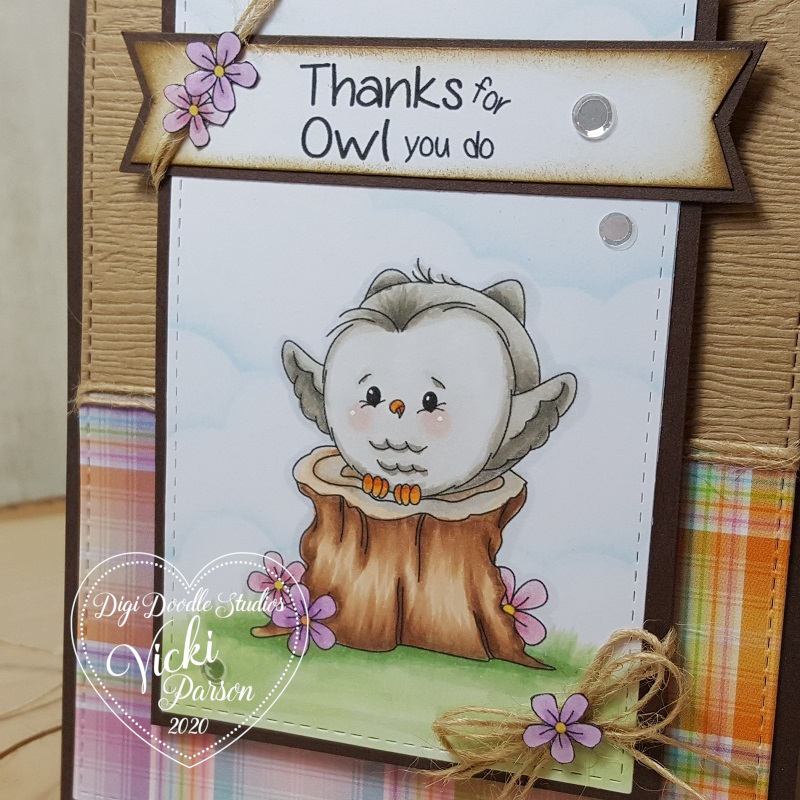
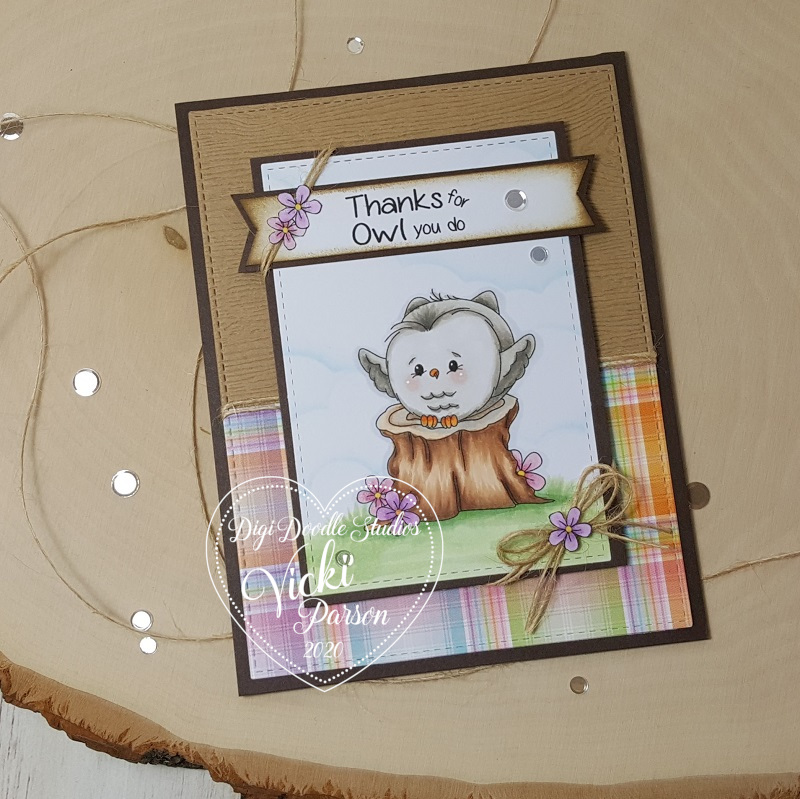
Although we’ve had snow in our forecast recently, I’m feeling Spring will be in the air soon and I really look forward to it along with all of the pretty flowers and green grass! So today, I’m sharing a card I’ve made using this adorable Pairables set from Digi Doodle Studios:
Isn’t this little owl the cutest?! I love how he has his little wings out for a hug! I’ve used several of the images from the “Owl-rageous” Pairables set to create the scene on my card. I have used Word.doc on my computer to arrange and size the different images where I wanted them for my scene and printed it out to color. I’ve also printed out the flower image from the set along with the sentiment separately to cut out for my design.
As you can see, I’ve taken the flower image and sized it differently and arranged it around the stump for the scene. I’ve also used it to cut it out separately to attach to the twine next to the sentiment as well as the twine bow at the bottom.
I’ve printed out the sentiment, cut it out and then cut the fish tails on each end and ink blended with brown ink around it. I’ve matted it with the same brown cardstock that I’ve layered the image panel on and it’s also the base of my top folding A2 sized card.
I’ve pulled out some textured woodgrain cardstock as well as the Spring Plaid papers from my Lawn Fawn stash. I thought the woodgrain and Spring-like colors worked well for this cute owl. I’ve finished it off with some clear sequins.
Here’s a closer look at the coloring I’ve done on this cutie! I’ve used the W tones to color him in and then the E20s to color the stump. I also end up going for the G24, G21 and G20 for coloring my grass. I love the bright Spring green it gives I think. I highlighted his cheeks and eyes with a white gel pen.
You can also see a subtle cloud line behind him. I’ve used the MFT Cloud Stencil with my ink blending tool and Tumbled Glass distress ink to create the background.
You can see that I’ve wrapped some twine around the center of the card where the two different papers meet as well as wrapped around each corner of the image panel. This is where I decided to add the cut out flowers on each end.
I feel like this owl with my arms open and ready to take in all of Spring when it comes and thank Mother Nature for bringing it around! LOL! How about you?
Thanks so much for stopping in today my friends! I’ll be seeing you soon! 🙂
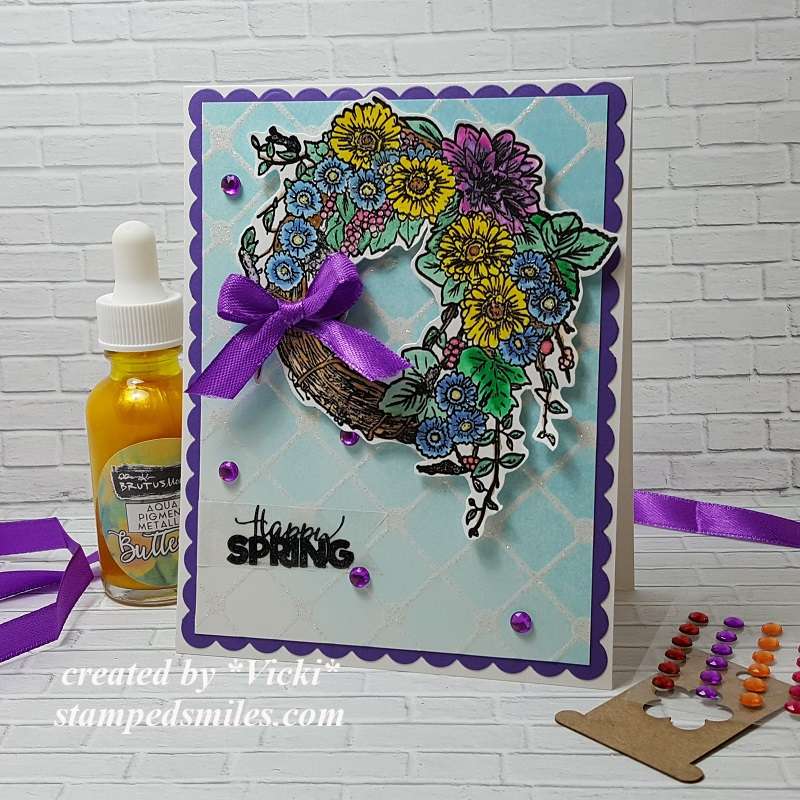
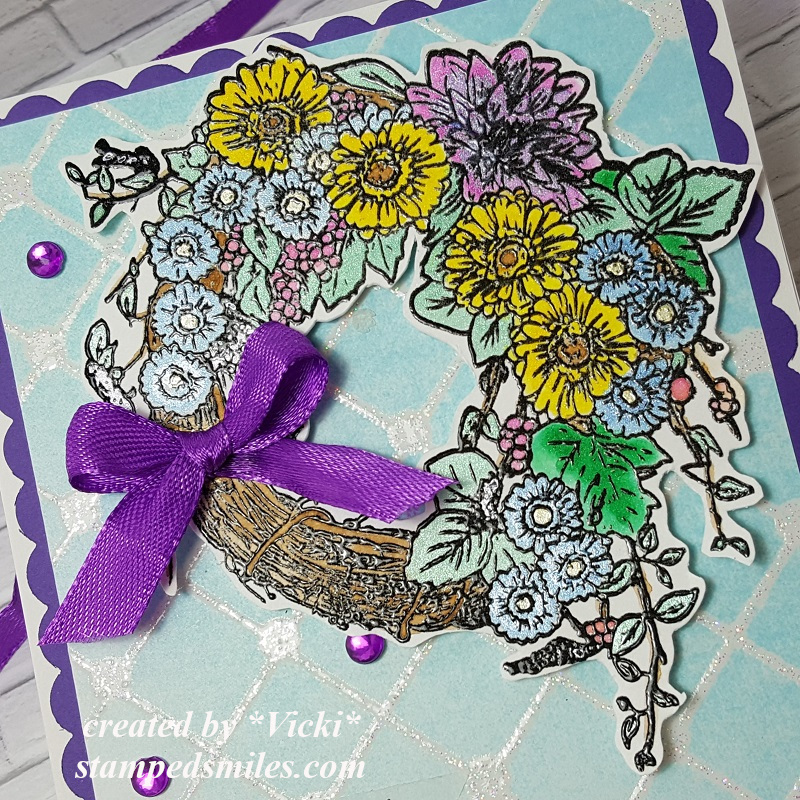
Hello friends! Just popping by to wish you all a wonderful weekend and to share a “Happy Spring” card to make you smile:
So, for my card, I started with the glitter embossed panel from the kit and took the Sea Glass ink pad that came with the kit and ink blended over this panel. I cut it down and then die cut a scallop piece of the purple cardstock from the kit and then attached it to an A2 sized top folding white piece of cardstock.
Although I really liked the sentiments from this stamp set, I wanted it to be Spring-like, so I took a sentiment from a different stamp set and stamped it with black ink over a piece of vellum and then clear heat embossed it. I cut the strip into a banner and then ran it through my Xyron machine to get it sticky and attached to the bottom of the card front.
Lastly, I’ve attached the image with foam tape over the card front panel and then glued a bow made with some of the ribbon from the kit. I then attached some purple-colored gems, also from the kit, randomly over the front.
Here’s a closer view of the watercolor I’ve done over this image. First, I’ve heat embossed the image and used the Aqua Pigments to color it in. I’ve slightly tilted it so you can see the pretty shimmer that these Aqua Pigments give to the look of it! The regular colors don’t shimmer, but the metallic do shimmer beautifully! I then glued the bow of the wreath image and popped up the wreath to place on the front of the card.
Hope you’ve enjoyed my card today and I wish you all a very happy Easter! Thanks so much for stopping in! See you soon!
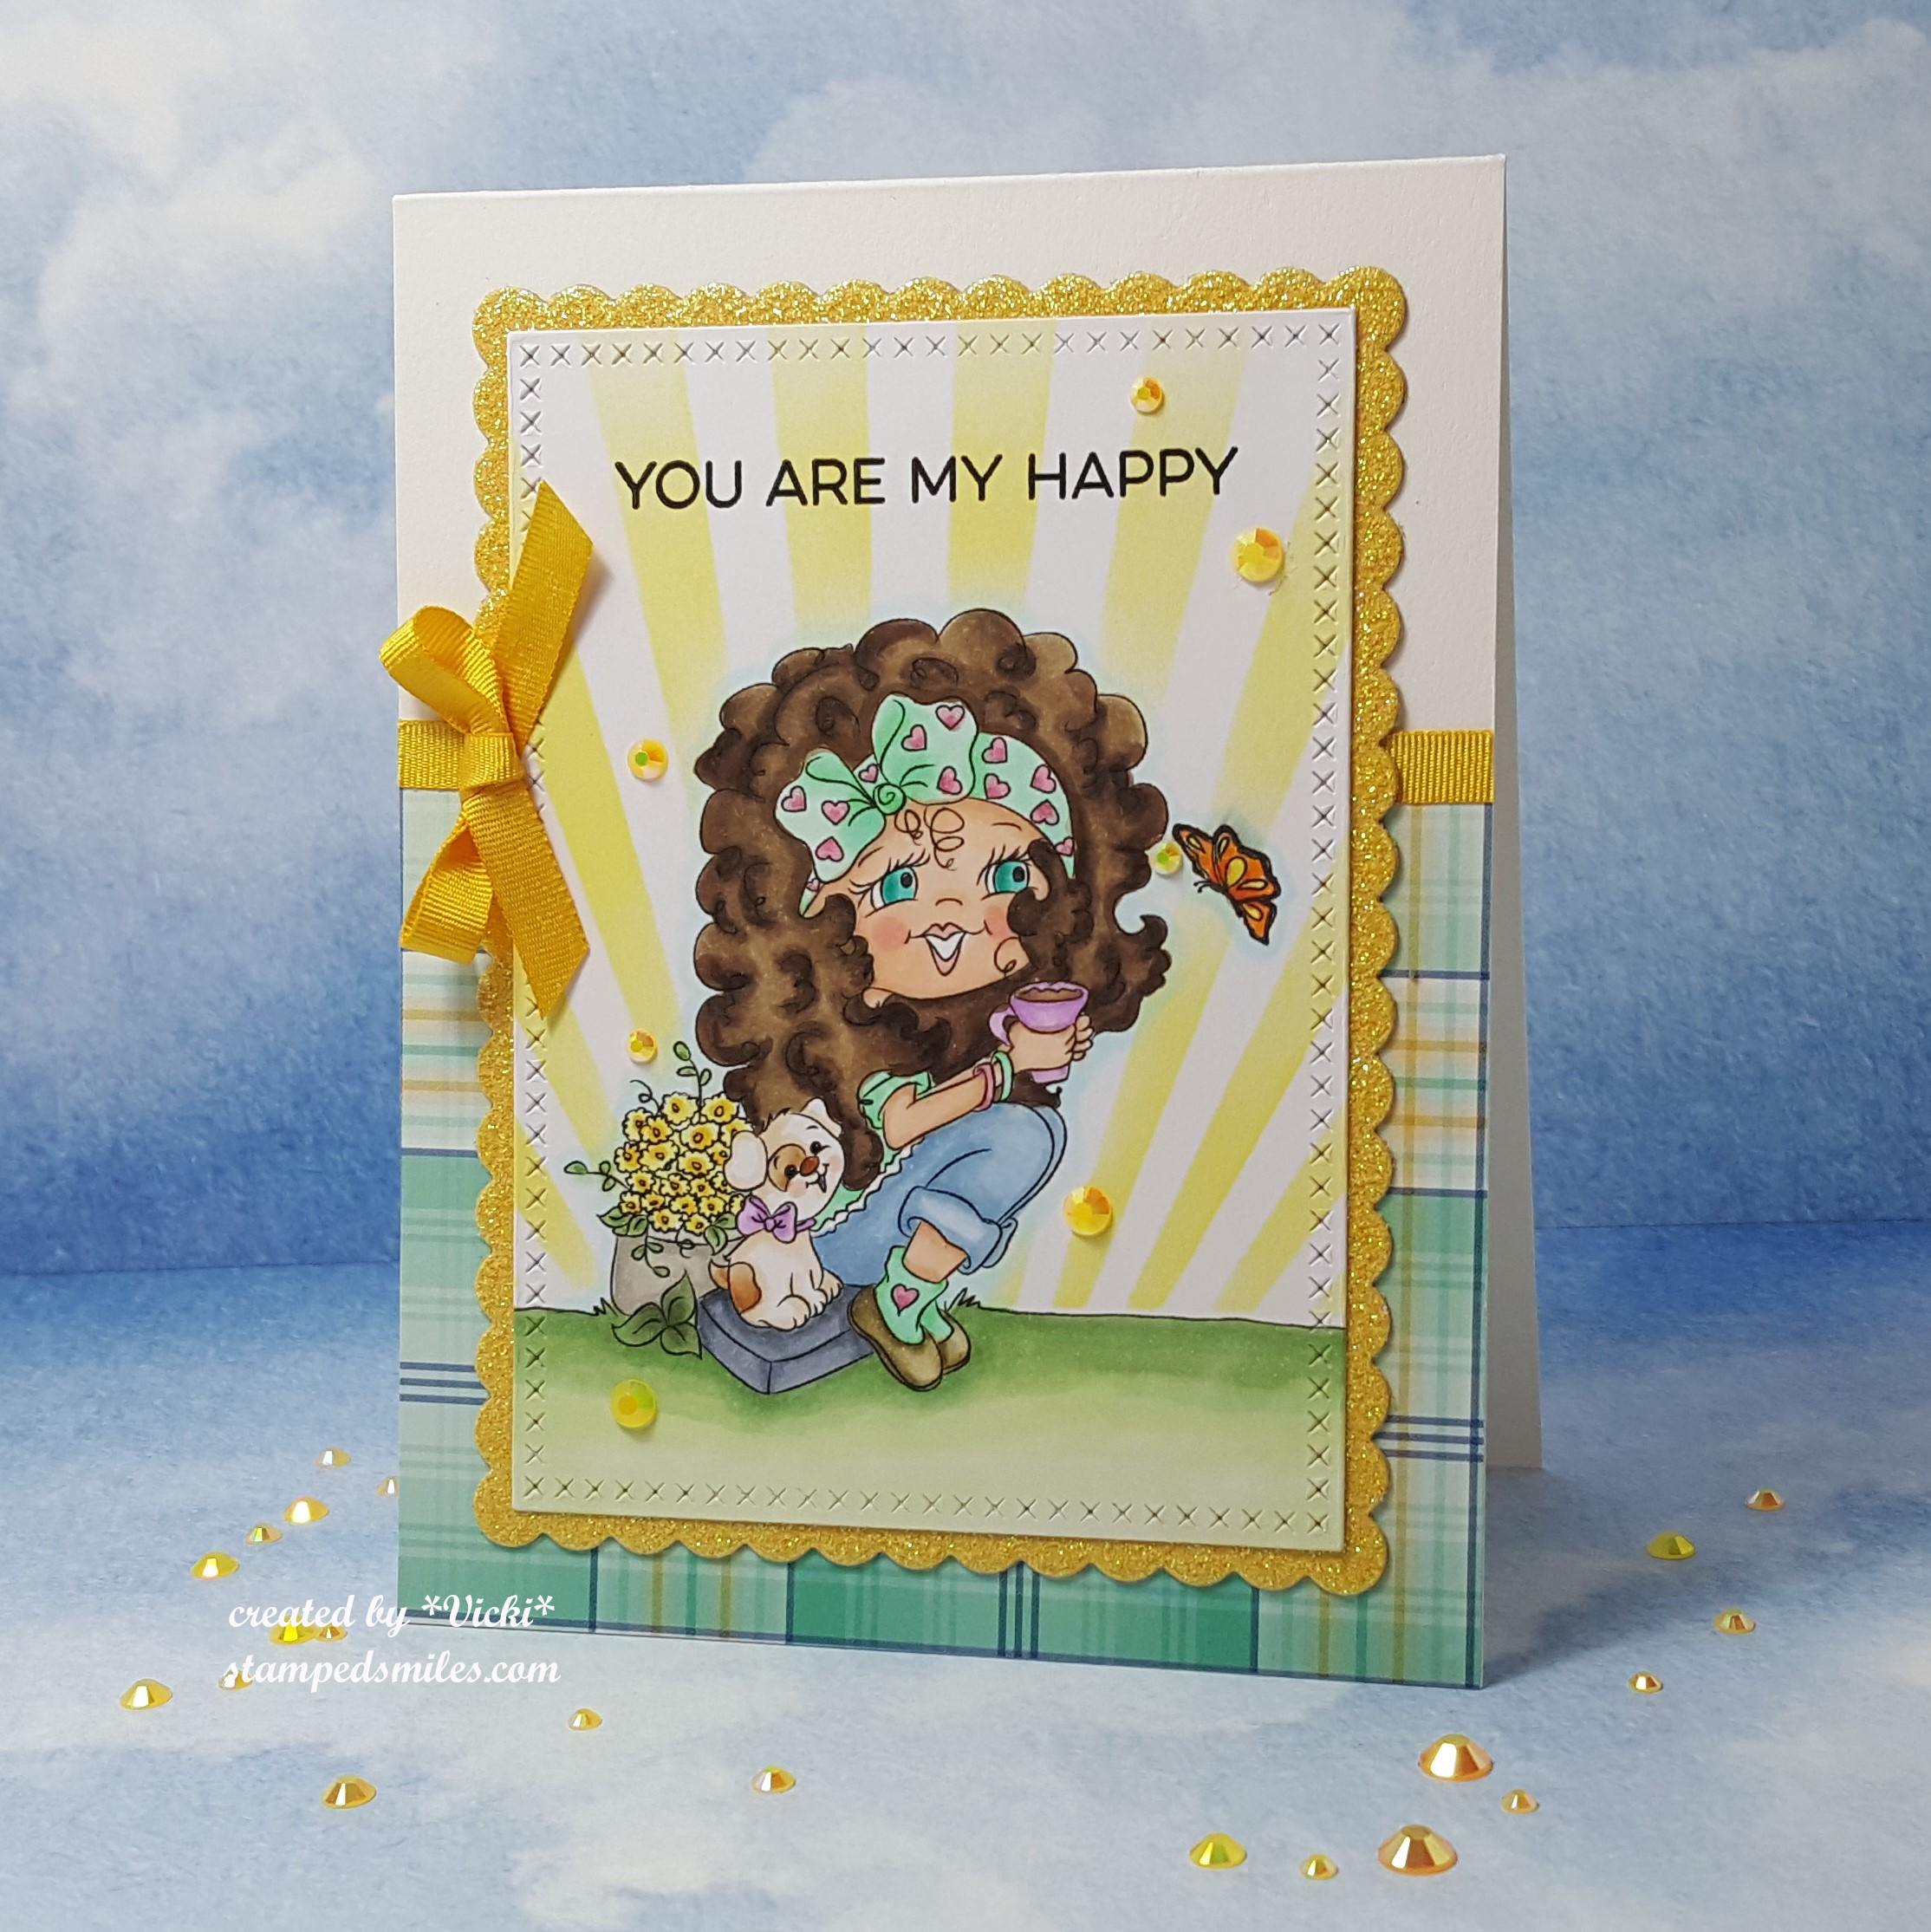
Well, there’s “no fooling” here today as I bring you a post to share the creation, I’ve made for a new challenge over at the 2 Crafty Critter Crazies Challenge Blog! Since it’s the first of April, we have a new challenge starting with the “Anything Goes + critter” theme in mind! Hope you will join us with your critter creations!
We are being sponsored by Digi Doodle Studios and this is the card I made for the challenge this month:
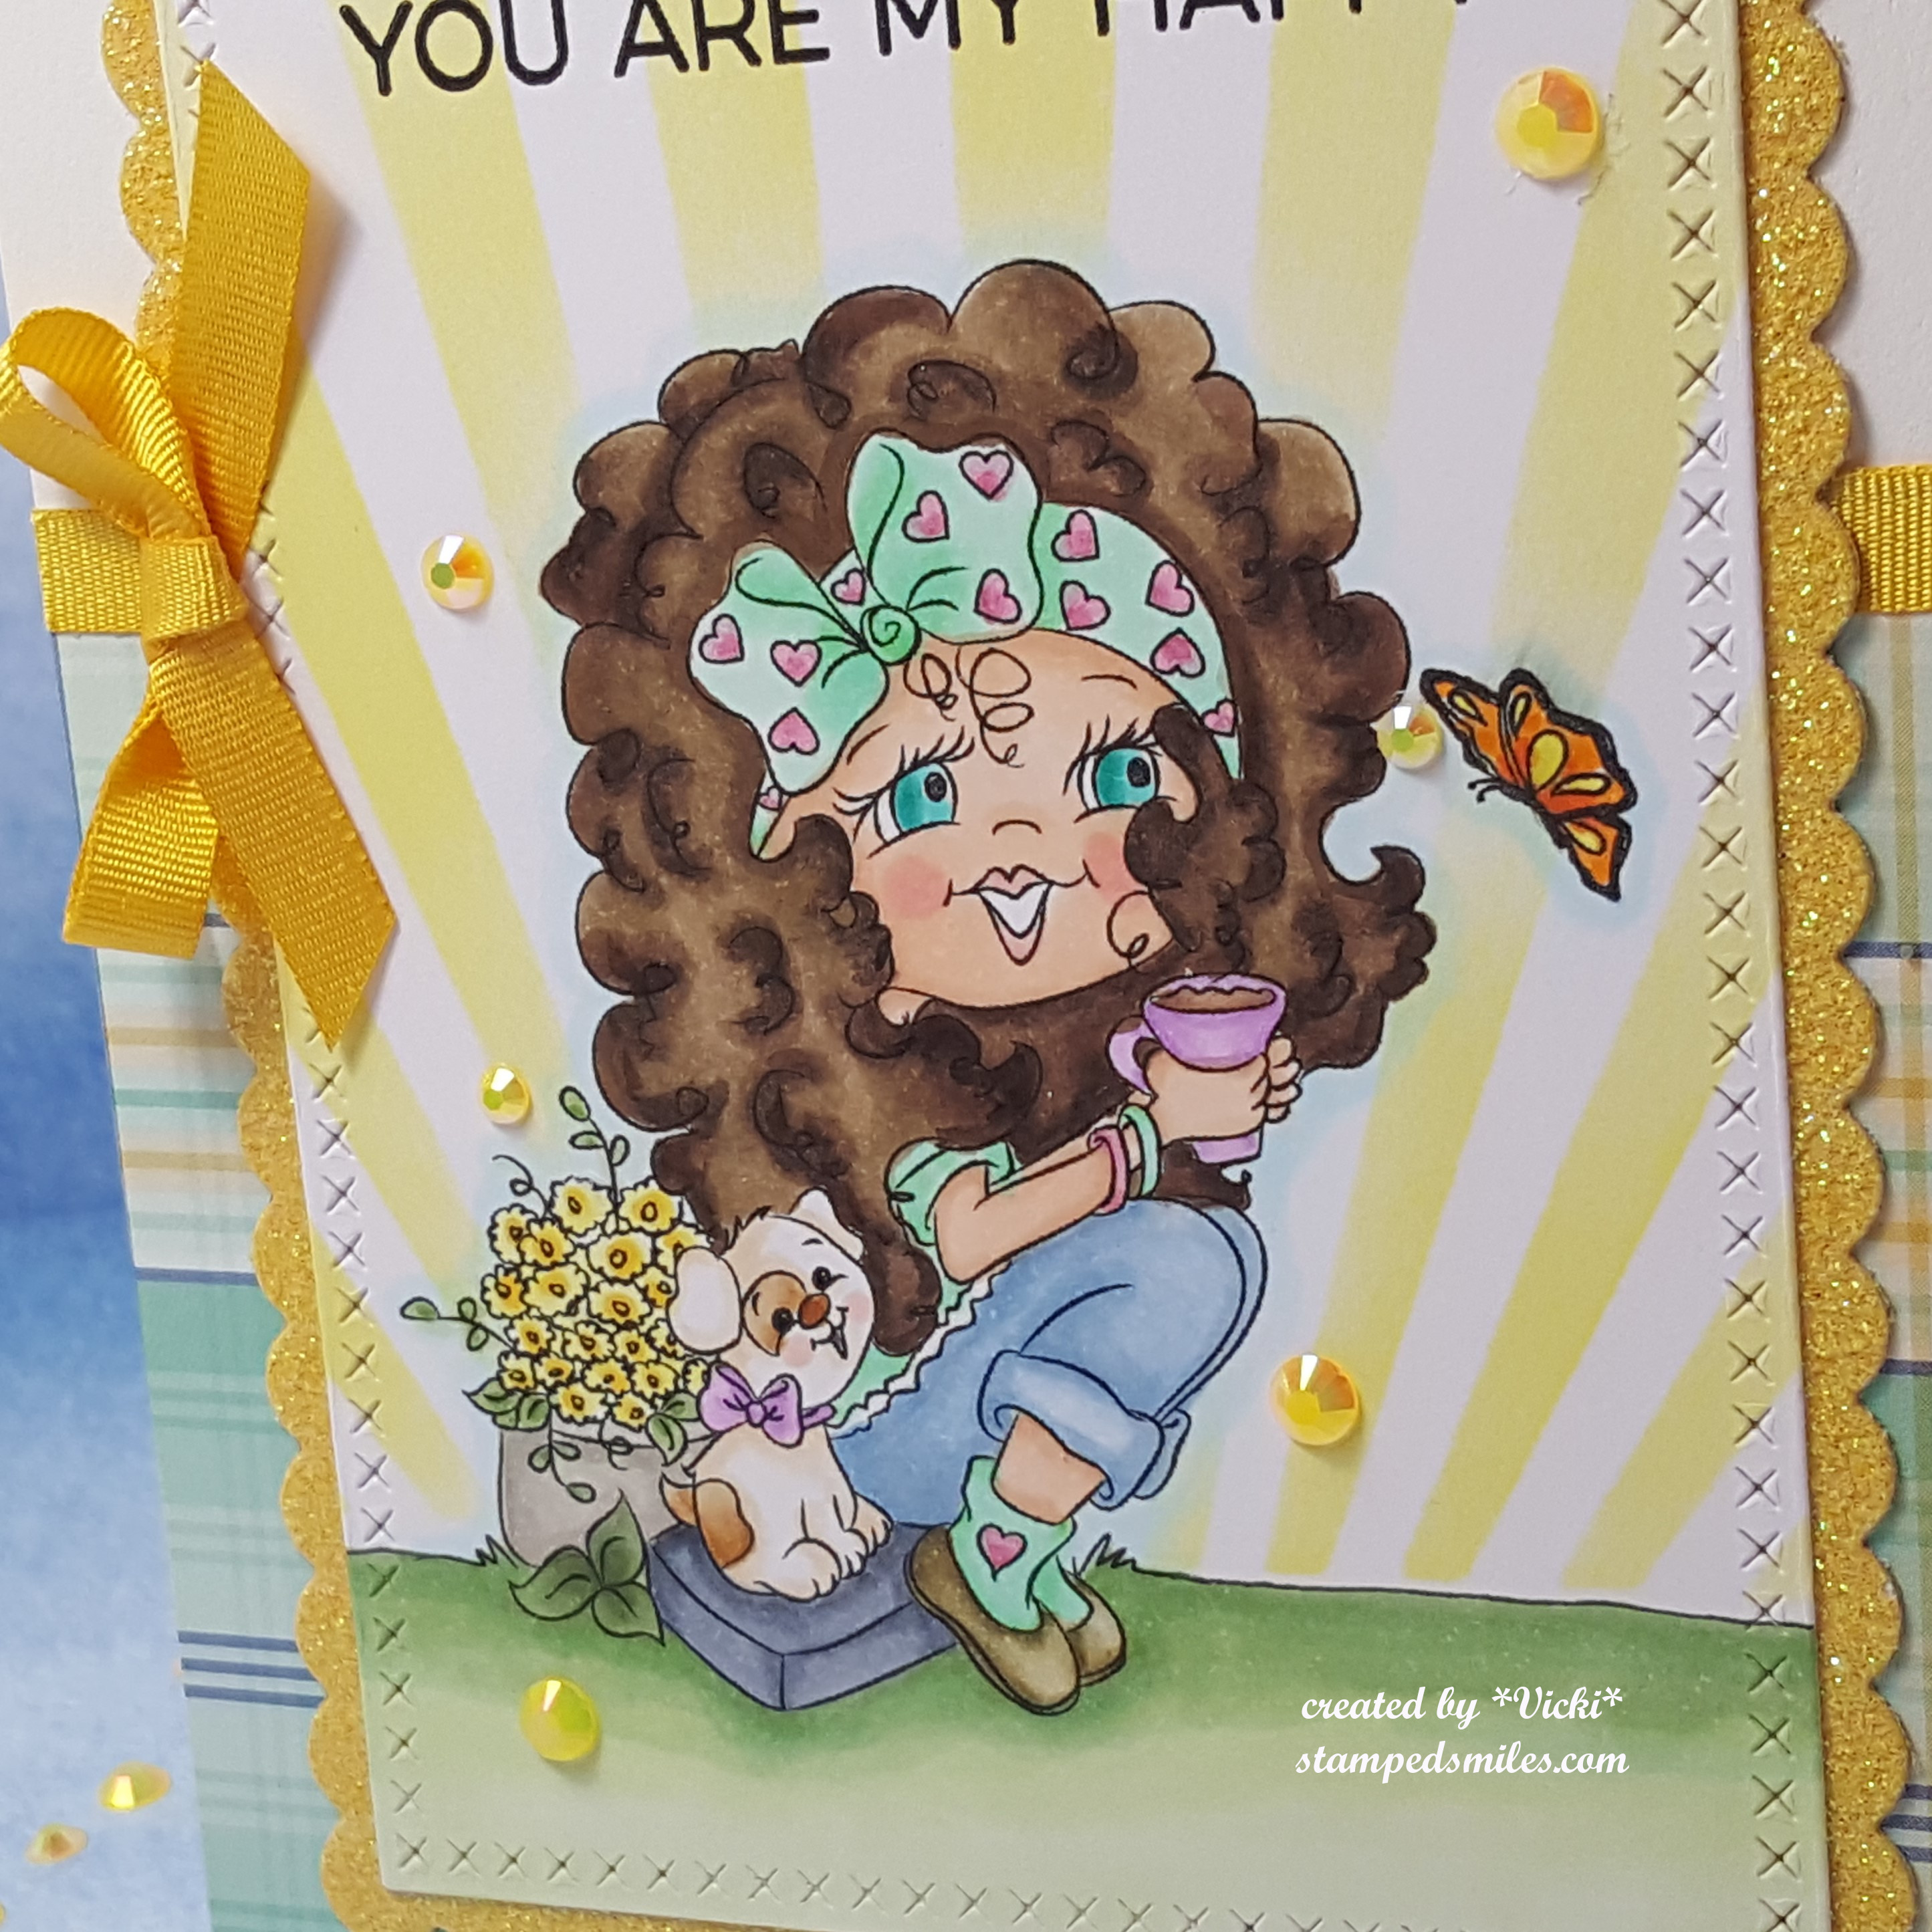
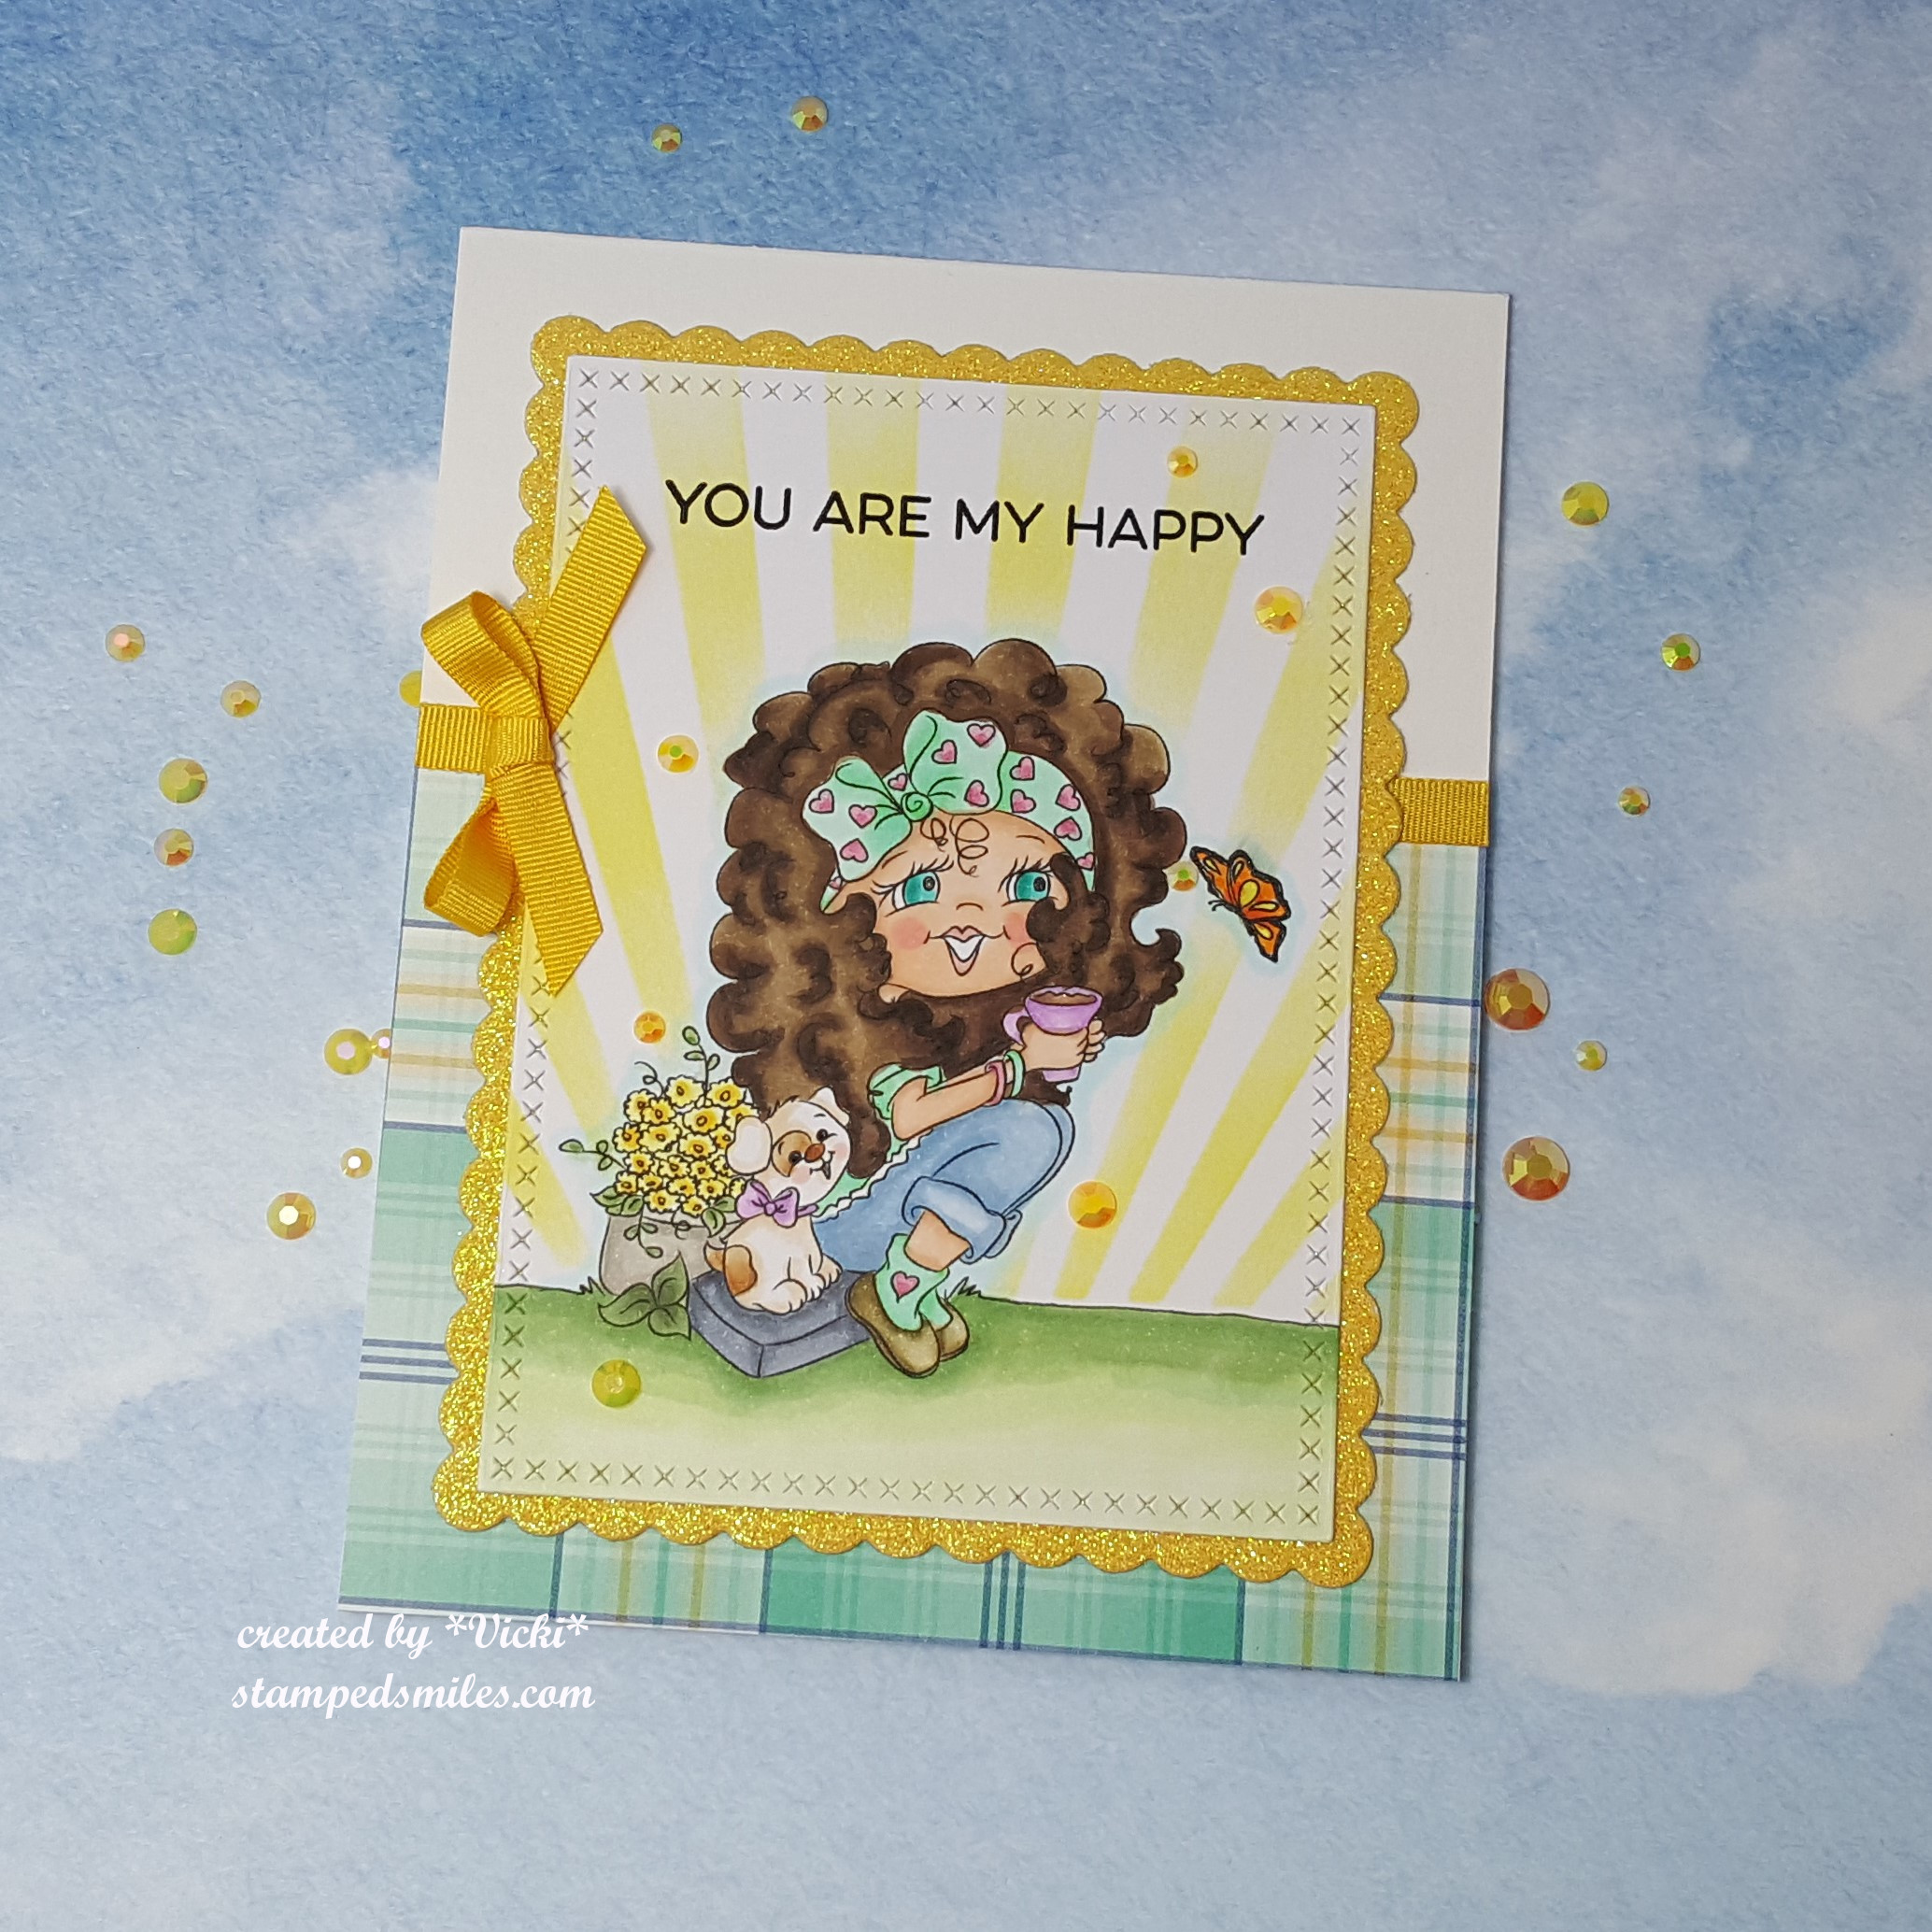
Our sponsor was kind enough to share this very sweet image called Mia which I’ve used for my card today. This is my first experience with these images, and I must say they have some really cute ones in their store, so hop on over and check them out!
I’ve colored her up with Copic markers including drawing extended lines for the grass and coloring it up all the way across and down. I cut it out with a cross stitched rectangle die and then used a sun ray stencil to ink some yellow behind her by taping off the grass edge, so I didn’t get any on that part. I then stamped the sentiment in black ink over top of that.
To continue on with the yellow color theme I’ve got going on, I cut out a piece of yellow glitter cardstock that was cut out with a scallop rectangle die (retired from Lawn Fawn) and attached it to the back of the image panel. I took some plaid papers for the bottom portion of the A2 white top folding card base and then attached some yellow grosgrain ribbon across the top and then attached the image panel and then added a yellow ribbon bow along the edge. Lastly, I finished it out with some yellow rhinestone crystals.
Here’s a closer look at the coloring I’ve done on the image. I took a black gel pen to color in the eyeball’s circles. I wasn’t sure how to go about coloring the eyes, but this is the way that made the most sense to me. I also went around the edges of the butterfly with the black gel pen. I took a glitter brush pen and went over the liquid in her cup.
I have to add that this image really got me thinking about past memories with my sweet little Mocca and how we would go out on nice Spring days like this. She certainly was always “my happy” for sure and I still miss her like crazy. I’m sure any of you that have lost pets understand what I’m saying. It’s great to have the memories we’ve shared after all this time!
Thanks so much for stopping by! I appreciate it so much!
As You Like It – Favorite Coloring medium – Copic Why? It’s my favorite “go to” coloring method and I love the way the markers blend together for shading and highlight effects.
Hello friends! Hope you are having a great week so far! It is Thursday already and we are getting closer to the weekend and even closer to the end of March already! WOW!
Since it’s Thursday, it’s time for a new challenge over at Cute Card Thursday! The theme of the challenge this week is “Spring Fever“! I can feel it for sure! Hope you can join us this week with your Spring creations! Here’s what I’ve made for the challenge:
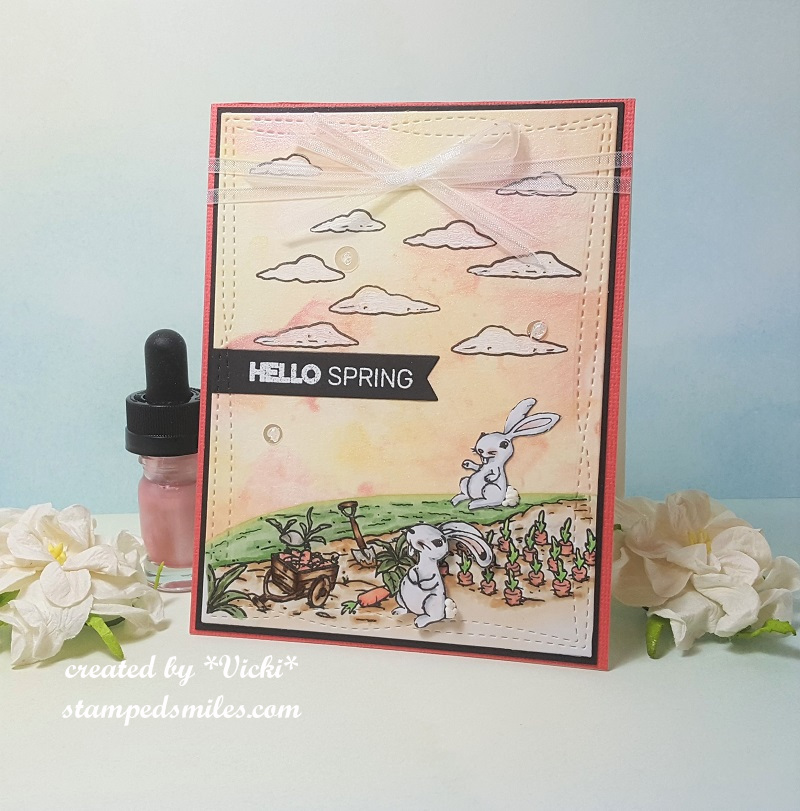
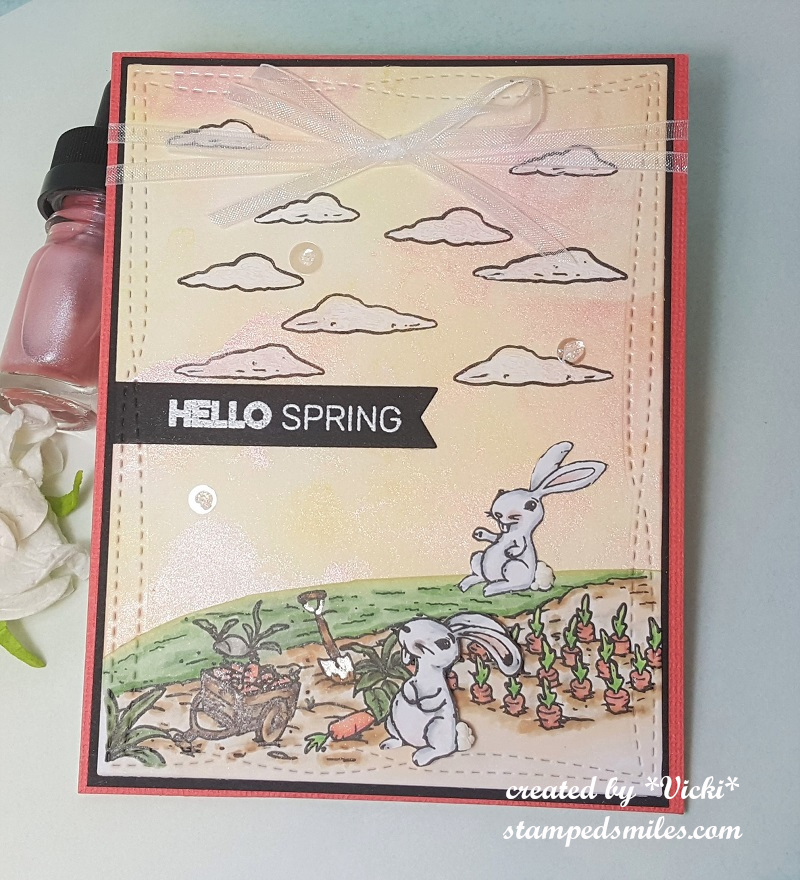
For this card, I did the “smooshing” technique with a couple of distress inks and the little Aqua Pigment bottle from the kit (see photo) for an added color and shimmer. I set that aside and worked on the images.
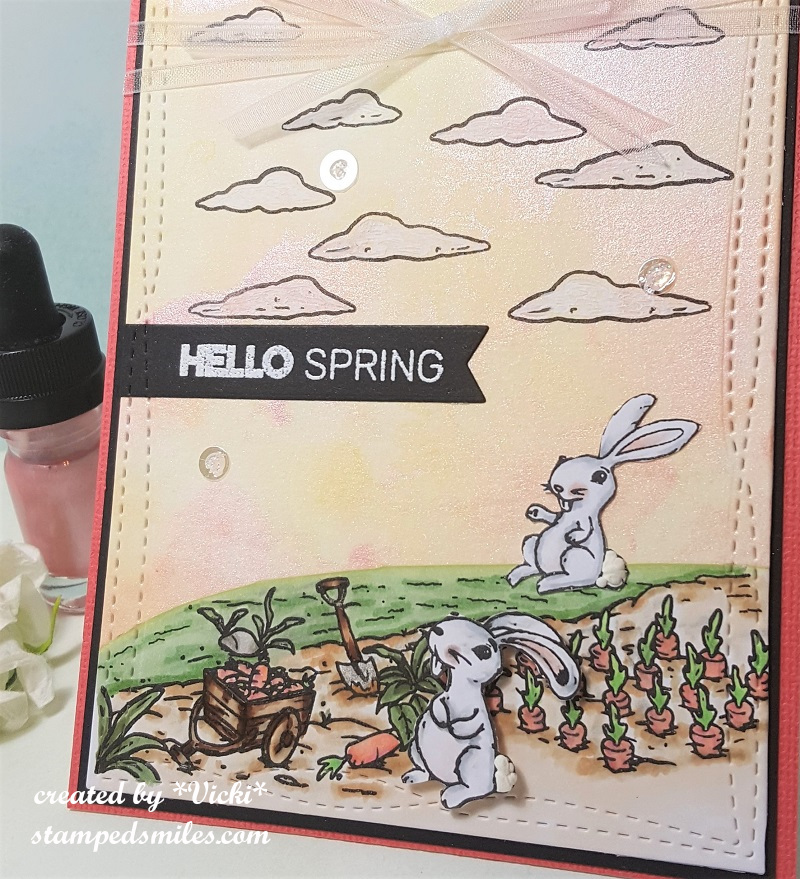
Taking a couple of the scene images from the stamp set, I put them together to create this scene over some X-Press It Card and colored everything in with Copics. I then cut it out and sponged along the edge where the grass is and attached it over the smooshed watercolor panel. I took both the bunnies from the set, colored them as well and fussy cut them out and popped up the one in the front with foam tape and glued the one in the back. I cut both of these panels with the MFT Wonky Stitched rectangle die.
I stamped the clouds in the upper portion and colored them with a white gel pen. I then took a sentiment from the same stamp set and heat embossed it with EP and die cut a banner strip. I layered this piece over a piece of black cardstock and then took some of the paper from the kit and layered it behind the black. This is where I took the ribbon and wrapped around the layers and added the bow too. This was all attached to a white A2 top folding card base.
Here’s a closer look at the image panel. You can see the pretty shimmer in the background. I also took some liquid applique and put it on the bunny tails so that when I heat set them, they puffed up. Always hard to photograph, but I’ve added some shimmer to the carrots with a clear glitter brush pen and colored the shovel parts with a silver gel pen. Lastly, I’ve attached some sequins from the kit and filled the centers with some Nuvo White Blizzard Crystal Drops.
From a different angle you may be able to see more of the shimmer on the card. I love how it turned out and it certainly has me getting that “Spring Fever” where I can’t wait to go outside!! How about you? What do you look forward to in the Spring?
Thanks so much for dropping in today my friends!! Have a wonderful day and I’ll see you soon!
Challenges I’d like to enter my card for:
Alphabet Challenge – ‘Z’ is for Zesty Colors (I’ve used Squeezed Lemonade and Spiced Marmalade distress inks for background)