Make a Wish for Whimsy Stamps

Hello friends!  Wow!  We are getting so close to Thanksgiving now within a few days!  I know that most people have been full steam ahead with making Christmas and I have really been quite festive myself with my own creations!  Today, I wanted to suspend the ‘Merry Making’ for just a moment….

Vicki-SZPreciousPresent-Nov26

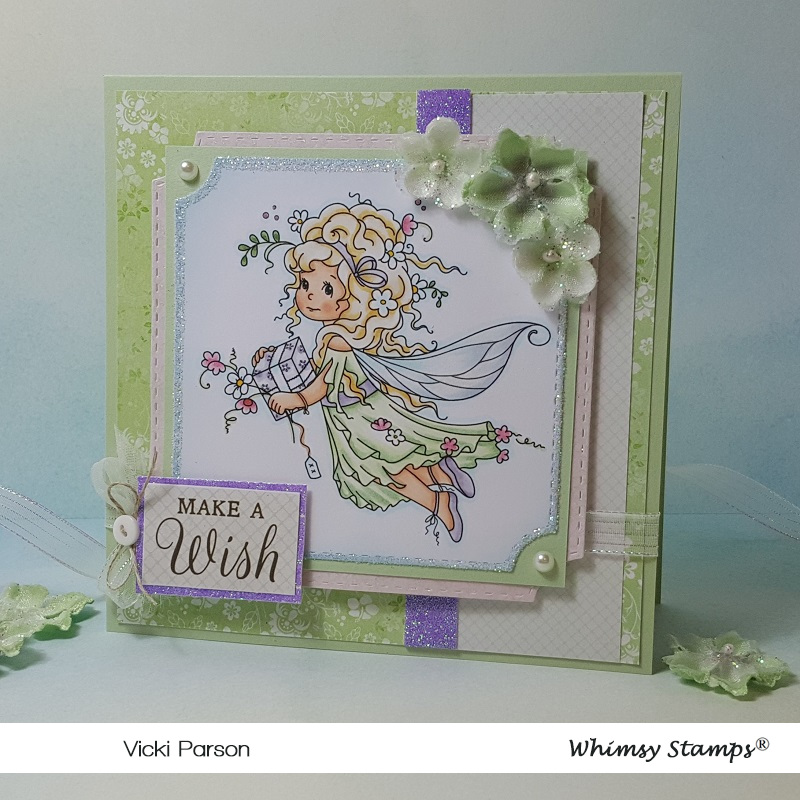
This little cutie digital stamp is appropriately named Precious Present from Whimsy Stamps and she’s another adorable fairy image by Sylvia Zet.  You could certainly change up the colors to make her more festive, but I just felt like taking a “wee” break (LOL..Wee Stamps…see what I did there?!) and make something soft and light.

After coloring her up, I used the Whimsy Stamps Notched Square Dies to cut her out with and then layer with more panels behind her.  I also took a glue pen and went along the edges of the image panel then covered with some clear glitter.  I did the same with the purple strip in the background and the layer behind the sentiment panel, but just used some pretty sparkly purple glitter.

The background papers including the sentiment panel came from a pretty paper pad called “Fairy Garden” by Kaisercraft that I had purchased earlier this past Spring.  Love how soft and light the colors and patterns are in it.  I also found the perfect Stampin’ Up! cardstock color for my card base and one of the image layers called “Certainly Celery”.  It’s an oldie but a goodie for sure!   I finished it off with some more of that clear metallic ribbon (my fave) with a bow at the edge of the sentiment panel along with some twine and a button.  I also added some flowers by Prima and a couple of pearls in the corners of the green layer behind the image.

Vicki-SZPreciousPresent-Nov26-close

Here’s a closer view of the coloring I’ve done for this image using Copic markers.  I kept things really soft and simple for this.  I did add some shimmer over her wings with a Spectrum Noir glitter brush pen and I used a pink metallic gel pen to color the “dots” above her head.

The layers were popped up with foam tape and I’ve also popped up the sentiment layer with foam tape over that as well.  (You can see the glitter in the pink layer that was die cut too!  This came from that paper pad I mentioned above.)

Vicki-SZPreciousPresent-Nov26-flat

I hope you’ve enjoyed my non-Christmas card today!  I think you could turn it into something festive and I thought about doing that, but then decided I wanted to use soft and light colors and turn it into maybe a birthday type card.  Besides, I love soft subtle colors and lots of sparkle…so it was fun to put together!  🙂

It already has me longing for Spring and winter hasn’t even really started over my way yet! LOL!!  I do have TONS of creations going on in my craft room and haven’t really been sharing them on my blog, but I hope to be getting to that very soon as we are approaching the December month and there will be so much to share!  I’m excited to be sharing things with you soon!

Thanks so much for stopping in and have a wonderful day!

Challenges I’d like to enter this card for:

  1.  The Fairy and Unicorn – November Anything Goes + fantasy themed
  2. Fab ‘n’ Funky – Add a Button(s)
  3. Little Red Wagon – Birthday Card
  4. Alphabet Challenge – ‘R’ is for Ribbon
  5. Creative Moments – Anything Goes with optional:  Ribbons and/or Bows
  6. QKR Stampede – #373 Anything Goes

Anything Goes at Cute Card Thursday with Holiday Wishes

Hello friends!  I hope you’re having a great week so far!  I’m trying to enjoy the warmer temps while I still am able to before it starts getting too cold out!  I wish I wasn’t feeling achy either, so hopefully that will improve too!

Today starts a new challenge for Cute Card Thursday and this week is our monthly “Anything Goes” challenge!  We’re sponsored by Whimsy Stamps and of course you know I’m using one of those images for my card today:

Vicki-WS-CCT607

How sweet is this one!  This digital stamp is by Sylvia Zet called Wintry Fairy from Whimsy Stamps.  Really love coloring up her sweet images!

For the background white layer, it’s hard to see, but I have used a snowfall embossing folder over it.  I also took a couple of the Whimsy Stamps Christmas Fun digital papers, printed them out and cut some sections for my card layout.  I layered them with some brushed gold cardstock and put them over the white embossed layer.  The piece at the bottom also has some gold ribbon wrapped around it that I added before attaching to the white layer.  These layers were mounted over a piece of red 5″ square top folding card base.

I also white heat embossed the sentiment from the Whimsy Stamps Holiday Mini Sentiments clear stamp set and then cut it out with the Whimsy Stamps Quick Strips die set.  I cut it twice so that I could get the length that I wanted and then glued it over the bottom of the layered image panel.

I then added a gold ribbon bow with some gold thread nested underneath a snowflake button that I covered with a rhinestone.  I also attached some white poinsettia flowers from my stash.

Vicki-WS-CCT607-close

Here’s a closer view of the image and how I’ve got her colored up with Copics.

I used a white gel pen for the bird’s cheeks and the berries as well as places on her coat.  You can see that I also took a gold gel pen and added details to her coat as well as her wings.  I then covered her wings and the flowers in her hair with a glitter brush pen.

For the snow t the bottom, I took a glue pen and loose clear glitter over top.

I used a square die cut to cut her out with and layered onto a piece of brushed gold cardstock and then another layer of red cardstock that was cut with a scallop square die.

Vicki-WS-CCT607-flat

I hope that you have enjoyed my card today!  It’s always great to get another Christmas card done before the rush gets going!

Please excuse me for a few days as I’m not feeling well, but hopefully will be around to visit with you soon!  Thanks so much for stopping in as I enjoy reading and smiling and sometimes giggling over your comments! 🙂   I will see you soon!

Challenges:

  1.  Love to Craft – Nov Anything Goes LTCCB40
  2. Sheepski Designs – Christmas is Coming!
  3. The Fairy and The Unicorn – Nov Anything Goes + Magical/Fairy
  4. Creative Fingers – Anything Goes
  5. Pammie’s Inky Pinkies – PIP1944 Anything Goes
  6. Unicorn – Christmas/Winter
  7. Daisy Chain – Christmas/Winter

Oak Tree Boy Hanging Onto Fall

Hello friends!  I hope that you’ve enjoyed the weekend and having a great start to your week so far!  Right now the weather guy is saying that we could reach freezing temps on Halloween night!  About 3 weeks ago we were still in hot temps and then ran right into this cold weather!  I wish I could’ve had a couple of days to open windows and it doesn’t look like I’m going to get that!  I’m trying to hang onto the Fall Season for as long as I possibly can!

Speaking of Fall, I have this really sweet image from Whimsy Stamps to share with you today!  He’s literally hanging on a tree limb for Fall!

Vicki-WSOakTreeBoy

This adorable image is one from Syliva Zet for Whimsy Stamps called Oak Tree Boy and I have him and his little bird friend all colored up in Autumn colors!

I knew I wanted to grab the papers from the Whimsy Stamps Rustic Wood and Brick digital paper collection, so I grabbed some more plaid papers from my stash and layered it with some gold mirror cardstock that I’ve also used for the scalloped circle layer behind the image.  I attached some seam binding ribbon around these layers and added them to a 5″ square kraft card base.

I took some sparkly Prima leaves from my stash and glued them on before adding the circle image panel with some craft foam behind it.  I glued on the seam binding bow and then I took the sentiment from the Whimsy Stamps Everyday Mini Sentiments and white heat embossed it over a piece of grey cardstock.  I then cut it out with the Whimsy Stamps Quick Strips die set and attached it over top of the image panel.

Lastly, I added a few sequins and filled the centers with some Nuvo Glitter Drops.

Vicki-WSOakTreeBoy-close

Here’s a closer view of the image and how I’ve colored him in!  For the “bells” on his hat and the little bird’s hat, I colored them, but then they were covered with a glue pen and some clear loose glitter.  I took my Copic colors and did little “dots” (pointillism technique) around the image.  I did this with a gold gel pen as well.

You can view the Copic markers that I’ve used on my creation below:

  • Boy’s Outfit – YG97, YG95, W5, W3, W1, E43, E40, / Shoes & buttons:  E87, E84
  • Boy’s Hair – E47, E44, E42 / Skin:  E21, E11, E02, E00, E000, R20, R00
  • Bird – E77, E74, E70, R20 / hat: YG97, YG95, W3, W1
  • Ladybugs – R29 and black pen
  • Bells on hats – Y28, Y26
  • Leaves – YR27, YR24, YR21, Y38, Y35
  • Acorns – E35, E33, E31
  • Tree Limb – E27, E25, E23
  • Pointillism and shading – E43, E41 and gold gel pen

Vicki-WSOakTreeBoy-flat

I hope you’ve enjoyed my my little Autumn card today and were inspired or at least brought a smile your way!

Thanks so much for dropping in today!  I enjoy hearing from you, so please say hello and I’ll be seeing you again soon!

Challenges:

  1.  The House That Stamps Built – Fall Colors Inspiration Palette
  2. Stamping Sensations – October Trees/Leaves/Autumn
  3. {Cupcake Inspirations} – CIC481 Fall
  4. Crafty Catz – Anything Goes #479
  5. QKR Stampede – Anything Goes #368
  6. Creative Fingers – Anything Goes #173
  7. Pammie’s Inky Pinkies – PIP1942 Anything Goes

Sending Snail Mail Hugs

Hello friends!  Yippee!  It’s finally “officially” Fall now! (According to the calendar anyway.) We are very slowly starting to get lower temps at least in the evening time anyway.  I’ve gotten out my Fall decorations and I’m ready!  How about you?

Today I have a very sweet image from Whimsy Stamps to share with you:

Vicki-WSLoveSlowMuch-Sept24

Awe!  I wouldn’t normally hug a snail, but I must say, this one is SUCH a cutie don’t you think?  This digital image is called “Love You Slow Much” from Whimsy Stamps-Sylvia Zet’s Wee Stamps Collection which was previously released as a rubber cling stamp.  So now you can have the option of choosing the digital or the rubber versions!

Of course, with Fall having started, I was really inspired to create with this cutie in some orange, yellow and tan toned colors!  With the exception of that blue bow tie on the snail, I’ve colored it differently as I think that makes him really stand out especially for dispensing hugs…or perhaps receiving them! 🙂

I’ve cut out the image with a stitched circle die and then die cut another larger circle in the orange color to mat behind that.  I’ve taken a piece of decorative paper from my stash with the wording and added some stitch marks along the edge of it with a black marker and then mounted it to a piece of white cardstock.  I wrapped some white organdy ribbon around these two pieces and mounted it onto an orange 5″ square top folding card base.

I took another piece of orange cardstock and die cut a tag out from an older Whimsy Stamps die that I have and then I stamped the “hugs” sentiment from the Whimsy Stamps Everyday Mini Sentiments clear stamp set towards the bottom of the tag and added it to the bow on the ribbon.  Lastly, I took some flowers and attached them around the card design.

Vicki-WSLoveSlowMuch-Sept24-close

Here’s a closer look at the coloring I’ve done on this image and used the following Copic markers:

  • Snail Body:  W7, W5, W3, W1, R00
  • Snail Shell:  E35, E33, E31, E30
  • Snail Bow Tie:  B26, B24, B21
  • Fairy’s Dress, Hair Flowers, Shoes, Wings:  YR07, YR04, YR02, BG000, C7, C5, C3
  • Fairy’s Hair & Skin:  E47, E44, E42, E41, E21, E11, E02, E00, E000, R20
  • I used BG000 and E0000 for around image and shadows
  • I’ve also used a gold gel pen for the center of the flowers in her hair and over the tiny marks behind her wings.  I’ve used a white gel pen for highlights in the Fairy’s cheeks as well as highlights on the snail’s shell.  I took a glue pen over her wings and added some clear glitter over them.
  • I’ve also used a Copic marker (unsure of color) to color a rhinestone for the center of the orange flowers.

Vicki-WSLoveSlowMuch-Sept24-flat

I hope you’ve enjoyed my creation today and that it has inspired you in some way!

Thanks so much for stopping in today!  I always appreciate your support!  I’ll be seeing you soon!!

Challenges I’d like to enter this card in:

  1.  Creatalicious – Anything Goes with optional circles
  2. Stamps & Fun = Creativity – Anything Goes
  3. The Paper Girls – Anything Goes
  4. The Fairy & The Unicorn – Fantasy Anything Goes
  5. Creative Knockouts – Anything Goes
  6. QKR Stampede – Anything Goes #364
  7. Creative fingers – Anything Goes
  8. Always Fun – Cute Critters

Sending Smiles Mermaid Style

Hello friends!  Well it feels nice to get back into the swing of things here again!  I want to thank you from the bottom of my heart for the awesome welcome back I recieved from you guys!  Wish I could reach out through the screen and give you all a big hug!  🙂

Today is August 1st AND it’s on a Thursday too, so I wanted to share the card I made for the Whimsy Stamps August Digital new release as well as a brand new Cute Card Thursday Challenge too!!  Whimsy Stamps is our sponsor this week and it’s an easy “Anything Goes“, so please be sure to stop by the blog to see the wonderful inspiration from the rest of the design team and play along with us!!  We look forward to seeing what you’re working on!

Vicki-WSGoldie-Aug1

Oh aren’t these Sylvia Zet images just as cute as can be?!  I so enjoyed coloring her up!  (See the close up photo and details below.)  This is the DIGITAL version of  “Goldie” just released from Whimsy Stamps this month.  You can still also purchase the rubber cling stamp, but now it’s nice to be able to have the option to choose either one!

Since her name is “Goldie“, I had to use the orangish color palette for her!  When looking at the image, I immediately saw “bubbles”, so I thought it would be fun to make a circle easel card design with her!  This actually turned out to be a “non-traditional” circle easel card with the circled image going askew from the main area…which makes it seem more like several bubbles underwater!

I have cut several different sizes of circles, one for the main circle card base and several others with some old SU! bokeh looking papers from my stash.  I used a stitched scallop circle die set to cut out the layers behind the circles.  I sponged all circles with some blue ink for more depth.  I’ve added a strip of blue glitter cardstock on the main card front layer as well as some ribbon to attach to the front.  I arranged the circles where I wanted them and added some foam tape here and there to pop up the layers.

To hold up the card front, the inside of the easel card has another strip of that blue glitter cardstock and I stamped an anchor image over one of the circle panels using an older Whimsy Stamps clear set.  I used some foam tape to pop that up so that the front card panel would prop up.

I’ve taken the Whimsy Stamps Everyday Mini Sentiments stamp set to stamp the sentiment under the image panel with black ink.  For the accents on the card, I’ve used some clear acrylic bubbles randomly and glued them in places.  For the fish, it was a wood veneer from my stash that I heat embossed with some cool orange metallic embossing powder.

Vicki-WSGoldie-Aug1-side

Here you can see the details from the side view of the easel design and how it’s propped up with that anchor circle holding the front card panel in place.  to mail this card, you just unfold it and lay it flat as shown in the last photo below.

Vicki-WSGoldie-Aug1-close

Here’s a closer look at this really sweet image.  Below are the list of Copics I’ve used to color her in with:

  • Fins, flowers, Bubbles – Y38, Y35, Y32, BG000
  • Hair – C8, C5, C3, C1
  • Skin – E21, E11, E02, E00, E000, R20
  • Snail – W5, W3, W1, E33, E31, R20

Wink of Stella used for mermaid body, clear glitter and 2-way glue pen used for the bubbles.  I used a black gel pen to dot the center of flowers.

Vicki-WSGoldie-Aug1-front

Here’s what the folded and closed circle card looks like.  She will not quite fit into a regular A2 sized envelope because I arranged the circles differently, but a nice 5×5 size would work great.  I do have an envelope creator which is handy for those odd shaped designs that I can custom make.

Hope you’ve enjoyed my card today!

Challenges I’d like to enter this card for:

  1.  Sweet Stampers – Summer (digi and stamp used)
  2. QKR Stampede – #358 Anything Goes
  3. Addicted to Stamps & More – #352 Make Your Mark
  4. Little Red Wagon – Digital Stamps
  5. Crafty Gals Corner – 3+ layers

Whimsy Stamps Cuddly Ride

Hello friends!  🙂

It’s been SO gorgeous outside with this wonderfully warm weather we’re having right now, so I find it hard to stay indoors right now!  We have rain coming, so I will be able to get some crafting done then!

Swinging by to share this really sweet digital image by Sylvia Zet for Whimsy Stamps called Cuddly Ride!  They have sold the rubber stamp version, but now they’re releasing these older images as digital files now!  So weather you like the rubber stamp or the digital images, it’s great to know that you can choose either!

Vicki-WSCuddlyRide-Apr9

I got her colored up in the following Copics:

  • Snail shell – E29, E27, E25, E23, E21
  • Snail body – W5, W3, W1, E21, E000, R20
  • Snail bow/patches, girl outfit – B37, B34, B32, YG13, YG11, C5, C3, C1
  • Girl’s Hair/Skin – E49, E47, E44, E43, E40, R20, R00, E21, E11, E00, E000
  • Pointillism under snail – W3, W1, W0
  • Used a white gel pen for highlights on snail and covered the ground with a Wink of Stella glitter brush pen

After coloring her up, I also sponged some clouds behind her with a stencil and then cut it out with the Whimsy Stamps Notched Square Dies.  I’ve also cut an additional larger blue layer for behind the image.  For the blue flowers scattered around as well as for the pieces for grass accents on my card, I’ve used the Whimsy Stamps No-See All Seasons Tree Dies.

I’ve taken a sentiment from my stash (retired Whimsy Stamps) and white heat embossed it over a piece of the blue cardstock and then I’ve used the Whimsy Stamps Quick Strips Die Set to cut it out.  Lastly, I’ve added some ribbon, a bow with a resin flower glued over the center of it and then I’ve added some rhinestones to the centers of the blue flowers.

Vicki-WSCuddlyRide-Apr9-close

From the same sentiment stamp set that I’ve used, I took a tiny heart image and stamped it with green ink around the colored image.  Of course, I tried to capture the wonderful shimmer underneath the snail where I’ve colored the Pointillism technique, but it just won’t show up in photos very well, but I just love the shimmer under him!  I also used a silver metallic gel pen to color the “buttons” on the girl’s jumper.

Vicki-WS-CuddlyRide-Apr9-flat

I thought she turned out really cute and I think this would make a wonderful card for that special friend who is always by your side!

That’s all for me now.  I think I may need to go back outside and enjoy some fresh air and sunshine before it’s gone!  Have a lovely day!

Challenges:

  1.  Simon Says Stamp Wednesday – Animal Antics
  2. Crafting With an Attitude – Anything Goes
  3. Creative Knockouts – Anything Goes
  4. Crafty Catz – Anything Goes + optional:  Use Your Dies
  5. Creative Fingers – Anything Goes
  6. Simply Create Too – Anything Goes