Just A Girl and Her Pumpkin

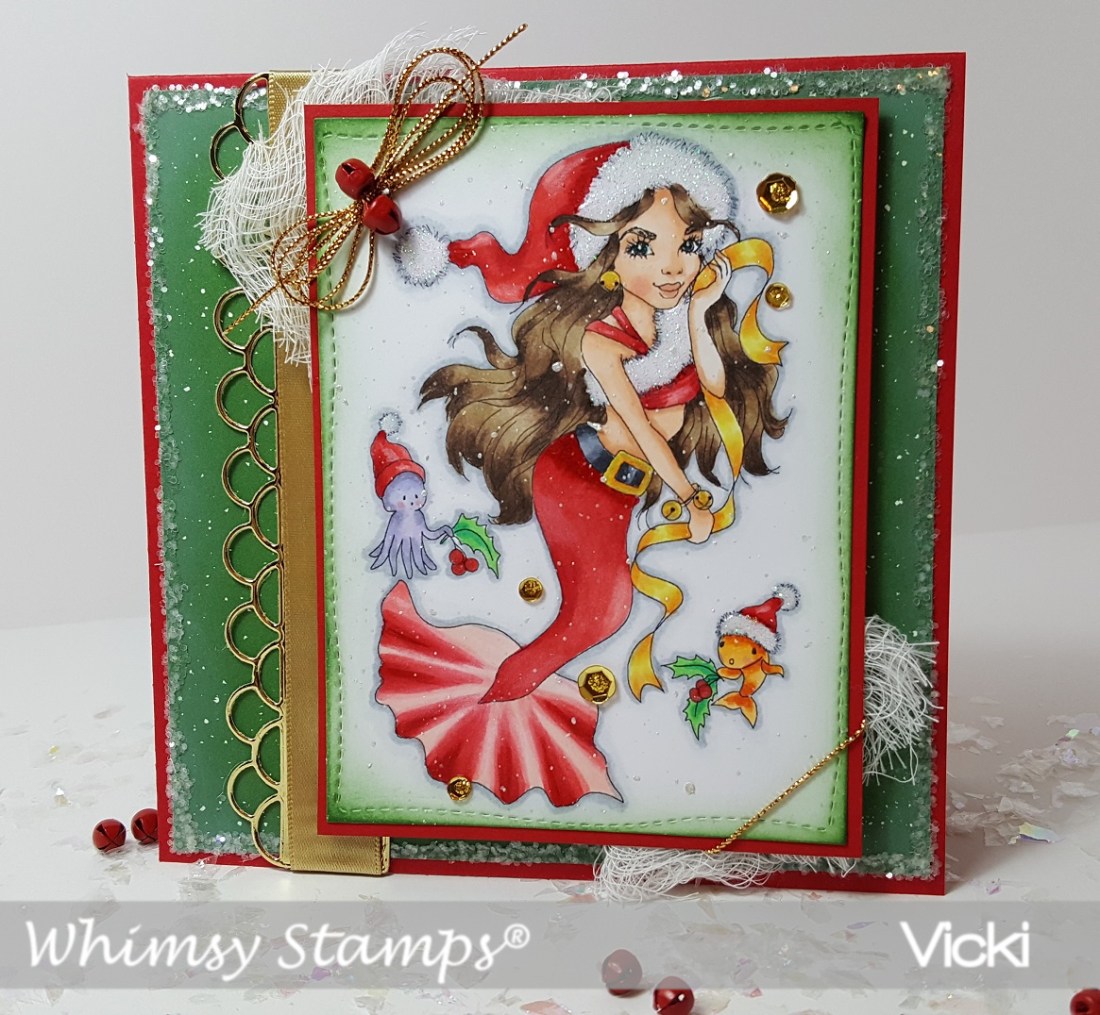
Hello friends!  Wow, I think Fall has begun over my way as the air has changed with cooler temperatures and I absolutely LOVE it! 🙂  Although I’ve been busy crafting away in my room, I like to get outdoors for a few breaks to walk around and see signs of the leave starting to change over.

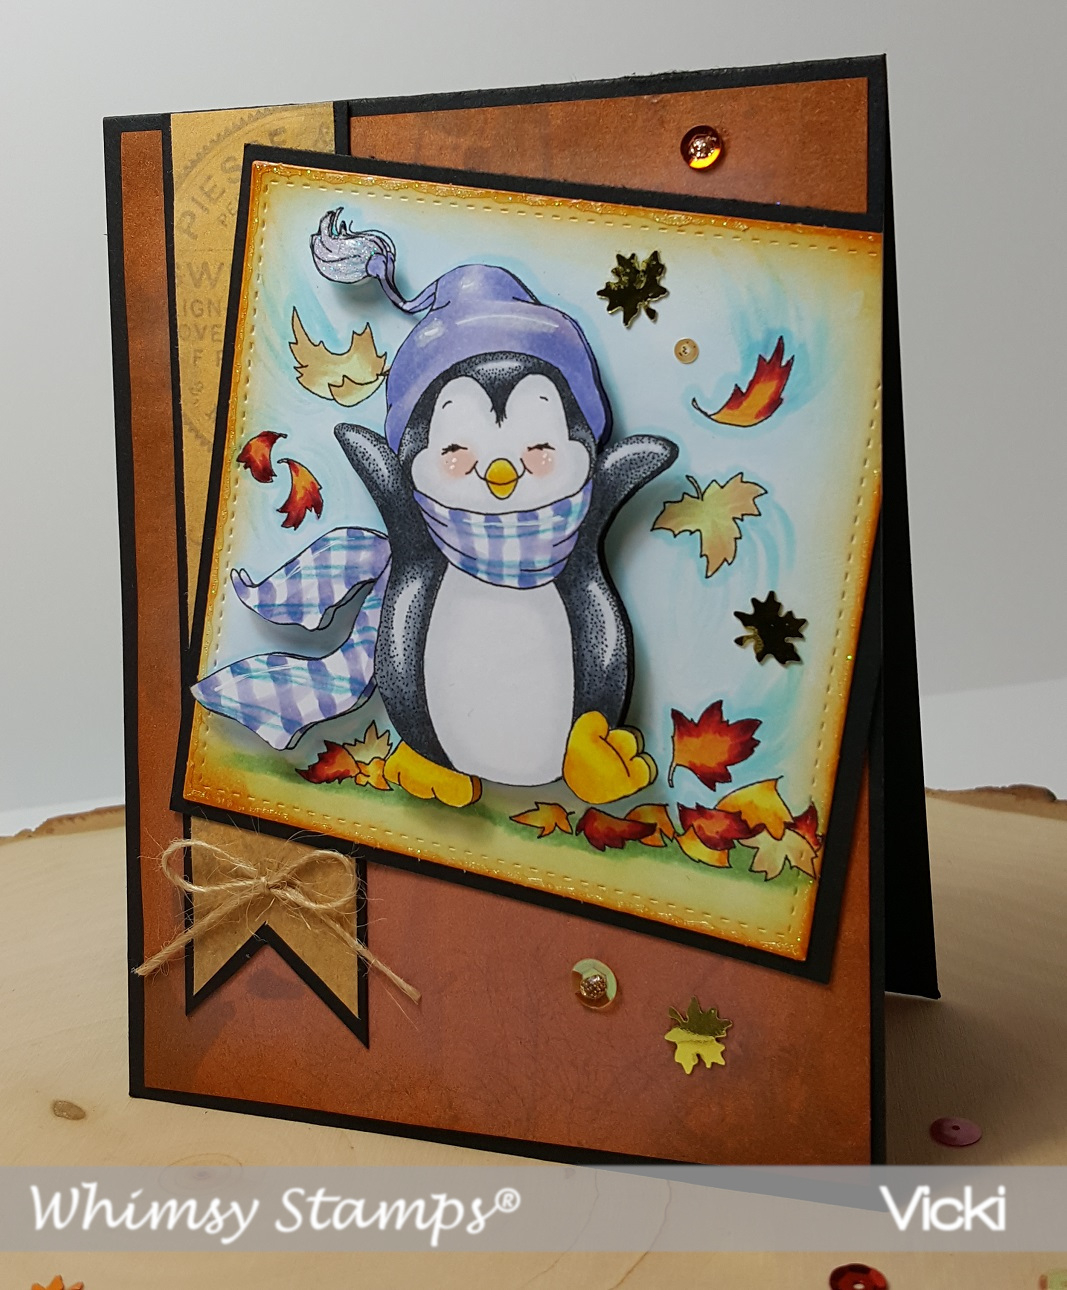
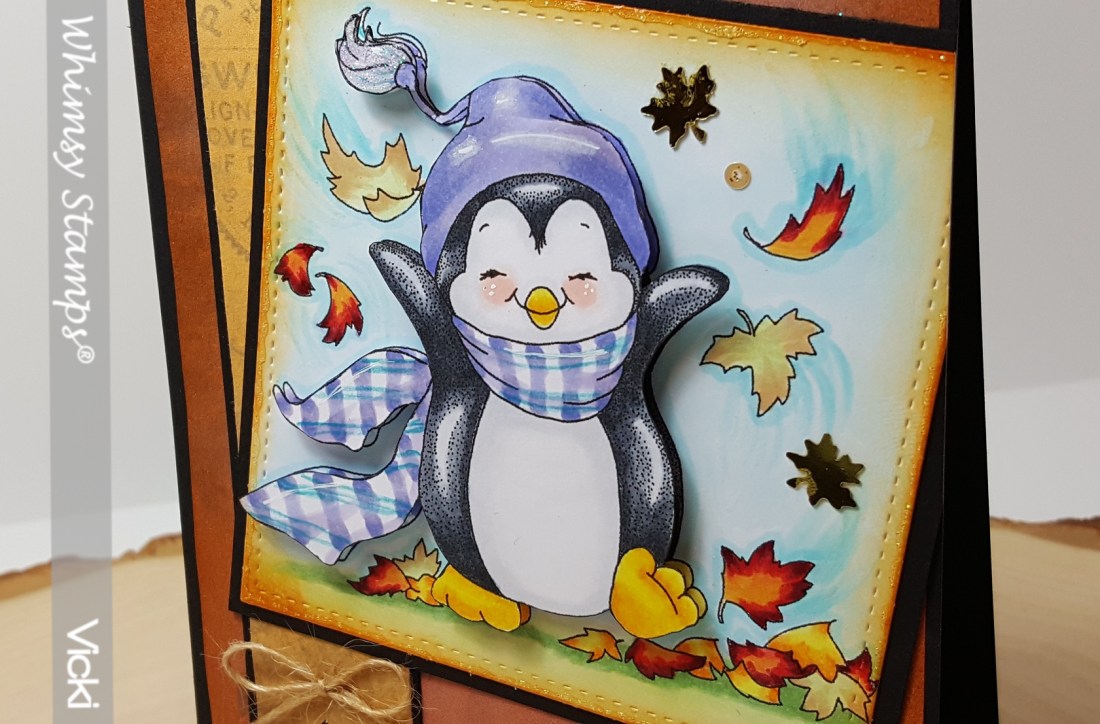
Today, I am over at the Whimsy Stamps Inspiration blog to share my card with you using one of the really adorable images from this month’s release called “A Girl and Her Pumpkin” digital stamp by Crissy Armstrong:

Vicki-WSGirlPumpkin-Sept25-blogpost

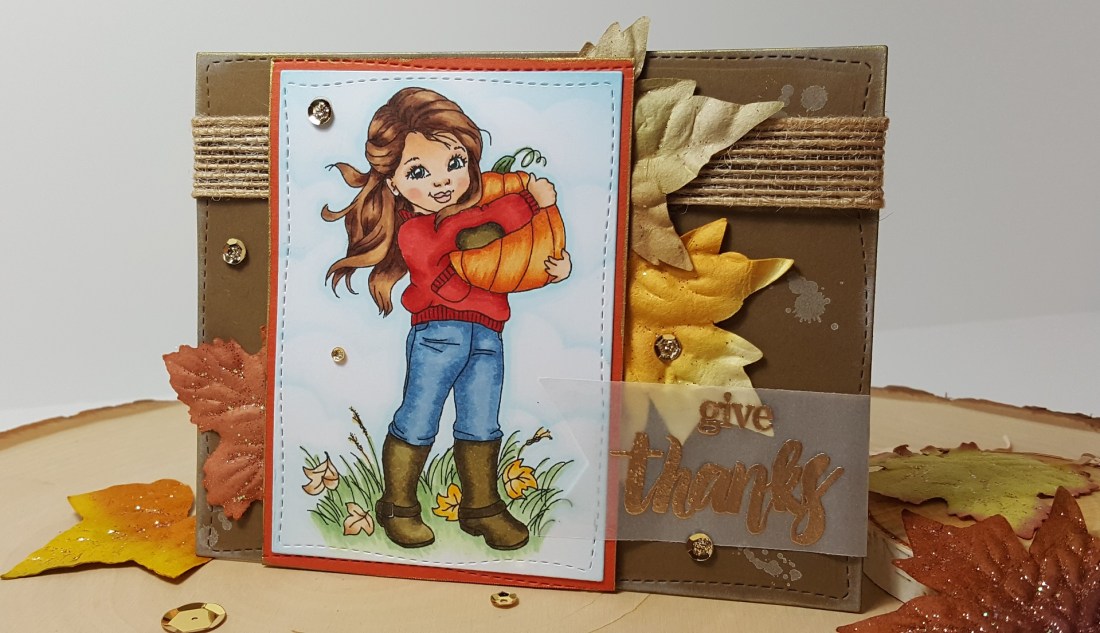
Isn’t she adorable?!  I really enjoyed coloring her up with my Copic markers.  As I was coloring, it actually reminded me of going to a near-by apple orchid with my children as they were growing up.  I would take photos of them with all of the pumpkins surrounding them as they would pick out which one they wanted to carve for Halloween.  (My oldest was not a fan of “pumpkin guts” and so we always ended up doing that part for him! LOL!)  But it must have made an impression with them because they still enjoy going as adults now!   Besides, what’s better than apple cider donuts and freshly picked apples?!  YUM!

So, after the reminiscing of memories, I cut her out with the WS Hand Stitched Nested Rectangles along with the card front base and attached to a white A2 sized top folding card base.  For the sentiment, I took a piece of vellum and heat embossed a greeting from the WS Painted Sayings stamp set and I also took some of the splatter images from the same set and stamped them randomly in the background with white ink.

Before attaching the image panels onto the card, I’ve added some gold ink around the edges, attached some leaves behind it and popped it up with foam tape.  The piece of vellum was hand cut into a banner and folded around card base and attached with glue behind the letters to hide it.  I then put some burlap ribbon around the card front base as well as the image panel, vellum banner and gold sequins filled with gold Stickles.

Vicki-WSGirlPumpkin-Sept25-close

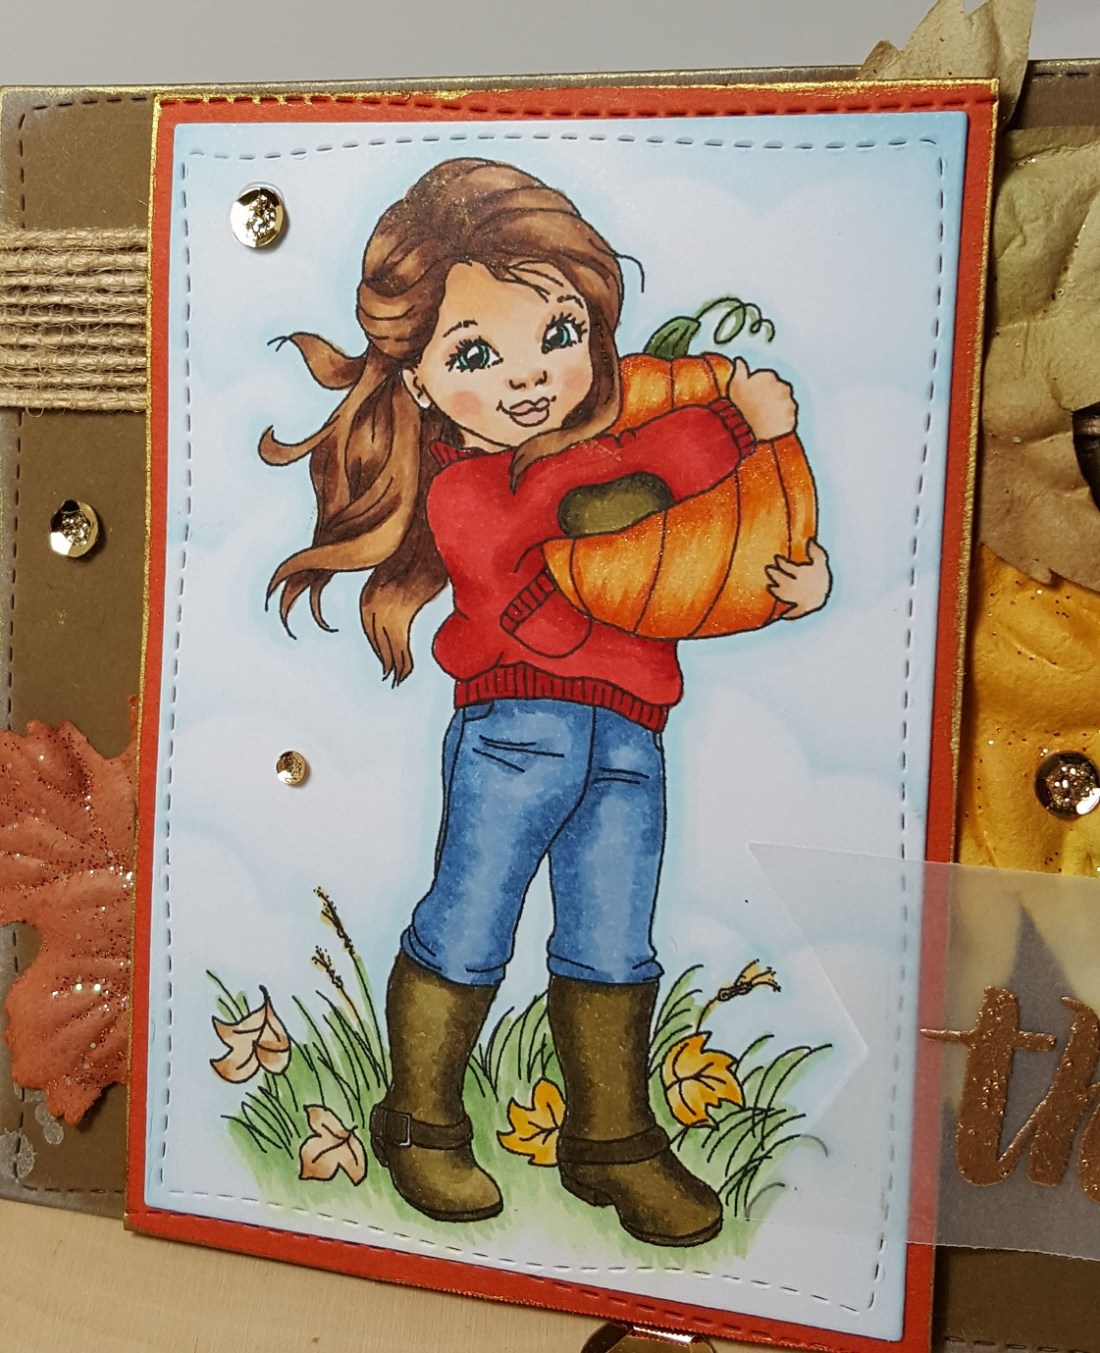
Here’s a closer view of the image and how she’s colored.  You can also better see the gold inked edges.  And of course, the photo didn’t pick it up, but I took some Wink of Stella clear glitter brush pen to go over the pumpkin with.

I’ve also used a cloud stencil to lightly sponge in a nice Fall sky behind her.

I think she would look so cute surrounded by a field of pumpkins…so there’s an idea!  Maybe I’ll work on that for next time!

Thanks so much for stopping in today!  I appreciate you taking the time!  See you soon!

challenges:

  1.  QKR Stampeded – Anything Goes #314
  2. Just Us Girls – JUGS459 photo week
  3. Crafty Friends – Autumn Colors
  4. Stamps & Fun = Creativity – Fall
  5. Crafting From the Heart – Anything Goes

Traditional Mermaid Christmas

Hello friends!  Although it still feels a bit like summer outside where I’m from with the temps in upper 80s and 90s all week long, I enjoy creating Christmas and snow-themed cards any time of the year!  Besides, I know that once Fall hits, it will soon be time for Christmas to come along right behind it!  I have used this adorable September release from Whimsy Stamps once again to inspire you with a more traditional Christmas themed colors and design this time:

Vicki-ChristmasMermaid-Sept18

I have used this gorgeous Christmas Mermaid digital stamp by Crissy Armstrong for my card today.  She is an amazing image for the coloring enthusiasts for sure!

My last card with this image showed her in more soft pastel tones.  (You can see that post by CLICKING HERE if you don’t remember it.)  This time I went for a more traditional Christmas color theme.  I found some really cool green with white splatter pattern paper to use, so I worked around that by coloring the mermaid outfit in reds with gold trimmings.  I took inspiration from the gold ribbon, bells and buckle and added in more elements with some gold on my card as well.

I was almost too scared to try this, but after coloring the image, I took some white Shimmerz paint and a paint brush to add some white splattering effect over top of her to give the appearance of snow and to also coordinate with the pattern paper in the background.  I didn’t get too carried away, but just enough and then I cut her out with the Whimsy Stamps Hand Stitched Nested Rectangles die set and took my ink foam blending tool and went around the edges with some Pine Needles distress ink.  I then took some gold cord and wrapped it around the two corners and then added a double bow with some red jingle bells on one end.  I also glued some cheese cloth on each corner before I added some foam tape behind her to mount her on the card design.

For the card design, the base is a red top folding 5.5″ square design with the green splattered pattern paper over it.  I took some chunky glitter and glued it around the edges and then perhaps you remember this “oldie but a goodie” border die from Whimsy Stamps along the edge of the image panel?  I cut it out with mirror gold card stock and then wrapped some gold silk ribbon over it and attached to the card.  I placed the foam taped image panel over top and then added the finishing touches over the image:

Vicki-ChristmasMermaid-Sept18-close

Here’s a closer look at the image where you can see all of the glitter and shimmer on her.  Before I splattered it, I covered her outfit with a clear glitter brush pen and went over her gold buckle and the jingle bells with a gold metallic gel pen.  I went over the tiny holly berries with a red metallic gel pen.  I then took some liquid glue and added some clear glitter to her hat and outfit trimmings along with the tiny creature’s hats.

After she was splattered, I added some gold sequins and then some gold Stickles in the centers of each one.

Those tiny creature faces just make me giggle every time! 🙂

I know she has tons of shimmer and sparkle, but she is a mermaid after all, and I do love adding a little bit of this and that as much as I can!  Do you like lots of bling?

Thanks so much for stopping by my blog, I truly appreciate your time!  I’ll see you again very soon!

Challenges:

  1.  The Holly & Ivy Christmas Challenge – Anything Goes + Christmas
  2. Crafty Creations – Anything Goes
  3. The Merry Christmas Challenge – Anything Goes + Christmas
  4. Winter Wonderland – Use Ribbon and/or Twine
  5. Little Red Wagon – Bling It On!
  6. CRAFT – Christmas
  7. Crafty Gals Corner – 3+ Layers

Fun in the Fall

Hello friends!  I can almost feel it in the air!  Fall is coming near and I’m looking forward to joining in the crisp cool air and pretty colors with the changing leaves.  These are just a couple of things that I love about this season!  How about you?

Well this sweet little penguin certainly knows how to have fun in the Fall for sure:

Vicki-PenguinFuninFall-Sept 11

Here’s another September release from Whimsy Stamps called Penguin Fun in Fall image by Crissy Armstrong.  Of course, I grabbed my purple color markers to color his hat and scarf!  LOL!  I decided to create a purple and turquoise plaid pattern.  I also gave the leaves in the air a bit of movement with my coloring as if he’s throwing them up in the air.  Trying to be a bit different with my layout, so I tilted the image panel and cut it off on the right side of my card base.

I’ve also used the September release digital papers from Whimsy Stamps called Autumn Beauty.  These are fabulous papers and I know I’m going to be using some more of these on an up-coming card!  I’ve used two different patterns on the background and the banner strip.  Lastly, I added some fun Autumn Leaves sequins from Little Things from Lucy’s Cards.  I’ve actually had it for a while and hoarded the package and not used it until now!  I filled the centers of the round ones with some gold Stickles.  I also added a twine bow at the bottom of the banner strip.

Vicki-PenguinFuninFall-Sept11-close

Here’s a closer view of the image.  Here you can see where I’ve used some foam dots to pop up the fussy cut penguin for a bit of dimension. (I’ve also colored the one underneath as you can see it peeking out a bit on the side.)   I cut the image panel out with a stitched square die, sponged around the edges with some Spiced Marmalade distress ink and then went over the edges with some clear glitter Stickles as well as put some on the penguin’s hat tassel.

I hope you’ve enjoyed my colorful Fall card today! Thanks for stopping by as I really appreciate seeing your encouraging words or knowing you’ve stopped by! 🙂

Challenges:

  1.  Creative Inspirations – Anything Goes
  2. Crafting By Designs – Anything Goes
  3. That’s Crafty – Autumnal theme.
  4. Brown Sugar – All Creatures Great & Small
  5. Use Your Stuff – Animals

Anything Goes at Cute Card Thursday with a Shaped Apple Card

Hello friends!  It’s time for another weekly Cute Card Thursday Challenge!   For this week, since it’s the beginning of the month, we will have our easy peasy “Anything Goes” challenge for you this week!  We are sponsored by Whimsy Stamps!

Vicki-PenguinAppleBushel-Sept6-CCT546-ATG

I couldn’t resist using this cute little fellow on my card for today!  This is the Penguin Apple Bushel digital stamp from Whimsy Stamps.  I’ve colored him with Copics and pencils and then fussy cut him out and attached him on the front of my apple shaped card with foam tape.  Hard to see in the photo, but I’ve added just a wee bit of shimmer with my glitter brush pen on the bitten inside apple he’s holding.  I’ve also added some white dots for his eyes with a gel pen.

Vicki-CCT546-ATG1

For the shape of my apple card, I found a fun apple card pattern and cut it out with my Cricut Explore machine and enlarged it the size that I wanted it to be.  I’ve taken some sponges and ink to add some shading and highlighting details to the apple.  I’ve taken that CUTE stamp set from Lawn Fawn called Thanks a Bushel to stamp a couple of hearts around the penguin as well as white heat emboss the sentiment on the front.

I’ve also added a black gingham ribbon along with some twine that I’ve attached an apple charm to before attaching it to the top of the apple.

Vicki-CCT546-ATG

So of course, I wanted to show you what the inside of the shaped card looked like too!  I thought that the inside needed to “look like” the inside of an apple, so I took the Lawn Fawn Outside In Stitched Apple die and cut a piece to fit the inside of the apple and then followed the “bite marks” to cut off the end and then I took a sponge to sponge around the areas of it with brown colored ink for shadows.  I’ve also taken the same die set to add a tiny green apple on the opposite side of the inside of the card.  The purpose for that was not just to add an extra decorative element, but I also wanted to cover up the back side of the penguin sticking out from the front of the card.  I then needed to add the “apple seeds” to the inside of the apple, so I took the Lawn Fawn Stitched Apple Frames to cut out the seeds die in black cardstock and glued them to the vanilla die cut apple panel. I’ve also added some shimmer to the seeds with my glitter brush pen.

I thought that there was still plenty of room for a message below the seeds or you could also write on the opposite side as well.  It’s just a fun and unique card design to go with that darling penguin!  I will need to make a special envelope to fit the card inside for giving.

Thanks so much for joining me on my blog today!

Have a fantastic day!

Challenges:

  1.  Stamping Sensations – “I Spy with My Little Eye, Something Beginning with ‘B’!” (Bushel, bows, blue cap, bite, barrel)
  2. Crafting From the Heart – Anything Goes
  3. Artistic Inspirations – Anything Goes
  4. Crafty Cardmakers – All Creatures Great & Small
  5. Fab ‘N’ Funky – Bingo! (I’ve used the third column:  die-cuts, ribbons, red)
  6. The Crafty Addicts – Anything Goes with optional Back to School

It’s a Mouth-Full!

Hello friends!  I’m back with you again to share another fun image from the Whimsy Stamps September Digital Release!

Vicki-NutsAboutYou-Sept4

This guy is so stinkin’ CUTE and I really had fun coloring this one! 🙂  I thought this was a great image to use any time of the year really and a cute idea for also a “new home” themed card.  I have used the So Nuts About Home Digital Stamp.

After coloring the image, I went around the edges with some distress ink using my ink foam blending tool.  Mounted that onto a black layer and popped it up over the card design with some craft foam.  I die cut a leaf from kraft cardstock and used some more distress inks with the ink foam blending tool to give it a bit of color.  I then added some sparkle with some Ranger Vintage Platinum glitter and a clear shimmer brush pen.  I curled the edges a bit and attached it over the image panel in the corner.

For the background of my card, I have used the new Autumn Beauty digital papers released this month.  You can see a bit peeking out, but it really doesn’t do justice to the papers…they’re really gorgeous!  I’ve layered them onto a piece of glitter cardstock that was cut along the edge with a scallop border die and then I lined it all up along the right side of my card base.  I’ve added a piece of burlap ribbon and a button with a twine bow on the lower portion of the card before adding my image panel to it.

Vicki-NutsAboutYou-Sept4-close

Here’s a closer look at this cutie and my coloring details.  He really makes me smile! 🙂

Hope you’ve enjoyed my creation today!  Thanks for sharing part of your day with me!

Challenges:

  1.  4 Crafty Chicks – Crazy Egg Anything Goes
  2. Moving Along With the Times – Gingham and/or Buttons
  3. Alphabet Challenge – ‘L’ for leaves

Whimsy Stamps September New Digital Release is Here

Hello friends!  I’m excited to be sharing with you my creation for one of the newly released images for this month from Whimsy Stamps!  Yay!

Every first of the month Whimsy Stamps will come out with a new release and the 1st day of the month begins with their digital release and the products become available for purchase as soon as they’re announced!  You may have seen my creation on the Whimsy Stamps Inspirations Blog along with all of the newly released images and inspiration from the rest of the design team!

Vicki-ChristmasMermaid-Sept2

Now what a cute and clever idea from Crissy Armstrong to come up with a Christmas Mermaid image, don’t you think?!  I love all the different possibilities with this one!  I thought it was a good place to start with the amazing release this month!

I kept her very soft and feminine with the pink and teal colors.  Not sure if you can be underwater with snowflakes…but it seemed like the perfect accent to add and I’m pretty sure that’s why the little critters have a surprised face! LOL!

For the image, I have used an oval die and cut around the areas that didn’t fit inside the shape.  I think it makes her look like she’s in a bubble of sorts!  I also layered her onto another teal glitter oval shape, and I have also die cut a sentiment that went perfectly with the image.  I’ve paired her with the Whimsy Stamps Christmas So Soft digital papers and some mint-colored cardstock.  They seemed to go well with the coloring I did on the image.  I popped the oval image panel up with some craft foam and added some fun tinsel ribbon in the strip behind her.  Then attached some snowflake sequins.

Vicki-ChristmasMermaid-Sept2-close

Here’s a closer view of the coloring I did on the image.  I kept the colors softer with pink and mint/teal.  I’ve used a gold gel pen to color in her gold bells and belt buckle.  I’ve also added some Nuvo clear Crystal drops on the “holly berries” the critters are holding and then went over all of the fur trimmings with a shimmer brush pen.

To get the “texture” in the mermaid’s tail area, I just took my “0” Copic blender and dotted it which also helped to blend in the colors.  Super cute and fun image to color!

Hope you’ve enjoyed my card today!  Thanks so much for dropping in!

Challenges:

  1.  My Time to Craft – Christmas in August
  2. The Holly & Ivy Christmas Challenge – Anything Christmas Goes
  3. QKR Stampede – Anything Goes (Challenge#311)

I’m Just Lion Around

Hello friends!  It’s the start of the very last week for August already!  Fall is quickly approaching, and no… I’m not “lying” around, but I have been playing with this really cute King Lion digital image from Whimsy Stamps:

Vicki-WSKingLion-Aug28

I really enjoyed coloring in this image!  I’ve used my Copics to color it and of course I had to add some fun little details as you will see in the photo below.

I was trying to keep this design somewhat simple as the star of the show needs to be this image.  To help with the design, I’ve printed out some Whimsy Stamps digital papers called Great Outdoors.  Although the distress coloring on the edges of the image panel looks a little bright in the photo, it is more toned down on the card when seeing it IRL.  I have also stamped the sentiment and some accents on the image panel from the Whimsy Stamps Painted Sayings clear stamp set.  I added some ribbon through the center and then I added some wood veneer accents on each side of the image panel before popping it up with foam tape.  I’ve also added a couple of gold enamel dots on each end of the sentiment above the image panel.

Vicki-WSKingLion-Aug28-close

Here’s a closer look at my coloring of the image and you can also see that I’ve added some glossy accents to his nose, some shimmer on his crown as well as some red glitter Stickles in the center of the red gems on his crown.  I’ve added even more glitter along the distressed edges of the image panel with some tinsel glitter Stickles.  I used a distress tool to go around the edges.

I hope you’ve enjoyed my card today!  I will be back again on Thursday for a new challenge!  Thanks so much for stopping by!  I appreciate you being here! 🙂

challenges:

  1.  Sketch Saturday – sketch #528

2.  Crazy 4 Challenges (C4C449) – masculine

3.  Crafty Friends – Animals/Birds

Living in the Wild Wild West

Hello friends!  I hope that you are having a great weekend so far!

I’m stopping by to share my Whimsy Stamps creation that I made for my posting on the WS Inspiration Blog.  It’s my first post as a Whimsy Stamps digital DT over there, but I’m also posting on my own blog, here, for my readers and in case someone would like more details about my card design. 🙂

I have to say that I have been enjoying my coloring with these digital images since I’ve joined the DT.  It seems like it’s been forever since I’ve made cards like this for some reason and the feeling, I once had doing this is starting to come back, so I’m glad to be a part of the team!

A horse is a horse of course of course, but this one took on a different “spot” when coloring it.  I have used this month’s release Western Pony digital stamp for my card:

Vicki-WS-blogpostAug25-WesternPony

The inspiration for coloring in this horse came from this month’s release of digital papers called Animal Prints.  The spotted papers reminded me of the appaloosa breed of horse and so I took my coloring inspiration from there.  I found a photo online to help with some of the coloring details:

1280px-Appaloosa_stallion

It’s hard to see in the photo, but there are just a couple of spots of the brown/tan color in this horse.  I decided to add just a bit more brown/tan spots on mine.

I’ve added some coordinating card stock for the accents which helped bring out the colors in the horse too!  As you can see in my layout, I took a strip of those Animal Prints papers and layered it with a piece of black cardstock and wrapped some twine around it.  I attached it over some other Whimsy Stamps digital papers called Ahoy, There from a past release.  (Although the theme doesn’t suggest to use it for this type of card, I thought it complimented the overall design and brought out the blue colors from the blanket under the saddle.)

I took a paper pierce tool and added some stitching details around the image as well as the blue card front papers before attached it all down.  The image panel and card stock layer were rounded with a corner chomper.

Because it’s a digital image that comes with 2 separate images, you can use them together or not and resize them how you’d like.  So I printed the hat separately and then popped it up over the image panel to make it look as if it’s flying off in the wind.

I’ve added a silver foil star that I die cut from the Whimsy Stamps Pierced Stars die set, wrapped some twine around it and placed a bow with a button over top.  Lastly, I white heat embossed a sentiment under the image panel on a banner with the Whimsy Stamps Everyday Mini Sentiment Clear stamp set.

Here’s a closer view of the image and how I’ve colored it:

Vicki-WS-blogposAug25-WesternPony-close

I’ve colored this image mainly with Copic markers and then took a white pencil to add a couple of highlights in the mane and tail.  I took my Copics to create the blades of grass and shadow for the ground.  There are also places on the harness and saddle that I’ve used a glitter gel pen for a metal look.

I think this sort of reminds me of a Western Sheriff with the star! LOL!  Thinking of that made me think this would be a fun card for a kid.

Hope you’ve enjoyed my creation today!  If you haven’t stopped by the Whimsy Stamps Inspiration Blog to follow along, you might want to hop on over there to subscribe so you can get lots of inspiration using the Whimsy Stamps products along with information on new releases too!

Thanks for dropping in!

Challenges:

  1.  Send a Smile 4 Kids – Slimy, humorous or Anything Goes 4 kids
  2. Try it On Tuesday – Take a Ride
  3. Crafty Creations – Anything Goes
  4. 2 Crafty Critter Crazies – Anything Goes + animal (2nd entry)

Spots and Dots for Cute Card Thursday

Hello friends!  It’s Thursday once again and time for another new challenge over at the Cute Card Thursday blog!  I really enjoy creating with challenges as it gives me inspiration and a push to finish a design in a way I might not have thought about doing otherwise.  If you haven’t done this yet with your card making, I encourage you to give it a try…you never know what you might come up with!

I know we are in the heat of August, but I think this month is going by fairly quickly and the Autumn Season will be here before you know it!  I was inspired by this along with another GORGEOUS image released this month from Whimsy Stamps, so check out my card for this week’s Cute Card Thursday challenge:

Vicki-CCT543spotanddots-WSAutumnHarvestRide

I have used this stunning Fall image From Whimsy Stamps called Autumn Harvest Ride by Crissy Armstrong.  I had some older Fall papers from my stash that had this fun dotted print on them and used these for the theme of the challenge to combine it with this wonderful Fall image as well.

The special card design I’ve used is called a Center Step Card.  (Click on the link to see the tutorial on how to make one for yourself on Splitcoaststampers.)

Vicki-CCT543spotsdots-WSAutumnHarvestRide

Upon a closer look at the design, I have also used a brand new (to me) elegant die cut by Spellbinders that I received as a prize winning from a fellow blog friend.  I’ve cut that with some garden green color and used that as a “back-drop” for my main image panel.  I’ve taken the Whimsy Stamps Pierced Border Trio Dies and cut another garden green piece for the image to sit.  I’ve also stamped out the sentiment with the Whimsy Stamps Everyday Mini Sentiments set and cut it out with an older Whimsy Stamps tag die to attach on the image panel with some twine.  I popped up the image panel with craft foam and layered this on the center panel of my card design.  I’ve also added a couple of Prima leaves between that.  I’ve attached some other dotted papers to the other panels including the bottom long panel and wrapped some gold ribbon around the bottom one before attaching it.  Lastly the gold ribbon and twine bows were added along with the button in the center gold bow and then I’ve added gold enamel dots on the side panels.

Vicki-CCT543spotsdots-WSAutumnHarvestRide-close

Here’s a closer look at the image and the coloring I’ve done with it.  I’ve mainly used my Copic markers to color it in and then added some gold gel pen coloring to the carousel pole, the saddle and bridle with the gold parts on them.  I took some Tinsel Stickles glitter to add to the “dots” on the saddle and bridle.  I then fussy cut it and attached it over the white dotted background and garden green border panel at the bottom.

Hope you’ve enjoyed my creation today and inspired you in some way to play.

I’ll be back again soon to share more creations!  Have a great day!

Here are the challenges I’d like to enter:

  1.  Creative Fingers – Anything Goes
  2. Crafty Friends – Anything Goes
  3. My Time to Craft – More Than One-Fold
  4. Shopping Our Stash – Leaves
  5. Crafty Gals Corner – Add Ribbon and/or Bow.

Basket of Best Friends

Hello friends!  Hope that you had a wonderful weekend!  I enjoyed spending time with hubby as he always makes me laugh…we have fun together no matter what we do!

Today I’d like to share another new creation I made from the Whimsy Stamps new August Digital release.  I fell in love with these guys and thought it would be perfect on just a simple little design:

Vicki-WS-Aug14-Pupsinbasket

This cute image is called Pups in a Basket.  I like that you can almost create any type of color or breed with this image by coloring it however you want.  So I found this adorable image online that I wanted to try and resemble the breed/coloring of:

119

Are these guys just as cute and fluffy as can be?!   I want to pet them! LOL!   Of course, the real thing has got to be the best! 🙂  And how cute would it be to add a red handkerchief to one of these pups on the image?  So many fun things to possibly do with them!

I used some plaid papers I had in my stash, and I wanted them to be somewhat neutral in color due to the accents of blue.  I’ve white heat embossed the banner at the top with the Whimsy Stamps Everyday Mini Sentiments stamp set.  Cut out all the panels with some dies and attached them to a top folding white A2 sized card base.  Lastly, I found some blue sequins to match and added some glitter accents to the centers.

Here’s a closer look at the image:

Vicki-WS-Aug14-pups up close

I’ve used my Copic markers to color it in and couldn’t help but also add some rosy cheeks with a white dot for highlights on them too!  This was so fun to color and how fun would this be to make up for someone with a new best friend!

So what type of breed or color(s) do you see in this image?  I’d love to know what you think!

Thanks so much for stopping in today!  Hope you’ve enjoyed my card and I’ll be back again soon to share more!

Challenges:

  1.  CCEE Stampers (CCEE1831) – Coloring Book Day (colored image)
  2. Crafty Creations – Anything Goes
  3. Creative Moments – Anything Goes
  4. QKR Stampede – Anything Goes
  5. Sunny Day Crafting – Anything Goes + animal on project
  6. That’s Crafty – Animal Magic