Whimsy Stamps Partner’s with Make a Wish Canada

Hello friends!  It’s my pleasure today to post information about this special image that Whimsy Stamps has just released today in honor of our beloved illustrator Crissy Armstrong’s brother, Ray Gauvreau, who is currently battling cancer.

I have made a special card just for him that is being sent out his way:

Vicki-WS-Penguin Ray

I started out by coloring up this image with my Copic markers in the following:

  • Penguin body, IV wheels/post – C8, C5, C3, C1
  • penguin feet/beak, tongue, cheeks – YR24, YR21, Y23, R20, R11, R00, R000
  • Bandage, IV bag – E33, E31, Y11, R00
  • ground/shadow – C1, E0000

For the background of my card, I took some xyron printed paper and foiled the background which I think looks great for a masculine theme design and that is what I was trying to go for with this card.  After foiling it, I took and sponged some yellow distress ink to blend around the edges of it for a bit of color, along with the image panel.

I had an old stamp set from my stash and thought it would be a great fit for this card, so I stamped the vertical “fight” sentiment next to the IV bag and then I took the other sentiment and heat embossed it with white EP and cut it in a strip to attach over the image.  Lastly, I’ve added some white enamel dots to each corner of the design.

Vicki-WS-Penguin Ray-close

Here’s a close look at the image and how I’ve colored it in.  It’s hard to tell in the photo of course, but I’ve also covered the IV bag with a clear glitter brush pen.  I think this image is a really great one to add to a crafter’s collection for “get well” cards and encouragement too like this one.  After cutting out the colored image panel and sponging the color around the edges, I’ve also layered this along with the foil panel with some black cardstock before attaching it onto a white top folding A2 sized card base.

Vicki-WS-Penguin Ray-flat

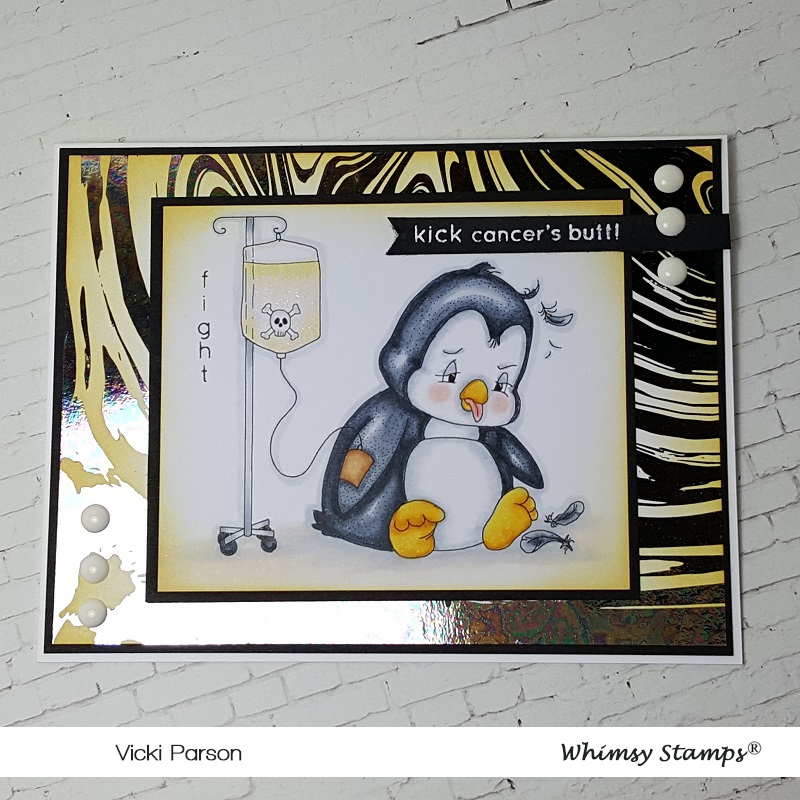
In this photo that I’ve laid flat, you can better see the shine from the foiled background that I’ve done.

Thank you so much for stopping in today and for your kind support too!

I will see you tomorrow for a special blog hop, so I hope you can join me!

Challenges:

  1.  Watercooler Wednesday – WWC213 – Anything Masculine Goes
  2. Aud Sentiments – Any sentiment EXCEPT “Happy birthday”
  3. QKR Stampede – #340 Anything Goes

Thinking of Tulips With Whimsy Stamps

Hello friends!  I’m here!  In case you were seeing nothing on my blog or something weird going on within the last day, I appologize!  I was messing with something and pretty much should have left things alone!  I think we are all back now and everything is good!  Whew!  (Don’t worry, I won’t be doing that again!)  I guess I thought I was savvy with tech things, but it turns out, I’m not!  Ha!

So now that I’ve got things back to normal, I can share my card with you this evening!

Vicki-WSTulip-March19

This is one of the adorable March digital releases from Whimsy Stamps called Tulip by CC Designs.  She was so fun to color, and I was thinking about tulips the entire time I was coloring her up!  Tulips are my favorite flower and I have a brick foundation with little buds of daffodils and tulips coming up!  Of course, this makes me excited about Spring and the warm weather we are starting to get!!  (Hopefully I will be able to share photos of how they come up soon!)

Whimsy Stamps has also released some really cool digital papers that I’ve used for the background of my card here called Rustic Wood and Brick Collection.  (Reminds me of my brick foundation where the flowers are coming up!)  I have also used a retired Whimsy Stamps die set called “Garden Flowers” that happened to have a tulip in it, so I cut several in white cardstock to go along the bottom of the card.  I also took one and inked it up in the colored I’ve used on my image and tied an additional thread bow at the top of it.

The sentiment on the bottom of the image panel comes from the Whimsy Stamps Everyday Mini Sentiments clear stamp set.  I white heat embossed it and then cut out with the Whimsy Stamps Quick Strips die set.  I used a MFT stitched scallop die to cut out the image from and layered her with some red cardstock.  Before I added the blue ribbon, I attached the piece of black cardstock where my layered image panel would go and wrapped it around the brick background.  I then added a white button with a linen thread bow in the center of that.  (This is what I used on the colored tulip.)  All of these layers were then mounted onto an A2 sized top folding white card base.

Vicki-WSTulip-March19-close

Here’s a closer look at her all colored up with Copic markers!  You can purchase them at Whimsy Stamps. These are the colors I’ve used on my image today:

  • bow, jacket, skirt, tulips – B97, B95, B93, R39, R37, R35, YG25
  • shirt, socks, shoes – BG000, E87, E84, E81
  • hair, skin – E27, E25, E23, E21, E11, E00, E000, R20
  • butterflies – C5, C3, YR04, YR02, Y13
  • C1 around image and white gel pen for flowers and jacket along with red and black gel pens for dots on butterflies
  • covered the red portion of die cut tulip with Wink of Stella clear glitter brush pen.

Vicki-WSTulip-March19-flat

I hope you’ve enjoyed my card this evening!  Are you as ready for those Spring flowers as much as I am?  What are your favorite flowers?

Thanks so much for stopping in today!!  See you again soon!

Challenges I’d like to enter my card for:

  1.   Words 2 Craft By (W2CB63) – “Happiness held is the seed, Happiness shared is the flower.”
  2. As You Like It – Dies or Stencils & why? (I love using dies because I feel there are so many fun things you can do with them/versatile, even it you don’t stamp!)
  3. A Bit More Time to Craft – #88 Anything Goes
  4. Challenge Up Your Life – Bye-Bye Winter

Whimsy Stamps St. Patrick’s Day Celebrations Week!

Hello friends!!  I’m so happy that we are into March as I hope to be feeling warmer temps and “seeing the green” very shortly over my way!  I’m more than ready for that!

In the meantime, how about we celebrate with some inspiration!

Vicki-WSPatricks Day Celebrations

I have made this super fun (mostly green) card especially for this fun event with the really adorable Little Leprechaun digital stamp by Crissy Armstrong.  I thought he was so cute sitting atop his pot of gold with his new winged friend there!  He was so fun to color up for this card! (See the Copic list below!)

For the card, I started out with some watercolor paper, and I’ve used some Aqua pigments (liquid watercolor from Brutus Monroe) and some extra water for the background of my card, then I cut it out with the Whimsy Stamps Hand Stitched Nested Rectangle Dies.  I also used this to cut out the leprechaun image too.  I’ve used some gold mirror cardstock to mat a layer of it behind the image panel.

I thought it would be fun to add a rainbow behind the image panel, so I took the WS Kinetic Curved Hills die set and cut strips with the straight curve die in the colors of the rainbow and added the strips over the background.  Then I attached the layered image panel and took the WS No-See All Seasons Tree die set to cut some grass and mushrooms to attach at the bottom of the card.  I used a white gel pen to color the spots on the tops of the mushrooms.  I also sponged some ink over all the pieces.  One of the sections of grass was popped up with foam tape.  Lastly, I took an older sentiment from Whimsy Stamps and made a banner that was popped up with foam tape over the design.  I then mounted the entire card panel over an A2 top folding white card base.

Vicki-WSPatricks Day Celebrations-close

Here you can see a close-up view of the coloring.  I have used the following Copics to color in the image with:

  •  pot, hat band, stockings, coat trims & dragonfly body:  C8, C5, C3
  • Leprechaun outfit:  C09, C07, G05, G03, Y11, Y13
  • Leprechaun gold trim and coins:  Y17, Y15 (layered over with gold gel pen)
  • hair, skin, dragonfly wings:  E09, E23, E21, E00, E000, Y11, R20, R00
  • clover on hat:  YG97, YG95
  • outline of image and “dots”:  C3, C1, C0, Y11, gold gel pen

You can also see the rainbow has some shimmer on it.  This is where I took a Spectrum Noir clear glitter brush pen to go over it.  You can also see a bit of shimmer from the Aqua pigments in the background…they’re really stunning, and I’ll be using them again in the future, so be sure to check back!! 🙂

Vicki-WSPatricks Day Celebrations-flat

I wanted to bring out some more of that gold with the mirror layer behind the leprechaun, so I brought some gold sequins into the layout and filled them with some gold Stickles.  When you hold this card up to the light, the whole thing really shimmers and sparkles!!  I loved how it turned out!  I hope you’ve enjoyed it too!

Thanks so much for dropping in today!

Challenges I’d like to enter this card for:

  1.  Double Trouble – challenge #23 – “Thing 1“:  The Wearin’ O’ the Green “Thing 2“:  Collaboration with Heart 2 Heart Challenge (entered below!)  “Thing 3“:  Include a golden touch (used gold mirror cardstock and sequins filled with gold Stickles!)
  2. Heart 2 Heart Challenge – Greens, Rainbows & Pots of Gold (3 part challenge)
  3. Daisy Chain – Spring is in the Air!
  4. Creative Inspirations – Spring Greens
  5. Mod Squad – Green, Green Everywhere
  6. Crafting By Designs – Anything Goes
  7. Three Amigos Blog Hop Challenges – Rainbow

Anything Goes for Cute Card Thursday!

Hello friends!  It’s time for an easy peasy “ANYTHING GOES” challenge over at Cute Card Thursday this week!!  Our monthly sponsor Whimsy Stamps will be joining us this week and I’m thrilled to share some of those products on my card today:

Vicki-WS-PenguinLovesBunny-March7

I have used this really sweet digital stamp on my card called “Penguin Loves Bunny“!  He is holding him ever so tightly and not wanting to let go!! 🙂

As I’m trying to get back into the swing of things here, I wanted to be sure to join some challenges and so I’ve picked out a nice sketch to start my card with here.  (See the details below the post for all challenges.)  I’ve been wanting to get out these yummy plaid papers that I’ve had for a couple of years.  This seemed like the perfect image for that too!

So I took the panel of plaid papers and layered it with some kraft cardstock.  I took some white organdy ribbon and wrapped a piece around the left side of it and tied on a bow at the top before attaching it to the upper right of my A2 sized top folding white card base.  I’ve cut out the image with an oval die and then layered another oval piece that was cut out with the kraft cardstock.  This oval panel was layered over the plaid.

I took a sentiment from the Whimsy Stamps Everyday Mini Sentiment clear stamp set and stamped the “miss you” underneath the image.  I also used the Whimsy Stamps Friend Word & Shadow die set to cut a piece of vellum with the shadow and then cut the word out with some pink cardstock and then attached them right underneath the stamped “miss you” sentiment.  Lastly, I’ve added some of the pink enamel dots from the Whimsy Stamps It’s a Party enamel dots set.

Vicki-WS-PenguinLovesBunny-March7-close

Here’s a closer look at the coloring of this image.  I’ve colored it in with Copic markers in the following colors:

  • Penguin:  C8, C5, C3, C1, Y38, Y35, Y32, R00
  • Bunny:  E47, E44, E42, E41, W5, W3, W1, R20, R11, R00

I also used a blender 0 and a white gel pen for cheeks and bunny tail.

Vicki-WS-PenguinLovesBunny-March7-flat

I thought this image would be so fun for Easter too!!  I can see it used in so many different ways!

Hope you’ve enjoyed my card today!!  Thanks so much for dropping in!!  See you soon!

Challenges I’d like to enter my card for:

  1.  Tuesday Morning Sketches – #493
  2. Crafty Animals – Anything Goes + related to animals
  3. Creative with Stamps – Friends
  4. {Cupcake Inspirations} – Plaid CIC465
  5. QKR Stampede – Anything Goes #337

Whimsy Stamps March New Release!

Hello friends!  I don’t think I ever remember being so sick before! WOW!  I was literally stuck in the bed for a couple of days there!  I’ve been taking some meds from doctor and starting to feel a bit better now, just regular cold and not so much the fever and chills any more.  Thank you SO MUCH for the very kind get well thoughts as I truly appreciate that!  So glad that’s over with now!

Have you checked out the new release over at Whimsy Stamps yet?  There are lots of really adorable digital stamps this month and I’m excited to be sharing one of those with you today:

Vicki-WSBunny-NewRelease

I have used this sweet little image by C.C. Designs for Whimsy Stamps called Bunny.  (And that little bunny is too cute wrapped up in the garden hose!!)

I have also used some fun new digital papers for the background on my card here too!  I’ve printed out a piece from the Whimsy Stamps Rustic Wood and Brick Papers digital collection and used it on the background of my green card panel.

I also used some die cuts to add some fun elements to my design as well as wrap some ribbon at the top and add a white flower with a rhinestone in the center of it.  I heat embossed a sentiment in white EP over a piece of the green cardstock and cut it out with a stitched die cut banner.

Vicki-WSBunny-NewR2

I have it all colored up with my Copic markers and then I’ve used some metallic gel pens for the dots and for the water sprinkling from the hose.

Here you can better see how I’ve colored in the image and the details of sparkle with the gel pens.  I’ve used some craft foam behind the image panel for a bit of dimension too.

Vicki-WSBunny-NewRflat

I hope you’ve enjoyed my card for today and have been inspired to go check out the rest of the new release at Whimsy Stamps!

I’ll be back again tomorrow for some more inspiration!  Thanks so much for dropping in!!  Have a great day!

Adopt Don’t Shop Whimsy Stamps Party!!

Hello friends!  As mentioned yesterday, I wanted to share with you a very special post today and it’s such a fantastic worthwhile cause!

And of course, it can’t be a fun party without some crafting involved, right?!!  So, since that little Doxie pup on the end was calling to my heart reminding me of my forever angel girl Mocca (on the sidebar of my blog here), I wanted to make something with that:

Vicki-WS-AdoptDon'tShop

Gosh this was SO fun to color!  That sheep dog in the background cracks me up!! 🙂

I have used the Adopt Don’t Shop DOGS clear stamp set and colored them up with my Copic Markers along with the grassy hill they’re on.  I also added some clouds behind the pups with a stencil and foam ink blending tool with blue ink.

  For the hearts paper behind them, I’ve used a left-over strip from the Hearts A Flutter Digital Paper Collection and attached this strip to the background of my white A2 top folding card base.  I layered the doggie panel onto a strip of black cardstock and mounted it over the heart background.

For the sentiment, I’ve layered it onto another piece of black cardstock and attached it in the corner of the doggie panel.  I used a circle punch to punch out the paw print and added it to the layout with a foam dot.

Vicki-WS-AdoptDon'tShop-close

Here’s a closer view of the image and how I’ve colored the pups.  Do they not make you smile or what?!

The dogs were mainly colored with the Copic ‘E’, ‘C’ and ‘W’ families.

Vicki-WS-AdoptDon'tShop-flat

To bring in some more hearts around the pups, I die cut the hearts from the Baby Animals die set and then covered them with a Wink of Stella Glitter Pen for a bit of shimmer.

Thanks so much for dropping in this evening and I know I have been very busy this week, but I will be trying to catch up with you all very soon!  Have a wonderful weekend!

Challenges I’d like to enter this card for:

  1.  Use Your Stuff – #347 Hearts, Pink and/or Red
  2. Words 2 Crafty By – (W2CB62) Best Friends                                                                              Piglet sidled up to Pooh from behind. 
    “Pooh” he whispered. 
    “Yes, Piglet?” 
    “Nothing,” said Piglet, taking Pooh’s paw. 
    “I just wanted to be sure of you.”
  3. The Creative Crafters – Anything Goes
  4. A Bit More Time to Craft – Anything Goes
  5. Sweet Stampin’ – Love Your Pet

Fistful of Flowers From Whimsy Stamps

Hello friends!  Hope that you are having a great week so far!  There is plenty of ice and snow over my way for the next several days, so I thought I would bring a little ‘happy’ today with a “Fistful of Flowers” from Whimsy Stamps!

Vicki-WSFistfulofFlowers-Feb12

Isn’t she the cutest?!  This was originally released as a rubber stamp from Crissy Armstrong, but this month it has been released in digital format now as well!

I have to be honest and say that after I had colored in the image, I was struggling with the colors of cardstock I wanted to use, and it seemed that anything I picked out wasn’t quite working.  (You ever have this problem?)  My hubby came in to visit me and I told him I was struggling, so he took me over to my paper and picked out these colors and I liked it, so I went with it!  Did he do good? 🙂

I have cut a piece of yellow cardstock out and then took the WS Mom’s Layered Flowers clear stamp set and white heat embossed the background with one of the daisy images.  I wrapped a piece of white ribbon around the yellow embossed piece that was also mounted onto a white 4.25 x 5.5 card front piece.  After wrapping the ribbon around both pieces, I added a bow and this panel was then mounted onto a white top folding A2 sized card base.

The colored image panel was layered with a blue cardstock which I’ve also cut a piece for a fishtail banner and added some daisy accent flowers to it.

Vicki-WSFistfulofFlowers-Feb12-close

                    This cutie has been colored up with the following Copics:

  • Jeans & Bow tie on shirt – B97, B95, B93, B34
  • Shirt & Hair Bows – R85, R83, R81
  • Flower Petals & White Band on Shirt – BG000 (also around image)
  • Flowers – center:  Y17 – Leaves/Stems: YG67, YG63, YG61
  • Grass – G24, G21, G20
  • Hair – YR30, E41, E43, E44, V95
  • Skin – E21, E11, E00, E000, R20

I took a glue pen and added some clear glitter over the edge of the flower petals for a bit of sparkle.  You can see that the daisy accents also have some light touches of glitter on the edges as well.

Vicki-WSFistfulofFlowers-Feb12-flat

So I hope you’ve enjoyed my card today and thanks for dropping by!

Challenges I’d like to enter this card for:

  1.  Crafting With an Attitude – Anything Goes
  2. Creative Fingers – Anything Goes
  3. QKR Stampede – #334 Anything Goes
  4. Crafty Friends – Anything Goes
  5. Pammie’s Inky Pinkies – PIP1906 Anything Goes
  6. Shopping Our Stash – Make Your Mark (colored with markers)

Anything Goes at Cute Card Thursday!

Happy Thursday friends! 🙂  It’s Thursday and that means it’s time for a NEW Cute Card Thursday challenge this week!  So this week it’s our beginning of the month “ANYTHING GOES” challenge!  We can’t wait to see your creations!

Our sponsor for this challenge is Whimsy Stamps.

Vicki-WS-ThinkSpringBunnies-Feb7

Are YOU thinking Spring too?!  I am, but I don’t think it’s working very well with the snow, cold and ice we’ve been getting! LOL!  So I will stay warm inside and bring my thoughts of Spring to my craft room!

I am using this really sweet digital image from Whimsy Stamps called Think Spring Bunnies by Crissy Armstrong.  It was previously released as a rubber stamp, but now it’s available in digital format!  I have printed out this image and used the following Copic Markers for coloring:

  1.  Bunnies – W5, W3, W1, W0, E33, E31, E30, C3, C1, C0 (tails)-, E44, E42, E40, Blender 0 (spotted bunny)
  2. spotted bunny inside ears, nose face – R20, R00
  3. Wooden sign – E25, E23, E21 (E23 used for center of yellow flowers)
  4. flowers – Y17, Y15, Y11, V17, V12 – YG67, YG61 (leaves/stems)
  5. grass – G24, G21, G20
  6. butterfly – Y11, R00
  7. sky around image – B01, B00, B000, B0000

Vicki-WS-ThinkSpringBunnies-Feb7-close

Here’s a closer view of the colored image.  I have also used a white gel pen in the bunny’s tails as well as the spotted bunny’s cheeks.  I also took a Wink of Stella clear glitter brush pen to go over the butterfly and the flying bug’s wings.

It was so fun to color these furry bunny butts!! 🙂

Vicki-WS-ThinkSpringBunnies-Feb7-flat

I’ve used some of the digital papers released last month called Oh Boy…really loving the ginghams in this set!  So, I’ve cut out both these papers along with some solid yellow papers (from same set) and the colored bunny strip with the Whimsy Stamps Hand Stitched Nested Rectangles dies.  I also took a strip of gray colored cardstock and used an older border die from Whimsy Stamps to create the scalloped edge.

These were all layered onto a white A2 sized top folding card base.  I wrapped some twine along the edge and tied it in a bow and then lastly, I’ve added some yellow crystals from Pretty Pink Posh randomly over the card.

Challenges:

  1.  Crafty Animals – Anything Goes + animal
  2. A Bit More Time to Craft – Anything Goes
  3. Crazy 4 Challenges (C4C469) – Ground Hog or Critter
  4. Send a Smile 4 Kids – Anything Goes/Easter/Spring
  5. 613 Avenue Create – Anything Goes with optional: use a critter
  6. Crafting From the Heart – Anything Goes

Whimsy Stamps New Digital Release – Willow

Hello friends!  So are you having a Super Bowl party today?  It’s always been sort of a little “thing” at our house each year since my kids were little….they were in it for the snacks of course!  LOL!

Today I want to share with you a card I made with one of the brand new February digital releases from Whimsy Stamps!

Vicki-WS-Willow-Feb3

I have used this darling little Willow girl on my card today!  Oh, those eyes are so catching on her!  (Had to make them a pretty blue!)  I have colored her up with the following Copic markers:

  1.  Dress, hair bows, shoe bows – R85, R83, R81, R00
  2. Flowers – Y17, Y15, Y11, V17, V12, YG63, YG61
  3. Shoes, Socks – E84, E81, BG000
  4. Hair – E27, E25, E23, E21
  5. Skin, Eyes – E21, E11, E00, E000, R20, R00, BG49, BG45
  6. Around image – C1 (white gel dots on cheeks and eyes)

First, I took the Whimsy Stamps Notched Rectangles die set and cut out the colored image.  Then I thought those yellow flowers she’s holding needed to be brought out a bit so I took the smaller flower image from the Whimsy Stamps Mom’s Layered Flowers clear stamp set and stamped it with yellow ink around the edges and die cut a scalloped rectangle layer with a suede brown cardstock to layer behind it.  I sponged around the edges with some Brushed Corduroy distress ink and ink foam blending tool.  I did the same to the left edge of the white A2 sized top folding card base.

For the right side of the card base, I took some of the Oh Boy digital papers from last month’s release and attached it.  Then I took the sentiment from the same floral clear stamp set as mentioned above and stamped it with some brown ink at the bottom right corner of the card.

Vicki-WS-Willow-Feb3-close

Here’s a closer view of the coloring on my image.  You can see the yellow glittered hearts and those piercing blue eyes!

I then took the layered image panel and attached it to some craft foam and added it to the center of the card design.  Lastly, I stamped a couple of hearts from the same stamp set mentioned above and filled them with some yellow glitter and added pearls to the corners.

Vicki-WS-Willow-Feb3-flat

Please be sure to stop by the Whimsy Stamps store to check out all of the brand-new February release.

Challenges:

  1.  City Crafter – Floral Background
  2. Addicted to Stamps & More – Anything Goes
  3. Watercooler Wednesday – WWC206 Anything Goes
  4. CCEE Stampers – CCEE1905 National ‘Thank You’ month
  5. Creative Knockouts – Flower Power

Sweet Anniversary Wishes

Hello friends!  Hope you’re having a great week so far!  It is really cold in our area right now as we are experiencing a “Polar vortex” with a high of -11 degrees F and low of -23 degrees F without wind chill for tomorrow.  Brr!  Many schools in the area as well as city workers are taking the day off due to the severe cold weather.   Please stay warm and safe wherever you are!

Not sure if you saw that Whimsy Stamps has started carrying this new adorable line of digital stamps from CC Designs in their store.  Here’s the card I’ve made today using one of those images:

vicki-pcaimeevalentino-jan29

I’ve used this super cute image called Aimee & Valentino for a special anniversary card.

I decided to print it out twice so that I could cut out the balloons and pop them up over the image.  I have used the following Copic markers to color it in:

  1.  reds on outfits, boots, hair clip and balloon – R37, R35, R32
  2. Pink on outfit and balloon – R85, R83, R81 (girl stripes on dress – E53, E51, E50)
  3. Boy’s outfit, boots and hair – C8, C5, C3, C1, C0, C00 (stripes on shirt – BG000)
  4. Girl’s hair – E27, E25, E23, E21
  5. Skin tones – E21, E11, E00, E000 (cheeks – R20)
  6. Grass/shadows – G24, G21, G20, E0000 (around image – BG000)
  7. I used metallic gel pens to color in the middle of hair clip, buttons and cheeks

I cut this image out with a stitched square die cut and then used a cloud stencil with Tumbled Glass distress ink and ink foam blending tool to add clouds behind the couple.

As mentioned above, I cut out the heart balloons on the second print out of the image and heat embossed the stamped numbers on them.  I used a stylist tool on the back of them to curve them in a bit and popped them up over the image with some foam dimensional dots.  I then added some shimmer over top of them with a Wink of Stella glitter brush pen.

vicki-pcaimeevalentino-jan29-upclose

Here’s a closer look at the coloring on the image.  You can see a bit of the shimmer over the balloons and where I’ve added some metallic color on the heart hair clip.  I took this image panel and layered it over a piece of gold mirror cardstock.

vicki-pcaimeevalentino-jan29-flat

I thought that the January released Hearts a Flutter digital papers were the perfect backdrop for this cute couple, so I printed the pink with white hearts one out and cut a piece out using the Whimsy Stamps Hand Stitched Nested Rectangle dies for that.  I found some coordinating card stock and gold heat embossed the sentiment from the WS Everyday Mini Sentiments clear stamp set and cut it out with a banner strip die.  I also placed it where I wanted it to go and used the Hand Stitched rectangle die again to create the stitch marks over it.

I took some gold ribbon and wrapped it around the heart design paper card front, placed the image panel over top and then layered on the sentiment banner with foam tape.  This was mounted over an A2 top folding white card base.  Lastly I added a gold bow and some gold sequins filled with some Stickles Tinsel glitter glue.

I hope that you’ve enjoyed my card! 🙂  Thanks so much for dropping by today!  See you soon!

Here’s some challenges I’d like to enter this card for:

  1.  CCEE Stampers – CCEE1904 Gold
  2. Aud Sentiments – Anything Goes + sentiment
  3. CRAFT – Love/Valentines (it fits with this theme as it’s about love!)
  4. Crafty Catz – Anything Goes with optional twist:  ribbon/lace
  5. My Time to Craft – All You Need is Love