Faux Emboss With a Stamp!

Hello there friends!  Hoping you had a wonderful weekend and a fabulous Mother’s Day as well!  I had a wonderful day with flowers delivered to me and wonderful phone messages.

Today I wanted to share a couple of cards that I had made participating in the “Spring Card Camp” classes from Online Card Classes. (It started April 11 and ran through the end of April.)  Although we are now on a separate Part 2 Spring Card Camp, I have enjoyed the classes each day and I thought I’d just take my time and enjoy everything.  So there may be posts spread across time as I go.  I just like to take my time and actually enjoy the process rather than hurry up and run right through it.  I feel this helps me to fully understand what I’m doing and what products I’ve used, take notes, etc.

The first class was taught from Jennifer McGuire as she showed us how to use a stamp and create our own embossing folder to make an impression with it!!  Something that I had not heard of before, so this was fun to try out:

Vicki-BMKindFloral-fauxemboss

So the idea of each class is to pretty much get a “two for one” type of design and stretch your supplies and design concept so that it makes it easier to create multiple cards at a time, which is really great right now as I seem to be making more cards and donating extra cards that I normally wouldn’t be doing at this time of the year.  (I also actually thought this could be applied towards Christmas making time as well…which I will be keeping in mind!)

I started with this panel first as this was my piece that created the faux embossng folder:

Vicki-BMKindFloral-FE

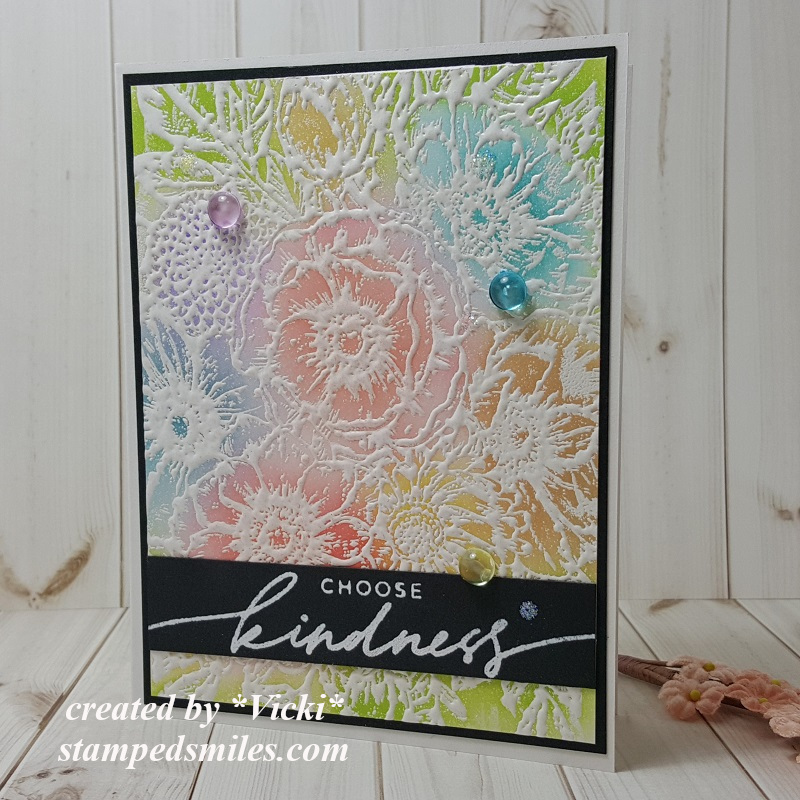
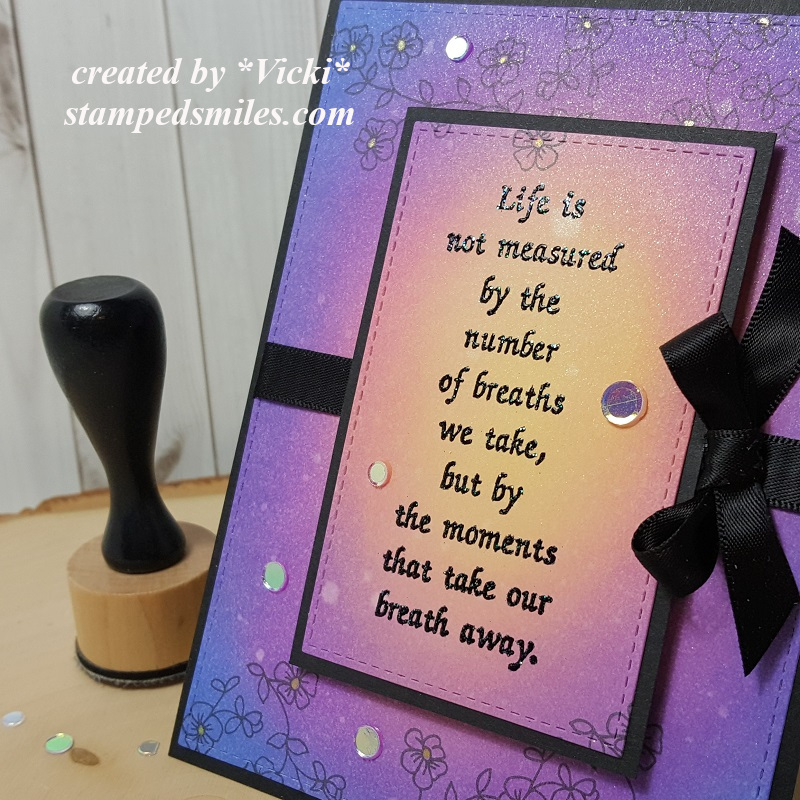
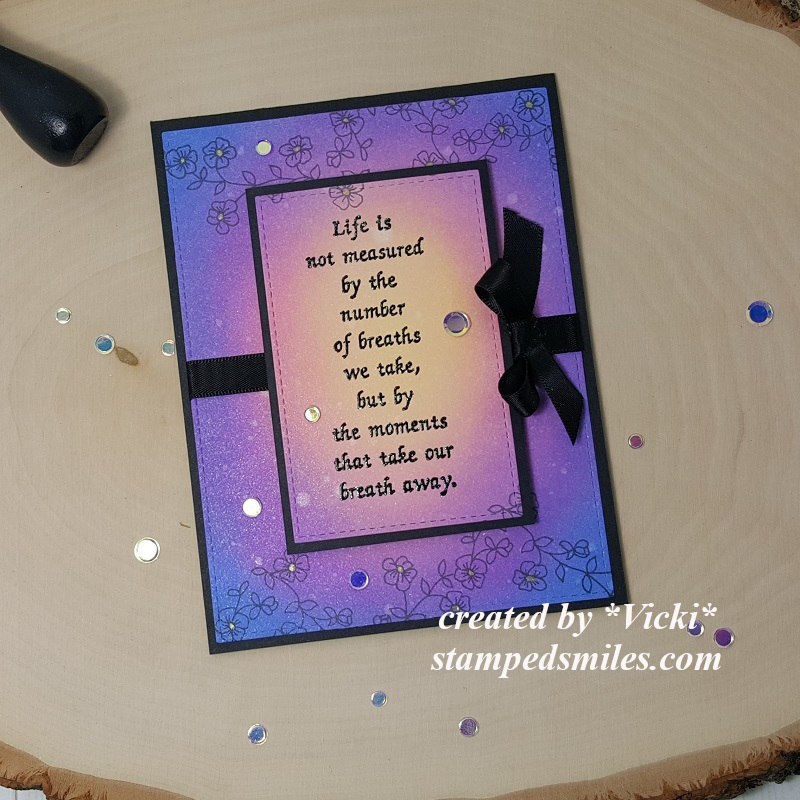
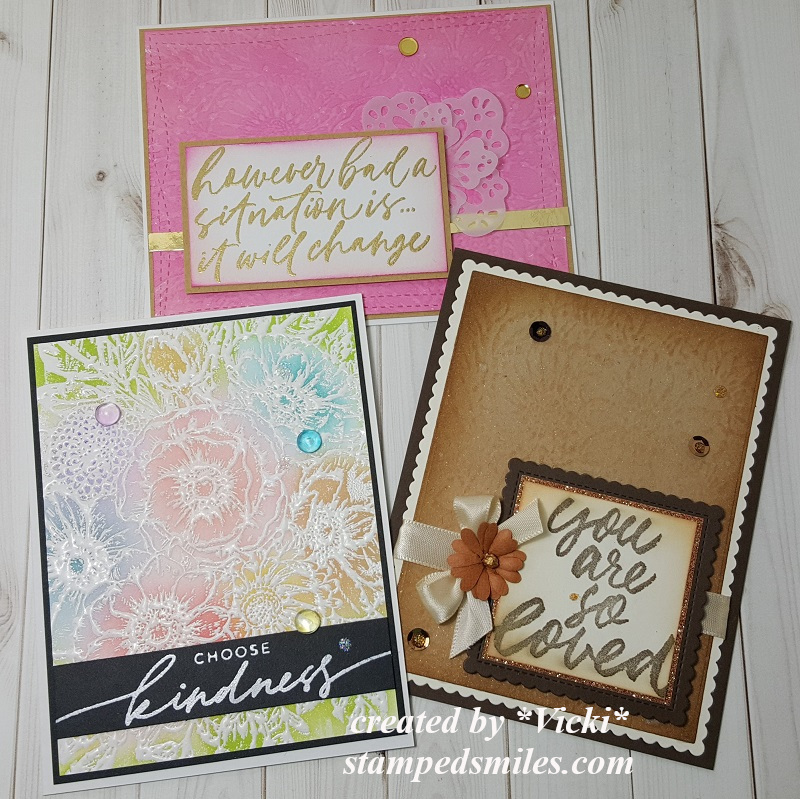
I decided to use this gorgeous large image from the Kind Floral stamp set to create my “faux embossing” piece with.  This image was heat set several times with white EP.   All of the cards I made including the sentiments were used with this same stamp set.

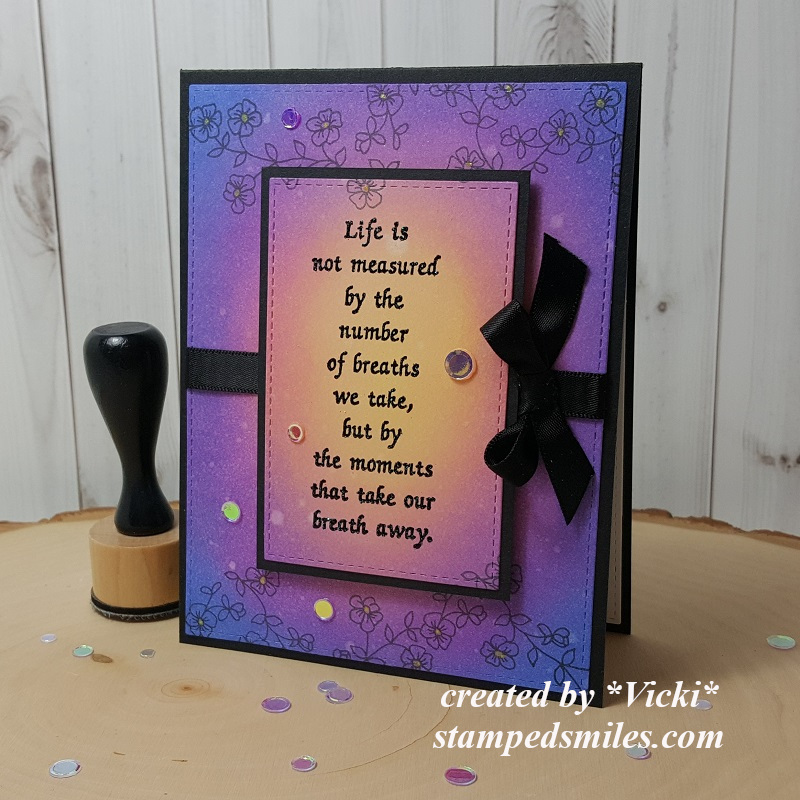
After using it for my “faux embossing” on my other cards shown below, I went back to it and finished it on a card by using some blending brushes and ink to color in the panel.  I took a strip of black cardstock and white heat embossed the sentiment over it and then layered it onto a white A2 side folding card base.  I finished it off with some colored bubble drops and Stickles glitter drops.

Vicki-BMKindFloral-FE1

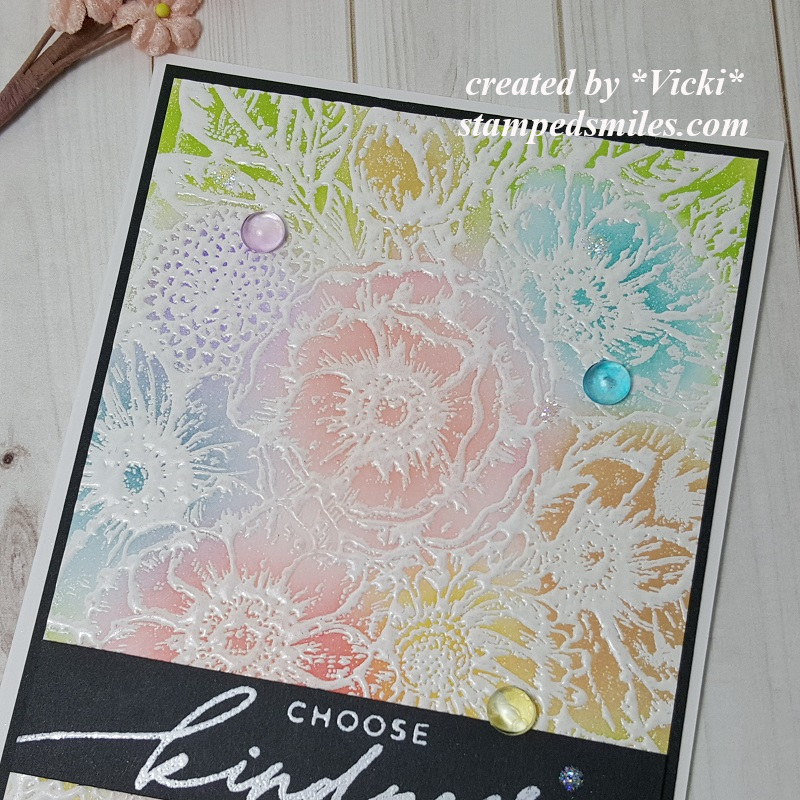
Here’s a closer view of the white heat embossing I did on this panel with the image.  It’s very thick as I had to build up layers to create a faux embossing folder to get a good impression with it.  (See below)

Vicki-BMKindFloral-FE2

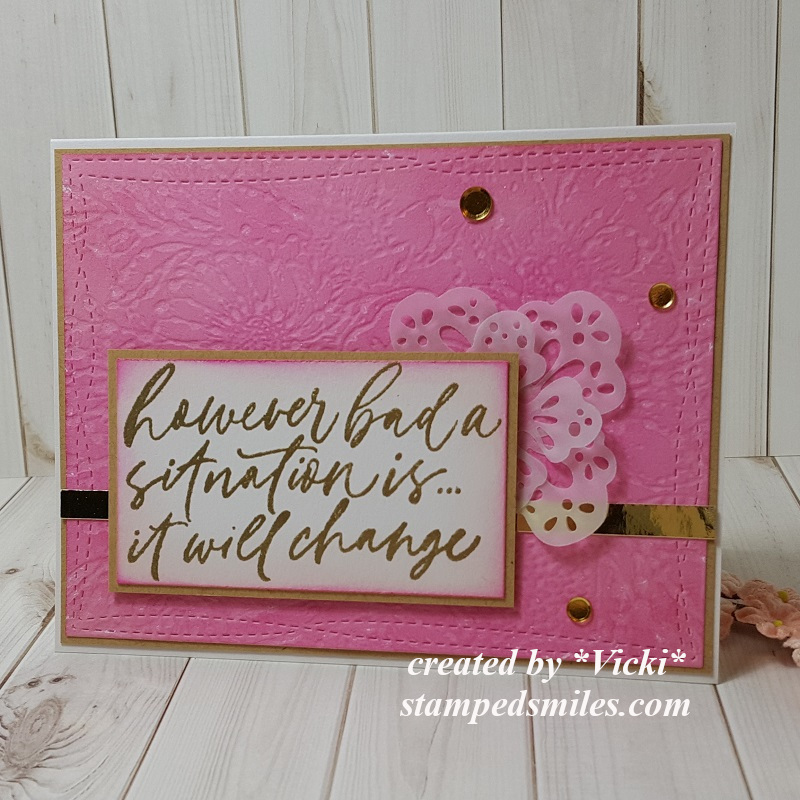
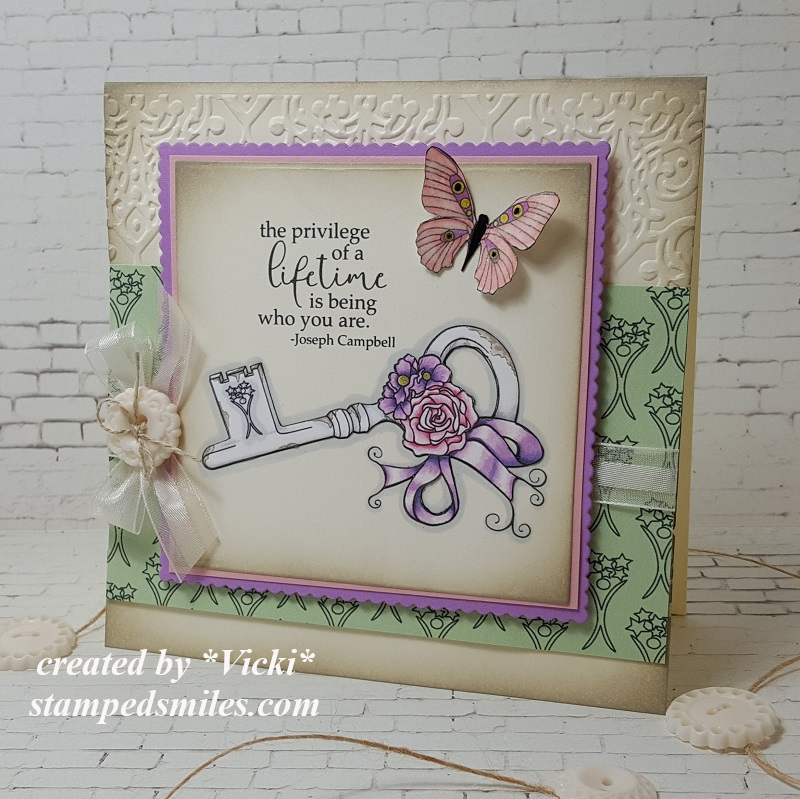
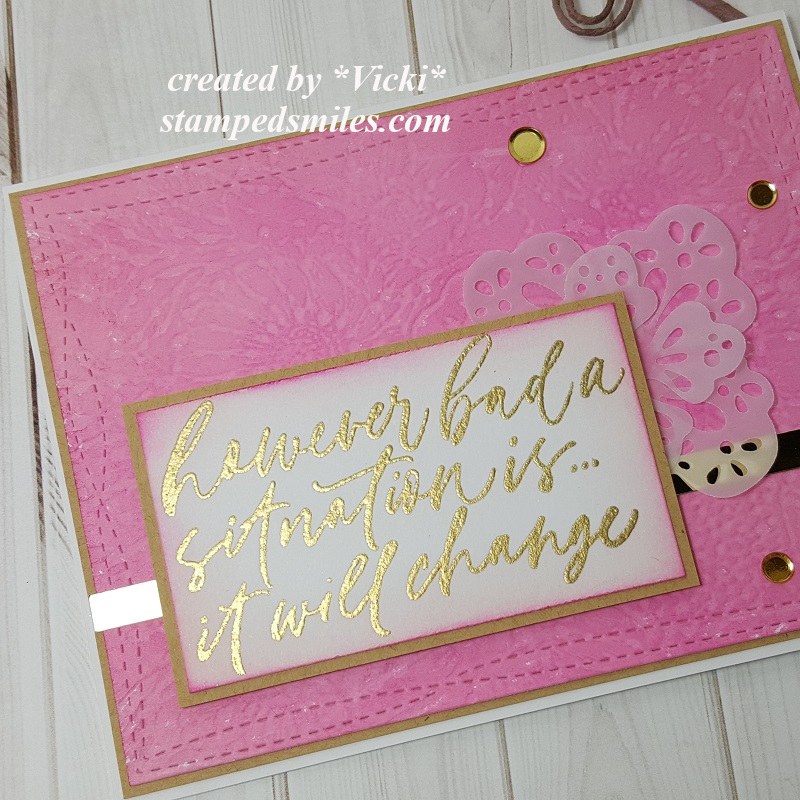
For my first card using the “Faux Embossing” piece, I took a sheet of pink cardstock and made the impression into it.  You can see it in the background.  For this panel I used the negative side of it and then sponged some darker pink ink over top of it so that you can really see the impression from the image.  I used a Wonky Stitched Rectangle die to cut it out with and layered it over a piece of kraft Cardstock.  This was attached to a top folded A2 sized white card base.

I took another sentiment from the same stamp set as above and heat embossed it with Gilded EP.  I sponged some more pink ink around the edges of this panel and layered it over another piece of kraft CS.  I popped it up with foam tape over some die cut flowers from vellum along with a strip of gold mirror cardstock and finished it off with some gold sequins.

Vicki-BMKindFloral-FE2a

Here’s a closer view at the texture in the background from the faux embossed piece.

I thought this gave a subtle but soft and pretty look to the design.  Also, that sentiment could not be at a more perfect time right now, don’t you think?

Vicki-BMKindFloral-FE3

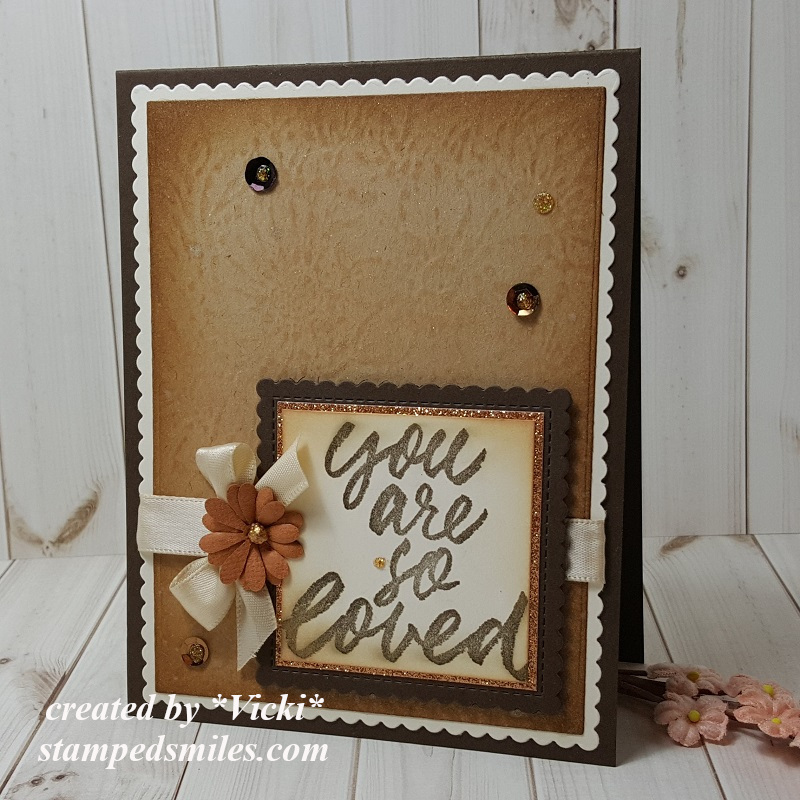
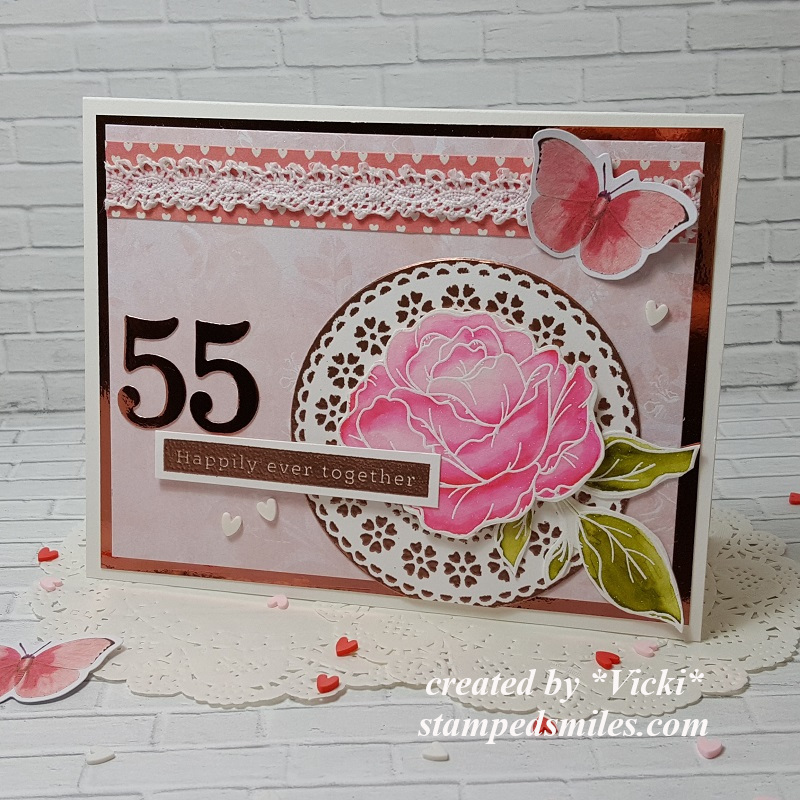
And for my last card, I made the faux embossed background using some more kraft CS.  This image I used the positive side and ran some distress ink over the raised areas to bring it out more.  I took a darker brown ink to go around the edges.

I stamped a sentiment from the same stamp set with brown ink, layered with some Copper Glitter paper and then cut a piece of Macchiato CS from a scalloped stitched square die that was also used for the A2 Sized top folding card base, and popped up the sentiment panel with foam tape.

I layered the embossed background piece over a vanilla cardstock layer that was cut with a scalloped stitched rectangle die and then I wrapped some silk ribbon with a bow around it before placing the sentiment panel over it.  I attached the flower and the sequins to the design and finished it off with some Nuvo Honey Gold Glitter Drops.

Vicki-BMKindFloral-FE3a

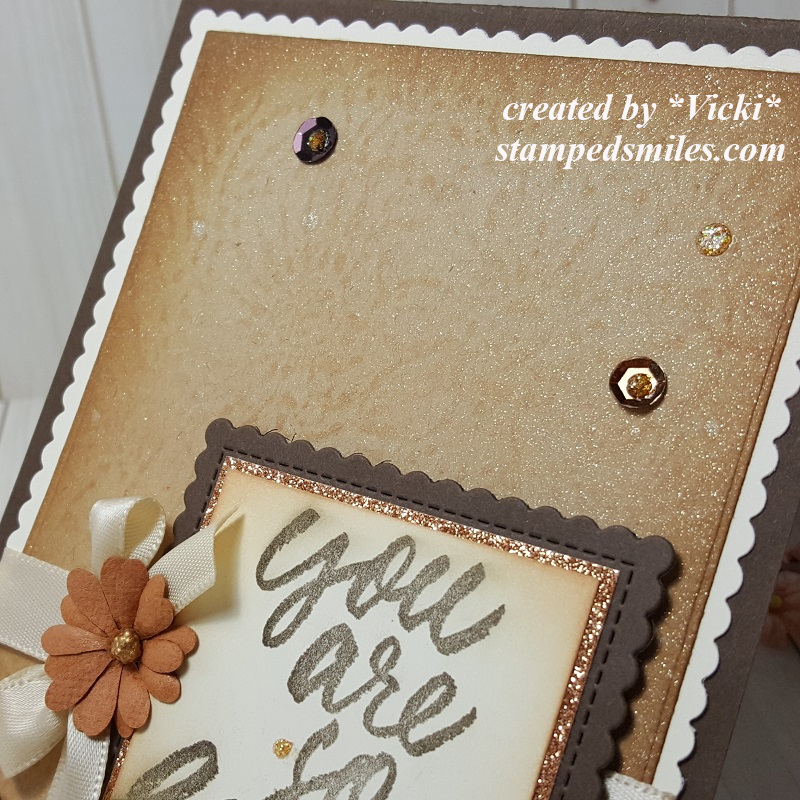
Here’s a closer look at not only the texture from the embossed background piece, but I also took some Shimmer Spray and covered the background with it.  You can sort of see the beautiful shimmer over it…and it really looks incredible in person.

Hope you’ve enjoyed what I’ve learned and created for class!  Thanks for dropping in with me today!  There will be more things I have to share with you coming up, so I’ll see you soon!!

Challenges:

  1.  Pearly Sparkles – Add a Ribbon or Bow (last card only)
  2. Moving Along With the Times Flowers
  3. Crafts Galore Encore – #75 Anything Goes
  4. Simply Create Too – #160 Use Flowers
  5. The Corrosive – #15 Anything Goes
  6. Use Your Stuff– #397 Flowers and/or Butterflies
  7. Arty Divas – #21 Anything Goes
  8. Cute Card Thursday – #633 Anything Goes

Full Bloom Rainbow

Hello friends!  I hope you’re having a great week so far!  I’m wondering if this cold weather has me feeling this way lately, but I’m seriously lacking in creativity and just have misplaced my MOJO lately!  If you’ve found it, please let me know! LOL!

In the meantime, I seriously needed to create a rainbow in my life and found that a young lady certainly was in need of a smile sent her way as well so I thought I would do just that:

Vicki-PinkMainCK-MMTPT604

I had received my Pink and Main Crafty Courtyard Card Kit and really loved the happy colors and pretty blooms in the stamp set and so I started out using the stencil with rainbow order inks for the background!

I’ve also used the same color of Distress Oxide inks to do the stamping on the tag and envelope as well.  I absolutely love the tag die set was included with the kit which I’ve used for the main focus of my card.  I always want to add just a bit of black to my rainbow colors, so I decided to white heat emboss the sentiment from the stamp set and then used one of the tag die elements to cut it out with and pop up over the bottom of the tag.

I’ve also used the ribbon and enamel dots included in the kit to finish it off.  (The floral sequins used for the photo prop were also included in the kit.  LOL!)

Vicki-PinkMainCK-MMTPT604-close

Here’s a closer look at the details in the tag.  For the black border around the tag, I just cut a piece down to size and then cut off the edges with my scissors to match up with the tag.  The scallop tag behind it was cut with the paper and die from the kit.  I used some circle punches to create the black re-enforcer and then I tied the ribbon together with some black twine from my own stash and topped the center with an enamel dot from the kit.

Vicki-PinkMainCK-MMTPT604-flat

This card has now been sent along to a young lady that is currently in the hospital dealing with cancer treatments and really needs some cheerful happy colors, so I hope that this will help fill her day with some cheer.

Hoping that this card has also sent some feelings of cheer today your way as well!  Thanks so much for stopping in today friends and I’ll see you soon! 🙂

Challenges:

  1.  Allsorts – Dies and/or Punches
  2. A Bit More Time to Craft – Anything Goes
  3. Pammie’s Inky Pinkies – PIP2007 Anything Goes
  4. Through the Craft Room Door– Anything Goes
  5. Fab ‘N’ Funky – For a Child (sent to a 15 yr. old in hospital)
  6. Simon Says Stamp Wednesday – Add a Sentiment
  7. Creative Knockouts – Flower Power

Guest Rock Star for Repeat Impressions POTW!

Hello friends!  I’m hoping that you’ve had a wonderful weekend!

I’m very excited to be sharing my projects today as a guest “Rock Star” for Repeat Impressions!  I’ve been asked to share a special post for their “Project of the Week” segment on their blog today!  Yay!

If you’ve been following me for a while, then you know how much I love to ink blend!  It’s something that is fun to do, and I’m always amazed at the finished colors!  I want you to get the same satisfaction when you do it too, so I thought that would take a fun photo tutorial for my guest POTW post!

Vicki-RIGDT-inkblendedscene

There is just something about this scene that makes me feel happy and relaxed!  So of course, that sentiment goes just perfectly with it!  This sentiment/saying is one of my all-time favorites and I was thrilled to use it for this design!

I’ve used the “Canoeing” (2905-G) along with the “Mountain Vista” (629-I) From Repeat Impressions for the image stamping over the ink blended scene.

Vicki-RIGDT-inkblendedscene-close

Here’s a closer look at the details in this card with how I went about creating it.  You can see the different blended colors in both the water and sky.  The setting sun was colored in with a glitter gel pen which created some shimmer to it.  The white gel pen highlighted details in the water.

Vicki-RIGDT-inkblendedscene-flat

Really had fun creating this scene with these stamps which were just perfect for an ink blended background!  I thought this would make for a wonderful retirement card!   If you want to create one of these types of cards yourself, please be sure to check out the step-by-step tutorial over at the Repeat Impressions Blog to see how I went about doing this!

I loved that sentiment stamp so much, that I just couldn’t help but create one more card using it again with another ink blended design:

Vicki-RIGDT-inkblendedlife

Really LOVE how this one turned out!

What’s fun about ink blending is all of the different color combinations you can play with and blend together for different looks!  This time, I’ve used different colors and started my ink blending in the center.  I’ve also used a die to cut out the center of the ink blended panel, heat emboss the sentiment over it, layer with a piece of black cardstock behind it, and pop it up over the rest of the ink blended background.  So even though it was cut out in the center, it’s a continuous ink blended design!

Vicki-RIGDT-inkblendedlife-close

On this ink blended panel, I’ve used some Shimmer Spray over it which gives it a really pretty shimmer with a bit of a “water droplet” effect as the Distress Oxide Inks react to water/liquids.  I think this turned out really cool as it gives it sort of a “Bokeh Effect”.

Before I cut out the center of the ink blended panel, I’ve used the “Flower Power Frame” (10202-Q) to stamp in black ink at the top and bottom of the panel. You can see that part of the stamped image was die cut on the sentiment panel.  I colored the centers of the flowers with a yellow glitter gel pen for added detail.

Vicki-RIGDT-inkblendedlife-flat

To add to the look, I thought it needed some sparkling clear sequins to finish it off!

I hope you’ve enjoyed my creations today and please be sure to stop on over at the Repeat Impressions Blog to check out the full tutorial on ink blending!

Thank you so much to Wendy and the fellow Rock Star friends for having me along as a guest!  Really enjoyed creating these projects with these fabulous stamps!!

Also thank YOU for stopping in today!  I appreciate your support so much!  I’ll be seeing you again soon my friends!

Challenges I’d like to enter:

  1.  Addicted to Stamps &More – Anything Goes
  2. Cute Card Thursday – CAS
  3. Cardz 4 Galz– Black and Bling (second card only)
  4. Daring Cardmakers – Someone or Something You Love (ink blending, words/verse)
  5. Creatalicious – #181 Anything Goes with optional embossing
  6. The Creative Crafters – #25 Anything Goes

Turner Syndrome Awareness Blog Hop

Hello friends!

February is TSA month and If you’re not familiar with this, please read about it below:

Turner Syndrome is a genetic disorder where a female is born with only one X chromosome, instead of two, leaving her with life-long medical issues and learning disabilities. This condition occurs one in 2,500 female births worldwide, but is more common among pregnancies that do not survive to full term. That is why Turner Syndrome Females are considered MIRACLES!

My TS related project is inspired by the TSA official color board:

For my project, I have combined two different digital sets that were kindly made especially for this blog hop and the TSA cause:

Vicki-JansDigi-TSAbloghop

I was really inspired by the wonderful colors along with the images from the inspirational board above, but it was fairly easy since the images were already pre-colored in the set to create with!

I’ve used the TSF Key digital set from Jan’s Digi Stamps for the images on my card.  Also what’s cool about this set is that all of the proceeds from this set go directly to the Turner Syndrome Foundation!  It’s a stunning set to have plus a great way to help with a terrific cause too!

I have printed out the images over a piece of white cardstock and cut them out.  I also added one of the images in a repeat pattern to print out over a piece of green cardstock for a decorative strip on the background of my card design.

I took an embossing folder and embossed only the top portion of my card base, added the green printed strip with ribbon wrapped around it and sponged the edges.  I layered some pink cardstock and cut a scallop square piece of lavender colored cardstock for behind my vanilla panel and popped it up over the card base with foam tape.

Lastly, I’ve attached the bow, button and twine to the side of the image panel and attached the cut-out butterfly to the top corner of the image panel.  I glued only the center portion of the butterfly so that I could pop out the wings.

Vicki-JansDigi-TSAbloghop-close

Here’s a closer view of the images.  I’ve used a Copic marker on the vanilla-colored panel to create a “shadow” around the key image and then I attached the cut-out key over top of that.  I’ve used the same Copic marker for a few more shadows around the key.  For that butterfly, I’ve used a glitter gel pen to color portions of the butterfly and then a clear glitter brush pen to go over the wings.

You can see that TSA symbol on the key which is the same image used for the green background panel I created on the computer.

Vicki-JansDigi-TSAbloghop-flat

I hope you’ve enjoyed my card today!

Thank you so much for stopping by!

Challenges I’d like to enter my card for:

  1.  Jan’s Digi Stamps Challenge Anything Goes
  2. Pammie’s Inky Pinkies – PIP2004 Anything Goes
  3. Arty Divas – #14 Anything Goes
  4. Through the Craft Room Door – Anything Goes
  5. Allsorts – A Touch Vintage

A Vintage Love

Hello friends!  I hope you’re having a great week!  I must be really wishing for flowers as this seems to be my theme this week!…along with watercolor and heat embossing! LOL!

Today I wanted to share a card I’ve made for an anniversary:

Vicki-SSSBeMyValentine-Anniversary

As you can see from the card itself, my parents have been married for 55 years.  So when I saw this Simon Says Stamp LE Valentine 2020 card kit, I knew that this would be a great way to start using the kit immediately!

I actually really didn’t know what direction I was going to go with this anniversary card and I just started pulling things out and switching different items to see what I wanted to do.  I sampled the stencil with the metallic paste from the kit and really liked it, but when I pulled out my copper metallic mirror cardstock, I decided to heat emboss over the stencil with the same copper EP that I used on the sentiment for this card.

I’ve also cut out the numbers with the copper metallic mirror cardstock along with the layer behind some of the papers from the card kit.  I’ve added another heart strip of the papers from the kit at the top and used one of the butterflies from the kit to go over the piece of lace I’ve added from my stash.  The layers were all attached over an A2 sized top folding card base.  Lastly, I added some white hearts that were actually from a different card kit.  LOL!

Vicki-SSSBeMyValentine-Anniversary-close

I wanted to share a closer look at the flower.  The stamp set in that card kit is so stunning!  I’ve white heat embossed the flower and leaves over some watercolor paper and then used my Clean Color Real Brush markers to color it with.  I’ve used some foam tape to pop up the flower over the stenciled heat embossed piece that was cut out with a circle die and attached to the card front.

You can see the shimmer over the butterfly wings that I’ve covered with a glitter brush pen.  I only glued the center of the butterfly so that I could pop out the wings a bit.

Vicki-SSSBeMyValentine-Anniversary-flat

Although this card looks a bit simple, there were a few steps to the stenciling and heat embossing some of the elements.

I hope you like it!  Thanks so much for stopping in and I’ll see you soon!

Challenges:

  1.  Simon Says Stamp Wednsday – Anything Goes
  2. QKR Stampede – #382 Anything Goes
  3. Allsorts – Take Flight
  4. Creative Fingers – #178 Anything Goes
  5. Watercooler Wednesday – WWC256 All About Occasions
  6. Lil Patch of Crafty Friends Anything Goes

Guest Design Spot For Retro Rubber Challenge and Playing Tic-Tac-Toe!

Hello there friends!  I hope that you’ve had a great weekend and found some enjoyable moments for yourself!  I had a nice and cozy weekend with my hubby!

Today, I’m thrilled to share my post for the Retro Rubber Challenge Blog as I’ve been asked to do a guest design spot for their challenge!  Retro Rubber is known for their challenges in which they challenge you to pull out those neglected older stamps from your stash and use them!  (They ask that you use a stamp that is at least 1 year or older to enter).  For this particular challenge, they’re asking you to follow along with a fun Tic-Tac-Toe board.

For my card, I was going for a diagonal direction one way, but it ended up fitting with several different directions on this board!  LOL!  I just had fun playing I think:

(My card below utilizes the top row across, and diagonally in both directions!) Squares used for my card are:  green, twine, pattern paper, die cut or punch, sympathy and nature.

Vicki-RRCB127GDT-EHMondoHydrangea

Isn’t this such a pretty floral stamp?!  Hydrangeas are pretty much my fave all time flower!  The colors amaze me and I have a line of them in my backyard along my fence and look forward to seeing them bloom every year!  I take photos of them too!

Well I have this container sitting on a shelf in my stamp room where this particular stamp and die set is just “staring at me” awaiting for me to pull it out!  I didn’t realize that it was actually a 3 year old set until I pulled it out, but do you remember this Mondo Hydrangea from Ellen Hutson by Julie E?  Fell in love with it immediately, purchased it and think I may have used it one time!  I was excited about pulling it out to make my card for today as it’s one that I really love!

I started by heat embossing the image with some Brutus Monroe Gilded EP and then used my Clean Color Real Brush markers and a water brush pen to blend out the colors over the images.  I then used the Mondo Hydrangea coordinating dies to cut out all of the images.  I also took some vanilla cardstock to die cut the top border with the MFT Stitched Scallop Basic Edges die as well as cut it out along with the green pattern papers with the MFT A2 Stitched Rectangle STAX die.  These layers were attached over an A2 sized vanilla top folding card base.

I’ve used a sentiment from the Whimsy Stamps Furever in Our Hearts stamp set and heat embossed that over that vanilla die cut panel as well. (Adorable pet sympathy set to have on hand!)

The flowers were popped up over the design with foam tape, but before I attached the large hydrangea to the card, I took some metallic gold twine and tied a bow around the stem.  Lastly, I added some clear confetti sequins.

Vicki-RRCB127GDT-EHMondoHydrangea-close

Here’s a closer look at the watercolor I’ve done over the flower.  I don’t do this very often, but it’s always satisfying when I play around with it!  At first I thought it would be intimidating to color, but it’s really not.  I just added layers of watercolor as I wanted it to look.  You can really see where the EP shines on this!

I had thought about adding some glitter over it, but wanted to keep it soft since it’s a sympathy card.

Vicki-RRCB127GDT-EHMondoHydrangea-flat

It seems that I hardly ever have a sympathy card on hand when I need one, so this will be a great one to have on stand by for my collection.

Thanks for stopping by today and I’ll see you soon!

Other challenges I’d like to enter this card for:

  1.  Cute Card Thursday – Green
  2. Krafty Chicks – KCC491 All Occasions
  3. Crafty Catz Anything Goes + optional twist:  Flower Power

It’s Christmas at Cute Card Thursday!

Well here we are friends!  Happy Halloween!!!   I hope whatever your plans are that you have a safe and wonderful evening!  I also hope the little trick-or-treaters don’t get too cold this year with the snow over my way!

Well, although it’s Halloween today, we are having a “Christmas” theme going on this week at the Cute Card Thursday Challenges!  So if you’re all packed up from making Halloween, then this would be a great time to start working on your Christmas makes for the year!  We look forward to seeing what you come up with!

Here’s the card I made for the challenge:

Vicki-CCT606

Isn’t this image just beautiful?!  I was so happy to pull out this stamp… finally and color it up for a Christmas card!  This was my purchase during STAMPtember from Paper Rose.  I had never heard of this company before that time, so this was the stamp set/die combo I picked to get as I fell in love with it.

I stamped the large image over a piece of Copic Blending Card and then stamped the sentiment from the set right underneath it.  Colored with Copics and then trimmed it down to fit over my card front.  I layered this panel onto a piece of brushed gold cardstock and then a piece of red.

For the card base, I took the two pine sprigs from the stamp set and randomly stamped them over a kraft colored A2 sized top folding card base.  I used the same ink color to stamp them with and then used that color to sponge around my image panel before attaching all the layers together.

Vicki-CCT606-close

Here’s a closer view of the coloring I’ve done over the image.  Although the brushed gold cardstock is a bit muted, you can see the slight shimmer in it.

I’ve taken a Copic marker and done some random “dots” all around the flowers.  I’ve also used a gold gel pen to color the center of the flowers as well as add some more “dots” around the poinsettias.

For the “berries” within the branches, I’ve added some Nuvo Morning Dew Drops which dries clear over them.  This would be the only dimension on my card which makes it nice and flat for mailing.

Vicki-CCT606-flat

I’m actually really happy to add another Christmas card onto my pile for this year and I have many places to send cards to, so I know I will be making more!

Thanks so much for joining me here today and I’ll be seeing you again soon!

Challenges:

  1.  Allsorts – Make Your Own Background Paper (stamped on card base)
  2. Pammies Inky Pinkies – Anything Goes PIP1943
  3. The Holly & Ivy Christmas Challenge – Anything Christmas Goes
  4. Through the Craft Room Door – Anything Goes
  5. Fab ‘N’ Funky – Christmas

Sparkles for Cute Card Thursday

Hello friends!  Today starts a new challenge for Cute Card Thursday!  The theme for this week’s challenge is “Sparkles“.  Usually when I think of sparkles, I usually think of Christmas or snow, but this time I went in a different direction for a reason…

Vicki-CCT605

Unfortunately, I needed a sympathy type of card this last weekend and it seems that I’m always making one as I need them instead of making several up at one time so that they’re ready and on hand when the time comes.

This is an older stamp set from Stampin’ Up! that I got a few years back during their Sale-a-bration time and it was a free set called “Heartfelt Blooms“.  I actually really love the floral image and how detailed the image is so that you don’t have to color it if you don’t want to.  It has been my “go-to” lately when I need something quickly.

I made it monochromatic green with the Old Olive color and Vanilla cardstock.  The “sparkle” is that beautiful glitter paper behind the strip and sentiment.  The sentiment was cut from oval dies and popped up with foam tape.

Hope you’ve enjoyed my simple card with sparkles today!

Thanks for dropping in and I’ll see you soon my friends!

Challenges:

  1.  Use Your Stuff – Tic-Tac-Toe (I used bottom row across)
  2. Creative Moments – Anything Goes with optional:  For the girls
  3. Through the Craftroom Door – Anything Goes

Cheerful Sketches Guest Designer

Hello friends!  Hope you’ve had a wonderful weekend!  I just got back from a lovely weekend trip with hubby and we had such a great time visiting over in Hannibal, MO.  This was something we both really needed to just get away for a bit and it was wonderful to be able to go and do something fun!

Today I’m sharing my creation I made as a guest designer for the Cheerful Sketches challenge blog.  (I had won a spot with one of my creations I had entered.)  I was also shared the sketch and an image to work with:

Vicki-GDTCheerfulSketches-MyBesties

The was a company that I have heard of before, but this is the first time that I have actually colored one up.  This is from the My Bestie Shop in their Harvest Collection called Harvest Besties Doll 25.

I took the image and colored it up and cut it out the size I needed for my card and layered it with some dark brown cardstock.  I took some sunflower style papers from my stash and placed a piece over a 5.5″ square dark brown top folding card base.

I cut out a couple of squares for each corner of the card and layered a scallop die cut square to each one with some orange colored cardstock.  I also took a strip of this same orange cardstock and attached it diagonally across it.

Lastly, I took the image panel and wrapped some seam binding ribbon around it with a bow, twine and button.  For the seam binding ribbon, I spritzed it with water and crinkled it up a bit and let it dry before adding to my card.  I then added some Fall Prima flowers around the design.

Vicki-GDTCheerfulSketches-MyBesties-close

Here’s a closer view of the image and how I’ve colored her up with Copic markers.  For the gold glittery details in the Fall sentiment and around her (including the buttons on her shoes), I’ve taken a Quickie Glue Pen to color it in with and then added some pretty Fall gold glitter over it.

The edges of this image panel were sponged with some Tea Dye Distress Ink and then sprayed with water for the water droplet marks.

Vicki-GDTCheerfulSketches-MyBesties-flat

She has put me in the mood to go to the pumpkin patch and bring one home!

Thanks so much for stopping in today!  Hope you’ve been inspired in some way and I’ll be seeing you soon!

Challenges:

  1.  Love to Craft – LTCCB39 Oct Anything Goes
  2. Little Red Wagon – Pumpkin Party
  3. Fab ‘N’ Funky – Autumn Colors
  4. Watercooler Wednesday – WWC241 Anything Goes Feminine
  5. Crafting with an Attitude – Anything Goes
  6. Crafty Catz – Anything Goes with option of Ribbon, Bow or Flower
  7. Creative Knockouts – Lots of Layers

Sending Snail Mail Hugs

Hello friends!  Yippee!  It’s finally “officially” Fall now! (According to the calendar anyway.) We are very slowly starting to get lower temps at least in the evening time anyway.  I’ve gotten out my Fall decorations and I’m ready!  How about you?

Today I have a very sweet image from Whimsy Stamps to share with you:

Vicki-WSLoveSlowMuch-Sept24

Awe!  I wouldn’t normally hug a snail, but I must say, this one is SUCH a cutie don’t you think?  This digital image is called “Love You Slow Much” from Whimsy Stamps-Sylvia Zet’s Wee Stamps Collection which was previously released as a rubber cling stamp.  So now you can have the option of choosing the digital or the rubber versions!

Of course, with Fall having started, I was really inspired to create with this cutie in some orange, yellow and tan toned colors!  With the exception of that blue bow tie on the snail, I’ve colored it differently as I think that makes him really stand out especially for dispensing hugs…or perhaps receiving them! 🙂

I’ve cut out the image with a stitched circle die and then die cut another larger circle in the orange color to mat behind that.  I’ve taken a piece of decorative paper from my stash with the wording and added some stitch marks along the edge of it with a black marker and then mounted it to a piece of white cardstock.  I wrapped some white organdy ribbon around these two pieces and mounted it onto an orange 5″ square top folding card base.

I took another piece of orange cardstock and die cut a tag out from an older Whimsy Stamps die that I have and then I stamped the “hugs” sentiment from the Whimsy Stamps Everyday Mini Sentiments clear stamp set towards the bottom of the tag and added it to the bow on the ribbon.  Lastly, I took some flowers and attached them around the card design.

Vicki-WSLoveSlowMuch-Sept24-close

Here’s a closer look at the coloring I’ve done on this image and used the following Copic markers:

  • Snail Body:  W7, W5, W3, W1, R00
  • Snail Shell:  E35, E33, E31, E30
  • Snail Bow Tie:  B26, B24, B21
  • Fairy’s Dress, Hair Flowers, Shoes, Wings:  YR07, YR04, YR02, BG000, C7, C5, C3
  • Fairy’s Hair & Skin:  E47, E44, E42, E41, E21, E11, E02, E00, E000, R20
  • I used BG000 and E0000 for around image and shadows
  • I’ve also used a gold gel pen for the center of the flowers in her hair and over the tiny marks behind her wings.  I’ve used a white gel pen for highlights in the Fairy’s cheeks as well as highlights on the snail’s shell.  I took a glue pen over her wings and added some clear glitter over them.
  • I’ve also used a Copic marker (unsure of color) to color a rhinestone for the center of the orange flowers.

Vicki-WSLoveSlowMuch-Sept24-flat

I hope you’ve enjoyed my creation today and that it has inspired you in some way!

Thanks so much for stopping in today!  I always appreciate your support!  I’ll be seeing you soon!!

Challenges I’d like to enter this card in:

  1.  Creatalicious – Anything Goes with optional circles
  2. Stamps & Fun = Creativity – Anything Goes
  3. The Paper Girls – Anything Goes
  4. The Fairy & The Unicorn – Fantasy Anything Goes
  5. Creative Knockouts – Anything Goes
  6. QKR Stampede – Anything Goes #364
  7. Creative fingers – Anything Goes
  8. Always Fun – Cute Critters