Thanksgiving Cuteness

Hello! Wishing a Happy Thanksgiving tomorrow for my U.S. friends!  Just wanted to pop in here to share this fun little card I made to help me get into the Thanksgiving mood and I needed a bit of a giggle which is what I was doing as I colored these fun critters:

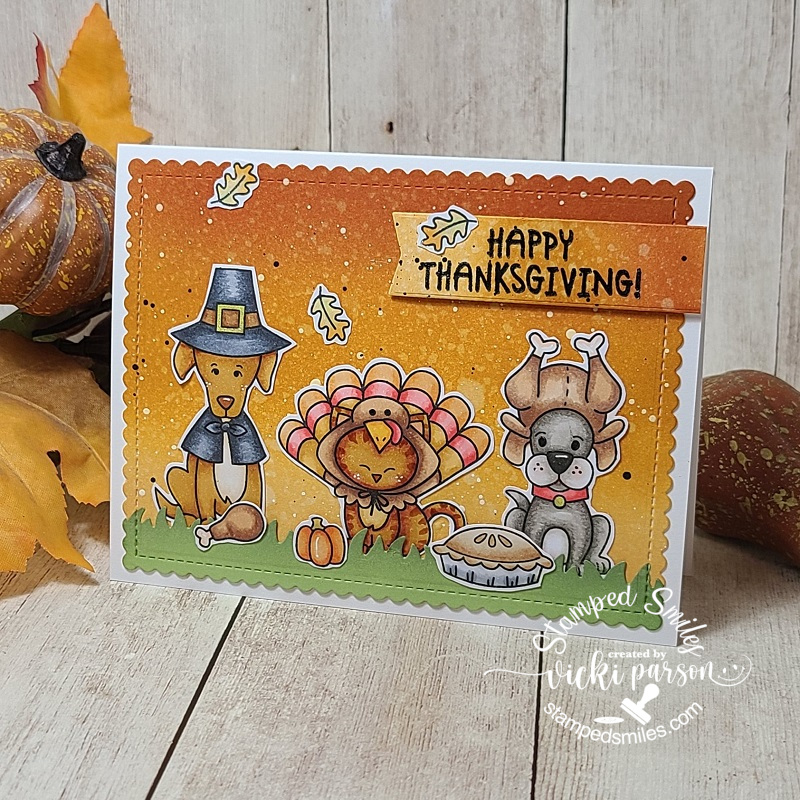
Aren’t these guys hilarious?!  This is one of the stamp sets that was released during the Simon Says Stamp STAMPtember event this year and of course if you recognize the critters, then you know it was designed by Newton’s Nook.  The stamp set is called “Talk Turkey” and was only available during this event.  I don’t make very many Thanksgiving cards, but when I saw this stamp set come out, it just had me giggling and so I nabbed it up!  I think I would certainly enjoy a Thanksgiving dinner with this crew!

For the card, I ink blended the background with the distress inks:  Rusty Hinge, Wild Honey and Scattered Straw.  I spritzed with water and dried the splotches with a towel.  (I’ve done the same method with the sentiment strip too.)  I then used some black and white paint to splatter over it and set aside to dry.

While waiting for the panel to dry, I colored up all of the images with my Copics.  I’ve added some gold and white gel pen marks in certain places and then I fussy cut them all out leaving a white border around them.  

I took a strip of green cardstock and die cut a grassy border and attached to the background panel.  I cut both of these layers out with a stitched scallop die and then cut out the black embossed sentiment with a banner die.  I then arranged all of the images where I wanted them and glued them down.  I took the banner and popped it up with foam tape.  I added the leaves and covered them with a glitter brush pen for a bit of sparkle.  I attached all of these layers to a white A2 card base and cut off the sentiment strip along the edge.

Hope you’ve enjoyed my card today and it made you smile!  Thanks for dropping by!

Enjoy your Thanksgiving with love, laughter and lots of thankfulness in your heart. 🦃

CHALLENGES:

  1. Aud Sentiments – Anything Goes + sentiment.
  2. Creative Knockouts – Anything Goes
  3. Colour Crazy Craft – Anything Goes with coloring
  4. Lil’ Patch of Crafty Friends – Anything Goes
  5. Pammie’s Inky Pinkies – Anything Goes
  6. Shopping Our Stash – Triple Threat (3 of something- I used 3 different dies, 3 critters, 3 leaves)

Say NO to Pot!

Hello there friends and happy Wednesday!  Hope you’re all doing well and having a great week so far!  It’s so hot over our way with a heat advisory in triple digits, so it’s a good time to stay in and craft, right?!

Stopping by today with another project I’ve made for Inky Stamper!  This one sort of cracks me up a bit as you can see by the title of my post! 😂

Vicki-InkyStamperGDT-Crab-circle easel

So, the sentiments from this Inky Stamper Crab stamp set are hilarious and I know many of the stamp sets come with funny sentiments like this too!  It’s always great to have different options for sentiments to go with an image!  Now, I don’t think that I’ve ever been to a crab boil, but I do love me some crab legs! 🦀 How about you?!

I’ve used some of the Doodlebug Paper Pads (also in the Inky Stamper store) and made that for the base of my background for the large “pot” image to sit over.  The sentiment was stamped directly onto the “pot” image before I colored it with Copics.  For the “flames” behind the pot, I’ve used the Inky Stamper Bear stamp set.  I’ve found so many different uses for that set.  I think it’s one of my faves from this store!

As you can see, the “crab” is inside the pot.  So for this, I used a craft knife to cut a slit for the “crab”, but when you use the coordinating die to cut out the “crab”, he will not exactly fit…so I dismantled the “crab”…like you would for cooking…and placed the cut up parts so his hands were in the air and his eyeballs are sticking out.😆  I taped him on the back of the pot so he would stay put through the slit in the pot and popped it up with foam tape over the flames.  I took the other images from the Crab stamp set and die cut the salt and pepper shakers and fussy cut the seashells to add to my easel card.

For the easel style card, I’ve used some circle dies for the easel as well as to create the frame for the “port hole” around the cooked crab scene.  I’ve used some brads and rubbed some mixed media silver paste around it.  I’ve also added a piece of rope/twine that I randomly tied a knot on for an accent.  I’ve also added some gems from the Picket Fence – Sand collection (also sold at Inky Stamper) above the crab…for seasoning of course!  The seashell on the inside grouping of the card has foam tape to secure the card front in place for the easel design.  This card will fit perfectly inside an A2 envelope so I can give someone a chuckle of course!

Hope you’ve enjoyed my easel card today and had a chuckle!  Thanks for dropping by!

Challenges I’d like to enter:

  1.  Addicted to Stamps and More – Make Your Mark (all images colored with Copics)
  2. Crafty Sentiments – Anything Goes
  3. Penny’s Paper-Crafty – Anything Goes using paper
  4. The Crafter’s Cafe – August Anything Goes
  5. Crafty Creations – Aug Anything Goes
  6. Pearly Sparkles – Aug Anything Goes
  7. Creative Knockouts – Anything Goes

HOliday Sweets Challenge Reminder for {Cupcake Inspirations}🥧

Hello friends!  Hope you had a wonderful weekend!  I first would like to say a huge thank you to those that have mentioned they were going to send out a Christmas card for Danny (mentioned in previous post below).  I think it will be so exciting to see how many cards he receives and from where around the world!  I think this will help bring him much needed cheer!


Today I have a fun creation with more inspiration for our “Holiday Sweets” challenge over at the {Cupcake Inspirations} blog!  So, I hope that you will drop on over, check out the inspirations from the rest of the sweeties and come share your delicious Holiday Sweets creations with us!

I’m still in a “cookie” mode and looking forward to making some traditional Christmas cookies in my own kitchen soon…so I’ve played around with a recent card kit I’ve received:

I’ve created a cozy and festive table scene full of delicious Christmas cookie treats using several products from an older Christmas card kit and a few other items.  First of all, the cookies from that kit were super fun to put together!  It comes with all the dies and stamps you need to decorate a (craft) cookie with!

I started my card with an A2 sized top folding kraft cardstock piece and used some of the Winter Cabin Papers to create my scene for the “table” and background. The cookies were all created with the stamps, dies and some paper from the kit, but I added some White EP for the frosting and some red Nuvo Crystal Drops for decoration.  There was a felt circle cut in the kit that I cut off to attach over my “table” to place the cookies on.  I also heat embossed the sentiment from the stamp set in the kit with Raven Sparkle EP and die cut with a banner from my stash.  I went around the edges of it with some white Ink.

The hot cocoa mug came from a previous card kit that I stamped, colored and cut out to place on my table scene.  I took the whole scene and layered it over a black piece of cardstock included in the kit and added it to my card base.

Here’s a closer look at those cookies!  You can see that the die cuts have cut the images out right up next to the image line.  I also took a glue pen and added some chunky style glitter from my stash to make some of the cookies look like they’re sugar coated.  You can also see the sparkle from the EP in my sentiment. 

Probably hard to see the bit of shimmer inside the cocoa mug and on the candy cane that I covered with my glitter brush pen, but it’s all shimmery and sparkly in person.  I colored up the mug with my Copic markers and fussy cut out the image.

I hope that you’ve enjoyed my cozy Christmas cookie scene here and are inspired to pull out your favorite Holiday sweets to play along with us too!  Please be sure to stop by the {Cupcake Inspirations} Challenge Blog to see more inspiration from the DT Sweeties!  Looking forward to seeing your creations there!

Thanks for popping in today friends!  I’ll be back very soon with a special post!

Challenges:

  1. Simon Says Stamp Monday – Food and/or Drink
  2. Simon Says Stamp Wednesday – Anything Goes
  3. Aud Sentiments – #265 Anything Goes + sentiment
  4. Creative Knockouts – #378 Christmas Delight
  5. Creative Fingers – #198 Anything Goes
  6. Christmas Kickstart – #43 ‘Twas the Night Before Christmas (cookies for Santa!)
  7. Merry Little Christmas – MLCCB28 Anything Christmas Goes

Pink & Main Video Hop with Hello Autumn Slimline

Hello friends!  I hope you’ve had a fantastic week!  It seems like this month is flying by!

I’m excited to share with you a fun video hop collaboration with Pink and Main on my You Tube Channel today! (Be sure to check it out on MY VIDEO because there is a giveaway and you’ll need to leave comments on the videos to be entered to win!)  So head on over to see the wonderful inspiration with the Pink and Main products going on!

Here’s the fun Autumn themed slimline card I’ve made for the video hop today:

So Pink and Main has come out with some fabulous new products which I’ve used for my card here and I’ve added some fun techniques to use with some of those products as well!

The background was really fun to create using the Pink & Main Blending Brushes along with the new Crackling Campfire Distress Oxide Ink color that just came out!  I’ve also used the wonderful Leafy Stencil from Pink & Main over the background too.  The cups and leaves were also colored using the oxide inks and a waterbrush which you can see in my video as well as how I’ve inked and cut out the one image backwards so I have two cups with the handles in opposite directions on my design here. 

You can check out how I’ve put this design together and the techniques I’ve used in this video below, or to leave a comment and see the link to the next person in the video hop, CLICK HERE to go to the video on You Tube.

I absolutely fell in love with that Need to Venti stamp set and coordinating dies!  I loved that older Christmas Mugs stamps they had previously came out, but Autumn is awesome to add to my collection because it’s my favorite time of the year!  So be sure to check out how to stretch out the use of this set in video above!

The Blessings slimline die was so fun to use on my card too and I love that the frame cuts out separately from the center and there was room to layer behind it before attaching to your slimline card base.  The Brutus Monroe Copper Glitterstock was the perfect accent behind the scallop frame. That frame was cut out with several layers of cardstock and stacked together for thickness.

The same Copper Glitterstock was used to cut out the sentiment dies as well.  I’ve used some vellum to layer behind the Autumn sentiment, which the backing diecut was also included in this same slimeline die set!  The final measurement of my slimline card was a piece of brown cardstock measuring 8.5″ x 7″ and scored at 3.5″ in the center.  The finished card will fit inside a #10 envelope when closed.

Here’s a closer view of the details with my colored cups using the distress oxide inks and waterbrush.  I’ve also used the same Need to Venti stamp set and oxide ink colors to stamp the leaves and die cut them out to arrange over my scene as well.

I popped up the cups with foam squares and added some drops over the whip topping in the cups with some Nuvo Honey Gold Crystal Drops.

Hopefully you can see the pretty Autumn colors and dimension in the card.  I sure had lots of fun putting all of this together!

Thanks so much for dropping in today and I’ll be seeing you soon!

Challenges:

  1. Challenge Up Your Life – Autumn Mood 
  2. The Paper Funday – #21 Anything Goes optional:  Fall/Autumn
  3. Dream Valley – Embossing wet/dry (embossed cup images)
  4. The Sisterhood of Crafters – Autumn Inspiration
  5. CCEE Stampers – CCEE2037 Slimline Cards
  6. Not Just Cards – Anything Goes
  7. Crafting Happiness – Anything Goes
  8. Pammie’s Inky Pinkies – PIP2037 Anything Goes
  9. Simon Says Stamp Monday – Frame It

{Cupcake Inspirations} Bithday Celebration Day 12 -Party Ending Soon!

Here we are friends!  This is my final day of inspiration to share with you on Day 12 of the special celebration over at {Cupcake Inspirations} for our 500th “birthday celebration” challenge!!  WHAT A PARTY IT HAS BEEN!! WOW!🧁🎉

Today, we are highlighting with our last but not least sponsor Inky Stamper – Please check out the challenge blog for more details about this sponsor.

The DT was generously given a stamp and die set to use for our creations:

Vicki-CIC500-Day12-InkyStamper

I have used this Oh so adorable Cupcake stamp and die set for my 4.5″ square card design.  So I thought it would be fun to create a fun little scene where you have the mouse coming out of his little “mouse hole” in the wall where he discovers this delicious looking cupcake with the sprinkles falling about! 😂

I started by masking off the middle of the square panel and created the “floor” by ink blending from the middle out.  I then moved my masking by covering that area up and used the negative from an oval die cut area to ink blend the “mouse hole” on the scene.  Lastly, I wanted it to look like a “wall”, so I just took a brick stencil and inked over it to go around the “mouse hole”

I stamped, colored and die cut the image and then popped him up with foam tape over the scene and stamped the sentiment underneath him.  I just glued on the sprinkles for the card.  I mounted the image panel over a die cut scallop square and then added a strip of sparkle washi tape over the card base.  (The scallop square panel was popped up with some craft foam.)  Hard to see in the photo, but I’ve brushed some glitter over the cupcake frosting!

Thank you so much for joining me here every day to check out the inspiration I’ve made from each of our sponsors.  I’m so glad that you took the time to celebrate right along with us!   I’ll be seeing you soon!

Challenges:

  1. The House That Stamps Built – A2620 Anything Goes
  2. Simon Says Stamp Wednesday – Anything Goes
  3. Cute Card Thursday – Inky! (used distress inks, masking and stencils for background)
  4. Creative Knockouts – #365 Anything Goes

{Cupcake Inspirations} Birthday Celebration Day 8 – Halfway Reminder! Cupcakes or Bust!

Hey there friends!  We’re now at the half-way mark of our wonderful “Birthday Celebration” challenge over at {Cupcake Inspirations}!


Have you been adding your birthday/celebration themed creations to the gallery yet for your chance to win a prize from one of the amazing sponsors we’ve enjoyed sharing the inspiration with?!  If you haven’t, we hope you will be able to join in the fun with us as we’re really loving the wonderful projects we’ve been seeing so far!


Today I thought it would be fun to create a unique card with my friends for {Cupcake Inspirations} as well as another of an old favorite from our sponsor Riley and Company that was also featured for yesterday!  I have loved this adorable moose for many years and so I couldn’t help but use another image to create something for a little chuckle….

Vicki-CIC500-Day8reminder-RileyandCo

I had so much fun with this easy to make card!  I’ve used my Cricut Explore to print out and cut the shape of the cupcake.  I actually did this twice so that I could make a folding card with the shaped design.  I made a score mark on the bottom cupcake along the left side and glued it together so that it would open up on the right side.

I’ve taken this really adorable Riley and Company “Or Bust” stamp that I’ve had for a few years and stamped and colored him up.  Since the space above the “or bust” words is empty, I filled it with a sentiment from a MFT set that was perfect! 😂  I then fussy cut him out and popped him up with foam tape over the card.

I used a gold metallic gel pen to color the frame of the sign he’s holding, wrapped some gold metallic ribbon around the cupcake with a bow and a cupcake button in the center and then finished it off with some glitter over the sprinkles on the top of the cupcake.

Hope that you’ve enjoyed my fun little shaped card today!  Thanks for dropping in and I’ll see you on Day 10 for more inspiration with another sponsor!

Challenges:

  1. Cut It Up – #207 Old School + die cut (Have had this Riley for years! Used Cricut)

{Cupcake Inspirations} Birthday Celebration Day 6

Hey there friends!  We are on day 6 of celebrating over at {Cupcake Inspirations} with another feature of sponsors for our 500th “birthday celebration” challenge!!  FUN FUN!

Today, we are highlighting Bugaboo Stamps & Lawn Fawn – Please check out the challenge blog for more details about these sponsors.

So on our first day, I had used some fabulous products from our sponsor Lawn Fawn.  But for today’s post, I wanted to highlight our other sponsor Bugaboo Stamps

Vicki-CIC500-Day6-Bugaboo

Now how stinkin’ CUTE is this little guy with his ginormous cupcake coming at you?!

I printed out this Picnic Ant-Cupcake2 from Bugaboo Stamps and colored him up with Copic markers.  I sponged some clouds behind him and colored some grass with my markers too.  I used my oval dies to cut the image out with along with the scallop oval layer behind it.

Found some fun papers from my stash along with the rectangle die, sentiment die, ribbon, twine and button to complete the card.

I “dressed up” the cupcake with some liquid applique that was heated up to make it “puffy” and then added some glossy accents over the cherry on top.

Really had fun with this cutie and I hope he brought you a little smile today friends!  Thanks for joining me!  See you again tomorrow!

Challenges:

  1.  Catch the Bug Challenge – End of Summer (what could be better than celebrating a picnic?!)
  2. Little Red Wagon – Use a Stencil (cloud background)
  3. Creative Knockouts – #364 Something to Say
  4. Aud Sentiments – #258 Anything Goes + Sentiment
  5. Colour Crazy Craft – Anything Goes + Coloring

{Cupcake Inspirations} Birthday Celebration Day 4

Ready for more celebrating!?  We are on day 4 of celebrating over at {Cupcake Inspirations} with another feature of sponsors for our 500th “birthday celebration” challenge!!  Yipee!🥳

Today, we are highlighting Varada Sharma – check out the challenge blog for more details about this sponsor.

Our DT has been generously provided with an entire new release collection from this sponsor!  There were so many fun things to play with, so I did some combining:

Vicki-CIC500-Day4-VardaSharma

How fun and yummy is this?!  There’s just something about cupcakes that are so fun to decorate with frosting, sugar crystals, sprinkles, fruit, etc etc and so why not do that with crafting too?!

I started with the background and decided to take the Hanging Banners Background image and print it out over some teal cardstock and then I used a Copic marker to add some shadowing around the images.  I cut it out with a stitched rectangle die and layered it over a piece of yellow cardstock to match the sentiment banner…which actually looks green in the photo, but it’s yellow IRL! LOL!  Then I mounted it over another A2 sized side folding teal cardstock base.

I sized and placed together the two different cupcakes from the Cupcakes, Cake Slices and Toppers set, printed it out and then colored them in with Copics.  I’ve cut them out with a circle die, layered it over another circle layer cut from some silver mirror cardstock.  I sponged some teal ink around the edges of the cupcake circle, added some stitch lines with a marker and then cut off the excess from the edge.

I used some glitter, glimmer and shine to add details to the cupcakes! (The photo is not showing all of the fun details at all!) Bummer…

I added a thin strip of that silver mirror cardstock across the bottom of the card front and then took the sentiment that I put together from the Celebration set, printed it out over white cardstock and then used my yellow ink to sponge over it.  I fussy cut it out and then popped it up with foam tape over the silver strip.

This is going to make a fabulous card for someone’s birthday.

Challenges:

  1.  A Bit More Time to Craft – Anything Goes
  2. Lil’ Patch of Crafty Friends– #140 Anything Goes
  3. Crafting Happiness – #62 Anything Goes

Finishing Up Summer School With Cupcake Creations!🧁

Hello friends!  Hope you’ve had a great week!  Wow…it’s Finally Friday!  I’ve been SO busy “behind the scenes” and I will be getting to all of that later on, but I needed to squeak in with the final creations for the MFT Summer School!

I finished up Day 2 with my “smile rainbow” and now for Day 3, they’re asking for a “symmetry” style of creation.  I was told that basically it’s something that if you were to split it in half, it would be exactly the same on the other half…so this is what I thought of:

Vicki-MFTSummerSchool-Day3Symmetry

I was so excited about getting the My Favorite Things Cupcakes card kit, so I was determined that I was going to pull it out and use it for the rest of my Summer School cards! LOL!  It’s such a cute set with the dies and sentiment stamps!  I really had fun!

I used some papers from the kit and sponged ink around the edges of everything pretty much.  I just used the two cupcakes side by side for the symmetry class.  I just have opposite colors of sprinkles.  I added the red cherry on top, covered with the glitter brush pen and then some glossy accents.  (The glossy accents really got a work out!😮)

Vicki-MFTSummerSchool-Day4Ombre

So Day 4 class was “ombre” and that pretty much called to me to use the stencil from the card kit (sprinkles in background) and then I just heat embossed white over white and then used inks for the emboss resist technique moving the colors from lightest to darkest to get that classical “ombre effect”.  I also added a die cut cupcake that I used the same ink effect over it.  I die cut the words from the kit with the dark papers I used for the base of the card.  I finished with some sparkly crystal accents to finish it off!

Vicki-MFTSummerSchool-Day5WhiteSpace

And last but certainly not least was Day 5 “White Space” class.  I don’t often make cards like this, but I honestly love those CAS style cards, but I always want to “teeter” on the fine line between CAS and not…so I always think I’m not doing CAS.  I’m just not comfortable with the “CAS” definition or “rules” of what is or isn’t CAS.  I just feel happiest doing whatever happens to work out in my plan for a design…that’s pretty much it!    Be happy and you’re good!

I used this class to also follow along with the MFT sketch challenge going on as it looked like it was a good sketch for making a “white space” design.

I started by masking off the square and sponging lightly around it, I white heat embossed the sentiment over a black strip and added some silver ink over the stencil again and then attached the cupcake over top with the papers…and added the cherry on top with glossy accents too!

I finished it off with another little flag die from the kit and some silver sequins!  I like how it turned out!  I think I deserve a cupcake after all the creations I made!!😋

I hope you’ve enjoyed my creations today and I really appreciate you stopping in to see what’s going today!  Have a fabulous weekend!

Challenges:

  1.  MFT Summer School– Day 3 Symmetry
  2. MFT Summer School – Day 4 Ombre
  3. MFT Summer School – Day 5 White Space
  4. My Favorite Things – Wednesday Sketch Challenge MFTWSC502 (my last card and I flipped the sketch on the side)
  5.  Crafty Creations – #412 August Anything Goes
  6. Craft Rocket – #73 Birthday
  7. Creative Fingers – #191 Anything Goes
  8. Arty Divas – Bonus Birthday Challenge
  9. Crafty Friends – #142 Anything Goes

Essential Worker Chef

Hello friends! I hope that your week is finding you in a good place right now. Sometimes I feel a bit overwhelmed with things that are going on in the world, but I am so thankful that I have the crafty time to keep my mind creative and music to help alongside to keep on keeping on. This is one way that I know I can express myself in a postitive way and hopefully inspire someone too.

In my previous post, I had made several healthcare worker cards and I had made one for my son who is a mail carrier, but I was having a hard time finding an image for a food service worker. (check out that post HERE.) I asked if anyone knew of any images. Someone had reached out to me and shared a few images that were just too adorable and I couldn’t pass up on nabbing one for my other essential worker son:

Isn’t he just as cute as can be?! I’ve used the LOTV Pancake Day digi stamp for my card. It actually reminds me of my son making crepes for a restaurant that he used to work for. I was treated with a delicious pumpkin pecan cream crepe by him a few years back on my birthday! It was yummy!

As you can see, I’ve altered the image a bit to fit with the current covid-19 restrictions by giving him a make-shift face mask as well as coloring some plastic-style gloves on his hands. To make it even more personal, I decided to give him a couple of colored tattoos on his arms as my son has tattoos on his arms and dark brown hair.😁

For the card, I’ve used some Sidewalk cardstock from Brutus Monroe and used a Stampin’ Up! brick embossing folder over it and then sponged some distress ink around the edges. It was cut out with a stitched rectangle die. I added a strip of Prism paper and some silver metallic ribbon over it before attaching it to a top folding A2 sized black card base. I finished it off with some silver Glossy Dots from Pink and Main.

I colored the image with Copic markers and as mentioned above added the special coloring for the tattos and gloves for his hands. I’ve also covered the pan with a glitter brush pen.

To make the face mask, I took a Copic liner to draw in the lines for the cord around his ear and then I took a tiny piece of thin tissue style paper that was used between the packages of acetate sheets you buy. I wanted it because it was thin and I was able to create tiny folds and wrinkles in it…I just glued it over the area on his face and manipulated it before it completely dried.

I stamped the sentiment from a Lawn Fawn stamp set with black ink next to the image and then I used a stencil that was cut out by my mom, thanks mom, on her Cricut machine and inked it up with some red ink using a foam brush tool. I wasn’t very accurate with not covering the image, but thankfully the sand eraser helped out! I finished coloring up the “ground” area and sponged around the stitched square cut out of the image. I layered it onto another piece of black cardstock and popped it up over the card with craft foam.

I think this card turned out so cute and it’s on the way to him now! I think he’ll get a kick out of it and he’ll probably notice the extra personalized details I’ve added to it too!😂

I hope you have enjoyed my special essential worker card today and brought you a smile! Thank you so kindly for stopping in and I’ll see you again soon!✌

Challenges:

  1. Pearly Sparkles – #52 For the Boys/Men
  2. Love to Scrap – LTSCB134 For the Boys
  3. QKR Stampede – #400 Anything Goes
  4. Digi Choosday – Anything Goes + colored image
  5. Arty Divas – #23 Anything Goes
  6. The Paper Funday – #18 Anything Goes with twist: make it masculine
  7. Simon Say Stamp Wednesday – Masculine
  8. Unicorn – Masculine