Spots and Dots for Cute Card Thursday

Hello friends!  Hope you’re having a great week so far.  The month of October is flying right through and I know once Halloween gets here, it will be the end of the year before we know it!

Today starts a new challenge over at Cute Card Thursday this week!  We are looking for “Spots and Dots” on your creations this time!  We look forward to seeing your take on this one!

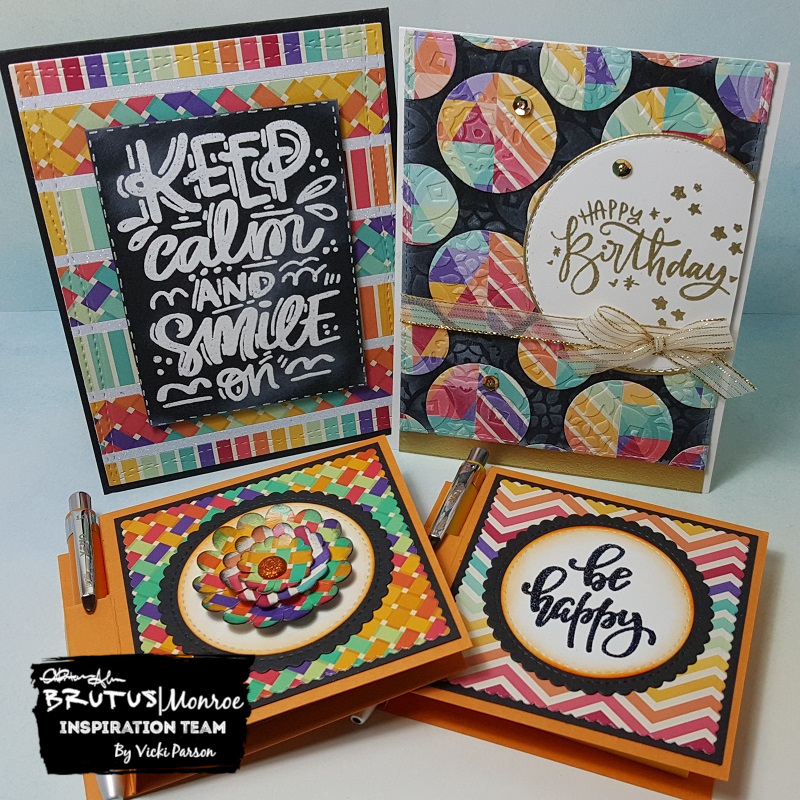
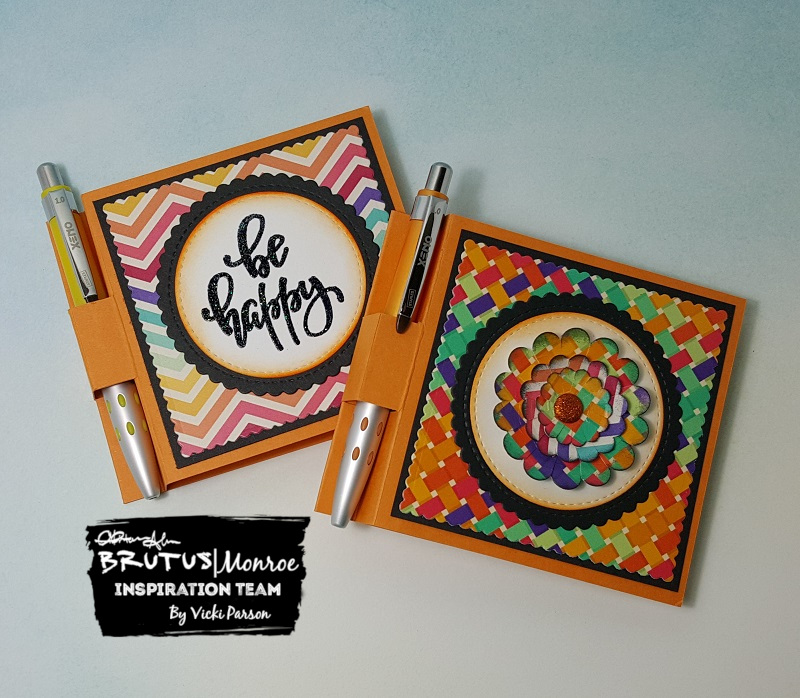
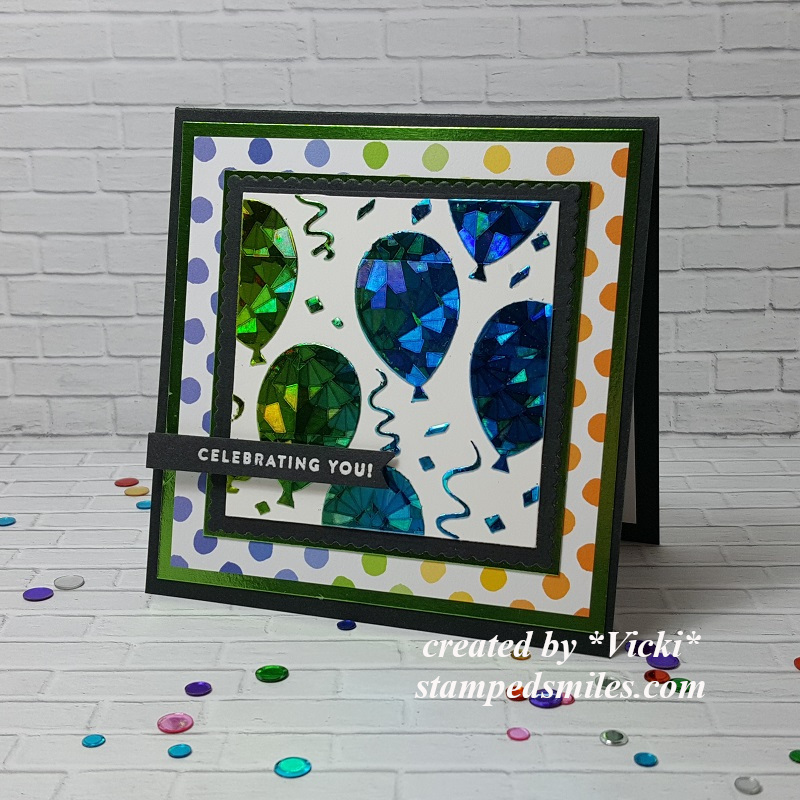
For my card, I decided to keep it rather simple:

Vicki-CCT604

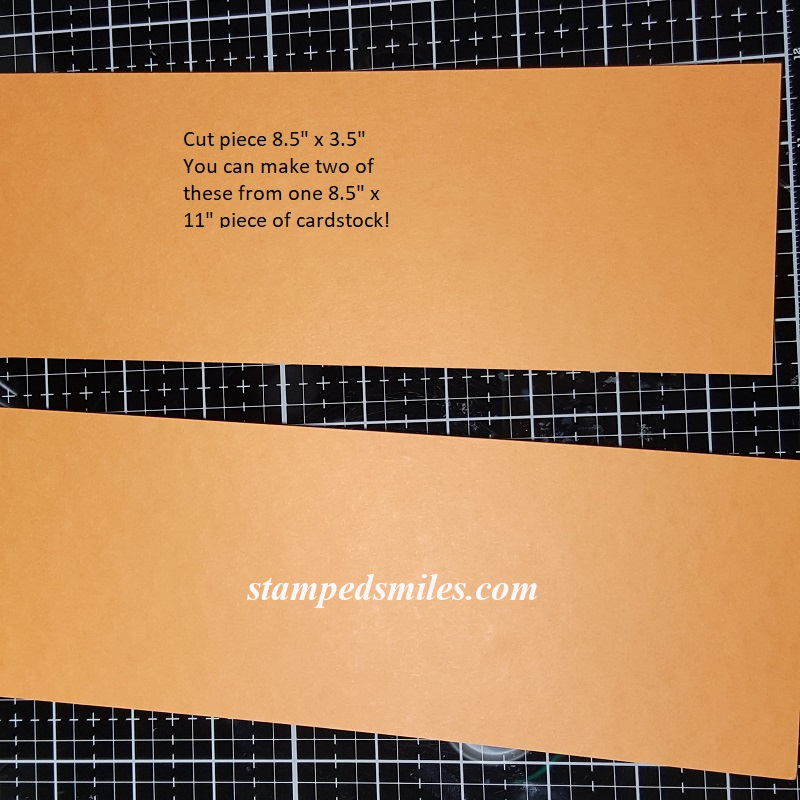
This card is using items from the Simon Says Stamp Sweet Birthday Limited Edition card kit which has since been sold out, but I know that you can still purchase a few of the items that were included in the kit.

I started out by taking the SSS Celebrate stencil from the kit and spread on some Deco Foil Transfer Gel over a white piece of cardstock from the kit and let it completely dry before moving on.  After it was dry, I took the Rainbow Shattered Glass transfer foil sheet and put it through my laminator.  It looks so pretty and shinny with a wow factor to it!  I cut this piece down and layered it over a black scallop square die cut panel.  I then layered these pieces over the green colored Tim Holtz Metallic paper from the kit.

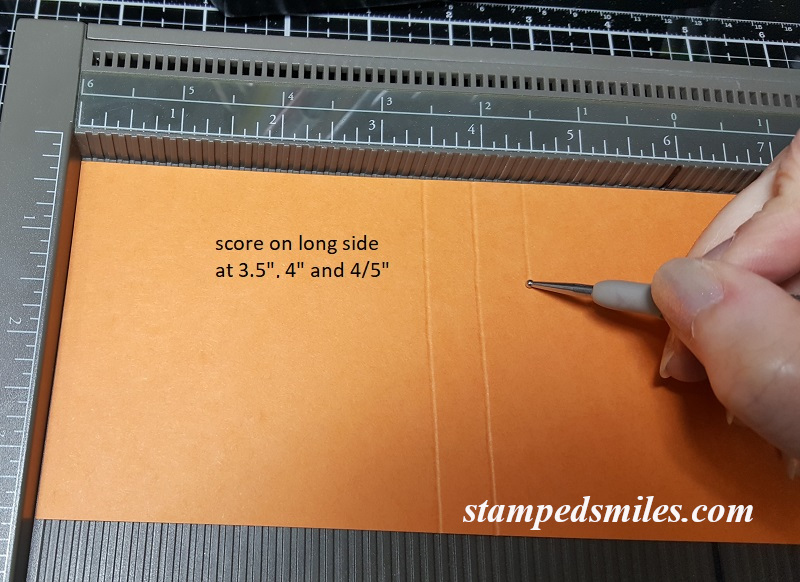
For the square card, I used a black top folding 4.25″ black card base and then layered another piece of that green metallic paper over it.  I took a ‘dotted’ piece of paper from the Honey Bee Over the Rainbow papers (included in the kit) and layered it over top of the metallic green.  Then I added my foiled balloons panel over this.

Lastly, I took the sentiment from the Simon Says Stamp Sweet Birthday stamp set and white heat embossed it over a piece of black cardstock that I trimmed down to a banner and popped up over the card with some foam tape.

Vicki-CCT604-flat

I really didn’t want to add too much more to it as it was for a male and I think with all of that foil and shine, it really didn’t need much else!  I think it’s fun, simple and really cheery looking especially with that foiling done.

I know that I’m getting this fun kit out again very soon as I am in need of another birthday card to send to someone that needs a good birthday cheer!

Challenges:

  1.  Pammie’s Inky Pinkies – PIP1941 Anything Goes
  2. Crafty Cardmakers – Sparkle
  3. Through the Craft Room Door – Anything Goes
  4. A Bit More Time to Craft – Anything Goes
  5. Watercooler Wednesday – WWC243 Masculine Anything Goes

Thanks so much for stopping in and sharing a bit of myself with you!  Wishing you a beautiful day friends!

Cute Card Thursday is Sentimental

Hello friends!  Hope you’re having a great week so far!

Today starts a brand new challenge over at Cute Card Thursday and the theme for this week is “Sentimental“.  We look forward to seeing your interpretation with your creations for this challenge!

Here’s how I’ve interpretated the challenge this week:

Vicki-CCT601-Sentimental

I really love sentiment stamps and sometimes they just seem to get used when you need to add a sentiment with your design.  I actually like to use them as not only the focal point of a design, but I like to also use them for backgrounds!

For my card today, I have used an older Simon Says Stamp card kit. (Nov 2016)  I really loved the font and the wording in this set and the different sizes that you can mix together.  The images are from the SSS Thankful Heart stamp set.

I started by stamping two of the images from the set with white ink over the A2 sized top folding card base and then added some papers from the card kit on the bottom portion.  I took a piece of white twine around the center of the card and added a button and bow.

The heart was die cut from a piece of cardstock from the kit with a stitched heart die and then I white heat embossed the sentiment and added some craft foam behind it before attaching it to the card.  I’ve also added a couple of hearts that were cut from white cardstock.

Very simple card, but a good one to have on hand for someone!  I hope you’ve enjoyed it and please be sure to join along with us this week!

Thanks so much for stopping in and I’ll see you soon!

Challenges:

  1.  Double D – Focus on the Sentiment
  2. Aud Sentiments – Anything Goes + Sentiment
  3. Retro Rubber – rrcb120 – Anything Goes + stamps older than 1 year (circa 2016)
  4. Shopping Our Stash – embossing
  5. Sweet Stampers – Use a Sentiment
  6. Simon Says Stamp Wednesday – Anything Goes

Sending Snail Mail Hugs

Hello friends!  Yippee!  It’s finally “officially” Fall now! (According to the calendar anyway.) We are very slowly starting to get lower temps at least in the evening time anyway.  I’ve gotten out my Fall decorations and I’m ready!  How about you?

Today I have a very sweet image from Whimsy Stamps to share with you:

Vicki-WSLoveSlowMuch-Sept24

Awe!  I wouldn’t normally hug a snail, but I must say, this one is SUCH a cutie don’t you think?  This digital image is called “Love You Slow Much” from Whimsy Stamps-Sylvia Zet’s Wee Stamps Collection which was previously released as a rubber cling stamp.  So now you can have the option of choosing the digital or the rubber versions!

Of course, with Fall having started, I was really inspired to create with this cutie in some orange, yellow and tan toned colors!  With the exception of that blue bow tie on the snail, I’ve colored it differently as I think that makes him really stand out especially for dispensing hugs…or perhaps receiving them! 🙂

I’ve cut out the image with a stitched circle die and then die cut another larger circle in the orange color to mat behind that.  I’ve taken a piece of decorative paper from my stash with the wording and added some stitch marks along the edge of it with a black marker and then mounted it to a piece of white cardstock.  I wrapped some white organdy ribbon around these two pieces and mounted it onto an orange 5″ square top folding card base.

I took another piece of orange cardstock and die cut a tag out from an older Whimsy Stamps die that I have and then I stamped the “hugs” sentiment from the Whimsy Stamps Everyday Mini Sentiments clear stamp set towards the bottom of the tag and added it to the bow on the ribbon.  Lastly, I took some flowers and attached them around the card design.

Vicki-WSLoveSlowMuch-Sept24-close

Here’s a closer look at the coloring I’ve done on this image and used the following Copic markers:

  • Snail Body:  W7, W5, W3, W1, R00
  • Snail Shell:  E35, E33, E31, E30
  • Snail Bow Tie:  B26, B24, B21
  • Fairy’s Dress, Hair Flowers, Shoes, Wings:  YR07, YR04, YR02, BG000, C7, C5, C3
  • Fairy’s Hair & Skin:  E47, E44, E42, E41, E21, E11, E02, E00, E000, R20
  • I used BG000 and E0000 for around image and shadows
  • I’ve also used a gold gel pen for the center of the flowers in her hair and over the tiny marks behind her wings.  I’ve used a white gel pen for highlights in the Fairy’s cheeks as well as highlights on the snail’s shell.  I took a glue pen over her wings and added some clear glitter over them.
  • I’ve also used a Copic marker (unsure of color) to color a rhinestone for the center of the orange flowers.

Vicki-WSLoveSlowMuch-Sept24-flat

I hope you’ve enjoyed my creation today and that it has inspired you in some way!

Thanks so much for stopping in today!  I always appreciate your support!  I’ll be seeing you soon!!

Challenges I’d like to enter this card in:

  1.  Creatalicious – Anything Goes with optional circles
  2. Stamps & Fun = Creativity – Anything Goes
  3. The Paper Girls – Anything Goes
  4. The Fairy & The Unicorn – Fantasy Anything Goes
  5. Creative Knockouts – Anything Goes
  6. QKR Stampede – Anything Goes #364
  7. Creative fingers – Anything Goes
  8. Always Fun – Cute Critters

Super Girl Starla Flying By!

Hello friends!  Happy Tuesday and I hope you’re having a wonderful week so far!  I actually can’t believe that September is already flying through this quickly!

Speaking of “flying”, I have this really cute card to share with you using another Whimsy Stamps image:

Vicki-WSStarla-Sept17

This little digital cutie is called Starla from Whimsy Stamps.  She has her arms out and so I thought it would be cute to have her appear as if she’s smiling while flying up through the clouds at us!  I also thought this would be a really nice encouragement card for a child and I’ll be sending it out to hopefully share some smiles.

I stenciled some clouds in behind her, cut the image out with a stitched square die and layered a piece of purple cardstock behind her.  I ran a piece of green colored cardstock through a star embossing folder, wrapped a silver ribbon around it and then attached it to a purple 5″ square top folding card base.

I die cut some stitched cloud borders for the bottom of the card design but sponged them with some Broken China Distress Ink before attaching them with foam tape.  I also die cut some stars to add for accents on the design with both silver glitter stock and a piece of purple to paper piece in the center of one of the silver outline stars.  I also added a rhinestone star to the center of the bow.

Vicki-WSStarla-Sept17-close

Here’s a closer look at Starla with the coloring I’ve done on her.  I’ve colored her up with Copic markers and added some details with gel pens.  I’ve also covered her headband with a glitter brush pen and also added some extra glitter over the stars at the top of her head band.  You can also see where I’ve added some “strokes” to show that she’s zooming through the clouds.  I also covered that area with a bit of shimmer with the glitter brush pen as well.    The “little girl” in me had to color some purple!

Vicki-WSStarla-Sept17-flat

The sentiment at the bottom was stamped with a sentiment from my stash with some black ink.

I hope you’ve enjoyed my card today and it’s brought you a smile or inspired you in some way!  Thanks so much for stopping in!  See you soon!

Challenges:

  1.  The House That Stamps Built – S1119 TicTacToe
  2. Daring Cardmakers – Special Thoughts
  3. QKR Stampede – #363 Anything Goes
  4. Sweet Stampin’ – Cards for Kids
  5. Addicted to Stamps – For a Lady/Girl
  6. Splitcoast Stampers Teapot challenge – Put a Smile on their face

It’s Autumn at Cute Card Thursday

Hello friends!  Thank you for joining me!  I hope you’re all having a wonderful week so far!  It’s a tad bit warmer than what I’d like to see it be in September for sure, so I’m hoping it cools down soon!

Today starts a new challenge this week for Cute Card Thursday.  This week we’d like to see your “Autumn” creations.  We look forward to seeing what you create for it!

Here’s what I’ve made using one of our sponsor’s images:

Vicki-CCT599-ADU

This little squirrel is so sweet and I love how the tail on him was designed!  This is called “Bushy Tail” from All Dressed Up.  They’re sponsoring the challenge this week, so please be sure to play along for a chance to win!

I’ve dug out some papers from my Autumn stash of papers and picked some out that I thought would go with this image.  I layered a strip over a 5″ square piece of dark gray cardstock that I embossed with a leaf embossing folder that I was finally able to use!  I sponged a bit of white ink over the raised areas.

I also took some score tape and ran it down the center of the card and added some glitter over it and burnished it in.  The image panel was popped up over the card with foam tape.  I added some twine around each corner of the image panel along with a bow that I’ve placed a pearl in the center.

Vicki-CCT599-ADU-close

Here’s a closer look at the squirrel image that I’ve colored in with Copic markers.  I wanted to keep the squirrel looking a bit softer, so I’ve used some lighter colors.

During the fall is a good time to view all of the squirrels running around our yard trying to burry their nuts.  We seem to find them in silly places sometimes as they save them for later! LOL!

I die cut the image with a scalloped square die and sponged around the edges with some Pumice Stone Distress Ink and layered it over a piece of the dark gray and then layered it again over a piece of kraft cardstock.

Vicki-CCT599-ADU-flat

Thanks so much for stopping by and I’ll see you again soon!

Challenges:

  1.  All Dressed Up Challenge – Anything Goes + ADU image #96
  2.   Creative Fingers – Anything Goes
  3. Allsorts – Autumn
  4. Crafty Friends – Autumn Colors
  5. Creative Moments – Anything Goes with optional Fall Colors
  6. Sunday Stamps – SSC213 “Autumn Whisper” colors

Autumn Embossed Background

Hello friends!

Here’s what I’ve made today:

Vicki-BM-Subbloghop

For my card, I stamped the image and cut it out with a circle die.  I’ve just colored mine up with Copic markers over a piece of White cardstock.

For the background, I’ve used a stencil with EP.

I took the stencil over a piece of white cardstock and covered it with the Embossing Ink and then lifted the stencil to sprinkle the embossing powder over it to heat set.  I cut out that piece and layered it over another piece of white cardstock that I die cut with a stitched scallop die.

Terracotta cardstock was used for my card base and the circle layer behind the image.

Lastly, I’ve added another circle layer with gold glitter paper, popped it up with some foam tape and added some gold thread nested behind it.  I took some gold sequins and filled them with gold glitter too.

Vicki-BM-Subbloghop-close

Here’s a closer look at the image and how I’ve colored it in.  As you know, I like to use my gel pens to add just a bit of sparkle to certain areas of the image and I’ve also added some “dots” around it with gel pens.

Vicki-BM-Subbloghop-flat

Here you can get a better glimpse of the heat embossed background on the left corner of the card.  It’s a very pretty Fall color and appropriately named “Crisp Leaves”.

Thanks so much for stopping by and I’ll see you soon!

Challenges:

  1.  Brown Sugar – Anything Goes
  2. Crafty Catz – Anything Goes
  3. QKR Stampede – #362 Anything Goes
  4. Simply Create Too – Anything Goes
  5. Crafty Calendar – Add Lots of Layers

Always Be Grateful

Hello friends!  Happy Saturday!  Yay!  The weekend is finally here! 🙂

I really love all things Fall including the beautiful colors you start seeing from the leaves on the trees.  Nothing better than a nice walk in the brisk cool air!  This is what has inspired my card today too!

Vicki-BMGrateful-Sept7

I knew I wanted to used this sentiment for a Fall theme.  I think it’s awesome just to have a sentiment be the focal of your card sometimes.  It was heat set over a piece of white cardstock and then sponged around the edges with the yellow Ink.  I wanted a bit more sparkle, so I took my Embossing Ink pad and rubbed it along the edges of the panel and heat embossed some of the Vintage Sparkle EP over it.

And of course I wanted to do some foiling too because it’s just fun especially when you have these cool Vintage Wallpaper-Foilable Washi Sheets to do it on!  I used the Deco Foil Spring Grass transfer sheets over it and then used more of that ink to sponge around the edges and also heat set some more of that Vintage Sparkle over the edges too.

For the background, I took a piece of white cardstock measuring 4″ x5.25″ and covered it with the Embossing Ink pad.  I used some more of that Golden Gourd EP and heat set this entire piece.  Then I took the foiled strips and attached them over top of this panel and layered onto a top folding A2 sized Jurassic card base.  I also layered the embossed sentiment panel over a piece of this same cardstock.

I then added the sentiment panel over the card front with some foam tape and then added some die cut leaves that I sponged with ink and then a couple of gold sequins with some gold glitter in the centers for more sparkle.

Vicki-BMGrateful-Sept7-close

Here’s a closer look at the heat embossed sentiment, background, and the sparkle around the edges where I heat embossed.

Vicki-BMGrateful-Sept7-flat

And here’s another look at the foiled washi strips too with the card laying flat.

I hope that you’ve enjoyed my Fall creation today and were inspired in some way!  Thank you for joining me today as well as the entire week!  See you soon!!

Challenges I’d like to enter this card for:

  1.  Creative with Stamps – Autumn
  2. Unicorn – #47 Autumn
  3. The Male Room – Autumn
  4. Simon Says Stamp Wednesday – Stamp It
  5. Aud Sentiments – Fall/Autumn + Sentiment
  6. Daisy Chain – Autumn is Coming

Brand New Images from Digi Doodle Studios + Video!

Hello friends!  Happy Friday!  I’m happy for the weekend to get here, how about you?!  The weather has started to cool down slightly and it’s so nice to have that air conditioning turned off for a change!

Today I’m super excited to share with you some really fun and adorable new image set that Digi Doodle Studios has come out with from the brand new “Pairables” Collection!  The set that I’m sharing today is adorable and so fun to mix and match images with!  Check out the two cards I made with it:

Vicki-DDSWizardPairables-video

I absolutely had so much fun creating a little scene with the images and then printing them out for coloring and making cards with!    All of the images that I’ve used here come from the new Digi Doodle Studios Charming Enchanters Wizard Pairables Digital Stamp Set and I believe that I’ve probably used most of the images from the set on these two cards.

Vicki-DDSWizardPairables-boy

For this particular card, I’ve used my computer to arrange the stars from the wizard’s wand and the sentiment how I want them placed and then printed it out twice.  One I printed on Copic blending card and another image printed out on Neenah Solar White cardstock so that I can do the ink blended background on it.

Vicki-DDSWizardPairables-boy-close

Here’s a closer view of the coloring details on the wizard.  You can see that he has a bit of a “glow” about him.  So after I colored him in with my Copic markers, I decided that I could use a yellow color pencil to add just a bit of glow to certain parts of the image.  I’ve then used gel pens to color in other detailed portions of the image and a white gel pen for the stars in the background as well.  I’ve tried to capture a little bit of that stunning shimmer for the background, but of course it doesn’t show up as great as it is in real life!

He was fussy cut out and placed over the ink blended background that I’ve made.

Since my last video on the ink blending, I’ve had a few more questions about it, so I thought I’d share a more in-depth look into it.  To see a video of how I’ve created the background on this “wizard” card, I’ve made a video to show in detail how I’ve done it with a few tips and tricks along the way.   So check it out below or watch it on You Tube by CLICKING HERE.

I hope that this helps a little more on explaining how I achieved the look for ink blending backgrounds.  I know that I’ve had people ask me to do a video on another background I’ve made on another card, so perhaps I will share another video on that later.

If you do have any questions, please feel free to leave a comment here or on You Tube or contact me and let me know!  If you have other suggestions, I’d always love to hear that too!

Vicki-DDSWizardPairables-girl

Here’s the other card that I’ve made using the same Charming Enchanters Wizard Pairables Digital Stamp Set.  Again, I’ve arranged and sized the images how I wanted them on my computer, printed it out just the same as above and fussy cut out all of the colored images to place over my background.

I’ve mounted the image panel over a piece of purple cardstock and then placed it over a top folding 5″ square black card base.  I’ve used a piece of ribbon to run behind the layered image panel and then added some fun decorative metal corners on it.

For this card on the background, I didn’t distress it with water, I just left it ink blended.

Vicki-DDSWizardPairables-girl-close

Here’s an up-close look at the coloring I’ve done on the image.  You can see again that I’ve used my gel pens to color in the tiny details like the stars on her hat, the bubbles from her cauldron, the bookmarker and the tiny nail on the wall.

To get the glow on the images, I’ve taken a green colored pencil and added it in the places that I thought her green magic potion would glow from.

Thanks so much for stopping in and hanging out with me today!  See you soon!

Challenges I’d like to enter:

  1. Get Creative – Anything Goes
  2. Through the Craft Room Door – Anything Goes
  3. Try it On Tuesday – Boys/Girls/Children
  4. Addicted to Stamps and More – Make Your Mark
  5. Crafting By Designs – September Anything Goes

Projects with Patterned Papers!

Hello friends!

I have sort of went a little “crazy” with the papers, but there are lots of fun tips, techniques and even a tutorial below to help you use those left over pieces you don’t want to throw away from your patterned papers!  I ALWAYS have left over pieces and I know you do too if you’re a hoarder like myself! LOL!

Here’s what I’ve been up to:

Vicki-BM-PatternedPapers-Sept4bloghop

I have used the same Patterned Paper Collection for each one of these designs and I love how they all turned out different too!  I’ve used a Bold Rainbow Paper Pad for all of these designs.  I’ve made a couple of cards with some fun techniques and I’ve also used the same papers to decorate my two Post-It Note Holders too.

Be sure to grab a beverage and stick with me for some paper crafting fun!

Vicki-BM-PatternedPapers-Sept4bloghop-Smile

Starting with this card, I thought it would be fun to take my left over strips and create a fun background for a card!  I also tend to hoard those tiny pieces of Glitter paper too!  So I’ve cut some very thin strips and placed those between the Rainbow paper pieces too.

How I’ve done this is simply by taking a piece of white Cardstock (you could even use copy paper to keep thickness down!) and attaching each strip down laying it right up next to each one as I go.  When I’ve covered the piece, I took a rectangle die cut and cut out the panel so that it all looks uniform even though all of the strips I used were uneven to begin with.

I’ve finished off my card by attaching my paper pieced panel to a top folding A2 sized black Cardstock base and then adding the fun sentiment that was heat embossed with white EP over a piece of black Cardstock.  I took some white ink and rubbed some over it and added some stitch marks along the edge with a white gel pen for a sort of chalkboard look.

Vicki-BM-PatternedPapers-Sept4bloghop-Birthday

Here’s another card I made actually using more of the strips from the Bold Rainbow Paper Pad.  I took the strips once again and adhered them to a piece of thin paper this time and lined up two different patterns next to each other.  I then took a circle punch and punched them out and then attached these in a pattern over a black card front piece.  I took a rectangle die and cut it out for the background.

So to give it a bit of texture and sort of a “quilt” pattern look, I took a Vintage Tapestry embossing folder and embossed the background too.

Then for the sentiment, I took and heat set it with Gilded EP.  I also added a few of the tiny stars from the set with it and then cut the whole thing out with a stitched circle die.  I also took the Embossing Ink and rubbed it around the edges of the circle and then heat set it with the Gilded EP.  I attached the circle over the background panel and cut off the part hanging off the side with my Scissors.

You will also notice at the bottom of the card that I took a strip of cardstock and covered it with Embossing Ink and heat set that strip with the same Gilded EP.  I attached that to the bottom of a white A2 sized top folding card base.

I then added a gold ribbon around the paper pieced background and attached the bow.  Then I just added this background piece over the white card base.  I finished it with some gold sequins and added glitter in the center of each one.

Vicki-BM-PatternedPapers-Sept4bloghop-PostItNoteHolders

I still wasn’t finished after the cards, so I made a couple of Post-It Note Holders too!  You will notice the one with the flower on the right, I’ve also used some of these papers to create a dimensional flower with it too!

To create the flower, all I did was punch out three different sized scallop circles, then used my scissors to cut into each scallop and creating petals that I lifted up for dimension and then layered each one on top of each other and added a glittery brad in the center.  I also used some black Ink to sponge around them.

The papers were cut with a scalloped square die cut for both of them and then layered them over a piece of black Cardstock.  I die cut a piece of white Cardstock with a stitched circle die and then sponged around the edges with some orange ink.  I then die cut a piece of black cardstock with a stitched scallop circle die for layering.

For the sentiment on the left holder, I took the sentiment and heat set it with black Sparkle EP.

The base of the Post It Note Holders were made using some orange cardstock.

And if you’d like to learn how to make one of these Post It Note Holders, then check out the step-by-step photo tutorial below:  (measurements shared in photos)

Vicki-PostItNoteHolder-Tutorial

Vicki-PostItNoteHolder-Tutorial1

Vicki-PostItNoteHolder-Tutorial2

Vicki-PostItNoteHolder-Tutorial3

Vicki-PostItNoteHolder-Tutorial4

Vicki-PostItNoteHolder-Tutorial5

Vicki-PostItNoteHolder-Tutorial6

Well that’s all I have for now! 🙂

Thanks so much for stopping by today friends!  See you real soon!

Challenges I’d like to enter:

  1.  Cardz 4 Guyz – Celebrate
  2. Tuesday Throwdown – Stripes
  3. CCEE Stampers – CCEE1935 – Encouragment (sending to a friend)
  4. A Bit More Time to Craft – Anything Goes
  5. Papercraft – Handmade/Stamped flowers
  6. Love to Scrap – #125 Anything Goes
  7. Scor-Pal – Sept More Than One Fold “Back to School”

New Release Week at Whimsy Stamps!

Hello friends!  It’s “release week” for September over at Whimsy Stamps!

I’d like to share with you a really fun “steampunk” style card today:

Vicki-WSSteampunkLilith-Sept3

Oh this was so fun to create!  When you check out the line of September’s Digital Stamps in the store, you will see a new line of “steampunk” style images that came out.  The one I’m using here is called Steampunk Lilith.  I thought she looked awesome with her little attitude carrying her gun there!  LOL!

I started with a white piece of cardstock and pulled out a steampunk style stencil and inked some distress colors over it along with the image tag panel and then sponged around the edges of them as well.  (Both of the tag panels are popped up with craft foam over the card base.)  Before attaching these panels, I took some silver paste and rubbed it around the edges after distressing them.

I die cut a piece of silver foil with the same tag die cut and then I took an embossing folder and embossed a piece of copper foil.  I mounted this piece onto a piece of gold glitter cardstock and wrapped a gold ribbon around it and attached it to the base of the card.  I also used this same ribbon for the bow at the top of the tag image.

I found a sentiment to go with the image that I silver heat embossed and then cut out with the Whimsy Stamps Quick Strips die.  After I sponged around it, I added some metal brads to each end and then popped it up with foam tape under the image.

All of these layers were attached to a suede colored top folding card base.  Since the image printed out a little taller than most of my digital images tend to, I made my card base 4.25″ x 6″ in size.  I have an envelope maker, so I can create the size I need.

Lastly, I’ve glued on some metal gears including the one in the center of the gold bow.

Vicki-WSSteampunkLilith-Sept3-close

Here’s a closer look at the image and how I’ve colored her up using a combination of Copic markers and gel pens.  You can sort of see the areas that I’ve colored up with gel pens that have the shine on them.  You can also see how shinny the metallic papers look as well as the embossed sentiment.  The embossing folder I used for the Copper strip comes from a Tim Holtz Texture Fades EF.

Vicki-WSSteampunkLilith-Sept3-flat

Hope you’ve enjoyed my card today and got inspired in some way!  Thanks so much for dropping in!  I’ll see you again soon!

Challenges I’d like to enter:

  1.  Simon Says Stamp Wednesday – Anything Goes
  2. As You Like It – Favorite Way to Add Text and Why? (I like to either stamp or heat emboss a sentiment and then die cut/cut it out, this way I can decide where I want to add it and if I like it well enough to add it…then I don’t have to.)
  3. Creatilicious – Anything Goes with optional humor
  4. Sisterhood of Snarky Stampers – ‘V’ is for Violent
  5. Rainbow Card Challenge – Beautiful Brown